- My Storyboards

Book Jacket Poster Templates
Customize book jacket poster templates.

If you're assigning this to your students, copy the poster to your account and save. When creating an assignment, just select it as a template!

What is a Book Jacket?
It is a creative and captivating way to introduce a novel to readers. It's the eye-catching book jacket project template design that wraps around the book, providing a glimpse into its contents and enticing readers to explore further. A book jacket cover showcases essential elements of the story, such as title, author, and often include artwork that reflects the theme or mood of the story. These designs are a window into the world within the pages, inviting readers to embark on a literary journey.
How to Use Book Jacket Templates
A template is your blank canvas to sparking creativity and engagement in the classroom. These captivating cover designs are more than just art and aesthetics; they're tools that bring literature to life. Here's how to harness the power of custom book cover templates for your classroom projects:
- Elevate Visual Appeal: A well-designed cover can instantly grab attention. Whether it's for a class novel or a student's own story, using a cover template adds an eye-catching element that draws a reader in.
- Enrich Book Reports: Take reports to the next level by incorporating aesthetic covers. Students can creatively summarize the story's essence on the cover, giving a preview of what awaits inside.
- Ignite Imagination: For creative writing projects, have students create their own jackets design for their own stories. This exercise encourages them to visually represent their narrative, adding a layer of excitement to their writing process.
- Promote Visual Literacy: Analyzing the components of book covers helps students develop visual literacy skills. They learn to decipher symbols, colors, and typography choices, understanding how these elements contribute to the overall message.
- Showcase Book Jackets: Organize a book jacket gallery where students complete all or part of a jacket and present their designs to their peers. This collaborative activity fosters a sense of pride and accomplishment while celebrating each student's creativity.
- Tailor to Any Subject: Book jackets aren't limited to literature classes. Extend book jacket for school project across subjects. Whether depicting historical figures' "biographies," scientific concepts, or math principles, templates serve as versatile tools for creative expression.
- Reflect on Themes: Have students create jackets that symbolize the themes of the novel. This activity encourages thoughtful consideration of the story's deeper messages.
With a wide array of book jacket templates available, Storyboard That offers a versatile resource for educators; you are bound to find the perfect book jacket template free that suits everyone's needs. These templates are the canvas upon which your students' creativity and understanding of literature can flourish. Elevate your classroom projects with captivating pictures and art designs that ignite imaginations and enrich learning experiences.
Designing Engaging Book Covers with Our Book Jacket Maker
Crafting a compelling cover design becomes effortless and enjoyable with our book jacket maker. Whether you're a teacher on the lookout for captivating classroom materials or an aspiring author with a new novel, our tool empowers you to create custom covers that resonate. Here's how to harness its potential:
- Personalize Your Vision: Start by selecting a template that resonates with your vision. Whether it's for a class project or a personal endeavor, you can tailor the design to match your style. Draw inspiration from our curated collection of book jacket examples to help you start.
- Explore Diverse Styles: Explore an array of styles and themes within the book jacket maker. From whimsical to formal, you'll find the perfect match that encapsulates the essence of your book.
- Save Time and Effort: Our book jacket maker streamlines the design experience. You don't need to have design experience; simply add your details, customize size, add illustrations, and watch your cover come to life.
- Share Your Creations: Once your template design is ready, easily download it in high resolution. This allows for seamless printing, whether you're using it for a project poster or as a real cover.
With our book jacket maker and jacket ideas, you're equipped with a versatile tool to design appealing and engaging covers. Whether it's for a project, a class assignment, or a personal endeavor, let your creativity flourish as you design covers that capture the essence of your work. Explore our library of printable templates and bring your literary visions to life!
In addition to our posters, you can also explore other exciting resources that Storyboard That offers. Whether you're diving into recommendations with our book recommendation template , creating immersive narratives with our graphic novel template , documenting memories with our scrapbook templates , or giving your journals a unique touch with our journal cover template , our platform provides a range of tools to enhance your creative and educational projects. Let your imagination roam free as you discover the endless possibilities waiting for you!
How to Make a Book Jacket Poster
Choose one of the premade templates.
We have lots of amazing templates to choose from. Take a look at our colorful example for inspiration!
Click on "Copy Template"
Once you do this, you will be directed to the storyboard creator.
Give Your Poster a Name!
Be sure to call it something related to the topic so that you can easily find it in the future.
Edit Your Poster
This is where you will include details, text, images, and make any aesthetic changes that you would like. The options are endless!
Click "Save and Exit"
When you are finished with your poster, click this button in the lower right hand corner to exit your storyboard.
From here you can print, download as a PDF, attach it to an assignment and use it digitally, and more!
Happy Creating!
Frequently Asked Questions About Book Jacket Posters
How can i use book jacket for school project.
A book jacket, also known as a dust jacket, is a cover design that wraps around a book, introducing its contents and engaging readers. A book jacket template is an excellent tool to access for school projects where you can visually represent the essence of a story, summarize its key elements, and entice your audience to explore further.
How can I find the right book cover temp
Storyboard That offers a diverse collection of templates, and you are bound to find a book jacket template that suits various themes and styles. We offer a variety of fonts, images, backgrounds, and characters and are suitable for any device. Not to worry, our book cover templates are easy to edit and make a custom size, and will make any student feel like a proud publisher! Browse through the options to find the template that aligns with your project's vision and captures the mood of your story.
Is there a book jacket creator tool to customize designs?
Yes, Storyboard That's book jacket maker allows you to customize posters with ease. You can personalize text, choose illustrations, and experiment with different styles to create a unique book cover that suits your project's requirements. You can even add your own image or photo to your book cover templates!
Try 1 Month For
30 Day Money Back Guarantee New Customers Only Full Price After Introductory Offer
Learn more about our Department, School, and District packages

- Thousands of images
- Custom layouts, scenes, characters
- And so much more!!
Create a Storyboard

Dust Jackets for Books – An Author’s Guide (plus 10 Examples)
If you’re a self-publishing author, you know that there are a lot of factors to consider when it comes to creating a professional-looking book. One important element that is often overlooked is the dust jacket – the protective cover that goes on the outside of your book. In this post, we’ll take a closer look at what dust jackets for books are, why they’re important, what to include when creating them, and how you can get one for your book.
Specifically, in this post you’ll learn about:
Table of contents
What is a dust jacket, front cover, front flap/back cover/back flap, custom dust jackets – examples with different layouts, popular printing platforms for self-publishers:, professional options, related posts.
Okay, let’s dive in!
A dust jacket (sometimes book jacket , dust wrapper or dust cover ) is a protective cover that is placed on the outside of a hardcover book. It is typically made of paper and has the title, author, and other information about the book printed on it. The purpose of dust jackets for books is to protect them from damage, such as scratches, scuffs, and tears, and to provide information about its contents to potential readers.
In contrast, a case-laminate hardcover is a hardcover book that has a glossy, laminated cover that is more durable and resistant to damage than a traditional dust jacket. A paperback book, on the other hand, does not have a protective cover at all and is bound with soft covers that are not as durable as a hardcover book.
To read a more detailed post about the different printing options available to self-published authors, be sure to check out our post about hardcover vs paperback options.
A well-made, custom dust jacket can help your book look professional and polished. In addition, a dust jacket can help to differentiate your book from other self-published books on the market, which is especially important if you’re trying to stand out in a crowded marketplace.
Now let’s break down each section of a dust jacket and what to include. Stay with us!
Anatomy of a Dust Jacket

In addition to the front cover, spine and back cover that paperbacks and case laminate hardcovers have, dust jackets also have two flaps that wrap around the front and the back of the book (noted as “front flap” and “back flap” in the image above).
The specific design and content elements that are included in each of these sections will vary depending on the book and the preferences of the publisher or author.
Below, we suggest what to include in each section:
The front cover is the same book cover design as the ebook, paperback and hard cover. We have more detailed posts about what makes a good book cover, but here are the basic elements that are included:
- The book’s title and author: The title and author are often prominently displayed on the front cover of the dust jacket.
- Awards or accolades: If the book has won any awards or has received notable recognition, this information may be included on the book’s jacket.
The elements included on the front cover are usually pretty fixed (e.g. the title, author name and design); whereas, when it comes to dust jackets for books, authors and publishers have more flexibility about what elements to include and where. Below is a list of the more common elements:
- Endorsements or reviews: The front cover of a dust jacket may also include endorsements or reviews from other authors, critics, or readers, which can help to build buzz and interest in the book.
- Additional details about the author: The dust jacket may include additional information about the author, such as a brief author biography, a list of their other works, a photograph and links to their social media accounts/website.
- ISBN, book publisher logo and publication date: The publisher and publication date are typically included on the back cover of the book’s dust jacket, along with the ISBN and any other relevant information about the book’s edition or printing.
- A Blurb of the book’s contents: The dust jacket often includes a brief summary or description of the book’s contents, which is designed to give potential readers an idea of what the book is about and what they can expect to find inside.
- Additional Graphics: Some authors like to keep it clean with the design and keep the flaps blank or include additional graphics relevant to the overall design of the cover.
In general, the purpose of a dust jacket is to provide information about the book and to entice potential readers to purchase it. The specific elements that are included on a dust jacket will vary depending on the book and the preferences of the publisher or author, but the above items are commonly found on dust jackets.
Next, let’s look at some examples that we’ve designed!

One Last Secret – Krissy Baccaro – This dust jacket layout is one of the more common. The front flap has been used to showcase reviews, the back flap to provide more information about the author and an author image, and finally the back cover the ISBN has a compelling blurb to hook potential readers.

The Blemished – Sarah Dalton – These examples here show the consistency of layout across a trilogy of books. Sarah used the front flap to feature favourable reviews, the back flap to provide her author bio and the back cover to feature the book’s blurb as well as a review. It can be tempting to include as much information as possible on a dust jacket, however, this layout provides enough space to let the different elements shine.

Ignite – Jenna Terese – In this example, the author has the blurb on the front flap and has featured the reviews prominently on the back cover. She has also included the publishing logo on the spine and back flap under her author bio and photo. If you have a pile of great reviews, this is a good way to show them off!

These Hollow Shores – A.P. Walston – For the additional flaps, this author has chosen to continue on the visual design elements in lieu of more information about the book in the front flap. Including visual elements of the design in the flaps provides aesthetically appealing custom dust jacket.

A Storm of Silver and Ash – Marion Blackwood Just because it is there, doesn’t mean it has to be used! This design continues on some visual elements of the front and back cover design into the front and back flaps. This decision focuses all of the reader’s attention on the blurb itself instead of other information that could be potentially distracting. If you have spent a lot of energy crafting the perfect book blurb, this could be an approach to consider!

Resistor – C.E. Clayton – This is a unique approach to make use of the back cover to feature another prominent character in the story. The front flap features the blurb, while the back features the author bio, photo, website and publishing logo. The author also features an award on the front cover. This design decision is sure to grab attention as both covers are used to feature strong illustrations.

Leaning Out – Monica E. Pierce – In this example, we see no wasted available space. The front flap has more about the author and bio as well as her email and publisher logo. The back flap has a note from the author. This is a nice touch as the author knows exactly who her audience is and can speak directly to them. The back cover has the book’s blurb, reviews, website, logo and ISBN. This is a great example of how much information can be put on a custom dust jacket design. If you have a lot of information that you can cater directly to your target audience, this could be a good approach.

Is There Still Room In Your Life For Me? – Will Manwill – With this approach the author opted to keep a lot of breathing space around the text elements that he did include which works really well for making the text stand out and not overwhelm. A few graphical elements from the front cover are used on the back cover and back flap to tie everything together.
Each of the dust jackets above were created by our team here at Ebook Launch. If you’re wanting help with designing your book cover and dust jacket, check out our book cover design package, and get in touch if you like what you see!
Now that we’ve discussed different layout examples, let’s talk about where you can print dust jackets for books…
There are many self-publishing printing platforms that offer a dust jacket option for hardcover books. Some popular options include:
- IngramSpark : IngramSpark is a self-publishing platform that allows authors to print and distribute their books globally, and offers a dust jacket option for hardcover books. IngramSpark is Ebook Launch’s platform recommendation for authors who are interested in a producing a dust jacket.
- Blurb : Blurb is a self-publishing platform that allows authors to create and print high-quality books, and offers a dust jacket option for hardcover books.
- BookBaby : BookBaby is a self-publishing platform that offers a range of print and distribution options for authors, and includes a dust jacket option for hardcover books.
- Lulu : Lulu is a self-publishing platform that offers a range of print and distribution options for authors, and includes a dust jacket option for hardcover books. Note: You should be aware of royalties compared to other platforms before making your choice.
Note : You might be wondering, “where is Amazon KDP”? That’s a good question. At the time of this writing, Amazon KDP does not offer a dust jacket option. They only offers paperback and case-laminate hardcovers for their printing options. This has been rumoured to change and we’ll update if/when it does.
These are just a few examples of self-publishing printing platforms that offer a dust jacket option for hardcover books. There are many other platforms available, and the best one for you will depend on your specific needs and preferences. It is always a good idea to research and compare different platforms to find the one that best meets your needs and budget.
Preparing a Custom Dust Jacket for Your Self-Published Book: DIY vs. Professional Options
- The first step is to create your book cover design for the front of your book.
- Once that is complete, you will need to decide on which platform you would like to print and distribute your book with (some popular options are listed in the previous section of this post).
- Finally, you will need to source that platform’s file creation guide and follow their instructions. For example, here is Ingram Spark’s file creation guide . You may be able to use an online design application like Canva or Photopea ; however, at Ebook Launch we use the Adobe Creative Suite of applications for our cover design and preparation of print files.
- While it’s certainly possible to create and print a dust jacket for your self-published book on your own, there are many benefits to investing in a professional cover design company to design and prepare your files for print:
- Overall quality of design – One of the biggest benefits is that a professional designer has the experience and skill to create a visually appealing and eye-catching cover that will help your book stand out from the competition.
- No errors when uploading file – a professional designer can help to ensure that your book cover meets industry standards and is optimized for printing and distribution. This can help to avoid costly mistakes or delays, and can ensure that your book is printed to the highest quality standards.
- Expert advice & peace of mind – A competent designer can provide feedback and advice on the best printing options for your specific book.
- If you’re considering hiring a professional to design and prepare your dust jacket, we offer all of our author’s who use our book cover services the option to create one. Here’s an overview of our dust jacket design services . If you have any questions, you can contact us .
In conclusion, dust jackets are an important element of a professional-looking book. They protect the book, and when designed well, they can help to make the book stand out from the competition. When creating a dust jacket, it’s important to include key information and design it to reflect the tone of the book. For self-publishing authors, there are options for creating and printing a dust jacket on your own, or hiring a professional design company to do it for you.
Now it’s your turn! What do you think? Did we miss anything? Will you be offer a dust jacket option for your self-published book?
- Back Cover of a Book: How to Convert Browsing into Buying
- Crafting the Perfect Book Spine for Self-Published Authors
- Hardcover vs Paperback: All You Need to Know
- How to Write a Better Book Blurb (Definitions and Examples)
- Book Cover Design service
We and selected third parties collect personal information as specified in the privacy policy and use cookies or similar technologies for technical purposes and, with your consent, for functionality, experience and measurement as specified in the cookie policy .
You can freely give, deny, or withdraw your consent at any time by accessing the preferences panel. Denying consent may make related features unavailable.
Use the “Accept” button to consent.
Unsupported browser
This site was designed for modern browsers and tested with Internet Explorer version 10 and later.
It may not look or work correctly on your browser.
- Design & Illustration
- Graphic Templates
How to Create a Book Jacket Template in InDesign
In this tutorial, I'll show you how to make a dust jacket for a book. Designing book jacket covers can be intimidating. Today, I'll show you how to set up a dust jacket template that you can reuse over and over again. Using the Page Tool, we will set up every section of the jacket as its own page. This will make the jacket design template easy to alter.
I've also included a handy diagram to show you the dimensions and the structure of the book jacket design. Use this as a guide for your future custom book covers and book jackets!
In a hurry? We’ve got amazing InDesign book templates and dust jacket templates over at Envato Elements , just like this one:

And if you prefer to watch video tutorials, we've got it covered as well. The Envato Tuts+ YouTube channel has hundreds of amazing design tutorials, like this new video about how to make a dust jacket for a book:

What You'll Learn in This Book Jacket Design Tutorial
- How to set up the structure of a book jacket template in InDesign
- How to set up Parent Pages, Swatches, and Styles
- How to design a book jacket template in InDesign
- How to export a book jacket template for printing
What You'll Need
You'll need access to Adobe InDesign. If you don't have the software, you can download a trial from the Adobe website . You'll also need:
- Six faces vector illustration
- Portrait of a young woman
- Kayden script font collection
- Addington CF (No longer available) We sugest Airif Simple Seirf
- Book jacket template paragraph styles—download the .indd file from the tutorial attachments
Download the assets and make sure the font is installed on your system before starting. I'll show you how to load Paragraph Styles later in the tutorial. When you are ready, we can dive into creating our InDesign book template!
1. How to Set Up the Structure of a Book Jacket Template in InDesig n
For this tutorial, we will start by setting up the InDesign book template with one page. Later, on the Layers panel, we will set up the rest of the structure of the book jacket template, as shown in the diagram below.
Each part of the book cover template will be set up as its own page. Users will then be able to resize the book jacket cover as they need.

In InDesign , go to File > New . Name the document Book Jacket Template and set the file to the following dimensions:
- Width to 6.375 in
- Height to 9.25 in
- Orientation to Portrait
- Units to Inches
- Uncheck Facing Pages
- Margins to 0.5 in
- Bleed to 0.125 in (it's best to seek your professional printer’s preference)
Click Create.

On the Pages panel (Windows > Layers), uncheck Allow Document Pages to Shuffle from the main menu. This option will allow us to move pages on the InDesign book template easily.

On the Pages panel, add four pages to the book jacket template through the Create New Page button. Also on the Pages panel, drag the pages into a five-page spread.

Select the Page Tool (Shift-P) from the Tools panel. Select the first page on the left and head over to the Control panel. Set the Width to 3.5 in.
Select the last page on the right with the Page Tool (Shift-P) and set the Width to 3.5 in . Use the Page Tool (Shift-P) to move the pages next to each other if necessary.

On the Layers panel, select the spine section of the book jacket cover and head over to Layout > Margins and Columns. Set the Margins on all sides to 0.25 in. Click OK.

Select the Page Tool (Shift-P) from the toolbar. Select the spine page and set the Width to 1 in.

Before we start the design of the InDesign book template, we need to alter the margin settings on the front cover and back cover. We need to subtract 0.375 in order to have the design aligned in the center.
On the Layers panel, select page 2 of the InDesign book template. Head over to Layout > Margins and Columns and set the Left margin to 0.875 in. This is to account for the 0.375-inch back wrap and the 0.5-inch margin on all sides.
Repeat the same procedure on the front page of the book jacket cover . On the Layers panel, select page 4. Head over to Layout > Margins and Columns and set the Right margin to 0.875 in.

2. How to Set Up Parent Pages, Swatches, and Styles
Open the Layers panel by going to Window > Layers. We’ll organize our book cover template into three layers so that users can edit the content.
Bring up the Layers panel by going to Window > Layers. Double-click on Layer 1 and rename it Background.
In the Layers panel main menu, select New Layer. Name it Text. Click OK . Also create a new layer named Images.

Head over to Window > Color > Swatches to expand the Swatches panel. Choose New Color Swatch button from the main menu. Set the Swatch Name and values to the following:
- Blue: C=100 M=80 Y=20 K=55
- Orange: C=0 M=75 Y=95 K=10
- Sand: C=10 M=13 Y=15 K=0
- Yellow: C=5 M=25 Y=55 K=0
Click Add and OK after you input each of the color values.

For this custom book cover tutorial, I created a list of Paragraph Styles that you can use to format the book jacket template.
Head over to Window > Styles > Paragraph Styles to open the Paragraph Styles panel. In the main menu, select Load Paragraph Styles.

Navigate to the Book Jacket Paragraph Styles InDesign document and click Open.
In the Load Styles window, click on Check All and click OK . You’ll have a list of styles on the Paragraph Styles panel ready to be used on your custom book cover template.

3. How to Design a Book Jacket Template in InDesign
Bring up the Rules on your custom book cover by pressing Command-R. Using the top ruler, create two guides horizontally. Sit both on the Y axis at 1 in and 2.75 in.

In the Layers panel, select the Background layer.
Head over to the toolbar and select the Rectangle Tool (M). Draw a rectangle to cover all of the book jacket template, making sure it is touching the bleeds.
In the Layers panel, lock the Background layer and select the Images layer.

Press Command-D to Place an object. Navigate to the Portrait of a young woman file and click Open . In the Control panel, set the Scale Percentage to 12%.
Drag the bottom center point of the frame towards the top to create a square frame. Place it under the top guide we created.

In the Layers panel, select the Text layer.
Select the Text Tool (T) and create a text frame that fits the width of the back flap. Place this text frame under the second guide.
Using the Paragraph Styles panel, style the text with the Flap - Quote, Copy, and the Flap - Signature style.

Using the Text Tool (T), create three text frames on the back cover. These frames will house a quote, copy, and some information in small text.
Using the Paragraph Styles panel, set the text to the Back Cover - Quote and Copy styles.
For the bottom text, set the frame to the Back Cover - Quote. Head over to the Control panel and set the Type Size to 8 pt. In the Swatches panel, set the color to the [Paper] color.

Select the Rectangle Tool (M) from the Toolbar. Create a rectangle to include the barcode if necessary. Place this item on the Images layer.

Using the Text Tool (T), create a text frame outside of the spine. Add the title of the book and format it using the Spine style from the Paragraph Styles.
Select the second word and head over to the Control panel. Set the Font to Kaydens Script , and set the Size to 38 pt and the Baseline Shift to -5 pt.
In the Swatches panel, set the color to Yellow. Using the Rotate Tool (R), rotate the text frame -90° and place it along the spine.

Press Command-D to Place an image on the front cover.
Navigate to the Six faces vector illustration file and click Open. Using the Selection Tool (V), move the frame to crop closely around any one of the portraits.
Resize the image to fit the front cover of the book cover template. Press Shift-Command to resize the image proportionally and drag from any of the corners. Place the image on the bottom margin.

Create two text frames for the word "the" and "Secret". Set both frames to the Front Cover - Title Line 1 style on the Paragraph Styles panel.
Select "the" and head over to the Control panel. Set the Font Size to 55 pt. Place both frames next to each other, creating good harmony between the two words.

Create a text frame under the first line for the rest of the title. Set the style on the Paragraph Styles panel to Front Cover - Title Line 2.

Add a final text frame under the title to include the author’s name. Use the Paragraph Styles to format the frame to the Front Cover - Author style.

Select the title and press Command-G to Group the frames. Duplicate them by pressing Option and dragging them to the front flap.
Head over to the Control panel and set the Scale Percentage to 45%.

Using the Text Tool (T), create a text frame under the title on the inside flap. Using the Paragraph Styles panel, set the text to the Copy style.

4. How to Export a Book Jacket Template for Printing
Before exporting the book jacket template for printing, it's useful to take a look around all the edges. This is to make sure all the images and vectors bleeding out are touching the bleeds. I advise you to consult your printer for any specific settings.
To export the file, go to File > Export. Name the file Book Jacket Template and choose Adobe PDF (Print) from the Format dropdown menu. Click Save.

In the Export Adobe PDF window, set the Adobe PDF Preset to Press Quality. Under Pages, set the Export As option to Spreads.

On the left side of the panel, select Marks and Bleeds. Check All Printer’s Marks and Use Document Bleed Settings. Click Export. You will have a ready-to-print PDF file.

Great Job! You’ve Finished This Book Jacket Design Tutorial!
In this tutorial, you learned how to make a book jacket. We covered key tools that will help anyone edit a book jacket design template quickly and easily. Today, you learned to:
- set up a ready-to-print InDesign book jacket template file
- load Paragraph Styles to format text
- add Color Swatches
- organize multiple Layers
- create a multiple-page spread in the Pages panel
- use the Page Tool to resize pages

5 Top Book Jacket Design Mockups and Templates
Now that you know everything about book jacket making, you might be in search of digital resources that help you save time.
Envato Elements is a fantastic source for book jacket design templates. This subscription-based marketplace offers you unlimited downloads for a flat fee.
Download InDesign book templates , book cover templates , and jacket design templates —and of course, premium fonts , add-ons , and more. Here are just five of our favorite dust jacket template mockups to show off your brand new designs!
1. Book Mockup Dust Jacket Template Edition (PSD, JPG)

Book jacket making gets so much easier with this template. Once you have your book jacket design ready after this tutorial, you can try this cool mockup to see it in 3D. The download includes eight PSD presentations and a total of 15 different book mockups which are 100% editable.
2. Book Jacket Mockup (PSD)

Here's another fantastic dust jacket template. No need to worry about how to make a book jacket with this mockup. This book jacket making kit features:
- nine photorealistic presentations
- 114 x 186 mm natural page size
- Photoshop CS4 or higher compatible
- 3000×2008 pixel resolution in 300 dpi quality
- easy and fast editing via smart objects
- organized layers and folders
3. Dust Jacket Book Mockup (PSD)

Do you need a premium mockup after learning how to make a dust jacket for a book? This book jacket design template is a great one. It features:
- six PSD mockup files (4500x3000 px)
- Photoshop smart objects
- size 6 x 9 in
- 6 different scenes
- replaceable background texture
- adjustable shading and lighting
4. Small Hardcover Book With Dust Jacket Mockups (PSD)

Here's a beautiful book jacket design mockup if you've got a smaller book design. The download includes five PSD book mockups you can easily edit thanks to the smart object layers.
5. Digest Size Book With Dust Cover Mockups (PSD)

You've finished your top book jacket design, and you want to present it in a professional way. This dust jacket template is what you need. It's specially designed for a digest size book (approximately 14x21 cm) and it features:
- four PSD mockups
- different poses in each mockup
- organized layers
- realistic effects and shadows
- changeable background
- smart objects
Discover More Book Design Tutorials
If you liked this tutorial on how to make a book jacket, you might like these:

Editorial Note: This post has been updated with contributions from Maria Villanueva . Maria is the Associate Editor of the Tuts+ Design channel.

How to Design a Book Cover
Making Book Jackets for School Projects
Utamaru Kido / Getty Images
- Homework Tips
- Learning Styles & Skills
- Study Methods
- Time Management
- Private School
- College Admissions
- College Life
- Graduate School
- Business School
- Distance Learning
- M.Ed., Education Administration, University of Georgia
- B.A., History, Armstrong State University
A common assignment given to middle and elementary school students is to design a summarizing book cover. Why? Many teachers are partial to this literature assignment because it contains elements of crafting, allowing more room for creativity, and provides students with a new way to summarize the plot and theme of a book.
Elements of this type of book jacket usually include:
- an image that hints at a book’s contents
- a summary of the story
- a review of the book
- a biography of the author
- publication information
When designing a thoughtful book cover for a novel, you must know a lot about its author and story. This is because creating a book cover is a lot like creating an advanced book report without giving away too much of the story. You cannot be successful in designing an appropriate cover for a book with which you are unfamiliar.
Designing the Whole Jacket
ThoughtCo / Grace Fleming
To ensure that your cover or jacket will have room for each element you wish to include, you'll first want to plan a basic layout. This should show where each piece of your project will go and how much space you can devote to them. For example, you might want to put the author’s biography on the back cover or the back flap and you know you will need at least half a page for it, wherever it goes.
Play around with a few different formats until you settle on one you like and use a rubric to make sure you don't leave anything out. Start with the arrangement in the image above if you don't know where to begin.
Preparing an Image
Fabio Principe / EyeEm / Getty Images
Your book jacket should contain an image that intrigues potential readers by giving them a taste of what's to come without spoiling the whole plot. Just as publishers do when designing real book covers, you should devote a good deal of time and energy to creating the perfect visual representation.
One of the first considerations for your image should be the genre and theme of your book. Your cover should reflect this genre and symbolize this theme. For example, if your book is a scary mystery that takes place in a haunted house, you could sketch an image of a spider in the corner of a dusty doorway. If your book is a funny tale about a clumsy girl, you could sketch an image of shoes with the shoestrings tied together.
If you are not comfortable sketching your own image, you can use text (be creative and colorful!) and/or public domain images. Ask your teacher for advice if you intend to use an image created by someone else to avoid copyright infringement.
Writing Your Book Summary
Maskot / Getty Images
The next piece to start working on is the book summary, which is usually found on the inside flap of book jackets. Because the intention is still to capture your readers' attention, this summary should sound a little different from a book report summary and give less of the plot away. You need to “tease” the reader with hints and examples, never telling them the climax. Instead, make them wonder what will happen.
In the haunted house mystery example, you could suggest that the house seems to have a life of its own. You could go on to explain that the house's inhabitants are having strange experiences within the house and end on the open-ended question or cliffhanger: “What is behind the odd noises Betty hears when she wakes each night at 2:00 a.m.?” The goal should be for readers to want to read to find out.
Writing the Author’s Biography
alvarez / Getty Images
The average author's bio is fairly short, so yours should be too. Limit the biography to only the most relevant information. When researching, ask yourself: What events in the author's life are connected to the topic of this book? What makes this author particularly qualified to write a book like this.
Optional pieces of information include the author’s place of birth, number of siblings, level of education, writing awards, and previous publications. Use these only as needed. Unless otherwise instructed, keep your biography to two or three paragraphs long. These are usually found on the back cover.
Putting It All Together
chudakov2 / Getty Images
You're finally ready to put it all together. To make sure that the dimensions of your jacket are perfect, you'll need to first measure the size of your book’s face from bottom to top to find its length then spine to edge to find its width. Cut a strip of paper six inches longer than the height and fold it over each side, trimming until you are happy with the size. Measure this new length. Repeat for the width.
Now, multiply your book's updated dimensions by two (you may need to multiply its width by more than this depending on the thickness of your book). You can start cutting and pasting elements onto the cover once the jacket is fitted and secured. Use the template you made earlier to organize these pieces and remember not to glue anything down until the placement is just right.
- How to Write a Great Book Report
- How to Find the Theme of a Book or Short Story
- How to Start a Book Report
- What Is a Synopsis and How Do You Write One?
- How to Study for an Open Book Test
- How to Create an EPUB File From HTML and XML
- How to Start and Maintain a Book Club
- Writing a History Book Review
- 50 General Book Club Questions for Study and Discussion
- The Haunted House (1859) by Charles Dickens
- Book Report: Definition, Guidelines, and Advice
- 20 Book Activities to Try With Grades 3-5
- Comps in Graphic Design and Printing
- How to Use ABC Books All the Way Through High School
- Symbols and Motifs in Literature
- What Is a Written Summary?
click here to read it now
Read this week's magazine

DIY: Book Jacket and Cover Design 101
Finding the right cover and jacket design for a book can be one of the most exciting parts of the publishing process—and one of the most challenging.
Indie authors will want to give some serious thought to the jacket design of their print editions, including the front cover, spine, back cover, and flaps. If done right, a smart design can have a big impact on book sales; almost nothing will turn off a reader more than a jacket that looks amateurish. Many authors may be tempted to go it alone—and there are lots of tools available for those who choose to do so—but hiring a professional designer who has experience creating book jackets can be a great investment.
Conduct Research
Before hiring a designer, an author should conduct some research so she can communicate her needs and expectations to the designer. Natalie Olsen, the founder of Kisscut Design, suggests that authors begin by browsing the shelves at their local bookstore and noting which titles catch their eye. Next, Olsen advises checking out some online resources like The Book Cover Archive , The Casual Optimist , FaceOut Books , and Design Observer's 50 Books/50 Covers for more ideas. “Your cover should look like it belongs alongside these creative, polished, professional examples—but it should also stand apart, commanding attention," she says.
Once an author has an idea of what she wants her jacket to look like, she can start searching for a designer.
Choose a Designer
“It’s important to not only hire an experienced designer, but an experienced book cover designer,” says Sophia Feddersen of the Scarlett Rutgers Book Design Agency. She notes that first time authors “may not know about cover genre conventions, design specifications, and other best-practices.” Authors should start by looking at a few designers’ websites in search of a good match. There are many excellent options out there, so it’s worth it for an author to take the time to find the right person for the project. Questions an author should consider:
- Does the designer have experience creating book covers? Are the designs appealing?
- Are the prices reasonable and in line with what other designers are charging? Keep in mind a full jacket design will be more expensive than just a front cover.
- Has the designer designed books in a similar category? A science fiction book cover specialist may not be the best choice for a romance novel.
- Does the designer respond quickly to inquiries and seem enthusiastic and professional?
- Is it clear who will be doing the design work, and is the author able to communicate directly with them?
Maximize the Design
Some important factors to carefully consider when designing a book are:
- Blurbs: A book jacket usually includes a number of blurbs from other authors or reviewers. Pick the best blurb from the most prominent author or outlet and include it on the front cover. Additional blurbs can go on the back cover.
- Image Size: Look at a thumbnail-sized image of the potential cover. Is the title readable and the image clear? Most readers browsing online won’t take the time to click on the image to see it full size, so make sure the design looks sharp and clear for someone browsing on a mobile phone.
- Updates: Jackets should be updated accordingly. If an author’s work wins an award or hits a bestseller list, that should be added to the front cover. Additional blurbs and reviews can be added to the back.
"Remember that the cover of your book isn't for you; it's for your audience,” Olsen says. She cautions that while feedback from friends and family is important, authors should work to get more objective input from outsiders who are not as familiar with the project. “[Your audience] includes a lot of people you've never met, but who you are about to influence with your work. So make it for them."

- You are a subscriber but you have not yet set up your account for premium online access. Contact customer service (see details below) to add your preferred email address and password to your account.
- You forgot your password and you need to retrieve it. Click here to retrieve reset your password.
- Your company has a site license, use our easy login. Enter your work email address in the Site License Portal.
- Expert Publishing Services
- 917-922-1339
- [email protected]
- Book Design
How to Design a Book Jacket

How to Design a Back Book Cover

Guide to Children’s Book Design
- book cover design
- book cover tips
- cover design
- tips and tricks
What is a book jacket and why does your book need one?
A book jacket—also called a dust cover or dust jacket—is the paper book cover that wraps around your book. Although it’s usually used on hardcover books, some paperbacks use a book jacket as well.
Book jackets provide both critical and helpful information about your book. And that’s just one of the purposes that a book jacket serves.
Purpose of a book jacket
One of the main purposes of a book jacket is to protect the book itself. Sometimes a reader might drop the book or spill liquid on it, and the jacket takes the brunt of the damage to keep the book itself safe.
Another main purpose is book marketing . Your book jacket acts as a sales tool to entice a potential reader to dive into the story within. Since a jacket provides more space than the actual book cover, you can really provide your reader with some great information.
Factors that lead a book to needing a jacket
The main factor in whether your book needs a jacket is the type of book you’re creating. Obviously, since jackets only apply to written books, you won’t need one if you’re only publishing an e-book.
However, you might want to seriously consider a jacket if you’re printing a hardcover. Since a book jacket provides protection to the book itself, a hardcover often deserves a jacket—particularly when compared to its less expensive paperback counterpart.
How to tell if your book should have a jacket
Book jackets should be impressive. They convey that a book is high quality simply because it deserves the protection that a jacket provides. If you want to convey that perception to your audience, you should consider a book jacket.
Additionally, your book might need a jacket if you have a lot of information to provide to your readers. A standard book cover includes the front cover design, back cover design, and spine. A book jacket has more real estate with flaps that fold over the cover.
Elements of a good book jacket
A good book jacket design isn’t just thrown together overnight. It requires careful planning, and in some cases, a skilled designer. Because the jacket is the first thing your potential reader will see, it’s important to make a good impression. People judge a book by its jacket, and you can help control how they perceive it!
Why people judge a book by its jacket
The book cover design printed on your book jacket tells the reader all about the book itself. The jacket is more than just a front cover, spine, and back cover. It of course includes the book title, author name, and publisher, if applicable. And the actual image or illustration and typography or font give your reader an idea of your book’s theme.
Think about the last time you picked up a book from your local library or bookstore. As you perused the hardcovers, you probably made your choice largely thanks to the jacket. You likely also noticed the elements that each book cover included that provided you information about each book and its contents.
Core elements that all book jackets should have
Every book jacket is unique in design and the information it provides. However, there are several core elements that all book jackets should have, which are often organized by placement on the jacket.
Here are a few elements that the front cover should include:
- Book subheading or tagline
- Author name
- Editor name, if applicable
- Publisher name, if applicable
The back cover should also include its own elements, such as:
- Book blurb or description that summarizes your story
- Publisher information, if applicable
- ISBN barcode
And don’t forget about the spine! This is the simplest part of your entire book jacket. The spine usually includes the full title, the author name—sometimes just the last name if there’s not much space—and the publisher.
In addition to these core elements, there are a few optional elements that you can include.
Optional elements to include—and why you might want them
Although you don’t want your book jacket design to feel too cluttered, you might want to consider adding some optional elements to give your readers more information about your book.
For example, it’s not necessary to include background imagery on your book jacket, but it sure goes a long way to impress and communicate with a potential reader. Adding a creative background design like a photo, illustration, or color scheme that hints at your book’s theme and tone can really entice someone to purchase your book.
Additionally, it never hurts to have a book review or a testimonial from a happy reader or industry professional! Many people in the book industry—including other writers—are happy to promote authors and their work. Consumers love to read reviews, so this could really go a long way to helping you ring up some book sales.
Finally, consider adding an author bio and photo to your book jacket. The flaps that fold around the book cover are a great place for this! Let your readers know a little bit about you and what inspired you to write the book. If a potential reader feels a connection to you as the author, they might be more inclined to read your book cover to cover.
How to design your own book jacket
Book jacket and cover design are not only important to how your target audience perceives your book—they’re also art forms that often require a talented designer. However, great design costs money. If you don’t have much of a budget for your book, you might consider designing your own book jacket.
How to know if you’re ready to design your own book jacket
On the surface, it might seem pretty simple to design your own book jacket. After all, it’s just typing some basic information onto a page, right? Wrong!
There’s a full design process to creating a book jacket. If you want to determine whether you’re ready to tackle the design on your own, start by asking yourself a few questions:
- Do you have access to graphic design software like the Adobe Creative Suite or Canva, and do you know how to use these programs?
- Where can you find a stock image or illustration to include on your jacket?
- Do you have a template for your book jacket, or do you have to set up the file?
- Are you familiar with design terms like resolution, bleed, and artboard?
If you’re not sure how to answer these questions, you’ll need to spend some time educating yourself on how to design your own book jacket. And during your research, be sure to read up on the legal ownership of the images and typography you choose to use.
How to make sure not to infringe on copyrighted materials for your book jacket
When you design a book jacket, you have to be careful not to use someone else’s work without express written permission. Many design elements like images and fonts you’ll find online are protected, so you could run into copyright infringement.
If you fall in love with an illustration, photo, or graphic for your book’s cover, make sure you understand who actually owns that image. You don’t want to publish something on your cover and later be sued by the person who snapped the picture or designed the image. The same is true for typography. Each font could be a professional designer’s intellectual property.
One way to avoid copyright infringement is to visit a stock image website. These sites often allow a person to purchase images and use them at their will. However, you’ll still have to read the fine print to make sure you’re allowed to publish it as part of your book.
Other things to keep in mind when designing your own book jacket
As you plan your book cover design , there are a few more things to keep in mind. You want to include a font and graphic that fit into your genre. So explore your options and make the right choice!
It never hurts to take a look at what other authors in your genre are doing. Check out some recently published books and inspect their jackets closely. You’ll likely find some book jackets that successfully communicate information about the author and the book itself. And you’ll come across other book jackets that aren’t quite as effective. Use this for inspiration! Springboard off of what works in the examples you find, and disregard the less successful jackets.
Additionally, determine what exactly you want on your book jacket. Thanks to the flaps that fold over the actual book cover, you have more room to work with on a book jacket. If you use every square inch of space wisely, you’ll create an effective book jacket that will entice potential readers.
When to hire a book jacket designer
Most authors don’t have professional design experience. And that’s okay! A professional book cover designer can create a stunning jacket that will attract and intrigue readers. If you’re ready to invest in your book and make a splash as a successful author, it might be time to hire a book jacket designer.
How to know when it’s time to hire a book jacket designer
There are two main factors that will help you decide when it’s time to hire a book jacket designer:
- You’re not comfortable with elements of the design process like setting up a template or creating a custom graphic image, and you want a professional to handle the design for you.
- You want your book jacket to have a “wow” factor to ring up book sales and help make a name for you as a serious and professional author.
You can hire a professional designer not just with graphic design experience, but also with experience in the publishing industry. These experts can create and execute a stellar design concept that will grab more readers’ attention than a jacket designed by a novice.
Things to keep in mind when working with a book jacket designer
When you work with a professional cover designer, you want to make sure that you communicate the information that you want your book jacket to convey. Explain your book’s genre, story, and tone to give your designer a thorough understanding of the experience you want your readers to have.
Once you’ve decided to hire a professional designer, you can concentrate on finding the right one for your book.
How to find the right designer
As an author, you take a lot of pride in your book. And you want to work with a book jacket designer who takes a lot of pride in their work.
Don’t just sign on with the first designer you find. Look around and review multiple design portfolios. When you find a designer whose style you like, talk to them about your project. Make sure you feel comfortable with them and feel confident in their work. After all, they’re going to create your book jacket design, and therefore provide your first impression to your readers.
Your book deserves an Elite book jacket design
The world is ready to read your book. You just have to show off a great book jacket design to draw them in!
Elite Authors knows how important book cover design is. And we take great pride in making beautiful books. Visit our website to learn more!
Related posts

Using Color Psychology in Book Cover Design to Attract Readers

Navigating Typography Choices for Your Self-Published Book

Cover Design Trends for Self-Published Authors in 2023
Build your online presence with genuine book reviews! Explore packages from $449.
Need help moving your files from CreateSpace to KDP?
Let us help you move your book for free..
- Content Types
Presentations Keep your audience engaged.
Documents Formalize your branding.
Videos Add movement to your brand.
Infographics Share information visually.
Whiteboards Brainstorming, plan, and design.
Charts and Graphs Bring life to your data.
Social Media Graphics Create scroll-stopping content.
Forms & Surveys new Visual forms that convert.
Mockups Create high-quality mockups in seconds.
Printables Create content for printing.

- Features & Assets
AI Designer
Interactivity
AI Image Generator
Integrations
Data Widgets
Collaborations
Social Scheduler
Branded Templates
Presenter Studio
Free Educational Resources See All
Visme Video Tutorials Watch videos on how to use Visme.
Ebooks Read in-depth knowledge for your industry.
Graphic Design Videos Learn design principles & best practices.
Live Webinars Interact with the experts live.
Free Online Courses Get certified with free online courses.
Our Blog See All
Presentations
Video & Animations
Digital Marketing
Infographics
Design for Business
Data Visualization
Design Inspiration
For Work All Teams
Agencies & Consulting Manage multiple brands.
Education Use Visme in the classroom.
Nonprofit Bring life to your cause.
Enterprises Create visual content at scale.
- Perfect For These Roles
Marketers Creative content that shines.
Human Resources Improve internal communication.
Sales Teams Close more deals with your content.
Training Development Create interactive training content.
Templates See All
Presentations 1000+ layouts and themes.
Chart & Maps Get data visualization ideas.
Social Media Graphics Browse templates for every platform.
Infographics Find the right format for your information.
Documents Templates for every business document.
Videos & GIFs Find the perfect preanimated template.
Branded Templates Get a bundle of templates that match your brand.
Forms & Surveys new Forms for engagement and conversions.
- Other Templates
Website Graphics
Survey Results
Case Studies See All

How the Florida Panthers Maximize Their Workflow & Win New Clients Using Visme

Converting More Leads from Existing Traffic with Visme’s Interactive Form Builder

How the Denver Broncos Use Visme to Visualize Data, Execute Strategies & Wow Partners

How a Consultancy Uses Visme to Create Engaging Client-Facing Content
Created with Visme See All
Infographics / Data Viz
Document / EBooks
Forms / Surveys
- Request a Demo
- Sign Up Free
- Free Educational Resources
- Book Covers
Professional Book Cover Maker for Engaging Cover Designs
Create Your Book Cover It’s free and easy to use.

- Easy-to-use book cover creator for print and digital books.
- Customized templates to fit any kind of book cover.
- Download as a ready-to-upload or print PDF, JPG or PNG.

Chosen by brands large and small
Our book cover maker is used by over 27,500,000 marketers, communicators, executives and educators from over 133 countries that include:

EASY TO EDIT
Book Cover Templates
Visme’s free book cover maker is filled with pre-designed templates. These templates make it simple to create an eye catching book cover. You can fully customize the free book cover templates to fit your needs.
Design a book cover for free with our professionally designed visual elements available in the Visme book cover design software.

Create your book cover View more templates
Features of the Book Cover Maker
Beautiful book cover templates.
The Visme online book cover maker comes pre-loaded with templates that control the overall design of your cover. These help you create designs that stand out to your ideal readers. Simply tap the “Book Covers” category and choose from any of our free book cover design templates.
Create Your Book Cover

Build your book cover
Visme gives you all the capabilities you need to create a free online book cover. You can make an impact on your audience with our book cover design software. Start the process by adding text, visuals and a beautiful font to your book cover.

Customize every aspect of your book cover with your preferred font and colors
Visme’s online book cover maker is a tool that creates high quality book covers. You can easily bring a creative vision to life with no design experience needed. Choose from our selection of free fonts or upload your own, or create preset color palettes to change color schemes with a single click.

More Great Features of the Book Cover Maker
Share your book cover.
The Visme book cover maker is built with your publishing goals in mind. When you’re done creating your cover it’s easy to export it to your publishing software of choice.

LEARN ABOUT BOOK COVERS
What is a Book Cover ?
A cover is the first thing potential readers will see when they come across your work. It’s an opportunity to showcase what is inside. Because of this, the cover plays a crucial role of introducing the book to your audience.
We've all heard the saying, "Don't judge a book by its cover." But the truth is that we all do it anyways — so make sure your book cover is eye-catching and makes someone want to read your book.

Use the book cover maker to design prize-worthy book covers quickly and easily.
Select one of the ready-to-use templates to make book covers online. Change the text in the placeholders to reflect your award topic or event title. Add all your relevant information, and customize the fonts to match your vision.
EVERYTHING YOU NEED + MORE
More Than a Book Cover Maker
Visme’s easy-to-use book cover generator empowers you to design book covers fast. Learn more about the features of the book cover generator.
MAKE IT ENGAGING
For digital books, create an animated book cover design with animated icons and illustrations that grabs attention and reels your readers into learning more.

BEAUTIFY YOUR CONTENT
Images & Graphics
Choose from over a million stock photos, icons, illustrations, characters, lines, shapes and more to add stunning design elements to your book cover.

VISUALIZE NUMBERS
Charts & Data Widgets
Easily visualize numbers and data with Visme's charts, graphs and data widgets. Add these widgets onto your book cover as additional design elements.
HOW IT WORKS
How to Make Book Covers in 5 Steps
Book covers are a critical component of your writing project. However, not every author has the ability to invest in expensive graphic design. Using Visme’s free book cover maker you can design a book cover in 5 simple steps.
Follow along with our quick-step tutorial below to get started creating your own stunning book cover design.
- Log in to your Visme account and click on the Printables tab on the dashboard.
- Scroll left through the icons and tap on the Book Cover icon to find a template.
- Customize the colors, add graphics and tweak the font of your book cover.
- Add the title and any additional text to your design.
- Download the completed book cover to upload to your book publishing software.
How to Use the Book Cover Maker
Log into Visme and open the book cover maker by clicking on Printables, then choosing the Book Covers icon to browse our premade templates.
Select the pre-designed layout that makes the most sense for your goals, or that simply is most visually appealing to you. Remember that you can customize everything or change your template inside the editor.
Upload any visual elements like the font pairings, icons or images that you need, or browse through all of our options in the left sidebar.
Find the right font for your book cover using our massive library or upload your preferred font into your brand kit.
Customize the font color so it matches with your color design, and adjust the size to achieve balance.
Use our editing grid to arrange the visuals into a balanced composition and ensure you’ve placed large enough margins to not have a cluttered design.
Proofread any text, headings or content you’ve placed on your book cover. Double check that everything looks great and you’re satisfied with your book cover design.
Download the finished book cover as a high resolution image or a PDF with bleed marks for printing.
Questions About the Book Cover Maker
How much does it cost to use the book cover creator, does the book cover maker have templates for all types of books, can every element in the book cover template be customized, how can i make my own book cover, can i upload my own pictures into the book cover maker, in what sizes can i download my book cover.

Your book covers deserve to be beautiful and so does the rest of your content
Sign up. It’s free!
Book Jacket Template
This free indesign book jacket template is a handy indesign template for self-publishers, authors and cover designers., beautifully designed, adaptable and featuring elegant typography and an on-trend color scheme, make your book a reality with this free indesign dust jacket template for hardcover and hardback book..
This free InDesign book jacket template is an easy-to-edit foundation for creating your own book cover design. Complete with a stylish and simple design, front and back cover, spine and flaps, it also comes complete with two color options.
Unlimited Downloads: 1,000,000+ InDesign Templates, Mockups & Design Assets by
Included in your free InDesign template is an expandable book jacket design for hardcover and hardback books. So what are you waiting for? Scroll down to find out more, and download the template.
Book jacket template size:
*This is an expandable book jacket template set up for a Trade cover size. 6 by 9 inches is one of the most popular standard sizes for books, however other sizes are widely used. There’s no need to panic if you require a different size; see our handy tutorial on how to resize templates .
Below you can preview this book jacket template, download the InDesign file and find a variety of helpful tips on how to edit your template in InDesign.

Download this Template
Download this InDesign book jacket template for free (your download will include an INDD file for InDesign CC and an IDML version for opening in InDesign CS4, CS5 or CS6):
Download Template (Free)
Help Working with InDesign Templates
We’ve put together a collection of helpful tips to make editing our InDesign Templates super easy. If you’re a newbie to Adobe InDesign it’s worth checking these out before starting work on your design.
How to Open an InDesign Template
Step 1. Download the file.
Step 2. Our InDesign templates are packaged and saved as ZIP files. If you have a Windows computer Right Click > Extract All before opening the InDesign file.
Unlimited Downloads: 1,000,000+ Fonts, Mockups & Design Assets by
Step 3. If you’re running InDesign CS6 open the INDD version of the file. If you’re working with InDesign CS4 , CS5 or CC open the IDML version.
UNLIMITED DOWNLOADS: 50 Million+ Fonts & Design Assets

How to Work With Layers in Your Template
Our InDesign templates are organized into layers, which group similar elements together. The layers in your document can be controlled from the Layers panel (Window > Layers) .
Pro tip: Try locking the YOUR IMAGES HERE layer to save time when editing text. This will prevent you from accidentally moving the graphics out of position.

How to Change the Colors
The color scheme of this template can be edited from the Swatches panel (Window > Color > Swatches) .

Pro tip: Editing a swatch will automatically update all instances of that color across your document.
How to Add Your Own Text
The text across this design can easily replaced with your own copy. Simple use the Type Tool (T) to select the text box you wish to edit. You can then add your own fonts and formatting. Read more about formatting text in InDesign.
How to Add Your Own Images
You’ll notice when you first open the template that all the image frames have a placeholder image. You can insert your own images by selecting the image frame and using File > Place to select a replacement image. Read our beginner’s guide to working with images in InDesign.
Pro tip: Do your images look blurry? Make sure your display is set to high-quality (View > Display Performance > High-Quality Display) . To see more accurately how your design will appear when printed go to View > Overprint Preview .
How to Resize Pages in InDesign

How to Export Your Document for Printing

How to Change the Fonts in a Document
You can format individual items of text using the Type Tool (T) and Controls panel, which you’ll find running along the top of the InDesign workspace. The fonts in most templates are not set as InDesign styles. However, it’s easy to create a Character or Paragraph Style using existing text formatting, and then edit this from the Styles panels (Window > Styles) . Read more about editing Styles in InDesign.
Discover more tips for InDesign beginners on our Tutorials page . Or discover inspiration about typography, layout design and much more right here .
The 10 Best Invitation Templates for Weddings, Parties and Events
Discover more..., paperback book cover template, the best book templates for adobe indesign, architecture template kit, newsletter template, graphic business card template, minimal architecture portfolio template, simple brochure template, how to create a christmas ecard in indesign, plus a free template, terrazzo business card template, sign up to our newsletter and get a free ebook.
Receive a copy of 10 Essential InDesign Skills, plus get monthly updates on new templates, fresh design inspiration and unmissable offers for creatives!
- Grades 6-12
- School Leaders
FREE 2024-25 Printable Teacher Calendar! 🗓️
42 Creative Book Report Ideas for Students
Inspire your students to share their love of books.
Responding to what you read is an important literacy skill. Reading about other people’s experiences and perspectives helps kids learn about the world. And although students don’t need to dive deeply into every single book they read, occasionally digging into characters, settings, and themes can help them learn to look beyond the prose. Here are 42 creative book report ideas designed to make reading more meaningful.
1. Concrete Found Poem

This clever activity is basically a shape poem made up of words, phrases, and whole sentences found in the books students read. The words come together to create an image that represents something from the story.
2. Graphic Novel
Have students rewrite the book they are reading, or a chapter of their book, as a graphic novel. Set parameters for the assignment such as including six scenes from the story, three characters, details about the setting, etc. And, of course, include detailed illustrations to accompany the story.
3. Book Snaps

Book Snaps are a way for students to visually show how they are reacting to, processing, and/or connecting with a text. First, students snap a picture of a page in the book they are reading. Then, they add comments, images, highlights, and more.
4. Diary Entry
Have your students place themselves in the shoes of one of the characters from their book and write a first-person diary entry of a critical moment from the story. Ask them to choose a moment in the story where the character has plenty of interaction and emotion to share in a diary entry.
5. Character To-Do List

This fun activity is an off-the-beaten-path way to dive deep into character analysis. Get inside the head of the main character in a book and write a to-do list that they might write. Use actual information from the text, but also make inferences into what that character may wish to accomplish.
6. Mint Tin Book Report

There are so many super-creative, open-ended projects you can use mint tins for. This teacher blogger describes the process of creating book reports using them. There’s even a free template for cards that fit inside.
7. Fictional Yearbook Entries
Ask your students to create a yearbook based on the characters and setting in the book. What do they look like? Cut out magazine pictures to give a good visual image for their school picture. What kind of superlative might they get? Best looking? Class clown? What clubs would they be in or lead? Did they win any awards? It should be obvious from their small yearbooks whether your students dug deep into the characters in their books. They may also learn that who we are as individuals is reflected in what we choose to do with our lives.
8. Book Report Cake

This project would be perfect for a book tasting in your classroom! Each student presents their book report in the shape of food. See the sandwich and pizza options above and check out this blog for more delicious ideas.
9. Current Events Comparison
Have students locate three to five current events articles a character in their book might be interested in. After they’ve found the articles, have them explain why the character would find them interesting and how they relate to the book. Learning about how current events affect time, place, and people is critical to helping develop opinions about what we read and experience in life.
10. Sandwich Book Report

Yum! You’ll notice a lot of our creative book report ideas revolve around food. In this oldie but goodie, each layer of this book report sandwich covers a different element of the book—characters, setting, conflict, etc. A fun adaptation of this project is the book report cheeseburger.
11. Book Alphabet
Choose 15 to 20 alphabet books to help give your students examples of how they work around themes. Then ask your students to create their own Book Alphabet based on the book they read. What artifacts, vocabulary words, and names reflect the important parts of the book? After they find a word to represent each letter, have them write one sentence that explains where the word fits in.
12. Peekaboo Book Report

Using cardboard lap books (or small science report boards), students include details about their book’s main characters, plot, setting, conflict, resolution, etc. Then they draw a head and arms on card stock and attach them to the board from behind to make it look like the main character is peeking over the report.
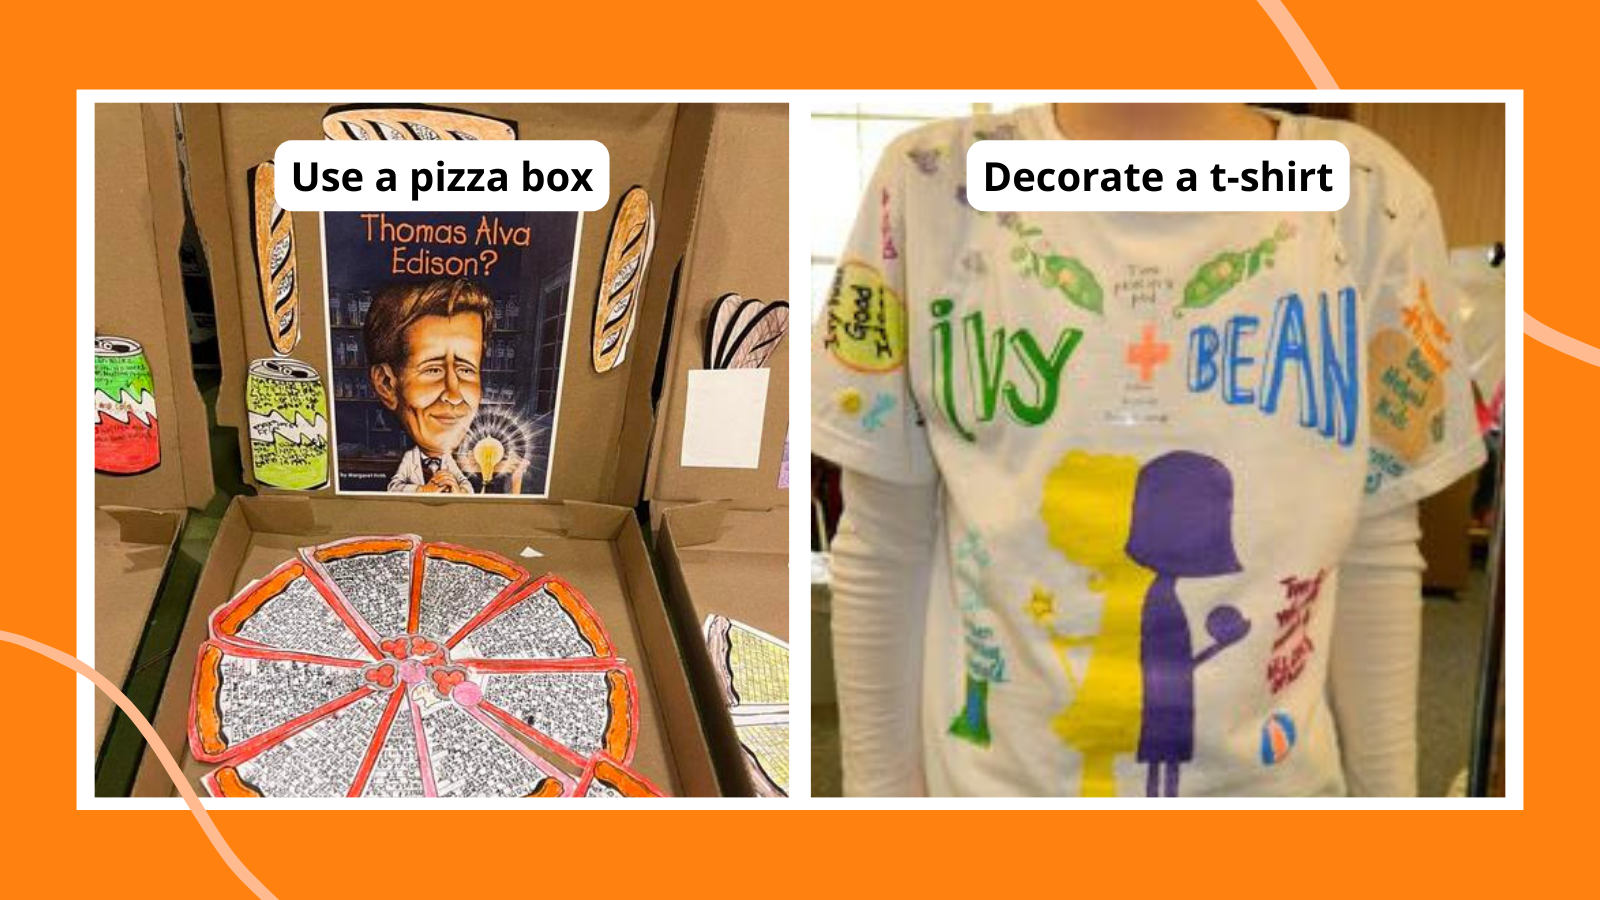
13. T-Shirt Book Report

Another fun and creative idea: Create a wearable book report with a plain white tee. Come up with your own using Sharpie pens and acrylic paint. Get step-by-step directions .
14. Book Jacket
Have students create a new book jacket for their story. Include an attractive illustrated cover, a summary, a short biography of the author, and a few reviews from readers.
15. Watercolor Rainbow Book Report
This is great for biography research projects. Students cut out a photocopied image of their subject and glue it in the middle. Then, they draw lines from the image to the edges of the paper, like rays of sunshine, and fill in each section with information about the person. As a book report template, the center image could be a copy of the book cover, and each section expands on key information such as character names, theme(s), conflict, resolution, etc.
16. Act the Part
Have students dress up as their favorite character from the book and present an oral book report. If their favorite character is not the main character, retell the story from their point of view.
17. Pizza Box Book Report

If you’re looking for creative book report ideas that use upcycled materials, try this one using a pizza box. It works well for both nonfiction and fiction book reports. The top lid provides a picture of the book cover. Each wedge of the pizza pie tells part of the story.
18. Bookmark
Have students create a custom illustrated bookmark that includes drawings and words from either their favorite chapter or the entire book.
19. Book Reports in a Bag

Looking for book report ideas that really encourage creative thinking? With book reports in a bag, students read a book and write a summary. Then, they decorate a paper grocery bag with a scene from the book, place five items that represent something from the book inside the bag, and present the bag to the class.
20. Reading Lists for Characters
Ask your students to think about a character in their book. What kinds of books might that character like to read? Take them to the library to choose five books the character might have on their to-be-read list. Have them list the books and explain what each book might mean to the character. Post the to-be-read lists for others to see and choose from—there’s nothing like trying out a book character’s style when developing your own identity.
21. File Folder Book Report

Also called a lap book, this easy-to-make book report hits on all the major elements of a book study and gives students a chance to show what they know in a colorful way.
22. Collage
Create a collage using pictures and words that represent different parts of the book. Use old magazines or print pictures from the Internet.
23. Book Report Triorama

Who doesn’t love a multidimensional book report? This image shows a 3D model, but Elisha Ann provides a lesson to show students how to glue four triangles together to make a 4D model.
24. Timeline
Have students create a timeline of the main events from their book. Be sure to include character names and details for each event. Use 8 x 11 sheets of paper taped together or a long portion of bulletin board paper.
25. Clothes Hanger Book Report Mobile

This creative project doesn’t require a fancy or expensive supply list. Students just need an ordinary clothes hanger, strings, and paper. The body of the hanger is used to identify the book, and the cards on the strings dangling below are filled with key elements of the book, like characters, setting, and a summary.
26. Public Service Announcement
If a student has read a book about a cause that affects people, animals, or the environment, teach them about public service announcements . Once they understand what a PSA is, have them research the issue or cause that stood out in the book. Then give them a template for a storyboard so they can create their own PSA. Some students might want to take it a step further and create a video based on their storyboard. Consider sharing their storyboard or video with an organization that supports the cause or issue.
27. Dodecahedron Book Report

Creative book report ideas think outside the box. In this case, it’s a ball! SO much information can be covered on the 12 panels , and it allows students to take a deep dive in a creative way.
28. Character Cards
Make trading cards (like baseball cards) for a few characters from the book. On the front side, draw the character. On the back side, make a list of their character traits and include a quote or two.
29. Book Report Booklets

This clever book report is made from ordinary paper bags. Stack the paper bags on top of each other, fold them in half, and staple the closed-off ends of the bags together. Students can write, draw, and decorate on the paper bag pages. They can also record information on writing or drawing paper and glue the paper onto the pages. The open ends of the bags can be used as pockets to insert photos, cut-outs, postcards, or other flat items that help them tell their story.
30. Letter to the Author
Write a letter to the author of the book. Tell them three things you really liked about the story. Ask three questions about the plot, characters, or anything else you’re curious about.
31. Book Report Charm Bracelet

What a “charming” way to write a book report! Each illustrated bracelet charm captures a character, an event in the plot, setting, or other detail.
32. Fact Sheet
Have students create a list of 10 facts that they learned from reading the book. Have them write the facts in complete sentences, and be sure that each fact is something that they didn’t know before they read the book.
33. Cereal Box TV Book Report

This book report project is a low-tech version of a television made from a cereal box and two paper towel rolls. Students create the viewing screen cut-out at the top, then insert a scroll of paper with writing and illustrations inside the box. When the cardboard roll is rotated, the story unfolds.
34. Be a Character Therapist
Therapists work to uncover their clients’ fears based on their words and actions. When we read books, we must learn to use a character’s actions and dialogue to infer their fears. Many plots revolve around a character’s fear and the work it takes to overcome that fear. Ask students to identify a character’s fear and find 8 to 10 scenes that prove this fear exists. Then have them write about ways the character overcame the fear (or didn’t) in the story. What might the character have done differently?
35. Mind Maps
Mind maps can be a great way to synthesize what students have learned from reading a book. Plus, there are so many ways to approach them. Begin by writing a central idea in the middle of the page. For example, general information, characters, plot, etc. Then branch out from the center with ideas, thoughts, and connections to material from the book.
36. Foldables

From Rainbows Within Reach , this clever idea would be a great introduction to writing book reports. Adapt the flap categories for students at different levels. Adjust the number of categories (or flaps) per the needs of your students.
37. Board games
This is a great project if you want your students to develop a little more insight into what they’re reading. Have them think about the elements of their favorite board games and how they can be adapted to fit this assignment. For more, here are step-by-step directions .
38. Comic strips

If you’re looking for creative book report ideas for students who like graphic novels, try comic strips. Include an illustrated cover with the title and author. The pages of the book should retell the story using dialogue and descriptions of the setting and characters. Of course, no comic book would be complete without copious illustrations and thought bubbles.
39. Timeline
Create a timeline using a long roll of butcher paper, a poster board, or index cards taped together. For each event on the timeline, write a brief description of what happens. Add pictures, clip art, word art, and symbols to make the timeline more lively and colorful.
40. Cereal Box
Recycle a cereal box and create a book report Wheaties-style. Decorate all sides of the box with information about the book’s characters, setting, plot, summary, etc.
41. Wanted Poster
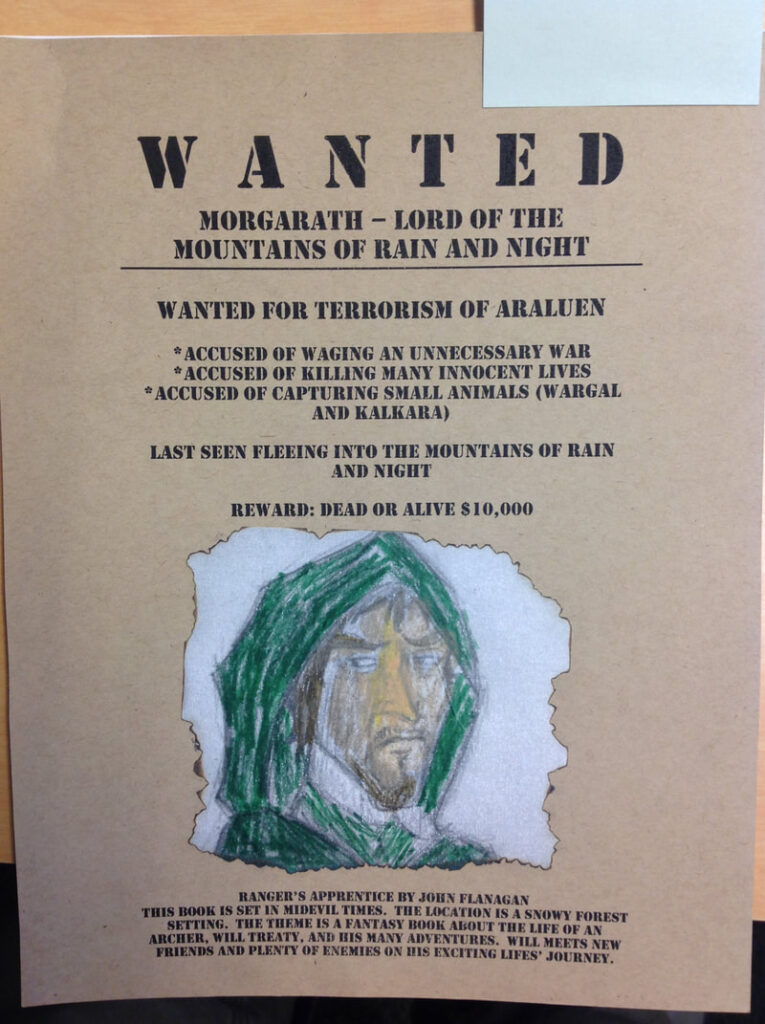
Make a “wanted” poster for one of the book’s main characters. Indicate whether they are wanted dead or alive. Include a picture of the character and a description of what the character is “wanted” for, three examples of the character showing this trait, and a detailed account of where the character was last seen.
42. Movie Version
If the book your students have read has been made into a movie, have them write a report about how the versions are alike and different. If the book has not been made into a movie, have them write a report telling how they would make it into a movie, using specific details from the book.
What creative book report ideas did we miss? Come share in our We Are Teachers HELPLINE group on Facebook.
Plus, check out the most popular kids’ books in every grade..

You Might Also Like

Expand Your Readers’ Palates With a Book Tasting
A perfect way for kids to nibble on a book. Continue Reading
Copyright © 2024. All rights reserved. 5335 Gate Parkway, Jacksonville, FL 32256
Please Sign In
Book Cover Essentials
Book Cover Essentials: How to Design the Dust Jacket Flaps
Knowing how to make the most out of the dust jacket flaps can help you create a beautiful, eye-catching cover that will draw in readers.

When it comes to making your book cover stand out, there are a few key elements that make a big difference. One of the most important is creating beautiful and engaging dust jacket flaps. Let’s explore what to put in these sections in order to make the perfect book cover.
Why Dust Jacket Flaps Are Important
Book covers serve a crucial role in grabbing a potential reader's attention and prompting them to pick up your book. However, there's more to a book's cover than just the front and back. The dust jacket flaps that frame the front and back covers also play an essential role in conveying important information to readers and enticing them to read more.
Dust jacket flaps provide an excellent opportunity to communicate your book's story and capture your reader's attention. While some readers may be content with a quick glance at the front cover, others want to know more about the author and the story before they decide to invest their time and money. That's why it's crucial to put as much thought into the dust jacket flaps as you would into the rest of your book cover design.
In essence, dust jacket flaps offer you the space to add vital details about your book that may not be communicated on the front or back cover. By creating a compelling and informative dust jacket flap, you increase the likelihood of drawing in curious readers who can potentially become your loyal fans and buyers.
Don't just view them as an extension of the cover but instead, recognize them as a significant part of your book's marketing potential. When you give your dust jacket flaps the attention they deserve, you open up opportunities for your book to gain traction and success in the competitive literary market.
What to Include on the Front Flap
The front flap of your book dust jacket is one of the most important elements of your cover design. It's the first thing readers see when they flip your book open, and it's crucial that you include the right information to grab their attention and entice them to buy your book.
So, what information should you include on the front flap of your dust jacket? Here are a few key things to consider, aside from the book title and author name:
- Brief Synopsis or Tagline Your front flap is a great place to give readers a sneak peek of what your book is about. Consider including a brief synopsis or tagline that summarizes the plot or themes of your book.
- Genre or Category It's helpful to let readers know what genre or category your book falls into, whether it's science fiction, romance, mystery, or something else. This will help readers who are browsing in a bookstore or online quickly determine if your book is something they're interested in.
- Cover Art or Design The design of the dust jacket flaps should be an extension of the outer covers of your books. They should match beautifully and look cohesive.
- Publisher Logo or Imprint If you're working with a traditional publisher, they may want to include their logo or imprint on the front flap to help with branding and marketing. If you're self-publishing, you can skip this step or include your own logo.
What to Include on the Back Flap
The back flap of your book’s dust jacket is an opportunity to provide additional information that can persuade potential readers to pick up your book. Here are a few essential pieces of information you may want to include:
- Summary of the Book One of the most important pieces of information you can include on the back flap is a brief summary of your book. This summary should capture the main themes, characters, and plot points in a concise and engaging way. Consider highlighting the most compelling aspect of your book or offer a hook that entices readers to delve into the story. You may skip this element if you think the summary on the back cover is more than enough.
- Author Bio and Photo Your author bio should be brief but informative, highlighting your accomplishments, credentials, and any other relevant information that can give readers an idea of your expertise and authority. You may also want to include a professional headshot or photo of yourself to put a face to your name.
- Endorsements and Reviews Positive endorsements and reviews from respected sources can be incredibly persuasive in encouraging readers to buy your book. If you have any blurbs from respected authors, experts, or reviewers, make sure to include them on the back flap. These endorsements can help validate the quality and appeal of your book to potential readers.
- Book Series Information If your book is part of a series, you should provide information about the other books in the series on the back flap. This can help readers understand the context of your book and give them an idea of what to expect from your other titles.
Why You Should Include Book Series Information on Dust Jacket Flaps
If your book is part of a series, the dust jacket flaps are an ideal place to include information about the series as a whole. This can be especially important for readers who are new to your series, as they may be unfamiliar with the previous books.
On the front flap, consider including a series logo or title, along with the book's number in the series. For example, if your book is the second in a series, you might include "Book Two of the XYZ Series" or simply "XYZ Series, Book Two."
On the back flap, you can include more detailed information about the series. This might include a brief synopsis of the first book or a summary of the overall story arc. You could also include blurbs from reviews or endorsements of the series as a whole.
If your book is part of a long-running series, you might also consider including a timeline or family tree to help readers keep track of the various characters and events. This can be especially helpful for readers who may have missed a book or two in the series.
By including information about your book series on the dust jacket flaps, you can help readers discover and enjoy your entire body of work. Just be sure to keep the information concise and easy to understand, so that new readers aren't overwhelmed or confused.
How to Design Eye-Catching Flaps
When it comes to designing the dust jacket flaps of your book, it's important to not only include essential information, but also make it visually appealing to potential readers. Here are some tips for designing eye-catching flaps:
- Keep it Simple Avoid cluttered or busy designs that can be overwhelming. You don’t have to include every element listed above; choose one or two and layout them professionally and cleanly. While you want your dust jacket flaps to stand out, it's important to keep the design simple and easy to read.
- Use High-Quality Images Whether it's a photograph, artwork, or graphic, be sure to use high-quality images on your dust jacket flaps. This will help grab the reader's attention and give them an idea of what your book is about. Again, keep the design complementary to the outer covers.
- Play with Color Experiment with different colors to create a visually appealing design. You can choose colors that match the book's cover or theme, or use bold colors to make the information pop.
- Use Fonts Wisely Choose fonts that are easy to read and match the style of your book cover. It's best to stick with 2-3 fonts at most to avoid a jumbled look.
- Add a Call-to-Action Encourage readers to purchase your book by adding a call-to-action on the dust jacket flaps. This can be as simple as "Available Now!" or "Get Your Copy Today!"
By following these design tips, you can create eye-catching dust jacket flaps that not only provide essential information, but also make your book stand out on the shelves.
More Resources
Self-Publishing Dos and Don'ts

How To Publish Your Book in Five Easy Steps

Overall, the front and back flap of your dust jacket should be clear, concise, and visually appealing. It's your chance to make a great first impression and get readers excited about flipping through your book.
Learn more about publishing your book your own way by downloading our free publishing guide.
Get Free Guide
Outlining and Drafting Your Story
Five Reasons Less is More When It Comes to Beating Writer’s Block
A Short History of Life Writing
Common Writing Mistakes You Should Avoid
Passing It On
The Dos and Don'ts of Writing the Author Bio of Your Self-Published Book
The Difficult Things: Writing About Pain, Grief, and Hardship
Writing About Your Life: Ideas To Help You Get Started
An Editor's Guide to Producing a Compelling Romance Novel
Why You Should Have a Professional Edit Your Work
Mastering the Art of Self-Editing: Essential Tips for Self-Published Authors
The Importance of Professional Editing: Elevating Your Self-Published Book
Unleashing Your Inner Author: Overcoming Writer's Block
The Do's and Don'ts of Self-Editing Your Manuscript
Finding Your Writing Voice: Developing a Unique Style
The Power of Storytelling: Crafting Engaging Narratives
Five Self-Publishing Do’s and Don’ts
The Benefits of Self-Publishing
The It’s a Team Effort: How Publishing With Us Works
Four Common Self-Publishing Roadblocks and How to Overcome Them
Five Tips for a Professional Cover Design
The Publishing Process
From Brainstorming to Publishing
A Beginner's Guide to Navigating Publishing Services
Book Cover Design: How to Make Your Book Stand Out
DIY Self-Publishing vs. Supported Self-Publishing: What's Right for You?
Self-Publishing a Book in 8 Steps
10 Autobiographies That Will Inspire You
Autobiography vs Memoir
Navigating The Top 8 Book Distributor Services: Pros and Cons
The Ultimate Guide to Self-Publishing
Demystifying Self-Publishing: How to Turn Your Book Dreams into Reality
Designing Eye-Catching Book Covers: A Guide for Self-Publishers
Self-Publishing vs. Traditional Publishing: Making an Informed Decision
Navigating the World of Print-on-Demand: A Primer for Self-Publishers
Distribution Options for Self-Published Authors: Reaching Your Target Audience
Self-Publishing on a Budget: Cost-Effective Tips for Authors
“Mind the gap”: Lessons Learned from Self-Published Authors
Setting Yourself Up for Success: 5 Essential Tips for Self-Publishing
Self-Publishing Platforms: 5 Things to Consider When Making Your Choice
Book Cover Design 101: Creating an Eye-Catching Book Cover
Book Cover Design: How “Founder's Syndrome” Impacts Your Success
From Blog to Book: Turning Your Online Content into a Publication
Overcoming Self-Doubt as a Self-Published Author: Boosting Confidence and Motivation
Precision Marketing: Define, Learn, and Create Your Target Audience
Build a Platform: Don’t Overlook Direct Sales
The Perfect Pitch: 5 Ways to Pitch Your Self-Published Book
Joining Book Festivals: 5 Ways To Maximize Your Appearance
10 Reasons Self-Published Authors Should Promote Their Books
10 Reasons Why Authors Should Still Send Press Releases
7 Reasons Why Self-Published Authors Should Go Print Too
A Beginner's Guide to Self-Publishing Success
Marketing Strategies for Self-Published Authors: Getting Your Book Noticed
8 Tips for Establishing Your Author Brand
Unleashing Your Book's Potential: Building Your Audience like a Startup
The Art of Writing Compelling Book Descriptions
Harnessing the Power of Social Media: Marketing Strategies for Self-Published Books
Want to Learn More?
Request your free publishing consultation below.
Fill our form to learn more about publishing with AuthorHouse
By clicking “Request My Free Consultation”, you are providing your electronic signature, voluntarily authorizing AuthorHouse and its affiliates to contact you using a manual or automated telephone dialing system and send you advertisement or telemarketing messages by email or text/SMS/MMS message to the address and phone number you have provided above. You are not required to agree to this in order to buy products or services from AuthorHouse. You certify that you are over the age of eighteen (18). You’ll get up to ten (10) messages per month. Standard message and data rates may apply. Click here to view our privacy policy .
Free Online Book Cover Maker
Create a professional book cover in a matter of minutes with Fotor’s book cover maker.
Effortlessly make your book stand out from the competition and get the attention it deserves.

Premade Book Cover Templates for All Genres
Don't judge a book by its cover, but when it comes to selecting and purchasing a book, the cover of the book still plays a significant role. Fortunately, Fotor's book cover creator makes it easy and fast to create eye-catching book cover designs. With an extensive library of premade, free book cover templates for all genres and styles, you’ll be able to find the right cover design for your book easily. No matter what type of book you’re working on- be it a science fiction book, a fantasy novel, a romance story, a recipe book or even a children’s book - you can find the appropriate book cover templates for your project. Browse the below book cover ideas for inspiration.

Book Cover Design Made Easy With Fotor
Fotor’s book cover maker is easy to use and packed with powerful features to make your book cover design process as stress-free as possible. With a few simple clicks, you can edit text, change book cover images and colors, resize and remove items, change layers, and more to customize the book cover template to fit your needs. No design experience is required. Freely change the book cover template in any way you want to bring your book to life.

Royalty-Free Images, Stickers and Fonts to Create Your Own Book Cover
Fotor is the only tool you need to create beautiful and unique book covers. You can choose from millions of royalty-free stock photos, illustrations, backgrounds and fonts for book cover, or upload your own images. Additionally, the automated background remover will allow you to effortlessly remove the background from your pictures and add them to your book cover design. Get creative and make your own book cover art now with Fotor’s book cover maker. It’s fast, easy and free!

Design eBook Covers and Printable Book Covers With Ease
Once you’re happy with your book cover design, you can easily download it in high-resolution format for print or use it as an eBook cover. You can also use the smart resizer tool to resize it for different uses in a single click. Effortlessly repurpose your book cover design and promote your book on social media, emails, and more. Take advantage of Fotor's book cover maker to create an eye-catching cover for your book and make it stand out.
How to Make a Book Cover?
- With Fotor's free online book cover maker, anyone can design a professional-looking book cover in just minutes. Firstly, go to fotor.com, click the “Create a design” button on the homepage and choose the “Book Cover” template layout.
- Browse or search by genres or keywords to find the right book cover template for you to get started.
- Insert your book name and any other text you want to include. Select book cover backgrounds and fonts, then play around with colors, layouts, typesets, and more to enhance your book cover design.
- When you’re satisfied with your book cover, click the "Download" button to export it as a high-resolution JPG, PNG, or PDF. Alternatively, click the "Share" button to share it online instantly.
Book Cover Design FAQs
What are some book cover design tips, what’s the best fonts for book covers, where i can get more book cover design ideas, how can i make a book cover for free, best free online book cover maker.
With designer-made, customizable book cover templates and easy-to-use online editing tools, designing the perfect book cover has never been easier. What are you waiting for? Get started with Fotor’s book cover maker today!
Explore More Design Tools on Fotor

Romance Novel Cover

How to Make Book Covers

Children's Book Cover

Recommended Blog Articles

6 Creative Book Cover Ideas: Templates & Inspirations

How to Design a Book Cover in 4 Easy Steps
6 Best AI Logo Generators for Designers & Businesses of 2024

10 The Most Inspiring Graphic Design Trends 2024: Stay Ahead in Creativity
- Home →
- Projects & Tutorials
- → How to Make a Fabric Book Cover (VIDEO) – Easy Book Jacket
 - Easy Book Jacket")
How to Make a Fabric Book Cover (VIDEO) – Easy Book Jacket
Give your favorite book or old Bible a makeover with my easy tutorial. I’ll show you how to make a fabric book cover to size in a matter of minutes! Every book lover knows how ugly things can get if you accidentally spill some coffee or tea onto the book you’re reading. In most cases, the book suffers catastrophic damage and that can be tough, especially if it’s one of your favorite novels. God knows I’ve lost my share of great books to critical coffee wounds.
There’s a way to prevent that though, a fun way indeed! Reusable fabric book covers!

They’ll keep your books safe from accidents, and give them that neat touch of class and style. Not only that, but you can use them to easily recognize some of the books that have been worn out over time!
Now get ready for action because you’re about to learn how to sew a fabric book jacket in just few minutes with this DIY fabric book cover tutorial of ours!

Below you will find my step by step written tutorial with VIDEO instructions for all the visual learners. I’ll show you how to measure your book and calculate the dimensions to make your own made-to-measure book jacket. You can use it for everything from a notebook, to dictionaries or your favorite books and Bibles.
We occasionally link to goods offered by vendors to help the reader find relevant products. Some of the links may be affiliate meaning we earn a small commission if an item is purchased.
Table of Contents
- 1 How to Make a Fabric Book Cover
- 2 Supplies and tools
- 3.1 Reusable Fabric Book Cover VIDEO TUTORIAL
- 3.2 FABRIC BOOK COVER INSTRUCTIONS:
- 3.3 STEP 1: Measure the book
- 3.4 STEP 2: Cut fabric
- 3.5 STEP 3: Make side pockets
- 3.6 STEP 4: Stitch side pockets
- 3.7 STEP 5: Pin and mark stitching line
- 3.8 STEP 6: Stitch down along the marked lines
- 3.9 STEP 7: Clip and turn around
- 3.10 STEP 8: Press
- 3.11 STEP 9: Insert the book, use and enjoy
- 3.12 STEP 10: Add ribbon bookmark (optional)
How to Make a Fabric Book Cover
Supplies and tools.

- outdoor decor fabric ( here , here or cotton fabric + interfacing)
- matching thread
- scissors (or rotary cutter and a cutting mat )
- ruler or measuring tape
- iron and ironing board
- sewing clips or pins
- sewing machine
How to Sew a Book Cover (Jacket)
Watch the diy fabric book cover video first and then follow the written step by step instructions below. Please enjoy and don’t forget to Like and SUBSCRIBE over on YouTube to be kept up to date with new videos as they come out.
Reusable Fabric Book Cover VIDEO TUTORIAL
FABRIC BOOK COVER INSTRUCTIONS:
Step 1: measure the book.
Take the book you want to make the fabric book cover for, and measure from the edge of the back cover to the edge of the front cover of the book. Add 8 inches (20cm) to that length.
Then measure from the top edge of the cover to the bottom edge of the cover. Add 2 inches (5cm) to this measurement.

Now go ahead and cut out the fabric in the size you just got.
STEP 2: Cut fabric
Cut your outdoor fabric according to the calculations above. In short:
- FABRIC WIDTH = book width + 8″ (20cm)
- FABRIC HEIGHT = book height + 2″ (5cm)
The dictionary I’m making this fabric book jacket for measures 15 x 9 inches (38 x 23)
My fabric piece measures 23 x 11″ (58 x 28)

STEP 3: Make side pockets
Put the fabric onto your workspace with its right side facing down. Fold the ends of the shorter edges inward about a 1/4 inch (6mm), and press flat with your iron. Pin in place if the fold do not hold.

STEP 4: Stitch side pockets
Sew the folds in place on both sides with your sewing machine. Backstitch at the beginning and the end of each seam. Those seams need to be durable.

STEP 5: Pin and mark stitching line
Take the book you want to make the fabric book covers for. Spread the fabric so that the shorter edges are on the sides and place the open book onto it, with its covers facing downward. Center the book on the fabric so that there are about 4 inches (10cm) of extra fabric on each side.
Fold the excess fabric over the book covers, close the book and pin the folds in place. Don’t make it too tight or too loose, try to find the middle.

Open the book up and mark the fabric about an eighth of an inch (3mm) away from the top and bottom edges next to the corners of the book. You need the markings on the folded sections only, they don’t need to be longer than that. Sew along those marks to make the pockets for the book cover.
STEP 6: Stitch down along the marked lines
Again, backstitch at both ends of the seam to reinforce it.

STEP 7: Clip and turn around
Clip all four corners of the cover with scissors to reduce bulk. Turn the entire cover inside-out and push out the corners with the back of a pen or a chopstick.
STEP 8: Press
Press the cover flat with your iron.
Fold the upper edge to the line where you made the seam on the pockets. Use your iron to press the folded section and keep it in place. Stitch along that fold. Repeat the same process with the bottom edge of the cover.

STEP 9: Insert the book, use and enjoy
Carefully slip the book covers inside the pockets of the fabric book cover. Make sure whether the book fits nicely.
Your new fabric book cover is now finished and ready for those long reading sessions!
STEP 10: Add ribbon bookmark (optional)
Stitch a ribbon to the upper right edge of your book cover to add a bookmark. It’s sew cute!
Of course, you can stitch a separate denim bookmark . It’s up to you – either way will work

OPTIONS: Cotton and interfacing alternative
I’ve mentioned this before, but you can use cotton fabric and interfacing instead of outdoor décor fabric if you want to.
Since the fabric book cover needs to be waterproof, you’ll need to apply the interfacing to the cotton after Step 2 of our tutorial. Other than that, the process is the same, so you can just follow the tutorial regularly.
NOTE: This is a fixed width cover, but you can easily make it adjustable if you add a flat elastic at the back and leave the right side edge unsewn and stitch the top and bottom seam allowances down.
What do you think about our How to make a fabric book cover tutorial? I hope it can help you solve your book safety problems! Now that you know how to sew a book cover, you can go ahead and make one for all your favorite books. You can also make a few for your friends who love to read, they’ll love the gift! Have fun enjoying your novels with no worries about their safety!
Do you like this fabric book cover and jacket? Pin for later:

Wanna be friends? Click HERE and follow me on Pinterest
RELATED SEWING PROJECTS FOR READERS:
- Book pillow pattern – to help you (or the kids) read longer in bed
- 2-in-1 Ebook pillow and DIY mobile stand – if you prefer e-books over paper books, this handy pillow stand holds e-books up to 7”
- Denim fabric bookmark – great little gift that even kids can sew
- Eyeglass case pattern
- 5.5K shares
Related Posts
How to Make T-shirt Yarn Using the Entire Shirt in a Continuous Strand
How to Finish Zipper Ends – Three Easy Methods [VIDEO]
How to Make Stylish Bow Headbands for Any Age! [from Babies to Adults]
How to Sew a Sanitary Pad Pouch [Step by Step VIDEO]
Hello, this is one of my favorites for Encouraging Hearts and Home, this week! I hope you stop by and say hello, this post has been pinned! Thank you for being a part of Encouraging Hearts and Home, we appreciate all that you share. Have a great week ahead!
Leave a reply:
Save my name, email, and website in this browser for the next time I comment.
Nice idea, and I think the fabric you chose is beautiful!
Thank you fir sharing your pattern at the Homestead Blog Hop this week!
Blessings! Laurie ☘️
*for, not “fir”. I’m country but not THAT country! ?
Lol, I spend few minutes trying to find and correct *my* mistake. I’m still bleary-eyed and stumbling about with feet dragging. I think I need more coffee 🙂
This is great, I can’t wait to give this a try! I have loads of books I want to look after and making a cover seems the perfect way!
I have a number of treasured old books that would benefit from protective covers and these are beautiful. Thank you for sharing this project and for being a part of the Hearth and Soul Link Party Community. I’m featuring this post at the party this week. Hope to ‘see’ you there! Take care, stay well, and I wish you a wonderful week!
Thank you so much April. It’s lovely to hear you liked them.
What a wonderful idea! I love the thought of a bookcase filled with beautifully fabric covered books! I do cover some of my books for various reasons but I usually just use paper. The fabric is a brilliant twist. Thanks for sharing and linking with me!
Shelbee http://www.shelbeeontheedge.com
I love the idea of using fabric to cover the book. I have used wall paper, but fabric is a new one for me. Excellent idea. Thank you for sharing with us at Meraki Link Party. Have a wonderful week. Much love Naush
Love your fabric choice, and what a great idea – thanks for sharing with #PoCoLo
These are great instructions and your cover is beautiful!
I’m going to make a few for paperbacks that I will be reading at airports and on planes on my next trip. I’d rather not have people know what I’m reading. The books aren’t “bad”, I’m just a private person, lol!
Leave a Reply:
Make Book Jacket 6
The best & easiest way to make book jackets in adobe indesign.

After completing your purchase, click the link on PayPal’s confirmation page to return to this site and download the software. An email with a download link will also be sent immediately.
Secure transactions by PayPal. You do not need a PayPal account.
Want to pay by check or invoice? Email dan(at)danrodney(dot)com
The download is free, but donations are appreciated.
Your donation will make us both feel warm and fuzzy, and thank me for the hours I spent creating something that saves you time.
If you purchased an older version, you can upgrade to version 6. Enter Upgrade Code to Proceed:
I’ll be emailing codes to existing users soon, but if you would like one right away, email dan(at)danrodney(dot)com
Used by Major Publishers & Individuals Alike
Easy to use.
Just type in your sizes and click OK. It can’t get any easier. Let Make Book Jacket do all the error prone steps for you, perfectly. I’ve worked in a book design studio. I know that laying out book jackets is tedious. That’s why I made this! Used by many of the top publishers in the world, Make Book Jacket is the gold standard in creating jackets and covers.
Change Spine Thickness & More
Jackets are often created before the spine thickness is known. No problem, files made with Make Book Jacket be edited and you can change any size (spine, cover, flaps, etc.) whenever you need to.
Export the Front Cover, Back Cover, or Spine
Covers often need to be used separately—for marketing materials, eBook covers, etc. It's super easy to crop the front cover, back cover, or spine and export it as a PDF, JPEG (or any other export format InDesign supports). You can even turn them cover into a separate InDesign file for further customization, which is great for eBooks and more!
Preview Mode for Jackets
Looking at a jacket, you see all parts at once, unlike the way readers see it on a shelf. They see only one part, such as the cover or spine. With one click of a preview layer, you see just the specific part you want (cover, spine, etc)! Once you use it, you won’t be able to design without it.
Native Look & Feel
Make Book Jacket adds a Jacket menu to InDesign with all the options. It’s super easy to use and feels like a feature that was meant to be built into InDesign.
Requires Adobe InDesign for Mac or PC
Make Book Jacket works inside of InDesign CS4 or later (tested through InDesign 2022).
If you do not use Adobe InDesign, Make Book Jacket is not the solution for you.
The interface is written in English, but it works in other languages (German, Spanish, French, Italian, & Dutch). If it doesn’t work in another language, let me know and I’ll add support for it!
People Love Make Book Jacket
This is perfect for my type of work, it will save me so much time. I’ve set up hundreds of book jacket mechanicals from scratch over the years and now it can be done in seconds and done more precisely.
Becky Terhune, Art Director, Scholastic
This is the best $19 I have ever spent, it’s a timesaver beyond belief. Thanks.
David Eldridge, Two Associates
Great! It saved me a ton of time—totally worth $19.
Michelle K.
It worked perfectly. You made my life a lot easier this weekend, it’s an amazing good value.
Louie Fasciolo, Shapero Rare Books
I’m a partner in one of Australia’s premier book design agencies. Make Book Jacket is just fantastic—I’d been looking for something like this for some time and had assumed I’d have to make it myself but never got around to it. As far I’m concerned, it’s paid its purchase price from the very first use. Thanks again.
Sam Chapman, Creative Director
For bulk purchases, email dan(at)danrodney(dot)com
Book Jacket: How to Create the Perfect Nonfiction Jacket
by Harry Wallett
Are you ready to take your hardcover jacket design to the next level? Are you a writer who likes to stand out from the crowd? If so, creating the perfect book jacket is an essential part of your success.
Since book jackets must work hard to attract attention in bookstores, it’s important to understand what a book jacket is, its purpose and how it can be used as an effective marketing tool for nonfiction hardcovers.
In this blog post, we’ll explore what makes a great book jacket, how to create one and why it matters.
Let’s dive in!
What’s the Difference Between a Book Jacket and a Book Cover?
A book cover and a book jacket are not actually the same thing. Book covers are typically designed with durable cardboard and are glued to the book at the spine. They consist of three parts, the front cover, the spine and the back cover.
On the other hand, book jackets are generally designed with paper or light cardstock and consist of an unglued wraparound sheet with five distinct parts: the font cover, the spine, the back cover, the front flap and the back flap.
While the front cover, back cover and spine can fit about the same marketing information on both items, the book jacket has a lot more marketing real estate to offer via the front and back cover flaps.
You can use this added space for branding elements like photographs, images, logos etc. as well as testimonials, an about the author section, and a marketing blurb about the book.
In short, book jackets offer far more room for creative design ideas that can help make your hardcover fiction stand out from other titles on the shelf.
With that in mind…
What Are the Elements of a Nonfiction Book Jacket?
When creating a nonfiction jacket for your publication there are 7 key elements you need to consider. Below, we’ll look at each element individually with some examples:
Title/Subtitle
The title — along with any subtitles — should be prominently displayed on the front cover and the spine of your book jacket, and they should use the largest font size in your entire design. Your goal is to make your title highly legible to catch the attention of passers by.
For example, Tony Wagner’s bestseller ‘Creating Innovators: The Making of Young People Who Will Change the World’ features a white oversized bold typeface on top of a school blackboard, which tells readers right away they’re looking at an educational book.

Author Name
On most nonfiction books, authors will feature their full name or their initials and last name on the front cover and spine as well, but not as prominently as the book’s title.
Typically, the font used for the author’s name will be sized in accordance to their level of fame and recognition. So, a popular author like Deepak Chopra will have their name in an oversize font, rivaling the title’s and often even placed above the title itself.
But authors who are not a household name yet will be better off choosing a font at least half the size of the title font so as not to upstage it.
Note: neither the title nor the author’s name are displayed on the back cover (except in rare exceptions.)
Testimonials/Reviews
When it comes to testimonials and reviews, you want to reserve your most important ones for your book jacket, and you want to fill your entire back cover with them.
Some nonfiction books may even place a single review right on the front cover, either top or bottom (typically their most influential.)
The number of testimonials and reviews you can fit on the back of your book will depend on the size of your hardcover and the length of the testimonials.
For example, if your book is a 6 x 9, you’ll be able to comfortably fit 7-8 short testimonials, or 4 long ones and still leave space for your barcode, ISBN, and other marketing information.
Any additional testimonials should be placed inside your book ahead of the title page — in other words, you want them to appear on the first page readers will see as they open your book.)

About the Author
Your author bio should be included in one of the book flaps, preferably the back-cover flap.
This section should include a flattering headshot, or shoulders up photo in high resolution. You want this photo to be preferably taken by a professional photographer using a suitable background that fits your cover’s color palette.
Below your author photo, you should include a short bio, including your credentials, what you do for a living (e.g. doctor, psychologist, marketing consultant, director of a nonprofit, company executive, etc.), mention of other books you’ve written, and ways for readers to learn more about you — e.g. your author’s website, twitter handle, etc.
Make sure your bio is written in the third person and to always give proper credit and copyright attribution for your author photo.
About the Book
Every nonfiction book needs a summary teaser section to entice potential buyers into picking it up and taking it straight to the cash register.
The goal of the about-the-book section is to reel in readers into your main thesis, showing readers what they stand to gain from reading your book without revealing any of your “secret sauce.”
Your goal is to create intrigue through your teaser that can only be resolved by purchasing and reading your book.
Many about-the-book sections are preceeded by a sentence in a large font that presents an introduction to the main premise of the book.
Here’s an example from ‘Creating Innovators:’

This section must not be taken for granted and needs to be crafted with a lot of care and attention, ideally by a professional copywriter, in order to truly capture the essence of your book so you can hook your reader right from the jacket.
Illustration/Images
While words hold power, visuals amplify it. Your main illustration is reserved for the front cover of your jacket and it must capture the essence of your book.
Ideally, you want the main image to complement your title and not compete with it. Also, your title image needs to be printed in the highest possible resolution so that your book jacket has a professional feel.
Any type of blemishes, unintentional blurriness or pixelation will make your cover, and by extension your book, appear amateurish.
Your cover image should also be composed in a way that seamlessly integrates into your jacket’s color palette.
Your overall goal with your illustration/title combo is to help create an atmosphere that draws readers into your story before they even pick up the book.
Publisher/Product Information
The final bit that’s necessary to complete your book jacket is information about your publisher and product information.
Publisher information typically includes the name and logo of your traditional publisher (e.g. HarperCollins) or your own name and logo, if you choose to self-publish your book.
These two pieces of information are typically placed at the bottom of the spine, below the book’s title and author’s name, and also at the bottom of one of the inside flaps, typically the back-cover flap, where you can also add the publisher’s website address.

Product information must be placed at the bottom of the back cover and needs to include:
- A book barcode (called a Bookland EAN or EAN-13) used by retailers to laser scan the product into their point-of-sale systems.
- Your book ISBN (International Standard Book Number)
- The book price (typically shown as an extension of the barcode)
The above information needs to be printed in black ink and must be encased in a white background so that scanners can get the required contrast to read it independent of your jacket’s color scheme.

Overall Book Jacket Design
When these seven elements come together, they form a complete book jacket design that’s primed for sales.
A book jacket is like a colorful billboard wrapped around your hardcover edition, and as such it must be designed to be memorable so potential readers can give you a second look when catching a glimpse of your book on a table or a shelf.
Ultimately, it all comes down to your overall cover design — how it manages to combine typeface, images and text into one coherent visual statement can make a huge difference on whether your book will succeed or fail in the marketplace.
All books are judged by their covers and a well-executed book jacket will play a key role in making your hardcover stand out from the crowd.
In conclusion
Creating a perfect nonfiction jacket isn’t an easy task and should not be taken lightly. Every element has its own purpose and needs to be combined in harmony to create a book jacket that’ll draw attention in bookstores, library shelves and readers’ hands.
When done correctly, book jackets become like billboards for authors, attracting readers to explore what lies within.
To ensure your book jacket is successful, it’s important to take the time to carefully stitch together all the pieces and not rush the process — this is the first thing potential readers will see when they discover your book and you want to make 100% sure it’s not the last!

Harry Wallett is the Managing Director of Cascadia Author Services. He has a decade of experience as the Founder and Managing Director of Relay Publishing, which has sold over 3 million copies of books in all genres for its authors, and looks after a team of 50+ industry professionals working across the world.
Harry is inspired by the process of book creation and is passionate about the stories and characters behind the prose. He loves working with the writers and has shepherded 1000s of titles to publication over the years. He knows first-hand what it takes to not only create an unputdownable book, but also how to get it into the hands of the right readers for success.
Books are still one of the most powerful mediums to communicate ideas and establish indisputable authority in a field, boosting your reach and stature. But publishing isn’t a quick and easy process—nor should it be, or everyone would do it!
A professional grade book takes 250+ individual tasks to complete. Cascadia is an expert in every single one of them. Do you want to harness our expertise to launch your book into the stratosphere? Chat with us !
Leave a Reply Cancel reply
Your email address will not be published. Required fields are marked *
Save my name, email, and website in this browser for the next time I comment.

Same Cascadia, New Management!

The Inevitable Journey of Ghazanfar Iqbal: Expatriate, Entrepreneur, and Author

Publishing for Peace: Author Ben JS Maure Inspires Canadian Peacekeepers

Unleashing Literary Flames: Award-Winning Author TK Riggins Keeps Readers Coming Back for More with 7-Book Series
Get our free definitive guide to creating a nonfiction bestseller here.
- Real Estate
Book Jacket Book Report
- Paper Templates
- Book Template
- Book Report Template
Download Book Jacket Book Report
Linked topics.
Related Documents
- Sixth Grade Book Report Form
- Science Fiction Book Report Template
- Mystery/Suspense Book Report Template
- High School Book Report Template
- Cereal Box Book Report Template
- Black History Cereal Box Book Report
- Diorama Book Report Template
- Tissue Box Book Report Template
- Paper Bag Book Report
- Bloom Ball Novel Book Report Template
- 4th Grade Book Report Template
- Second Grade Book Report Template
- Fourth Grade Book Report Template: Fiction
- Non-fiction Book Report Rubric
- Book Jacket Book Report Template - Varicolored
- Book Jacket Book Report Template - Black and White
- Cereal Box Book Report Template - With Picture
- Cereal Box Book Report Template - Without Picture
- Ar Book Report Form Template - Accelerated Reader
- Cereal Box Book Report Templates - Table
- Convert Word to PDF
- Convert Excel to PDF
- Convert PNG to PDF
- Convert GIF to PDF
- Convert TIFF to PDF
- Convert PowerPoint to PDF
- Convert JPG to PDF
- Convert PDF to JPG
- Convert PDF to PNG
- Convert PDF to GIF
- Convert PDF to TIFF
- Compress PDF
- Rearrange PDF Pages
- Make PDF Searchable
- Privacy Policy
- Terms Of Service
Legal Disclaimer: The information provided on TemplateRoller.com is for general and educational purposes only and is not a substitute for professional advice. All information is provided in good faith, however, we make no representation or warranty of any kind regarding its accuracy, validity, reliability, or completeness. Consult with the appropriate professionals before taking any legal action. TemplateRoller.com will not be liable for loss or damage of any kind incurred as a result of using the information provided on the site.
Want to get more organized and stop feeling overwhelmed? Get our FREE Guide, The 30-Minute Organizing Secret.
DIY Book Cover No-Sew Fabric Book Jacket
THIS POST MAY CONTAIN AFFILIATE LINKS. PLEASE S EE OUR FULL DISCLOSURE POLICY FOR DETAILS .
Make an adorable DIY book cover with fabric scraps in matching colors to add a quick no-sew fabric book jacket to your library collection.
I’m Keri from One Mama’s Daily Drama, back with another easy craft idea! This DIY book cover is about to be your favorite easy craft because you need just a few supplies and no sewing skills. You’ll be making a whole library of book jackets this afternoon.

Making your own fabric book cover is an easy way to change the way a book looks without damaging it. I’m very protective of the books I purchase, but I also get a lot of them secondhand.
You might want to make a DIY book cover to protect some of your favorite books. Or maybe you bought a great novel, but the cover it already damaged. And of course, if you use books in your home decor this is an easy way to make them all match.
This DIY book cover technique probably isn’t sturdy enough for school textbooks that get tossed in a backpack every day, but it would be perfect for a small notebook or journal.
How to Make a DIY Book Cover
For this craft I chose fat quarters from my fabric stash. You can purchase fabric in a variety of colors and patterns to fit your style.
What you need:
Want more ideas like this? Subscribe today to get our weekly Ideas in Your Inbox newsletter plus other exclusive gifts and offers — all for FREE!
Craft Tools:
- Iron and ironing board
- Spray starch
- Super glue (optional)

DIY Book Cover Craft Tips:
How can i make my book cover neatly.
The best way to make sure that your finished book cover is smooth and neat looking is to iron it before cutting. You may need to use steam for stubborn lines, so make sure you give it time to dry before crafting too.
What material should I use for a book cover?
I chose cotton fabric (fat quarters) for mine. You can also use synthetic fabric, like polyester. Felt, thin leather, and other textured materials look great.
How can I make a padded fabric book cover?
For large children’s books, a padded cover makes it a bit more comfortable on the lap. You can purchase pre-quilted fabric , but some varieties may be too thick to hold their shape well.
How can I keep fabric from fraying?
Heavy starch does a good job of keeping most fabric from fraying too much. If you find that it is still fraying more than you like, run a small amount of fray check along all the cut edges.

Where can I iron without an ironing board?
If you have an iron but not the space for an ironing board , there are probably a few other places in your house that are heat-safe. Do not iron on vinyl, laminate or wood, as the heat can cause damage. Granite and marble (like counters), tile (floors), and metal (the washer/dryer) are the best options. Put a towel or other fabric down for extra protection.
How do I keep a fabric book cover from sliding around?
The more starch you use, the stiffer the finished book cover will be. You can also use superglue for a very permanent hold. Use a dab of superglue along the seams where fabric is against fabric for a more secure hold. Be sure to remove the book before gluing, as super glue is permanent and will damage your book!

DIY Book Cover
- 1 Pair of scissors
- 1 iron and ironing board
- 1 piece fabric measurements depend on book size
- 1 can heavy spray starch
- 1 bottle super glue optional
Instructions

Love the ideas you see here on Ideas for the Home by Kenarry®? Subscribe today to get our weekly Ideas in Your Inbox newsletter plus other exclusive gifts and offers — all for FREE!

What’s Next?
If you enjoyed this DIY book cover then you’ll enjoy these crafts for book lovers too.
Printable Bookplates

Printable Reading Journal Pages

Kawaii Corner Bookmark Printables

You may also enjoy these no-sew craft ideas on Ideas for the Home by Kenarry® –
- Make A No-Sew Burlap Pillow Wrap Using Burlap Ribbon
- No-Sew Fabric Lined Storage Baskets
- Mason Jar Tissue Holder – No-Sew Home Decor

Keri is a writer, graphic designer, wife and mom of two from Texas. She began One Mama's Daily Drama when her teens were little as a way to help parents navigate the chaos of family life. She is passionate about planning, organizing and helping other parents find practical solutions to everyday challenges.
As an independent contractor, Keri also serves as our graphic designer creating images for both Ideas for the Home by Kenarry and Clutter Keeper, our home organization blog.
Keri has been sharing her great ideas on Ideas for the Home by Kenarry® since October 2018. Follow Keri on Facebook , Pinterest , Instagram and Twitter .
Similar Posts

Personalized Flour Sack Towel: HTV Project

How To Make Shower Steamers

Scrapbooking: Six Great Reasons to Go Digital

Airplane Valentine’s Day Cards for Kids: Free Printable

How To Make Beautiful Seashell Goat’s Milk Soap

Recycled Crafts: How To Emboss Aluminum
Leave a reply cancel reply.
Your email address will not be published. Required fields are marked *
Review Cart
No products in the cart.

Rate This Recipe
Book Jacket Book Report

For this book report, you will create a book jacket that tells about the book you have just read. Follow the directions below to complete the jacket and present it to the class by the first day of school: Monday, August 16th. Take pride in your work. Use your best penmanship, add color and pictures, edit for spelling and grammar errors, and pay particular attention to your word choice. Neatness counts!
CONSTRUCTING THE BOOK JACKET:
You will need a two foot long piece of poster paper which you can get inexpensively at any craft store or teacher supply store.
1. From the left side, measure in 4 inches, then 11 inches, then 13 inches, and then 20 inches. 2. Lightly draw vertical lines at each spot you measured. Then the paper can be folded inward along the lines. Check with the diagram below.
#1 #2 #3 #4 #5
7 2 77” 4”4 11” 4”4 7” 2
24” 3. On the front, number each panel, beginning at the left with one and proceed across to five. See the diagram above. 4. Turn the paper over and continue numbering from the left with six and end with 10. See the diagram below.
#6 #7 #8 #9 #10
4” 7” 2 7” 4” 11”
24” 5. Follow the directions on the back of this page for the information to put on each panel. What Goes Where? Putting It All Together!
Front Cover/Panel 4: This is the front cover. In this section you need the title, author’s name, your name, the date and an interesting picture that you think “fits” the story of the book.
Summary/Panels 5 & 6: This is the front flap. Write a two or three paragraph summary of the book that highlights the beginning, middle, and end of the book. Remember, the summary states the facts, not what you thought about the book.
Main Ideas/Panel 7: This is the inside front. Write a short, complete sentence describing the main idea for each chapter of the book. There are a lot of chapters, but I know you can do it!
Main Character/Panel 8: This is the inside spine. Use creative lettering to write the name of the main character, Salamanca Tree Hiddle. Use a thesaurus to find five adjectives that describe her. These adjectives should be words that you do not use in your everyday vocabulary. For example, don’t use words like nice, happy, or pretty to describe the character.
Problems and Solutions/Panel 9: This is the inside back. Use this panel to illustrate, comic book style, three problems the characters faced in the story. Give each picture a one-sentence caption.
Vocabulary/Panel 10: This is the inside back flap. As you read your book, look up words you don’t know. List ten new words alphabetically and their definitions. Make sure you use a definition that makes sense to you.
Author’s Notes/Panel 1: This is the back flap. On this flap, write a short biography about yourself. Yes, about you! Include a self-portrait or a snapshot of you.
Back Cover/Panel 2: This is the back cover. You should write a response to the book here. It will be your review of the book. It should include your rating of the book and why. Use a scale of 1-10 with 10 being the highest score.
Spine/Panel 3: This is the outer spine of the book cover . Use creative lettering for the title with publisher’s name at the bottom. Egads! How Will Ms. Sutton Grade My Project? I’m Glad You Asked! Book Jacket Report Rubric: 100 Points
English 6 Your Name: 10 8 6 4 2 The cover of your book jacket includes your name, the author’s name, and the book’s title. The illustration is creatively designed and relates to the book’s theme. The spine of your book jacket includes the title of the novel and the publisher. The title is written in creative lettering. Spelling, grammar, and punctuation are correct. The name of the main character is written in nice lettering and five vivid words describe the main character. Five new words are listed alphabetically and defined. You have included a complete sentence for each chapter, describing the main idea of that chapter in a well-written summary sentence. The summary includes two or three complete paragraphs that highlight the beginning, middle, and end of the story. You include only the facts from the story. You do not include your personal opinion. Your personal response to the story is written in a well-developed paragraph. You tell why you liked or disliked the book, and you support your response with examples from the book. Your response focuses on the main character, or the setting, or the plot. The author’s notes include either a photo of yourself or a self-portrait. Your biography is written in a complete, well-developed paragraph. The overall presentation is creative and well organized. You have written neatly in cursive, using your best handwriting.

Home » Printing » How to print your book: a guide for self-publishers

Essential elements that go into printing a book
You must check several boxes before submitting your work for printing. Preparing your manuscript, choosing your binding and paper type, and navigating printing costs are all necessary steps in turning your book into a tangible finished product. This section dives into the essential elements of printing a book, helping to ensure a frictionless journey across the final self-publishing line.
1. Manuscript: preparing for print
A critical step in pre-printing is ensuring your manuscript is properly prepared and formatted for production. Pay attention to your margins, font selection, page numbers, headers, and footers. Here’s how.
- Margins : Adequate margins ensure your text doesn’t get too close to the edge of the page, which prevents content from being cut off during printing and binding.
- Font selection : Choose a legible font that suits the genre and style of your book. If you publish an ebook, stick to standard fonts to ensure compatibility across different reading devices.
- Page numbers : Include page numbers consistently throughout your manuscript for seamless navigation.
- Headers and footers : Add headers with the book’s title and chapter names for easy reference.
While polishing your manuscript, consider investing in developmental editing services before getting into layout and print. A developmental editor will help you improve your book’s structure, content, and style before publication. Catching narrative inconsistencies and stylistic challenges early can pay dividends in the long run.
2. Professional editing and design
The quality and readability of your book’s content are pivotal to its success. While you can do a lot independently, recruiting support in this area makes sense for many self-published creators.
It’s no secret that it’s difficult to catch typos in your own writing . Psychologists call this generalization—the mind’s default mechanism to store information and understand meaning rather than technicality. So, hiring a professional editor is invaluable in ensuring your book is free from errors, typos, and grammatical mistakes. Undoubtedly, a well-edited book elevates your credibility as a self-publisher.
In addition to editing help for your copy, photos, and other content, consider a book designer. Investing in professional book design can elevate your book’s marketability and curb appeal. Designing a captivating book cover can distinguish your book on the shelves and capture potential readers. And an organized, aesthetically pleasing interior layout creates an enjoyable reading experience.
In short, don’t skimp on proper book editing and design. You put a lot of time, energy, and resources into creating your book. Maximize your investment by ensuring your book looks and reads like a future bestseller.
3. Paper and binding options
Your choice of paper and binding significantly impacts the look and feel of your final book. With visually oriented books, like photo books, opting for quality is key. But for literary novels with hundreds of pages, efficiency is more of a factor. When weighing these options, consider the following.
- Paper weight : Different paper weights affect the thickness and durability of your book. A heavier paper adds substance and longevity, while a lighter paper is better for portability and affordability.
- Paper color and finish : Paper color and finish contribute to the overall aesthetics of your book. Choose between white, cream, or colored paper, and test out matte or glossy finishes. If your printing service offers a proof or swatch kit, try printing your photo book on different paper so you can see how your images show up on each type.
- Binding options : There are many options, including perfect binding, spiral binding, and hardcover binding. Each has unique advantages, with perfect binding being cost-effective, spiral binding providing flexibility, and hardcover offering durability and a premium look.
Some printing services offer swatch kits , allowing you to experience different paper types and finishes before deciding. Spend time figuring out which materials work best with your book vision and budget.
4. Cover options: paperback versus hardcover
The front cover is your book’s first impression, so choosing the right type is vital. If you’re unsure which book option is best , let’s explore both in detail.
- Paperback : Paperback covers are flexible, lightweight, and cost-effective. They are perfect for novels, zines, and serialized books with frequent updates or revisions. However, they’re less durable than hardcovers.
- Hardcover : Hardcover books exude a premium feel and durability, making them ideal for special editions, coffee table books , and books with a longer shelf life. However, hardcovers are typically more expensive to produce.
Consider your book’s genre, target audience, and budget when choosing between a paperback and hardcover. Or, best yet, offer both and let your fans decide!

5. Typeface: choosing the right font
Selecting the right typeface is essential for the book’s cover and interior. Typography complements your book’s design, helps set the tone, and enhances readability. But choosing the right font is not always easy. Here’s what to think about when picking.
- Prioritize readability. Clear and legible fonts are integral to any book design. After all, what is a book’s point if a reader can’t make out the photos, captions, or text?
- Match the font to your book’s genre and tone. The right font can immediately create a cohesive and immersive reading experience.
- Maintain consistency. Avoid using too many fonts; limit your selection to two or three for a cohesive design.
- Experiment with font sizes and line spacing. Play around to strike the right balance between readability and aesthetics.
- Seek feedback. Gather opinions on the font’s readability and appeal from mentors and trusted advisors.
- Consider san-serif and serif. Sans-serif fonts are usually best for contemporary genres, while serif fonts are great for classic or historical genres.
Remember that simplicity and legibility often trump decorative or overly stylized fonts.
6. ISBN and barcode: the essentials for distribution
An International Standard Book Number (ISBN) is a unique identifier that distinguishes your book from others in the market. It is essential for sales, distribution, and libraries. You can obtain an ISBN from your country’s ISBN agency or through self-publishing platforms. Blurb issues ISBNs for free * with any book created using BookWright , our Adobe InDesign plugin, or our PDF to Book uploader tool.
Barcodes are also crucial for retail distribution. They encode the ISBN and facilitate accurate scanning at bookstores. Many printing services provide barcodes and ISBNs or offer guidance on obtaining them.
*Before you can set your book up for sale with Blurb and distribute through the Blurb Bookstore, Amazon, or Ingram Global Retail Network, you must first purchase a copy of it. Purchasing a physical copy will allow you to see and touch your book while also being able to check and correct errors before making it available for others to purchase.

7. Proofing: ensuring perfection
Before proceeding with the entire print run, request a physical proof copy of your book. Many printing services offer this option, which allows you to review your final product and catch any remaining errors, layout issues, or formatting glitches. A proof copy is a great way to comb through your book and ensure it’s ready before giving the green light to initiate a complete print run.
You may also want to get a second set of eyes and recruit the services of a professional proofreader or copy editor. Hiring a professional editor can be invaluable for several reasons:
- Unbiased evaluation : Professionals provide an impartial review, catching errors you might miss due to familiarity with the content.
- Language expertise : Editors enhance grammar, punctuation, and clarity, elevating readability and flow.
- Consistency and style : Editors ensure consistent spelling, capitalization, and punctuation, maintaining a cohesive writing style.
- Enhanced content : Editors can suggest revisions to strengthen the book’s content and message.
- Visual elements : Proofreaders verify accuracy in images, captions, and tables, ensuring correct placement and labeling.
- Catching last-minute errors : Professional editors find those last-minute mistakes that may have slipped through multiple self-edits.
- Saving time and effort : Hiring a professional frees up time for other aspects of publishing, helping you focus on what you do best.
8. Cost considerations
Printing costs are a significant aspect of self-publishing, and there’s much to be mindful of. Here’s where to start.
- Setup costs : Offset printing may involve upfront setup expenses, like creating printing plates or molds for your book. These costs are more significant for offset printing than print-on-demand, where setup fees are minimal or nonexistent.
- Per-copy costs : The per-unit cost of printing each book varies based on print quantity, trim size, paper type, and binding options. Bulk printing with offset may reduce the per-copy cost, making it cost-effective for higher print quantities.
- Shipping : If you’re distributing physical copies of your book, you must consider shipping costs. The printing facility’s location and the book’s destination influence shipping expenses.
- Additional charges : Depending on your requirements, there may be additional charges for services like rush printing, special finishes, or customizations.
To keep costs manageable without compromising quality, consider these cost-saving strategies.
- Print-on-demand is cost-efficient for creators with uncertain demand or those testing the market. It eliminates the need for significant upfront investments and inventory storage.
- Digital printing is more economical for short print runs, as it eliminates setup costs associated with offset printing.
- Opt for a standard trim size for your book to avoid additional trimming costs during production.
- Bulk printing with offset may be cost-effective due to reduced per-unit costs if you anticipate high demand.
- Invest in self-promotion and marketing to increase book sales—it takes money to make money, as they say.
By grasping all the costs involved in self-publishing and implementing relevant cost-saving strategies, you can effectively budget your book printing expenses accordingly and price your product with an adequate profit margin.
Print your book with Blurb
We’re Blurb, a print-on-demand service built by and for indie self-publishers. Our easy-to-use bookmaking software tools, array of customization options, and convenient print and distribution capabilities provide a cost-effective yet professional-quality solution.
With Blurb, only print what you need when you need it, saving on upfront costs and minimizing inventory risks. You can also leverage Blurb to help sell and distribute your book across popular channels, including Amazon.
Start your self-publishing journey and turn your work into the print version you envision.
This is a unique website which will require a more modern browser to work! Please upgrade today!
This is a modern website which will require Javascript to work.
Please turn it on!
How would you rate your experience using this page?
Visit our help center for resources to common issues, thank you for your feedback., help topics.
- KDP Help Center Home
- Create a KDP Account
- Manage Your KDP Account
- Two-Step Verification
- CreateSpace Account
- Year End Tax Forms
- What is my tax account status?
- Complete the Tax Questionnaire
- Kindle Store: BR - BR Tax Withholding
- AU & IN Goods and Services Tax
- Applying for a U.S. EIN for Corporations and Non-Individual Entities
- Setting Prices for Amazon Japan
- Setting European Union Prices
- How EU Prices Affect List Price Requirements
- Set Trim Size, Bleed, and Margins
- Format Front Matter, Body Matter, and Back Matter
- Save Your Manuscript File
- Paperback and Hardcover Manuscript Templates
- Cover Creator
- Create a Paperback Cover
- Format Images in Your Book
- Paperback Fonts
- Fix Paperback and Hardcover Formatting Issues
- Paperback Submission Guidelines
- Create a Hardcover Cover
- What criteria does my eBook's cover image need to meet?
- Why is my cover image not updating on Amazon?
- What file formats are supported for eBook manuscripts?
- Create a Table of Contents
- KDP Tools and Resources
- Publishing Service Providers & Resources
- Getting Started with Kindle Create
- Kindle Create Tutorial
- Prepare Reflowable and Print Books with Kindle Create
- Prepare Comic eBooks with Kindle Create
- Prepare Print Replica Books with Kindle Create
- Previewing and Publishing Your Kindle Create Book
- Kindle Previewer
- Kindle Comic Creator
- Kindle Kids' Book Creator
- Quality Notifications Dashboard
- Guide to Kindle Content Quality
- Enhanced Typesetting
- X-Ray for Authors: Tips and Tricks
- KDP Bookshelf
- Arabic (Beta)
- Chinese (Traditional) (Beta)
- Hebrew and Yiddish
- Indian-Language Publishing
- Books Titles & Editions
- Authors & Contributors
- Write a Book Description
- Make Your Book More Discoverable with Keywords
- Kindle eBook Pre-Order
- Primary Audience and Reading Age
- Publishing Public Domain Content
- Language & Reading direction
- Schedule a Release
- International Standard Book Number (ISBN)
- Print Options
- Color Ink Options
- Upload and Preview Book Content
- Convert a Paperback Word File to PDF
- Price Troubleshooting
- Paperback Printing Cost
- Hardcover Printing Cost
- Printing Cost & Royalty Calculator
- Book Status
- Low-Content Books
- Kindle Vella - Reader Experience
- Kindle Vella - Start a Story
- Kindle Vella - Publish an Episode
- Kindle Vella - Royalties, Reporting, and Payments
- Kindle Vella - Content Guidelines
- Hardcover Print Elements
- Edit your Series
- Delete a series
- Set the reading order for your series
- Where can I find my Amazon Series Page?
- How to create a series with multiple authors
- Can I offer discounts to books in my series?
- Series Collections on kdp.amazon.co.jp
- How do I order a proof or author copy?
- How much do proof or author copies cost?
- What is the cost to ship my proof or author copy?
- When will my proof or author copy arrive?
- I’m getting an error ordering my author copy
- I’m getting an error ordering my proof copy
- My proof or author copy came damaged
- My proof or author copy didn’t arrive on time
- My proof or author copy has printing errors
- KDP Categories
- Read Sample (Look Inside the Book)
- Customer Reviews
- Search Results
- Why are my books not linked on Amazon?
- Link Your Books on the KDP Bookshelf
- How do I unlink my books?
- Sales Ranking
- Book Trends Data
- Ways to Promote Your Book
- How to enroll in KDP Select
- How to cancel KDP Select
- KDP Select All Stars
- Kindle Countdown Deals
- Royalties in Kindle Unlimited
- Free Book Promotions
- Author Central
- Create A+ Content
- A+ Content Examples
- A+ Content Guidelines
- Advertising for KDP books
- eBook Distribution Rights
- Paperback and Hardcover Distribution Rights
- Buying and Gifting eBooks for Others
- Sample Chapters
- Audiobooks Through ACX
- Amazon Literary Contests
- Nominate Your eBook for a Promotion (Beta)
- Update Your Book Details
- Update Your Manuscript
- Modify Converted eBook Content
- How to Send Your Updated eBook to Customers or Yourself
- Update Your Cover
- Unpublishing and Deleting Books
- eBook Royalties
- Paperback Royalty
- Hardcover Royalty
- Orders Report
- Promotions Report
- Pre-Order Report
- Month-to-Date Report
- Prior Months' Royalties Report
- Royalties Estimator
- Payment Report
- Old Sales Dashboard
- Sales and Royalties Report
- Historical Report
- KDP Payment Options
- When will I get paid?
- How to add (or edit) my bank account?
- Troubleshoot Payment Issues
- Digital Book Pricing Page
- Print Book Pricing Page
- eBook List Price Requirements
- Content Guidelines
- Metadata Guidelines for Books
- Intellectual Property Rights Frequently Asked Questions
- Reporting Possible Violations of Our Guidelines
- Privacy Notice Information
- Bonus Content
- Featured Offer Eligibility for Third-Party Sellers
- Introduction
- Paths to Getting Your Content on Kindle
- Comparing Formats
- Cover Image Guidelines
- Navigation Guidelines
- HTML and CSS Guidelines
- Hyperlink Guidelines
- QA Standards
- Text Guidelines - Reflowable
- Image Guidelines - Reflowable
- Table Guidelines - Reflowable
- Creating Fixed-Layout Books with Text Pop-Ups
- Creating Fixed-Layout Books with Image Pop-Ups or Virtual Panels
- Creating Fixed-Layout Books Without Pop-Ups
- Creating Kindle Editions with Audio/Video Content
- Creating Dictionaries
- Enhanced Typesetting and Page Flip
- Attributes and Tags Supported by Enhanced Typesetting
- HTML and CSS Tags Supported in Kindle Format 8
- Media Queries
- Guidelines for Converting XMDF to KF8
- 1 – Set Up Your KDP Account
- 2 – Prepare Your Manuscript
- 3 – Prepare Your Cover
- 4 – Title Setup: Book Details, Content, & Pricing
- 5 – Publishing & Review
- 6 – Promoting Your Book & Getting Paid
Have feedback? Can't find your answer in our Help pages?
Proof and Author Copies
| for a proof or author copy, proof and author copy prices, available , and how to schedule a . | or to resolve common issues. | about an order you already placed. |
| . | , or would like to give packaging feedback. | if you've tracked your order and it didn't arrive by the delivery estimate. |
To learn more about ordering Proof and Author copies, check out our videos below on YouTube:
Make more money and reach more readers through Kindle Unlimited. Learn More
Total KDP Select Author Earnings
May 2024
•
$55.9 Million
Please sign in to continue
Election latest: 'More names' set to come out in election date betting scandal
Multiple Conservative Party candidates are facing an investigation from the Gambling Commission over alleged bets on the date of the general election. Tory voters have expressed their outrage, while minister Michael Gove has said he's "almost lost for words".
Thursday 20 June 2024 17:51, UK
- General Election 2024
Please use Chrome browser for a more accessible video player
- Bulletin: The main things you need to know this teatime
- 'More names' to come in election betting scandal
- 'This is the final straw': Tory voters express anger
- Tory candidate facing probe 'considering legal action'
- Catch-up: What we know so far about betting allegations
- Sunak and Starmer facing live Question Time audience tonight
- Live reporting by Samuel Osborne and (earlier) Tim Baker
- Sam Coates: This is a big, big, big problem for the Conservatives
- Rob Powell: Betting scandal could punch Tories' electoral bruise
Election essentials
- Manifesto pledges: Alliance Party | Conservatives | Greens | Labour | Lib Dems | Plaid Cymru | Reform | SNP | Sinn Fein | Workers Party
- Trackers: Who's leading polls? | Is PM keeping promises?
- Campaign Heritage: Memorable moments from elections gone by
- Follow Sky's politics podcasts: Electoral Dysfunction | Politics At Jack And Sam's
- Read more: Who is standing down? | Key seats to watch | What counts as voter ID? | Check if your constituency is changing | Guide to election lingo | Sky's election night plans
Following the news that more names are set to emerge in relation to the election date betting scandal, here is a quick summary of what we know so far:
It emerged overnight that Laura Saunders, the Tory candidate for Bristol North West, is facing an investigation by the Gambling Commission.
Ms Saunders is married to Tony Lee, who is the party's director of campaigns.
The Gambling Commission has not commented on individual cases.
But it said today that "currently the commission is investigating the possibility of offences concerning the date of the election".
The Conservative Party said they had been contacted by the commission about a "small number" of individuals.
Ms Saunders' solicitor later said on her behalf that she "will be cooperating with the Gambling Commission" investigation, but added she is "considering legal action against the BBC" and other outlets "who infringe her privacy rights".
Read more and see the full list of candidates for Bristol North West here:
Sky News understands more names are set to emerge in relation to the election date betting scandal.
A gambling industry source said: "Yes to more names. Cops not involved."
It emerged that one of Mr Sunak's close protection police officers had been arrested over alleged bets on the timing of the election.
Sky News understands several bets were placed, with at least one of them being a three-figure sum.
Read more on this story here:
Craig Williams, a close parliamentary aide of Rishi Sunak, admitted to placing a "flutter" on the date of the election "weeks ago".
This is reported to have happened just before the prime minister surprised many by calling a vote for 4 July, with Mr Williams said to have staked a £100.
The Conservative Party said it was a personal matter.
Mr Williams is the party's candidate for Montgomeryshire and Glyndwr.
Read more and see the full list of candidates for the seat here:
Laura Saunders, the Conservative candidate who is facing a probe over allegedly betting on the timing of the election has said she is "considering legal action".
Ms Saunders "will be cooperating with the Gambling Commission" investigation, her solicitor said on her behalf.
They added that she is "considering legal action against the BBC" and other outlets "who infringe her privacy rights".
The statement said: "It is inappropriate to conduct any investigation of this kind via the media, and doing so risks jeopardising the work of the Gambling Commission and the integrity of its investigation.
"The publication of the BBC's story is premature and is a clear infringement of Ms Saunders' privacy rights.
"She is considering legal action against the BBC and any other publishers who infringe her privacy rights."
We're gearing up for a busy evening for the Politics Hub.
We'll have our show with Sophy Ridge from 7pm and then from 8pm the leaders of the four biggest political parties in the UK will take part in a BBC Question Time leaders special.
But before that, here are the main things you need to know:
- Rishi Sunak's campaign has been thrown into fresh turmoil just two weeks before polling day over allegations of betting on the date of the election ;
- The Gambling Commission has said it's considering launching an investigation into a " small number of people" ;
- Laura Saunders is the second Conservative candidate to trigger scrutiny from the watchdog, and says she will co-operate with the investigation but is "considering legal action" against the BBC;
- Ms Saunders is married to Tony Lee - the Conservative director of campaigns - with reports that he as well faces a probe after going on leave from CCHQ;
- And Sky News understands more names are set to emerge .
- Elsewhere, Northern Ireland's Alliance Party has published its general election manifesto , featuring reform of Stormont's devolved structures as a key objective;
- And the Scottish Greens have launched their manifesto too , outlining plans for a wealth tax on the richest people in the UK.
- Coming up this evening , there is a BBC Question Time leaders special;
- Rishi Sunak, Sir Keir Starmer, Sir Ed Davey and John Swinney are all taking part, with Fiona Bruce hosting;
- The leaders will have 30 minutes each to answer questions from the audience, and we'll have live updates here from 8pm;
- Before that, from 7pm Politics Hub With Sophy Ridge will feature a full-length interview with Green Party leader Adrian Ramsay;
- It is the latest in a series of interrogations - with all party chiefs set to feature over the last few weeks of the campaign.
More names are set to emerge in relation to the election date betting scandal, Sky News understands.
A gambling industry source said the police were not involved.
The source said: "Yes to more names. Cops not involved."
It comes after the Gambling Commission said it is looking into allegations around bets made on the date of the election.
The commission is looking into Laura Saunders, the Conservative candidate for Bristol North West.
That came after Rishi Sunak's close parliamentary aide Craig Williams, the Tory candidate for Montgomeryshire and Glyndwr, was revealed to have placed a bet on a July election date three days before it was announced.
And the prime minister's close protection officer has been arrested and suspended over alleged bets about the timing of the election.
What are the laws around gambling with inside knowledge?
By Alix Culbertson , politics reporter
There are strict rules around gambling, with the latest laws updated in the Gambling Act 2005.
Gamblers are not allowed to use inside information to place a bet or to instruct someone else to do so on their behalf.
They are also not allowed to pass inside information on to someone else which they use for betting.
Section 42 of the act deals with cheating and says a person commits an offence if they cheat at gambling or do "anything for the purpose of enabling or assisting another person to cheat at gambling".
It adds: "It is immaterial whether a person who cheats improves his changes of winning anything, or wins anything."
Someone found guilty of cheating can be imprisoned for a maximum of two years and/or fined, or six months in prison for a lesser offence.
By Laura Bundock , correspondent
The Sky News YouGov Voters Panel has reacted overwhelmingly negatively to the alleged insider betting scandal, with some saying it would impact their voting intention.
Our exclusive panel gave snap reaction to the news some Conservative Party candidates are being investigated by the Gambling Commission over alleged bets relating to the date of the general election.
One 2019 Conservative voter said: "This is the final straw."
Another told us it "makes you view the Tories in an even worse position than they currently are".
But among those previous Conservative voters who are considering Reform UK, it's just another "nail in the coffin".
Multiple panellists used that exact phrase.
The Tories are "dead and buried in this election", said another.
One said it felt like Rishi Sunak "doesn't really seem to have any control over them".
Other words that came up included "damaging" and "disgusting", with "unsurprising" another repeated term.
The Sky News YouGov Voters Panel represent over 40 different constituencies and a range of political views.
At the start of the campaign, they were all undecided who to vote for.
The Scottish Greens have launched their manifesto, outlining plans for a wealth tax on the richest people in the UK.
Here's a look at the key points in the 56-page document:
- Introduce a £28bn per year Green New Deal investment programme;
- Implement a wealth tax on the richest people in the UK;
- Stop oil and gas companies from being able to advertise;
- End all subsidies for fossil fuels ;
- Build a zero-carbon transport system ;
- Fully divest all public sector pension funds from fossil fuels;
- Cap the price of food essentials during periods of high inflation to tackle the cost of living crisis;
- Introduce a minimum income guarantee , where the social security system steps in to ensure everyone can meet a good standard of living;
- In the long term bring in a universal basic income ;
- Reform the law on the possession of drugs so it would no longer be an offence;
- Levy a private jet tax of £1,000 per head against those using their own planes to travel to or within the UK;
- Remove the powers of the UK government to block decisions made by the Scottish Parliament;
- Introduce proportional representation to all levels of election in the UK and abolish the House of Lords;
- Extend the vote to 16 and 17-year-olds in all elections and base voting eligibility on residency instead of citizenship, including people with refugee status.
Northern Ireland's Alliance Party has published its general election manifesto, featuring reform of Stormont's devolved structures as a key objective.
Here are the key points from the party's manifesto:
- Alliance wants to reform Stormont, removing the veto power to block decisions and even collapse the institutions ;
- It is also seeking to end the community designation system , which effectively hands blocs of unionists or nationalists a veto in contentious votes in both the Assembly and Executive;
- Instead it proposes an alternative method where controversial votes require a weighted majority to pass ;
- It is also calling for changes to the mandatory coalition system ;
- The party wants to replace the current first minister and deputy first minister titles at Stormont with two joint first ministers to reflect the co-equal status of the jobs;
- The manifesto prioritises securing a new financial deal for Northern Ireland, with an improved funding model for the allocation of Treasury resources to the region;
- Alliance contends Brexit has been "fundamentally destructive" for the UK and is calling for a closer relationship with the EU and a negotiated agreement on veterinary medicines;
- The manifesto also calls for a reform of government spending rules to free up funding to tackle climate change ;
- Alliance is also calling for a new injection of government funding for integrated education ;
- It also argues the voting age should be dropped from 18 to 16 and calls for the end of the first-past-the-post voting system in UK general elections;
- And finally it is also calling for a directly elected House of Lords .
By Alix Culbertson , politics reporter
The Gambling Commission has said it is looking into allegations around bets made on the date of the election.
It comes after Rishi Sunak's close parliamentary aide Craig Williams, the Tory candidate for Montgomeryshire and Glyndwr, was revealed to have placed a bet on a July election date three days before it was announced.
Boris Johnson's "honest, unrestrained and deeply revealing" memoir will be published later this year.
Publisher HarperCollins announced the book, titled Unleashed, will be published on 10 October and will cover Mr Johnson's time as London mayor and prime minister.
"I am honoured that HarperCollins is publishing my personal account of the huge realignment that took place in UK politics in the last 15 years - and what may lie ahead," Mr Johnson said.
"So stand by for my thoughts on Britain's future to explode over the publishing world like a much shaken bottle of champagne."
In January 2023, Mr Johnson's register of interests revealed he had received a £510,000 advance for his memoirs, well above the £7,674 advance his successor Liz Truss got for her book 10 Years To Save The West.
Since leaving parliament last year after several scandals, Mr Johnson has been doing gigs on the speaking circuit and writing a column for the Daily Mail.
He has recently featured in videos endorsing numerous Conservative candidates in the general election and has put his name to letters sent to thousands of voters urging them not to vote for Nigel Farage's Reform UK.
Tonight the leaders of the four biggest political parties in the UK will sit down for 30 minutes each to answer questions from a live studio audience on the BBC's Question Time Leaders' Special.
The show will start at 8pm, and we'll have live updates and analysis from our chief political correspondent Jon Craig throughout.
The Liberal Democrats' leader Sir Ed Davey will appear first, followed by the SNP's John Swinney, then it will be Sir Keir Starmer and Prime Minister Rishi Sunak.
Be the first to get Breaking News
Install the Sky News app for free

IMAGES
VIDEO
COMMENTS
With a book cover template from Storyboard That, students are able to create a colorful cover without having to draw anything at all! Our images, scenes, and characters make it simple to design book covers for any book. Use this project as a class on the same book, or encourage students to create book jackets for books in your classroom library.
This sample template shows the layout for a typical 6″ x 9″ dust jacket. The actual flat dimensions of this jacket are 9.25″ x 20.095″ which will allow for 3″ flaps. Using this template, you can see how the dimensions your printer gives you will help create your own jacket artwork.
Storyboard That offers a diverse collection of templates, and you are bound to find a book jacket template that suits various themes and styles. We offer a variety of fonts, images, backgrounds, and characters and are suitable for any device. Not to worry, our book cover templates are easy to edit and make a custom size, and will make any ...
One Last Secret - Krissy Baccaro - This dust jacket layout is one of the more common. The front flap has been used to showcase reviews, the back flap to provide more information about the author and an author image, and finally the back cover the ISBN has a compelling blurb to hook potential readers. The Blemished - Sarah Dalton - These ...
On the Layers panel, select page 2 of the InDesign book template. Head over to Layout > Margins and Columns and set the Left margin to 0.875 in. This is to account for the .375-inch back wrap and the 0.5-inch margin on all sides. Repeat the same procedure on the front page of the book jacket cover.
Create a professional book cover for free. You've done the hard work and created an amazing book. Make sure it sells out by creating an awesome cover design! Canva's free book cover maker is ridiculously easy to use - even for the novice or not-so-tech-savvy writer. Our book cover maker allows you to choose from hundreds of layouts ...
Measure this new length. Repeat for the width. Now, multiply your book's updated dimensions by two (you may need to multiply its width by more than this depending on the thickness of your book). You can start cutting and pasting elements onto the cover once the jacket is fitted and secured.
Some important factors to carefully consider when designing a book are: Blurbs: A book jacket usually includes a number of blurbs from other authors or reviewers. Pick the best blurb from the most ...
A standard book cover includes the front cover design, back cover design, and spine. A book jacket has more real estate with flaps that fold over the cover. Elements of a good book jacket. A good book jacket design isn't just thrown together overnight. It requires careful planning, and in some cases, a skilled designer.
Visme's online book cover maker is a tool that creates high quality book covers. You can easily bring a creative vision to life with no design experience needed. Choose from our selection of free fonts or upload your own, or create preset color palettes to change color schemes with a single click. Create Your Book Cover.
This free InDesign book jacket template is an easy-to-edit foundation for creating your own book cover design. Complete with a stylish and simple design, front and back cover, spine and flaps, it also comes complete with two color options. Unlimited Downloads: 1,000,000+ InDesign Templates, Mockups & Design Assets by.
Also called a lap book, this easy-to-make book report hits on all the major elements of a book study and gives students a chance to show what they know in a colorful way. 22. Collage. Create a collage using pictures and words that represent different parts of the book. Use old magazines or print pictures from the Internet. 23. Book Report Triorama
No measuring, no cutting, no back breaking time spent trying to cover each edge. Just a simple flip, fold, and you're done. Now I will say that this creates a crisp look. Most interiors of dust jackets are stark white so if you are looking for an aged/vintage look then you may have to get creative in aging the paper.
Use High-Quality Images. Whether it's a photograph, artwork, or graphic, be sure to use high-quality images on your dust jacket flaps. This will help grab the reader's attention and give them an idea of what your book is about. Again, keep the design complementary to the outer covers. Play with Color.
Firstly, go to fotor.com, click the "Create a design" button on the homepage and choose the "Book Cover" template layout. Browse or search by genres or keywords to find the right book cover template for you to get started. Insert your book name and any other text you want to include.
STEP 1: Measure the book. Take the book you want to make the fabric book cover for, and measure from the edge of the back cover to the edge of the front cover of the book. Add 8 inches (20cm) to that length. Then measure from the top edge of the cover to the bottom edge of the cover. Add 2 inches (5cm) to this measurement.
Make Book Jacket works inside of InDesign CS4 or later (tested through InDesign 2022). If you do not use Adobe InDesign, Make Book Jacket is not the solution for you. The interface is written in English, but it works in other languages (German, Spanish, French, Italian, & Dutch). If it doesn't work in another language, let me know and I'll ...
I created this video especially for families and young readers who have been affected by the current school closures and quarantines. If you'd like to see mo...
Author Name. On most nonfiction books, authors will feature their full name or their initials and last name on the front cover and spine as well, but not as prominently as the book's title. Typically, the font used for the author's name will be sized in accordance to their level of fame and recognition. So, a popular author like Deepak ...
Linked Topics. Download, Fill In And Print Book Jacket Book Report Pdf Online Here For Free. Book Jacket Book Report Is Often Used In Theme Analysis, Book Critique, Character Analysis, Book Analysis, Reading Comprehension, Book Review Sheet, Book Report Template, Book Template, Paper Templates And Life.
Cut and fold top and bottom edges. With the right side facing down, fold the top edge of the fabric in 2 inches and iron the crease. Line the book up to make sure it will fit inside the top flap, then fold the bottom edge up to cover the bottom of the book. Iron that crease and trim that flap to be about 2 inches.
For this book report, you will create a book jacket that tells about the book you have just read. Follow the directions below to complete the jacket and present it to the class by the first day of school: Monday, August 16th. Take pride in your work. Use your best penmanship, add color and pictures, edit for spelling and grammar errors, and pay ...
Spend time figuring out which materials work best with your book vision and budget. 4. Cover options: paperback versus hardcover. The front cover is your book's first impression, so choosing the right type is vital. If you're unsure which book option is best, let's explore both in detail.
Create a Book. Book Detail Resources. Books Titles & Editions; Authors & Contributors; Write a Book Description; Make Your Book More Discoverable with Keywords; Kindle eBook Pre-Order; Primary Audience and Reading Age ; Publishing Public Domain Content; Language & Reading direction; Release Date Options. Schedule a Release; Upload Book Resources
In January 2023, Mr Johnson's register of interests revealed he had received a £510,000 advance for his memoirs, well above the £7,674 advance his successor Liz Truss got for her book 10 Years ...