- Microsoft's Promise of Easy AI
- Walmart's Killer Tech Deals This Week

How to Add PowerPoint Slides Into a Word Document
Insert PowerPoint slides as individual images
- Brock University
What to Know
- In Word, go to Insert > Add from Files and select the PowerPoint file. Choose Insert Slide for each slide you want to add.
Use the Picture Format menu to adjust each inserted slide.
When you want to use PowerPoint slides in a Microsoft Word document, use the Add from Files tool to import one or more slides from a PowerPoint presentation as images to the Word file. We show you how to do it using Microsoft Word for Microsoft 365, Word 2019, Word 2016, and Word for Mac.
How to Insert PowerPoint Slides Into a Word Document
Slides from an existing PowerPoint presentation can be inserted as an image into a blank document or an existing document.
Open an existing or blank Word document, then position the cursor where you want to insert the PowerPoint slide.
Go to the Insert tab and select Add from Files .
Select the PowerPoint file that contains the slides you want to add to the Word document.
If the file isn't listed, select Show More Files to browse the filesystem and choose a file.
In the Insert From File panel, find the slide you want to insert as an image and select Insert Slide to insert it into the document.
The slide appears as an image. It can only be edited with photo tools.
Considerations
In old versions of Microsoft Office , it sometimes made sense to export PowerPoint content into Word to mark it up with the speaker's notes and other information. However, PowerPoint has advanced such that these workarounds no longer prove as helpful.
PowerPoint presentations can be exported in different formats including PDF, several image formats, several movie formats, and a rich-text outliner format. Use these export formats as an alternative to a multi-step Word process.
Get the Latest Tech News Delivered Every Day
- How to Make an Image Background Transparent in PowerPoint
- How to Add Page Numbers in PowerPoint
- Converting PowerPoint Presentations to Word Documents
- How to Merge PowerPoints
- Converting PowerPoint Slides to Word Documents
- How to Add a Background Picture to PowerPoint Slides
- Create Pictures From PowerPoint Slides
- A Beginner's Guide to Text Wrap in PowerPoint
- How to Make a PowerPoint Presentation
- Use PowerPoint Slide Finder
- How to Print PowerPoint Slides With Notes
- How to Link or Insert Excel Files to Word Documents
- Copy Slides to Another PowerPoint Presentation
- How to Insert PDF Files Into PowerPoint Presentations
- How to Place a Picture Inside a PowerPoint Shape
- How to Add Pages to a PDF
Byte Bite Bit
How to Insert PowerPoint into Word: Step-by-Step Guide
Ever found yourself juggling between Microsoft PowerPoint and Microsoft Word, wishing you could merge those vibrant slides into your well-structured documents seamlessly? You’re not alone. I remember the headaches before I got the hang of it. But guess what? It’s easier than you think, and I’m going to show you exactly how.

To start, visualize copying a slide from your PowerPoint presentation and dropping it into Word. Simply click on the slide in PowerPoint, copy it, jump to Word, and paste it directly where your cursor is positioned. Voila! Now, you’ve got a PowerPoint slide sitting pretty in your Word document.
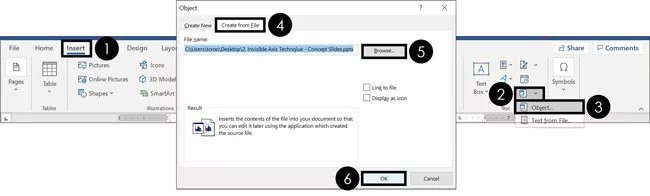
If linking the slide dynamically to keep it updated is more your style, use the “Insert” tab in Word, select “Object,” and browse to your PowerPoint file. This method embeds the slide as a PowerPoint object, giving you the flexibility to double-click and edit it right there in Word. No more back-and-forth hassle.
- 1.1 Using the Insert Tab for Text and Images
- 1.2 Embedding Files and Objects
- 2.1 Incorporating Content from Other Microsoft Applications
- 2.2 Organizing Slides and Content for Impact
- 3.1 Linking Objects Across Files
- 3.2 Managing and Updating Linked Data
Inserting Content Into Your Document
When adding content to a Microsoft Word document, it’s essential to know the right tools for the task. This guide will cover inserting text, images, embedding files, and objects, ensuring your content is well-presented.
Using the Insert Tab for Text and Images
Inserting text or images into your Word document is straightforward. Place your cursor where you want to add the content.
- Go to the Insert tab on the Ribbon.
- Choose Text Box for additional formatting options, or select Pictures to insert an image.
For images, you have options to insert from your device or online sources. I often prefer local images because of their reliability and control over resolution.
Once inserted, click on the image to access the Picture Format tab. Here, you can adjust size, style, and effects to get the desired look. This is an easy way to make your document look professional and visually appealing.
Embedding Files and Objects
Embedding files and objects can enhance your document’s functionality by including external information directly.
- On the Insert tab, click Object in the Text group.
- Select Create from File and browse for your file.
For instance, embedding a PowerPoint slide can be done by choosing the specific slide to display its content within Word. This method keeps the object updated alongside its source file if linked, ensuring consistency.
Embedded objects, like Excel charts, still retain their functionality, allowing for interactivity within your document. The embedded content is a static snapshot unless you choose to link them, making the data dynamic.
This approach is handy for keeping everything in one file, which is particularly convenient for presentations or collaborative projects.
Mastering PowerPoint Presentations
To create impactful PowerPoint presentations, it is essential to incorporate content from other Microsoft applications effectively and to organize slides and content for maximum impact. Here’s how you can do this efficiently.
Incorporating Content from Other Microsoft Applications
When working on a PowerPoint presentation, borrowing content from other Microsoft applications can be a game-changer. By incorporating charts from Excel, text from Word, or even other slides from separate PowerPoint files, you can enhance the richness of your presentation.
I start by using the Insert Object feature. It allows embedding elements like Excel charts directly into slides. This method keeps the data live and editable. To do this:
- Go to the Insert tab.
- Select Object in the Text group.
- Choose Create from File and browse for the necessary file.
For Word documents, I paste formatted sections into my PowerPoint, ensuring text consistency and professionalism. This seamless integration makes my presentations informative and visually cohesive.
Organizing Slides and Content for Impact
Effective organization of slides can elevate your presentation from average to exceptional. Arranging slides in a logical order ensures the audience can follow your narrative without confusion. Here’s how I manage this:
- Outline View: I use the Outline view to structure my content logically.
- Thumbnails: I rearrange slide thumbnails to ensure a natural flow.
- Group Similar Slides: I group related slides together to build story segments.
- Use of Visuals: Incorporate images, charts, and tables to break up text-heavy slides.
Example: Instead of one bulky slide, I break it into smaller, digestible parts using visuals and bullet points.
This approach keeps the audience engaged and enhances their retention of the material. Remember, a well-organized slide show speaks volumes about your professionalism and attention to detail.
Advanced Techniques for Linking and Updating
The power and flexibility of linking and updating PowerPoint slides within a Word document can greatly streamline your workflow, especially in dynamic environments. In the following subsections, we will discuss how to link objects across files and manage linked data effectively.
Linking Objects Across Files
Linking a PowerPoint slide in a Word document helps you maintain a dynamic connection to the source file.
Steps to Link a PowerPoint Slide:
- Open the Word document and place the cursor where the slide should appear.
- Go to the “Insert” tab.
- Click on “Object” in the “Text” group.
- In the dialog box, select “Create from File” and browse to your PowerPoint file.
- Check the “Link to File” box.
You can also use Paste Link if you have the slide copied. This ensures any updates in the source file reflect in the Word document, saving you time and maintaining consistency.
Managing and Updating Linked Data
After linking, it’s crucial to manage and update the linked data to keep it current.
Updating a Linked Object:
- Right-click the linked object.
- Select “Linked Slide Object” then “Links…”.
- In the dialog box, click “Update Now” to refresh the data.
In scenarios where the linked source file moves or changes, you might need to re-establish the link. Right-click the linked object, choose “Linked Slide Object”, and go to “Change Source…” to locate the new file.
Setting security measures is also crucial. Restrict permissions or use a read-only option to protect sensitive data. If a link is no longer needed, use the “Break Link” option to prevent updates and turn the linked object into a static image.
These techniques will make your life easier and keep your documents up to date 📝.
Related posts:
- How to Save PowerPoint as Video: Step-by-Step Guide for Beginners
- How to Add Notes to PowerPoint: A Step-by-Step Guide for Enhanced Presentations
- How to Edit Background Graphics in PowerPoint: Step-by-Step Guide for Effective Presentations
- How to Track Changes in PowerPoint: A Step-by-Step Guide
- How to Create Master Slides in PowerPoint: Easy Guide for Professionals
- How to Compress Media in PowerPoint: Enhancing Performance and Quality
- How to Make a Shape Transparent in PowerPoint: Step-by-Step Guide
- How to Change Footer in PowerPoint: A Step-by-Step Guide
- How to Save a Template in PowerPoint: A Step-by-Step Guide
- How to Add Multiple Animations to One Object in PowerPoint: Step-by-Step Guide
- What Is Microsoft PowerPoint Used For? Discover Its Essential Applications
- How to Lock Aspect Ratio in PowerPoint: A Step-by-Step Guide
Leave a Comment Cancel reply
Save my name, email, and website in this browser for the next time I comment.
How to Add PowerPoint Slides Into a Word Document

Adding PowerPoint slides into a Word document can be very useful for creating professional reports, proposals, articles, and more. By combining slides from a PowerPoint presentation with the robust text formatting capabilities of Word, you can make visually engaging and informative documents.
Benefits of Adding PowerPoint Slides to Word
Here are some of the key benefits of bringing PowerPoint slides into Word:
By leveraging the strengths of both PowerPoint and Word, you can create professional, polished documents perfect for sharing with colleagues, clients, and partners.
How To Insert a Single PowerPoint Slide
The slide will now appear in the Word document as an embedded image. You can work with the inserted slide just like any other image in Word – move, resize, crop, add captions, etc.
Insert Multiple PowerPoint Slides
Embed an entire powerpoint presentation, convert presentation to word document.
You can then work with the content just like any other Word doc – edit text, add images, customize formatting, etc.
Best Practices
Following these tips will ensure your documents with integrated PowerPoint slides look polished, professional, and communicate effectively.
By mastering these techniques for importing PowerPoint slides, you can produce truly stunning Word docs that leverage the power of both applications. So give it a try today – combine the visual punch of PowerPoint with the formatting strengths of Word for next level documents!
About The Author
Vegaslide staff, related posts, powerpoint 2003: customizing slide design, how to hide audio icon in powerpoint slide, how to hide a slide in powerpoint: a step-by-step guide, how to use mouse as laser pointer in powerpoint presentation.
How to Embed a PowerPoint Slide in a Word Document

Did you know you can embed a PowerPoint slide in a Word document? How about inserting a link to a PowerPoint presentation into a Word document?
Microsoft Word and Microsoft PowerPoint work well together in various ways. Both of these apps are included with a Microsoft 365 subscription . One thing you can do while using both together is adding a presentation into a Word document as an object. Here’s how to embed a PowerPoint slide in a Word document and why it’s a useful tool.
Embed a PowerPoint Slide
There are two ways you can add PowerPoint content into a Word document. You can either paste content by pressing Ctrl + V or insert it as a linked or embedded object. With the latter, you can still with the object in the original app. In this case, after inserting a PowerPoint object into Word, you can double-click the slide to use PowerPoint.
As Microsoft explains :
If you insert the slide into the document as a PowerPoint object, Word runs PowerPoint when you double-click the slide, and you can use PowerPoint commands to work with the slide. When you insert an entire PowerPoint presentation as an object, the document displays only one slide. To display different slides, double-click the PowerPoint object, and then press Enter to run the slide show.
How to Insert a Linked Object or Embed a PowerPoint Slide
When it comes to PowerPoint and Word, you can link or embed one or more slides or embed the entire presentation. When you double-click the object, Word runs the PowerPoint slide show. However, you cannot edit the presentation within the document. And, the presentation object can be embedded only, not linked.
Note: The main difference between linked objects and embedded objects is where the data is stored and how you update the data after placing it in the Word file.
- Open your Word document where you want to insert an object.
- Next, open the PowerPoint presentation that includes the slides you want to create a linked object or embedded object from.
- Select the entire presentation or the slides you want in PowerPoint.
- Choose Ctrl+C on your keyboard to copy the slides.
- Click where you want to add your PowerPoint content over in your Word document.
- On the Home tab, in the Clipboard group, click the arrow under Paste , and then click Paste Special .
- In the As list, select Microsoft PowerPoint Presentation object or Microsoft PowerPoint Slide object .
- Select Paste to insert an embedded object, or select Paste link to insert a link to the object, and then click OK .
In this case, you’ve embedded an object. When an object is linked, information can be updated if the source file is modified. Linked data is stored in the source file. When you embed a PowerPoint object, information in the Word file doesn’t change if you modify the source PowerPoint file. Embedded objects become part of the Word file and, after they are inserted, they are no longer part of the source file.

Inserting a Link
As an alternative, you can insert a link to the object by following the directions below:
- Click where you want to insert a link to your PowerPoint content in your Word document.
- Choose the Insert tab , then click the arrow next to Object in the Text group.
- Select Object .
- In the box, choose the Create from File tab , then browse to the location of your presentation.
- Choose Link to File or Display as icon , then click OK .
In this case, you’ve inserted a link to the entire PowerPoint presentation.

About Updates
Linked objects get updated automatically. Because of this, Word updates the linked information every time the Word file is open or any time the source PowerPoint file changes while the Word file is open. However, you can change the settings for individual linked objects so that the linked object is not updated or so that it is updated only when the reader of your document chooses to update it manually.
Additionally, you can prevent Word from updating links in all the documents that you open. You can do this as a security measure, thereby preventing updating documents with files that are perhaps from an untrusted source.
You can also permanently break the connection between a linked object and its source PowerPoint file . When the connection is broken, you can no longer edit the object in the document, and it becomes a picture of the PowerPoint content.
Manually Update Links
To manually update links in Word:
- Right-click the linked object, click Linked Slide Object or Linked Presentation Object and then click Links .
- Click the link that you want to update manually, and then under Update method for selected link , click Manual update .

Prevent Linked Objects From Being Updated
If you won’t want a linked object to get updated:
- Click the link that you want to prevent from being updated, and then under Update method for selected link , select the Locked check box.

There’s much you can do with PowerPoint and Word that you might have never considered. For example, did you know you can make a PowerPoint presentation read-only or that you can convert a Word document to a PowerPoint presentation? Also, don’t forget you can get all office apps as part of a suite of software with a Microsoft 365 subscription.
Your email address will not be published. Required fields are marked *
Save my name and email and send me emails as new comments are made to this post.
Recommended for you

How to Embed PowerPoint Slides in Word

Your changes have been saved
Email Is sent
Please verify your email address.
You’ve reached your account maximum for followed topics.
Why Your Front Camera Selfies Look Bad (and How to Fix Them)
Here’s how to maximize your duolingo xp, how to use your ipad as a second mac monitor with sidecar.
The need to create and share documents incorporating various media types is ever-present in today's world. With its widely used applications like Word and PowerPoint, Microsoft Office Suite offers many features that allow you to integrate different types of content into your documents seamlessly.
One example of integrating different Office apps is embedding PowerPoint slides in a Word document. Whether you want to showcase a presentation or merge the two formats, there are a couple of ways you can embed PowerPoint slides in Word.
1. Insert PowerPoint Slides as Objects in Word
In Microsoft Word, an object refers to any non-text component of your document. You can use objects to import data into Microsoft Word , PowerPoint slides included. Here's how you can do that:
- Open your Word document, and go to the Insert menu.

- Click Browse and select your PowerPoint presentation.
Checking Insert Link will embed the slide and add a shortcut to the source file. If the source file changes, the embedded slide will change as well. Leaving this option unchecked will insert a copy of the slide into your document and won't reflect changes from the source file.
The second checkbox is Display as icon . This inserts an icon and the file name into your document rather than the slide itself. You'll have to click on the icon to see the slide.
2. Paste PowerPoint Slides Into Word
A more versatile yet straightforward method of embedding PowerPoint slides is to copy and paste them into Word. This allows you to select which slides you want to embed and exempts you from dealing with objects and links. Here's how you can paste PowerPoint slides into Word:
- Open your PowerPoint presentation.

- Right-click the slides and select Copy .
There are two ways you can proceed from here. You could paste your clipboard as it is or use the Paste Special option. The former will simply paste the slides as images, whereas the latter will paste the slides as proper editable objects. Here's how you can use Paste Special in Word:
- Switch to the Word document, and then click where you want the information to appear.

- In the Paste Special dialog box, select Microsoft PowerPoint Slide Object .
Like before, you can link to the source file by selecting Paste link . Selecting Paste will create a copy of the slide and won't reflect the changes in the source file. You can also check Display as icon to add an icon instead of the slide itself.
3. Export PowerPoint Handouts to Word
An additional method worth mentioning is using PowerPoint handouts . You can easily export these into Word to display slides in your document. PowerPoint handouts are essentially a compilation of slides with additional space for notes or annotations, making them an ideal choice for supplementary content in your Word document.

- In the dialog box, select your desired page layout and whether you want to insert links.
PowerPoint will open in Word and create a new document containing your slides.
Power Up Your Word Documents
Incorporating PowerPoint slides into your Word documents can enhance their visual appeal and effectiveness. Fortunately, Word and PowerPoint offer various methods for doing this. You can embed slides as objects, paste them as images, or create a PowerPoint handout.
By experimenting with these options, you'll be well on your way to creating compelling and informative documents that combine the power of Word and PowerPoint.
- Productivity
- Microsoft PowerPoint
- Microsoft Word

Import a Word document
Embed Word content directly into your PowerPoint presentation. You can import a Word document as an object, which inserts a static snapshot of the document. This is useful when the Word document is a single page and has pictures. Another option is to use a Word outline as the foundation for a presentation.
In this article:
Export a Word document to PowerPoint
Insert a word document as an object, use a word document as an outline to build your presentation.

Open the document you want to transform into a presentation in Word for the web. Make sure that it contains only text. The headings in the document will become the slide headings in the presentation.

This feature is only available for Word for the web. For more information, see Export Word documents to PowerPoint presentations .
Top of Page
The easiest way to insert a Word document is to first create your document in Word, then add it to your presentation.
Select the slide in which you want to place the Word document.
Click Insert > Object .

If the Word document already exists, in the Insert Object dialog box, select Create from file .

Click Browse to locate the Word document you want to insert. Select your Word document, and click OK .
Make sure the Link and Display as icon check boxes are clear. Click OK to insert the contents of your Word document as an object.
Note: If you prefer to have your Word document open in Word instead of in PowerPoint, select the Display as icon check box to insert an icon into the presentation. Clicking the icon will open the document in Word.

Tip: You can also insert a linked object . Select the Link check box to make your object a shortcut to the Word document you imported.
Discover more PowerPoint training at LinkedIn Learning
In your Word document, click Home .
Use Styles to format the content in your Word document.
Highlight the content you want to use as a slide title, and select Heading 1 in Styles .
Highlight the content you want to use as the slide text, and select Heading 2 in Styles .
In the Word document, click File > Save , and then click File > Close .
Note: Your Word document must be closed to insert it into a PowerPoint presentation.
Open PowerPoint, and click Home > New Slide .

Select Slides from Outline .

Find and select the Word document in the Insert Outline dialog box, and click Insert . A new slide will be created for each Heading 1 in you document.
Note: If your Word document contains no Heading 1 or Heading 2 styles, PowerPoint will create a slide for each paragraph in your content.
Understand the differences between linked objects and embedded objects
Change linked or embedded objects
Discover more courses like this at LinkedIn Learning

Need more help?
Want more options.
Explore subscription benefits, browse training courses, learn how to secure your device, and more.

Microsoft 365 subscription benefits

Microsoft 365 training

Microsoft security

Accessibility center
Communities help you ask and answer questions, give feedback, and hear from experts with rich knowledge.

Ask the Microsoft Community

Microsoft Tech Community

Windows Insiders
Microsoft 365 Insiders
Was this information helpful?
Thank you for your feedback.

How To Add PowerPoint Slides Into A Word Document
Published: August 2, 2023
Benefits of Adding PowerPoint Slides into a Word Document
Combining PowerPoint slides with a Word document can offer several advantages and greatly enhance your document’s visual appeal and effectiveness. Here are some key benefits of incorporating PowerPoint slides into your Word documents:
- Improved Visual Communication: PowerPoint slides are designed to convey information visually, making complex concepts easier to understand. By inserting these slides into a Word document, you can provide your audience with a comprehensive and engaging visual experience.
- Efficient Content Organization: PowerPoint slides can effectively break down information into concise points or sections. By adding them to a Word document, you can maintain a logical and structured flow, allowing readers to easily navigate through different topics or ideas.
- Enhanced Presentation Flexibility: If you’ve previously created a PowerPoint presentation and want to reuse the slides in a different context, adding them to a Word document provides the flexibility to repurpose your content. This allows you to create a cohesive document that combines the benefits of both formats.
- Clear and Professional Formatting: PowerPoint slides are typically designed with attention to visual aesthetics and layout. By including these slides in a Word document, you can maintain consistent formatting within your document and present information in a visually appealing and professional manner.
- Interactive Elements: PowerPoint slides often include interactive features like animations, multimedia elements, and hyperlinks. By incorporating these slides into a Word document, you can retain these interactive elements, enhancing the interactivity and engagement of your content.
By leveraging the benefits of combining PowerPoint slides and Word documents, you can create informative and visually captivating materials that effectively communicate your message. Whether you’re creating presentations, reports, or educational materials, this integration provides a powerful tool for delivering content with impact.
Step 1: Open PowerPoint and Word
The first step to adding PowerPoint slides into a Word document is to open both PowerPoint and Word applications on your computer. These two software programs are commonly used for creating presentations and documents, respectively.
To open PowerPoint, locate the program icon on your desktop or in your Start menu. Double-click on the icon, and the application will launch.
To open Word, follow the same steps as PowerPoint. Look for the program icon on your desktop or in your Start menu, and double-click to open it.
It’s important to note that you should have both applications installed on your computer before proceeding with this process. If you don’t have them installed, you can download and install them from official Microsoft websites or utilize the versions available in Office 365 subscriptions.
Once both PowerPoint and Word are open, you’ll be ready to proceed with the next steps to add PowerPoint slides into your Word document.
Keep in mind that the specific steps may vary slightly depending on the version of PowerPoint and Word you are using. However, the overall process remains relatively similar, regardless of the edition.
Now that you have PowerPoint and Word open, let’s move on to the next step, where you’ll prepare your PowerPoint slides for insertion into your Word document.
Step 2: Prepare Your PowerPoint Slides
Before adding PowerPoint slides into your Word document, it’s important to ensure that your slides are properly prepared. Follow these steps to prepare your PowerPoint slides:
- Create or Open a PowerPoint Presentation: If you already have a PowerPoint presentation with the desired slides, open it. Otherwise, create a new presentation and add the necessary slides. Ensure that the content on each slide is well-structured and visually appealing.
- Review Slide Content: Carefully review the content on each slide. Make any necessary edits or revisions to ensure that the information is accurate, concise, and aligned with the message you want to convey in your Word document.
- Consider Slide Design: Pay attention to the design elements of your slides, including font styles, colors, and layout. Aim for consistency and choose a design that complements the tone and purpose of your Word document.
- Remove Unnecessary Elements: Remove any elements from your slides that are not required in your Word document. This includes slide numbers, animations, transitions, and speaker notes. Simplify your slides to focus on the core content.
- Save Your PowerPoint Presentation: Once you’re satisfied with the slides, save your PowerPoint presentation. This will ensure that your work is saved and ready to be exported or inserted into your Word document.
By carefully preparing your PowerPoint slides, you can ensure that they fit seamlessly into your Word document and effectively contribute to the overall message you want to deliver. Taking the time to refine the content and design of your slides will enhance the clarity and professionalism of your Word document.
Now that your PowerPoint slides are prepared, we can proceed to the next step: exporting the slides as images to be inserted into your Word document.
Step 3: Export PowerPoint Slides as Images
To add PowerPoint slides into a Word document, you need to export the slides as images. This will allow you to insert the visuals seamlessly into your Word document. Follow these steps to export your PowerPoint slides as images:
- Select the Slides: Open your PowerPoint presentation and select the slides you want to export as images. You can either select individual slides by holding down the Ctrl key while clicking on each slide or select multiple slides by clicking and dragging your mouse over the desired slides.
- Access the Export Option: Once you have selected the desired slides, navigate to the “File” menu at the top left corner of the PowerPoint window. Click on “Save As” or “Export” to access the saving options.
- Choose Image Format: In the saving options, choose the image format you prefer. JPEG and PNG formats are commonly used for exporting PowerPoint slides as images. Consider your document’s requirements and the image quality you desire when selecting the format.
- Specify the Output Folder: Next, specify the folder where you want to save the exported slide images. It’s recommended to create a separate folder specifically for these images to keep them organized and easily accessible when you’re ready to insert them into your Word document.
- Adjust the Image Resolution: Depending on your needs, you may want to adjust the image resolution before exporting the slides. Higher resolutions will result in clearer and sharper images but may increase file sizes. Strike a balance between image quality and file size to ensure optimal performance.
- Export the Slides: Finally, click on the “Save” or “Export” button to export the selected slides as images. The images will be saved in the specified folder in the chosen format, ready to be inserted into your Word document.
By exporting your PowerPoint slides as images, you ensure that they can be easily inserted into your Word document without any formatting or compatibility issues. With this step complete, we can now move on to the next step of adding the exported slide images into your Word document.
Step 4: Open the Word Document
Now that you have exported your PowerPoint slides as images, the next step is to open your Word document. Follow these steps to open a Word document:
- Launch Microsoft Word: Locate the Microsoft Word application on your computer and open it by double-clicking on the program icon.
- Create a New Document or Open an Existing One: Once Word is open, you have the option to create a new document or open an existing one. To create a new document, click on the “File” menu at the top left corner of the Word window and select “New.” You can also choose to open an existing Word document by selecting “Open” from the “File” menu and navigating to the desired document’s location on your computer.
- Prepare the Word Document: If you have opened an existing Word document, review and prepare it for inserting your PowerPoint slide images. If you are creating a new document, add any necessary headers, footers, titles, or introductory content to set the context for your slide images.
- Save the Word Document: It’s important to save your Word document before inserting the slide images. Click on the “File” menu and select “Save” or use the keyboard shortcut Ctrl + S (Command + S on a Mac) to save your document. Choose a suitable file name and location for easy retrieval.
Opening your Word document prepares you to add the previously exported PowerPoint slide images seamlessly. Make sure you have the document ready and saved before moving on to the next step.
Now that your Word document is open and prepared, we can proceed to the next step: inserting the PowerPoint slide images into the document.
Step 5: Insert the PowerPoint Slide Images
After opening your Word document, the next step is to insert the PowerPoint slide images that you exported. Follow these steps to insert the slide images:
- Place the Cursor: Position your cursor in the Word document where you want to insert the first slide image. This could be at the beginning of a new paragraph, after a specific sentence, or within a designated layout element.
- Access the Insert Menu: Navigate to the “Insert” tab on the Word toolbar. This tab contains various options for adding different types of content to your document.
- Select the “Pictures” Option: Within the “Insert” tab, click on the “Pictures” button. This will open a file explorer window that allows you to locate and select the exported PowerPoint slide images.
- Choose the Slide Images: Browse through your computer folders and select the slide images you want to insert. To select multiple images, hold down the Ctrl key while clicking on each image. Once selected, click on the “Insert” button in the file explorer window.
- Manage the Slide Images: Word will automatically insert the selected slide images into your document at the cursor’s position. You can resize, move, or adjust the images as needed. To resize an image, click and drag the corner handles. To move an image, click and drag it to the desired location in your document.
- Repeat the Process: Repeat steps 1 to 5 for each slide image you want to insert into your Word document. Insert the images in the order you would like them to appear.
By inserting the PowerPoint slide images into your Word document, you effectively integrate visual elements that enhance the overall presentation and convey your message effectively. Organize and format the slide images according to your desired layout and document structure.
Now that you have inserted the slide images into your Word document, the next step is to adjust and customize them to fit seamlessly within your content. This will be covered in the next step.
Step 6: Adjust the Slide Images in Word
Once you have inserted the PowerPoint slide images into your Word document, the next step is to adjust and customize them to ensure they fit seamlessly within your content. Follow these steps to adjust the slide images:
- Resize the Images: Depending on the layout and design of your Word document, you may need to resize the slide images to achieve the desired visual balance. Click on an image to select it, then click and drag the corner handles to resize it proportionally. Alternatively, you can use the sizing options in the “Format” or “Picture Tools” tab that appears when an image is selected.
- Align the Images: Align the slide images with the surrounding text or other visual elements in your Word document. You can choose to align them to the left, right, center, or justify them to span the full width of the page. Use the alignment options available in the “Format” or “Picture Tools” tab to achieve the desired alignment.
- Wrap Text: The text in your Word document may overlap with the slide images. To avoid this, you can wrap the text around the images. Select an image, go to the “Format” or “Picture Tools” tab, and choose the appropriate text wrapping option, such as “Square,” “Through,” or “Tight.” Experiment with different options to see what works best for your document’s layout.
- Apply Borders or Effects (Optional): If desired, you can further enhance the appearance of the slide images by applying borders or effects. Select an image, go to the “Format” or “Picture Tools” tab, and explore the available options for borders, shadows, reflections, or other effects that can add depth and visual interest to your images.
- Group or Arrange Images (Optional): If you have multiple slide images, you might want to group them together or arrange them in a specific order. Select the images, go to the “Format” or “Picture Tools” tab, and use the options to group, ungroup, arrange, or align the images as needed.
By adjusting the slide images in your Word document, you can ensure they blend harmoniously with your content and effectively convey your message. Pay attention to the visual aesthetics and the overall layout of your document, using these adjustment options to achieve a polished and professional look.
With the slide images adjusted, you’re now ready to add captions or descriptions to provide context and clarity. This will be covered in the next step.
Step 7: Add Captions or Descriptions to the Slide Images
To provide context and enhance the understanding of your PowerPoint slide images within your Word document, it’s important to add captions or descriptions. Follow these steps to add captions or descriptions to the slide images:
- Select an Image: Click on the slide image to select it. You can select one image at a time or multiple images simultaneously by holding down the Ctrl key while clicking on each image.
- Access the Caption or Description Option: Go to the “References” tab in the Word toolbar. This tab contains options related to referencing and captions.
- Add a Caption: Click on the “Insert Caption” or “Add Caption” button in the “References” tab. A dialog box will appear, allowing you to enter the caption or description for the selected image.
- Enter the Caption or Description: In the dialog box, enter the text for the caption or description. Be concise yet descriptive, providing information that helps readers understand the content and context of the slide image.
- Format the Caption: Customize the formatting of the caption to match the style of your document. You can modify the font size, style, alignment, or add a numbering system if desired.
- Apply the Caption: Once you’re satisfied with the caption or description, click the “OK” or “Insert” button in the dialog box to apply it to the selected image(s).
- Review and Edit Captions: Verify that the captions or descriptions are correctly applied to the appropriate slide images. Take some time to review and edit the captions, ensuring they accurately reflect the content and purpose of each image.
By adding captions or descriptions to your slide images, you provide additional information and enhance the accessibility and clarity of your document. This helps readers fully understand and interpret the visuals within the context of your overall content.
With the slide images now accompanied by captions or descriptions, the next step is to further customize and refine them according to your specific needs. We will cover this in the following step.
Step 8: Customize the Slide Images in Word
To make your PowerPoint slide images stand out and align with your Word document’s style and design, you can further customize them. Follow these steps to customize the slide images:
- Select an Image: Click on the desired slide image to select it. You can select one image at a time or multiple images simultaneously by holding down the Ctrl key while clicking on each image.
- Access the Picture Formatting Options: Navigate to the “Format” or “Picture Tools” tab in the Word toolbar. This tab contains various formatting options for working with images.
- Apply Picture Styles: Experiment with different picture styles available in the “Format” or “Picture Tools” tab to apply pre-designed effects and enhancements to your images. Styles can modify the image’s borders, shadows, reflections, and other visual attributes.
- Adjust Brightness, Contrast, or Color: Fine-tune the appearance of the slide images by adjusting brightness, contrast, or color saturation. Explore the available options in the “Format” or “Picture Tools” tab, such as the “Corrections,” “Color,” or “Recolor” features. Make adjustments that enhance the clarity and visual impact of the images.
- Crop or Rotate Images: To emphasize specific parts of an image or improve its composition, use the cropping or rotating options available in the “Format” or “Picture Tools” tab. Crop out unwanted elements or rotate the image to a desired angle.
- Add Borders, Shapes, or Text Boxes (Optional): For additional customization, consider adding borders, shapes, or text boxes around or over the slide images. Use tools like the “Drawing Tools” or “Shapes” options available in the Word toolbar to create visually appealing elements that further highlight your images.
- Experiment and Preview: Continuously experiment with different formatting options and preview the results to see how they complement your Word document. Make adjustments until the slide images are visually aligned with your overall design and effectively convey your message.
By customizing the slide images in your Word document, you can create visually appealing and professional-looking content that enhances the reader’s experience. Take time to explore different options, experiment with various effects, and ensure that the customizations you apply align with the theme and tone of your document.
With the slide images now customized to your liking, the final step is to save and share your Word document with the PowerPoint slides embedded within it, ready for presentation or distribution.
Step 9: Save and Share Your Word Document with PowerPoint Slides
After adding PowerPoint slides to your Word document and customizing them, it’s time to save and share your final document with others. Follow these steps to save and share your Word document with embedded PowerPoint slides:
- Save Your Document: Before sharing, save your Word document to ensure that all changes and additions are preserved. Click on the “File” menu at the top left corner of the Word window, then select “Save” or use the keyboard shortcut Ctrl + S (Command + S on a Mac). Choose a suitable file name and location to save your document.
- Check Compatibility: Ensure that the Word document is compatible with the intended recipients’ software. Save the document in a format that is widely used and accessible, such as .docx or .pdf.
- Share Electronically: Share your Word document digitally by attaching it to an email or uploading it to a cloud storage service. Provide clear instructions to recipients on how to access and view the document.
- Print a Hard Copy (Optional): If necessary, you can print copies of your Word document with the embedded PowerPoint slides. Ensure that you have access to a printer and select the appropriate printer settings for optimal print quality.
- Include Instructions (Optional): If there are specific instructions or guidelines for viewing the document, include them in an accompanying email or document to provide recipients with additional context or usage tips.
- Ensure Proper Viewing: Prior to sharing, open the Word document on different devices and software applications to verify that the PowerPoint slides are displayed correctly. This step helps identify any formatting or compatibility issues that need to be addressed.
By saving and sharing your Word document with embedded PowerPoint slides, you can distribute your content to colleagues, clients, or any audience you wish to engage with. Whether you’re presenting information, sharing reports, or providing educational materials, this final step allows others to benefit from the combined power of PowerPoint slide visuals and textual content within a single document.
Congratulations! You have successfully learned how to add PowerPoint slides into a Word document and share it with others. Have fun creating impactful and visually appealing documents!

Related Stories
Converting PowerPoint Slides To Word Documents
Hyperlinks, Bookmarks, And Cross-References In Microsoft Office
How To Use Speaker Notes In PowerPoint
How To Make A Word Cloud In PowerPoint
Link Data In Excel, Word, And PowerPoint With Paste Link
Add Hyperlinks To PowerPoint Presentations
How To Use Dual Displays When Working With Microsoft Office
How To Apply Security In PowerPoint Presentations

Avoiding Common Mistakes When Choosing Movers from Boston to DC

From Homemaker to OnlyFans Star: The Journey of a Housewife from Spain

How to Merge PDF Files Without Losing Quality: Tips and Tricks

How to File a Wrongful Death Claim in Texas?

Top Gold-Farming methods in WoW Dragonflight Fourth Season

Top 100 Christmas Songs for the Best Christmas Music

The Life and Career of Dean Haglund: A Journey from Canada to the Paranormal and Beyond

16 Best Ad Blocker For Every Browser and Device

Different Types of Aesthetics: 30 Outfit Ideas to Step Up Your OOTD Game

Monopoly Man Monocle and 10 Other Popular Examples of the Mandela Effect
The Best Way To Insert Your PowerPoint Graphics Into Word
by Brother Shawn | Knowledge Base , PowerPoint Graphics Questions | 0 comments

Follow these instructions to embed a graphic into your Word document. These steps guarantee that your graphic’s fonts are the correct size and give you the option of making your graphic editable in Word.
- Determine the width of your graphics for Word. For example, one inch margins = 6.5” wide graphics if they are to be the full width of the page text. If your graphics are to be less than the full width of the page text, you can choose any width you need.
- On your graphic select all of the graphic elements you want to use and Group them.
- “Cut” your graphic (click CTRL+X). Note: you want to copy and delete (also called “cut”) your graphic because when you change the Page Size your graphic scales proportionally. That could distort your graphic and change font size.
- Open both your Word document and your PowerPoint graphic.
- Switch to PowerPoint, and copy (Press CTRL+C.) the slide with the graphic that you want. Note: Select your slide in Slide Sorter view.
- Switch to your Word document, and then click where you want your graphic to appear.
- On the Home tab, in the Clipboard group, click the arrow under Paste, and then click Paste Special.
- In the As list, select Microsoft Office PowerPoint object. You have many other options and each has advantages and disadvantages. Try each of the following Paste methods to see what works best for you: • You can click Paste to insert an embedded object, or click Paste link to insert a link to the object. • You can insert a graphic by selecting your graphic (not your whole slide) and Paste Special into Word but the file will not be editable. • You can save your PowerPoint graphic as a jpg, tiff, gif, png and choose “Insert/Picture/From File…” Navigate to your graphic and choose it for inclusion in your Word document.
TaDaa! You are done. Now your graphic is in Word in the format that works best for you.
Submit a Comment Cancel reply
Your email address will not be published. Required fields are marked *
Recent Posts
- Bad PowerPoints Happen to Good People (But Not You)
- Fresh New PowerPoint Template Styles for Spring
- How to Create Awesome Zoom Virtual Backgrounds
- Why Color Contrast Matters in Your PowerPoint Presentations
- Creating Branching Scenarios in PowerPoint
Recent Comments
- Karen Webb on 5 PowerPoint Design Tips from a Graphic Designer
- Miriam Castellon on PowerPoint Tips: Over 25 Ways to Save a Presentation
- Elevano Consulting on Get Rolling with these 40 New Hub and Spoke Graphics
- Miguel Monteiro on 5 Things You Didn’t Know PowerPoint Could Do
- Philippa Leguen de Lacroix on 5 Things You Didn’t Know PowerPoint Could Do
- February 2020
- January 2020
- December 2019
- January 2017
- December 2016
- November 2016
- October 2016
- September 2016
- August 2016
- February 2016
- January 2016
- December 2015
- November 2015
- October 2015
- September 2015
- August 2015
- February 2015
- January 2015
- December 2014
- November 2014
- October 2014
- September 2014
- February 2014
- January 2014
- December 2013
- Cutout People Images
- Cutout People Images Questions
- Knowledge Base
- Membership/Account
- PowerPoint Graphics
- PowerPoint Graphics Questions
- PowerPoint Tips
- Stock Images
- Uncategorized
- Entries RSS
- Comments RSS
- WordPress.org
How to insert a word document into PowerPoint: Step-by-Step Guide
Inserting a Word document into PowerPoint can be a game-changer when you’re trying to create a dynamic presentation. With just a few clicks, you can integrate all the information from a Word doc into your slides, making it easier for your audience to follow along. So, let’s dive in and learn how to do it!
Step by Step Tutorial on How to Insert a Word Document into PowerPoint
Before we jump into the steps, know that inserting a Word document will save you loads of time copying and pasting text. You can insert the whole document, or just parts of it, into your presentation.
Step 1: Open your PowerPoint presentation
To start, open the PowerPoint presentation where you want to insert the Word document.
Opening PowerPoint is as simple as clicking on the icon on your desktop or searching for it in your computer’s search bar. Once the program is open, you can either create a new presentation or open an existing one where you want to insert the document.
Step 2: Click on the "Insert" tab
Look for the "Insert" tab at the top of the PowerPoint window and click on it.
The "Insert" tab is where all the magic happens. It’s where you can add all sorts of things to your slides, like pictures, charts, and yes, documents!
Step 3: Select "Object" in the "Text" group
Within the "Insert" tab, you’ll find a group labeled "Text." Click on "Object" located in this group.
When you click on "Object," a dialog box will pop up that offers you several options for what kind of object you want to insert. This is where you’ll be able to insert your Word document.
Step 4: Choose "Create from file" and browse for your Word document
In the dialog box, select "Create from file," then click "Browse" to find and select your Word document.
Choosing "Create from file" allows you to insert the document as is, without any need to modify it first. Once you’ve found the file, select it and click "OK."
Step 5: Decide whether to link to the Word document
You have the option to link to the Word document. If you choose this, any changes made to the Word file will update in PowerPoint.
Linking to the Word document can be handy if you’re working on a document that’s frequently updated. However, if the file is final, you might not want to link it.
Step 6: Click "OK" to insert the Word document into your slide
After making your choice about linking, click "OK," and your Word document will be inserted into your PowerPoint slide.
And just like that, your document is now a part of your PowerPoint presentation! You can resize and move the object around on your slide to fit your layout.
After completing these steps, your Word document will be successfully inserted into your PowerPoint presentation. You can now manipulate the document within your slide, zoom in on specific sections, or scroll through the pages.
Tips for Inserting a Word Document into PowerPoint
- Make sure your Word document is finalized before inserting it to avoid unnecessary edits in PowerPoint.
- If you link the Word document, remember that any changes made to the original file will reflect in the presentation.
- Keep your Word document short and concise; lengthy documents can be overwhelming in a presentation.
- Consider breaking up the document into sections and inserting them on different slides for clarity.
- Use the "Format Object" options in PowerPoint to enhance the inserted document’s appearance with borders or effects.
Frequently Asked Questions
Can i edit the word document once it’s inserted into powerpoint.
No, you can’t directly edit the Word document in PowerPoint. You’ll need to edit the original Word file and then re-insert or update the link in PowerPoint.
Will the formatting from the Word document transfer over to PowerPoint?
Yes, most formatting will transfer over, but some complex elements may not appear exactly as they do in Word.
What if I only want to insert part of the Word document?
You can either edit the Word document before inserting it or take a screenshot of the part you want and insert it as an image.
Can I insert a Word document into PowerPoint on a Mac?
Yes, the process is similar on a Mac. You’ll use the "Insert" tab and the "Object" option to insert the Word document.
Is it possible to insert a Word document into an existing text box in PowerPoint?
No, you cannot insert a Word document into an existing text box. The document is inserted as an object that can be resized and moved, but not within a text box.
- Open your PowerPoint presentation
- Click on the "Insert" tab
- Select "Object" in the "Text" group
- Choose "Create from file" and browse for your Word document
- Decide whether to link to the Word document
- Click "OK" to insert the Word document into your slide
Inserting a Word document into PowerPoint is a seamless way to enhance your presentation without the hassle of manually copying text. It’s a straightforward process that can save you time and keep your slides looking professional and uniform. Whether you’re presenting in a classroom, a boardroom, or at a conference, the ability to incorporate a Word document directly into your PowerPoint slides is an invaluable skill.
Remember, once inserted, treat the document as you would any other element in PowerPoint. Resize it, position it, and make sure it complements your presentation’s overall flow. And don’t forget, if you link the document, any updates you make in Word will automatically reflect in PowerPoint, keeping your content fresh and up-to-date.
Now that you know how to insert a word document into PowerPoint, start integrating your reports, essays, and other documents into your presentations to create a more dynamic and informative experience for your audience. Happy presenting!

Matt Jacobs has been working as an IT consultant for small businesses since receiving his Master’s degree in 2003. While he still does some consulting work, his primary focus now is on creating technology support content for SupportYourTech.com.
His work can be found on many websites and focuses on topics such as Microsoft Office, Apple devices, Android devices, Photoshop, and more.
Share this:
- Click to share on Twitter (Opens in new window)
- Click to share on Facebook (Opens in new window)
Related Posts
- How to Rotate a Powerpoint Slide Presentation
- How to Insert Word Doc into PowerPoint: A Step-by-Step Guide
- How to Download a Google Slides Presentation as a Powerpoint File
- How to Insert an Excel Spreadsheet Into Powerpoint: A Step-by-Step Guide
- How to Do a Powerpoint Google Slides Presentation Conversion
- How to Make Google Slides Vertical (5 Quick Steps)
- How to Insert Slides from Another Presentation: Powerpoint 2024 Guide
- How to Add a Hyperlink on Google Slides
- How to Add a New Slide in Google Slides: A Step-by-Step Guide
- How to Delete a Slide in Powerpoint 2010: Step-by-Step Guide
- How to Merge Files in Powerpoint: A Step-by-Step Guide
- How to Delete Multiple Slides in Google Slides: A Step-by-Step Guide
- How to Hide a Slide in Powerpoint 2010: A Step-by-Step Guide
- How to Make a Powerpoint Slide Vertical in Powerpoint 2013: A Step-by-Step Guide
- How to Convert Powerpoint to Google Slides: A Tech Solution
- How to Remove Slide Numbers in Powerpoint 2019: Easy Steps
- How to Insert a File Into a Word 2013 Document: A Step-by-Step Guide
- How to Duplicate a Slide in Powerpoint: A Step-by-Step Guide
- How to End Powerpoint on Last Slide in Powerpoint 2010: A Step-by-Step Guide
- How to Insert a Google Slides Page Number: Step-by-Step Guide
Get Our Free Newsletter
How-to guides and tech deals
You may opt out at any time. Read our Privacy Policy
Critical PowerPoint Shortcuts – Claim Your FREE Training Module and Get Your Time Back!
How to Convert PowerPoint to Word (Step-by-Step)
- PowerPoint Tutorials
- Shortcuts & Hacks
- October 2, 2019
In this article, you’ll learn how to convert PowerPoint to Word so that you can edit your handouts or speaker notes directly in Microsoft Word.

The only issue you need to be aware of is the content on your slides.
Converting PPT to Word does NOT convert the content of your slides into a Microsoft Word document. Instead, the process exports your slides as thumbnails in one of five following handout layouts:

The five handout options when converting PowerPoint to Word are:
- Notes next to slides
- Blank lines next to slides
- Notes below slides
- Blank lines below slides
- Outline only
There is currently no way to convert the content of your individual slides – text boxes, shapes, SmartArt graphics, etc. – into a native Word document. For that, you will unfortunately have to copy and paste your information manually, slide by slide.
Below you’ll find a variety of methods to convert your PowerPoint slides to Word. Choose the method that works best for you.
NOTE: If you are just trying to convert your slides into the PDF file format, you DO NOT need to convert your PowerPoint presentation into a Word document first. Instead, you can simply save your PowerPoint presentation in the PDF file format. Read our guide here for details .
Table of Contents
[watch] convert powerpoint to word (speaker notes only).
You are currently viewing a placeholder content from Youtube . To access the actual content, click the button below. Please note that doing so will share data with third-party providers.
Exporting your slides to Microsoft Word like this embeds your slides as thumbnails within a table.
While you cannot edit the individual PowerPoint slides, you can manipulate the table to format your handouts any way you like.
To see an example of how to convert PowerPoint speaker notes to Word without the thumbnail, watch the short video above. To learn more different ways you can print PowerPoint notes, read our guide here .
How to Convert PowerPoint to Word

To convert your PowerPoint slides into Microsoft Word handouts, simply:
- Navigate to the File tab
- Select Export
- Click on the Create Handouts section
- Select the Create Handouts command
- Choose your Handout Type
- Select Paste or Paste Link (explained below)
As a result, Microsoft Word opens, and your PowerPoint slides are converted into handouts based on your selection. For example, here’s how your slides look for the ‘Blank lines next to slides’ option.

Paste vs. Paste Link Options
At the bottom of the Send to Microsoft Word dialog box, you are given the option to Paste or Paste link (as pictured below).

Paste: Exports your slides to Microsoft Word as a standalone file. Any updates or edits you make to your slides in PowerPoint will not be reflected in Word.
If you update your slides and want those changes reflected in Word, you will need to export your slides all over again.
Paste link: Exports your slides to Word as linked thumbnail images. Any edits you make to your slides in PowerPoint will be automatically updated within the thumbnail images inside Word.
This is all great. However, there are two caveats to the Paste link option to be aware of. Read on to see what they are.
Caveat #1: Only the PowerPoint thumbnails are linked to Word
The link created only updates the thumbnails of your slides in Word.
That means that if you export your slides to Word with your Speaker Notes beneath the slides, and you later update those speaker notes in PowerPoint, your changes will not be reflected in the Word document.
You’ll need to follow the steps above to convert PPT to Word all over again, to have your changes accurately reflected.
Caveat #2: The Word thumbnails only live in Word
Any updates and edits you make to your slides in PowerPoint will be updated in Microsoft Word.
But if you delete slide thumbnails in Word or move things around, none of those changes will be reflected in PowerPoint.
In fact, any changes like these will be overwritten as soon as PowerPoint pushes its latest updates back to Word.
How to View linked PowerPoint Slides in Microsoft Word

To view any linked PowerPoint slides you have in Microsoft Word, simply:
- Select the Info tab
- Click Edit Links to Files
This opens the Links dialog box, which you can see below.

This is where you can update, edit, and manage any linked files to your Word document. Here is a quick rundown of what each of these options does:
Update Now: This forces Word to update based on whatever is in your PowerPoint file. This normally happens by default whenever you save your PowerPoint presentation, but you can control when it happens here.
Open Source: This will open the PowerPoint presentation from which these slides are linked. This can be faster than trying to find the original presentation you used to create your handouts.
NOTE: If you move your PowerPoint presentation to a different place on your computer or change its file name after you convert PowerPoint to Word, you will get the following error: “This object is corrupt or no longer available”.
To fix this, simply use the Change Source option to re-locate the file. It’s either in a different location on your computer or has a new name.

Change Source: This allows you to change which PowerPoint file you are linked to. It’s useful if you have updated the name of your PowerPoint file after you converted it to Word.
To maintain an active link between PowerPoint and Word, the PowerPoint file’s name needs to be the same.
Break Link: This allows you to break the PowerPoint to Word links for individual slides. When you break the link to a slide (as discussed further below), it will no longer update in Word as you edit it in PowerPoint.
Update method for selected link: If you don’t want your files to automatically update, you can choose to manually update them instead.
How to Update a Linked PowerPoint Slide
Now that you know how to link PowerPoint slides to Word, there are two ways that you can update the links. Both methods achieve the same goal, so just pick the one that makes the most sense (and is easiest to remember) for you.
1. Right-click the slides in Word

To update an individual linked PowerPoint slide in Word, simply:
- Navigate to the slide you want to update
- Right-click the slide’s thumbnail picture in Word
- Select Update Link
NOTE: This only updates the converted PowerPoint slide you selected. If you want to update the rest of your slides, you’ll need to right-click them individually or use the next technique.
2. Use the Edit Links to Files command

To update all your linked PowerPoint slides in Microsoft Word, simply:
- Click the Info tab
- Select Edit Links to Files
- Select the slide you want to update
- Click Update Now
If you have multiple slides you want to update, you can continue selecting slides and updating them in Word.
If your document is set to Automatic Update, you can also just close and reopen Word to have all of your links automatically update (as long as you have saved and closed your PowerPoint presentation).
How to Break Linked PowerPoint Slides in Word

To break the links between your PowerPoint and Word files, from within Microsoft Word, simply:
- Select the linked slide you want to break
- Click Break Link
Because each PowerPoint slide thumbnail is considered a link, if you want to remove all the links, you will need to click on each slide and break it individually.
How to Insert PowerPoint into Word (as an embedded presentation)
An alternative to converting PowerPoint to Word as handouts is to instead embed your presentation inside of Microsoft Word.
When you do this, instead of inserting pictures of your slides, your entire PowerPoint presentation is is embedded. You can then double-click it to launch your presentation in PowerPoint.
To embed a PowerPoint presentation inside of Word, from within Microsoft Word simply:
- Navigate to the Insert tab
- Open the Object dropdown menu
- Select Object
- Choose Create from file
- Click Browse
- Navigate to and select your PowerPoint file
- Choose Link to File (assuming you want changes to automatically update)
As a result, your PowerPoint presentation becomes embedded in your Word document.

As you can see, there are several ways to convert PowerPoint to Word depending on what you are trying to accomplish. In addition, you have several options to choose from for each method.
Is it worth your time to link the two programs together? That depends on how frequently you need to update your PowerPoint slides (and want those updates reflected in Word). If you decide to go this route, I recommend spending a few extra minutes reviewing the tips above on linking and updating links, so you know what to expect (and how to fix things if your links get broken).
If you decide not to link PowerPoint to Word, you can always easily export your PowerPoint slides to Word whenever you update them. This is my recommendation for you if you are not updating your slides frequently.
If you enjoyed this article and want to learn more about our online training courses and resources, you can visit us here .
🔒 Unlock the PowerPoint Shortcuts Trusted by Industry Leaders KKR, American Express, HSBC, and More!
Join over 114,880 professionals from diverse fields including consulting, investment banking, advertising, marketing, sales, and business development who have supercharged their PowerPoint game with our proven methods.
✅ Customize compelling presentations effortlessly.
✅ Master time-saving techniques for faster deck creation.
✅ Boost your career prospects with top-notch PowerPoint skills.
Get FREE access to the Critical PowerPoint Shortcuts module of our premium training course by entering your name and email below.
DISCLAIMER: PC Users Only!
We respect your privacy and will keep your info safe and confidential.
Related Articles
About the author.

This Post Has 2 Comments

This is great, but the file size becomes enormous once in word.

Yes this is true. You can check the compression options in Word to try to reduce the file size. Select a picture, go to Picture Format tab > Compress (inside Adjust) and select either Print or Web. It’s the same steps as for PPT, as we cover in our tutorial here: https://nutsandboltsspeedtraining.com/powerpoint-tutorials/powerpoint-compress-images/
Comments are closed.
Popular Tutorials
- How to Strikethrough Text (l̶i̶k̶e̶ ̶t̶h̶i̶s̶) in Word, Excel & PowerPoint
- How to Make Animated Fireworks in PowerPoint (Step-by-Step)
- Strikethrough Shortcut (l̶i̶k̶e̶ ̶t̶h̶i̶s̶) for Word, Excel & PowerPoint
- How to Create a Flash Card Memory Game in PowerPoint (Like Jeopardy)
- Keyboard Shortcuts Not Working: Solved
PowerPoint Tutorial Categories
- Strategies & Opinions
- Presentation Design
- Pictures, Icons, Videos, Etc.
- New Features
- Miscellaneous
- Charts & Data Viz
We help busy professionals save hours and gain peace of mind, with corporate workshops, self-paced courses and tutorials for PowerPoint and Word.
Work With Us
- Corporate Training
- Presentation & Template Design
- Courses & Downloads
- PowerPoint Articles
- Word Articles
- Productivity Resources
Find a Tutorial
- Free Training
- For Businesses
We help busy office workers save hours and gain peace of mind, with tips, training and tutorials for Microsoft PowerPoint and Word.
Master Critical PowerPoint Shortcuts – Secure Your FREE Training Module and Save Valuable Time!
⌛ Master time-saving expert techniques.
🔥 Create powerful presentations.
🚀 Propel your career to new heights.
We value your privacy – we keep your info safe.
Discover PowerPoint Hacks Loved by Industry Giants - KKR, AmEx, HSBC!
Over 114,880 professionals in finance, marketing and sales have revolutionized their PPT skills with our proven methods.
Gain FREE access to a full module of our premium PowerPoint training program – Get started today!
We hate spam too and promise to keep your information safe.
You are currently viewing a placeholder content from Facebook . To access the actual content, click the button below. Please note that doing so will share data with third-party providers.
Unsupported browser
This site was designed for modern browsers and tested with Internet Explorer version 10 and later.
It may not look or work correctly on your browser.
- Presentations
How to Insert Word Documents into PowerPoint Quickly and Easily (+Video)
- Bahasa Indonesia
- العربية/عربي
Most Microsoft Office apps play nicely together. Word and PowerPoint are no exception! You can quickly insert Word document into PowerPoint slides. It’s a great way to insert files in PPT for your presentation audience to review.

In this tutorial, you’ll learn how to insert a document into PowerPoint. We’ll take a Microsoft Word file and add it to a PowerPoint presentation. It’s a great example of how Microsoft Office apps work well together, to help you work more efficiently.
We also have a helpful complement to this tutorial. Download our FREE eBook: The Complete Guide to Making Great Presentations . Grab it now before you read on.

How to Insert Word Documents Into PowerPoint Quickly (Quickstart Video)
In this tutorial we use the Simphony template . You can find more great PPT presentation templates on Envato Elements in our Ultimate Guide to the Best Microsoft PowerPoint Templates .

To learn more, read the tutorial below.
Jump to content in this section:
- Find the Insert > Object Menu
- Insert Word Document Into PowerPoint
- Place on Your Slide
How to Insert a Word Doc in PPT
Ready to learn how to insert a Word doc in PowerPoint? We've got you covered with a written set of instructions.
Let’s work through how to insert document in PowerPoint presentations from Microsoft Word. It’s an easy process that you’ll find yourself using often. Learning how to insert document in PowerPoint files helps you add more content.

For this quick tutorial, we’ll work with the beautiful Simphony Presentation Template from Envato Elements. It’s a stunning design that you can use to learn how to insert a file into PPT from Microsoft Word.
1. Find the Insert > Object Menu
Ready to learn how to insert a document in PowerPoint with ease? It’s time to get started! With the Simphony template open, navigate to a slide where you want to insert files in PPT. This template is compatible with our insert files in PPT steps.
Once you’re there, find PowerPoint’s ribbon. The ribbon is the series of menu bars across the top of the screen. You’ll see these labeled Home, Insert, Draw, Design , and more. In this case, find Insert and click on it.

The Insert tab opens, with an array of options displayed. They’re grouped into several distinct categories. Among these is the Text group. Find it, then choose Object .
2. Insert Word Document Into PowerPoint
When you click the Object button, you’ll see the menu that lets you insert file into PPT. It’s the Insert Object menu, and with it you can see how to insert a file into PPT.
On the left, locate the Create from file bubble. Click it. This feature lets you navigate to a file that you've got stored on your computer. Then, use it to watch how to insert a Word doc in PowerPoint.

Now, click Browse . A file explorer window opens. On it, browse to a Word document that you've got stored on your computer. When you find it, click to select it. Then, choose OK . This is the key step as you learn how insert a Word doc in PowerPoint.
3. Place on Your Slide
You’re ready to insert file into PPT from your Word document! It’s a good idea to show the document’s icon right on the slide. This way, your audience knows that you've got a file ready to share.

To do this, click the Display as icon check box on the Insert Object menu. If you don’t check this, you’ll see the contents of your Word document appear right on the slide.
This can be a useful option, but it’s often better to show an icon rather than the full file. Finally, click OK.

That’s it! You’ve just learned how to insert a Word document into PowerPoint. You’ll see a small Word thumbnail appear on your slide. Click and drag to move it around the slide. Pick a convenient spot, and you’re all set! Readers of your slides can now click and explore the document that you’ve attached.
Learn More About Microsoft PowerPoint with Envato Tuts+
You just learned how to insert a Word doc in PowerPoint. It's a crucial skill to bring together the best of two files. When you insert files in PPT, your viewer can jump between documents easily.
Learn more in our PowerPoint tutorials and quick video tutorials on Envato Tuts+. We've got an assortment of PowerPoint material to help you work better with images in your presentations:

Find More Templates (For Great PowerPoint Presentations in 2024)
Thinking of how to insert a document into PowerPoint, remember premium templates. They’re your best friend in 2024! Use them to unlock design inspiration and save time.
It can be hard to choose a great PowerPoint template. That’s because there are so many options! To help you decide, we’ve collected some of the very best Envato Elements PowerPoint templates. Explore these collections today to find your new favorite template:

Make Great Presentations ( Free PDF eBook Download )
We also have the perfect complement to this tutorial, which walks you through the complete presentation process. Learn how to write your presentation, design it like a pro, and prepare it to present powerfully.

Download our new eBook: The Complete Guide to Making Great Presentations . It's available for free with a subscription to the Tuts+ Business Newsletter.
The Top Source for the Best PowerPoint PPT Templates (With Unlimited Downloads)
Envato Elements is the ultimate source for the very best premium PowerPoint templates. With thousands to pick from , finding the perfect one is truly a breeze.
The Elements offer is powerful: unlimited downloads. For a flat monthly rate, download and use as many premium PowerPoint templates as you want! Use these to insert files in PPT from Word and other Microsoft Office apps. They help you share your content in style.
And that’s not all. As an Elements subscriber, you’ll enjoy unlimited access to over 15 million digital assets. These include:
- stock photos
Combine them with your favorite PPT templates to create unforgettable presentations.

Embrace the premium templates from Envato Elements and enjoy:
- Sleek, modern designs. These elegant layouts can’t be found for free online. They’re hand-crafted by creative experts with you in mind.
- Inspiring features. Can’t decide how best to share your content with your audience? Just fill in the blanks in an Elements template! You’ll find new ways to present on every slide.
- Easy-to-use layouts. Not a presentation design expert? You don’t have to be! Templates from Elements are intuitive and simple to work with. Plus, many include helpful tutorial guides in the download.
As you can see, if you want to insert files in PPT, Elements templates are your best friend. Join today and get to work downloading cool new designs for all of your presentation needs.
Insert Files in PPT Today - Quickly and Easily!
In a few steps, you’ve just learned how to insert a document into PowerPoint. Consider the possibilities. Now, you can share detailed documents with your presentation audience. But you don’t have to tie up valuable slide space or interrupt the flow of your presentation!
Instead, you can seamlessly attach documents for your viewers to read - all on their own schedule. Do it with a premium Envato Elements PowerPoint template to create incredible slide decks that audiences will love.
So, what are you waiting for? Put your new skills to work now. Insert file into PPT and watch as audiences learn more and benefit from the full scope of your creative content.

How-To Geek
How i use copilot to easily create powerpoint presentations in minutes.

Your changes have been saved
Email Is sent
Please verify your email address.
You’ve reached your account maximum for followed topics.
Quick Links
You first need to add copilot to powerpoint, generate an entire presentation with a single prompt, asking copilot to add a slide, add images to the presentation using copilot, organizing the presentation with copilot’s help, key takeaways.
- Ensure you have a Microsoft 365 and Copilot Pro subscription in order to use Copilot in PowerPoint.
- You can generate a full presentation, with text, images, and summaries, by providing a single prompt to Copilot.
- You can also request Copilot to add slides and images or organize the presentation.
When I have trouble creating a presentation in PowerPoint, I use something in my creative arsenal that can help me do it in minutes: Copilot. Here's how I use it to generate entire presentations, add slides, and more.
To use Copilot in PowerPoint, you need two subscriptions. Since PowerPoint is a Microsoft 365 app , you’ll need a Microsoft 365 subscription, which costs $6.99 a month. You will also need a Copilot Pro subscription, which costs $20 per month.
After purchasing those subscriptions, you should see the "Copilot" button on the ribbon of the Home tab in PowerPoint.

If you don't see Copilot, you'll need to add it by updating your Microsoft 365 license. To do that, head to File > Account and click “Update License” in the Product Information section.

Then, follow the instructions to sign in to your Microsoft account. Ensure it’s the one with the Microsoft 365 and Copilot Pro subscriptions. Then, close PowerPoint and relaunch it—you should be able to see Copilot now.
If you want to create an entire presentation, you have to tell Copilot the topic of the presentation, and it will generate it for you. To do that, use the following syntax: Create a presentation about [Topic] . In the prompt, replace Topic with what you want Copilot to write about.
If you want it to include additional slides based on the topic, you can expand your prompt further. You could, for instance, add the following to the prompt: Include slides about [Sub Topic 1], [Sub Topic 2], [Sub Topic 3] . Replace Sub Topic 1, Sub Topic 2, Sub Topic 3, and so on in the prompt with the topics of the slides.
For instance, I created a presentation about doomscrolling using this prompt: Create a presentation about doomscrolling. Include slides about what it is, its origin, why we do it, and how to stop it .

Once you press Enter on your keyboard, Copilot will generate an entire presentation, complete with text and images. Also, it will include notes at the bottom of each slide, giving you a quick summary. Take time to go through it and correct any errors—AI-generated content might consist of incorrect information.
One thing to remember is that Copilot might not have created the exact number of slides you stated. It might add more or miss some (it's not perfect).
After Copilot creates the presentation, you can ask it to add more slides. The syntax is: Add a slide about [Topic] . In a presentation about the steps to mindful meditation, I wanted to add a slide about remembering to notice thoughts. I typed the following in Copilot: Add a slide about noticing thoughts without passing judgment .

If I wanted to animate a slide, I would select it from the list of slides on the left panel, and type: Animate this slide . I can even add an agenda to the entire presentation by typing: Add an agenda slide .
You can add images to a slide by using the following syntax: Add an image of [Image Description] . Ensure it's short and sweet while being adequately descriptive so that Copilot understands what you mean.
I decided to include an image of a dog doing yoga in one of my presentations by typing: Add an image of a dog doing yoga .

If you feel the presentation could be better organized, Copilot can help. It can suggest the best structure based on what it knows about it. To do that, type the following in Copilot: Organize this presentation .

After you see Copilot's suggested slide order for the presentation, it's up to you to accept or reject the changes.
Remember, you can use Copilot in other Microsoft 365 apps as well. You can, for example, use it to write documents in Word or do calculations in Excel in minutes. Being able to use it in Microsoft 365 apps like this can significantly boost your productivity.
- Microsoft PowerPoint
- Microsoft 365
Convert Pdf To PowerPoint
Convert pdf to powerpoint with this easy to use and fast pdf converter. you can convert a pdf to powerpoint, choosing either ppt or pptx. turn your documents into presentation with this online tool..
Stay connected:
How to convert PDF to Powerpoint?
- Upload your PDF file.
- Choose PowerPoint 2007-2013 (*.pptx) or PowerPoint 2003 or older (*.ppt) from the dropdown menu.
- Click on "Start".

Convert PDF To PowerPoint Online for free and wherever you want
Turn your pdf into powerpoint.
Can you convert a PDF to PowerPoint? Yes, you can! And it's easy!
Upload your PDF via drag & drop, browsing your device, providing a link or uploading it from a cloud storage. Afterwards, choose the PowerPoint format you want; either PPT or PPTX.
Done? Perfect, click on “Save Changes” and let us do what we do best: convert PDF to PowerPoint.
No Registration Needed
On PDF2Go, you don't have to register to use the PDF to PowerPoint converter. You also don't have to install or download anything. The only exception is your converted PPT or PPTX presentation file.
Stay safe from malware, viruses and other threats for your computer and other device.
Create A PowerPoint File
Why would you want to convert a PDF file into a PowerPoint presentation? PPT and PPTX files are great for holding a presentation or giving a speech. They underline what you say just perfectly.
Convert information you have gathered in a PDF document and easily create slides for your PowerPoint presentation. All you need now are some transitions and effects!
100% File Safety
We do everything to keep your file safe. Secure upload with SSL, regular deletion of files from our servers, no manual checking and absolutely no changes when it comes to the rights of your documents.
If you still have questions, feel free to check our Privacy Policy.
Possible Presentation Files
Convert any PDF, no matter how many pages or how many images and media is embedded, to create slides. We support the common Microsoft PowerPoint presentation formats.
Mobile PDF Converter
Convert PDF to PPT or PPTX, online and from everywhere. With an online service like PDF2Go, you can easily convert PDF to PowerPoint from home, work or on the go. Even on vacation.
This online service is optimized for mobile usage on your computer, tablet, laptop or even on your phone.
Rate this tool 4.4 / 5
You need to convert and download at least 1 file to provide feedback
Feedback sent
Thank you for your vote
Blog & Articles

How to Embed Fonts in Word and PowerPoint
Learn how to embed the fonts in your presentations or documents and share them with others

How to Efficiently Use the PDF2Go Chrome Extension
The article explains how to efficiently use the PDF2Go chrome extension

How to Insert a PDF Into a PowerPoint
Add a PDF to your PowerPoint presentation – either as an object or as an image.
Dictionary & File Formats
PDF is short for Portable Document Format. PDF documents can contain formatted text, different fonts, hyperlinks, images, and even media such as sounds and videos.
A JPG (or extended JPEG, Joint Photographic Experts Group file) is an image file format.
OCR is short for Optical Character Recognition. This process is used to recognize the visual representation of text, for example in an image.
Specify a downloader that fits your task
- Summarize PowerPoints with AI
- Summarize Word documents with AI
- Summarize PDF with AI
- Generate PowerPoints with AI from text
- Create Presentation with AI
- GPT for Presentations
- Chat with Document Groups
- Import files from Cloud
- Request Demo
- June 24, 2024
- Comments Off on 6 Ways to Generate a Quiz with AI from Word Documents
- Artificial Intelligence
- 6 Ways to Generate a Quiz with AI from Word Documents

Imagine if you could create a quiz from a Word document with AI in just a few clicks. Sounds like magic but innovative AI tools, this is actually already possible today 🤯 AI tools allow you to make your quiz, assessment or test more interactive and bring your education materials to life, offering a more revolutionized learning approach. Teachers, professors, tutors and other professionals in education use quizzes and tests on a regular basis to test the knowledge of their students. Oftentimes the content those quizzes are based on already exists in some form or shape. Word documents (DOCX), PDF or PowerPoint (PPT) presentations already contain a lot of information… So wouldn’t it be nice if you could simply generate a quiz from the content of a Word document for example?
Get ready to explore six game-changing tools that will turn your content into engaging quizzes with AI. As an example we will in particular dig into how you can generate quizzes with AI from a Word document.
So let’s get started…
By the way… Looking to create a multiple choice quiz from a PDF, check this out: https://slidespeak.co/blog/2024/05/13/generate-multiple-choice-questions-from-pdf-with-ai/ .
Standout Features of the Top Tools used to Generate Quizzes with AI from Word
- Highly Accurate: Known for its high accuracy in question identification.
- Document support: Supports creating quizzes from Word, PDF and PowerPoints (including images).
- Interactive Quizzes: Directly embed quizzes in presentations.
- Integrations: Planned integrations with LMS providers (Moodle, Canvas, …)
Free: Yes – free trial.
Paid Subscription: Starts at $19 per month
- Context Retention: Retains conversation context for natural, coherent discussions.
- Multi-Modal Input: Understands text and images for richer interactions.
Free: Basic model is free.
Paid Subscription: Starts at $20 per month
Revisely’s Quiz Maker
- Customizable Templates: Wide variety of editable quiz templates.
- AI-Generated Questions: AI creates diverse, relevant questions automatically.
- Adaptive Learning: Tailors learning paths based on quiz performance.
Paid Subscription: Starts at $8.99 per month
- AI Insights: Analyzes results to highlight performance trends and gaps.
- Collaborative Creation: Supports teamwork in quiz creation.
- Question Variety: Includes multiple-choice, true/false, and open-ended questions.
Paid Subscription: Starts at $15 per month
- Tool Integration: Connects with Google Classroom and Microsoft Teams.
- Custom Memes: Use custom memes in quizzes for fun and personalization.
- Homework Mode: Assign quizzes as homework with auto-grading and feedback.
Paid Subscription: Starts at $125 per month
The Best Tools to Generate a Quiz with AI from Word
Method 1: slidespeak.

SlideSpeak is an amazing AI tool that turns documents into interactive quizzes, making life easier for educators and trainers who need engaging assessments without the headache of manual question creation.
It’s impressively accurate, identifying relevant content for quiz questions with a 90% success rate. Plus, it’s fast – processing a multi-page document and generating a quiz in just a few seconds.
How It Works
Let’s see how SlideSpeak can create a quiz from a Word document.
- Upload Your Document:

Start by uploading your Word document to SlideSpeak’s platform. The Word document should contain content from which you want to generate quiz questions.
- Quiz Question Generation:

After uploading your Word document, you’ll enter the chat interface where your document will be displayed on the left side for preview. From there, you can interact with the AI by providing prompts to generate multiple-choice questions.
For instance, you can instruct the AI to generate questions like, “Create a quiz of 10 questions about geography using the uploaded document as a reference.” SlideSpeak’s algorithms will then carefully analyze the text and produce appropriate multiple-choice questions based on your instructions.
- Review and Incorporate

Once the AI finishes its task, assess the accuracy and relevance of the generated multiple-choice questions. If they meet your standards, proceed to copy and incorporate them into your educational resources. Additionally, this tool functions as an AI-powered PowerPoint generator, enabling you to generate a presentation directly from text. Simply click the “Create Presentation” button to begin.
Importing Quiz Questions into an LMS
Once you have generated your quiz questions, you can import them into Learning Management Systems (LMS) like Moodle or Canvas LMS. Both platforms support importing questions in specific formats to streamline the process.
- Export Questions from SlideSpeak: Ensure your questions are formatted correctly. Moodle supports several formats, such as GIFT and XML.
- Access Moodle: Log in to your Moodle account and navigate to the course where you want to add the quiz.
- Import Questions:
- Go to the course administration menu and select “Question bank” and then “Import.”
- Choose the appropriate format (e.g., GIFT format).
- Upload your file and follow the prompts to complete the import.
- Add Questions to Quiz: Once imported, you can add the questions from the question bank to a quiz.
- Export Questions from SlideSpeak: Format your questions to be compatible with Canvas. Canvas supports QTI (Question and Test Interoperability) format.
- Access Canvas: Log in to your Canvas account and navigate to the course where you want to add the quiz.
- Go to “Settings” in the course navigation menu.
- Select “Import Course Content.”
- Choose “QTI .zip file” from the Content Type drop-down menu.
- Create Quiz: Once imported, go to the “Quizzes” section and create a new quiz or add the questions to an existing one.
Why Choose SlideSpeak?
- Save Time: It streamlines the quiz creation process, saving educators valuable time and effort.
- Accuracy: Its advanced AI ensures that generated questions are pertinent and effective. It even analyzes images in Word and PDF documents. SlideSpeak uses the latest ChatGPT technology.
- Security: All data is stored fully encrypted and is not shared with any third parties.
- Integration with LMS: SlideSpeak is currently working on integrating with Moodle, CanvasLMS and other LMS providers to directly upload AI quizzes to your favorite LMS.
Visit SlideSpeak
Method 2: ChatGPT

Developed by OpenAI, ChatGPT is still the most powerful AI for assisting with many different tasks, including the ability to create quizzes from documents and text. With its advanced AI language model, ChatGPT can easily produce human-like text directly from your Word document.
ChatGPT has a comprehensive understanding of diverse topics with its knowledge cut off date currently being October 2023 . Globally, millions of users rely on ChatGPT across various domains, particularly in education and beyond. Since the new release of ChatGPT 4o, free users are now also able to upload files . That means you do NOT have to pay for ChatGPT to upload Word or PDF documents.
It’s worth mentioning that OpenAI ChatGPT currently does not support images that are embedded in Word, PDF or other documents (see here ).

Begin by uploading your Word document containing the content for quiz creation.
- Interact with the Tool

After your document has been uploaded, you can start to interact with the tool. For example, you can instruct ChatGPT to generate questions like, “Create a quiz of 25 questions about history using the uploaded document as a reference.”
- Review and Copy
Once generated, review the quiz questions for accuracy and relevance. For any changes, simply interact with the tool. When all the quizzes are correct and match your standard, you can simply copy the content and paste it into your educational material.
Why Choose ChatGPT?
- Flexibility: Tailor quiz questions to suit different learning levels and topics through interactive prompts.
- Reliability : Benefit from ChatGPT’s robust language understanding capabilities, ensuring high-quality quiz content.
- User-Friendly: Enjoy a simple, easy-to-use interface that makes the quiz creation process accessible to all.
Visit ChatGPT
Method 3: Revisely’s Quiz Maker

Revisely is a comprehensive learning platform designed for students and professionals, offering many resources for traditional academic subjects, especially beneficial for GCSE, AS, and A-Level exam preparation. The platform features specialized AI Flashcard and Quiz Creators to enhance understanding in various fields.
With a simple, distraction-free layout, it aligns with the latest AQA, Edexcel, and OCR specifications, ensuring high-quality, relevant revision materials. Since its launch, 3 million users have accessed its 10,000 resources and created 7 million AI-generated study aids. Revisely transforms textbooks into interactive quizzes, promoting smarter and more effective learning.

You can simply drag your Word document into the tool or click the button to upload it from your files.
- Choose Quiz Format
Once the Word Document has been uploaded, choose the language, question type and amount of questions to include from the drop-down menu.
- Copy and Paste the Quiz

From your choices, Revisely will produce a quiz that you can simply copy and paste into your educational material.
Why Choose Revisely?
- Reliability: Revisely’s advanced AI abilities generate high-quality, accurate quizzes that align with the latest AQA, Edexcel, and OCR specifications.
- Integration: Easily integrate generated quizzes into your existing educational materials.
- User-Friendly: Enjoy a simple, distraction-free interface that makes the quiz creation process straightforward and accessible.
Visit Revisely
Method 4: Quizgecko

Quizgecko is a user-friendly AI tool designed to quickly convert your Word documents into engaging quizzes – in any language! Its streamlined interface and efficient quiz generation capabilities make it an excellent choice for anyone looking to create assessments without the hassle of manual question formulation.
Quizgecko excels at extracting key information from your content, ensuring the generated questions are relevant and accurate. This tool also allows for easy customization, enabling you to tailor the quizzes to your specific needs.

Start by uploading your Word document to Quizgecko’s platform. Simply click the “Choose File” button to start the process.
- Generate Questions:

Once your document is uploaded, Quizgecko’s AI will analyze the text to generate questions. You can specify the type and number of questions you need, such as multiple-choice, true/false, or short-answer questions.
- Customize and Download:

After the initial question generation, you can review and customize the questions to better fit your educational goals. Once satisfied, you can download the quiz in your preferred format.
Why Choose Quizgecko?
- Speed : Quickly generates quizzes from your documents, saving you time.
- Simple Customization : Allows for easy editing and customization of quiz questions.
- User-Friendly: Offers an intuitive interface for a seamless quiz creation experience.
Visit Quizgecko
Method 6: Quizizz AI

This tool is ideal for educators who want to save time and focus on teaching, as it eliminates the repetitive work involved in quiz creation. Quizizz AI can generate quizzes from various content sources, including documents, websites, videos, and images, making it a versatile choice for creating comprehensive assessments.
With Quizizz AI, you can create quizzes in minutes by simply uploading a file, entering a prompt, or pasting a link to a webpage or YouTube video. The AI quickly generates questions based on the content provided, allowing you to customize and enhance the quiz as needed.
- Upload Your Content:

Start by uploading your Word document or any supported file (PDF, PPT, PPTX, DOC, DOCX, JPG, PNG). Alternatively, you can enter a prompt, paste a web page link. Quizizz even supports creating a quiz from a YouTube video URL or video, mind blowing huh?
- Generate and Customize
Quizizz AI will analyze the uploaded content and generate a series of questions. You can choose the number and type of questions you want, such as multiple-choice, true/false, or short-answer.

Review the questions and make any necessary adjustments. You can modify question text, change question types, add or delete answer options, and include multimedia elements like images, videos, and audio clips.
- Finalize and Use:
Once you are satisfied with the quiz, you can finalize it and incorporate it into your educational material. Quizizz AI also offers an “Enhance” feature to further customize and refine the quiz, ensuring it meets your students’ needs.
Why Choose Quizizz AI?
- Versatility: Generates quizzes from multiple content sources, including documents, websites, videos, and images.
- Customization: Allows for extensive customization of quiz questions.
- Accessibility: Ensures quizzes are accessible and engaging for all students.
Visit Quizizz AI
Frequently Asked Questions
- How can AI be used to generate quizzes?
AI can automate quiz creation by analyzing text, identifying key concepts, and generating questions automatically. Tools like SlideSpeak and ChatGPT use advanced AI algorithms to streamline this process, making quiz creation faster.
- How to convert documents into quizzes with ChatGPT?
Using ChatGPT for quiz creation involves uploading a Word document and interacting with the AI through text prompts. ChatGPT then uses its language model to generate various types of quiz questions based on the content provided, allowing for customization and refinement.
- What is the best tool to generate quiz with AI from Word?
Among the top choices for generating questions from text are SlideSpeak, known for its high accuracy in question identification, and Quizgecko, which excels in quick and accurate quiz generation with a user-friendly interface.
- What benefits are there to using an AI tool like Quizziz to create quizzes?
AI-driven platforms like Quizziz AI enhance the quiz creation process by automating the extraction of key information from documents, generating diverse question types (such as multiple-choice, true/false, and short-answer questions), which saves you time and effort. You benefit from these AI tools due to their ability to quickly create engaging quizzes, automate question generation, and provide insightful analytics to track learning outcomes.
- How can you create a quiz with AI for an LMS?
You can create a quiz for your LMS by using a tool like SlideSpeak or QuizGecko. After finalizing your quiz questions, you can export them in a compatible format, such as GIFT or XML. Then, log in to your LMS (like Canvas or Blackboard), navigate to the quiz creation section, and use the import function to upload your quiz file. Configure the quiz settings, including time limits, question order, and scoring rules, and publish the quiz.
After publishing, preview the quiz to ensure everything is functioning correctly and make any necessary adjustments. Monitor student performance once they take the quiz to ensure it meets your educational objectives. Tools like SlideSpeak simplify this process by allowing easy question generation and export, making it accessible even for beginners.
- Can AI generate quizzes in Moodle?
Yes, AI can generate quizzes for Moodle. You can use AI tools like SlideSpeak and ChatGPT to create quiz questions from your content. Once generated, export the questions in a Moodle-compatible format, such as GIFT or XML, and import them into Moodle’s question bank. From there, you can add the questions to your quizzes within Moodle.
- Are there any e-learning platforms with AI capabilities?
Yes, several e-learning platforms have AI capabilities to enhance quiz and assessment creation. For example, Quizizz is a tool that automatically generates quizzes by analyzing content from sources like Word documents and presentations, streamlining the quiz creation process for educators. The platform adapts quiz difficulty based on student performance, offering personalized learning paths. Feedback and analytics are provided in real-time, enabling educators to track student progress and identify areas needing improvement, while students receive immediate feedback on their quiz responses. Quizizz AI also incorporates gamification elements such as points and leaderboards to engage students, making learning interactive and enjoyable.
Final Thoughts
Transforming your Word documents into engaging quizzes is now easier than ever with the power of AI. These innovative tools offer an easy way to generate interactive assessments that make learning fun and effective. By leveraging AI, you can save time, enhance the quality of your quizzes, and provide a more dynamic learning experience for your audience.
Related Post

How to create PowerPoint from Excel

- May 13, 2024
- Comments Off on How to create PowerPoint from Excel

How to Generate Multiple-Choice Questions from a PDF with AI
- Comments Off on How to Generate Multiple-Choice Questions from a PDF with AI

Add Speaker Notes with AI to Presentations
- April 18, 2024
- Comments Off on Add Speaker Notes with AI to Presentations
AI generate presentations and summaries.
Summarize and generate PowerPoint files with ChatGPT. Upload, chat, and gain new insights from your presentations. Use SlideSpeak AI to boost your productivity.
- Help Center
- Affiliate Program 💵
- Call us: +1 (512) 777-1759
- Compress PowerPoint
- Convert PowerPoint to PDF
- Convert PowerPoint to PSD
- Convert PowerPoint to Figma
- Convert PDF to Word
- Terms of Service
IMAGES
VIDEO
COMMENTS
Change linked or embedded objects. Right-click the linked object, and then click Linked Slide Object or Linked Presentation Object. Click Open or Open Link, depending on whether the object is embedded or linked, and then make the changes that you want. If the object is embedded, the changes are only in the copy that is in the document.
Go to the Insert tab and select Add from Files . Select the PowerPoint file that contains the slides you want to add to the Word document. If the file isn't listed, select Show More Files to browse the filesystem and choose a file. In the Insert From File panel, find the slide you want to insert as an image and select Insert Slide to insert it ...
3. Insert a PowerPoint Into Word. Another way to add an entire PowerPoint presentation is to come up here to the Insert tab and click on what's called the Object option. Use the Create from File tab to insert a PowerPoint slide into Word. Let's choose to Create from File, and then I'll go ahead and browse to a PowerPoint presentation file and ...
Steps to Link a PowerPoint Slide: Open the Word document and place the cursor where the slide should appear. Go to the "Insert" tab. Click on "Object" in the "Text" group. In the dialog box, select "Create from File" and browse to your PowerPoint file. Check the "Link to File" box.
If you've copied the PowerPoint slide to your clipboard, you'll see a "Microsoft PowerPoint Slide Object" option in the box under "As." Click it to select the option. Next, to embed the slide, click the bubble next to "Paste." To link the slide, click the bubble next to "Paste Link." Select "OK" to insert the linked or embedded object.
Open Microsoft Word and navigate to the document you are working on. Place your cursor where you want to insert the PowerPoint presentation. In the upper left corner, locate the "Insert" option and click on it. Locate the "Text" group and click on the drop-down arrow to the right of "Object."
Learn how to insert/embed/integrate PowerPoint presentation into a word document. This tutorial explains embedding PowerPoint into word as an icon, link and ...
Open the PowerPoint file and select the slide you want to add to Word. Copy the slide (Ctrl + C on a PC or Command + C on a Mac). Switch over to the Word document and position the cursor where you want the slide inserted. Paste the slide (Ctrl + V on a PC or Command + V on a Mac). The slide will now appear in the Word document as an embedded image.
Click where you want to insert a link to your PowerPoint content in your Word document. Choose the Insert tab, then click the arrow next to Object in the Text group. Select Object. In the box ...
Open your Word document, and go to the Insert menu. In the Text section, click on the Object button. In the dialog box, go to the Create from File . Click Browse and select your PowerPoint presentation. Checking Insert Link will embed the slide and add a shortcut to the source file. If the source file changes, the embedded slide will change as ...
How to Insert a PowerPoint Slide Into Microsoft Word. Part of the series: Tech Niche. Inserting a PowerPoint slide into Microsoft Word is something you can d...
The easiest way to insert a Word document is to first create your document in Word, then add it to your presentation. Select the slide in which you want to place the Word document. Click Insert > Object. If the Word document already exists, in the Insert Object dialog box, select Create from file. Click Browse to locate the Word document you ...
Repeat the Process: Repeat steps 1 to 5 for each slide image you want to insert into your Word document. Insert the images in the order you would like them to appear. By inserting the PowerPoint slide images into your Word document, you effectively integrate visual elements that enhance the overall presentation and convey your message effectively.
Open both your Word document and your PowerPoint graphic. Switch to PowerPoint, and copy (Press CTRL+C.) the slide with the graphic that you want. Note: Select your slide in Slide Sorter view. Switch to your Word document, and then click where you want your graphic to appear. On the Home tab, in the Clipboard group, click the arrow under Paste ...
Go to 'Insert' tab. Click on 'Object' under '... - In today's tutorial, we will teach you how to attach a PowerPoint file in Word document.Open a Word document.
Step 4: Choose "Create from file" and browse for your Word document. In the dialog box, select "Create from file," then click "Browse" to find and select your Word document. Choosing "Create from file" allows you to insert the document as is, without any need to modify it first. Once you've found the file, select it and click "OK."
To convert your PowerPoint slides into Microsoft Word handouts, simply: Navigate to the File tab. Select Export. Click on the Create Handouts section. Select the Create Handouts command. Choose your Handout Type. Select Paste or Paste Link (explained below) Click OK.
When you paste in Word, click the arrow below Paste, click Paste Special, and then paste as a image (I typically use .png) Alternatively, in PowerPoint you can right-click the grouped objects and use the Save as Picture option and then insert the image in your Word document. ~Beth Melton Microsoft Office MVP. ~Beth Melton.
To insert a Word document as an object within a PowerPoint, follow these steps: Select the slide on which you'd like to insert the document. Click "Insert" and then click "Object." If you've already created and named the document, select "Create from file" from within the "Insert object" dialog box. Then, click "Browse" and locate the document ...
Can I insert all the slides from a .pptx into my Word 2007 document in one step? Whenever I copy and paste (or paste special), only the first slide is inserted. I don't need them linked, just embedded into my meeting minutes. The person who used to do these minutes would copy and paste every slide individually into the Word file.
Cindy, Insert - Slide from file - browse - navigate then select the file - open - select the slides you want to use or insert them all - click Insert. If you do not want to insert the slides you can always link to the other presentation, you can use an action button or insert the other presentation as an object (Insert - object - From file ...
Find it, then choose Object . 2. Insert Word Document Into PowerPoint. When you click the Object button, you'll see the menu that lets you insert file into PPT. It's the Insert Object menu, and with it you can see how to insert a file into PPT. On the left, locate the Create from file bubble. Click it.
After Copilot creates the presentation, you can ask it to add more slides. The syntax is: Add a slide about [Topic]. In a presentation about the steps to mindful meditation, I wanted to add a slide about remembering to notice thoughts. I typed the following in Copilot: Add a slide about noticing thoughts without passing judgment.
Copilot cannot create PowerPoint presentation from a Word document even when using the suggested prompt as follows: " Create a new presentation based ... 365 license, likely a work license based on the wording, to access all the features ("full options") for converting documents into presentations.
You can convert a PDF to PowerPoint, choosing either PPT or PPTX. Turn your documents into presentation with this online tool. Drop Files here Choose File Start. Settings Convert PDF file(s) to: Start ... How to Insert a PDF Into a PowerPoint. Add a PDF to your PowerPoint presentation - either as an object or as an image.
On the Mac, it may be on the Print menu as well. One option: Use File> Print, select Notes from the Layout options, then click the PDF button & choose Save as PDF. The resulting PDF then can be opened in Word & saved in a Word document file type. That document can be inserted in†o another if necessary.
Press "Set as default" to set your local folder as the default file storage location. ... There's no option to insert stock elements, change the slide size to a custom size, use the Designer ...
Revisely Upload Word Document. You can simply drag your Word document into the tool or click the button to upload it from your files. Choose Quiz Format; Once the Word Document has been uploaded, choose the language, question type and amount of questions to include from the drop-down menu. Copy and Paste the Quiz; Revisely Copy Quiz for Word ...
I am writing to report a persistent issue I have encountered over the last 14 days regarding the inability to save online Word documents as PowerPoint presentations. This issue seems to be a significant bug on Microsoft's side, as it has persisted despite my efforts to troubleshoot, including checking with business packages.