Unsupported browser
This site was designed for modern browsers and tested with Internet Explorer version 10 and later.
It may not look or work correctly on your browser.
- Presentations

How to Present a PowerPoint Slideshow With Presenter View (+ Video)
- Bahasa Indonesia
Giving a presentation can be intimidating, even to seasoned speakers. Learn how to use PPT Presenter View , which is your private cockpit view.

This is a view that you'll see on your own screen while giving a presentation using PowerPoint. While the audience will see the presentation on the projector or big screen, you'll have your own private view on a second monitor.
This feature is like a cockpit for giving presentations. You'll keep all the most important controls front and center while presenting.
PowerPoint Presenter View gives you at least four essential tools that make presenting your slideshow more comfortable:
- In Presenter View , this display keeps your speaker notes in view to reference while speaking.
- You'll see a thumbnail for the next slide to begin preparing for your next key point, and you can jump to other slides quickly.
- A timekeeping tool helps you track how long you've been speaking to ensure you don't overrun any time limits.
- Drawing tools allow you to add illustrations on screen while presenting to draw attention to specific parts of your slides.
You need every advantage you can get when it's time to give a presentation. In this tutorial, you'll learn how to make the most out of Presenter View in PowerPoint.
In this tutorial, I'm going to focus on an underused feature of PowerPoint: Presenter View.
How to Present a PowerPoint Slideshow With Presenter View (Video)
In this video, I'll teach you how to get started with Presenter View in PowerPoint. You'll learn how to enable Presenter View and then use the tools inside of it. I'll teach you to use the special Presenter View features to keep your notes and tools close, that way you can present more confidently.

Keep reading to find out more about using Presenter View in PowerPoint and the best features to try out.
Turn On PowerPoint Presenter View
In PowerPoint for macOS, simply click on Presenter View on the Slide Show tab to kick off the presentation in Presenter view .

You'll see the Presenter View interface on one screen. The other display will show the "audience version" of the presentation. In other words, it shows what they'll see on a projector screen, or even their own display.
How to Make the Most of Presenter View
Let's dive into some of my favorite features that Presenter View brings to the table. Using even one of these is reason enough to try out Presenter View in PowerPoint. But when you combine them together, it's a no-brainer.
This is how to use Presenter View on PowerPoint. But the real question is why to use presenter mode PowerPoint. The reason is twofold:
- It helps your slides look better.
- It keeps you organized.
You can share neat, uncluttered slides that aren’t packed with content. That’s because you can keep your supporting content to yourself.
For this Presenter View in PowerPoint tutorial, we’ll be using the beautiful Tezia - Corporate PowerPoint Template from Envato Elements. Tezia has 40 stunning slide layouts. Each one works great in PowerPoint Presenter View . Download it today and follow along.

Now, let’s learn how to use Presenter View in PowerPoint fast!
1. Speaker Notes
Speaker Notes is a top feature that works best with Presenter View in PowerPoint. Many presenters will spend time filling out cards or scribbling ideas onto paper. But it's much easier to add them directly into your PowerPoint file.

To add Speaker Notes to a presentation, start off by working in Normal view on PowerPoint's View tab. At the bottom of your screen, you can click on Notes to open up the Speaker Notes section and add your own text.

Speaker Notes and Presenter View go hand in hand. When you're in Presenter View , your speaker notes will show up on the right side of your screen. You can adjust the text size with the icons near the lower right corner.

Speaker Notes show how to use Presenter View in PowerPoint to your advantage. They help keep you on track as you present on your key topics.
Speaker Notes are important because they avoid the potential of you reading off your slides. Why? Because you don’t have to commit every key detail to memory! You can engage with your audience, all while referring to pre-built notes that they’ll never see.
2. Slide Previews
Let’s face it: you might be sharing a presentation with dozens of different slides inside. When you know how to put PowerPoint in presentation mode, you can get a sneak preview as you present. It’s easy to forget exactly how you sequenced slides together.
With Presenter View , you can stop guessing. That’s because you’ll always have a preview of the next slide in your deck.
As you work in Presenter View in PowerPoint, notice the slide thumbnail in the upper right corner. It’s labeled Next Slide , and that’s exactly what you’re seeing. This helps you transition smoothly from slide to slide. Often, you may set up some closing narration on one slide to help introduce the next. Guesswork and delays are gone, thanks to using Presenter View in PowerPoint.
Knowing how to present on PowerPoint involves keeping slides in a logical order. That means that on occasion, your next slide should no longer be the next one in line. Presenter View helps you handle this situation.

Across the bottom of the view is a filmstrip of every slide’s thumbnail. You can scroll through it and click on any slide to jump directly to it.
This way, you can jump around in your slide deck without your audience ever knowing it! This helps you drive the flow of your slide deck in real time, with no interruptions or distractions.
3. Drawing Tools
Like sports commentators do during a broadcast, you can use drawing tools to draw on top of your slides. This is perfect if you've got a tablet for example, but the feature works well for computer users with a mouse too.
To enter the drawing tools, you can click on the icon shown in the PowerPoint screenshot below. This turns on the tools you need to add highlights and annotations to the selected slide.

Annotations are great if you want to call out key details in real time. You can highlight, mark up, or circle any element on a slide. This is how to use Presenter View in PowerPoint in a live environment. You can use it to capture audience attention and focus on details as your narrative flows.

Choose from tools like the Laser Pointer, Pen, and Highlighter to add annotations to a slide. A laser pointer is a digital version of the popular tool used to draw attention to parts of a slide.
The Pen and Highlighter tools will actually add new marks on top of the slide that your audience will see.
4. Timekeeping
This feature is straightforward to use, but I can't stress enough how helpful it is. Nothing is worse than giving a presentation and realizing that you used only half of the time. Or that you went far over the time limit.
In Presenter View , you'll see a feature that keeps time above the current slide thumbnail. You can pause this feature with the Pause button or reset the counter with the icon on the far right. But often, it's best to leave it running. This keeps you on pace, on track, and focused on your message.

Plus, this is how to put PowerPoint in presentation mode to work for you. At a glance, you can see how much time you have left. This may encourage you to speed up your dialogue. Or it may afford you extra time to expound on a key point or new supporting detail.
I can think of many times when this feature would have been a big help during presentations in college. When you're graded or judged based upon your runtime, it's a great idea to keep that time total in view.
5. Navigate Effortlessly with Keyboard Shortcuts
Presenter mode PowerPoint presentations are easy to navigate. That’s because they work well with a variety of keyboard shortcuts. By using these shortcuts, you can see how to present on PowerPoint efficiently.

Presenter View offers an array of keyboard and mouse shortcuts that you can use as you present. Again, your audience won’t notice this.
For a look at them, click on the Tips button in the upper left corner of Presenter View . You’ll see a complete cheat sheet of shortcuts listed. Refer to it often and use these tips to navigate through your slides.
The Best Source for Stunning PowerPoint Templates (With Unlimited Downloads)
Envato Elements is the best place to find stunning PowerPoint templates in 2022 . For a flat, monthly rate, you can download as many PowerPoint templates as you want. Plus, Elements offers an array of other creative content. This includes stock photos, music, fonts, and more.

When you’re using Presenter View in PowerPoint, you need templates that look their best. It’s tempting to turn to free options. But premium templates from Envato Elements are always your best bet.
Why? They’re designed by creative experts with you in mind. You simply fill in the blanks to add your own content. You don’t have to spend time and effort designing slides from scratch. This gives you even more time to craft a compelling narrative to wow any audience.

With premium Envato Elements templates, you’ll unlock an array of features. Each of these helps you shine when you use presenter mode PowerPoint features:
- easy-to-edit text placeholders
- photos and illustrations throughout
- charts and infographics
- pre-built animations
As you learn how to put PowerPoint in presentation mode, you’ll see how all these benefit you.
Learn More Powerful PowerPoint Tools
We can use tools like Presenter View to reduce the anxiety that comes along with giving presentations. It may still take time to prepare and feel confident about your presentation. But Presenter View keeps those key features in easy view so that you aren't scrambling for written notes.
Check out these tutorials to learn more about giving presentations using Microsoft PowerPoint :

Download Our eBook on Making Great Presentations (Free PDF)
We have the perfect complement to this tutorial, which will walk you through the complete presentation process. Learn how to write your presentation, design it like a pro, and prepare it to present powerfully.
Download our eBook: The Complete Guide to Making Great Presentations . It's available for FREE with a subscription to the Tuts+ Business Newsletter.

Start Using Presenter View Today
You just learned how to use Presenter View in PowerPoint. You're the pilot, and now you're in the cockpit of your presentation plane! The features you saw in this tutorial will keep everything you need in view while you give a presentation.
Don't forget to launch your presentation in presenter mode PowerPoint mode. That means you'll always have your slide cues, notes, and more while you speak to an audience.
Editorial Note: This post has been updated with contributions and a video from Andrew Childress . Andrew is a freelance instructor for Envato Tuts+.

- Slidesgo School
- PowerPoint Tutorials
How to Use the Presentation Modes and the Screen Recording Features in PowerPoint

After designing all the slides for your presentation, the next and last step is presenting in front of your audience. In this new Slidesgo School tutorial, you’ll see how the presenter view works and how you can record your presentation .
Presentation Modes
Presentation modes — set up slide show, presentation modes — record slide show.
- There are different presentation modes in PowerPoint, besides the one you can find at the bottom of the screen.
- To access the presentation modes, go to the Slide Show tab.
- The first two options allow you to start the presentation from the beginning or from the currently selected slide.

- If you choose Present Online, an URL will be generated, which you can then share with your potential online viewers. After clicking this button, a new window will open, displaying info about the Microsoft Office online presentation service and a checkbox to enable remote download for your online audience. To enjoy this service, you need an Office 365 account. When you’re ready, click Connect to generate the URL.
- If you choose Custom Slide Show, you can select which slides to display in your presentation. First, create a new custom slide show and select the slides that you want to display. Then, click Add, enter the name of the presentation and click OK. This new custom presentation will appear on the list. Select it and click Show to begin the presentation.
- In the Set Up group you’ll find options to set up the presentation, hide slides, rehearse your presentation and even record it.
- Click Set Up Slide Show to adjust several settings regarding your presentation. You’ll find more information in the next section of this tutorial .
- If you click Hide Slide, the selected slide won’t show up during your presentation. Hidden slides will appear faded out on the list and their numbers will be crossed out.
- If you click Record Slide Show, you’ll be able to record your presentation from the beginning or from the current slide. We’ll go into detail in the last section of this tutorial.
- There are several checkboxes regarding whether to play narrations, use timings and show media controls.

- In the Monitors group you can choose which screen to display your presentation.
- The last group, Captions & Subtitles, is only available in Office 365. You’ll find options to enable subtitles, which will be generated out of your speech (so you’ll need to have a mic). There are settings to change the language and the position of the subtitles.
- Open your presentation in PowerPoint.
- Go to the Slide Show tab.
- In the Set Up group, click Set Up Slide Show. A new window will open, where you’ll find several options.
- In the top-left corner, under “Show type”, you can choose whether the presentation will be in fullscreen with speaker notes, windowed, or in fullscreen without speaker notes or the menu bar.

- Under “Show options” you can choose whether to show the presentation without narration or animations, or disable the hardware graphics acceleration (for better performance). You can also set the pen and laser pointer color.

- Under “Show slides”, you can choose which slides to show in your presentation. You can select all of them, a specific range or a custom slideshow.
- There are other settings to determine how to advance slides (manually or using timings), what the resolution will be and whether to use the presenter view.
- Click Record Slide Show. From the drop-down menu, select From the Current Slide or From the Beginning.
- A new window will open, along with the presentation in fullscreen mode. At the top-left you’ll find a button to start recording.
Do you find this article useful?
Related tutorials.

How to Use the Presenter View in Google Slides
Google Slides, like PowerPoint, has different presentation modes that can come in handy when you’re presenting and you want your slideshow to look smooth. Whether you’re looking for slides only, speaker notes or the Q&A feature, in this new Google Slides tutorial, you’ll learn about these and their respective settings. Ready? Then let’s explore the presenter view!

How to Download Google Slides Templates
When preparing a presentation, many people start panicking because they realize how much time it will take to edit each and every slide. Creating them from scratch, filling them in, looking for pictures, moving the elements...How stressful! But there is a solution that saves you a lot of time. We're sure that you've browsed the internet for templates, or basically, pre-established designs and elements, that can be downloaded for free and can be edited to your liking. Are we right? Then, we have some good news for you!

Discover our collection of printable templates
With the advance of technology, printing has become something that is no longer a necessity. Smartphones have made the paper format less and less frequent, but there are still certain cases in which having physical resources is much more convenient. Whether it's for taking notes, handing out assignments, making worksheets or handing out business cards or invitations, it's necessary to print your customized designs.From now on, in every Slidesgo printable presentation that you download, you will find the instructions for printing on the third slide. Depending on the style, colors or format of each presentation, we will tell you if you can...

How to Add Superscript and Subscript in Google Slides
Let’s take the most famous formula: E=mc^2, Einstein’s relativity equation. It wouldn’t be the same if it was E=mc2, right? Okay, yes, some people write it like that because it’s very famous and it won’t be misunderstood. But technically… It can! This is where the sophistication of superscript or subscript enters the room! Do you know how to write them in equations, copyright brands or even footnotes in your presentations? Let’s figure out how.
How To Get Into Presentation Mode In PowerPoint
Are you looking to take your PowerPoint presentations to the next level?
We will discuss why you should use Presentation Mode, how to enter it, its key features, and how to navigate through your slides.
Key Takeaways:
What is presentation mode in powerpoint.
Presentation Mode in PowerPoint refers to a feature that allows presenters to display their slides in a full-screen view, enhancing the visual impact of their presentation.
Why Use Presentation Mode in PowerPoint?
Using Presentation Mode in PowerPoint offers numerous advantages, such as creating a more engaging and professional presentation experience for both the presenter and the audience.
Presentation Mode allows the presenter to navigate slides effortlessly, maintaining a smooth flow of information that keeps the audience’s attention intact. The ability to preview slides on a separate monitor while presenting ensures that the speaker remains in control of the presentation pace and content delivery.
Allows for a more engaging and professional presentation
One of the key reasons to use Presentation Mode in PowerPoint is that it allows presenters to deliver a more engaging and professional presentation by providing advanced control over their slides, including features like a laser pointer .
Helps the presenter stay on track and organized
Presentation Mode in PowerPoint aids presenters in maintaining focus, organization, and efficiency throughout their presentation by offering tools like Presenter View, where notes and slide previews can be accessed.
Provides a better experience for the audience
When toggling to Presentation Mode, the display settings undergo a transformation that optimizes the presentation for viewer interaction. The ability to seamlessly swap displays allows the presenter to effortlessly navigate through slides, ensuring a smooth transition between different sections of the presentation. This elegant integration of features not only captivates the audience but also enables a more fluid and engaging delivery of the content. The visual appeal of the slides is enhanced, making it easier for viewers to follow along and grasp the key points being presented.
How to Enter Presentation Mode in PowerPoint?
Step 1: open your powerpoint presentation.
The first step to enter Presentation Mode in PowerPoint is to ensure that your presentation file is open and ready for display.
To do so, open PowerPoint and locate the file containing your presentation. Click on the file to open it. Review that the slides are arranged in the correct order and that any speaker notes or animations are set up as desired. Check the slide sorter view to confirm the flow of your presentation. Ensure that the current slide is the one you want to begin with when Presentation Mode is activated. This initial setup is crucial for a seamless transition into your presentation.
Step 2: Click on the ‘Slide Show’ tab in the top menu bar
Once you’re on the ‘Slide Show’ tab, you’ll find a variety of essential controls that aid in delivering a seamless presentation experience. Here, you can click on ‘From Beginning’ to start the slide show from the very first slide. You can choose ‘From Current Slide’ to begin from the slide you’re currently on.
Step 3: Select ‘From Beginning’ or ‘From Current Slide’ to start the presentation
After accessing the ‘Slide Show’ tab, choose between the ‘From Beginning’ or ‘From Current Slide’ options to initiate your presentation in Presentation Mode, ensuring the desired display settings and presenter view are selected.
When you opt for ‘From Beginning,’ your presentation will start from the very first slide, whereas selecting ‘From Current Slide’ allows you to start your presentation from the slide you are currently on. This choice depends on whether you want to begin at the start of the presentation or jump in at a specific point.
What Are the Features of Presentation Mode in PowerPoint?
Presenter view with notes allows speakers to refer to their talking points discreetly, ensuring a seamless delivery. The incorporated laser pointer feature permits highlighting key areas on slides, directing the audience’s focus effectively. Slide previews provide a comprehensive overview of the presentation flow, aiding in smoother transitions between topics. The option to hide or reveal slides as needed enhances the element of surprise and control during the presentation, captivating the audience’s attention. These combined features transform the presenter’s performance into a dynamic and engaging experience for all participants.
Full-screen display of slides
Ability to use a laser pointer or pen tool.
Presentation Mode enables presenters to use a laser pointer or a pen tool to highlight key points on slides, enhancing the clarity and impact of their presentation.
Presenter view with notes and slide previews
When utilizing the Presenter view, presenters gain the advantage of accessing notes discretely without them being displayed to the audience, allowing for a more professional and polished delivery. In addition, having a live preview of the upcoming slides enables the presenter to seamlessly transition between points, enhancing the flow of the presentation. Through system preferences or the displays app, customization options such as adjusting the layout to suit individual preferences or toggling between speaker notes and slide previews can be easily configured, providing a tailored experience for each presenter.
Option to hide the presentation controls
In scenarios where presenters are utilizing a two-monitor setup for advanced display configurations, such as showing notes on one screen while presenting on the other, hiding presentation controls on the main display ensures that only the essential content is visible to the audience, maintaining a neat and streamlined appearance.
How to Navigate Through Slides in Presentation Mode?
Use the arrow keys on your keyboard.
Utilize the arrow keys on your keyboard to seamlessly advance through slides in Presentation Mode, ensuring a smooth and controlled flow of your presentation.
Click on the arrows in the bottom left corner of the screen
Users can enhance their presentation experience by utilizing the fullscreen mode . By entering fullscreen, viewers can keep the focus solely on the presentation content, removing any distractions from the surrounding interface elements. This feature is particularly useful when showcasing detailed slides or when presenting to a larger audience, allowing for a more immersive and engaging delivery.
Use the scroll wheel on your mouse
With its responsive nature, the scroll wheel ensures quick and precise movements, enabling presenters to fluidly transition between slides with the utmost ease.
How to Exit Presentation Mode in PowerPoint?
To exit Fullscreen mode in PowerPoint, you can simply press the ‘Esc’ key, the keyboard shortcut that is universally used to escape full-screen views across various applications. This action will promptly take you out of the immersive mode and back to the regular interface.
Step 1: Press the Esc key on your keyboard
Exiting Presentation Mode using the ‘Esc’ key is a simple maneuver that can swiftly transition you back to your familiar workspace. Once you press the ‘Esc’ key, the fullscreen effect will dissolve, and any Speaker Notes you might have been glancing over will no longer dominate your screen, ensuring a seamless flow as you exit the presentation. This action provides an effortless way to shift the focus back to the general view of your PowerPoint, facilitating a smooth continuation of your usual workflow.
Step 2: Click on the ‘End Show’ button on the top left corner of the screen
Step 3: select ‘end show’ from the drop-down menu.
For a more detailed exit process, users can select ‘ End Show ‘ from the drop-down menu within PowerPoint, ensuring a controlled and comprehensive conclusion to their presentation.

Frequently Asked Questions
How do i enter presentation mode in powerpoint.
To enter presentation mode in PowerPoint, click on the Slideshow tab in the top menu and then select “From Beginning” or “From Current Slide” depending on where you want to start your presentation.
Can I customize the way I enter presentation mode in PowerPoint?
Is there a shortcut to enter presentation mode in powerpoint, can i use a different display for presentation mode in powerpoint.
Yes, you can use a different display for presentation mode by going to the Slideshow tab and selecting “Set Up Slide Show.” From there, you can choose to present on a secondary monitor or projector.
How do I exit presentation mode in PowerPoint?
Can i add speaker notes while in presentation mode in powerpoint, similar posts, how to create handouts in powerpoint by exporting to word, how to select multiple objects in powerpoint with keyboard, how to convert text into wordart in powerpoint, how to make jumbled words in powerpoint, how to add column in powerpoint table without resizing, how to create your own theme in powerpoint.
Home Blog PowerPoint Tutorials How to Work with Presenter View in PowerPoint
How to Work with Presenter View in PowerPoint

Not all presenters have excellent memory recall or the ability to speak flawlessly to the audience without any cues. However, many of them are good at hiding it by using Presenter View in PowerPoint. It is a presentation mode that enables the presenter to hide speaker notes and presentation controls from the audience while leveraging the various handy features offered by PowerPoint.
How to Use Presenter View in PowerPoint
To start using Presenter View, ensure it’s enabled before you begin your slideshow. If you are new to this feature, we recommend using this option to familiarize yourself with the various navigation options for this presentation mode. This might also be helpful if the PowerPoint templates you are accustomed to using might have animations that you might want to preview in this mode to understand when to give the next visual cue.
How to Enable Presenter View in PowerPoint
To enable PowerPoint presenter view, go to the SlideShow tab and make sure the Use Presenter View option is enabled. This will ensure that you can access Presenter View when you switch your slides to SlideShow mode.

Adjust Display Settings
You can swap between the presenter view and slideshow mode or duplicate the slideshow to exit the Presenter View from the Display Settings menu from the top toolbar.

Navigate Slides in Presenter View
Like any standard PowerPoint presentation in SlideShow mode, you can navigate between slides by using the arrow keys or with a presentation remote. Presenter View also provides slide navigation buttons to move the slides back and forth.

View Taskbar in Presenter View
The Show Taskbar option at the top enables viewing the taskbar. This can be helpful if you require using the taskbar, such as to view your battery charge, see the time, enable or disable another app from the taskbar menu, etc.

Reset or Pause the Timer
Once you start your presentation in Presenter View, a timer starts showing how much time you have spent in slideshow mode. This is an excellent way to understand how much time you have consumed for your session and to keep an eye out for good timekeeping. You can also hit Pause or reset the timer anytime.

Change the Size of the Speaker Notes
How to view notes in PowerPoint while presenting? If you have any speaker notes added to your slides, they will appear in Presenter View on your screen. You can increase or reduce the size of the text via the two options at the bottom of the speaker notes pane.

Using Annotation Tools in Presenter View
PowerPoint annotation tools can be accessed from the bottom toolbar in Presenter View. The Pen and Laser Pointer Tools button gives you access to the pen, ink colors, laser pointer, and eraser and also allows you to show or hide the mouse pointer via Arrow Options .

View All Slides in Presenter View
If you need to go back and forth to find a relevant slide for an ongoing discussion or query during your presentation, you can view all slides in Presenter View via the See all slides option.

Zoom Slides using Presenter View
PowerPoint’s Zoom feature lets presenters quickly pick a portion of the slide to zoom into. Presenter View allows you to leverage this feature by instantly selecting a portion of the slide to enlarge it after selecting Zoom into the slide option. To exit the Zoom mode or hit the Esc key.

Black or Unblack SlideShow
Sometimes, you might want to turn the screen blank for a while, such as during a mid-presentation break. The Black or Unblack SlideShow option blanks the slides for your audience while continuing to show you all navigation options via Presenter View.

Toggle Subtitles in Presenter View
One of the most revolutionary features introduced by Microsoft for PowerPoint over the past decade has been Live captions. This feature enables subtitles by converting speech to text as you present. You can toggle Live subtitles on or off while in presenter view to help your audience read what you speak.

Toggle Camera in Presenter View
Like subtitles, you can also toggle the camera on or off in Presenter View.

End Slideshow in Presenter View
There are different ways to end or exit a SlideShow from Presenter View. You can hit the Esc key or click End Slide Show . Similarly, you can click the three dots at the bottom and select End Show .

More Slideshow Options
Other than the various visibility prominent menus available to navigate, annotate, and present your slides, you can also find a few additional options via More slideshow options , which are accessible via the three dots at the bottom toolbar. These include adjusting the position of the subtitles, turning your screen white or black, ending the slideshow, etc.

How to Use Presenter View on a Single Screen
While Presenter View can be enabled to work with dual monitors, you can also use Presenter View on a single monitor with remote meeting apps like Zoom. A simple method for switching to Presenter View on a single monitor is to click the three dots ( More slideshow options ) at the bottom in SlideShow mode and select Show Presenter View .

You can also switch to Presenter View on a single monitor anytime using the ALT+F5 hotkey.

The presenter can easily manage a PPT in presentation mode, with the utility to view speaker notes, annotate or zoom slides, toggle subtitles or camera on or off, and keep your audience engaged via better slideshow management. However, if you’re new to this presentation mode, a bit of practice might help you avoid confusion when presenting before an audience in Presenter View for the first few times. For more information, check our article about PowerPoint presentation shortcuts .

Like this article? Please share
PowerPoint Tools, Presentation Skills Filed under PowerPoint Tutorials
Related Articles

Filed under PowerPoint Tutorials • June 11th, 2024
How to Play a Slideshow on PowerPoint
Master one of the key features for presentations. Learn how to play a Slideshow on PowerPoint with our guide.

How to Change a Shape in PowerPoint
Editing PowerPoint shapes doesn’t have to be a complex concept. Learn all the different methods on how to change PowerPoint shapes here.

How to Add Music to PowerPoint
Looking for ways on how to add music to your presentation? Stay tuned for this article on how to add audio files into PowerPoint.
Leave a Reply

5 Easy Steps to Use Presenter View in PowerPoint

Do you want to learn how to use the Presenter View in Microsoft PowerPoint presentation?
The Presenter View in Microsoft PowerPoint is a game changer for presenters. It will help you focus by showing you all the relevant slides and speaker notes .
In this blog post, we will walk through the following methods:
How to enable and use presenter view in PowerPoint
Controls of "Presenter View" in PowerPoint
Frequently asked questions on how to use Presenter View in PowerPoint.

How to Use Presenter View in PowerPoint Presentations
Before you can access the presenter view of Microsoft PowerPoint, you need to follow these steps:
Open Microsoft PowerPoint and select an existing presentation.

Once the existing presentation opens, go to the Slide show Tab and navigate to the "Monitors" section. Check the box beside the "Use Presenter View."

Select from the "Start Slide Show" section to start your presentation "From the Beginning."

Click the three dots menu on your full-screen slideshow view and select "Show Presenter View."

When your presentation displays "Presenter View," you can scroll and use it for your speech.

The following are the common features you will see whenever you are in presenter mode:
Command buttons
Use the command buttons found at the top of your Presenter view.
Show Taskbar : Reveal or conceal this helpful indicator on your desktop .
Display Settings: For projecting, switching the display between presenter view or replicating the slide show across both screens.
End the Slide Show : Back to Normal view.

The timer is in the upper-left part of the current slide and is designed to show your presentation's duration. Keep an eye on it and stay ahead of schedule!
For a temporary break, press the Pause button to pause the timer.
Select the Reset button to start fresh and set the timer back to zero.

The Notes pane lets you view any added speaker notes on the slide in great detail. From Presenter's view, you can easily adjust the size of this display for your convenience.
Select Increase or Decrease Font Size to alter the size of the annotations that show next to your current slide deck.

Vertical scroll bar in Presenters View
This vertical scroll bar appears at the lower-left corner of the Presenter view. These navigation buttons will help you move from the previous slide to the next slide.

End Presenter View
With the Presenter view, you don't have to finish the presentation if you no longer need it. You can close the window.
Select the Options menu.
Click Hide Presenter View
PowerPoint will re-open the standard slideshow view.

See all slides
This control button will display all the slide panels.

Pen and laser pointer tools
This built-in laser pointer tool can assist you in highlighting and keeping your audience following your topic on certain slides.

Final Thoughts on Using Presenter View in PowerPoint
Presenter View in PowerPoint is a powerful tool to help you create dynamic presentations and engage your audience.
Following the five quick and easy steps above can make your presentation looks professional and compelling. With these tools at your fingertips, you can impact every presentation!
Watch our video tutorials about Google Slides and PowerPoint presentations on our Simple Slides YouTube Channel. If you want to access our 10,000+ customizable templates, slides, and infographics, visit and subscribe now to our premium packages in Simple Slides!
Frequently Asked Questions on How to Use Presenter View in PowerPoint:
Why can't i use the presenter view in powerpoint.
To enable the feature, the presentation computer must recognize each monitor as a separate display. To confirm this is the issue, press the "Esc" key while on the presentation screen and see if anything changes.
How do I use the Presenter View in PowerPoint without showing notes?
The presenter view has the option. With this feature, only the slides are displayed, while text wraps below each slide. You can still make changes or add notes that won't appear to your audience; only you can access them.
How can I see my PowerPoint notes while presenting with one monitor?
With the Presenter View PowerPoint feature, viewing all PowerPoint slides and accompanying notes from one computer is possible. You can refer to your notes anytime during your presentation without switching monitors.

Related Articles:
How to Add a YouTube Video to PowerPoint: A Step-By-Step Guide
Microsoft Teams PowerPoint Presenter View
Adding Pop-Up Texts in PowerPoint
Get A Free Sample of Our Award-Winning PowerPoint Templates + University
Join our mailing list to receive the latest news and updates from our team. Don't worry, your information will not be shared.
We hate SPAM. We will never sell your information, for any reason.
Try 100+ Slides & 5 University Lectures for FREE.
Recent Posts

Try 100+ Slides & 5 University Lectures for FREE.
Get access to 100+ Templates & 5 University Lectures. Just enter your email below.

Join Our Free Trial
Get started today before this once in a lifetime opportunity expires.
- Skill Assessments
- AI Course Builder
- Free Courses
- PowerPoint 2019 Basic
Presenter View in PowerPoint

Start Free Trial
Or log in with:
How to Use Presenter View in PowerPoint

- You can use thumbnails to select slides out of sequence and create a customized presentation for your audience.
- Preview text shows you what your next click will add to the screen, such as a new slide or the next bullet in a list.
- Speaker’s notes are shown in large, clear type so that you can use them as a script for your presentation.
- You can temporarily black out the screen during a presentation and then resume where you left off. This can come in handy during breaks or question and answer periods.
Start Presenter View
- Click the Options button.

The Presenter view fills the screen. The same presentation tools are available below the slide, and it also shows the current time and a thumbnail of the upcoming slide. At the bottom of the screen, use the arrows to move forward or backward in the presentation.
Command Buttons
At the top of the Presenter view, there are command buttons.
- Show Taskbar : Show or hide the Windows taskbar.
- Display Settings : When projecting, swap which display shows the presenter view or duplicate the slide show on both screens.
- End the Slide Show : Return to Normal view.

The timer is located at the top-left corner of the current slide. It keeps track of how long Presenter view has been running.
- Click the Pause button to temporarily stop the timer.

The Notes pane gives you a large look at any notes added to the slide. In Presenter view, you have the flexibility to change the display size.

End Presenter View
You can close Presenter view without ending the presentation entirely.
- Click the Options menu.

You return to the regular slide show view.
To close Presenter View and end the presentation, just press Esc .

FREE Quick Reference
Free to distribute with our compliments; we hope you will consider our paid training.
- LinkedIn-ready certificate
- Skill assessments
- Bite-sized, interactive lessons
- Saved progress
Critical PowerPoint Shortcuts – Claim Your FREE Training Module and Get Your Time Back!
How to Present a PowerPoint Slideshow (w/ Shortcuts)
- PowerPoint Tutorials
- Shortcuts & Hacks
- May 11, 2019
There are a variety of ways to start a PowerPoint presention, depending on:
- Where you start your presentation (from beginning or from current)
- Which PowerPoint view you prefer to present in (Slide Show view or Presenter view)
- How comfortable you are with keyboard shortcuts
Why would Microsoft include so many ways to present a presentation? My guess is that everyone learns PowerPoint differently, and has personal presentation styles. The more options you have, the easier your life will be as there will always be a way to start your presentation the way you want to (or jump back into it when you need to).
See all the options below and find the method that works best for you and let the slide show begin !
NOTE: If you are running two presentations side-by-side, each presentation needs to be started as it’s own slide show. To see how to set up two PowerPoint presentations to run side-by-side like this before you start your slide show, read my guide here .
Table of Contents
Start slide show from beginning.

To start a slideshow from the beginning of your presentation using the ribbon, simply.
- Navigate to the Slide Show tab
- Select From Beginning
Selecting From Beginning starts your presentation from the very first non-hidden slide in your presentation, regardless of which slide you are currently inside of your deck.

You can also start your slide from the beginning of your presentation by hitting the Slideshow From Beginning keyboard shortcut, F5 .
Regardless of which method you use, this is the classic way to start your presentation in full screen from your first title slide (regardless of where you are in your slide deck).
Let the slide show begin!
NOTE: To expand your knowledge and learn how to use PowerPoint’s FREE and HIDDEN built-in laser pointer to point things out during your presentation, read my guide here .
Take your PPT skills to the next level
Start slide show from current.

To begin your slide show from the slide you are currently on using the ribbon, simply
- Navigate to the Slide Show tab
- Select From Current Slide
Selecting From Current Slide starts your slide show from whatever slide you are currently on, even if the slide is hidden.

You can also start your slide from the current slide you are on by hitting the Shift+F5 keyboard shortcut.
Because it’s often easiest to catch errors when building your slides in this full screen mode, I highly recommend learning the Shift+F5 shortcut and using it frequently as you build your slides to spot them for errors.

If you don’t want to bother learning the From Current Slide shortcut, you can also start your slideshow by clicking the Slide Show icon at the bottom of your screen.
This is a fantastic way to spot check your slides as you are building them. On top of that, it’s a fast and uncomplicated way to re-start your presentation from where you left off after demoing something on screen.
Start a mini-slide show in PowerPoint
You can also use the following hidden PowerPoint shortcut to run a mini slide show over the top of your current deck.

To run a mini slide show, simply:
- Hold down the Alt key on your keyboard
- With your mouse, click the Slide Show icon
Doing so starts a small slide show of your presentation that you can see below, from the current slide you are on.

Presenter View
The Presenter View is an alternate way to run your presentation in PowerPoint. In this view, your slides are projected on screen, and the details of your presentation are displayed on your computer as pictured below.

The presenter view includes your next (non-hidden) slides that is coming up, your current slide projected on screen, how long you’ve been talking and your speaker notes.

To launch the Presenter View from the beginning of your presentation using your Ribbon, simply:
- Navigate to the Slide Show tab
- Hold down the Alt key on your keyboard
- Click From Beginning
Holding down the Alt key and clicking From Beginning , the Presenter View will launch from the very first (non-hidden) slide in your presentation.

You can also launch the presenter view from the beginning of your presentation at any time by clicking Alt + F5 on your keyboard.
Start Presenter View in PowerPoint From Current Slide

Did you know that you can access different views in PowerPoint by adding keys as you click commands in the PowerPoint ribbon?
To start the Presenter view from your current slide using your Ribbon, simply:
- Hold down the Alt key on your keyboard
- Click From Current Slide
Holding the Alt key and clicking From Current Slide launches the Presenter View from your current slide. So, this is another way you can quickly practice your presentation, see your speaker notes and see what’s coming up next.
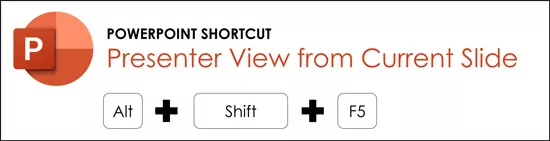
You can also launch the Presenter View from the beginning of your presentation at any time by hitting Alt+F5 on your keyboard.
Showing and Hiding Presenter View
Regardless of which view you start your PowerPoint slide show; you can switch between the two different slide show views without exiting presentation.

To switch between the two slideshow views (while giving your presentation), simply:
- Right-click your slide in whichever presentation view you are currently in
- Select either Show Presenter View or Hide Presenter View
When would you use a feature like this during a presentation? One example is if you want to view your notes without leaving the slide show mode.
NOTE: The letter r for both Show Presenter View and Hide Presenter View is underlined. This means that it is a keyboard shortcut. So, if you want to quickly flip between these two presentation views, you can simply right-click your slide and hit the letter r on your keyboard. Doing so automatically switches the view you are in.
Controlling how your presentation runs
Another way to control how your presentation runs (including the default laser pointer and pen color), is the Set Up Slide Show dialog box.

To open the Set Up Slide Show dialog box, simply:
- Select the Set Up Slide Show command
Doing so, opens all your PowerPoint slide show settings and options as pictured below.
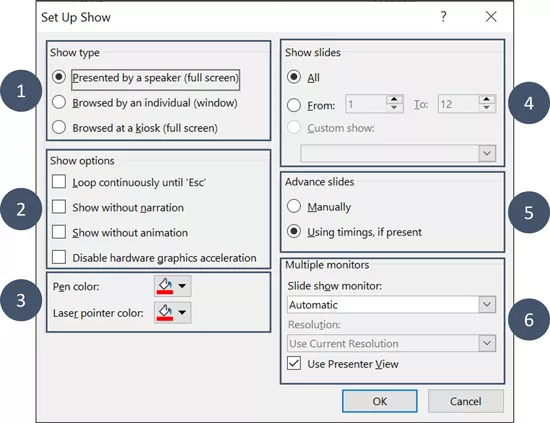
Inside the slide show settings dialog box, you can select:
- How your presentation runs (full screen, window or in kiosk mode).
- Your default pen and laser pointer color options ( see our laser pointer article here ).
- Which slide you want start from, or which slides you want to show. You can also setup a custom show here.
- How your slides progress (manually or using slide timings).
- Which of your computer monitors (or screens) your slide show runs on.
The Set Up Slide Show dialog box is also the secret to running multiple presentations at the same time in PowerPoint. To expand your knowledge and learn how to set this up, read our guide here .
Setup Slide Show SECRET Shortcut

To use the SECRET shortcut to open the Set Up Slide Show dialog box, simply:
- Hold down the Shift key on your keyboard
- With your mouse, click the Reading View icon at the bottom of your screen
This is useful when you need to quickly cycle through lots of PowerPoint presentations and change how those presentations run. Instead of wasting time clicking through the Ribbon, simply hold the Shift key and click the Reading View icon. This is also a friendly conversation starter with a fellow PowerPoint enthusiast at Happy Hour.
NOTE: The color of your Reading View icon might be different than in the picture above, as it is dependent on the Office Theme you selected for PowerPoint.
How to exit a PowerPoint presentation early?

Regardless of how you start your full screen presentation, you can end your presentation at any time by hitting the Esc key on your keyboard.
Hitting Esc immediately takes you out of the PowerPoint presentation mode and back to the normal editing view of your slides, on whatever slide you were last presenting.
Here is how you can use a combination of all the different keyboard shortcuts to spot check and practice your presentation in full screen before you finalize your presentation.
- Hit F5 on your keyboard to start your presentation in full screen from the very first slide in your presentation. You can then use your arrow keys to advance, spot checking your slides for errors.
- When you find an error, simply hit Esc key to return to the normal PowerPoint editing view to fix your slide.
- When you are done, hit Shift + F5 to return the full screen presentation mode from the slide you just updated. You can then continue spot checking your presentation (without having to start over from the beginning).
In this way you can quickly work your way through your slides and practice your presentation, fixing and adjusting your content as you go.
Understanding how to run your presentations is CRITICAL to the success of your presentation. Not only in presenting them live, but also in knowing how to spot check your slides as you build them.
I personally find it easiest to spot check your slides and quickly fix errors by running your presentation in slide show mode (or full screen). The last place you want to discover an error is during your presentation.
Using the commands and shortcuts above, you can quickly start, exit and step back into your slide show. Once you have these commands and features down, you will also look like a whiz during your presentations.
If you enjoyed the depth of this article, you will love our other PowerPoint training courses and free resources. To learn more, visit us here .
🔒 Unlock the PowerPoint Shortcuts Trusted by Industry Leaders KKR, American Express, HSBC, and More!
Join over 114,880 professionals from diverse fields including consulting, investment banking, advertising, marketing, sales, and business development who have supercharged their PowerPoint game with our proven methods.
✅ Customize compelling presentations effortlessly.
✅ Master time-saving techniques for faster deck creation.
✅ Boost your career prospects with top-notch PowerPoint skills.
Get FREE access to the Critical PowerPoint Shortcuts module of our premium training course by entering your name and email below.
DISCLAIMER: PC Users Only!
We respect your privacy and will keep your info safe and confidential.
Related Articles
About the author.

Popular Tutorials
- How to Strikethrough Text (l̶i̶k̶e̶ ̶t̶h̶i̶s̶) in Word, Excel & PowerPoint
- How to Make Animated Fireworks in PowerPoint (Step-by-Step)
- Strikethrough Shortcut (l̶i̶k̶e̶ ̶t̶h̶i̶s̶) for Word, Excel & PowerPoint
- How to Create a Flash Card Memory Game in PowerPoint (Like Jeopardy)
- Keyboard Shortcuts Not Working: Solved
PowerPoint Tutorial Categories
- Strategies & Opinions
- Presentation Design
- Pictures, Icons, Videos, Etc.
- New Features
- Miscellaneous
- Charts & Data Viz
We help busy professionals save hours and gain peace of mind, with corporate workshops, self-paced courses and tutorials for PowerPoint and Word.
Work With Us
- Corporate Training
- Presentation & Template Design
- Courses & Downloads
- PowerPoint Articles
- Word Articles
- Productivity Resources
Find a Tutorial
- Free Training
- For Businesses
We help busy office workers save hours and gain peace of mind, with tips, training and tutorials for Microsoft PowerPoint and Word.
Master Critical PowerPoint Shortcuts – Secure Your FREE Training Module and Save Valuable Time!
⌛ Master time-saving expert techniques.
🔥 Create powerful presentations.
🚀 Propel your career to new heights.
We value your privacy – we keep your info safe.
Discover PowerPoint Hacks Loved by Industry Giants - KKR, AmEx, HSBC!
Over 114,880 professionals in finance, marketing and sales have revolutionized their PPT skills with our proven methods.
Gain FREE access to a full module of our premium PowerPoint training program – Get started today!
We hate spam too and promise to keep your information safe.
You are currently viewing a placeholder content from Facebook . To access the actual content, click the button below. Please note that doing so will share data with third-party providers.
- Create a presentation Article
- Save Article
- Design Article
- Share and collaborate Article
- Give a presentation Article
- Set up your mobile apps Article
- Learn more Article

Give a presentation
Give a presentation in powerpoint.
Start a presentation
On the Slide Show tab select From Beginning . Now, if you are working with PowerPoint on a single monitor and you want to display Presenter view, in Slide Show view, on the control bar at the bottom left select the three dots, and then Show Presenter View .
To move to the previous or next slide, select Previous or Next .
To view all the slides in your presentation, select See all slides .

During your presentation, the speaker notes are visible on your monitor, but aren't visible to the audience.
The Notes pane is a box that appears below each slide. Tap it to add notes.
If you don’t see the Notes pane or it is completely minimized, click Notes on the task bar across the bottom of the PowerPoint window

You can choose which language the caption/subtitle text should be shown to your audience. This feature requires Windows 10 and an up-to-date version of PowerPoint.
Select Slide Show > Subtitle Settings .
Set your Spoken Language .
Select Subtitle Language to see which languages PowerPoint can display on-screen as captions or subtitles, and select the one you want.
In the Subtitle Settings menu, set the desired position of the captions or subtitles.
More appearance settings are available by selecting Subtitle Settings > More Settings (Windows) .

Need more help?
Want more options.
Explore subscription benefits, browse training courses, learn how to secure your device, and more.

Microsoft 365 subscription benefits

Microsoft 365 training

Microsoft security

Accessibility center
Communities help you ask and answer questions, give feedback, and hear from experts with rich knowledge.

Ask the Microsoft Community

Microsoft Tech Community

Windows Insiders
Microsoft 365 Insiders
Was this information helpful?
Thank you for your feedback.
Stack Exchange Network
Stack Exchange network consists of 183 Q&A communities including Stack Overflow , the largest, most trusted online community for developers to learn, share their knowledge, and build their careers.
Q&A for work
Connect and share knowledge within a single location that is structured and easy to search.
How can I edit a presentation while in presentation mode?
I'm looking for a way to present to a live audience and incorporate their input into my presentation. With a "static" presentation, you have to keep taking down, editing, and then re-presenting the slide deck. I'm looking for a way to incorporate and save changes directly into the live presentation.
I use Keynote and PowerPoint, so a method to accomplish this with either would be ideal. But I am open to a solution that requires something else.
- microsoft-powerpoint
- presentations
- iwork-keynote
- I would gladly take a hack for PowerPoint or Keynote. That would be the preferred method – Max Phillips Commented Jan 10, 2017 at 21:46
- Would a PDF with fillable forms meet your requirements? It's not clear what sort of input you want to accept. If it's just text, then running a PDF reader in full-screen mode might do what you want. – AFH Commented Jan 10, 2017 at 22:19
- There is no hack. This behavior has been "normal" in Powerpoint at least for quite a while. 99% of people present by duplicating their screen (same thing on projector and their computer) but if you extend your display to the projector Powerpoint by default uses a different mode that has a special view on the computer display an the full-screen slide on the projecting display. And... you can edit in real time, while presenting, with live updates to the slides. – music2myear Commented Jan 10, 2017 at 23:00
3 Answers 3
For Windows:
PowerPoint has had this capability for quite some time. The key is to NOT duplicate your computer screen with the presenting screen ( TV, projector, other screen, etc. I'll use "projector" in this how-to for simplicity purposes. ) The only requirement is that you have some screen besides the projector.
With a Windows computer, when you connect to a projector use the Win + P command and choose the Extend the display. This means that your computer screen and the projector will show different things. You can also do this in Display Settings if you're more familiar with that.
PowerPoint has some intelligence to determine which screen is a projector and which is not, but if you need more control over which screen the presentation is on and which one will be your control screen, in the Slide Show tab you'll find Set Up Slide Show, which includes settings for this.
Another thing to keep in mind is that Presenter View (also an option in the Slide Show tab) can make things a little more difficult, but not much. When using Presenter Mode, the default behavior is for the Presenter Mode window to go full-screen, and you cannot edit in Presenter Mode. However, resizing the Presenter Mode window should allow you to easily bring up the main PowerPoint window, which is where the magic will happen.
So, all that aside, the meat of the solution:
Just edit the darn thing. That's all it takes.
With the presentation running happily away on the projector and the main PowerPoint window up on your computer screen, you can edit as much as you please and your edits will be reflected in real-time in the presentation itself ( Note: I've known about the Presenter Mode and running presentations on multiple monitors for years, but am only testing the specifics of editing in PowerPoint 2016. I do not know how the behavior is different in previous versions. ).
I don't know. I could not find specific documentation of this ability/feature for either Keynote or PowerPoint for Mac. While in Windows the Presenter view can be resized, some suggest this is not an option in Office for Mac.
One work around would be to use the Freeze capability of most projectors to freeze the current image on the screen, then exit the presentation on the computer, edit the slideshow, begin it at that slide again, and then unfreeze the projector image.
- I'm pretty familiar with extended desktop. It's what I work in most of the time. Is this procedure the same on Mac? And what version of PowerPoint are you using? – Max Phillips Commented Jan 11, 2017 at 16:26
- Macs an Keynote have generally encouraged people to use the extended desktop, so I'm not surprised you're more familiar with that mode. Unfortunately, I do not have the ability to test on an Apple computer. I tested this while writing the answer on Office 2016, which is the same version available for Mac. – music2myear Commented Jan 11, 2017 at 16:38
- I just can't figure out how to resize the Presenter Mode window. If I play the show without presenter view it takes over the PowerPoint module, there is no window behind it. – Max Phillips Commented Jan 11, 2017 at 16:44
- Interesting. I know the feature isn't new (or limited) to 2016 because of the answers to this question from 3 years ago: superuser.com/questions/681019/… – music2myear Commented Jan 11, 2017 at 17:04
- I'm trying to find documentation on the Mac versions. – music2myear Commented Jan 11, 2017 at 17:04
For Mac using PowerPoint 16:
Open the presentation you want to show. On the Mac menu bar go to window and click New Window.

This will pop out a duplicate PowerPoint presentation. Drag one of them to the second monitor and run it under setup option: "Browsed by an individual (window)"

You can now edit and add slides on the fly in the window that remains on your main desktop without interrupting the presentation. You can even edit the slide that you are currently showing on the screen and it will update automatically as you change it.
- TIL. Sweet. I'm glad you were able to figure it out. Feel free to mark this as the answer, but I'd also recommend modifying your original question to indicate you're talking about Mac OS, which would help clarify why my answer was not the best. – music2myear Commented Jan 11, 2017 at 23:11
- I want to give credit it where it's deserved. I wasn't trying to steal it. Just wanted to make sure that it was out there for people to find. – Max Phillips Commented Jan 12, 2017 at 4:43
- No worries. We're about the best answers, and sometimes details such as the OS you're limited to help make sure answers that sound like they may have multiple possible answers can be narrowed down to the right one. – music2myear Commented Jan 15, 2017 at 19:23
Windows 7 x64 using PowerPoint 2016
When using two screens make sure to uncheck "Use Presenter View" and start your slideshow

On Screen 1 you will be able to edit text on the fly and even add slides.
On Screen 2 you will see updates in real-time. If a slide is added in Screen 1 then you will need to activate Screen 2 and press the left or right arrows respectively.
You must log in to answer this question.
Not the answer you're looking for browse other questions tagged microsoft-powerpoint presentations iwork-keynote ..
- Featured on Meta
- Upcoming sign-up experiments related to tags
Hot Network Questions
- Can I get a refund for ICE due to cancelled regional bus service?
- Predictable Network Interface Names: ensX vs enpXsY
- Does it matter if a fuse is on a positive or negative voltage?
- Calibre viewer doesn't fill window
- Is there a drawback to using Heart's blood rote repeatedly?
- What does Athena mean in this passage of book 3 of the Odyssey?
- Cathay Pacific Online Booking: When to Enter Passport Details?
- Is it unfair to retroactively excuse a student for absences?
- Why was the animal "Wolf" used in the title "The Wolf of Wall Street (2013)"?
- Cleaning chain a few links at a time
- Imagining Graham's number in your head collapses your head to a Black hole
- Was Paul's Washing in Acts 9:18 a Ritual Purification Rather Than a Christian Baptism?
- Using Suica to train from Shinjuku to Kawaguchiko
- Can you arrange 25 whole numbers (not necessarily all different) so that the sum of any three successive terms is even but the sum of all 25 is odd?
- How much is USA - Brazil?
- Is there any other reason to stockpile minerals aside preparing for war?
- Is it better to show fake sympathy to maintain a good atmosphere?
- Why is a game's minor update (e.g., New World) ~15 GB to download?
- PWM Dimming of a Low-Voltage DC Incandescent Filament (Thermal Shock?)
- How do guitarists remember what note each string represents when fretting?
- Geometry question about a six-pack of beer
- What is the translation of misgendering in French?
- Did Tolkien give his son explicit permission to publish all that unfinished material?
- Con permiso to enter your own house?
Think Outside The Slide
4 Options for How to Present a PowerPoint Slide Show in a Zoom meeting
If you are using Zoom to meet with others who are working remotely, you may not realize that you have six choices when it comes to how you will present your PowerPoint slides to the group (I added two options I discovered after the article was first published). In this article I will share more details on these six options and you will get a link to that option in my video that shows you what your audience will see. In this article I am using the Zoom app in Windows 10. The six options are:
- Share your entire screen/desktop
- Share the Slide Show window
- Share the editing window with a clean look
- Run the Slide Show in a window and share that window
- Use Presenter View to show the audience your slides while you see Presenter View
- Present with your video beside your PowerPoint slides
Did you find this article using a Google search? Get more answers to your virtual presentation questions here and get updates of new articles and videos here .
Option 1: Share your entire screen/desktop
This is the default method that most people choose because it is the closest to what we would do if we were in a meeting room with the participants sitting around the table. In Zoom, you choose the sharing option called Screen. The audience sees everything that is on your screen, so if PowerPoint is not full screen, they will see any wallpaper you have and any other open applications with potentially confidential information displayed. They will not see the Teams controls at the top of the screen as those are always hidden from the audience when sharing your screen or a window.
You start your slide show in PowerPoint and all features will work, including animations and transitions. You can use a presentation remote to advance through your slides or use the arrow keys. Even though the slides take up the whole screen, you can still access the Zoom controls by moving your mouse to the top of the screen and selecting the controls you want. If you are concerned that you may miss any chat or questions from the audience, click on the Chat option in the Zoom controls and the chat window will be shown on top of your slides without the audience seeing it. Be careful as seeing comments in the chat window may distract you from your presentation.
Here is the section of my video that shows Option 1: Share your entire screen/desktop
Option 2: Share the Slide Show window
Because Zoom allows you to share any window that is open on your computer, another option you have is to share the window that has the Slide Show in it. Before you start sharing in Zoom, start the Slide Show in PowerPoint. This will display the slides on the entire screen. Use Alt+Tab to go back to the Zoom window. In the Zoom sharing options, choose the window that is displaying the slide show (make sure you select the slide show window, not the PowerPoint regular window).
Again, since you are using full PowerPoint, all features work and this is similar to presenting before an audience in a meeting room. Because you are only sharing a window, the audience won’t see anything else on your screen. Even though the slides take up the whole screen, you can still access the Zoom controls by moving your mouse to the top of the screen and selecting the controls you want.
Here is the section of my video that shows Option 2: Share the Slide Show window
Option 3: Share the editing window with a clean look
The first two options don’t allow you to see any other documents or notes that you may have on your screen because the slides cover the entire screen. If you don’t need any animation or transition features and are comfortable with the audience seeing the edit view of PowerPoint, you can choose to use a view that minimizes the PowerPoint interface so the slide is the focus.
In the normal editing view, minimize the slide thumbnails by dragging the vertical divider all the way to the left until it just shows the text indicating that thumbnails are available. Drag the horizontal divider at the bottom of the slide down to hide any notes that are below the slides. Third, collapse the ribbon by clicking on the collapse indicator (an upward arrow head) in the lower right corner of any ribbon. Finally, maximize the size of the slide in the editing window if it did not automatically resize itself. Now your slide is large in the editing window and PowerPoint has a cleaner look than the normal editing view.
In the Zoom sharing options, choose the window for this PowerPoint presentation. When you move through the slides, you are not using Slide Show mode so there are none of the animation or transition features available. Any embedded media will not run automatically and must be manually played. You can move through the slides using the down and up arrow keys or the PageDown and PageUp keys.
This is not as clean as Slide Show mode, but it allows you to see other open documents on your screen without the audience seeing them. You can still see and access the Zoom controls by moving your mouse to the top of the screen.
Here is the section of my video that shows Option 3: Share the editing window with a clean look
Option 4: Run the Slide Show in a window and share that window
Many presenters are not aware that PowerPoint has the option to run a slide show within the window it is in without taking up the entire screen. PowerPoint refers to this as the “Browsed by an individual” mode or Reading View. To use this mode, on the Slide Show ribbon, click on the Set Up Slide Show button. In the dialog box, in the Show type section in the to left corner, change the option by clicking on the radio button for “Browsed by an individual”. Click the OK button to save the change and exit the dialog box. Now whenever you enter Slide Show mode, the slides are run just in this PowerPoint window, not the full screen. You can change this back to the default of “Presented by a speaker” after the meeting is done.
Update Aug 11 2020: A recent Zoom update seems to have changed the order you need to do the steps. First start the Slide Show mode in PowerPoint. You will see the slide show with some additional controls at the top and bottom of the window and possibly black bars on the top/bottom or left/right depending on the size of the window relative to the size of the slides. This is a slightly different look for the audience if they are used to the full screen version of Slide Show mode. Then, in the Zoom sharing options, choose the window for this PowerPoint presentation. If you share the PowerPoint window first before entering Slide Show mode it confuses Zoom and it will stop sharing the window.
Because this is Slide Show mode, all animations and transitions work as expected. What is different than the full screen Slide Show mode is that the laser pointer, inking, and some other features are not available. Since you are only sharing this window, the audience does not see any other documents you may have open on the screen. You can still see and access the Zoom controls by moving your mouse to the top of the screen. This allows you to keep up with any chat discussion while presenting.
Since this option is only sharing one window, it uses less bandwidth than sharing a full screen which may help users on lower speed connections have a better experience with less lags or distortion. This option may give you the best combination of PowerPoint features and presenter controls and options.
Here is the section of my video that shows Option 4: Run the Slide Show in a window and share that window
Option 5: Use Presenter View to show the audience your slides while you see Presenter View
If you prefer to use Presenter View to see your speaking notes while the audience only sees your slides, I have instructions for using Presenter View in Zoom with 1 or 2 screens and in Windows or on a Mac in my Complete Guide to using PowerPoint Presenter View in Zoom .
Option 6: Present with your video beside your PowerPoint slides
You can present in a Microsoft Teams or Zoom meeting with your video beside your PowerPoint slides so your facial expressions can be easily seen along with the slides. The idea is to arrange our video and slides on our desktop and share the entire screen, so we control the size of both the video and the slides. This does not require you to install any software and uses the built-in features of the operating system and PowerPoint. For Windows 10 I explain the detailed steps in this article and show you how this is done in this video . For a Mac I explain the detailed steps in this article .
In my opinion, Option 5, using Presenter View, is the best option for most presenters because it allows you to see your notes and access all the expert features of Presenter View while the attendees see your full slides. It is what I use when I deliver my customized training courses .
( Get more articles on using Zoom effectively here )
Full video with all four options
Dave Paradi has over twenty-two years of experience delivering customized training workshops to help business professionals improve their presentations. He has written ten books and over 600 articles on the topic of effective presentations and his ideas have appeared in publications around the world . His focus is on helping corporate professionals visually communicate the messages in their data so they don’t overwhelm and confuse executives. Dave is one of fewer than ten people in North America recognized by Microsoft with the Most Valuable Professional Award for his contributions to the Excel, PowerPoint, and Teams communities. His articles and videos on virtual presenting have been viewed over 4.8 million times and liked over 17,000 times on YouTube.
By Dave Paradi
Dave Paradi has over twenty-two years of experience delivering customized training workshops to help business professionals improve their presentations. He has written ten books and over 600 articles on the topic of effective presentations and his ideas have appeared in publications around the world . His focus is on helping corporate professionals visually communicate the messages in their data so they don't overwhelm and confuse executives. Dave is one of fewer than ten people in North America recognized by Microsoft with the Most Valuable Professional Award for his contributions to the Excel, PowerPoint, and Teams communities. His articles and videos on virtual presenting have been viewed over 4.8 million times and liked over 17,000 times on YouTube.

- What's New?
- Tutorial Index
- Advanced Search
- Windows 10 Forums
Turn On or Off Presentation Mode in Windows

Turn On or Off Presentation Mode in Windows

How to Turn On or Off Presentation Mode in Windows When giving a presentation, you may want to turn on presentation mode. While presentation mode is turned on, your computer stays awake, system notifications are turned off, and your presentation settings for screen saver, volume, and desktop background are applied. In addition, the presentation settings . icon will show on the taskbar notification area to indicate it is currently turned on. This tutorial will show you how to turn on or off presentation mode for your account when giving a presentation in Windows 7 , Windows 8 , and Windows 10 . In Windows 7 , Presentation Settings and presentation mode is only available in the Professional, Ultimate, and Enterprise editions. In Windows 8 , Presentation Settings and presentation mode is only available in the RT, Pro, and Enterprise editions. In Windows 10 , Presentation Settings and presentation mode is only available in the Pro, Enterprise, and Education editions . CONTENTS: Option One: Turn On or Off Presentation Mode in Windows Mobility Center Option Two: Turn Off Presentation Mode from Presentation Settings Notification Area Icon Option Three: Turn On or Off Presentation Mode in Presentation Settings Option Four: Turn On or Off Presentation Mode in Command Prompt OPTION ONE Turn On or Off Presentation Mode in Windows Mobility Center 1. Open the Windows Mobility Center (mblctr.exe). 2. Click/tap on the available Turn on or Turn off button for Presentation Settings . (see screenshots below) 3. When finished, you can close the Windows Mobility Center if you like. OPTION TWO Turn Off Presentation Mode from Presentation Settings Notification Area Icon 1. Click on, right click, or press and hold on the presentation settings icon on the taskbar notification area, and click/tap on Stop Presentation . (see screenshot below) OPTION THREE Turn On or Off Presentation Mode in Presentation Settings 1. Open Presentation Settings (PresentationSettings.exe). 2. Check (on) or uncheck (off) the I am currently giving a presentation box for what you want, and click/tap on OK . (see screenshot below) OPTION FOUR Turn On or Off Presentation Mode in Command Prompt 1. Open a command prompt (cmd.exe). 2. Copy and paste the command below you want to use into the command prompt, and press Enter . (see screenshots below) (Turn on presentation mode) PresentationSettings.exe /start OR (Turn off presentation mode) PresentationSettings.exe /stop 3. When finished, you can close the command prompt if you like. That's it, Shawn Related Tutorials How to Enable or Disable Presentation Settings in Windows How to Add Presentation Settings to Desktop Context Menu in Windows How to Enable Windows Mobility Center on a Desktop Windows PC How to Open Windows Mobility Center in Windows 10 Windows 11 Tutorials

- Vista Forums
- Eight Forums
- Seven Forums
- Eleven Forums
- Privacy and Cookies
- Terms of service

Top PowerPoint Keyboard Shortcuts to Present Like a Pro!

From business consultants to sales reps and entrepreneurs, anyone who works with presentations can benefit from knowing some PowerPoint keyboard shortcuts. Today, I’ll show you 20+ handy commands to help you shine before and during your presentations.

But First, What Are PowerPoint Shortcuts?
PowerPoint shortcuts are keys or keyboard combinations that quickly allow you to perform an action in the program . Otherwise, you’d have to use your mouse or navigate through multiple menus and toolbars until finding the right command. In other words, PowerPoint keyboard shortcuts help you reduce steps and optimize your experience when working in a presentation.
Now, let’s see which are the top shortcut keys you should know:
Useful PowerPoint Keyboard Shortcuts for Last-minute Changes
Even the most experienced speakers find themselves making last-minute changes in their slides' appearance or presentation structure. It’s just part of the presenter’s life. But there’s no reason to panic, the following keyboard shortcuts will give you a hand in those moments.
PowerPoint Shortcuts for a Quick Formatting
1) use “alt+w+m” to enter slide master view.
For last-minute changes in the layout of your presentation, your slide master is the place to go.

Let’s say you want to replace the logo in your footer, change the color palette, or replace the font of your headlines. When you have only a few minutes available before presenting, this seems like an impossible task but here’s the secret: Anything that you put in your slide master will apply to all your slides so that you don’t need to go fixing them one by one.
If you’re not familiar with this type of slides, we’ve got a complete guide for you on how to create and use your master slides in PowerPoint .
2) Use “Shift” to keep objects in proportion
Have you ever resized a circle in PowerPoint and it ended up looking like an oval? When you resize by sight it’s hard to obtain perfect symmetry but the “Shift” key can help with that.
Simply press and hold “Shift” while resizing your elements. This comes in handy to make your objects bigger or smaller without losing their proportions. It works for shapes, images, and any other object in your slides.
3) Align your text
Alignment is essential to provide a clean and professional aspect to your documents. However, as formatting is one of the last steps in the making of a presentation, people tend to forget it. If this happens to you often, these are the PowerPoint shortcuts you need for a quick text alignment before starting your slide show:
- Use “Ctrl + J” to justify your text
- Press “Ctrl+E” to center the text
- Use “Ctrl+L” for left alignment
- Press “Ctrl+R” to right-align your text.
4) Use F7 to check your spelling
Most people don’t know this but you can actually check your presentation’s spelling in PowerPoint. It’s pretty simple: Once you enter the last words in your slides, press F7 . A new section will appear at the right of your screen showing misspelled words and giving you some options you can replace them with.
In some cases, you might need to try with “Fn + F7” to activate the check spelling shortcut.
5) Fix Up your Slides
Not exactly a PowerPoint keyboard shortcut but definitely a hack that will save you time and effort in the making of your slides.
If you work with presentations constantly, you’ll be happy to learn that you don’t need to design them yourself. You can have your deck quickly polished (or completely redesigned!) by professional PowerPoint designers . Check out some examples from the 24Slides team:
Want to get results like these? Learn more about the 24Slides’ presentation design services .
PowerPoint Keys To Edit Your Presentation Structure
1) use “ctrl + m” to insert a new slide.
Sometimes new information appears right before the big moment and you need to quickly update your presentation. Whenever you find yourself in this situation, select a slide and press “Ctrl+M'' to insert a new one. You’ll have a fresh title slide to keep adding content.
2) Use “Ctrl + D” to duplicate
But if you want to have similar slides, use “Ctrl + D” to duplicate them. This way, instead of working from a blank slide, you’ll be able to use one as your base and replace as much information as you want. This PowerPoint shortcut works for slides and objects alike.
3) Move slides
Arrange your presentation structure by using “Ctrl + Up arrow” to move a slide up or “Ctrl + Down arrow” to move it down.
I find this PowerPoint shortcut very useful especially when working with long presentations. Here’s why: Dragging slides one by one makes the thumbnails pass quickly and if you have 30+ slides, you’ll need more than a few seconds to land your slide in the spot that you want. Save yourself some time with this simple trick.
PowerPoint Shortcut Keys to Use During a Presentation
There are other PowerPoint keyboard shortcuts that only work in the slide show mode. We’ll go from my favorite basic commands to some advanced keyboard shortcuts to help you manage your presentation like a pro.
Basic PowerPoint Commands
1) use f5 to start a slideshow.
Done editing and ready to present? Press F5 to start your Slideshow from the first slide.
2) Use “Shift + F5” to start from the current slide
If you want to start from a specific slide, press “Shift+F5” . Let’s say you made a pause in your presentation to review some slides and want to pick up where you left off. Just select the last slide you were at and use this shortcut. It will save you tons of time because you won’t have to go through all your slides again.
3) Zoom in and Zoom out
Whenever you want to show an area of your slide in detail, press “+” to zoom in. You’ll be able to get a closer view of any element in your slide just by dragging the pointer. And when you’re finished zoom out with “-”
Advanced PowerPoint Shortcuts to Wow your Audience
1) annotate in your slides.
Did you know that you can mark up your slides during a live presentation? Yes, PowerPoint has some secret tools that help you grab and hold your audience’s attention while on a slideshow. And here are the shortcuts you need to activate them:
- Use “Ctrl + P” for a Pen Tool
You’ll be able to draw free lines and scribble across your slide. The PowerPoint pen tool comes in handy when you want to explain a process or show how to get from one point to another.
- Use “Ctrl + i” for a Highlighter
The PowerPoint highlighter pen uses a yellow color to help you annotate and draw attention to your slide’s key points.
- Use “Ctrl + L” for a Laser
A laser pointer is always useful to highlight specific aspects of your presentation. But don’t worry if you didn’t bring yours, PowerPoint lets you turn your cursor into a cool laser pointer.
- Extra: The PowerPoint Eraser tool
Now that you know how to annotate in your presentation, it’s fair that I share with you how to erase the marks you made in your slides. Use “Ctrl + E” to activate the Eraser tool. And if you want all the marks to vanish at once, just press the E key .
2) Show a black or white screen
Sometimes you’re elaborating on a concept and want people to focus all their attention on you and not your slides. In those moments, use the key “B” to change the screen to black during a slideshow or “W” to turn it white. You can go back to your slides by pressing the same key again.
3) Use “G” to display all the slides
You’ll open a nice visualization of all your slides so you can easily go back and forth through your presentation in a matter of seconds. Try it and check your audience’s reaction!

How to See Your Keyboard Shortcuts in PowerPoint?
I know. There are so many PowerPoint shortcuts that it’s impossible to remember them all. But that shouldn’t be a problem for presenters like you because PowerPoint offers some help.
A) In Presentation Mode
Whenever you need to check how to use keyboard shortcuts during your presentation, press F1 . A slide show help dialog box will display a list of your PowerPoint shortcuts available.

B) In Normal View
There are other types of shortcuts in PowerPoint called Key Tips or Access Keys which allow you to navigate through the ribbons and main menu. To activate them, press Alt or F10 .

C) Help Box
If you want to get the full list of PowerPoint shortcuts and further information about them, use the Help box. Just press F1 and search for “shortcuts”.

Note that this option only works when you’re connected to a WiFi network.
INFOGRAPHIC: Top PowerPoint Keyboard Shortcuts Every Presenter Should Know
The 24Slides team created this incredible infographic that summarizes all the PowerPoint keyboard shortcuts we’ve seen.

Save it, share it, and don’t forget to practice before your live presentation!
Create professional presentations online
Other people also read

6 Presentation Styles of Famous Presenters
How to create and deliver a powerful presentation introducti...

The seven worst presentations of all time and why they went ...

Microsoft 365 Life Hacks > Presentations > How many slides does your presentation need?
How many slides does your presentation need?
When you’re creating a presentation, it’s important to consider the amount of information you’re sharing with your audience. You don’t want to overwhelm them, but you also want to be comprehensive and ensure that you’re covering all your bases. Whether you’re giving a 10, 15, or 30-minute presentation, see how many slides your presentation needs to get your point across.

Rules and guidance for PowerPoint presentations
PowerPoint is a powerful visual aid for introducing data, statistics, and new concepts to any audience. In PowerPoint, you can create as many slides as you want—which might sound tempting at first. But length doesn’t always guarantee a successful presentation . Most presentations last around 10-15 minutes, and anything longer than that (such as a 30-minute presentation) may have additional visual aids or speakers to enhance your message.
A handy rule to keep in mind is to spend about 1-2 minutes on each slide. This will give you ample time to convey your message, let data sink in, and allow you to memorize your presentation . When you limit each slide to this length of time, you also need to be selective about how much information you put on each slide and avoid overloading your audience.
For 10-minute presentations
Ten minutes is usually considered the shortest amount of time you need for a successful presentation. For a shorter 10-minute presentation, you’ll need to be selective with your content. Limit your slide count to approximately 7 to 10 slides.
For 15-minute presentations
When preparing for a 15-minute presentation, concise and focused content is key. Aim for around 10 to 15 slides to maintain a good pace, which will fit with the 1-2 minute per slide rule.
For 30-minute presentations
A longer presentation gives you more room to delve deeper into your topic. But to maintain audience engagement, you’ll need to add interactivity , audience participation, and elements like animations . Aim for around 20 to 30 slides, allowing for a balanced distribution of content without overwhelming your audience.

Tell your story with captivating presentations
Powerpoint empowers you to develop well-designed content across all your devices
Using the 10-20-30 rule
The 10-20-30 rule is an effective way to structure your presentation. It calls for no more than 10 slides and no longer than 20 minutes (as well as a 30-point font).
Tips for crafting an effective presentation
No matter how long a presentation is, there are guidelines for crafting one to enhance understanding and retention. Keep these tips in mind when creating your PowerPoint masterpiece:
- Avoid overload: Ensure that each slide communicates a single idea clearly, avoiding cluttered layouts or excessive text.
- Pay attention to structure: Think of slides as bullet points with introductions, endings, and deep dives within each subject.
- Add visual appeal: Incorporate images, charts, and graphics to convey information without using too many words to make your audience read.
- Engage with your audience: Encourage interaction through questions, polls, or storytelling techniques to keep your audience actively involved.
- Put in the practice: Familiarize yourself with your slides and practice your delivery to refine your timing and confidence.
Ultimately, the ideal number of slides for your presentation depends on the allocated time frame and how detailed your content is. By striking a balance between informative content and engaging delivery, you can create a compelling presentation that can teach your audience something new.
Get started with Microsoft 365
It’s the Office you know, plus the tools to help you work better together, so you can get more done—anytime, anywhere.
Topics in this article
More articles like this one.

How to introduce yourself in a presentation
Gain your audience’s attention at the onset of a presentation. Craft an impressionable introduction to establish tone, presentation topic, and more.

How to add citations to your presentation
Conduct research and appropriately credit work for your presentation. Understand the importance of citing sources and how to add them to your presentation.

How to work on a group presentation
Group presentations can go smoothly with these essential tips on how to deliver a compelling one.

How to create a sales presentation
Engage your audience and get them interested in your product with this guide to creating a sales presentation.
Everything you need to achieve more in less time
Get powerful productivity and security apps with Microsoft 365

Explore Other Categories
IMAGES
VIDEO
COMMENTS
Select the Slide Show tab. Select the Use Presenter View checkbox. Select which monitor to display Presenter View on. Select From Beginning or press F5. In Presenter View, you can: See your current slide, next slide, and speaker notes. Select the arrows next to the slide number to go between slides. Select the pause button or reset button to ...
Start presenting. On the Slide Show tab, in the Start Slide Show group, select From Beginning. Now, if you are working with PowerPoint on a single monitor and you want to display Presenter view, in Slide Show view, on the control bar at the bottom left, select , and then Show Presenter View.
Turn On PowerPoint Presenter View. In PowerPoint for macOS, simply click on Presenter View on the Slide Show tab to kick off the presentation in Presenter view. Turn on Presenter View by clicking on Presenter View on the Slide Show tab. You'll see the Presenter View interface on one screen.
First, create a new custom slide show and select the slides that you want to display. Then, click Add, enter the name of the presentation and click OK. This new custom presentation will appear on the list. Select it and click Show to begin the presentation. Defining a custom slide show.
Step 1: Open your PowerPoint presentation. The first step to enter Presentation Mode in PowerPoint is to ensure that your presentation file is open and ready for display. To do so, open PowerPoint and locate the file containing your presentation. Click on the file to open it. Review that the slides are arranged in the correct order and that any ...
A simple method for switching to Presenter View on a single monitor is to click the three dots ( More slideshow options) at the bottom in SlideShow mode and select Show Presenter View. You can also switch to Presenter View on a single monitor anytime using the ALT+F5 hotkey. The presenter can easily manage a PPT in presentation mode, with the ...
To see the full course that this video came from, go here: ️https://www.simonsezit.com/courses/microsoft/powerpoint-2021-online-course/In this Microsoft Pow...
Watch this video to find out how. Set up your presentation. First, go to the SLIDE SHOW tab and make sure Use Presenter View is selected. For rehearsal, you can press ALT+F5 to display the Presenter view on a single screen. Rehearsing this way will help you get comfortable with your slides, and give you practice using the Presenter view.
Check the box beside the "Use Presenter View." Select from the "Start Slide Show" section to start your presentation "From the Beginning." Click the three dots menu on your full-screen slideshow view and select "Show Presenter View." When your presentation displays "Presenter View," you can scroll and use it for your speech.
In this screencast, you'll learn how to present a PowerPoint slideshow with Presenter View. Download unlimited PPT templates with Envato Elements: https://...
Start Presenter View. Click the Options button. Select Show Presenter View . The Presenter view fills the screen. The same presentation tools are available below the slide, and it also shows the current time and a thumbnail of the upcoming slide. At the bottom of the screen, use the arrows to move forward or backward in the presentation.
Navigate to the Slide Show tab. Hold down the Alt key on your keyboard. Click From Beginning. Holding down the Alt key and clicking From Beginning, the Presenter View will launch from the very first (non-hidden) slide in your presentation.
In today's tech tip, we share some Microsoft PowerPoint presentation tips. Including how to get into presentation mode, how to annotate the screen while pres...
PowerPoint Presenter View was designed for use in a meeting room. Connect your laptop that sits on the table to the projector or TV. Use Presenter View to see your notes while the audience just sees the slides on the large screen. Works great. Until we don't do presentations in meeting rooms.
Start Presenter View Preview by pressing Alt+F5. In Zoom, share a portion of the screen from the Advanced sharing options. Make the current slide larger in Presenter View and adjust the sharing rectangle so you just share the current slide portion of the screen in Zoom. Deliver your presentation. Full detailed article.
Start a presentation. On the Slide Show tab select From Beginning . Now, if you are working with PowerPoint on a single monitor and you want to display Presenter view, in Slide Show view, on the control bar at the bottom left select the three dots, and then Show Presenter View. To move to the previous or next slide, select Previous or Next .
5. For Mac using PowerPoint 16: Open the presentation you want to show. On the Mac menu bar go to window and click New Window. This will pop out a duplicate PowerPoint presentation. Drag one of them to the second monitor and run it under setup option: "Browsed by an individual (window)"
In this article I am using the Zoom app in Windows 10. The six options are: Share your entire screen/desktop. Share the Slide Show window. Share the editing window with a clean look. Run the Slide Show in a window and share that window. Use Presenter View to show the audience your slides while you see Presenter View.
This video will show the three ways to put your PowerPoint presentation into Presentation mode, for displaying to a kiosk or meeting.The purpose of this vide...
1. Open the Windows Mobility Center (mblctr.exe). 2. Click/tap on the available Turn on or Turn off button for Presentation Settings. (see screenshots below) 3. When finished, you can close the Windows Mobility Center if you like. OPTION TWO.
If this happens to you often, these are the PowerPoint shortcuts you need for a quick text alignment before starting your slide show: Use "Ctrl + J" to justify your text. Press "Ctrl+E" to center the text. Use "Ctrl+L" for left alignment. Press "Ctrl+R" to right-align your text.
Learn how to send Microsoft PowerPoint in Presentation ModeFollow our presenters/host on Twitter: https://twitter.com/educatoralexHIT THE RED SUBSCRIBE BUTTO...
Rules and guidance for PowerPoint presentations. PowerPoint is a powerful visual aid for introducing data, statistics, and new concepts to any audience. In PowerPoint, you can create as many slides as you want—which might sound tempting at first. But length doesn't always guarantee a successful presentation.
I was asked how to open a PowerPoint straight into presentation mode. Just follow the video and it should be fine :D-----...