
Getting Started with Lead Assignment Rules in Salesforce

Lead Assignment Rules in Salesforce are a powerful tool that allow your GTM (Go-To-Market) teams to automate the process of generating leads and assigning them to the most suitable sales representatives based on specific criteria. Managing and assigning leads becomes key, particularly when dealing with high daily volumes and considering the priority of leads based on various factors. And, as we all know, speed to lead is crucial : if you waste even one minute, your conversion plummets by a shocking 391%.
Ideally, your organization should employ different lead assignment rules tailored to your go-to-market strategies and motions. For instance, the assignment rules for leads generated from a demo request on your website may differ from those for leads obtained through downloading an ebook.
A lead assignment rule consists of a prioritized set of rule entries that dictate how leads are assigned throughout your go-to-market motions, either to a specific user or to a Salesforce Queue. These rules are automatically triggered when leads are created and can also be applied to existing records.
However, there is one significant constraint with Salesforce assignment rules: only one can be active at any given time. This means that as your business scales and you implement multiple business processes, you'll need to consolidate all the complex logic into a single comprehensive assignment rule with multiple rule entries. As you can imagine, managing, maintaining, and updating such an operation can become increasingly challenging over time.
Salesforce Lead Assignment Rules Examples
- Leads from Enterprise Accounts with ARR greater than $200M are assigned to Enterprise SDR Queue.
- Leads from accounts with ARR greater than $50M (and less than $200M) are assigned to Mid Market SDR Queue.
- Leads reaching Nurture Lead Status are directed to SDR 1.
- Irrelevant leads with a ‘gmail.com’ domain are routed to a dummy user and disregarded.
- Distribute leads to reps based on their respective sales territories.
Salesforce Lead Assignment Rules: A step-by-step guide
Here is a step-by-step guide to help you set up Salesforce Lead Assignment Rules in keeping with your business needs and sales strategies.
Step 1: Log in to Salesforce:
Access your Salesforce account using your credentials.
Step 2: Navigate to Setup:
Click on the gear icon in the screen's upper-right corner to access the Setup menu.
Step 3: Access Lead Assignment Rules:
In the Setup menu, search for "Lead Assignment Rules" in the Quick Find box. Click on "Lead Assignment Rules" under the "Leads" section.
Step 4: Create a New Rule:
Click on the "New Lead Assignment Rule" button to create a new rule.
Step 5: Define Rule Entry Criteria:
Enter a suitable name for the rule and specify the rule's entry criteria.
You can decide whether to write a formula or build a prioritized set of rule entry criteria. The logic you define determines the conditions that need to be met for the rule to trigger.
Step 6: Specify Rule Assignments:
Choose the desired assignment method for your leads. Salesforce provides different assignment options, such as assigning leads to Queues or specific users. Select the appropriate option based on your business requirements, and (optionally) choose an email template to be sent to the new owner of the lead.
Step 7: Save and Activate the Rule:
Once you have configured all the necessary settings, click the "Save" button to save the lead assignment rule. After saving, activate the rule to make it operational.
Step 8: Test and Validate:
It is essential to test the rule and ensure that leads are being assigned as expected. Create test leads and verify their assignments based on the defined criteria. Make any necessary adjustments or refinements to the rule if required.
Salesforce editions and permissions for Lead Assignment Rules
After gaining an understanding of how lead assignment rules can benefit your business and determining their suitability, you may wonder, "Do I have the appropriate Salesforce edition?" The short answer is, “Yes.” Salesforce has now made this feature available in every edition.
In terms of user permissions, certain requirements must be met to view and edit lead assignment rules in Salesforce. Users must have the "Manage Leads" permission and the ability to "View Setup and Configuration" in order to access lead assignment rules. For editing purposes, users need the "Customize Application" permission along with either the "Modify All Data" or "Modify Leads" permission. If you are unable to locate this section in Salesforce or encounter difficulties with viewing or editing assignment rules, reach out to your Salesforce administrator to verify that you have the necessary permissions in place.
Assignment rules limits and challenges
Salesforce Lead Assignment Rules, while suitable for small teams with straightforward rules, come with significant limitations that can hinder efficiency for larger teams. These limitations become more apparent as the volume of leads increases and more complex use cases arise.
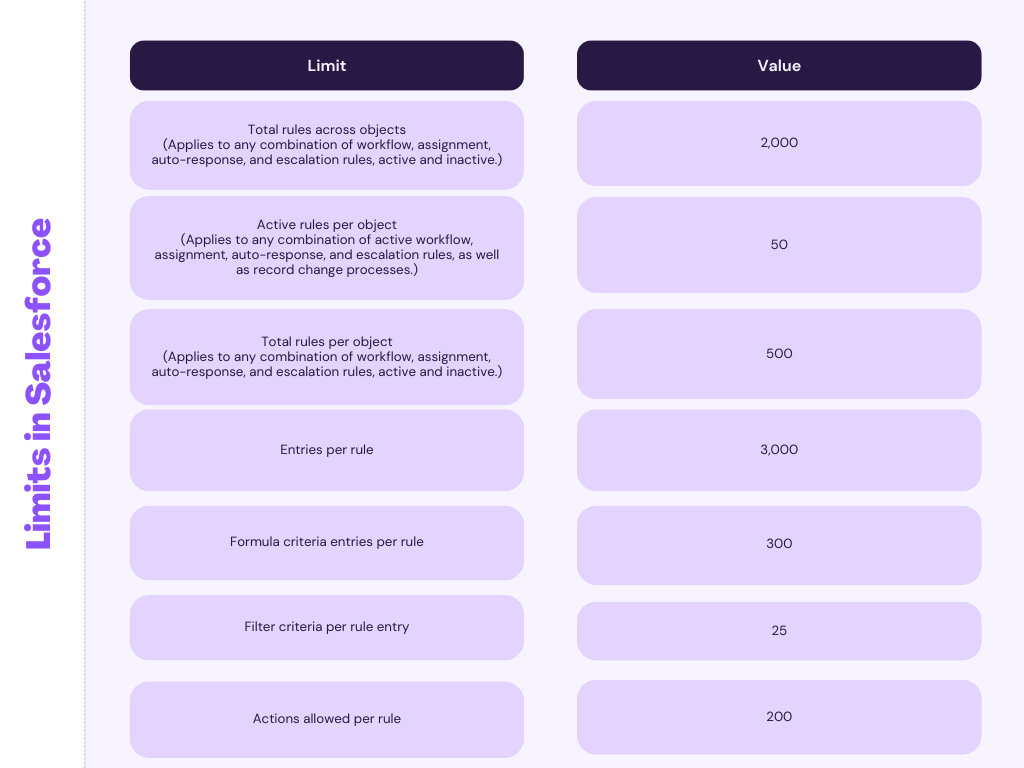
One major drawback is the stringent limits imposed by Salesforce on the number of rules, entries, and actions allowed per rule. These limits are illustrated in the following table:
However, there are additional factors to consider when utilizing assignment rules in Salesforce. It is crucial to be aware of the following challenges before embarking on building your entire logic using Salesforce's native functionality:
- Limited to Leads and Cases: Assignment rules only apply to the lead and case objects. While this may suffice for simple and initial use cases, it falls short when implementing ABM (Account Based Marketing) strategy or when the need to route Opportunities arises.
- Complex QA and Audit: Salesforce's native functionality lacks versioning or debugging tools, making testing and troubleshooting assignments a laborious task. Additionally, there is no built-in record of why a lead was assigned in a particular way, further complicating the auditing process.
- Limited Assignment Options: When using assignment rules, you can only assign a Lead record to a specific user or a Salesforce Queue. Managing more intricate assignments, such as round-robin distribution, becomes challenging and costly to implement within the confines of assignment rules.
- Single Active Rule: As mentioned previously, Salesforce restricts the use of only one active lead assignment rule at a time. This means that despite having multiple processes with distinct underlying logic, you are forced to consolidate them into a single, busy rule, making management and updates cumbersome.
Considering these challenges, it becomes evident that relying solely on assignment rules may not provide the flexibility and functionality required for more complex lead management scenarios.
How Sweep Simplifies Salesforce Lead Assignment
Although assignment rules in Salesforce offer a powerful solution with a short learning curve, we recognize that the drawbacks can become a significant pain point as businesses grow and the native Salesforce tools may not fully support your team's needs.
To address these challenges, we have developed Sweep's Assignment tool, a visual no-code solution designed to simplify the implementation of assignment logic within Salesforce. This empowers organizations to build their go-to-market motions while maximizing assignment efficiency. The benefits of using Sweep's Assignment capabilities include:
- Assigning any object: From Opportunities to Accounts & Contacts and custom objects, you can apply assignment logic across various Salesforce objects.
- Achieving full visibility: Gain a comprehensive understanding of your business processes and easily track where assignments are taking place.
- Managing round-robin groups: Distribute leads equally among sales representatives using round-robin assignment to ensure fairness, or add weights to better control assignments between reps.
- Simplifying territory management and assignment: Streamline the process of managing territories and assigning leads based on specific territories.
- End-to-end lead routing capabilities: Enhance the lead routing process with advanced features such as Lead Deduplication and Lead-to-Account Matching, ensuring that leads always receive a seamless buying experience.
If you have any questions or would like to learn more about how Sweep Assignment can assist your business as it scales, please don't hesitate to contact me at [email protected]. I would be delighted to show you around or provide further insights into Salesforce Lead Assignment Rules.
Explore the Buying Group Motion! Start your journey with our Resource Center.
- Intelligent Lead Delivery
- Convert Signals to Revenue
- Enterprise Salesforce Orchestration
- Products Overview Discover modern Revenue Orchestration
- Integrations Connect signals to plays
- Pricing Plans for every company
- Why LeanData
Snowflake Scales Account Based Plays with LeanData Revenue Orchestration

Clockwise Supports PLG Motion with LeanData Revenue Orchestration
- Become a Partner Team up with LeanData
- Technology Partner Directory Discover ISV solutions to fit your needs
- Solutions Partner Directory Connect with our network of authorized Service Integrators

LeanData’s integration with Salesloft allows a user to route prospects to the right reps.

Slack has transformed business communication– it’s the platform where work can happen.

Expertly target and engage high-value accounts when they’re ready to buy.

LeanData’s integration with Outreach allows a user to route prospects to the right reps.
- Learning Center
- Certification
- Tips & Tricks
- Help Center
- About Us Learn more about us and our mission
- Newsroom Keep up with what’s new at LeanData
- Events Stay up to date and network with industry professionals at our upcoming events
- Careers Join the LeanData team
- Contact Us Get your questions answered - contact us now
G2 Recognizes Lead-to-Account Matching and Routing as Newest Tech Category, with LeanData the #1 Vendor
Leandata showcases power of modern revenue orchestration at opsstars 2022, leandata announces winners of the 2022 opsstars awards, how to automate lead routing in salesforce.

How assignment rules work in Salesforce
When leads come into your Salesforce instance, a rep needs to reach out to that lead as quickly as possible. How do you get that lead to the right rep? Salesforce lead assignment rules (SARs/LARs) help you to specify just this. You can route based on geography, email domain, lead source, employee count, etc. to get your lead(s) to the right rep(s). Depending on the size of your organization, you can have a few lines of assignment rules. I’ve seen some organizations with over 200 lines of assignment rules! When you get to dozens of lines, it can become quite difficult to manage, which we will tackle later.
To start, navigate to SFDC > Setup > Lead Assignment Rules > New, then name your assignment rules. To create your first rule, click on the name of your assignment rules, then under “Rule Entries” hit “new”, and this will appear:

You’ll want to fill out your criteria to assign the lead: the order of the record, the rule that you want to specify, and the user that lead should be routed to. What I’ve done for my first rule above is for any inbound lead with an email address that contains “.gov” to go to Christine.
Salesforce assignment rules work in a cascading fashion, meaning once the criteria is met, it stops evaluating the rest of the rules.
Routing to the right people at the right time
Have you ever filled out a “Contact Us” form and didn’t get reached out to for several days? Or perhaps several sales reps reached out to you? There are impacts to your funnel as a result of this.
There are numerous statistics that show the faster you reach out to a lead, the higher likelihood there is that the customer will buy. Harvard Business Review found, “Firms that tried to contact potential customers within an hour of receiving a query were nearly seven times as likely to qualify the lead (which we defined as having a meaningful conversation with a key decision-maker) as those that tried to contact the customer even an hour later—and more than 60 times as likely as companies that waited 24 hours or longer.”
Also, some companies take a queue-based or shark tank approach, whereby any lead that comes in goes to a queue and the reps all go for it. In this scenario, some customers can get reached out to multiple times. Other companies employ territories or a pure round-robin approach, which only has so much efficacy. Studies show that account-based selling leads to higher revenue and shorter sale cycles. Once you figure out how you want to go-to-market, then you can start working on your routing. By employing a proper lead routing solution that allows you to assign leads to a single rep, or the right person, your sales numbers will improve.
Lead routing by geography
Often you have reps that own a certain region: countries, states, cities, or zip codes. Provided you are capturing geographic information on your lead forms you can tell Salesforce Assignment Rules to assign leads to reps that own a particular area. You can see that I’ve specified all the states for the United States and a few countries in Europe.
Inbound lead routing In Salesforce
Most companies have a 2-way sync between their Marketing Automation and Salesforce. If this is set up correctly, when you have inbound leads that come in through Contact Us forms, download white papers or if you decide to push a lead list, perhaps from a tradeshow, Salesforce Assignment Rules(SARs) can pick up these leads.
As mentioned before, when the lead gets entered, it’ll go through all your SARs until a condition is met and it is assigned. You’ll need to set up your Salesforce Assignment Rules in such a way that you account for all scenarios. Unfortunately, SARs does not have rule checking or validation.
Account-based lead routing in Salesforce
Hopefully you’re familiar with account-based lead routing – a certain rep owns a certain set of named accounts. In Salesforce today, account-based lead routing is very difficult to set up. If you can only utilize SARs, you’d do it based on domain, and it will look like the below:

You might think that email domains can only go so far – what if my leads use @gmail.com or some other variety of personal email address? What if there’s a strange email domain iteration like @us.hp.com? Can we incorporate company name to help with account-based lead routing? How about location?
Some organizations with savvy SFDC admins can create custom code that incorporates a variety of other fields to help, but it can get complicated and much outside of the scope of this article.
How to automate and optimize Salesforce lead routing
With SARs you can incorporate and blend different field values like domain, territory, campaign, source, etc. to assign your leads. As mentioned above, with custom code brought in you can get a little fancier with what you want to do or you can buy a solution, many of which are bought off the app exchange. If you’re looking for a solution that is scalable, secure, blends multiple different types of go-to-market motions, and gives you reporting capabilities, LeanData can help.
LeanData is downloaded off the app exchange, 100% native to Salesforce, and trusted by over 600 companies for a variety of use cases:
- Lead-to-account (L2A) matching – this helps with your account based lead routing and extends beyond just email domain to include company name, website, physical location, and phone number
- DupeL and DupeC – light, on-going deduplication of leads that come in to other leads or contacts that already exist in your database.
- Territory – where users can own anything from zip codes to countries and equivalencies are built in (NY = New York or US = United States).
- Round Robin – which incorporates working hours, vacations, holidays, etc.
- Notifications – through Slack, email, or chatter.
- Integrations – with Salesloft, Outreach, and Zoominfo to eliminate manual steps.
There are many other features like L2O, L2L, decisions, creation of tasks/opportunities/accounts, time-based, and much more. LeanData has a drag-and-drop interface to mold to exactly how you want your leads routed to each of your reps. If you’re curious if LeanData can support your GTM, request a demo , and one of our sales team members or solution consultants can set time up with you to discuss further.

- Lead Routing

Xander Sporck
Xander is a consultant for the tech industry with extensive experience in solutions engineering. Connect with Xander on LinkedIn .
More Related Content

10 Lead Routing Plays You Didn’t Know You Could Do in LeanData
LeanData lead routing can be as simple or complex as you need it to be. Elevate your lead routing game with these 10 plays.

Lead Leakage, the Often Overlooked Loss of Revenue
Leads aren’t big question marks in the sky. They’re dollars in the form of unrealized deals, and you may be losing a lot of them.

Spring Cleaning Your CRM: 5 Ways to Maintain Clean Data in 2024
Without clean data, your go-to-market motion is fraught with lead leakage, manual triage, a bad buying experience, and ultimately loss in revenue. Learn five ways to...
- TutorialKart
- SAP Tutorials
- Salesforce Admin
- Salesforce Developer
- Visualforce
- Informatica
- Kafka Tutorial
- Spark Tutorial
- Tomcat Tutorial
- Python Tkinter

Programming
- Bash Script
- Julia Tutorial
- CouchDB Tutorial
- MongoDB Tutorial
- PostgreSQL Tutorial
- Android Compose
- Flutter Tutorial
- Kotlin Android
Web & Server
- Selenium Java
- Home : Salesforce Admin Tutorials
- Salesforce Administration
- Section 1 : Getting Started
- What is Salesforce.com
- What is login.Salesforce.com
- Enabling Caching and Automcomplete at Salesforce login
- Overview of ERP and CRM
- What is Cloud Computing
- Why Salesforce CRM is #1 on Demand
- Section 2 : Designing your Data Model
- Understanding the Sales Process
- Analysing a functional requirement
- Converting functional requirement into technical specifications
- Section 3 : Building your Data Model
- Understanding Salesforce.com application
- How to create an App in SFDC?
- How to create custom object in SFDC
- Creating fields using different field types in Salesforce.com
- Overview on Salesforce Object Relationships
- How to create Master Detail relationship in SFDC?
- Cannot create Master Detail Relationship?
- How to create Lookup relationship in salesforce.com?
- How to create Many to Many Relationship in Salesforce?
- What is Schema Builder
- Section 4 : Implementing Business Logics
- What is a Formula Filed?
- What are Cross Object Formulas?
- What are Validation Rules?
- Roll up Summary Fields
- Field Dependencies
- Section 5 : Setting up User Interface
- Page Types and Page Elements
- What are page Layouts?
- Home page layouts and components
- Why Documents are used in Salesforce
- Section 6 : Customizing Standard Salesforce Application
- How to Customise Standard Salesforce application
- Section 7 : Salesforce Security Model
- Overview on Salesforce security Model
- How to create New Users in SFDC?
- What is SAML?
- Public groups in Salesforce
- Role Hierarchies in Salesforce.com
- How to create and manage Profiles
- What is Field Level Security?
- How to use Permission Sets?
- Control Record visibility using Organisation wide Defaults
- Control Record visibility using Role Hierarchy
- Control Record visibility using Sharing Rules
- What are Record Types and how can we configure
- What are Page Types and page Elements
- Section 8 : Data Management
- Different Data Management Tools
- How to Import/Update/Upsert data using Data Import Wizard
- How to install Apex Data Loader in macOS and Windows
- How to Insert a record using Apex Data Loader
- How to Update and Insert records Apex Data Loader
- How to Delete and Export records Apex Data Loader
- Section 9 : Salesforce.com Audit
- Field History Tracking
- Setup Audit Trail
- Section 10 : Automate Business Process
- How to create New Email Template in Salesforce
- Salesforce Workflow Rules Overview
- Creating Workflow rules with Rule Criteria & Workflow actions
- Configuring Approval Process
- Assignment rules for Leads and Cases
- Section 11 : Reports and Dashboards
- What is a report in Salesoforce and how we create them?
- Salesforce Reports and Dashboards Overview
- How to use report builder?
- ADVERTISEMENT
- How to create Summary reports?
- How to create matrix reports?
- Salesforce Dashboards
- Creating Dashboards with Dashboard Components for Tabular and Joined Reports
- Section 12 : Salesforce Service Cloud
- Overview on Salesforce Service Cloud
- How to create service cloud console
- Configuring Agent console in Salesforce
- Section 13 : Portal and Sites
- Developing Force.com Sites
- How to enable and use Customer Portal
- How to enable and use Partner Portal
- Integrate Salesforce with websites
- How to create Web to Lead forms in Salesforce
- How to create Web to Case forms in Salesforce?
- Section 14 : AppExchange
- What is Salesforce AppExchange.
- Section 15 : Managing Sandboxes
- What is Salesforce Sandbox?.
- Different Sandboxes and Sandbox Environment Types.
- How to create Salesforce Sandbox template?.
- How to create Salesforce Sandbox?
- How to login Salesforce Sandbox?
- Section 16 : Salesforce lightning
- How to create Salesforce custom domain?
- What is Salesforce lightning Experience?
- What is Salesforce lightning component Framework?
- Creating first Salesforce lightning App
- Styling Salesforce lightning App
- Lightning Componnet : aura:attribute tag
- What is Salesforce DX?
- Create Salesoforce DX project
- Salesforce Dev Hub Setup step-by-step
- Creating Sratch Org
- ❯ Salesforce Administration
- ❯ Assignment rules for Leads and Cases
Salesforce lead assignment rules – Salesforce Tutorials
Creating and managing salesforce lead assignment rules .
In this Salesforce tutorial we are going to learn about What is an assignment Rules , How can we create and manage Salesforce lead assignment rules, and why should we create assignment rules in Salesforce.
What is an Assignment Rule?
Assignment Rules are used to assign Leads and Cases automatically to the assigned users based on criteria. There are two types of Assignment Rules in Salesforce they are
- Lead Assignment Rules and
- Case Assignment Rules.
What are Salesforce lead assignment rules?
Salesforce lead assignment rules defines the administrators to assign a lead to users and queues based on criteria. A lead can be generated either by manually or generated from the web.
What are case Assignment Rules?
Salesforce lead assignment rules defines the administrators to assign a Case to users and queues based on criteria. A Case can be generated by manually , generated from the web to case, Email to case etc.
How to create Salesforce lead assignment rules?
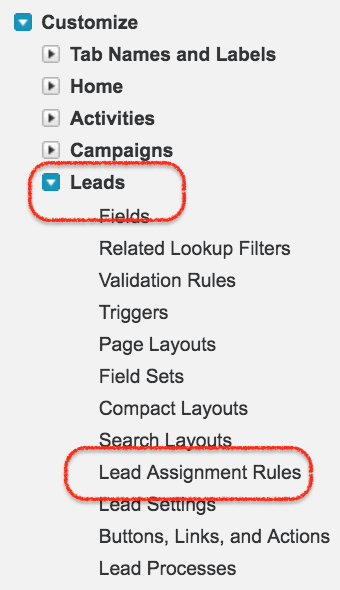
Creating and Managing Salesforce lead assignment rules are very important. Let us learn how to create lead assignment rules in Salesforce.com. To create assignment rules login Salesforce and navigate to Setup | Build | Customize | Lead | Lead Assignment Rules.
- Click on Lead assignment rules as shown above.

Click on New Button to create new Salesforce lead assignment rule.
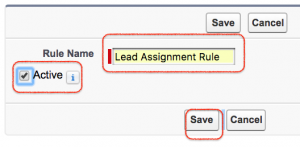
- Enter Rule name.
- The assignment rule must be activated as shown above.
- Click on Save button.
There are only one standard rule in our salesforce. If we create new Assignment rule in Salesforce the first standard rule will be automatically deactivated. At a single point of time only one assignment rule is active. For a single rule there can be multiple rule entries.

- When creating Rule entry we have to learn about these three Order number, Criteria and Assigned to.
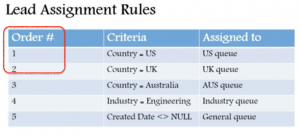
How to create New Rule entries in Salesforce Lead Assignment Rules.
In Salesforce we can create many rule entries for single Assignment Rule.
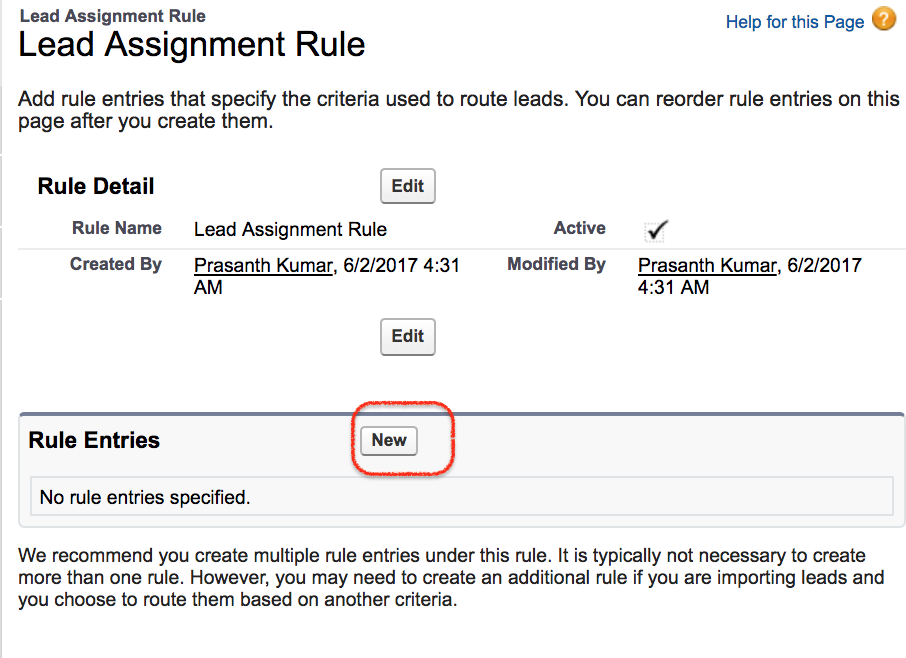
- Click on New Button to create new Rule entry.
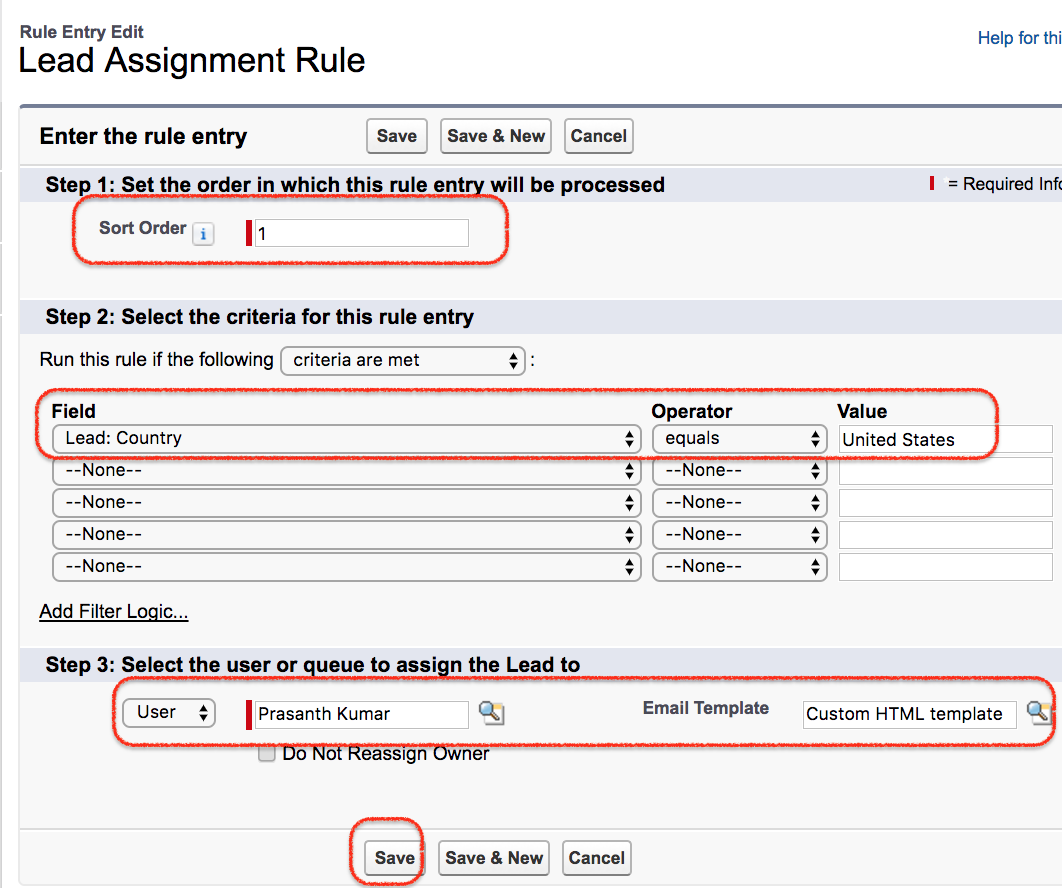
- In step 1 :- Enter Sort order as #1.
- In Step 2 :- Enter rule criteria as shown above.
- In Step 3 :- Select the user or queue to assign the lead.
- Select user and Email template as shown above.
Learn how to create Email template in Salesforce.
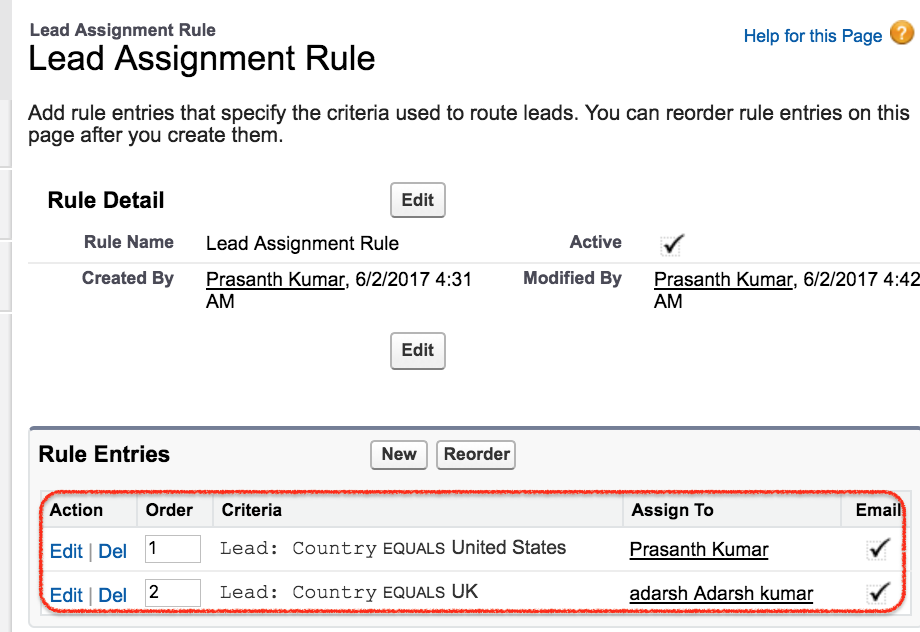
We have created two Rule entries with order 1 and Order 2. In this Salesforce lead assignment rules, Generated leads will be automatically assigned to the country United State and Country United Kingdom.
Conclusion :
In this Salesforce Tutorial we have learned about What is Assignment rule and How to create Salesforce lead assignment rules. Like wise case assignment rules are also similar to lead assignment rules.
Popular Courses by TutorialKart
App developement, web development, online tools.
Lead Assignment Rules Salesforce
To set up the lead assignment in Salesforce, we will need to define our assignment rules and criteria. This usually involves creating Salesforce rules, assigning leads in Salesforce, and defining the criteria that will make the rule.
In this Salesforce tutorial, we will learn the lead assignment rule and see how to create it in Salesforce Lightning and Salesforce Classic.
Table of Contents
Lead Assignment Salesforce
The lead assignment is the process of assigning new leads to specific sales representatives or teams in our organization in Salesforce. By using it, we ensure that each lead is controlled by the most appropriate person, which increases the chances of a successful lead transformation.
It also specifies the actions that should be taken when a lead meets the criteria. In simple terms, a lead assignment rule specifies how leads should be defined in Salesforce using a set of criteria and actions.
Then, based on specified criteria like lead source, lead zone, or locations, lead assignment rules can be used to automate the distribution process of allocating leads to particular sales teams.
Keep one thing in mind: In Salesforce, we can create multiple lead assignment rules for a particular object, but only one is active at a time.
Read How to add event to public calendar in Salesforce?
Assignment Rules in Salesforce
Here are the steps to create a lead assignment notification in Salesforce:
1. Log in to your Salesforce account and go to Setup . In the Quick Find box, type Assignment Rules , then select Lead Assignment Rules .

2. Click New to create a new lead assignment rule.

3. Enter a Rule Name for our rule. Activate our rule by clicking the Activate button. This rule will automatically deactivate the current lead assignment rule, as only one rule is activated at a time. Click Save to save our rule.

4. Select the Rule Name and open it to add lead assignment rules.

5. Click New to create multiple rule entries under this rule.

6. Set the Rule Order in which this rule entry will be processed. Define the criteria that will trigger the rule. This can include fields like lead source, lead score, or location. Add any additional filter criteria, if necessary.
Specify the actions that should be taken when a lead meets the criteria. This can include assigning the lead to a specific sales representative or team and sending an email notification. Click Save to save the lead assignment rule.

7. Test the rule by creating a test lead that meets the criteria and ensures that it is assigned correctly.

Once our lead assignment rule is created and tested, Salesforce will automatically assign incoming leads based on the criteria we’ve defined.
With this, we learned to create the lead assignment notification in Salesforce .
Here are the steps to create a lead assignment rule in Salesforce :
1. Log in to your Salesforce Classic account. Click on Avtar and then select Switch to Salesforce Classic .

2. Go to the Setup menu in Salesforce Classic and click on the Build section.

3. Click on the Lead object under the Customize section. Click on Lead Assignment Rules .

4. Click New to create a new lead assignment rule.

5. Enter a Rule Name for our rule. If we want to activate your rule by clicking the Activate button. Click Save to save our rule.

6. In order to add lead assignment rules, select the Rule Name .

7. Click New to create new rule entries.

8. Specify the Rule Order in which the rule should be evaluated if we have multiple rules. Set the rule criteria by defining conditions that the lead record must meet to trigger the rule. We can use any field on the lead record to create your criteria.
Define the actions that should be taken when a lead meets the rule criteria. For example, we can assign the lead to a specific user or queue, or we can send an email notification. Click Save to save the lead assignment rule.

9. We may verify that our rule is working properly by creating a test lead that satisfies the requirements.

That’s it! Our lead assignment rule is now ready to automatically assign incoming leads to the appropriate sales team members or queues based on the criteria you defined.
In conclusion, lead assignment rules in Salesforce allow us to automate the process of assigning incoming leads to the appropriate sales team members or queues based on specific criteria.
You may also like the following Salesforce tutorials:
- Send Email Alerts using Workflow Rule in Salesforce
- How to add Photo to Salesforce Profile
- How to Delete Survey in Salesforce
- Entitlement Rules in Salesforce
- How to add lead source in salesforce
I am Bijay Kumar, the founder of SalesforceFAQs.com. Having over 10 years of experience working in salesforce technologies for clients across the world (Canada, Australia, United States, United Kingdom, New Zealand, etc.). I am a certified salesforce administrator and expert with experience in developing salesforce applications and projects. My goal is to make it easy for people to learn and use salesforce technologies by providing simple and easy-to-understand solutions. Check out the complete profile on About us .
Your browser appears to have JavaScript disabled or does not support JavaScript. Please refer to your browser's help file to determine how to enable JavaScript.
- HubSpot Community
- Marketing & Content
Lists, Lead Scoring & Workflows
Lead assignment rules.
- Subscribe to RSS Feed
- Mark Topic as New
- Mark Topic as Read
- Float this Topic for Current User
- Printer Friendly Page
Dec 20, 2017 6:29 PM
Solved! Go to Solution.
- Mark as New
- Report Inappropriate Content

Dec 21, 2017 12:52 PM
View solution in original post
- View all posts
- Previous post
Nov 23, 2020 11:08 PM

Nov 24, 2020 11:54 AM
Feb 22, 2018 9:12 AM
Jan 8, 2019 11:54 PM
Feb 22, 2018 9:22 AM
Feb 22, 2018 9:29 AM
Feb 22, 2018 9:37 AM
Feb 22, 2018 2:38 PM
Feb 22, 2018 2:42 PM
Feb 22, 2018 2:52 PM
Feb 22, 2018 2:53 PM - edited Feb 22, 2018 2:53 PM
Sign up for the Community Newsletter
Receive Community updates and events in your inbox every Monday morning.
Create a Round Robin Lead or Case Assignment Rule
First off, what is a “round robin”? Simply put, it’s a rotation through a group. In the context of Salesforce.com, the term round robin frequently comes into play when assigning Lead or Case records to users. For example, you might have five sales reps working new Leads and, as an administrator, you want to divvy out all new Leads equally among the five reps. So if you had a 100 new leads, you would want each rep to get exactly 20 Lead records.
NOTE: This example will be for Leads, but the same concept applies to Case Assignment Rules
A round robin assignment rule allows you to equally distribute new Lead records without having to manually assign them using a rotation as shown below:
- Lead 1 goes to Sales Rep 1
- Lead 2 goes to Sales Rep 2
- Lead 3 goes to Sales Rep 3
- Lead 4 goes to Sales Rep 4
- Lead 5 goes to Sales Rep 5
- Lead 6 goes to Sales Rep 1 (notice the rotation?)
- Lead 7 goes to Sales Rep 2
- Lead 8 goes to Sales Rep 3
- ….and so on
To pull this off in Salesforce you’ll need to create two custom fields on the Lead object. The first is an Auto Number field and the second is a Formula field. You’ll see in a moment how to leverage these two fields to assign Leads.
To create our new fields go to Setup > App Setup > Customize > Leads > Fields
Slide down the page past the “out of the box” fields until you see the “New” button where you can create a custom field.
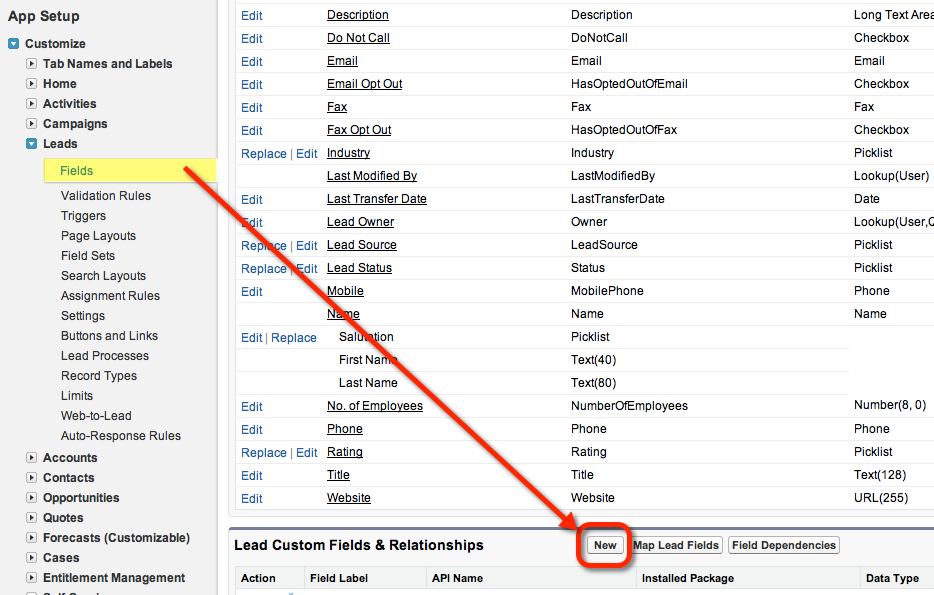
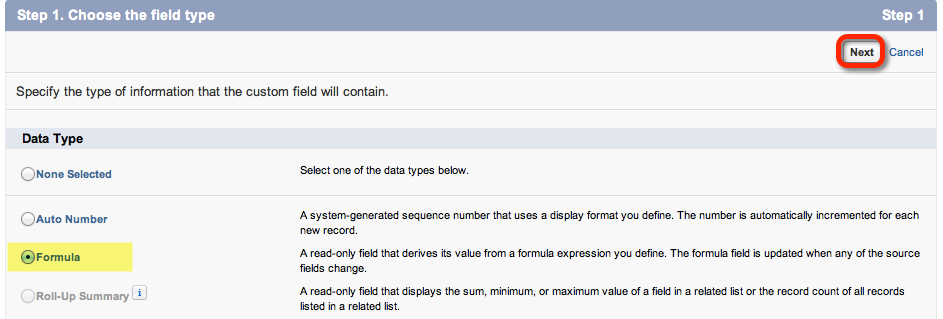
In Step 1 of the custom field wizard, pick the data type “Auto Number”

- Field Label: Lead Number
- Display Format: {0}
- Starting Number: 1
- Field Name: Lead_Number
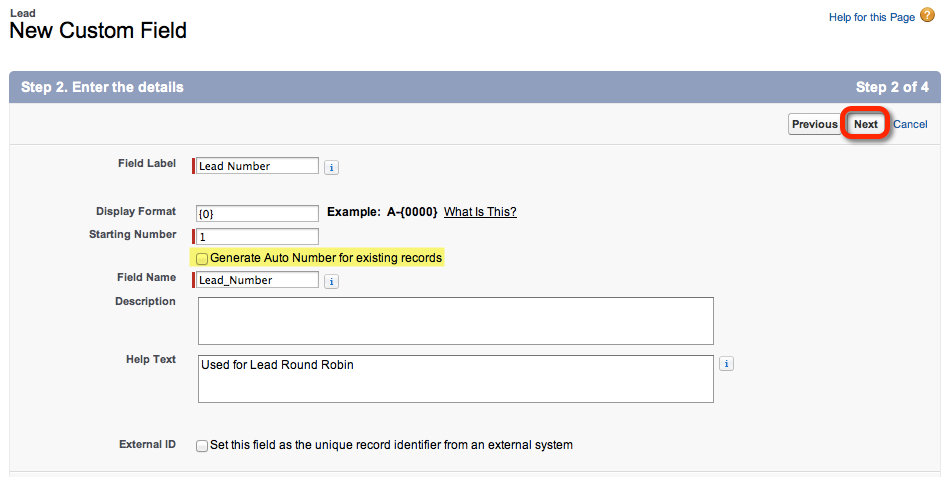
Salesforce assigns a number to this field for each new record created in a sequence (and it’s unique). It cannot be edited by a user. As new records are created the number will increment (i.e. the first Lead is “1”, the next Lead created will get the number “2”, and so on). You will also see a checkbox to tell Salesforce to create a number for existing records. If you need to assign existing records a number, go ahead and check this box. If you leave it blank, only new Lead records will receive a number. Don’t worry that the “Display Format” is only showing one digit in length. It will grow as needed as you get to 10, 100, 1000 etc. Continue through the wizard creating the field
Next we are going to create a formula field that will take the number generated by Salesforce and assign it a value in a range you specify in the formula.
In Step 1 of the wizard specify a Formula field.
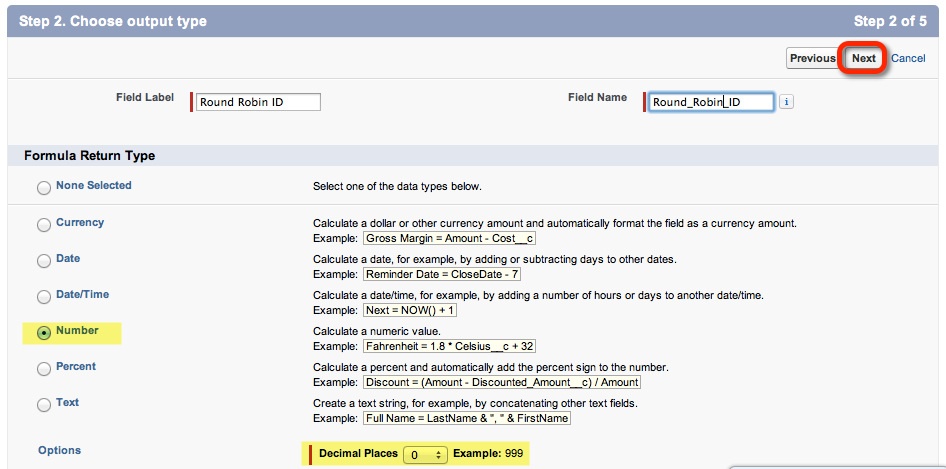
On Step 2 of the wizard
- Field Label: Round Robin ID
- Field Name: Round_Robin_ID
- Formula Return Type: Number
- Options: 0 Decimal Places
In Step 3 you’ll write a formula with the following value:
MOD(VALUE({!Lead_Number__c}) ,3) +1
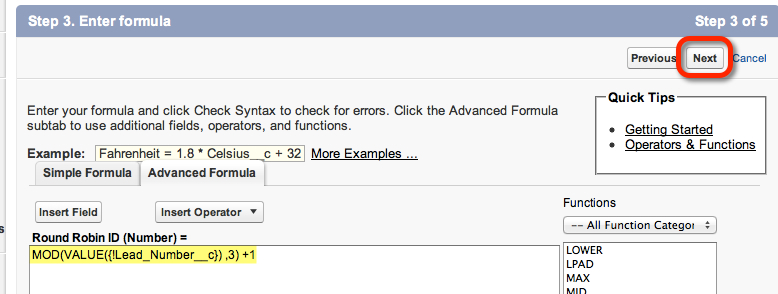
The MOD function is going to take our Lead Number, do a bit of math and return a number in a range we specify. The “3” in the formula above means that it will return a number of 1, 2, or 3. This quick Lead View shows how the formula is taking our Lead Number field and creating a Round Robin ID.
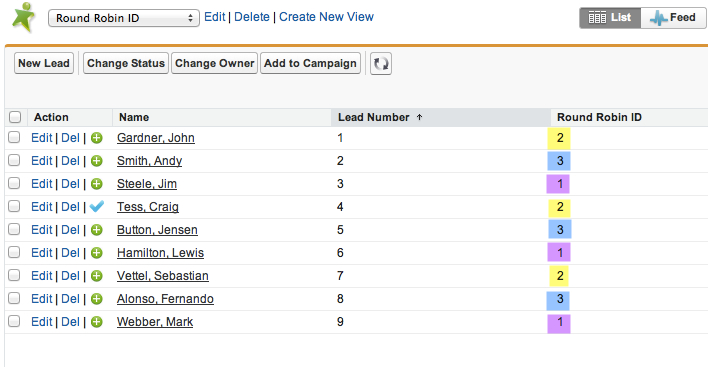
For example if you change the “3” in the MOD formula to “5” you’ll get a result of either 1, 2, 3, 4, or 5 for your Round Robin ID.
Now that we have a method to tag each Lead with a Round Robin ID (number), we can leverage this in a Lead Assignment Rule by going to Setup > App Setup > Customize > Leads > Lead Assignment Rules, then click the “New” button.
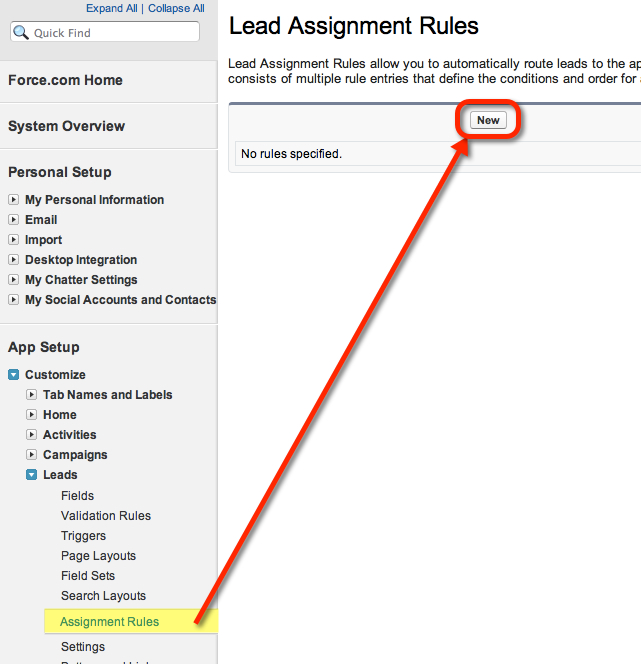
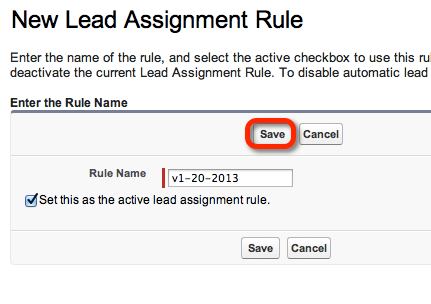
On the next screen give your Lead Assignment Rule a name and click the Active checkbox and click “Save” as in the screenshot below:
On the next screen click on the Rule Name

Then click the “New” button to start entering rules.
- Sort Order: 1
- Field: Lead: Round Robin ID
- Operator: equals
Select the User to be assigned the Lead and (optionally) select an email template to notify the new owner they have just been assigned a Lead. There is an “out of the box” email template called “Leads: New assignment notification (SAMPLE)” that comes with Salesforce that is usually stored in the “Unfiled Public Email Templates” folder.
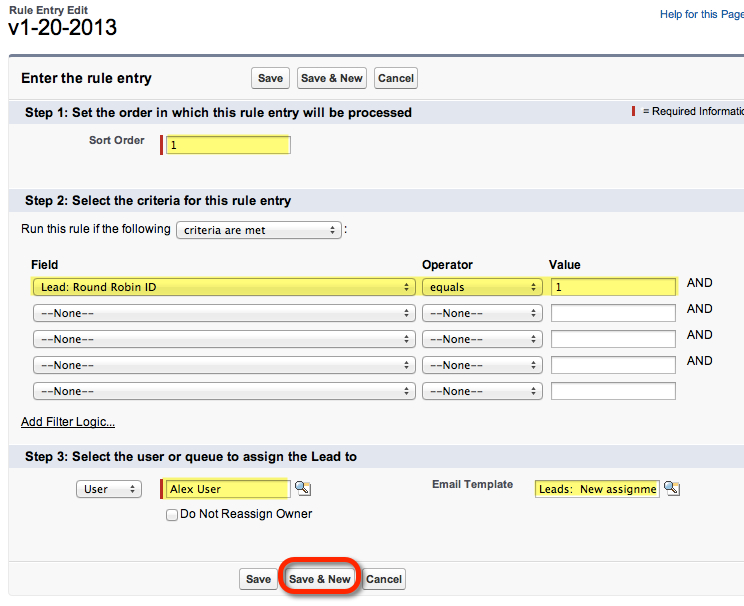
Create a rule for each rep that needs to be assigned a Lead based on our Round Robin ID. The Sort Order is the order in which the rules are evaluated.
How does Sort Order come into play?
When you have a set of assignment rules, Salesforce evaluates the rule in the order you specify (i.e. the Sort Order). Salesforce checks the Lead record against the first rule (Sort Order 1), and if the criteria is a match, Salesforce reassigns the Lead to the new Owner. If the Lead record being evaluated does not match the first rule, the Lead assignment rule checks the next rule in the sort order and continues until the criteria makes a match. We’ll expand on how to construct and best practices on Assignment Rules in a later blog post.
When you are finished, you’ll have a rule for each person that you want assigned a lead.
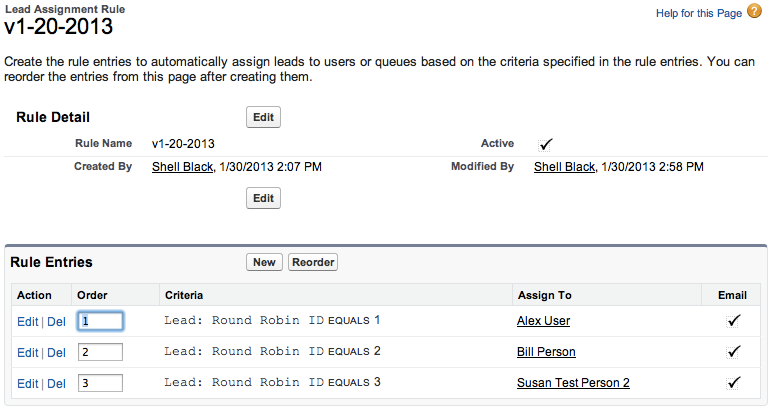
TIP: If you want one person to get a certain percentage of Leads, let’s say 60%, you could change your MOD formula to give you ten results. Then on your assignment rule your rule would look something like this:
That’s it!
If you want to manually test your rule, make sure your page layout has the checkbox “Assign using active assignment rules” displayed. If not, add it to your page layout:
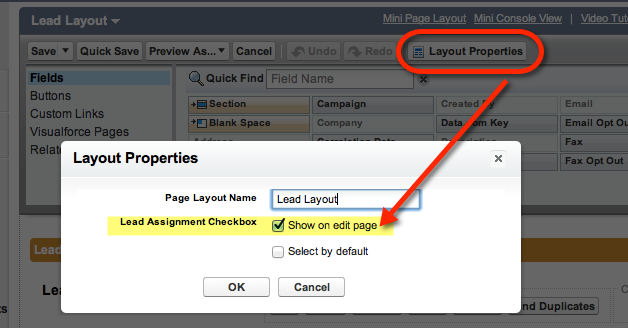
Check that box and save the Lead record. Viola! Your lead should be reassigned based on the rules you have in place.

Product Area
Feature impact.

- Learn About, Implement, and Optimize Sales Cloud Features
- See an Overview of Metrics, Goals, Suggestions, Tasks, and...
- Organize and Find Records Easily with Personal Labels
- Tour the Campaigns Object
- How Campaigns Can Help
- Use Campaigns with Other Clouds
- Understand Campaign Hierarchy
- Getting Started Worksheet
- Campaign Fields
- Considerations for Using Campaigns
- Can I use list email or mass email for my email campaigns?
- How do I add contacts and leads to campaigns?
- How can I calculate the ROI for my campaigns?
- How can I track which opportunities resulted from campaigns?
- How is Campaign influence different from ROI reports?
- Who has access to Campaigns?
- Customize Campaign Types in Lightning Experience
- Customize Campaign Types in Salesforce Classic
- Campaign Member Statuses
- Allow Users to Create Campaign Hierarchies
- Create or Edit a Campaign
- Field Handling for Cloning Campaigns with Related Records
- Allocations for Cloning Campaigns with Related Records
- Create a Campaign Hierarchy
- Share Campaigns
- Track Campaign Field History
- Campaign Member Fields
- Add Individual Leads, Contacts, or Person Accounts to Campaigns
- Add Campaign Members with Manage Members
- Add Members by Account from a Campaign Page
- Add Campaign Members from an Account Page
- Add Multiple Contacts and Leads to Campaigns
- Add Multiple Members to a Campaign from a List View
- Add Campaign Members from Standard and Custom Reports
- Import Campaign Members
- Add Existing Contacts to a Campaign with the Data Import Wizard
- Add Existing Leads to a Campaign with the Data Import Wizard
- Add Existing Person Accounts to a Campaign with the Data Import Wizard
- Create Contacts and Add Them to a Campaign with the Data Import Wizard
- Create Leads and Add Them to a Campaign with the Data Import Wizard
- Considerations for Using Accounts as Campaign Members
- Enable Accounts as Campaign Members
- Adding Accounts as Campaign Members
- Displaying and Editing a Campaign Member
- Campaign Member Task Overview
- Manage Members with the Campaign Members Related List
- Editing Multiple Campaign Members
- Add or Update Campaign Members with the Data Import Wizard
- Delete Individual Members from Campaigns
- Delete Multiple Contacts and Leads from Campaigns
- How Customizable Campaign Influence Works
- Switching to Customizable Campaign Influence
- Enable Customizable Campaign Influence
- Add Customizable Campaign Influence Related Lists
- Create a Custom Campaign Influence Model
- Add Influential Campaigns to an Opportunity
- Find Campaign Influence Results
- Configure Campaign Influence
- Add Campaign Influence Manually
- Get Started with Connected Campaigns
- Considerations for Connecting Campaigns
- Enable Connected Campaigns
- Connect Individual Campaigns Between Account Engagement and Salesforce
- Connect Multiple Campaigns at Once
- Connect Existing Campaigns with Salesforce Data Loader
- Considerations for Member Sync
- Sync Campaign Members
- Engagement History for Campaigns
- Configure Lead Management
- Define Default Settings for Lead Creation
- Leads Created from Your Company’s Website
- Generate Leads from Your Website for Your Sales Teams
- Generate Leads with Buyer Assistant
- Generate Leads from LinkedIn Lead Gen Ads
- Let Users View and Edit Converted Leads
- Map Custom Lead Fields for Lead Conversion
- Enable Lead Conversion in the Salesforce Mobile App
- Lead Intelligence View
- Leads List View Home
- Display and Edit Leads
- Convert Qualified Leads
- Troubleshoot Lead Conversion
- Things to Know About Merging Duplicate Leads
- Merge Duplicate Leads in Lightning Experience
- Merge Duplicate Leads in Salesforce Classic
- Update Leads with Third-Party Data
- Reassign Leads from a Queue
- Lead Sharing in Salesforce Classic
Guidelines for Creating Leads
- Considerations for Converting Leads
- Considerations for Deleting Leads
- Lead Fields
- Lead Conversion Field Mapping
- Guidelines for Mapping Custom Lead Fields for Lead Conversion
- Guidelines for Setting Up Web-to-Lead
- Leads: What’s Different or Not Available in the Salesforce Mobile App
- What Is a Lead?
- What are the advantages of using leads?
- Can I automatically email leads that come from my website?
- Can I capture leads from multiple web pages?
- Can I convert existing accounts or contacts into leads?
- How are lead fields mapped to other fields during conversion?
- How can I be sure that leads aren’t lost?
- How can I tell which of my leads are new?
- How can our webmaster test the Web-to-Lead page?
- How many leads can we capture from our website?
- What happens when I convert leads?
- What if my company reaches the limit for web-generated leads?
- What status is assigned to web-generated leads?
- Who owns new web-generated leads?
- Activate and Deactivate Product Prices with Their Products...
- Organize Products with Product Families
- Products Concepts
- Guidelines for Creating Products
- Considerations for Cloning Products
- Set and Edit Product Prices in Salesforce Classic
- Set Product Prices in Lightning Experience
- Considerations for Setting Prices
- Enable Product Schedules
- Considerations for Using Product Schedules
- Add and Edit Product Schedules
- Establish Schedules for Products on Opportunities
- Create Custom Price Books
- Considerations for Creating and Maintaining Price Books
- Guidelines for Sharing Price Books
- Considerations for Removing Price Books
- Considerations for Removing a Product from a Price Book
- Product, Price Book, Price Book Entry, and Product Schedule Fields
- Considerations for Removing Products and Price Books
- Set a Default Product Quantity of 1 on Opportunities
- Automatically Enter the List Price as the Sales Price on Opportunities
- Enable Opportunity Update Reminders
- Set Up Big Deal Alerts for Opportunities
- Enable and Configure Similar Opportunities
- Manage Settings to Show Changed Deals
- Considerations for Creating and Updating Opportunities
- Considerations for Cloning Opportunities
- Things to Know About Sharing Opportunities
- Move an Opportunity to the Next Stage in Lightning Experience
- Move an Opportunity to the Next Stage in Salesforce Classic
- Opportunity History
- Things to Know About Deleting Opportunities
- Schedule Reminders to Update Opportunities
- Considerations for Scheduling Opportunity Update Reminders
- Guidelines for Finding Similar Opportunities
- Add Products to Opportunities
- Things to Know About Adding Products to Opportunities
- Define Competitors
- Competitor Fields
- Opportunity Fields
- Opportunity Product Fields
- Opportunities: What’s Different or Not Available in the Salesforce...
- Set Up Quotes
- Enable Quote Creation Without a Related Opportunity
- Create, Preview, and Activate Quote Templates
- Add Rich Text to a Quote Template
- Add a List to a Quote Template
- Add an Image to a Quote Template
- Add a Totals Section to a Quote Template
- Add a Signature Block to a Quote Template
- Create and Manage Quotes
- How Quote Syncing Works
- Sync Quotes and Opportunities
- Create a Quote PDF from the Standard Template
- Create a Quote PDF by Selecting a Template
- Email Quote PDFs
- Considerations for Creating Quote Templates
- Guidelines for Using the Quote Templates Editor
- Considerations for Adding Images to Quote Templates
- Quote Template Fields
- Quote Template and PDF Limitations
- Considerations for Deleting Quotes
- Considerations for Creating and Managing Quotes and Quote Line Items
- Considerations for Creating Quote PDFs
- Quotes Fields
- Troubleshooting Quote Syncing
- Quotes: What’s Different or Not Available in the Salesforce Mobile App
- Set Up Contracts
- Activate Contracts
- Contract History
- Delete Contracts
- Contract Fields
- Enable Orders
- Enable Negative Quantities for Order Products
- Enable Reduction Orders
- Enable Zero Quantity Orders
- Enable Orders Without Price Books
- Share Orders
- Order History
- Order Products
- Add Products to an Order
- Reduction Orders
- Reduce Orders
- Add Products to a Reduction Order
- Guidelines for Creating Orders
- Editing and Deletion Limitations for Orders and Reduction Orders
- Considerations for Activation Limitations
- Salesforce CPQ Reduction Orders Limitations
- Editing and Deletion Limitations for Order Products
- Order Fields
- Order Product Fields
- Enable New Order Save Behavior
- Account Intelligence View
- Considerations for the Account Intelligence View
- Guidelines for the Account Intelligence View
- Turn On the Account Intelligence View
- Share Accounts
- Guidelines for Merging Duplicate Accounts
- Things to Know About Merging Duplicate Accounts Associated with...
- Merge Duplicate Accounts in Lightning Experience
- Merge Duplicate Accounts in Salesforce Classic
- Update Accounts with Third-Party Data
- View and Convert Leads on an Account
- Account History
- Set Up Account Hierarchy in Salesforce Classic
- Set Up Account Hierarchy in Lightning Experience
- Enable Automated Account Fields
- Business Contact Sharing for Orgs That Use Person Accounts
- Considerations for Using Person Accounts
- Considerations for Using Merge Fields for Person Accounts
- Considerations for Using Merge Fields in Validation Rules for Person...
- Enable Person Accounts
- Add Teams to Your Accounts
- Set Up a Default Account Team
- Use Reports to Maintain Account Teams
- Considerations for Account Access via Teams
- Facilitate Collaboration by Enabling Account Teams
- Customize Account Team Roles
- Maintain Your Users’ Account Teams
- Disable Account Teams
- Considerations for Customizing Account Teams
- Account Team Fields
- Guidelines for Creating Accounts
- Guidelines for Deleting Accounts
- Considerations for Using Account Hierarchy in Lightning Experience
- Considerations for Using Account Hierarchy in Salesforce Classic
- Account Fields
- Considerations for Creating Contacts
- Guidelines for Viewing and Managing Contacts
- Contact Intelligence View
- Considerations for Deleting Contacts
- Merge Duplicate Contacts in Lightning Experience
- Merge Duplicate Contacts in Salesforce Classic
- Retain Recently Updated Data Privacy Records for Merged Leads and...
- Considerations for Merging Duplicate Contacts
- Considerations for Merging Contacts Associated with Portal Users
- Update Contacts with Third-Party Data
- Considerations for Sharing and Accessing Contacts
- Considerations for Importing Contacts from a Mobile Device
- Considerations for Automatic Contact Creation
- Turn On Contact Intelligence View
- Enable Self-Service for Contacts and Person Accounts
- Set Up Contact Hierarchy in Lightning Experience
- Display Contacts in an Org Chart in Salesforce Classic
- Allow Users to Create Private Contacts
- Set Up Automatic Contact Creation
- Comparing Contacts to Multiple Accounts to Other Options
- Set Up Contacts to Multiple Accounts
- Account Contact Relationship Fields
- Create Custom Report Types for Account Contact Relationships
- Validation Rules for Account Contact Relationships
- Create and Edit Relationships Between Contacts and Accounts
- Considerations for Relating a Contact to Multiple Accounts
- Set Up Contact Roles
- Add and Manage Contact Roles in Lightning Experience
- Add and Manage Contact Roles in Salesforce Classic
- Considerations for Using Contact Roles
- Contact Role Fields
- Set Up and Customize Opportunity Contact Roles in Lightning Experience
- Considerations for Customizing Opportunity Contact Roles
- Set Up Opportunity Contact Roles in Salesforce Classic
- Add and Manage Opportunity Contact Roles
- Guidelines for Using Opportunity Contact Roles
- Opportunity Contact Role Fields
- Considerations for Changing the Account for Contacts
- Considerations for Using Contact Hierarchy in Lightning Experience
- Contacts: What’s Different or Not Available in the Salesforce Mobile...
- Contact Fields
- Before You Turn On Salesforce Maps Lite
- Visualize Customers and Prospects on a Map
- Resolve Latitude and Longitude Discrepancies
- Considerations for Setting up Revenue Insights
- Revenue Insights Assets
- Enable and Configure Revenue Insights
- Revenue Insights Post Installation Steps
- Monitor, Update, and Delete Revenue Insights Apps
- Troubleshoot Revenue Insights Enablement
- Select Who Can Use Revenue Intelligence
- Enable More Features for Revenue Intelligence
- Revenue Insights Team Tab
- Revenue Insights Sales Performance Tab
- Revenue Insights Forecast Historical Trend Tab
- Sales Rep Command Center Dashboard
- Sales Stage Analysis Progression
- Sales Stage Analysis Conversion
- Forecast Insights Dashboard
- Commit Calculator Dashboard
- Product Insights Dashboard
- Considerations for Einstein Account Management
- Set Up Einstein Account Management
- Use Einstein Account Management
- Considerations for Setting Up Pipeline Inspection
- Turn On Pipeline Inspection
- Select Who Can Use Pipeline Inspection
- Select Summary Fields For Pipeline Inspection Metrics
- Manage Pipeline Inspection Metrics
- Select a Forecast Rollups Method in Pipeline Inspection
- Configure Deal Insights in Pipeline Inspection
- Show Opportunity Scores in Pipeline Inspection
- Enable the Flow Chart in Pipeline Inspection
- Enable More Features for Pipeline Inspection
- Managing Pipelines with Pipeline Inspection
- Set or Change the Summary Field for Pipeline Inspection Metrics
- Pipeline Inspection Charts
- Einstein Deal Insights
- Tiered Einstein Opportunity Scores
- Guidelines and Limits for Pipeline Inspection
- Pipeline Inspection Metrics and Fields
- Collaborative Forecasts Concepts
- Turn On Collaborative Forecasts and Define Forecasts Settings
- Forecast Types
- Group Sales Forecasts to Match Your Business
- Create and Activate Forecast Types
- Schedule and Product Date Forecasts
- Territory Forecasts
- Guidelines for Showing Opportunity Fields in Forecasts Pages
- Forecast Rollup Methods
- Select a Forecast Rollup Method
- Give Users Access to Collaborative Forecasts
- Set Up Your Forecast Hierarchy
- Enable Partner Portal Users to Add Opportunities in Collaborative...
- Activate and Assign Custom Forecasts Pages
- Considerations and Guidelines for Custom Forecasts Pages
- Define Your Company’s Forecast Date Range
- Customizing Forecasts Categories
- Show, Hide, and Reorder Forecast Columns
- Allow Forecast Adjustments and Manager Judgments
- Show Quota Information in Collaborative Forecasts
- Manage Quota Data in Setup
- Managing Quota Data from External Sources
- Select a Forecast Currency in Collaborative Forecasts
- Guidelines for Using Multiple Currencies in Collaborative Forecasts
- Add Custom Calculated Columns
- Considerations for Using Custom Calculated Columns
- Managing External Data to Include in Collaborative Forecasts
- Add Custom Columns That Include External Data
- Set Up Historical Data for Forecast Charts
- Manage Opportunity-State-to_Forecast-Category Mappings
- Considerations for Disabling Collaborative Forecasts Features
- Guidelines for Using Collaborative Forecasts
- Revenue and Quantity Forecasts
- Custom Measure Forecasts
- Overlay Splits Forecasts
- Considerations for Managing Territory Forecasts
- Showing or Hiding Quota Information
- Considerations for Using Quotas
- Forecasts Hierarchy
- View Forecasts from Difference Perspectives
- See Recent Changes in Forecast Value Changes
- Reviewing Week-to-Week Forecast Changes
- Finding Trends Across Forecast Periods
- Monthly and Quarterly Forecasts
- Change Your Forecast Date Range
- Partner Portal User Opportunities in Collaborative Forecasts
- Guidelines for Viewing Opportunity Details in Collaborative Forecasts
- Guidelines for Refreshing Forecasts in Collaborative Forecasts
- Manager Judgments
- Apply Manager Judgment
- Forecast Adjustments
- Adjust Forecast Values
- Who Can Apply Manager Judgments and Adjust Forecasts
- Manager Judgment and Forecast Adjustment Deletions
- Share Forecasts with Stakeholders
- Preparing Sales Leaders to Report on Forecasts
- Guidelines for Using Collaborative Forecasts Reports
- What's Different or Not Available in the Salesforce Mobile App
- Bird’s-Eye View of Planning and Managing Territories
- Designing Territory Models
- Managing Territories
- Optimizing Your Territory Model Continuously
- Territory Type
- Territory Type Priority
- Territory Model
- Territory Hierarchy
- Territory Model State
- How Do Permissions for Territories Affect Feature and Data Access?
- Territory Management 2.0 Data Model
- Enable Sales Territories
- Define Default User Access for Territory Records
- Enable Filter-Based Opportunity Territory Assignment
- Collaborate on Territory Models
- Create Territory Types
- Create a Territory Model Record
- Create Territories
- Assign Forecast Managers to Territories
- Customize Territory Labels
- Assign Users to Territories
- Define a Picklist for Territory User Roles
- Assign Territory Roles to Users
- Identify Users in Territories Assigned to Accounts
- Identify Territory Users by Territory Role
- Show Your Reps Other Users Assigned to Their Leads’ Territories
- Track Historical User Assignments in Territories
- Create Rules to Assign Accounts to Territories
- Assign Accounts Directly to Territory Records
- Preview Territory Assignments for Accounts
- Assign Accounts and Leads to Territories Manually
- Add Assignment Rules to Territories
- Requirements for Assigning Opportunities to Territories Manually
- Assign Opportunities to Territories Manually
- Run the Opportunity Territory Assignment Filter
- Clone Territory Models
- Activate a Territory Model
- Configure Territory Permissions and Access for Salesforce Admins and...
- Run Assignment Rules for a Territory
- Find Out Which Territories an Assignment Rule Applies To
- View and Manage Assignment Rules at the Territory Model Level
- Activating Assignment Rules and Applying Them to Descendant...
- Preparing Sales Management for Territory Reporting
- Identify Accounts Assigned to Territories
- Identify Territories Without Assigned Accounts
- Identify Users Not Assigned to Territories
- Identify Territories with Assigned Users
- Report on Summarizable Account Fields by Territory
- Archive a Territory Model
- Delete a Territory Model
- Disable Sales Territories
- Explore Your Company’s Territory Model
- Identify an Account’s Sales Territories
- View a List of the Accounts or Opportunities in Your Territories
- Report on the Accounts and Opportunities in Your Territories
- Allocations and Considerations for Territories
- Sales Territories: What’s Different or Not Available in the...
- How Account Assignment Rules Work
- Add Teams to Your Opportunities
- Set Up a Default Opportunity Team
- Use Reports to Track Teams
- Considerations and Guidelines for Using Teams
- Guidelines and Considerations for Using Opportunity Splits and...
- Enable Opportunity Teams
- Customize Team Roles
- Maintain Users’ Opportunity Teams
- Disable Opportunity Teams
- Considerations for Customizing Teams
- Opportunity Teams Fields
- Get Ready to Enable Splits
- Enable Opportunity Splits
- Edit Splits Layouts
- Customize Split Types
- Add Opportunity Product Splits
- Deactivate or Delete Opportunity Split Types
- Disable Opportunity Splits and Opportunity Product Splits
- Set Up Audit History for Splits and Opportunity Teams
- Considerations for Managing Audit History
- Enable Multiple Currencies
- Considerations for Enabling Multiple Currencies
- Activate and Deactivate Currencies
- Enable or Disable Advanced Currency Management
- Edit Dated Exchange Rates
- Enable Path
- Create a Path
- Configure the Last Path Step
- Considerations and Guidelines for Creating Paths
- Considerations for Setting Up WDC
- Assign a WDC Administrator
- Recommended WDC Permission Sets
- Recommended WDC Profiles
- Assign WDC Only User Licenses
- Assign WDC User Feature Licenses
- Configure Thanks in the Chatter Publisher and Salesforce Mobile App...
- Assign Publisher Layout to Profiles
- WDC Editions and Permissions
- Enable or Disable WDC Settings
- Skills Customization
- Skills Limitations
- Create a Badge
- Configure Access to Thanks Badges
- Add a Skill Via Record Detail Pages
- Remove a Skill Via Record Detail Pages
- Endorse a Skill Via Record Detail Pages
- Einstein Features in Sales Cloud
- Einstein and Data Usage in Sales Cloud
- Set Up Einstein Opportunity Scoring for Sales Cloud Users
- Manage Sales Cloud Users’ Access to Einstein Features
- Set Up Sales Summaries for Einstein Copilot
- Set Up Create Close Plan in Einstein Copilot
- Set Up Meeting Follow-Up Email in Einstein Copilot
- Digital Engagement for Sales Cloud
- Sharing Information with Partners
- Add Partner Relationships
- Partner Fields
- Deleting Partners
- Create a Partner Portal
- Add LinkedIn Sales Navigator Components to Lead, Contact, and...
- Add LinkedIn Sales Navigator Lightning Actions to Lead, Contact, and...
- Send LinkedIn InMail and Connection Requests from Salesforce
- Resources for the Sales Professional
Get some guidance when you manually create leads to track your prospects.
Required Editions
If you automatically assign the new lead, the record type of the lead can change, depending on the behavior your admin specified for assignment rules.
- If your sales team uses divisions (Salesforce Classic only), the division of a new lead is automatically set to your default division, unless you manually select a different one.
- Your admin determines the default lead status for new leads.
- The lead is marked Read and doesn’t appear in the My Unread Leads list view. In Salesforce Classic, if you click Save & New , the lead is marked Unread.

Cookie Consent Manager
General information, required cookies, functional cookies, advertising cookies.
We use three kinds of cookies on our websites: required, functional, and advertising. You can choose whether functional and advertising cookies apply. Click on the different cookie categories to find out more about each category and to change the default settings. Privacy Statement
Required cookies are necessary for basic website functionality. Some examples include: session cookies needed to transmit the website, authentication cookies, and security cookies.
Functional cookies enhance functions, performance, and services on the website. Some examples include: cookies used to analyze site traffic, cookies used for market research, and cookies used to display advertising that is not directed to a particular individual.
Advertising cookies track activity across websites in order to understand a viewer’s interests, and direct them specific marketing. Some examples include: cookies used for remarketing, or interest-based advertising.
Cookie List

Salesforce is closed for new business in your area.

IMAGES
VIDEO
COMMENTS
How to create Lead Assignment Rules based on State. Free Consultation: https://bit.ly/40rs0PGUpgrades: https://bit.ly/3z14UnpLinkedin: https://bit.ly/3z2OQlc...
Salesforce Lead Assignment Rule Example. Here's a quick example: Criteria #1: If State = California, assign to Stacy. Criteria #2: If Country = United Kingdom, assign to Ben. Criteria #3: If Country = France, assign to Lucy. Criteria #4: If Annual Revenue is greater than $500,000,000 USD, assign to "High Roller Queue".
To create a lead assignment rule in Salesforce: From Setup, enter "Assignment Rules" in the Quick Find box, then select Lead Assignment Rules. Click New. Enter the rule name. (Example: 2023 Standard Lead Rules) Select "Set this as the active lead assignment rule" to activate the rule immediately. Click Save.
Sales Cloud Basics. Setting Up and Managing Territory Assignments. Automate territory assignments for accounts using rules that you define. Rules can apply to parent territories and their child territories. Or assign accounts and leads manually directly in account and lead detail pages.
For lead distribution, use assignment rules to define the criteria by which you want to distribute your leads, such as partner tier, geography, or specialization. From Setup, enter Leads in the Quick Find box, then select Lead Assignment Rules. Create a lead assignment rule, let's call this All Channel Sales Leads.
Assignment Rules. As an admin, you can help your organization succeed by staying up to date with the latest Salesforce releases and getting familiar with product enhancements. Check out the Summer '24 release notes for a list of new features and available updates.
In Setup, search for Lead Assignment Rules, and open it. Click New. Name your rule Round Robin Assignment Rule, and click Save. Click to open Round Robin Assignment Rule. In the Rule Entries section, clickNew. In Sort Order, enter 1. Set the rule criteria by choosing Round Robin in the Field dropdown, Equals in the Operator dropdown, and 1 in ...
Enter Lead Settings in the Quick Find box, then select Lead Settings to specify your default lead settings. Users who convert leads become the new lead owner. To prevent the Lead Status value from changing to the new owner's default value, turn on Preserve Lead Status. Enter Assignment Rules in the Quick Find box, then select Lead Assignment ...
Also known as lead assignment, lead routing is an automated process of distributing inbound leads to the department or sales rep best-equipped to handle that lead. More sophisticated lead routing systems take in consideration a variety of lead assignment rules determined by the company. Normally these rules are based on the sales territory, industry, potential deal size among other variables ...
Fortunately, there is an out-of-the-box solution provided by Salesforce, and it's totally free… State and Country Picklists. ... Finally, don't forget to check any internal automation you have created directly in Salesforce. Lead or Case Assignment Rules, Territories, validation rules, etc. You may or may not need to make any updates ...
For a slightly simpler setup, you can use Salesforce lead assignment rules without ETM. Salesforce's built-in lead assignment rules are customizable criteria used to automatically route lead records to the right user or queue. ... For example, if the state/province equals Alaska, Arizona, California, Hawaii, Nevada, Oregon, or Washington ...
Access your Salesforce account using your credentials. Step 2: Navigate to Setup: Click on the gear icon in the screen's upper-right corner to access the Setup menu. Step 3: Access Lead Assignment Rules: In the Setup menu, search for "Lead Assignment Rules" in the Quick Find box. Click on "Lead Assignment Rules" under the "Leads" section.
How to Create Salesforce Lead Assignment Rules. Creating lead and case assignment rules in Salesforce is a relatively straightforward process. Login to Salesforce and select Setup in the upper right corner of the horizontal navigation bar.; In the Setup search box, type "assignment rules" and then select either Lead Assignment Rules or Case Assignment Rules.
Manage Round Robin Lead Assignment to multiple groups of Salesforce users each based on different and custom criteria. Easy to setup and maintain. Country /US State/Zip supported by default. Create multiple custom matching fields to use for distribution.
Salesforce lead assignment rules (SARs/LARs) help you to specify just this. You can route based on geography, email domain, lead source, employee count, etc. to get your lead(s) to the right rep(s). ... Often you have reps that own a certain region: countries, states, cities, or zip codes. Provided you are capturing geographic information on ...
7. Click the 'Layout Properties' button on the palette and disable the 'Show on edit page' and 'Select by default' Case Assignment Check-box and click OK, then click Save. 4. Test and confirm that when a user creates a new case/lead, the 'Assign using active assignment rules' checkbox is set to true. Save the case/lead.
Click Setup. In the Quick Find box, type Lead Assignment Rules. Click on the Lead Assignment Rules | New button. Now create an assignment rule, as shown in the following screenshot: Step 2: Create an Apex class and Test class. Now, we have to understand a new Apex annotation i.e. @InvocableMethod.
In Salesforce we can create many rule entries for single Assignment Rule. Click on New Button to create new Rule entry. In step 1 :- Enter Sort order as #1. In Step 2 :- Enter rule criteria as shown above. In Step 3 :- Select the user or queue to assign the lead. Select user and Email template as shown above. Click on Save button.
Go to the Setup menu in Salesforce Classic and click on the Build section. 3. Click on the Lead object under the Customize section. Click on Lead Assignment Rules. 4. Click New to create a new lead assignment rule. 5. Enter a Rule Name for our rule. If we want to activate your rule by clicking the Activate button.
Lead assignment rules in Salesforce are set to assign a sales owner based on State/Province. Test 1: The default marketing owner creates a Salesforce Lead directly within Salesforce, including name, email, company and state. Lead assignment rules run upon save and the appropriate sales team owner becomes the Lead owner.
To create our new fields go to Setup > App Setup > Customize > Leads > Fields. Slide down the page past the "out of the box" fields until you see the "New" button where you can create a custom field. In Step 1 of the custom field wizard, pick the data type "Auto Number". In Step 2. Field Label: Lead Number. Display Format: {0}
Required Editions. From the Leads tab, you can automatically assign the lead using the active lead assignment rule. To do so, select Assign using active assignment rules. If the active assignment rule assigns the lead to a queue, you must be a member of the queue or have View All permission for leads. If you don't assign the lead using an ...
The assignmentRuleHeader Property spec states: The assignmentRuleHeader property specifies the assignment rule to be used when creating a case or lead. *** It does not state any support for Lead/Case updates. I understand this was working previously (that post is from 2015) - my first assumption is that some Salesforce change made this stop ...
Lead generation is the process of building interest in a product or service and then turning that interest into a sale. Lead gen makes the sales cycle more efficient because it focuses on the strongest and most valuable prospects. The result is greater success in new customer acquisition and conversion rates. There are three types of leads:
But you're still on the path to finding, winning, and keeping customers. See how Salesforce, the world's first intelligent CRM, can help you blaze a trail to business growth. WATCH DEMO.