Set and Check User Rights Assignment via Powershell
You can add, remove, and check user rights assignment (remotely / locally) with the following powershell scripts..
Posted by : blakedrumm on Jan 5, 2022


Local Computer
Remote computer, output types.
This post was last updated on August 29th, 2022
I stumbled across this gem ( weloytty/Grant-LogonAsService.ps1 ) that allows you to grant Logon as a Service Right for a User. I modified the script you can now run the Powershell script against multiple machines, users, and user rights.
Set User Rights
How to get it.
All of the User Rights that can be set:
Note You may edit line 437 in the script to change what happens when the script is run without any arguments or parameters, this also allows you to change what happens when the script is run from the Powershell ISE.
Here are a few examples:
Add Users Single Users Example 1 Add User Right “Allow log on locally” for current user: . \Set-UserRights.ps1 -AddRight -UserRight SeInteractiveLogonRight Example 2 Add User Right “Log on as a service” for CONTOSO\User: . \Set-UserRights.ps1 -AddRight -Username CONTOSO\User -UserRight SeServiceLogonRight Example 3 Add User Right “Log on as a batch job” for CONTOSO\User: . \Set-UserRights.ps1 -AddRight -Username CONTOSO\User -UserRight SeBatchLogonRight Example 4 Add User Right “Log on as a batch job” for user SID S-1-5-11: . \Set-UserRights.ps1 -AddRight -Username S-1-5-11 -UserRight SeBatchLogonRight Add Multiple Users / Rights / Computers Example 5 Add User Right “Log on as a service” and “Log on as a batch job” for CONTOSO\User1 and CONTOSO\User2 and run on, local machine and SQL.contoso.com: . \Set-UserRights.ps1 -AddRight -UserRight SeServiceLogonRight , SeBatchLogonRight -ComputerName $ env : COMPUTERNAME , SQL.contoso.com -UserName CONTOSO\User1 , CONTOSO\User2
Remove Users Single Users Example 1 Remove User Right “Allow log on locally” for current user: . \Set-UserRights.ps1 -RemoveRight -UserRight SeInteractiveLogonRight Example 2 Remove User Right “Log on as a service” for CONTOSO\User: . \Set-UserRights.ps1 -RemoveRight -Username CONTOSO\User -UserRight SeServiceLogonRight Example 3 Remove User Right “Log on as a batch job” for CONTOSO\User: . \Set-UserRights.ps1 -RemoveRight -Username CONTOSO\User -UserRight SeBatchLogonRight Example 4 Remove User Right “Log on as a batch job” for user SID S-1-5-11: . \Set-UserRights.ps1 -RemoveRight -Username S-1-5-11 -UserRight SeBatchLogonRight Remove Multiple Users / Rights / Computers Example 5 Remove User Right “Log on as a service” and “Log on as a batch job” for CONTOSO\User1 and CONTOSO\User2 and run on, local machine and SQL.contoso.com: . \Set-UserRights.ps1 -RemoveRight -UserRight SeServiceLogonRight , SeBatchLogonRight -ComputerName $ env : COMPUTERNAME , SQL.contoso.com -UserName CONTOSO\User1 , CONTOSO\User2
Check User Rights
In order to check the Local User Rights, you will need to run the above (Get-UserRights), you may copy and paste the above script in your Powershell ISE and press play.

Note You may edit line 467 in the script to change what happens when the script is run without any arguments or parameters, this also allows you to change what happens when the script is run from the Powershell ISE.
Get Local User Account Rights and output to text in console:
Get Remote SQL Server User Account Rights:
Get Local Machine and SQL Server User Account Rights:
Output Local User Rights on Local Machine as CSV in ‘C:\Temp’:
Output to Text in ‘C:\Temp’:
PassThru object to allow manipulation / filtering:
I like to collaborate and work on projects. My skills with Powershell allow me to quickly develop automated solutions to suit my customers, and my own needs.
Email : [email protected]
Website : https://blakedrumm.com
My name is Blake Drumm, I am working on the Azure Monitoring Enterprise Team with Microsoft. Currently working to update public documentation for System Center products and write troubleshooting guides to assist with fixing issues that may arise while using the products. I like to blog on Operations Manager and Azure Automation products, keep checking back for new posts. My goal is to post atleast once a month if possible.
- operationsManager
- troubleshooting
- certificates
At the edge of tweaking
Advertisement
To Allow User or Group to Sign in Locally in Windows 10,

- In the next dialog, click Add User or Group .

- From the list, select the user account or group to allow log on locally for it. You can select more than one entry at once by holding the Shift or Ctrl keys and clicking on the items the list.

- Click on the OK button to add the selected items to the policy list.

You are done.
If your Windows edition doesn't include the secpol.msc tool, you can use the ntrights.exe tool from Windows 2003 Resource Kit . Many resource kit tools released for previous Windows versions will run successfully on Windows 10. ntrights.exe is one of them.
The ntrights tool
The ntrights tool allows you to edit user account privileges from the command prompt. It is a console tool with the following syntax.
- Grant a right: ntrights +r Right -u UserOrGroup [-m \\Computer] [-e Entry]
- Revoke a right: ntrights -r Right -u UserOrGroup [-m \\Computer] [-e Entry]
The tool supports plenty of privileges which can be assigned to or revoked from a user account or group. Privileges are case sensitive . To learn more about the supported privileges, type ntrights /? .
To add ntrights.exe to Windows 10 , read this post: What is ntrights app and how you can use it . You can place the ntrights.exe file to the C:\Windows\System32 folder to quickly call it.
Deny log on locally with ntrights
- Open an elevated command prompt .

Articles of interest.
- Deny User or Group to Sign in Locally in Windows 10
- Allow or Deny Users to Logon with Remote Desktop in Windows 10
- Allow or Prevent Users or Groups to Shut Down Windows 10
Winaero greatly relies on your support. You can help the site keep bringing you interesting and useful content and software by using these options:
If you like this article, please share it using the buttons below. It won't take a lot from you, but it will help us grow. Thanks for your support!
Author: Sergey Tkachenko
Sergey Tkachenko is a software developer who started Winaero back in 2011. On this blog, Sergey is writing about everything connected to Microsoft, Windows and popular software. Follow him on Telegram , Twitter , and YouTube . View all posts by Sergey Tkachenko
Leave a Reply Cancel reply
Your email address will not be published. Required fields are marked *

Privacy Overview
All about Microsoft Intune
Peter blogs about Microsoft Intune, Microsoft Intune Suite, Windows Autopilot, Configuration Manager and more

Restricting the local log on to specific users
This week is about restricting the local logon on Windows devices to specific users. Not because it is something particularly new, but simply because it is been an ask every now and then. Think about further locking down a kiosk device, for example. Restricting the local logon can be achieved by either only allowing specific users to log on, or by denying specific users to log on. In other words, whitelisting versus blacklisting. The allow-option is basically a whitelist and the deny-option is basically a blacklist. When looking at restricting the local logon, a whitelist is the easiest method to get quickly really restrictive, as only the users on the list are allowed to log on locally. Luckily, nowadays there is easy method for configuring such a whitelist with users that are allowed to log on locally on a Windows device. This post will provide some more details around that configuration, followed with the configuration steps. This post will end with showing the user experience.
Note : Keep in mind that this post is focussed on the local log on on Windows devices and not the remote log on.
Configuring the allow local log on setting
When looking at configuring the allow local log on configuration, the UserRights section in the Policy CSP is the place to look. That section contains many of the different policy settings of the User Rights Assignment Local Policies , including the Allow log on locally ( AllowLocalLogOn ) policy setting. That policy setting can be used to configure the users that are allowed to locally log on to the Windows device. Besides that, it’s also good to mention that with the latest Windows 11 Insider Preview Builds, this section of the Policy CSP, is getting more and more policy settings. Nearly all of the User Rights Assignment Local Policies are now available for configuration, including Logon as a service , Logon as a batch job , and many more. Maybe even better, all of these available policy settings – including the new policy settings that are currently still in preview – are now configurable via the Settings Catalog profile (as shown below in Figure 1).
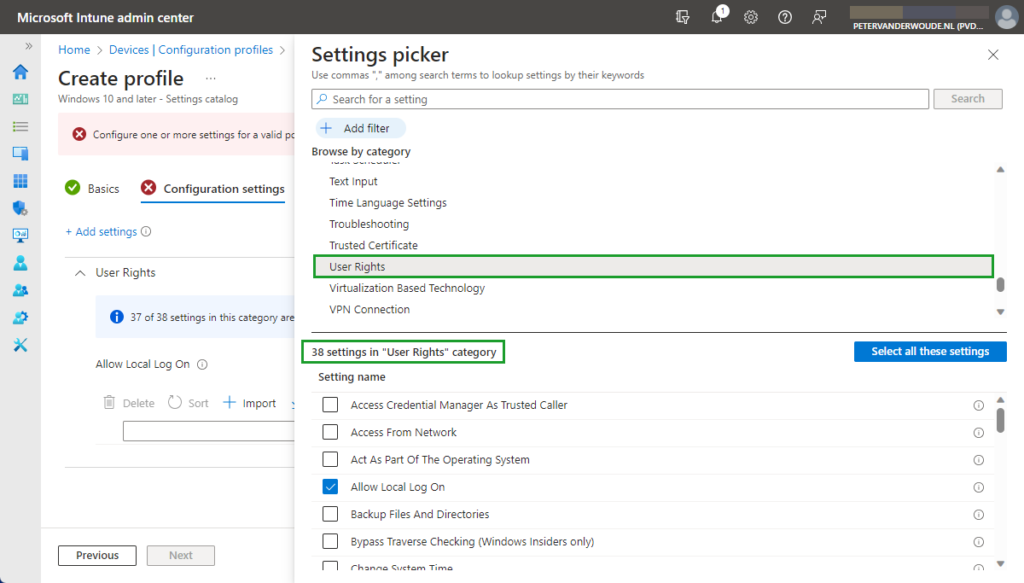
After being familiar with the available policy settings and the configuration profile, the configuration of those policy settings is pretty straight forward. The following eight steps walk through the creation of a Settings Catalog profile that contains the required setting to configure the local logon, by using the Allow log on locally policy setting.
- Open the Microsoft Intune admin center portal and navigate to Devices > Windows > Configuration profiles
- On the Windows | Configuration profiles blade, click Create profile
- On the Create a profile blade, provide the following information and click Create
- Platform : Select Windows 10 and later to create a profile for Windows 10 and Windows 11 devices
- Profile : Select Settings catalog to select the required setting from the catalog
- On the Basics page, provide the following information and click Next
- Name : Provide a name for the profile to distinguish it from other similar profiles
- Description : (Optional) Provide a description for the profile to further differentiate profiles
- Platform : (Greyed out) Windows 10 and later
- On the Configuration settings page, as shown below in Figure 2, perform the following actions
- Select User Rights as category
- Select Allow Local Log On as setting
- Specify the required users and local groups – all on separate lines – and click Next

- On the Scope tags page, configure the required scope tags and click Next
- On the Assignments page, configure the assignment and click Next
- On the Review + create page, verify the configuration and click Create
Note : As these settings are now configurable via the Settings Catalog , that also takes away the challenges with multiple entries. No need to manually specify a delimiter, as Microsoft Intune takes care of that.
Experiencing the user rights configuration
After configuring the users that are allowed to log on locally to the Windows device, it’s pretty straight forward to experience the behavior. Simply try to log on to that device with a user account that is not allowed to log on locally. That will provide an experience as shown below in Figure 3. The user will receive the notification that the sign-in method is not allowed. Besides that, it’s also important to be familiar with the side effects of this configuration. The most important side effect is the impact on the self-service capabilities, like self-service PIN reset and self-service password reset. That’s simply because those capabilities rely on the temporary account defaultuser1 and that account won’t be able to log in, as only the specified users are allowed to locally log on to the Windows device. That experience is shown below in Figure 4. The user will either receive the status message of 0xc000015b , or will simply be switched back to the logon screen.
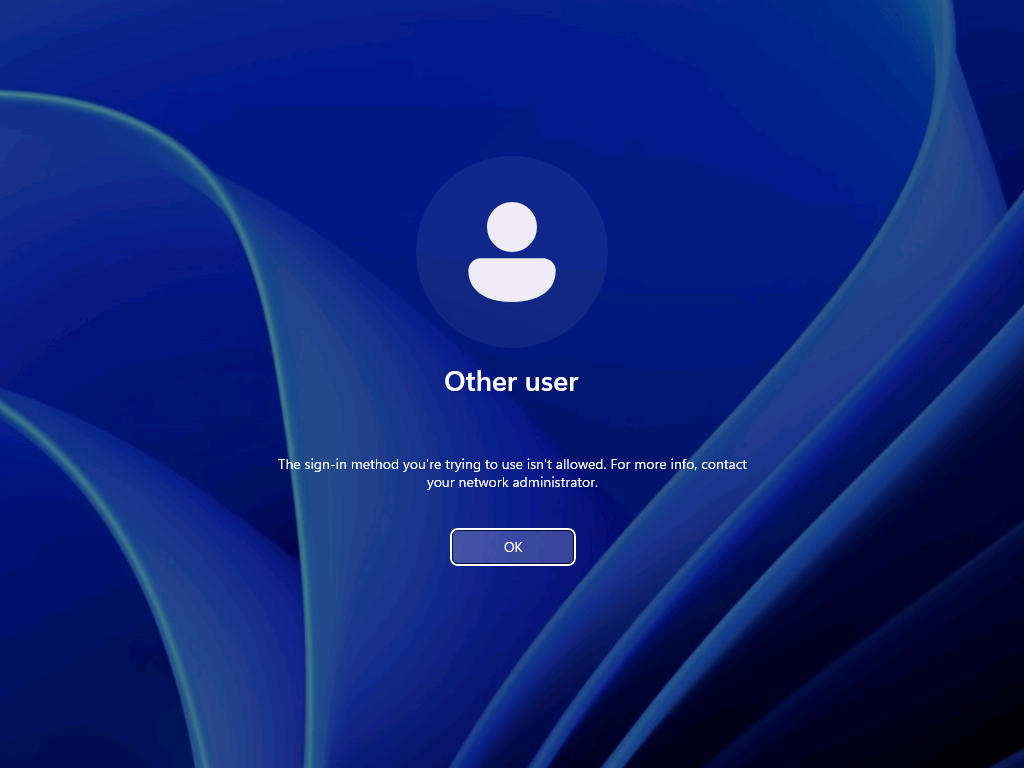
Note : The failed log on information is registered in the Security log in the Event Viewer with Event ID 4625 .
More information
For more information about the user rights configuration options, refer to the following docs.
- UserRights Policy CSP – Windows Client Management | Microsoft Learn
- Self-service password reset for Windows devices – Microsoft Entra | Microsoft Learn
25 thoughts on “Restricting the local log on to specific users”
I’d like to contribute to this.
This method does not inherently allow you to specify an EntraID group of users that you wish to deny local logon (at least it didnt use to) however i’ve found that if you use “account protection” policies populate the local group “Guests” with users from an EntraID group you can use the above stated policy to in effect acheive deny local logon for an EntraID group of users. (Via denying the local group “guests” as stated in your blog)
I use this in production, works well
Thank you for that suggestion, Temilit. Regards, Peter
I have not been able to replicate this. I followed inthecloud247’s blog post on this, but the only SID I was able to add to the Guests local group was the SID of an AAD directory role, and not one of an AAD security group.
Which version of Windows are you using? Regards, Peter
- Pingback: Microsoft Roadmap, messagecenter en blogs updates van 21-09-2023 - KbWorks
Can you use an AAD group here?
Not at this moment, Henrik. Regards, Peter
Is there currently a way to restrict interactive log in but allow elevation log in prompts? I would like to prevent Intune Admins from logging in locally but still allow elevation for installs/CMD.
Not sure you can achieve that with this policy, but I haven’t looked really deep in that use case yet. Regards, Peter
- Pingback: Intune Newsletter - 22nd September 2023 - Andrew Taylor
- Pingback: Enabling remote access for specific users on Azure AD joined devices – All about Microsoft Intune
Is there a way to specify an EntraID security group with this settings?
Hi Yoni, The last time I tried that was not possible yet. Regards, Peter
Is there a way sign in KioskUser0 automatically using User Rights?
Hi Mo, Can you provide some more details about what you’re trying to achieve? Regards, Peter
We have deployed Self-Deploy AutoPilot profile plus Kiosk Configuration Profile for single app and then assign to dynamic device group. The Self-Deploy AutoPilot process completes without any issues and Kiosk policy is applied to the device. However, the KioskUser0 should auto logging automatically after Self-Deploy AutoPilot process completes, but its not auto logging.
Any thought why KioskUser0 not auto logging automatically?
Hi Mo, That can be many things, but something I often see is the device lock configuration that is interfering. Regards, Peter
Hello Peter,
We have Azure AD Joined devices in our enviornment which are migrated from source tenant to target tenant as part of carve out project. Recently we observed that post autopilot build completition when user tried to sign in to device they were prompted error as Sign in method not allowed. However, if we tried to login to device with local admins then it allows.
Standard users not allowed to login, we do have AllowLocallyLogIn baseline policy deployed by security team but it contains Administrators and Users group both. Does on Azure AD joined devices this policy really gets validated when users trying to sign in with UPN ?
This issue is not for all users but 10% users are facing, as a workaround when we reimported hash of thier device again and reimaged device then sign in was allowed (bit strange).
Do you have any idea on this then please give some direction.
Hi Suraj, How did you migrate the devices from source tenant to the target tenant? Regards, Peter
I am seeing something similar for new devices. Again, not all, only a subset. quite often, the user can happily use the device for a period (a few days) then this occurs. LOgging onto the device locally, I am seeing the Allow Logon Locally being blank. very odd. This is using Windows 11 23H2
Hi Shaun, When that happens, do you see anything about (other) policies being applied and/or change? Regards, Peter
I tried to do the restriction as in your procedure, but I got the error 65000 in intune. Since then, it has been impossible to connect with ALL the accounts on the computer. Do you have a solution to go back?
Hi Simon, In that case, you should apply a counter policy with the default configuration. Regards, Peter
I’ve had a similar issue. What would the correct counter policy be to reset the default logon configuration or do you have an article that details that?
Hi Mike, Easiest is to check a different device an see what the default configuration is. Regards, Peter
Leave a Comment Cancel reply
Notify me of follow-up comments by email.
Notify me of new posts by email.
This site uses Akismet to reduce spam. Learn how your comment data is processed .
WinSecWiki > Security Settings > Local Policies > User Rights
User Rights Assignments
Although in this section they are called user rights, these authority assignments are more commonly called privileges.
Privileges are computer level actions that you can assign to users or groups. For the sake of maintainability you should only assign privileges to groups not to individual users. Each computer has its own user rights assignments. In particular this means you should be cognizant of rights assignments on member servers which may easily differ from the rights assignments you find on your domain controllers. To centrally control user rights assignments on computers throughout your domain use group policy.
- Logon rights
- Admin equivalent rights
- Tracking user rights with the security log
- User rights in-depth
- Access this computer from the network
- Act as part of the operating system
- Add workstations to domain
- Adjust memory quotas for a process
- Allow log on locally
- Allow logon through Terminal Services
- Back up files and directories
- Bypass traverse checking
- Change the system time
- Create a pagefile
- Create a token object
- Create global objects
- Create permanent shared objects
- Debug programs
- Deny access to this computer from the network
- Deny logon as a batch job
- Deny logon as a service
- Deny logon locally
- Deny logon through Terminal Services
- Enable computer and user accounts to be trusted for delegation
- Force shutdown from a remote system
- Generate security audits
- Impersonate a client after authentication
- Increase scheduling priority
- Load and unload device drivers
- Lock pages in memory
- Log on as a batch job
- Log on as a service
- Manage auditing and security log
- Modify firmware environment values
- Perform volume maintenance tasks
- Profile single process
- Profile system performance
- Remove computer from docking station
- Replace a process level token
- Restore files and directories
- Shut down the system
- Synchronize directory service data
- Take ownership of files and other objects
Child articles:
- Logon Rights
- Admin Equivalent Rights
- Tracking User Rights with the Security Log
- User Rights In-Depth
Back to top

Stack Exchange Network
Stack Exchange network consists of 183 Q&A communities including Stack Overflow , the largest, most trusted online community for developers to learn, share their knowledge, and build their careers.
Q&A for work
Connect and share knowledge within a single location that is structured and easy to search.
Allow logon locally option grayed out
We have a Domain Controller running on windows2012R2.
All local computers are on Windows10.
When i try to login to one of the client computer with Domain User Credentials i get an error

What could be the issue?
I tried to add users to " Allow log on locally " Policy on Local computer with Local admin login but im unable to add users or groups
Is there any work around?
please suggest.
- group-policy
- Probably UAC; use "Run as administrator" to launch the policy editor. Anyway, there already is "Everyone" listed... you can't really add much more. – Massimo Apr 4, 2016 at 19:17
- i tried running with administrator even , no Luck. . if this is not the solution, what could be the issue "The sign in method . . . . " :/ – Uday Sriramadas Apr 4, 2016 at 19:22
- 1 Seems like a user/computer GPO setting more than a local computer. Might want to check the GPO settings on the server more than on the local computer. – Naryna Apr 4, 2016 at 19:22
- May be , Do you have any idea which GPO may cause this thing? #Brandyn – Uday Sriramadas Apr 4, 2016 at 19:26
- You can use gpresult to find what GPOs are applied to the computer. – Massimo Apr 4, 2016 at 19:28
You need to manage this element via Group Policy Management. Czerw11 did a good write up of the process of using Group Policy Management to update this on your domain controllers via the Default Domain Controller Policy, you can extend this to your client policy as well.
https://czerwsup.wordpress.com/2014/11/05/allow-log-on-locally-add-new-user-greyed-out-fix-via-domain-controller-policy-settings/
Summary Steps:
- Admin Tools
- Group Policy Management
- Navigate through your domain to Default Domain Policy in your case (not Default Domain Controllers Policy as in the example)
To improve this answer, the best practice is to not edit the Default Domain Controllers Policy, but to create a GPO with these policies changes and assign it to the narrowest OU you need to affect the servers. If you edit the Default Policies you remove all of the default permissions.
- Computer Configuration -> Policies -> Windows Settings -> Security Settings -> Local Policies
- User Rights Assignment
- Double Click on Allow Log On Locally and add your users
You must log in to answer this question.
Not the answer you're looking for browse other questions tagged group-policy login windows-10 ..
- The Overflow Blog
- Why do only a small percentage of GenAI projects actually make it into...
- Spreading the gospel of Python
- Featured on Meta
- Our Partnership with OpenAI
- What deliverables would you like to see out of a working group?
Hot Network Questions
- Disease of too-much concentration
- Resistor's markings don't match readings
- Is it illegal for a company to cross out the "To the order of" line on a check and change companies being paid?
- KOMA Script (scrlttr2) and tabularray - compatibility issues?
- Decode Caesar cipher based on a given text
- How should one decide the author order
- I cleaned the grease off an old floppy drive’s motor; do I need to lubricate it?
- USA - Do I need to apply for ESTA if I have B1/B2 visa?
- Why did the authors use the phrase "the quantity of people" in these examples?
- Unison via cron, how to deal with one job still running as the next one starts
- How to mathematically describe the action of CNOT on the control qubit alone?
- Movie in which the couple figurine atop a wedding cake doubles as a voodoo doll
- plot a function in a subdomain with pgfplots
- How to track PBKDF2 progress?
- If Shavuos and Shemini Atzeres are essentially the same holiday then why are their korbanos different?
- what is G7-Bᵒ7/C doing in the chord progression
- An infinite series of origami puzzles
- Why does Hindley claim to have crammed Kenneth head first into a bog?
- Information can't take an s
- Why does the word "ahínco" carry an accent mark if it is llana?
- What exactly does RootSum mean?
- Is it true that there is no method of initiating a direct citizen referendum in the US, which a number of other countries have?
- Can't delete Apex class from production, deployment fails with "This Batchable class is in use. : Apex Sharing Recalculation", but no job queued?
- Did ROM chips jump from 8K to 32K?
This browser is no longer supported.
Upgrade to Microsoft Edge to take advantage of the latest features, security updates, and technical support.
Local Accounts
- 21 contributors
- Applies to: ✅ Windows 11 , ✅ Windows 10 , ✅ Windows Server 2022 , ✅ Windows Server 2019 , ✅ Windows Server 2016
This article describes the default local user accounts for Windows operating systems, and how to manage the built-in accounts.
About local user accounts
Local user accounts are defined locally on a device, and can be assigned rights and permissions on the device only. Local user accounts are security principals that are used to secure and manage access to the resources on a device, for services or users.
Default local user accounts
The default local user accounts are built-in accounts that are created automatically when the operating system is installed. The default local user accounts can't be removed or deleted and don't provide access to network resources.
Default local user accounts are used to manage access to the local device's resources based on the rights and permissions that are assigned to the account. The default local user accounts, and the local user accounts that you create, are located in the Users folder. The Users folder is located in the Local Users and Groups folder in the local Computer Management Microsoft Management Console (MMC). Computer Management is a collection of administrative tools that you can use to manage a local or remote device.
Default local user accounts are described in the following sections. Expand each section for more information.
Administrator
The default local Administrator account is a user account for system administration. Every computer has an Administrator account (SID S-1-5- domain -500, display name Administrator). The Administrator account is the first account that is created during the Windows installation.
The Administrator account has full control of the files, directories, services, and other resources on the local device. The Administrator account can create other local users, assign user rights, and assign permissions. The Administrator account can take control of local resources at any time by changing the user rights and permissions.
The default Administrator account can't be deleted or locked out, but it can be renamed or disabled.
Windows setup disables the built-in Administrator account and creates another local account that is a member of the Administrators group.
Members of the Administrators groups can run apps with elevated permissions without using the Run as Administrator option. Fast User Switching is more secure than using runas or different-user elevation.
Account group membership
By default, the Administrator account is a member of the Administrators group. It's a best practice to limit the number of users in the Administrators group because members of the Administrators group have Full Control permissions on the device.
The Administrator account can't be removed from the Administrators group.
Security considerations
Because the Administrator account is known to exist on many versions of the Windows operating system, it's a best practice to disable the Administrator account when possible to make it more difficult for malicious users to gain access to the server or client computer.
You can rename the Administrator account. However, a renamed Administrator account continues to use the same automatically assigned security identifier (SID), which can be discovered by malicious users. For more information about how to rename or disable a user account, see Disable or activate a local user account and Rename a local user account .
As a security best practice, use your local (non-Administrator) account to sign in and then use Run as administrator to accomplish tasks that require a higher level of rights than a standard user account. Don't use the Administrator account to sign in to your computer unless it's entirely necessary. For more information, see Run a program with administrative credentials .
Group Policy can be used to control the use of the local Administrators group automatically. For more information about Group Policy, see Group Policy Overview .
- Blank passwords are not allowed
- Even when the Administrator account is disabled, it can still be used to gain access to a computer by using safe mode. In the Recovery Console or in safe mode, the Administrator account is automatically enabled. When normal operations are resumed, it's disabled.
The Guest account lets occasional or one-time users, who don't have an account on the computer, temporarily sign in to the local server or client computer with limited user rights. By default, the Guest account is disabled and has a blank password. Since the Guest account can provide anonymous access, it's considered a security risk. For this reason, it's a best practice to leave the Guest account disabled, unless its use is necessary.
Guest account group membership
By default, the Guest account is the only member of the default Guests group SID S-1-5-32-546 , which lets a user sign in to a device.
Guest account security considerations
When enabling the Guest account, only grant limited rights and permissions. For security reasons, the Guest account shouldn't be used over the network and made accessible to other computers.
In addition, the guest user in the Guest account shouldn't be able to view the event logs. After the Guest account is enabled, it's a best practice to monitor the Guest account frequently to ensure that other users can't use services and other resources. This includes resources that were unintentionally left available by a previous user.
HelpAssistant
The HelpAssistant account is a default local account that is enabled when a Remote Assistance session is run. This account is automatically disabled when no Remote Assistance requests are pending.
HelpAssistant is the primary account that is used to establish a Remote Assistance session. The Remote Assistance session is used to connect to another computer running the Windows operating system, and it's initiated by invitation. For solicited remote assistance, a user sends an invitation from their computer, through e-mail or as a file, to a person who can provide assistance. After the user's invitation for a Remote Assistance session is accepted, the default HelpAssistant account is automatically created to give the person who provides assistance limited access to the computer. The HelpAssistant account is managed by the Remote Desktop Help Session Manager service.
HelpAssistant account security considerations
The SIDs that pertain to the default HelpAssistant account include:
- SID: S-1-5-<domain>-13 , display name Terminal Server User . This group includes all users who sign in to a server with Remote Desktop Services enabled.
- SID: S-1-5-<domain>-14 , display name Remote Interactive Logon . This group includes all users who connect to the computer by using a remote desktop connection. This group is a subset of the Interactive group. Access tokens that contain the Remote Interactive Logon SID also contain the Interactive SID.
For the Windows Server operating system, Remote Assistance is an optional component that isn't installed by default. You must install Remote Assistance before it can be used.
For details about the HelpAssistant account attributes, see the following table.
HelpAssistant account attributes
Defaultaccount.
The DefaultAccount account, also known as the Default System Managed Account (DSMA), is a well-known user account type. DefaultAccount can be used to run processes that are either multi-user aware or user-agnostic.
The DSMA is disabled by default on the desktop editions and on the Server operating systems with the desktop experience.
The DSMA has a well-known RID of 503 . The security identifier (SID) of the DSMA will thus have a well-known SID in the following format: S-1-5-21-\<ComputerIdentifier>-503 .
The DSMA is a member of the well-known group System Managed Accounts Group , which has a well-known SID of S-1-5-32-581 .
The DSMA alias can be granted access to resources during offline staging even before the account itself is created. The account and the group are created during first boot of the machine within the Security Accounts Manager (SAM).
How Windows uses the DefaultAccount
From a permission perspective, the DefaultAccount is a standard user account. The DefaultAccount is needed to run multi-user-manifested-apps (MUMA apps). MUMA apps run all the time and react to users signing in and signing out of the devices. Unlike Windows Desktop where apps run in context of the user and get terminated when the user signs off, MUMA apps run by using the DSMA.
MUMA apps are functional in shared session SKUs such as Xbox. For example, Xbox shell is a MUMA app. Today, Xbox automatically signs in as Guest account and all apps run in this context. All the apps are multi-user-aware and respond to events fired by user manager. The apps run as the Guest account.
Similarly, Phone auto logs in as a DefApps account, which is akin to the standard user account in Windows but with a few extra privileges. Brokers, some services and apps run as this account.
In the converged user model, the multi-user-aware apps and multi-user-aware brokers will need to run in a context different from that of the users. For this purpose, the system creates DSMA.
How the DefaultAccount is created on domain controllers
If the domain was created with domain controllers running Windows Server 2016, the DefaultAccount exists on all domain controllers in the domain. If the domain was created with domain controllers running an earlier version of Windows Server, the DefaultAccount is created after the PDC Emulator role is transferred to a domain controller that runs Windows Server 2016. The DefaultAccount is then replicated to all other domain controllers in the domain.
Recommendations for managing the Default Account (DSMA)
Microsoft doesn't recommend changing the default configuration, where the account is disabled. There's no security risk with having the account in the disabled state. Changing the default configuration could hinder future scenarios that rely on this account.
Default local system accounts
The SYSTEM account is used by the operating system and by services running under Windows. There are many services and processes in the Windows operating system that need the capability to sign in internally, such as during a Windows installation. The SYSTEM account was designed for that purpose, and Windows manages the SYSTEM account's user rights. It's an internal account that doesn't show up in User Manager, and it can't be added to any groups.
On the other hand, the SYSTEM account does appear on an NTFS file system volume in File Manager in the Permissions portion of the Security menu. By default, the SYSTEM account is granted Full Control permissions to all files on an NTFS volume. Here the SYSTEM account has the same functional rights and permissions as the Administrator account.
To grant the account Administrators group file permissions does not implicitly give permission to the SYSTEM account. The SYSTEM account's permissions can be removed from a file, but we do not recommend removing them.
NETWORK SERVICE
The NETWORK SERVICE account is a predefined local account used by the service control manager (SCM). A service that runs in the context of the NETWORK SERVICE account presents the computer's credentials to remote servers. For more information, see NetworkService Account .
LOCAL SERVICE
The LOCAL SERVICE account is a predefined local account used by the service control manager. It has minimum privileges on the local computer and presents anonymous credentials on the network. For more information, see LocalService Account .
How to manage local user accounts
The default local user accounts, and the local user accounts you create, are located in the Users folder. The Users folder is located in Local Users and Groups. For more information about creating and managing local user accounts, see Manage Local Users .
You can use Local Users and Groups to assign rights and permissions on only the local server to limit the ability of local users and groups to perform certain actions. A right authorizes a user to perform certain actions on a server, such as backing up files and folders or shutting down a server. An access permission is a rule that is associated with an object, usually a file, folder, or printer. It regulates which users can have access to an object on the server and in what manner.
You can't use Local Users and Groups on a domain controller. However, you can use Local Users and Groups on a domain controller to target remote computers that aren't domain controllers on the network.
You use Active Directory Users and Computers to manage users and groups in Active Directory.
You can also manage local users by using NET.EXE USER and manage local groups by using NET.EXE LOCALGROUP, or by using various PowerShell cmdlets and other scripting technologies.
Restrict and protect local accounts with administrative rights
An administrator can use many approaches to prevent malicious users from using stolen credentials such as a stolen password or password hash, for a local account on one computer from being used to authenticate on another computer with administrative rights. This is also called lateral movement .
The simplest approach is to sign in to your computer with a standard user account, instead of using the Administrator account for tasks. For example, use a standard account to browse the Internet, send email, or use a word processor. When you want to perform administrative tasks such as installing a new program or changing a setting that affects other users, you don't have to switch to an Administrator account. You can use User Account Control (UAC) to prompt you for permission or an administrator password before performing the task, as described in the next section.
The other approaches that can be used to restrict and protect user accounts with administrative rights include:
Enforce local account restrictions for remote access
Deny network logon to all local administrator accounts, create unique passwords for local accounts with administrative rights.
Each of these approaches is described in the following sections.
These approaches do not apply if all administrative local accounts are disabled.
User Account Control (UAC) is a security feature that informs you when a program makes a change that requires administrative permissions. UAC works by adjusting the permission level of your user account. By default, UAC is set to notify you when applications try to make changes to your computer, but you can change when UAC notifies you.
UAC makes it possible for an account with administrative rights to be treated as a standard user nonadministrator account until full rights, also called elevation, is requested and approved. For example, UAC lets an administrator enter credentials during a nonadministrator's user session to perform occasional administrative tasks without having to switch users, sign out, or use the Run as command.
In addition, UAC can require administrators to specifically approve applications that make system-wide changes before those applications are granted permission to run, even in the administrator's user session.
For example, a default feature of UAC is shown when a local account signs in from a remote computer by using Network logon (for example, by using NET.EXE USE). In this instance, it's issued a standard user token with no administrative rights, but without the ability to request or receive elevation. Consequently, local accounts that sign in by using Network logon can't access administrative shares such as C$, or ADMIN$, or perform any remote administration.
For more information about UAC, see User Account Control .
The following table shows the Group Policy and registry settings that are used to enforce local account restrictions for remote access.
You can also enforce the default for LocalAccountTokenFilterPolicy by using the custom ADMX in Security Templates.
To enforce local account restrictions for remote access
- Start the Group Policy Management Console (GPMC)
- In the console tree, expand < Forest >\Domains\< Domain >, and then Group Policy Objects where forest is the name of the forest, and domain is the name of the domain where you want to set the Group Policy Object (GPO)
- In the console tree, right-click Group Policy Objects > New
- In the New GPO dialog box, type < gpo_name >, and > OK where gpo_name is the name of the new GPO. The GPO name indicates that the GPO is used to restrict local administrator rights from being carried over to another computer
- In the details pane, right-click < gpo_name >, and > Edit
- Ensure that UAC is enabled and that UAC restrictions apply to the default Administrator account by following these steps:
- Navigate to the Computer Configuration\Windows Settings\Security Settings\Local Policies\, and > Security Options
- Double-click User Account Control: Run all administrators in Admin Approval Mode > Enabled > OK
- Double-click User Account Control: Admin Approval Mode for the Built-in Administrator account > Enabled > OK
- Ensure that the local account restrictions are applied to network interfaces by following these steps:
- Navigate to Computer Configuration\Preferences and Windows Settings , and > Registry
- Right-click Registry , and > New > Registry Item
- In the New Registry Properties dialog box, on the General tab, change the setting in the Action box to Replace
- Ensure that the Hive box is set to HKEY_LOCAL_MACHINE
- Select ( … ), browse to the following location for Key Path > Select for: SOFTWARE\Microsoft\Windows\CurrentVersion\Policies\System
- In the Value name area, type LocalAccountTokenFilterPolicy
- In the Value type box, from the drop-down list, select REG_DWORD to change the value
- In the Value data box, ensure that the value is set to 0
- Verify this configuration, and > OK
- Link the GPO to the first Workstations organizational unit (OU) by doing the following:
- Navigate to the *Forest*\<Domains>\*Domain*\*OU* path
- Right-click the Workstations > Link an existing GPO
- Select the GPO that you created, and > OK
- Test the functionality of enterprise applications on the workstations in that first OU and resolve any issues caused by the new policy
- Create links to all other OUs that contain workstations
- Create links to all other OUs that contain servers
Denying local accounts the ability to perform network logons can help prevent a local account password hash from being reused in a malicious attack. This procedure helps to prevent lateral movement by ensuring that stolen credentials for local accounts from a compromised operating system can't be used to compromise other computers that use the same credentials.
To perform this procedure, you must first identify the name of the local, default Administrator account, which might not be the default user name "Administrator", and any other accounts that are members of the local Administrators group.
The following table shows the Group Policy settings that are used to deny network logon for all local Administrator accounts.
To deny network logon to all local administrator accounts
- In the console tree, expand < Forest >\Domains\< Domain >, and then Group Policy Objects , where forest is the name of the forest, and domain is the name of the domain where you want to set the Group Policy Object (GPO)
- In the console tree, right-click Group Policy Objects , and > New
- In the New GPO dialog box, type < gpo_name >, and then > OK where gpo_name is the name of the new GPO indicates that it's being used to restrict the local administrative accounts from interactively signing in to the computer
- Configure the user rights to deny network logons for administrative local accounts as follows:
- Navigate to the Computer Configuration\Windows Settings\Security Settings\, and > User Rights Assignment
- Double-click Deny access to this computer from the network
- Select Add User or Group , type Local account and member of Administrators group , and > OK
- Configure the user rights to deny Remote Desktop (Remote Interactive) logons for administrative local accounts as follows:
- Navigate to Computer Configuration\Policies\Windows Settings and Local Policies, and then select User Rights Assignment
- Double-click Deny log on through Remote Desktop Services
- Link the GPO to the first Workstations OU as follows:
- Navigate to the < Forest >\Domains\< Domain >\OU path
- Right-click the Workstations OU, and > Link an existing GPO
You might have to create a separate GPO if the user name of the default Administrator account is different on workstations and servers.
Passwords should be unique per individual account. While it's true for individual user accounts, many enterprises have identical passwords for common local accounts, such as the default Administrator account. This also occurs when the same passwords are used for local accounts during operating system deployments.
Passwords that are left unchanged or changed synchronously to keep them identical add a significant risk for organizations. Randomizing the passwords mitigates "pass-the-hash" attacks by using different passwords for local accounts, which hamper the ability of malicious users to use password hashes of those accounts to compromise other computers.
Passwords can be randomized by:
- Purchasing and implementing an enterprise tool to accomplish this task. These tools are commonly referred to as "privileged password management" tools
- Configuring Local Administrator Password Solution (LAPS) to accomplish this task
- Creating and implementing a custom script or solution to randomize local account passwords
Was this page helpful?
Coming soon: Throughout 2024 we will be phasing out GitHub Issues as the feedback mechanism for content and replacing it with a new feedback system. For more information see: https://aka.ms/ContentUserFeedback .
Submit and view feedback for
Additional resources
Everything can be done automatically, as long as you configure it manually :-)
Configure ‘Allow logon locally’ automatically using PowerShell and Microsoft Intune
I know Microsoft Intune has the ability to configure this particular user rights assignment natively already. At time of writing, the new security baseline for Windows 11 23H2 in Intune configure this as well, restricting local logons to the built-in groups: Users and Administrators.
This solution does something else. This solution grabs the currently logged on user and configures the ‘ Allow logon locally ‘ policy to ONLY allow this very user as well as Administrators to be able to log on locally. A custom group is added as well for backup reasons. If no user is logged on, the script does nothing. More details down below.
The solution is made to prevent ‘stealing’ credentials from one user/device and be able to use it on another device within the same environment.
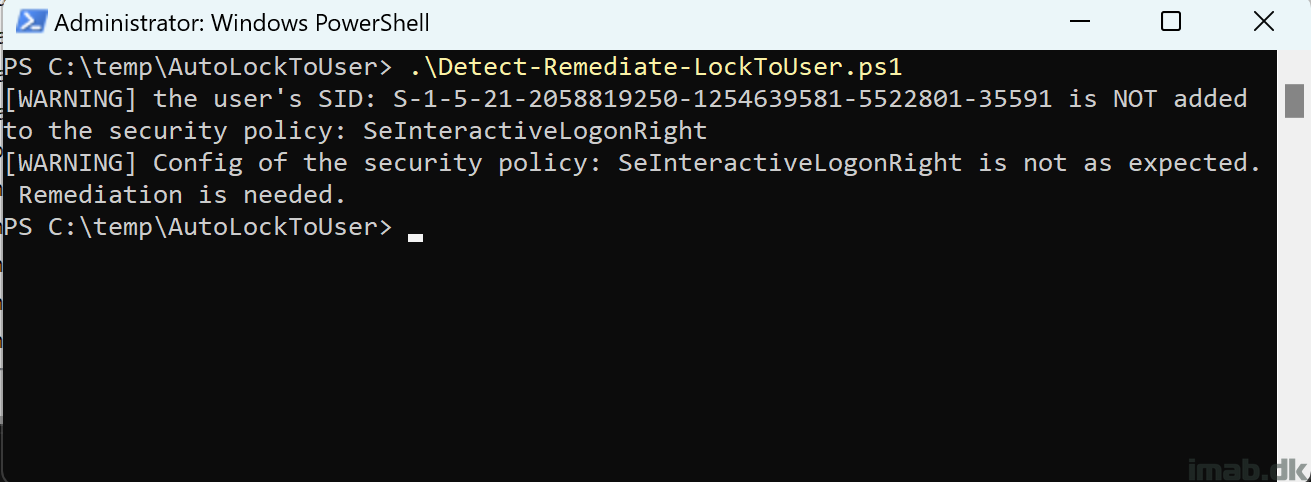
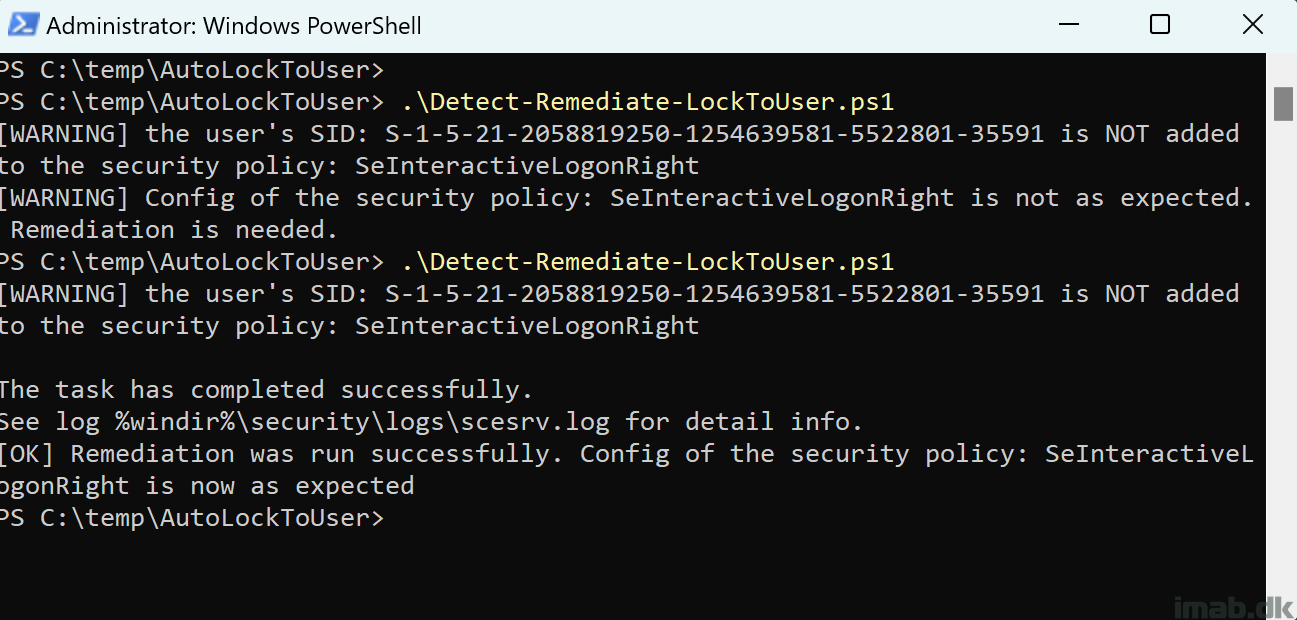
The script is located here on my GitHub repository: Proactive-Remediations/Detect-Remediate-LockToUser.ps1 at main · imabdk/Proactive-Remediations (github.com)
The script accepts 2 parameters: -runDetection and -runRemediation .
-runDetection
This portion of the script is detecting whether the logged on user is added to the ‘ Allow logon locally ‘ policy. If the user is not added, the script will exit with exit code 1, instructing Microsoft Intune to kick off the remediation script.
-runRemediation
This portion of the script will add the currently logged on user to the ‘ Allow logon locally ‘ policy, add the additional $trustedGroup as well as remove the built-in group Users .
- Edit the $trustedGroup variable to suit your needs. Again, this is done in a hybrid environment with an on-premises AD. I haven’t tested this with Entra ID identities or groups.
Detect-Remediate-LockToUser.ps1
In headlines, the script does following:
- Queries the explorer.exe for the logged on user(s)
- Exports the current SecPol configuration to C:\Windows\Temp\secedit.tmp
- Translates the logged on user(s) common name to the corresponding SID
- If SID is not found and runRemediation is set to $true a new SecPol configuration will be written to C:\Windows\Temp\secedit.tmp and imported
- Exit script gracefully to signal either success or failure to Intune
Microsoft Intune
Put the script to use with Microsoft Intune and the Remediation feature. The script comes a standalone script, but running this with Microsoft Intune and Remediation , requires 2 scripts.
The first script where -runDetection is set to $true and -runRemediation is to $false . The second script where both are set to $true.
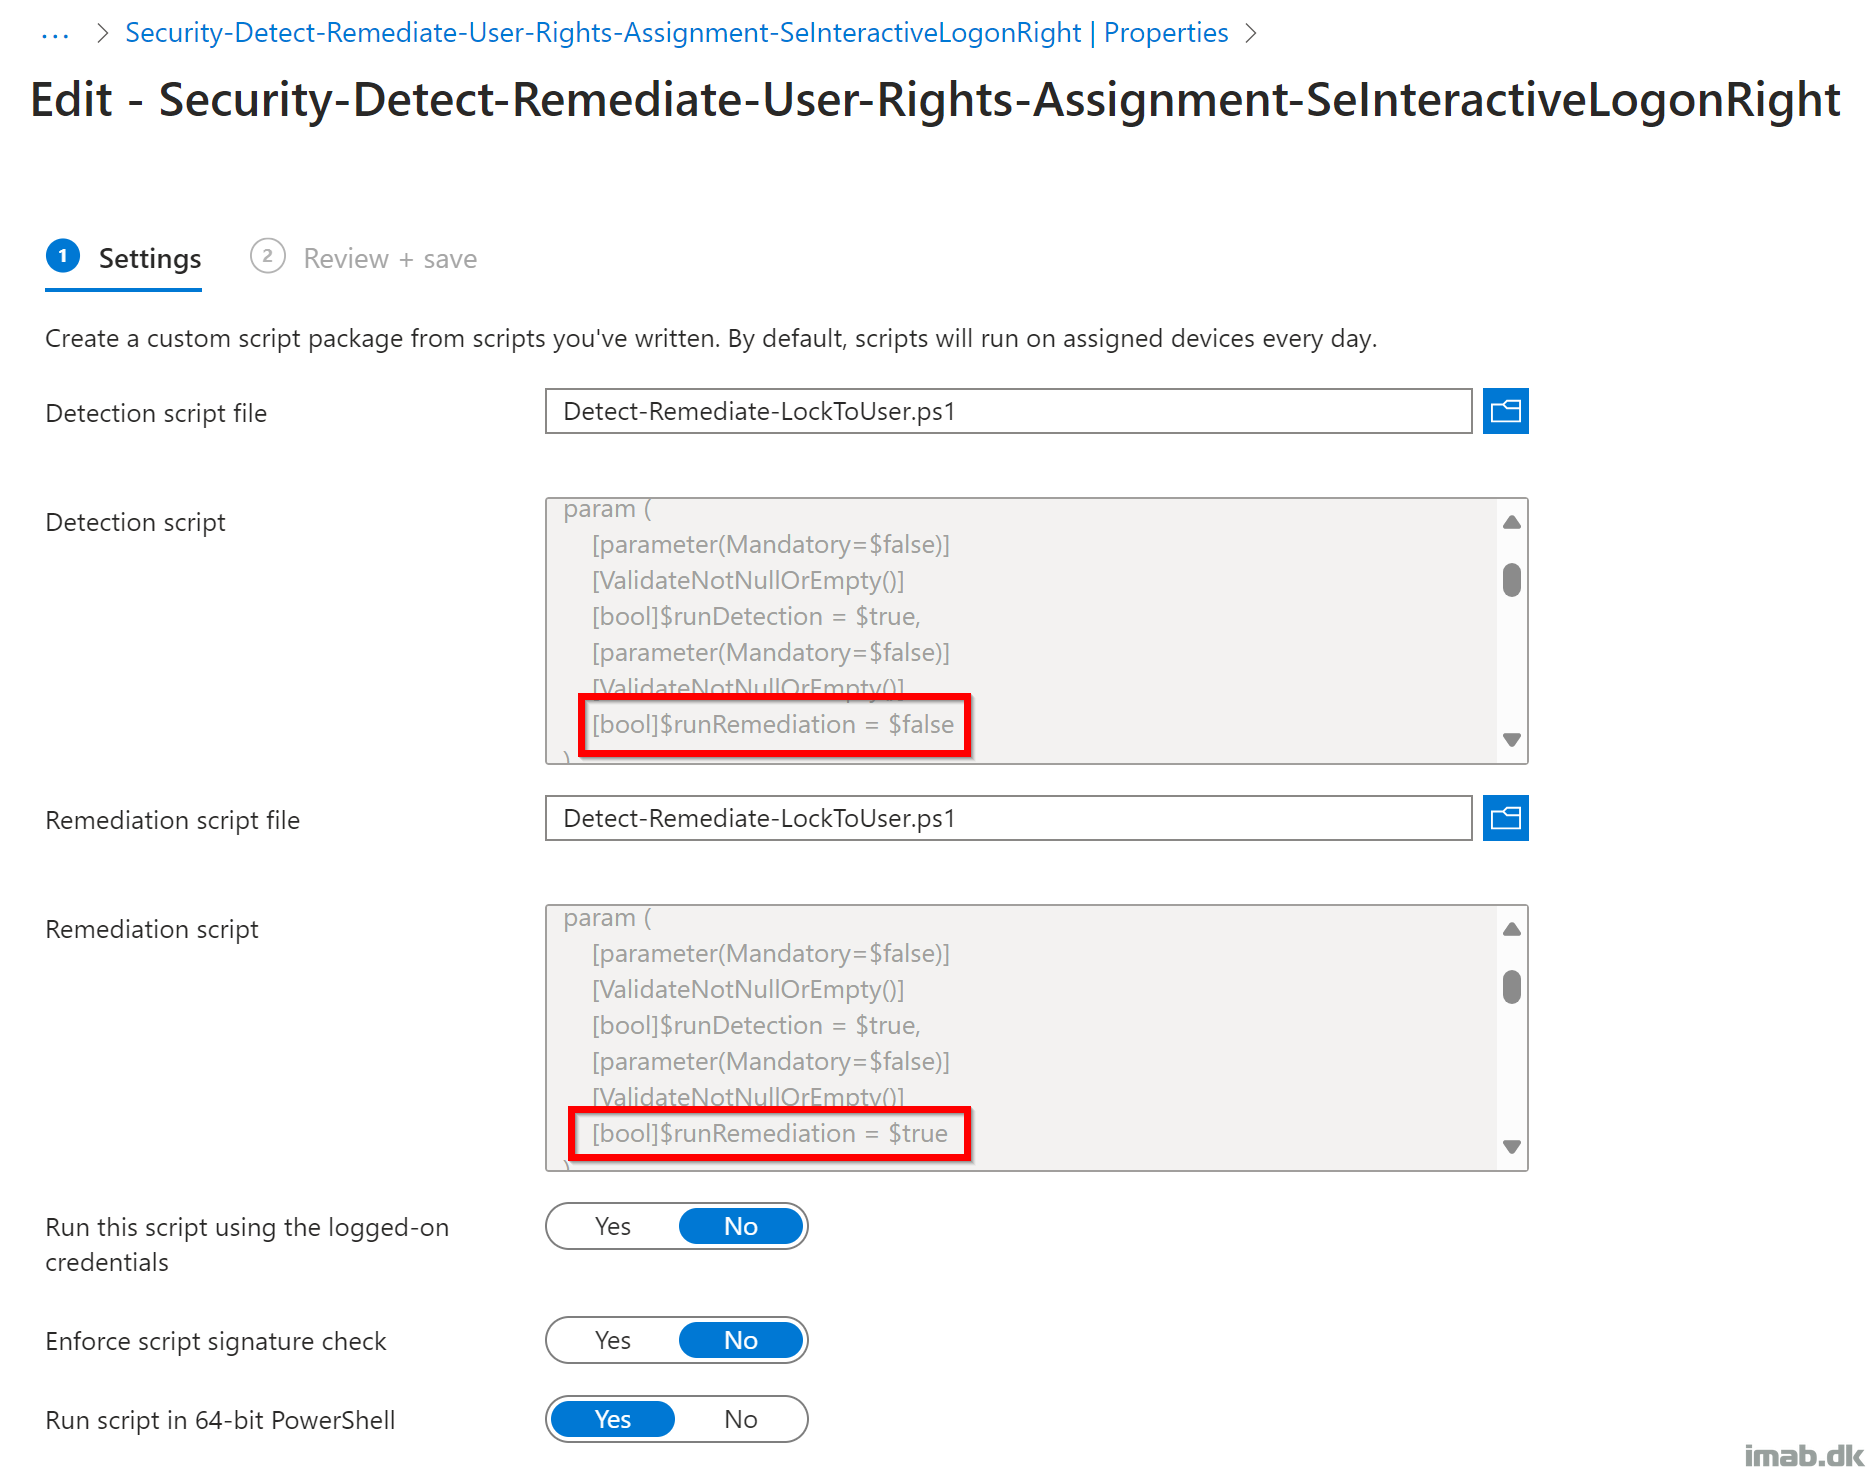
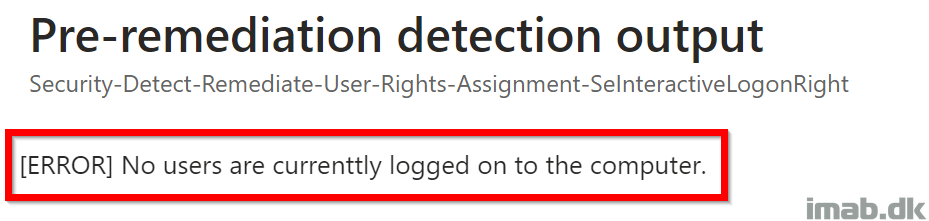
Device status
The script will output various status messages to Intune. This is useful when setting this up initially or troubleshooting.
The scripts are also logging their actions into C:\ProgramData\Microsoft\IntuneManagementExtension\Logs\ HealthScripts.log
Final words
Disclaimer: Test this thoroughly! I have only tested this with on-premises active directory identities. I cannot stress this enough. If something is acting up, you will not be able to logon to the device where this script has been run on. 🙂
Leave a Comment Cancel reply
This site uses Akismet to reduce spam. Learn how your comment data is processed .
- NIST 800-53
- Common Controls Hub
Windows Server 2019 Allow log on locally user right must only be assigned to the Administrators group.
IMAGES
VIDEO
COMMENTS
When you grant an account the Allow logon locally right, you are allowing that account to log on locally to all domain controllers in the domain. If the Users group is listed in the Allow log on locally setting for a GPO, all domain users can log on locally. The Users built-in group contains Domain Users as a member.
1 Press the Win + R keys to open Run, type secpol.msc into Run, and click/tap on OK to open Local Security Policy. 2 Expand open Local Policies in the left pane of Local Security Policy, and click/tap on User Rights Assignment. (see screenshot below step 3) 3 In the right pane of User Rights Assignment, double click/tap on the policy (ex: "Shut down the system") you want to add users and/or ...
1. Press the Win+R keys to open Run, type secpol.msc into Run, and click/tap on OK to open Local Security Policy. 2. Expand open Local Policies in the left pane of Local Security Policy, click/tap on User Rights Assignment, and double click/tap on the Allow log on locally policy in the right pane. (see screenshot below) 3.
Configure Allow log on locally user rights via Local Security Policy GUI. Follow the below steps to set Allow log on locally user rights via Local Security Policy. 1. Open the Run window by pressing ' Windows' + ' R' keys. 2. Type the command secpol.msc in the text box and click OK. 3. Now the Local Security Policy window will be open ...
Personal File Server - Get-UserRights.ps1 Alternative Download Link. or. Personal File Server - Get-UserRights.txt Text Format Alternative Download Link. In order to check the Local User Rights, you will need to run the above (Get-UserRights), you may copy and paste the above script in your Powershell ISE and press play.
User rights govern the methods by which a user can log on to a system. User rights are applied at the local device level, and they allow users to perform tasks on a device or in a domain. User rights include logon rights and permissions. Logon rights control who is authorized to log on to a device and how they can log on. User rights ...
However, users can still log on remotely through Remote Desktop Services if this group is added to the local policy Allow logon through Remote Desktop Services in the same GPO section. After changing the policy settings, it is not necessary to reboot the computer. Changes to user rights assignment of accounts will be applied the user logs on ...
undefined. User Rights Assignment is one of those meat and potatoes features of the operating system that we all have a cursory understanding of but rarely think about in depth. User rights include logon rights and permissions. Logon rights control who is authorized to log on to a device and how they can log on.
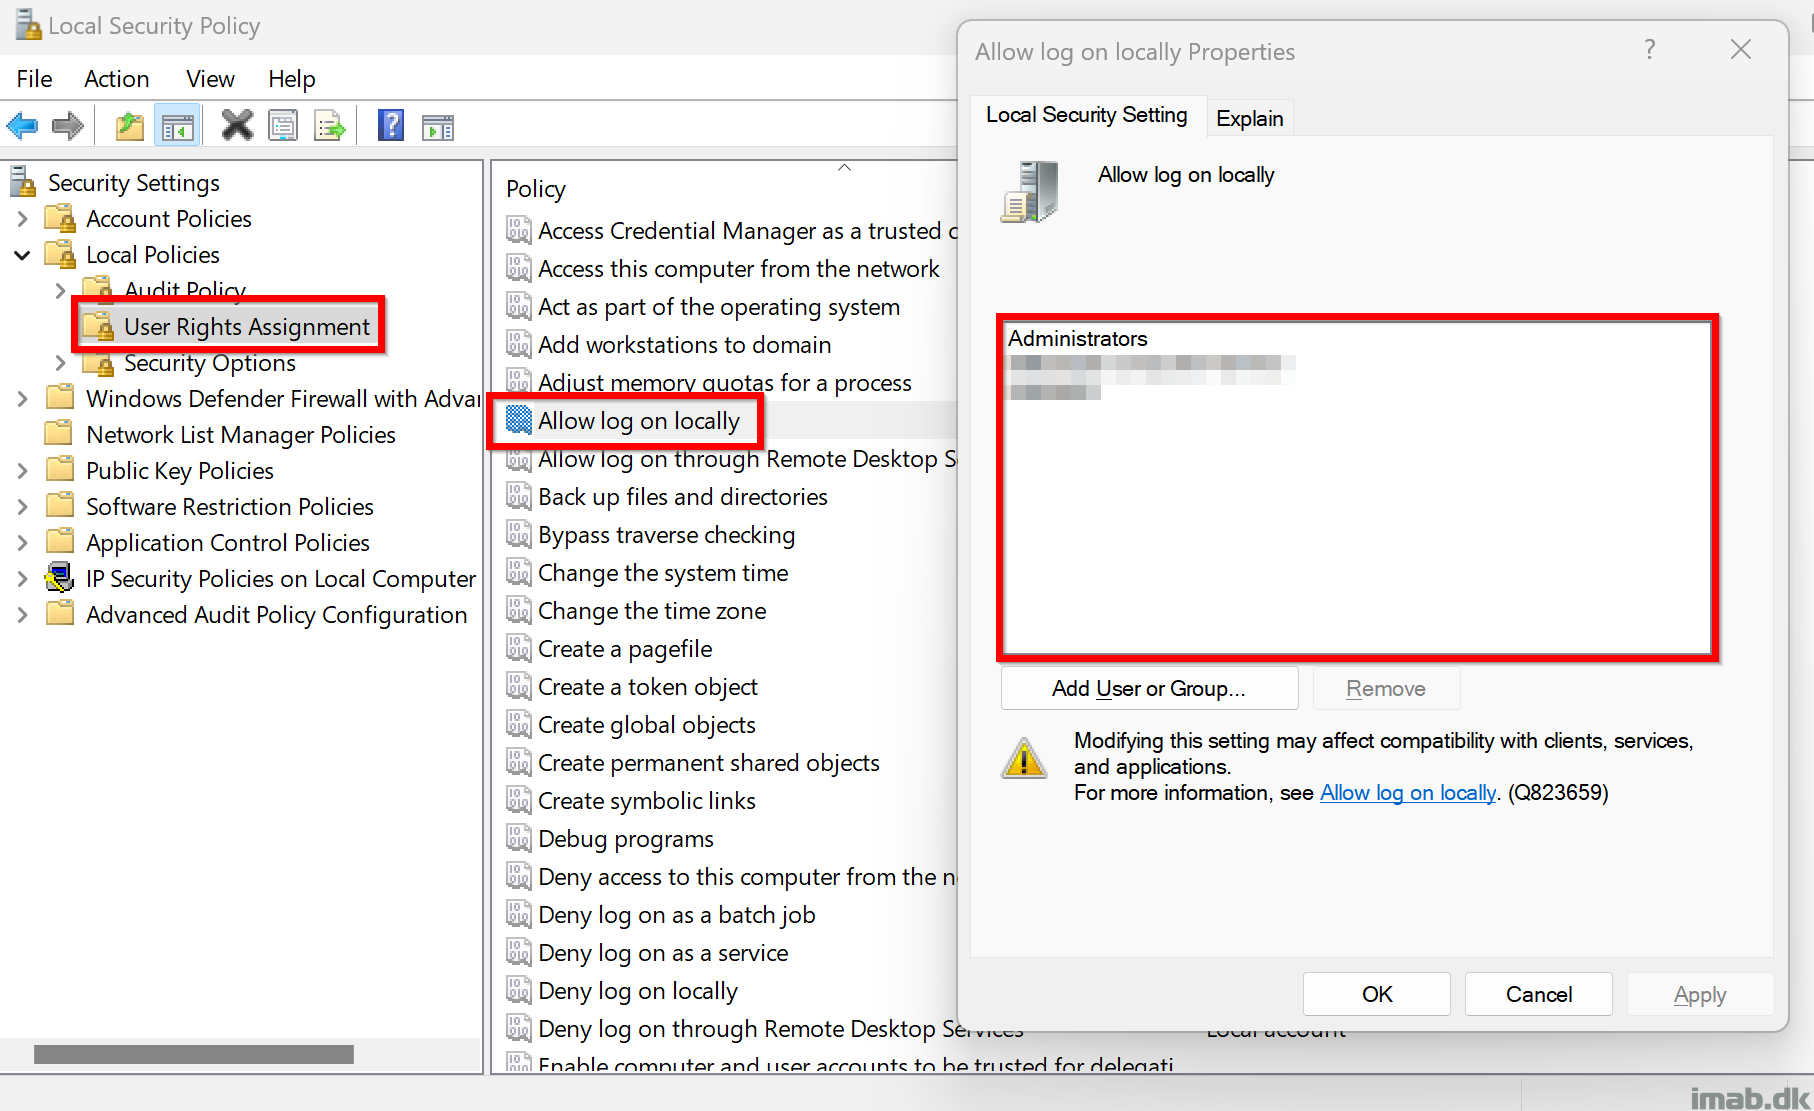
Deny log on locally. The "Deny log on locally" specifies the users or groups that are not allowed to log into the local computer. This policy can be found in Computer Configuration > Policies > Security Settings > Local Policies > User Rights Assignment > Deny log on locally. Deny log on locally Properties. In my example, I've created a ...
Go to User Local Policies -> User Rights Assignment. On the right, double-click on the policy Allow log on locally to change it. In the next dialog, click Add User or Group. Click on the Advanced button. Now, click on the Object Types button. Ensure that you have the Users and Groups items checked and click on the OK button.
Allow log on locally has nothing to do with local user accounts in the SAM. Only allow this right for user who you wish to be able to logon at the local keyboard and monitor of computer. Note that by default any user in the forest can logon to any workstation or member server because the local Users group includes Domain Users as a member.
Click Add settings and perform the following in Settings picker. Select User Rights as category. Select Allow Local Log On as setting. Specify the required users and local groups - all on separate lines - and click Next. Figure 2: Overview of the configuration of the required setting. On the Scope tags page, configure the required scope ...
Run "gpedit.msc". Navigate to Local Computer Policy >> Computer Configuration >> Windows Settings >> Security Settings >> Local Policies >> User Rights Assignment. If any groups or accounts other than the following are granted the "Allow log on locally" user right, this is a finding: Administrators. Users.
User rights assignments are settings applied to the local device. They allow users to perform various system tasks, such as local logon, remote logon, accessing the server from network, shutting down the server, and so on. In this section, I will explain the most important settings and how they should be configured.
Type the name of the account that you want to allow to log on locally. As an alternative, click Browse to locate the account with the Select Users, Computers, or Groups dialog box, and then click OK. After you have the account name entered, click OK in the Add User or Group dialog box, and then click OK in the Allow log on locally Properties ...
Logon rights; Admin equivalent rights; Tracking user rights with the security log; User rights in-depth; Access this computer from the network; Act as part of the operating system; Add workstations to domain; Adjust memory quotas for a process; Allow log on locally; Allow logon through Terminal Services; Back up files and directories; Bypass ...
User rights are applied at the local computer level, and they allow users to perform tasks on a computer or in a domain. User rights include logon rights and permissions. Logon rights control who is authorized to log on to a computer and how they can log on. User rights permissions control access to computer and domain resources, and they can ...
When you grant an account the Allow logon locally right, you are allowing that account to log on locally to all domain controllers in the domain. If the Users group is listed in the Allow log on locally setting for a GPO, all domain users can log on locally. The Users built-in group contains Domain Users as a member.
1. Press the Win+R keys to open Run, type secpol.msc into Run, and click/tap on OK to open Local Security Policy. 2. Expand open Local Policies in the left pane of Local Security Policy, click/tap on User Rights Assignment, and double click/tap on the Deny log on locally policy in the right pane. (see screenshot below) 3.
Run "gpedit.msc". Navigate to Local Computer Policy >> Computer Configuration >> Windows Settings >> Security Settings >> Local Policies >> User Rights Assignment. If any accounts or groups other than the following are granted the "Allow log on locally" user right, this is a finding. - Administrators.
If you edit the Default Policies you remove all of the default permissions. Computer Configuration -> Policies -> Windows Settings -> Security Settings -> Local Policies. User Rights Assignment. Double Click on Allow Log On Locally and add your users. Share.
Navigate to the Computer Configuration\Windows Settings\Security Settings\, and > User Rights Assignment. Double-click Deny access to this computer from the network. Select Add User or Group, type Local account and member of Administrators group, and > OK.
I know Microsoft Intune has the ability to configure this particular user rights assignment natively already. At time of writing, the new security baseline for Windows 11 23H2 in Intune configure this as well, restricting local logons to the built-in groups: Users and Administrators.. This solution does something else. This solution grabs the currently logged on user and configures the ...
Verify the effective setting in Local Group Policy Editor. Run "gpedit.msc". Navigate to Local Computer Policy >> Computer Configuration >> Windows Settings >> Security Settings >> Local Policies >> User Rights Assignment. If any accounts or groups other than the following are granted the "Allow log on locally" user right, this is a finding: