

7. 3D models
When you start creating 3D Models, you should be familiar with these terms:
- Part – a single component or body that you are designing
- Dimension – a constraint applied to edge length or surface size
- Assembly – an arrangement of parts to form a construction
- CAD – Computer Aided Design
Types of 3D models
There are two types of 3D models that you might like to design:
- Geometric models — components made entirely from lines, shapes and extrusions
- Organic models — involve using curves to sculpt a mesh to a desired form.
Geometric models are typically used for engineering and construction applications, while organic models are used in 3D animations and industrial design. A combination of both types is also possible.
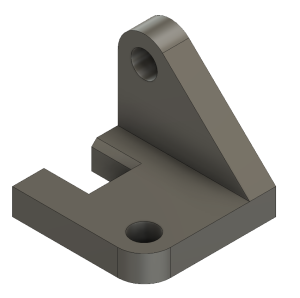
Designing a 3D model for your assignment
Use this strategy to approach the design of a 3D model:
- Draw a rough sketch of the part with pencil and paper
- Annotate your sketch with dimensions, constraints or other key features
- Plan steps to convert your drawing to a digital model (e.g. sketch, extrude, fillet, etc…)
- Apply these steps in your 3D modelling software
- Refine your model according to other details from your sketch
- Verify that all dimensions and constraints were correctly applied.
Prepare your model for 3D printing
3D modelling software can export your model in a variety of formats. Depending on how or where you 3D print your model, these formats are typically used:
- A stereolithography file (.STL)
- A Wavefront 3D model file (.OBJ)
Steps for exporting your model in these formats are generally found in the help pages of the software you are using.
3D modelling software
Use of 3D modelling software largely depends on the model you are trying to create. If you are creating:
- a geometric engineering component, CAD software is usually the best option
- an organic model for 3D animation, then 3D modelling software is best.
Get more information on 3D modelling tools .
3D Photogrammetry software
Photogrammetry software is a very useful tool for constructing 3D Models from photographs. This can be done with photos from a phone or digital camera, and then the software’s algorithms do all the work. Visit 3D Photogrammetry tools for more information.
Ways to get 3D models
3D modelling can be used in a variety of ways. You can upload a 3D model for online interaction, 3D printing, animation or for use within VR/AR applications.
You can get a 3D model via:
- CAD or 3D Modelling software — 3D Models can be created from scratch using this software
- Photogrammetry — construct 3D models from photographs at the click of a button using specialised software
- MRI/CT Scan Conversion — extract a 3D model from any CT Scan or MRI data
- 3D Scanning — scanning an object with a 3D scanner
- Online Collections — download an online 3D model
Examples of 3D models you can create using photogrammetry. Press the play buttons to interact with each model:
Trilobite 3D model
Trilobite by Nick Wiggins on Sketchfab
Kangaroo Cranium 3D Model
Kangaroo Cranium by Nick Wiggins on Sketchfab
Model of sculpture ‘A student’s head’ 3D Model
Model of sculpture ‘A student’s head’ by The University of Queensland Library on Sketchfab
Find existing 3D models
Find designs to download and use under a Creative Commons Licence from:
- Thingiverse — a MakerBot website for sharing 3D models
- Yeggi — 3D model search engine
- NIH 3D Print Exchange — a collection biomedical 3D models that include, anatomy objects, proteins, cells and tissues
Museum collections
Some museums are now making parts of their collections available as scans for home 3D printing:
- British Museum Exhibits on Sketchfab
- The New York Metropolitan Museum of Art on Thingiverse
- Smithsonian
Types of Assignments Copyright © 2023 by The University of Queensland is licensed under a Creative Commons Attribution-NonCommercial 4.0 International License , except where otherwise noted.
Share This Book
Una's Blog
Ulster University Animation Student Blog
Assignment 1 – Introduction to 3D Modelling – 7th March – 50% – Complete Compilation Post
ASSIGNMENT 1 – Introduction to 3D Modelling – 7 th March – 50%
(compilation post of all work and references during assignment 1 ), week 1 – module introduction:.
We were introduced to the new semester and given our next modules that we would be working on. We would be focusing on 3D Digital Literacy and Animated Narratives. We were given our first assignment due for the 5th of March, where we will have to Model, UV unwrap, texture and real-time render one of the following:
- Mantel Clock
- Treasure chest & treasure
- Sword & shield
- Sci-Fi door
- Magic Witch / Wizard Staff
I am most drawn to the sword and shield or the wizard staff as I think I could create an interesting design for one of these.
I had begun the research for this assignment by looking at the 3D staffs made by other 3D modellers on Sketchfab and seeing how they designed their staffs. I was looking for inspiration in order figure out what kind of staff I wanted to create as well as how to go about designing each part.
I created an Inspiration List on Sketchfab with my favourite or the most unique designs that I found: https://sketchfab.com/unamaciver/collections/staff-inspo
I was most inspired by Meltem Ozceliks Star Staff design here: https://skfb.ly/6UxDR
as well as Marlena Bayer’s Staff of Eternity design: https://skfb.ly/6XUoo
I then decided to start brainstorming and do some really rough concept sketches of potential staff designs and elements to include for my assignment model:

I continued drawing and designing more ideas for my staff for the first assignment. I began looking at staffs and weapon designs from various media and video-games.
One of my main inspirations was Final Fantasy X, an RPG game, where one of the main characters has a staff that changes design throughout the game.

I also looked at Okami, another video game, for its weapons and world designs. I love the art and style of the game and wanted to perhaps create a staff that could be found in the game.

Tsukuyomi from Okami, as modelled by daemongrave on SketchFab: https://sketchfab.com/3d-models/tsukuyomi-28197e3ae5e0480b980318db002658eb
I also looked at various staff designs and 3D artists that further helped me in my staff model concept design:

I also looked at the work of artists:
- Adrien Chan: https://www.artstation.com/artwork/1nGyxe
- M. Barutcu: https://www.artstation.com/artwork/xzwWB4
- Nathan Mulhollen: https://www.artstation.com/artwork/Aqwbzo
- Annie Boudaghain: https://www.artstation.com/artwork/8nROn
- Ayhan Ayogan: https://www.artstation.com/artwork/amoNq
These are my cleaned-up staff designs that I came up with that I liked most!:

STAFF DESIGN
For Assignment 1, I continued making progress on finalising my staff design this week and refining this further. I wanted to make a staff that could be found in a video-game like my primary references and inspiration, yet I did not want to just copy a staff and remake it instead designing my own ideas to it. I considered making a dragon staff, however I believed this would be too difficult for someone at my modelling level and I thought I wasn’t as unique as I would like for my design. I really liked the elements of the Shinto religion in Okami, and so I wanted to incorporate parts of that into staffs the final design, whilst keeping some of the fantastical designs found in weapons in Final Fantasy.

The final staff design I am working on consists of a basic staff pole with a decorative hilt and a moon and sun at the head. Tied around the centre of the pole is a Yoshiro shimenawa rope, and hanging from the staff is a lantern with mala beads and an ofuda (paper slip).

I collected the previous image references that had elements that I wanted to include in my final staff design. I tried to look at mostly objects and crafts that could be found in real life and then used those to make a magical staff for a wizard or mage.
FINAL CONCEPT DESIGN FOR STAFF:

I made a quick line art concept sketch of my final staff from the front and side to understand how it will look the entire way around in 3D. After having finished this, I was able to finally begin modelling my staff on Maya.

I am still very new to modelling and using 3D software and am finding it difficult to create my designs from basic shapes such as cubes, spheres and cylinders how I want to, however the following YouTube tutorials on Maya have been extremely helpful in the creation of my staff model.
The Game Dev Academy tutorials especially have been really useful in helping me learn how to modify and sculpt my staff model., as well as a few other videos I have also looked at.
- How to Model A Sword in Autodesk Maya & Substance Painter (Complete Workflow) | Maya Weapon Modeling: https://youtu.be/xH6L1sFpgAw
- Speed Modeling | Priestess Staff from Goblin Slayer | Maya 2019: https://youtu.be/Qh_0pES7CNU
My model currently looks a bit bare and simple, however as I continue to refine the details and shapes, I hope I can create something that I can be proud of as a 3D modelling beginner.
This week I continued working on assignment 1, completing my model.
I had a call with Michael O’Callaghan from Oaken Studios (https://www.oakenstudios.com/) who looked at my staff model and helped show me ways to create my staff model more efficiently and effectively by using simple model shapes and showing me step by step how he would go about creating the parts of my model. This was incredibly useful for parts of my model like the bottom of the staff and the bow which were more complicated steps I was less sure on how to create.
These are screenshots of Michael’s process making parts of my staff, which I then followed myself.

He also gave me tips on how I could have made other parts of my staff such as the moon in different ways which improved my understanding and techniques using Maya a lot. I found this session extremely helpful, especially by finding out ways to create parts of my staff design much faster and easier than how I was going about creating each part.
After this talk and over the weekend, I understood how to complete my model and was able to create the bow, hilt and tassel, as well as fix up other parts of my model. I cleaned up my mesh, removing any ngons that were visible and fixed imperfections in the modelling.

However, I unfortunately found that my staff had certain mistakes that I was not sure how to correct without having to delete and completely remodel parts of the staff, such as ngons that had appeared when extruding and warping the model parts. I did not have the time to do this, but thankfully most of these mistakes are not visible. In future, however, if I was animating or sending the staff professionally and had the time, I would have recreated the staff.

I was struggling to make the cloud part of my staff, however, Jodie was able to call me and show me on discord techniques they had learned in their tutorials for how I could draw vertices on a cube, and then delete the extra parts and then extrude the faces.

Thus I completed my model.
I looked at a few reference videos on YouTube to help me when completing the UV mapping and exporting of my staff.
Reference Videos:
UV Mapping Fastest and Easiest Way in Maya 2018: https://youtu.be/cy1vqLw-agk
I also had a one-on-one tutorial with Henry to help with my assignment also. This was really helpful as he looked over my model, and liked it. He suggested ways on how to export it and to put it into a UV island and import it as units.
UV Mapping my model was probably the most difficult part of the process but after completing the tasks Alec had set to us and being able to rewatch the lectures, I was able to fully UV map my entire model in order to texture it.

Final UV Mapping:

Substance Painter:
Initially I had to upload my model to Substance Painter and bake the mesh. Then I added a couple of smart materials to give the overall staff a texture. I added masked and aterial colour selector to choose specific parts of my staff to texture. I also went onto substance share where I could download specific smart materials for silk and painted wood.

After completely texturing my staff, I then painted into it to added shadows and smaller details.
I primarily followed Alec’s video lectures to texture my staff, however I did also look at other YouTube tutorials to follow, so I could learn how to add different effects. I used the following videos as reference:
- Old Beer Mug – Beginner’s guide to stylized texturing in Substance Painter: https://www.youtube.com/watch?v=kDzM_QwwNPY
Substance Painter Emissive maps: https://youtu.be/agrPbueG1Kw
- Substance Painter Beginner Tutorial : Emissive Materials: https://www.youtube.com/watch?v=kNpQ_wkEy8o
I followed the emissive tutorial which gave me the effect of my staffs lantern glowing, which I found really cool! However the emission would not load onto Sketchfab when I exported it unfortunately.

For my staff colours, I lboth used the natural colours I found on the references but also looked at the designs in Overwatch which varied between the designs and colours in skins. I was mostly inspired by Genji’s Oni and Blackwatch skins and wanted to use a similar colour scheme for my staff.

After finishing up on the texture on my staff, I was completely finished with my Staff model and then exported and uploaded it to Sketchfab.

FINAL MODEL – Moon Staff
https://sketchfab.com/3d-models/moon-staff-78b10195746a4f5f89ca799be8b0305b
For this assignment I modelled, UV unwrapped, textured and real-time rendered a Magic Witch / Wizard Staff. I designed and practiced using referencing images and creating my own concept from reference; 3D Modeling Techniques; UV unwrapping; Using basic materials & textures; Real-time rendering in my model in Sketchfab.
As a novice to 3D modelling and the programs, I think completing this assignment really helped me to understand how to model, use references, and figure out how to use programs like Maya and Substance Painter. In the beginning I spent a very long time figuring out the tools and techniques to model and had never before attempted to 3D model, so I have improved a lot from the start of the semester.
I believe the parts of the assignment I did well were modelling an intricate object for the first time. I made a 3D model just how I imagined in my concept design. I heavily used references and other 3D artists and their work in order to learn as much as possible when undergoing this assignment. I learnt how to use smart materials, layers and advanced modelling as well as UV mapping.
Some mistakes I made when creating my model were having too many triangles and vertices in the final model, and a couple of ngons I couldn’t fix without having to completely remodel the entire staff, which would not be acceptable at industry level. I also was unable to export the emission glow effect I had created in Substance Painter. I believe I could have been more precise UV Mapping the model as well as fix a couple of imperfections in the model.
If I could change or remake the model again, I think I would be more accurate in modelling to make it as low poly as possible, with fewer triangles, vertices, edges and have no ngons. I would also further my knowledge of modelling in Maya and Substance Painter by learning more about vertex manipulation and sculpting with curves, as well as watching even more tutorials on various techniques I could use to improve.
In conclusion, as someone who had only begun using 3D art programs just more than a month ago, I think I successfully created a good model that made me learn so much in the time creating it and am happy with the outcome and proud of my progress. Overall, I think my model is well made to me as my first complete 3D model.

Assignment 1 -Introduction to 3D Modelling – 7 th March – 50%
For this assignment I modelled, UV unwrapped, textured and real-time rendered a Magic Witch / Wizard Staff. In this assignment I also designed and practiced using referencing images and creating my own concept from references.
- Blog Link : https://blogs.ulster.ac.uk/unamaciver/2021/03/07/assignment-1-complete-compilation/
Portfolio Page:
- SketchFab Link : https://sketchfab.com/3d-models/moon-staff-78b10195746a4f5f89ca799be8b0305b
Maya Scene Files:
- Google Drive Link: https://drive.google.com/drive/folders/1cUax0SGuE4QHmWbko2Pmn92RrQsuqrXz
- Final Model Drive Link: https://drive.google.com/drive/folders/1odY-QFfAB6t6eidVlXS3415wLNNnfYPx
Leave a Reply Cancel reply
Your email address will not be published. Required fields are marked *
Save my name, email, and website in this browser for the next time I comment.

Sign In or Create Account
Forgot password.
If you don't receive the email within an hour (and you've checked your Spam folder), email us as [email protected].
Assignment 3d models


Want to create or adapt books like this? Learn more about how Pressbooks supports open publishing practices.
7. 3D models
When you start creating 3D models, it’s helpful to be familiar with these terms:
- Part – a single component or body that you are designing
- Dimension – a constraint applied to edge length or surface size
- Assembly – an arrangement of parts to form a construction
- CAD – Computer Aided Design
Types of 3D models
There are two types of 3D models that you might like to design:
- Geometric models — components made entirely from lines, shapes and extrusions
- Organic models — involve using curves to sculpt a mesh to a desired form.
Geometric models are typically used for engineering and construction applications, while organic models are used in 3D animations and industrial design. A combination of both types is also possible.
Designing a 3D model for your assignment
Use this strategy to approach the design of a 3D model:
- Draw a rough sketch of the part with pencil and paper
- Annotate your sketch with dimensions, constraints or other key features
- Plan steps to convert your drawing to a digital model (e.g. sketch, extrude, fillet, etc…)
- Apply these steps in your 3D modelling software
- Refine your model according to other details from your sketch
- Verify that all dimensions and constraints were correctly applied.
Prepare your model for 3D printing
3D modelling software can export your model in a variety of formats. Depending on how or where you 3D print your model, these formats are typically used:
- A stereolithography file (.STL)
- A Wavefront 3D model file (.OBJ)
Steps for exporting your model in these formats are generally found in the help pages of the software you are using.
3D modelling software
Use of 3D modelling software largely depends on the model you are trying to create. If you are creating:
- a geometric engineering component, CAD software is usually the best option
- an organic model for 3D animation, then 3D modelling software is best.
Get more information on 3D modelling tools .
3D Photogrammetry software
Photogrammetry software is a very useful tool for constructing 3D Models from photographs. This can be done with photos from a phone or digital camera, and then the software’s algorithms do all the work. Visit 3D Photogrammetry tools for more information.
Ways to get 3D models
3D modelling can be used in a variety of ways. You can upload a 3D model for online interaction, 3D printing, animation or for use within VR/AR applications.
You can get a 3D model via:
- CAD or 3D Modelling software — 3D models can be created from scratch using this software
- Photogrammetry — construct 3D models from photographs at the click of a button using specialised software
- MRI/CT Scan Conversion — extract a 3D model from any CT Scan or MRI data
- 3D Scanning — scanning an object with a 3D scanner
- Online Collections — download an online 3D model
Example of a 3D model you can create using photogrammetry. Press the play button to interact with the model:
Kangaroo Cranium 3D Model
Kangaroo Cranium by Nick Wiggins on Sketchfab
Find existing 3D models
Find designs to download and use under a Creative Commons Licence from:
- Thingiverse — a MakerBot website for sharing 3D models
- Yeggi — 3D model search engine
- NIH 3D Print Exchange — a collection biomedical 3D models that include, anatomy objects, proteins, cells and tissues
Museum collections
Some museums are now making parts of their collections available as scans for home 3D printing:
- British Museum Exhibits on Sketchfab
- The New York Metropolitan Museum of Art on Thingiverse
- Smithsonian
Digital Skills: Assignment Essentials Copyright © 2024 by Charles Sturt University is licensed under a Creative Commons Attribution-NonCommercial 4.0 International License , except where otherwise noted.
Share This Book
Browse Course Material
Course info.
- Lorena Bello Gomez
Departments
- Architecture
As Taught In
- Architectural Design
- Environmental Design
Learning Resource Types
Introduction to architecture & environmental design, assignment 1.3 human scale: 3d model.
This resource contains information related to Human Scale: 3D Model.

You are leaving MIT OpenCourseWare
Assignment Model | Linear Programming Problem (LPP) | Introduction
What is assignment model.
→ Assignment model is a special application of Linear Programming Problem (LPP) , in which the main objective is to assign the work or task to a group of individuals such that;
i) There is only one assignment.
ii) All the assignments should be done in such a way that the overall cost is minimized (or profit is maximized, incase of maximization).
→ In assignment problem, the cost of performing each task by each individual is known. → It is desired to find out the best assignments, such that overall cost of assigning the work is minimized.
For example:
Suppose there are 'n' tasks, which are required to be performed using 'n' resources.
The cost of performing each task by each resource is also known (shown in cells of matrix)
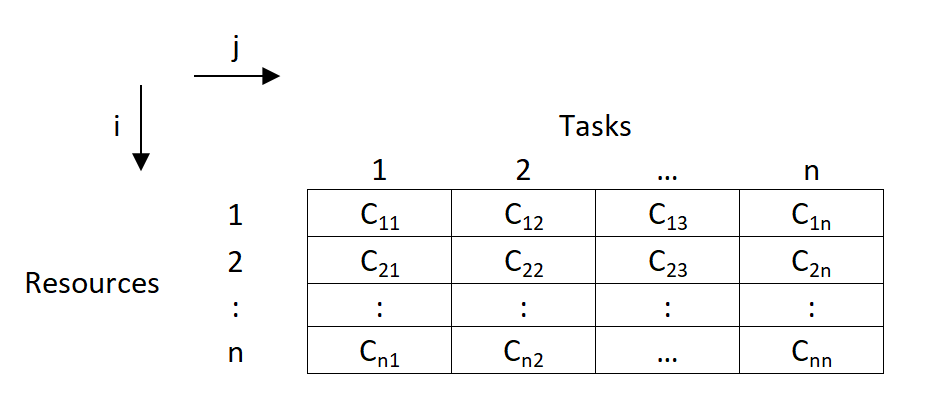
- In the above asignment problem, we have to provide assignments such that there is one to one assignments and the overall cost is minimized.
How Assignment Problem is related to LPP? OR Write mathematical formulation of Assignment Model.
→ Assignment Model is a special application of Linear Programming (LP).
→ The mathematical formulation for Assignment Model is given below:
→ Let, C i j \text {C}_{ij} C ij denotes the cost of resources 'i' to the task 'j' ; such that

→ Now assignment problems are of the Minimization type. So, our objective function is to minimize the overall cost.
→ Subjected to constraint;
(i) For all j t h j^{th} j t h task, only one i t h i^{th} i t h resource is possible:
(ii) For all i t h i^{th} i t h resource, there is only one j t h j^{th} j t h task possible;
(iii) x i j x_{ij} x ij is '0' or '1'.
Types of Assignment Problem:
(i) balanced assignment problem.
- It consist of a suqare matrix (n x n).
- Number of rows = Number of columns
(ii) Unbalanced Assignment Problem
- It consist of a Non-square matrix.
- Number of rows ≠ \not= = Number of columns
Methods to solve Assignment Model:
(i) integer programming method:.
In assignment problem, either allocation is done to the cell or not.
So this can be formulated using 0 or 1 integer.
While using this method, we will have n x n decision varables, and n+n equalities.
So even for 4 x 4 matrix problem, it will have 16 decision variables and 8 equalities.
So this method becomes very lengthy and difficult to solve.
(ii) Transportation Methods:
As assignment problem is a special case of transportation problem, it can also be solved using transportation methods.
In transportation methods ( NWCM , LCM & VAM), the total number of allocations will be (m+n-1) and the solution is known as non-degenerated. (For eg: for 3 x 3 matrix, there will be 3+3-1 = 5 allocations)
But, here in assignment problems, the matrix is a square matrix (m=n).
So total allocations should be (n+n-1), i.e. for 3 x 3 matrix, it should be (3+3-1) = 5
But, we know that in 3 x 3 assignment problem, maximum possible possible assignments are 3 only.
So, if are we will use transportation methods, then the solution will be degenerated as it does not satisfy the condition of (m+n-1) allocations.
So, the method becomes lengthy and time consuming.

(iii) Enumeration Method:
It is a simple trail and error type method.
Consider a 3 x 3 assignment problem. Here the assignments are done randomly and the total cost is found out.
For 3 x 3 matrix, the total possible trails are 3! So total 3! = 3 x 2 x 1 = 6 trails are possible.
The assignments which gives minimum cost is selected as optimal solution.
But, such trail and error becomes very difficult and lengthy.
If there are more number of rows and columns, ( For eg: For 6 x 6 matrix, there will be 6! trails. So 6! = 6 x 5 x 4 x 3 x 2 x 1 = 720 trails possible) then such methods can't be applied for solving assignments problems.
(iv) Hungarian Method:
It was developed by two mathematicians of Hungary. So, it is known as Hungarian Method.
It is also know as Reduced matrix method or Flood's technique.
There are two main conditions for applying Hungarian Method:
(1) Square Matrix (n x n). (2) Problem should be of minimization type.
Suggested Notes:
Modified Distribution Method (MODI) | Transportation Problem | Transportation Model
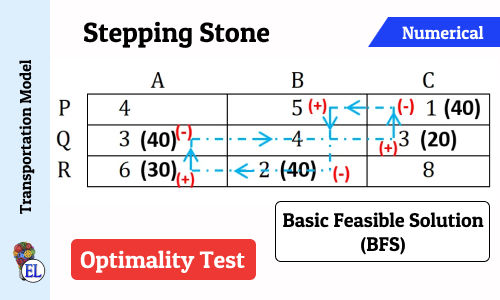
Stepping Stone | Transportation Problem | Transportation Model
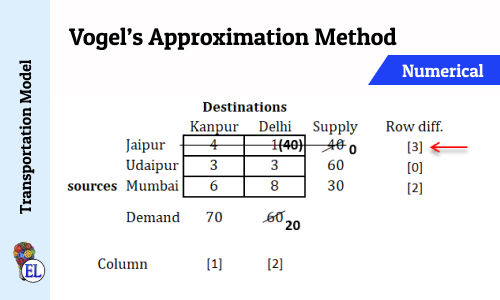
Vogel’s Approximation Method (VAM) | Method to Solve Transportation Problem | Transportation Model
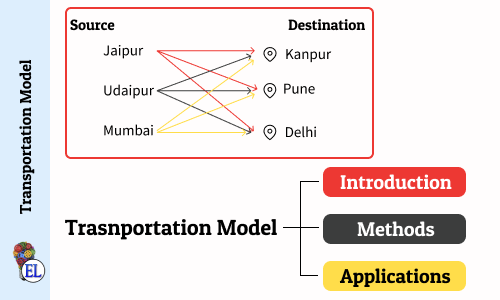
Transportation Model - Introduction
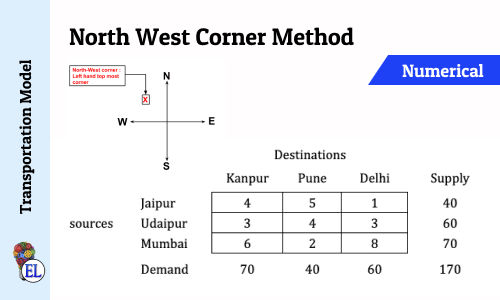
North West Corner Method | Method to Solve Transportation Problem | Transportation Model
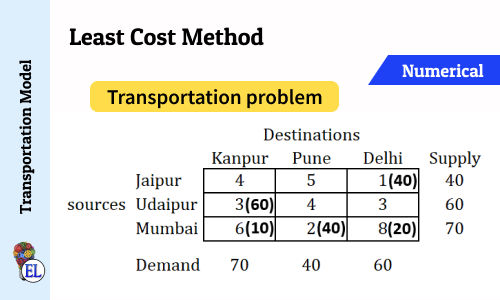
Least Cost Method | Method to Solve Transportation Problem | Transportation Model
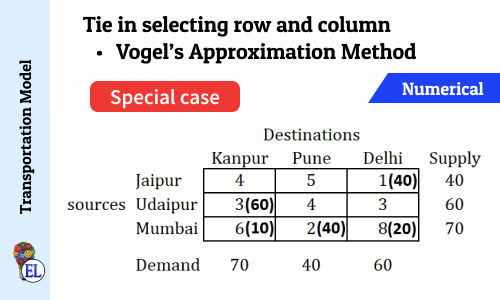
Tie in selecting row and column (Vogel's Approximation Method - VAM) | Numerical | Solving Transportation Problem | Transportation Model
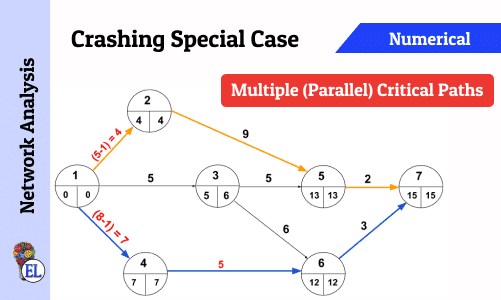
Crashing Special Case - Multiple (Parallel) Critical Paths
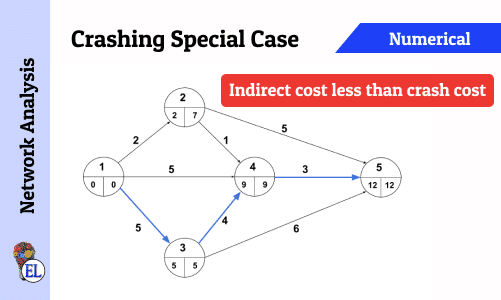
Crashing Special Case - Indirect cost less than Crash Cost
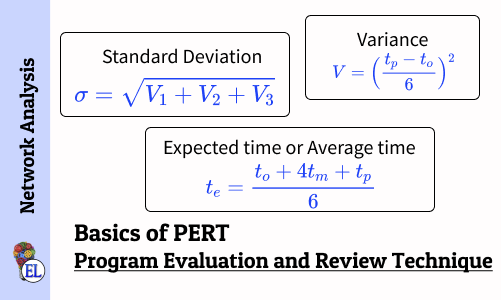
Basics of Program Evaluation and Review Technique (PERT)
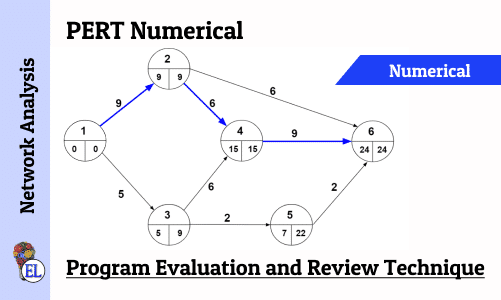
Numerical on PERT (Program Evaluation and Review Technique)
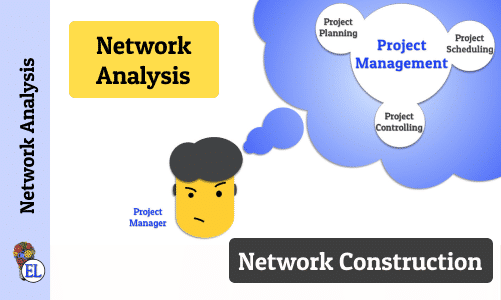
Network Analysis - Dealing with Network Construction Basics
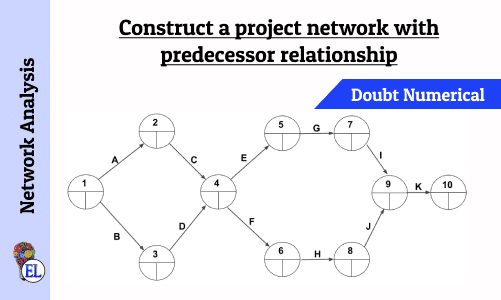
Construct a project network with predecessor relationship | Operation Research | Numerical
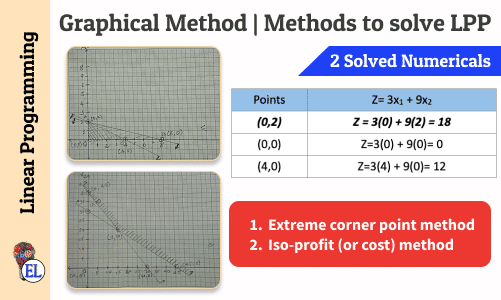
Graphical Method | Methods to solve LPP | Linear Programming
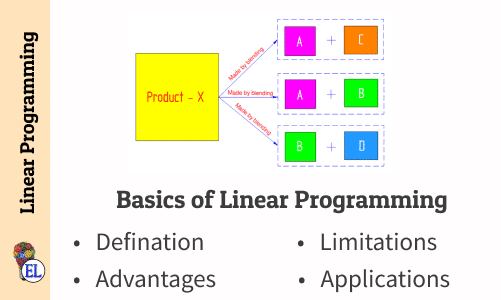
Basics of Linear Programming
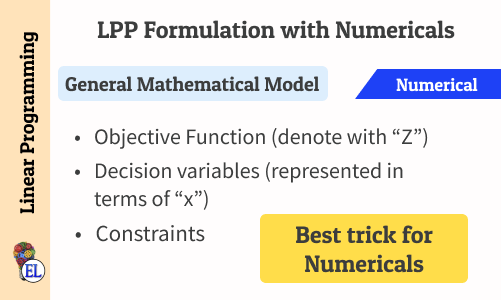
Linear Programming Problem (LPP) Formulation with Numericals

All comments that you add will await moderation. We'll publish all comments that are topic related, and adhere to our Code of Conduct .
Want to tell us something privately? Contact Us
Post comment

Education Lessons
Stay in touch, [notes] operation research, [notes] dynamics of machinery, [notes] maths, [notes] science, [notes] computer aided design.
- Building Permit Drawings Assignment Help
- Landscaping Layouts Assignment Help
- Building Inspection Plans Assignment Help
- 2D Drafting Assignment Help
- Electrical Drawings Assignment Help
- Dimensioning and Annotation Assignment Help
- Solid Objects Assignment Help
- Advanced Solid Models Assignment Help
- Furniture and Product Designs Assignment Help
- Civil Engineering Drawings Assignment Help
- Architectural Drawings Assignment Help
- HVAC Drawings Assignment Help
- Interior Design Assignment Help
- Jewelry Designs Assignment Help
- Landscape Drawings Assignment Help
- Mechanical Drawings Assignment Help
- Structural Drawings Assignment Help
- Bridge Designs Assignment Help
- 3D Printed Models Assignment Help
- Finite Element Analysis (FEA) Assignment Help
A Comprehensive Guide to Successfully Completing 3D Modeling Assignments

Do you find it difficult to complete your 3D modeling assignments? You're not alone, so don't worry. 3D modeling assignments can be difficult and overwhelming for many students, but with the right strategy and some helpful advice, you can approach them with confidence. We will walk you through every step of successfully completing 3D modeling assignments in this comprehensive guide. You can build a solid foundation for your assignments by grasping the fundamentals of 3D modeling, mastering them, and studying examples from real-world applications. Additionally, we'll show you how to assess the demands of the assignment, plan your workflow, collect references, begin modeling, use textures and materials, set up lighting, and render your model. We will also offer success advice, such as the value of consistent practice and participating in online forums and communities. You'll learn the knowledge and abilities required to excel in your 3D modeling assignment help and overcome any difficulties with the help of this thorough guide. So let's get started and start your path to mastering 3D modeling!

Understanding the Basics of 3D Modeling
It's imperative to have a firm grasp of the fundamentals before delving into the world of 3D modeling assignments. It's important to become familiar with the software you'll be working with. Spend some time investigating the features, tools, and functionalities of the 3D modeling software you choose, whether it's AutoCAD, Blender, or another one. To increase your confidence, watch tutorials, read the manual, and use the software. It's also crucial to understand the fundamentals of 3D modeling. Understanding terms like polygons, vertices, edges, textures, and lighting is part of this. Spend some time learning these foundational concepts because they will form the basis of your assignments. Studying examples from real-world situations is also very helpful. Investigate the architecture, video games, movies, and product designs for ideas. Investigate the methods used by experts to produce lifelike models and attempt to use them in your assignments. You can learn a lot about the craft of 3D modeling by looking at existing models. You'll be well-prepared to take on 3D modeling assignments with confidence and creativity if you have a solid foundation in the fundamentals. These are the three main ideas you need to understand:
Familiarize Yourself with the Software
To begin a 3D modeling assignment, you must first familiarize yourself with the software you'll be working with. Spend some time investigating the features, tools, and functionalities of the 3D modeling software you choose, whether it's AutoCAD assignment help , Blender, or another one. Learn how to use the interface, the navigational controls, and the fundamental functions. You'll be able to use the program more effectively and expeditiously while modeling as a result. Watch the software's specific tutorials to learn more about its sophisticated features and methods. Reading the documentation and consulting online sources can also yield insightful information and troubleshooting hints. Most importantly, regularly practice using the software. To learn more about the capabilities of various tools and functionalities, experiment with them. Learning the program inside and out will help you work more confidently and productively, which will ultimately improve the caliber of your 3D modeling assignments.
Master the Fundamentals of 3D Modeling
You need to have a solid foundation in 3D modeling fundamentals in order to succeed in 3D modeling assignments. Understanding terms like polygons, vertices, edges, textures, and lighting is part of this. Your models' foundation is made up of these components, which also raises the caliber of the final product. Spend some time learning and honing these foundational skills because they will form the basis of your assignments. Become familiar with the creation and manipulation of polygons to give your models shape, the definition of the structure by vertices and edges, and the addition of depth and realism by textures and materials. Learn about lighting principles and how they can improve the ambiance and appearance of your 3D models. By mastering these fundamentals, you'll gain a firm grasp on the guiding principles of 3D modeling and be better prepared to produce accurate and appealing models for your assignments.
Study Real-World Examples
Studying actual examples from the real world is one of the best ways to improve your 3D modeling abilities. Investigate the architecture, video games, movies, and product designs for ideas. Investigate the methods used by experts to produce lifelike models and attempt to use them in your assignments. You can learn a lot about the craft of 3D modeling by looking at existing models. Pay attention to the level of detail, the use of textures, and the lighting strategies used. Pay attention to the composition and aesthetics as a whole. Recognize how various components work together to produce a model that is both coherent and eye-catching. You can increase your knowledge, your creativity, and your capacity to produce stunning 3D models by studying examples from the real world. Push your limits and create your own distinctive style in the world of 3D modeling by using these insights.
Step-by-Step Guide to Completing 3D Modeling Assignments
Let's get started on the step-by-step procedure for finishing your 3D modeling assignments now that you have a strong foundation. The first step is to carefully review the assignment requirements, noting the details, measurements, and any special instructions. By breaking the assignment down into smaller tasks and making a timeline, you can plan your workflow once you have a clear understanding of the requirements. Collecting images, blueprints, or sketches that are relevant to your assignment will help you create accurate and realistic models. Once you have references, you can begin modeling. Start by making the fundamental structures and shapes, and as you go along, refine your model. Applying textures and materials will improve your model's visual appeal, and lighting and rendering setup will improve its overall presentation. To improve your skills, always remember to regularly save your work. You can successfully complete your 3D modeling assignments by carefully following this step-by-step manual.
Analyze the Assignment Requirements
To successfully complete a 3D modeling assignment, one must first carefully review the instructions. Read and comprehend the specifications, measurements, and any particular instructions provided by your instructor in detail. It's critical to recognize the primary outputs required of you and to keep track of the submission deadline. Understanding the requirements in detail will help you plan your workflow more successfully. Take into account the complexity of the assignment and divide it into more manageable tasks. This will make it easier for you to allot enough time and resources to each component, enabling you to successfully complete the assignment within the allotted time. You can approach the assignment with confidence if you approach it by paying close attention to the requirements from the start.
Plan Your Workflow
Planning your workflow is essential once you are aware of the assignment requirements. You can effectively manage your time by breaking the assignment into smaller tasks and making a timeline. Assess the assignment's complexity first, and then allot more time to difficult parts that might call for further investigation or experimentation. Identify any potential bottlenecks or areas where you might need assistance or clarification by taking into account the dependencies between tasks. You can stay organized and monitor your progress by creating a visual representation of your workflow, such as a Gantt chart or a task list. Additionally, it's crucial to account for a buffer period for unforeseen difficulties or revisions. You'll be able to approach the assignment in a structured manner, stay on track, and meet the deadline with ease if you plan your workflow in advance.
Gather Reference Material
It's crucial to compile relevant reference material before beginning the modeling process. This involves gathering any relevant visual materials, such as photos, blueprints, sketches, or other visual references. Throughout the modeling process, reference material is a helpful guide that helps to ensure accuracy and realism in your work. It offers hints in terms of proportions, specifics, and overall beauty. Reference material is even more important when it comes to lighting and texturing because it enables you to comprehend how surfaces and materials should appear in various lighting situations. You can make wise decisions and build models that are more convincing and visually appealing by reading and examining the references. To make it simple to access your references during the modeling process, remember to organize them logically. You'll be prepared to create excellent and visually accurate 3D models for your assignment with a wide range of reference materials at your disposal.
Start Modeling
It's time to start the modeling process now that you have your reference materials gathered. Create the fundamental structures and shapes that will serve as the model's framework first. Bring your vision to life by utilizing the tools and methods offered by the 3D modeling program of your choice. Pay close attention to the little things and iterate, improving your model as you go. To ensure accuracy and maintain a cohesive design, take breaks and step back to evaluate your work from various angles. To prevent any potential loss of progress or data, save your work frequently. Keep in mind that modeling is an iterative process, and changes and improvements are frequently made as you go. To get the desired result, don't be afraid to experiment and try different strategies. Keep calm, pay close attention to the little things, and consult your reference materials as necessary. You can produce engaging and visually appealing 3D models for your assignment by embracing the modeling process and maintaining a systematic approach.
Apply Textures and Materials
Applying textures and materials to your model will make it more visually appealing and realistic after the basic structure has been finished. Apply textures, colors, and materials to various parts of your model using the texturing tools provided by your preferred 3D modeling program. As you choose the textures and materials, keep in mind the precise specifications of your assignment and the desired aesthetic. To make your model appear more realistic, pay close attention to small details like surface roughness, reflections, and shadows. To achieve the desired look and feel, experiment with various textures and materials, and don't be afraid to make any necessary adjustments. To ensure that the textures and materials react correctly, preview your model in various lighting situations. You can improve the visual appeal and realism of your 3D model and produce a more engaging and immersive result by applying textures and materials thoughtfully.
Set Up Lighting and Rendering
Your 3D model's overall presentation depends heavily on lighting. You can achieve the desired ambiance and mood that improves the visual impact of your model by experimenting with various lighting configurations. To draw attention to the finer points of your design and highlight its key elements, change the lighting's color, brightness, and direction. The right lighting can significantly improve your model's overall aesthetic appeal, whether it's natural lighting for a realistic look or imaginative lighting for a more artistic effect. After you are happy with the lighting arrangement, render your model to capture the complex interaction of light and shadow. The final output, which showcases your 3D model's full potential and brings it to life in a visually stunning way, is produced by rendering your model.
Tips for Success in 3D Modeling Assignments
It's critical to regularly practice and invest time in developing your skills if you want to succeed in your 3D modeling assignments. You'll gain a better understanding of modeling techniques and a greater sense of proficiency by consistently honing your craft. Additionally, participating in online forums and communities devoted to 3D modeling can offer beneficial chances for networking and learning. Engaging with people who share your interests enables you to share ideas, get feedback, and keep up with market trends. When approaching assignments, don't be hesitant to experiment and let your creativity run wild. By thinking outside the box and experimenting with various tools and techniques, you can create distinctive models that beautifully display your personal style. Keep an open mind to constructive criticism because it can help you develop and hone your skills even more. You can succeed in your 3D modeling assignments and realize your full potential as a talented modeler with practice, collaboration, and a willingness to innovate. Here are a few more pointers to remember:
Practice Regularly
The key to mastering 3D modeling is consistent practice. Set aside a specific period of time every day or week to work on your skills. You can improve your modeling skills, gain a better understanding of the software tools, and gain more comfort using intricate shapes and structures by practicing regularly. To broaden your skill set, put yourself to the test by taking on a variety of projects and exploring various aesthetics. Consider joining online forums or communities where you can ask questions of other modelers and gain insight from their experiences. Just keep in mind that practice is a continuous process, and the more time you put into it, the better you will get at 3D modeling.
Join Online Communities and Forums
Getting involved in online 3D modeling communities and forums is a great way to advance your knowledge. These online communities give users the chance to meet others who share their enthusiasm for 3D modeling, such as students, professionals, and enthusiasts. Participating in these communities enables you to get advice, feedback, and support from more seasoned participants. It is a great place to pick up new skills, find fresh ideas, and keep up with the most recent developments in the industry. You can promote a sense of community and continuously broaden your knowledge base by actively taking part in discussions, sharing your work, and giving feedback to others. These communities also frequently provide tools like webinars, tutorials, and industry news that can help you develop as a 3D modeler. Utilize the advantages of online communities to network, educate yourself, and work together with like-minded individuals as you progress in learning 3D modeling.
3D modeling assignments can at first seem overwhelming, but with a strong foundation and a methodical approach, you can successfully approach them. Start by learning the fundamentals of 3D modeling, which includes becoming familiar with the software and becoming an expert in concepts like textures and polygons. Insights and inspiration can be gained from looking at examples from real-world situations. Once you have the necessary information, complete your assignments successfully by following a step-by-step procedure. Analysis of the requirements, workflow planning, gathering of reference materials, and modeling with careful attention to detail and iterative revision. Your models will become more realistic when textures, materials, and lighting are applied. Don't forget to regularly practice to improve your abilities and to join online communities to interact with other enthusiasts and professionals. Think outside the box and embrace creativity because doing so will distinguish your work. You can confidently complete 3D modeling assignments and keep developing as a skilled modeler with commitment, perseverance, and the appropriate approach.
Post a comment...
Balanced Sample Assignment and Objective for Single-Model Multi-Class 3D Object Detection
Ieee account.
- Change Username/Password
- Update Address
Purchase Details
- Payment Options
- Order History
- View Purchased Documents
Profile Information
- Communications Preferences
- Profession and Education
- Technical Interests
- US & Canada: +1 800 678 4333
- Worldwide: +1 732 981 0060
- Contact & Support
- About IEEE Xplore
- Accessibility
- Terms of Use
- Nondiscrimination Policy
- Privacy & Opting Out of Cookies
A not-for-profit organization, IEEE is the world's largest technical professional organization dedicated to advancing technology for the benefit of humanity. © Copyright 2024 IEEE - All rights reserved. Use of this web site signifies your agreement to the terms and conditions.
- Staff picks
- Downloadable
- Collections
- Community members
- Sketchfab Masters
- Animals & Pets
- Architecture
- Art & Abstract
- Cars & Vehicles
- Characters & Creatures
- Cultural Heritage & History
- Electronics & Gadgets
- Fashion & Style
- Food & Drink
- Furniture & Home
- Nature & Plants
- News & Politics
- Places & Travel
- Science & Technology
- Sports & Fitness
- Weapons & Military
- Best selling
- 3D Printable
- For business Sketchfab for Teams Augmented Reality 3D Viewer 3D eCommerce 3D Configurators Find a Partner Pricing Customer Stories
Assignment_3_Model 3D Model
No description provided.
CC Attribution Creative Commons Attribution

IMAGES
COMMENTS
Designing a 3D model for your assignment. Use this strategy to approach the design of a 3D model: Draw a rough sketch of the part with pencil and paper; Annotate your sketch with dimensions, constraints or other key features; Plan steps to convert your drawing to a digital model (e.g. sketch, extrude, fillet, etc…); Apply these steps in your 3D modelling software
At Autodesk, we empower innovators everywhere to take the problems of today and turn them into something amazing. Start Tinkering Join Class. Explore our free Tinkercad lesson plans, developed in partnership with teachers to align with standards including ISTE, Common Core, and NGSS.
Assignment model - 3D model by Kalagon. Explore Buy 3D models. For business / Cancel. login Sign Up Upload. Assignment model. 3D Model. Kalagon. Follow. 4. 4 Views. 0 Like. Add to Embed Share Report. Triangles: 30.3k. Vertices: 15.7k. More model information. No description provided. Published 6 months ago. Oct 7th 2023. Uploaded with Maya No ...
Overall, I think my model is well made to me as my first complete 3D model. ***** Assignment 1 -Introduction to 3D Modelling - 7 th March - 50%. For this assignment I modelled, UV unwrapped, textured and real-time rendered a Magic Witch / Wizard Staff. In this assignment I also designed and practiced using referencing images and creating my ...
Assignment 3D models ready to view, buy, and download for free. Popular Assignment 3D models View all . Download 3D model. Library (Large Space) Higher Fidelity - Tagarino. 28 Views 0 Comment. 4 Like. Download 3D model. Shiba! 243 Views 0 Comment. 7 Like. Game Asset Pipeline Assignment 2: Screwdriver. 25 Views 0 Comment. 4 Like.
Assignment 1 Basic 3D Modeling in Blender Create a still life scene using 5-6 objects. The objects can be created in blender or imported from free 3D modeling repository. Your objects will reflect your interests, so choose them to represent a specific concept you will try to communicate. Do not use same objects.
Assignment 1 Basic 3D Modeling in Maya The goal is to create a still life scene using 5-6 objects and practice transformations. Each object can be cre-ated in Maya directly or imported from a free 3D modeling repository. Your objects should reflect your interests, so choose them to represent a specific concept you attempt to communicate.
3D CAD Assignment | 3D CAD Model Library | GrabCAD. Join 13,400,000 engineers with over 5,980,000 free CAD files. The CAD files and renderings posted to this website are created, uploaded and managed by third-party community members. This content and associated text is in no way sponsored by or affiliated with any company, organization, or real ...
3D Assignment Models Free Download in various formats such as OBJ FBX STL DAE GLB ready to use for Unity/Blender/Maya/Cinema4D/Autodesk 3ds Max
Orbit navigation Move camera: 1-finger drag or Left Mouse Button Pan: 2-finger drag or Right Mouse Button or SHIFT+ Left Mouse Button Zoom on object: Double-tap or Double-click on object Zoom out: Double-tap or Double-click on background Zoom: Pinch in/out or Mousewheel or CTRL + Left Mouse Button
Designing a 3D model for your assignment. Use this strategy to approach the design of a 3D model: Draw a rough sketch of the part with pencil and paper; Annotate your sketch with dimensions, constraints or other key features; Plan steps to convert your drawing to a digital model (e.g. sketch, extrude, fillet, etc…); Apply these steps in your 3D modelling software
ADMIN MOD. Free 3D reference posing tool for figure drawing. Hello! I'm creating side projects as a hobby and to learn new things, and I've created a free reference posing tool! The tool is completely free. The basic idea is you have a 3D poseable figure that you can move it's body however you like (and move it in the scene).
This resource contains information related to Human Scale: 3D Model. Browse Course Material Syllabus Calendar Readings Assignments Projects ... Assignment 1.3 Human Scale: 3D Model Download File DOWNLOAD. Course Info Instructor Lorena Bello Gomez; Departments Architecture; As Taught In ...
Assignment 3 for Modeling for Real Time Systems 1. - Assignment 3 - Download Free 3D model by averypearson. Explore Buy 3D models. For business / Cancel. login Sign Up Upload. Assignment 3. 3D Model. averypearson. Follow. 4. 4 Downloads. 7. 7 Views. 1 Like. Download 3D Model Add to Embed Share Report. Triangles: 1.2k. Vertices: 667. More model ...
Behance is the world's largest creative network for showcasing and discovering creative work
In 3D computer graphics, 3D modeling (or modelling) is the process of making a mathematical representation involving any three-dimensional surface associated with an object (either inanimate or living) via special software. The product is referred to as a 3D style. It can be displayed to be a two-dimensional image by using a process called 3d ...
There are two main conditions for applying Hungarian Method: (1) Square Matrix (n x n). (2) Problem should be of minimization type. Assignment model is a special application of Linear Programming Problem (LPP), in which the main objective is to assign the work or task to a group of individuals such that; i) There is only one assignment.
Assignment 3 Model - Download Free 3D model by nshamrell. Explore Buy 3D models. For business / Cancel. login Sign Up Upload. Assignment 3 Model. 3D Model. nshamrell. Follow. 3. 3 Downloads. 1. 1 View. 0 Like. Download 3D Model Add to Embed Share Report. Triangles: 42.7k. Vertices: 21.7k. More model information. No description provided. ...
The task is to assign 1 job to 1 person so that the total number of hours are minimized. So, the first step in the assignment model would be to deduce all the numbers by the smallest number in the row. Hence, the smallest number becomes 0 and then we can target the zeroes to arrive at a conclusion.
3D modeling assignments can at first seem overwhelming, but with a strong foundation and a methodical approach, you can successfully approach them. Start by learning the fundamentals of 3D modeling, which includes becoming familiar with the software and becoming an expert in concepts like textures and polygons. Insights and inspiration can be ...
Orbit navigation Move camera: 1-finger drag or Left Mouse Button Pan: 2-finger drag or Right Mouse Button or SHIFT+ Left Mouse Button Zoom on object: Double-tap or Double-click on object Zoom out: Double-tap or Double-click on background Zoom: Pinch in/out or Mousewheel or CTRL + Left Mouse Button
To address this problem, we proposed a single-model multi-class 3D object detector with balanced sample assignment and objective, named BSAODet. Specifically, the quality-balanced sample assignment (QBSA) is introduced to dynamically collect stable high-quality samples for each class according to the predicted sample performance and geometric ...
Assignment_3_Model - Download Free 3D model by KB112. Explore Buy 3D models. For business / Cancel. login Sign Up Upload. Assignment_3_Model. 3D Model. KB112. Follow. 1. 1 Download. 5. 5 Views. 0 Like. Download 3D Model Add to Embed Share Report. Triangles: 124. Vertices: 71. More model information. No description provided. ...