How to Make Microsoft PowerPoint A3? (Step-By-Step Guide)
Are you looking to create a professional-looking PowerPoint presentation in A3 size? If so, youve come to the right place! In this article, well walk you through the steps of creating a presentation in Microsoft PowerPoint A3, from changing the page size to adding text, images, and other elements.

Short Answer
To make a Microsoft PowerPoint presentation A3 size, you can change the slide size in the “Design” tab.
To further adjust the size, you can enter the specific measurements in the “Slide Size” dialog box.
Benefits of Creating a PowerPoint Presentation in A3 Size
In addition, the larger page size makes it easier to see the overall structure of the presentation at a glance, as well as to create a clear flow of information.
All of these benefits make A3 size an ideal choice for creating professional-looking presentations.
What is Microsoft PowerPoint?
It is one of the most popular and widely used presentation programs available, and is used in both business and educational settings.
Microsoft PowerPoint allows users to create a variety of documents, such as posters, handouts, and even A3-size presentations.
Microsoft PowerPoint is capable of creating dynamic, eye-catching presentations that will help you stand out and capture your audiences attention.
How to Change the Page Size of a PowerPoint Presentation?
When creating a PowerPoint presentation in A3 size, youll need to change the page size of the presentation.
Select the Page Setup option and then select A3 from the drop-down menu.
If youre using an older version of PowerPoint, you may need to upgrade in order to access this feature.
Additionally, some versions of PowerPoint may require additional steps to change the page size.
Once the page size has been changed to A3, you can start adding text, images, and other elements to your presentation.
This will allow you to quickly create a professional-looking presentation thats in A3 size.
With the right tools and a bit of effort, you can create a professional-looking presentation that will impress your audience.
How to Add Text, Images, and Other Elements to a Presentation?
Once the page size is changed, you can start to add text, images, and other elements to your presentation.
Additionally, you can easily add images to your presentation by selecting the Insert tab and selecting the Pictures option.
To do this, go to the File menu and select the Save As option.
Tips for Creating Professional-Looking Presentations in A3 Size
Creating professional-looking presentations in A3 size is easier than ever with Microsoft PowerPoint. To get started, open your presentation in PowerPoint and go to the File menu. Select the Page Setup option and then select A3 from the drop-down menu. Once you have changed the page size, you can start adding text, images, and other elements to your presentation. Here are some tips to help you make the most of your presentation in A3 size:
1. Choose an Appropriate Font: Choosing the right font for your presentation is key to making it look professional. Make sure to select a font that is easy to read and not too small.
3. Use High-Resolution Images: Low-resolution images can ruin the look of a presentation. Make sure to use high-resolution images that will look sharp and clear on the A3 size page.
By following these tips, you can create a professional and engaging presentation in A3 size.
Additional Resources for Creating PowerPoint Presentations in A3 Size
To make a PowerPoint presentation in A3 size, you will need to change the page size of the presentation.
To do this, open the presentation in PowerPoint and go to the File menu.
Once the page size is changed, you can start adding text, images, and other elements to your presentation.
First, you should consider using templates to make sure that your presentation looks great.
Templates can help you to quickly create a presentation that looks professional and is easy to navigate.
The Microsoft Office website offers a wide variety of free and paid templates that you can use for presentations in A3 size.
Prezi is a great tool for creating presentations, and it offers a variety of templates and tools that you can use to make sure that your presentation looks great.
Finally, you should also consider using a presentation design service.
They can also provide you with additional resources such as custom fonts, graphics, and animations that can help to make your presentation look polished and professional.
Troubleshooting Common Issues with Creating PowerPoint Presentations in A3 Size
When creating a PowerPoint presentation in A3 size, there can be a few common issues that arise.
To fix this, you can adjust the font size of the text or adjust the zoom level.
Finally, the presentation may take longer to render if the page size is larger, so you may need to adjust the quality of the images used in the presentation.
Final Thoughts
Making a PowerPoint presentation in A3 size is a great way to make a professional-looking presentation.
With the right tools and a few simple steps, you can easily create an engaging presentation in A3 size that will surely impress your audience.
James Wilson has extensive knowledge in the information technology industry.His second love, besides dealing with computers, is smart home technology. He is continually updating information to better comprehend this problem and has a deep understanding of the apartment’s support system.
Recent Posts
A better way to change your slide sizes in PowerPoint without breaking it.
- October 6, 2021
- Tips and Ticks
An easy way to change slide sizes in PowerPoint presentations to 4:3 (Standard) or 16:9 (Widescreen) formats without breaking your theme and template or stretching your logos and images.

As with most things related to technology, there is more than one way to skin the cat – or in our case to resize PowerPoint presentations. We are going to discuss both the standard way ( as well as why we don’t recommend it ) and the right way, using our FREE PowerPoint resizing tool.
If you ever changed a presentation to Standard or Widescreen sizes in PowerPoint and thought you would likely agree that the outcome was unpredictable and undesirable.
TLDR: If you want to skip the details and go straight to the instructions on how to use our FREE PowerPoint presentation resizing tool to change slide sizes without breaking your slide content then Click Here .
Why the standard solution does not work:
In short, the standard way to resize your PowerPoint changes and breaks your fonts . Using the PowerPoint resize tool also stretches images , graphics, and logos on your slide and Slide Master Layouts.
The best way to explain what is wrong with this method – is to show you. With your presentation open go to the Design Ribbon and click on the Slide Size drop-down menu and select either the Standard(4:3) or Widescreen(16:9) aspect ratios.
You can pick either ‘Maximize’ – which will cause your content to flow over the edges of the screen or ‘Ensure Fit’ which will create empty gaps on either side of your presentation.
Whichever of the two options you select the result is not going to be what you want. Your slide content probably looks broken, logos might be stretched, the theme’s font has changed to Calibri, your corporate colors might have disappeared and your Master Layout’s placeholders are resized disproportionally.

METHOD 1: The standard way, how to change PowerPoint Slide Sizes in Windows 10 or Mac:
Part 1: before you change your powerpoint slide size.
Step 1: Make sure your presentation is in its original working format.
Step 2: Save your Theme color scheme.
1) Click on the View Ribbon, 2) then the Slide Master button

3) Click on the Colors drop-down menu and then on the 4) Customize Colors… button at the bottom of the list.

At the bottom of the Colors dialog box give your color scheme a name in the Name field – and call it whatever you want but remember the name because we are going to use that after we resize our template. Click on Save.

Step 3: Save your Theme fonts
1) While still on the Slide Master Ribbon click on the Fonts drop-down menu and then on the Customize Fonts… button at the bottom of the list.

2) In the Name field give your Theme Fonts a name that you will use and click on the Save button. 3) Close the Slide Master Ribbon by clicking on the “Close Master View” button.

Part 2: After you change your slide size
Step 4: Resize your PowerPoint presentation
After you close the Slide Master Ribbon the Design Ribbon should be visible again. Click on the Slide Size drop-down menu and select either the Standard(4:3) or Widescreen(16:9) aspect ratios and select the ‘Ensure Fit’ option ( it is easier to move items around than to also have to resize them especially when converting to a larger slide size ).

Step 5: Reselect your Theme color and Theme font
With the Design Ribbon still active click the Variants drop-down menu, then color and select the Color Theme you saved earlier, and then do the same for your fonts.

Step 6a: Fix stretched images – Method 1
Here is a quick hack to fix stretched graphics and images.
1) Right-Click on the stretched image and select “Size and Position” to open the Size and Position Task Pane. You will notice the Scale Height and the Scale Width are different, for example; Scale Height might be 99% and Scale Width might be 74%.
2) All you need to do to fix your image is press the up or down arrow on either the Width or Height and voila, your image is no longer stretched. If that doesn’t work then make sure Lock Aspect Ratio is checked.

Step 6b: Fix stretched images – Method 2
Another way to resize your images is to reset your images. To do this you simply select your image and then from the Picture Format Ribbon select the Reset Picture drop-down menu and select Reset Picture & Size button.

Step 7: Move placeholders, content, and images into their new position.
The last thing to do is move items such as placeholders and images around on your presentation to make them fit better.
METHOD 2: The better way, to change your slide dimensions:
Step 1: Go to our FREE resize tool Go to our FREE PowerPoint resize tool and Upload your PowerPoint file: www.knockoutprezo.com/resize-powerpoint
Step 2: Select a file location and select your PowerPoint document
Step3: Select whether you want to resize to Standard or Widescreen sizes. Once you make your selection the file will upload, convert the PPTX and then then the download will start automatically.
- PowerPoint won’t stretch your images and graphics
- No more missing colors
- Your theme fonts stay as it was ( Header and Body fonts )
- Your layouts stay in their original location which is a lot more predictable and easier to work with.

Step 3: Move placeholders, content, and images into their new position.
More PowerPoint Fixes
If you are interested, we also have two other PowerPoint Fixing tools, they are:
- Replace and fix my PowerPoint fonts – ( Find Out More )
- Change and fix my PowerPoint authoring language across all slides and Master Layouts – ( Find out more )

The DinoFire Wireless Presentation Pointer is top of its class
- Built in Volume Control
- Hyperlink Button
- Switch Windows

Want to learn more about typography and why you should use which fonts?
A clear and focused guidance on how letters, words, and paragraphs should be aligned, spaced, ordered, and shaped.
Full Disclosure: As an Amazon Associate, Knockout Prezo earns from qualifying Amazon purchases.

Mega Epic PowerPoint Template

Meta Modern PowerPoint Presentation

Easy UX Wireframes PowerPoint Theme

Keep It Simple PowerPoint Pitch Deck

Just My Type (Audiobook)
A delightfully inquisitive tour that explores the rich history and the subtle powers of fonts.
Full Disclosure: As an Amazon Associate, Knockout Prezo earns from qualifying Amazon purchases.
2 Responses
Unfortunately, the resizing tool did not work for my use case. It simply overlayed a different slide deck formatting, but didn’t change any configurations, which made the deck useless. I like the thought for this tool though, as reformatting slides is a huge pain and time drain.
Do you mind me asking about your feedback about our resize tool. I didn’t quite understand your feedback.
Essentially what the tool does is that it resizes the deck without breaking, stretching etc the presentation assets, HOWEVER the user still needs to adjust the elements of the presentation. Did you go from 16×9 to standard or the other way around? There isn’t a way for the software to tell if you want an element aligning to the left, middle or right of the slide for example.
Leave a Reply Cancel reply
Your email address will not be published. Required fields are marked *
Save my name, email, and website in this browser for the next time I comment.
What our clients have to say
© Copyright Knockout Productions (Pty) Ltd 2019 – 2023
How to Change Slide Size in PowerPoint? [A Helpful Guide!]
By: Author Shrot Katewa
![How to Change Slide Size in PowerPoint? [A Helpful Guide!]](https://artofpresentations.com/wp-content/uploads/2021/06/Featured-Image-How-to-Change-Slides-Size-in-PowerPoint.jpg "how to make powerpoint presentation a3")
Microsoft PowerPoint is a powerful software. You can not only create a standard presentation design, but you can also create documents of various sizes using PowerPoint! However, that requires you to have a good understanding of various slide sizes available in PowerPoint. You may be wondering, how to change the slide size in PowerPoint?
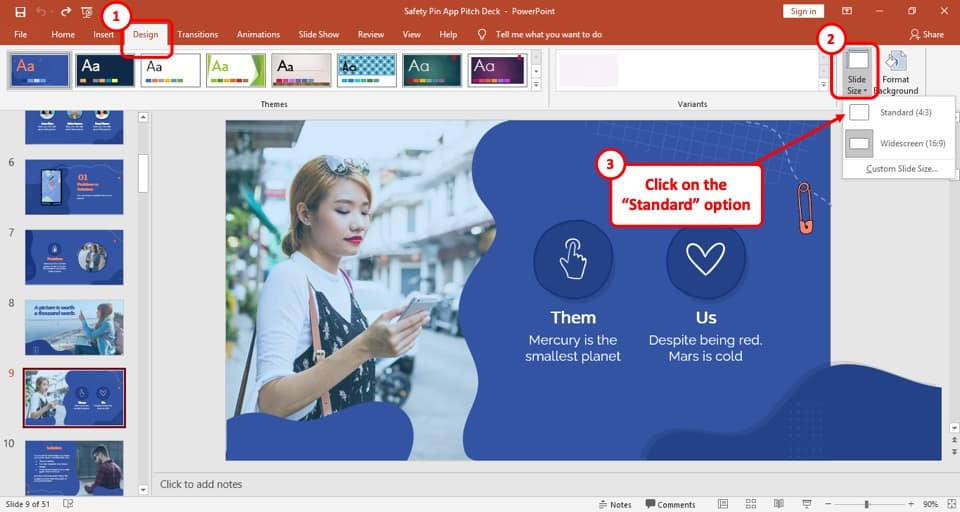
To change the slide size in PowerPoint, click on the “Design” tab. Then, click on “Slide Size”. From the dropdown, choose “Standard” or “Widescreen”. You can also click on “Custom Slide Size” to change the size of the slides in PowerPoint to A3, A4 or a completely custom size.
In this article, I will walk you through the nuances of changing a slide size in PowerPoint. We will go into the steps in detail with pictures so that you get the best understanding of the subject!
So, let’s get started!
A Quick Note Before We Begin – for this article, I will be using one of the presentation templates from Envato Elements . With Envato Elements, you get access to thousands of presentation designs with unlimited downloads so you never run out of options again. Plus, you get free previews so you know exactly what you’re getting before buying! It is also very affordable.
1. How to Change Slide Size in PowerPoint?
Changing the size of your slides in Microsoft PowerPoint is actually a lot easier than you think! All you have to do is go to the ‘Design’ tab from the ribbon, click on the ‘Slide Size’ button at the top right corner of your screen and select the slide size you want.
Below, I’ll be discussing how to change the size of slides in different versions of Microsoft PowerPoint as well as in different device including Mac, iPad and Android:
1a. Change Slide Size in PowerPoint 2016 and 2019
Follow the steps below to change the slide size in Microsoft PowerPoint 2016, PowerPoint 2019 and Office 365:
Step 1: Click on the ‘Design’ tab
At first, click on the ‘Design’ tab, which is the fourth option on your ribbon to get access to the design section of your PowerPoint presentation.
Step 2: Click on ‘Slide Size’ option
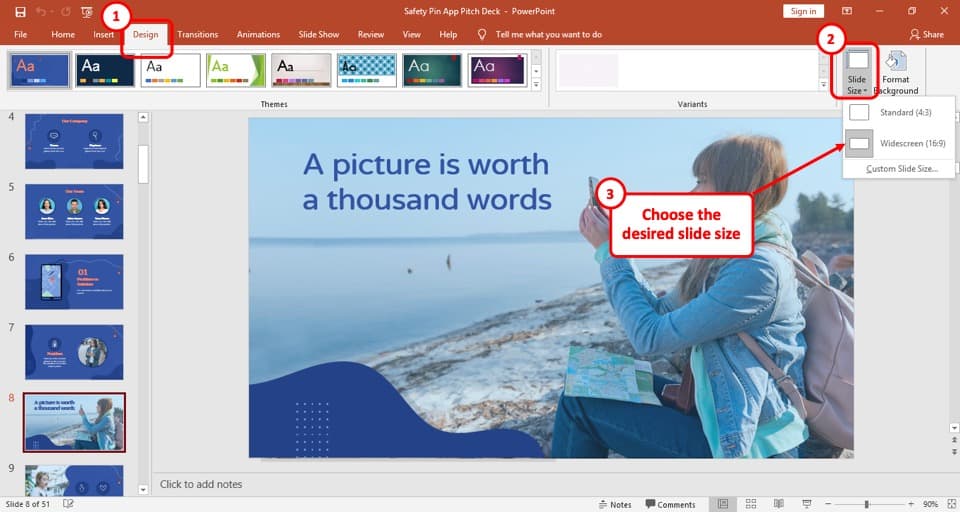
Go to the top right of the ‘Design’ tab in the ‘Customize’ section and ‘Left click’ on the ‘Slide Size’ button and a drop-down menu will open.
Step 3: Select the desired slide size from the ‘Slides sized for’ option.
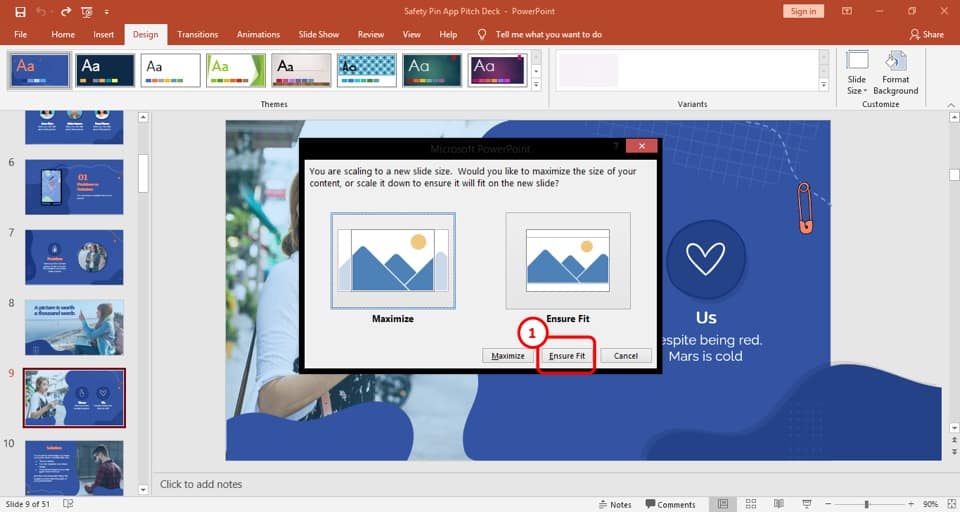
Now, another dialogue box will show up in the middle of your screen. Click on ‘Ensure Fit’ to adjust your slide contents. (we will talk about the difference between the “Maximise” and “Ensure Fit” options later in the article)
If you choose to click on the ‘Custom Slide Size’ option, you may see a different dialogue box first. We will get to that in a moment and I will share with you how to customize the slide sizes in addition to the default options provided by PowerPoint.
1b. How to Change Slide Size in PowerPoint 2010?
The process of changing slide size in Microsoft PowerPoint 2010 is described below:
Step 1: Click on the ‘Design’ tab and go to ‘Page Setup’ option
Click on the ‘Page Setup’ option located in the ‘Page Setup’ section of the ‘Design’ tab. This will open up a new dialogue box.
Step 2: Choose the slide size you want from the drop-down menu after clicking on ‘Slides sized for’.
‘Left click’ on the ‘Slides sized for’ menu to get the options of slide size. Choose your preferred style and then click on the ‘Ok’ button.
1c. How to Change the Slide Size in PowerPoint 2007?
The process of changing slides in Microsoft PowerPoint 2007 is identical to the process in PowerPoint 2010. For reference, here’s how to change the slide size in PowerPoint 2007:
1d. How to Change Slide Size in PowerPoint on Mac
The process of changing slide size in PowerPoint on Mac is described in simple steps below:
Step 1: Click on the ‘File Menu’ and then on ‘Page setup’
Click on the ‘File’ menu which is located in the ‘Quick Access’ toolbar above the ‘Home’ tab and a drop-down menu will appear. Click on the ‘Page Setup’ option from the drop-down menu which will open up another dialogue box.
Step 2: Choose your new slide size from the dialogue box
Click on your preferred slide size and then press the ‘Ok’ button. PowerPoint will prompt you to choose between “Scale” or “Don’t Scale”. This is similar to the Maximise or Ensure Fit options Windows users see.
Go with the “ Scale ” option as this will adjust the sizes of all shapes and text for each slide. You can also choose to go with “Don’t Scale” option and adjust everything manually as per your requirement.
Your slide size will change accordingly.
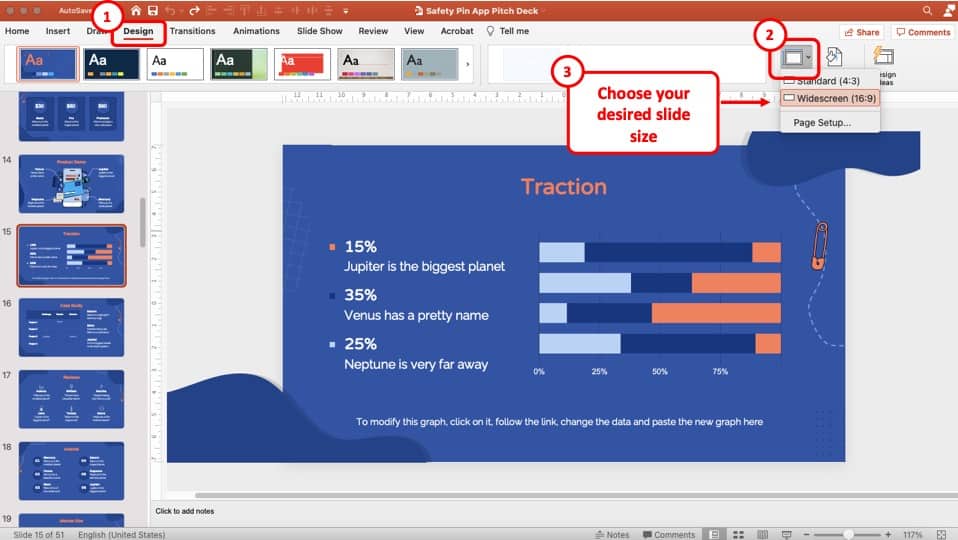
If you are using Office 365 or later versions of PowerPoint on Mac, you an also find the option to change the slide size from widescreen to standard by click on the Design tab, and then clicking on “Slide Size” as showcased earlier.
1e. How to Change Slide Size in PowerPoint on iPad?
Follow the steps below to change slide size in PowerPoint on iPad:
Step 1: Go to the ‘Home’ menu after opening your PowerPoint Presentation file
At the bottom right corner of the screen, you will find the ‘three dots’ icon, which is the ‘Options’ menu. Tap on the ‘Options’ menu and then select the ‘Home’ option.
Step 2: Change your size after tapping the ‘Slide Size’ option
A ‘Design’ option will now appear on your screen. Tap on it and then tap on the ‘Slide Size’ option. After that, change your slide size to ‘Standard’ or ‘Widescreen.’
1f. How to Change Slide Size in PowerPoint on Android?
Unfortunately, you cannot change the size of your presentation slides using PowerPoint on Android. However, there is another application for Android called ‘ WPS Office ’, which you can use to change the size of your slides from ‘Standard (4:3)’ to ‘Widescreen (16:9).’
Simply open your PowerPoint Presentation using this app and go to the ‘Settings’ option at the bottom left corner. Then scroll rightwards to the ‘Design’ tab, where you will find the ‘ Slide Size’ option. From there, you will be able to select your desired slide size.
2. How to Change Slide Size to A4 in PowerPoint?
To change the slide size of your PowerPoint presentation to A4, follow the steps below:
Step 1: Click on ‘Custom Slide Size’ located in the ‘Design’ tab

Click on the ‘Design’ tab and then from the ‘Slide size’ menu, click on the ‘Custom Slide Size’ button.
Step 2: Choose the ‘A4 Paper (210x297mm)’ option to change the slide size
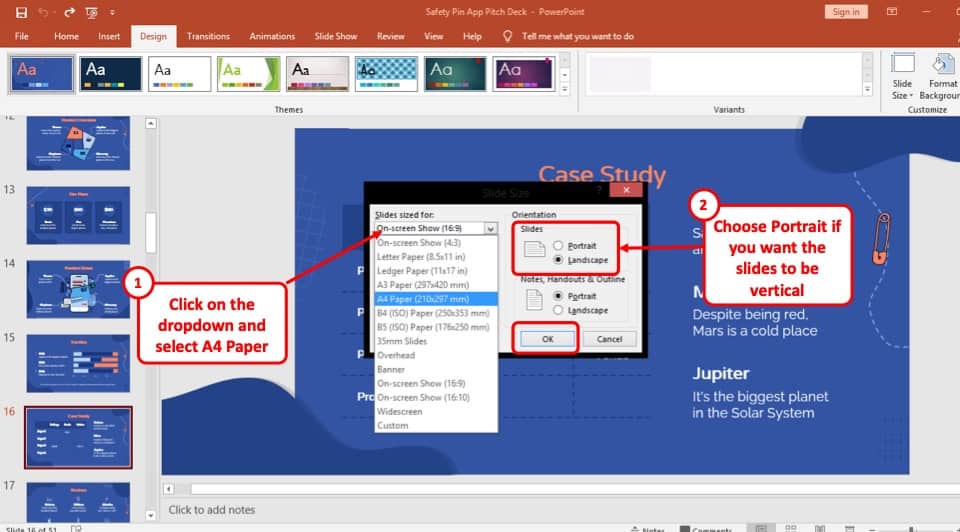
From the pop-up window, click on the ‘Slides sized for’ button and a drop-down menu will show you the different slide sizes available. Now all you have to do is select the ‘A4 Paper (210x297mm)’ size option and hit the ‘ Ok ’ button.
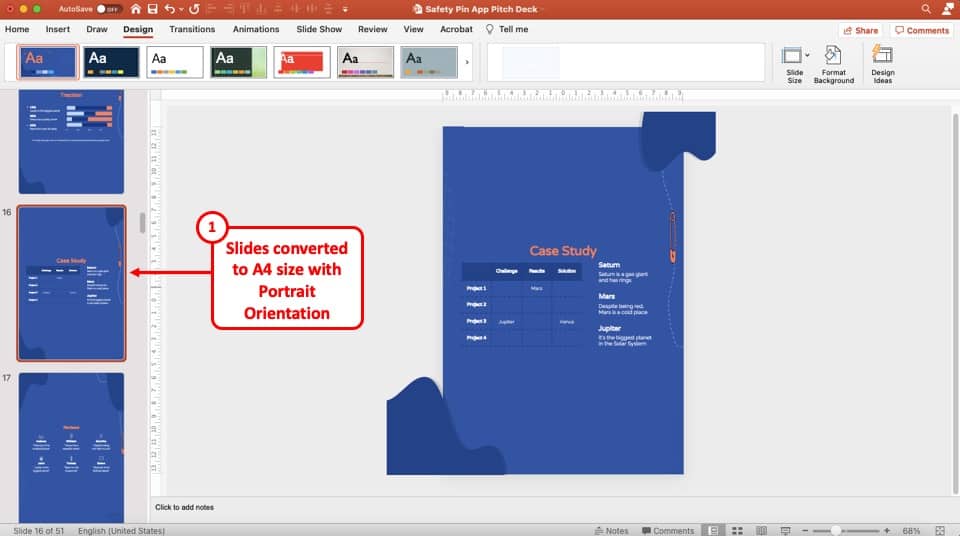
Here’s how the A4 slide size will look in the portrait orientation in PowerPoint.
3. How to Change Slide Size to A3 in PowerPoint?
You can modify the slide size to A3 in Microsoft PowerPoint by following the easy steps below:
Step 1: Selecting the ‘Custom Slide Size’ button to change slide size
At first, click on the ‘Slide Size’ option in the ‘Design’ tab. From the drop-down menu select the ‘Custom Slide Size’ option.
Step 2: Select the ‘A3 Paper’ and Click on OK
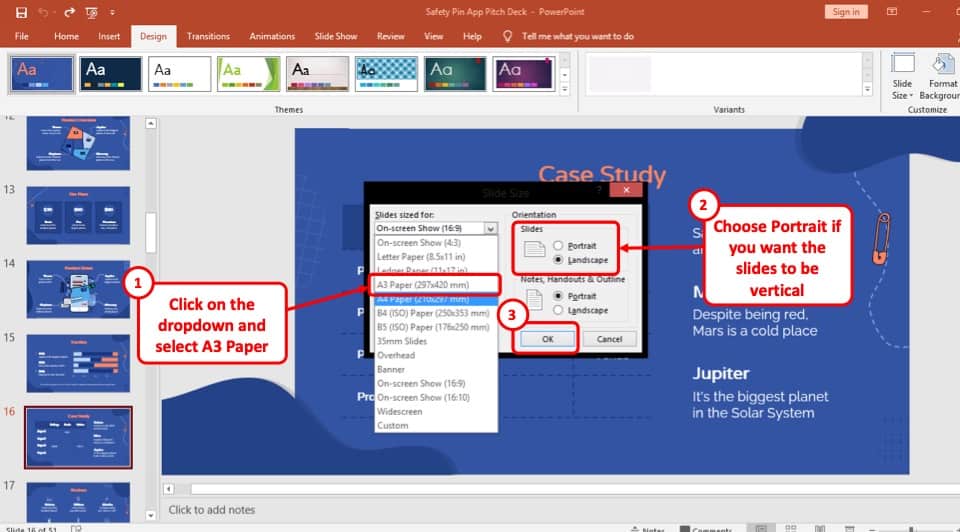
Expand the ‘Slides sized for’ drop-down menu by clicking on it. Then, ‘Left click’ on the ‘A3 Paper (297x420mm)’ paper option. Press the ‘Ok’ button at the bottom right of the pop-up window and then click on the ‘Ensure Fit’ button to resize the content accordingly to the slides.
4. How to Create Custom Slide Size in PowerPoint?
Follow the easy steps described below to create custom slide size in PowerPoint:
Step 1: Selecting ‘Custom Slide Size’ to create a custom size for your presentation

Click on the ‘Slide Size’ option in the ‘Design’ tab. From the drop-down menu select the ‘Custom Slide Size’ option.
Step 2: Input the Height and Width in the dialogue box and click ‘Ok’
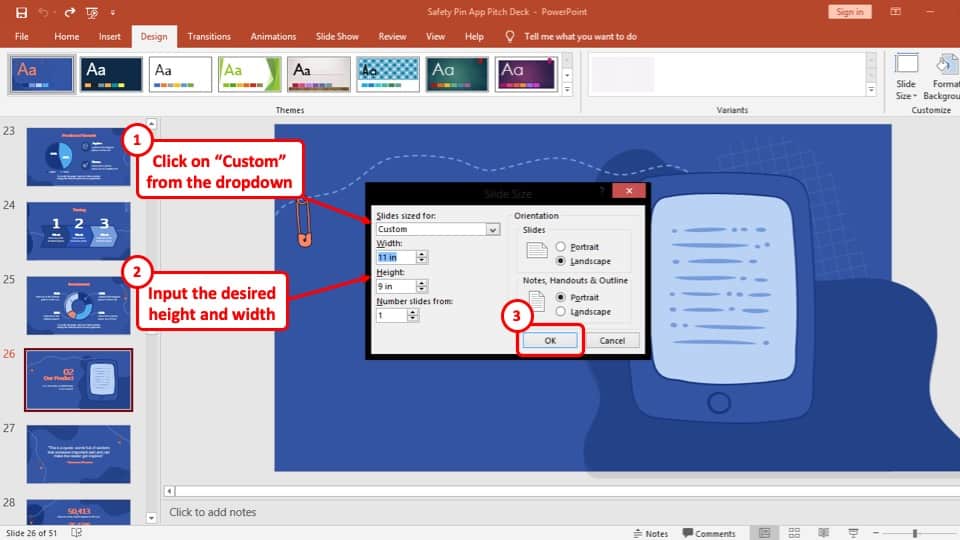
After clicking on the ‘Custom Slide Size’ option, a pop-up window will appear. To input a custom slide size, click on the ‘Slides sized for’ button and from the drop-down menu, select ‘Custom .’
After adding the desired Height and Width for the slide, click on the ‘Ok’ button and then click on the ‘Ensure Fit’ button.
5. How to Change Slide Size from Widescreen to Standard?
To change the slide size from Widescreen to Standard, just follow the steps below:
Step 1: Click on the ‘Design’ tab which is on the top left of your presentation
The first step is to go to the ‘Design’ tab which is the fourth tab on the ribbon of your PowerPoint window.
Step 2: Click on ‘Slide Size.’
Click on the ‘Slide Size’ button located in the ‘Customize’ section of the ‘Design’ tab. A drop-down menu will appear once you click on it.
Step 3: Change your slide size from Widescreen to Standard and adjust slide content
The slide size is set to ‘Widescreen 16:9’ by default. To change it, ‘Left click’ on ‘Standard (4:3)’ . This will open up a dialogue box, where you will find the ‘Maximize’ and ‘Ensure Fit’ options.
If you click on the ‘Maximize’ option, your content will not be sized down to fit your slide and images may get distorted. On the other hand, clicking on the ‘Ensure Fit’ option will resize the contents of the down to your preferred size.
6. How to Increase Slide Size in PowerPoint When Printing?
When printing, sometimes PowerPoint just doesn’t print to the edge of the page. Meaning, there is a white bleed (border or margin) when you try to print it or when you try to convert it into a PDF.
You can fix this problem by either increase or adjusting the slide size before printing.
Here’s a video that explains the process in detail –
Although the video is for Mac, you can easily adjust the settings for the slide size for Windows just the same way.
It is important to remember to make sure that you don’t increase the slide size of your entire presentation but only adjust the printing size of the slides.
7. Can You Change Orientation of Just One Slide in PowerPoint?
There is currently no direct way to change the orientation of just one slide in PowerPoint. However, you can circumvent this issue by either creating a hyperlink to an external file or adding a portrait PDF file directly in PowerPoint.
We wrote a detailed article on the exact steps and processes that you need to follow in order to do this. Make sure you read that article on How to Change Orientation of Just One Slide in PowerPoint !
More PowerPoint Related Topics
- How to Use a Presentation Clicker to Deliver Presentations Effectively!
- How to Crop a Picture in PowerPoint? [Complete Step-by-Step Tutorial!]
- How to Give a Presentation on Zoom? A Helpful Resource!
- How to Convert a PowerPoint to PDF? [A Simple Guide!]
- PowerPoint vs Google Slides: Which is Better? [ULTIMATE Test!]
- How to Change Bullet Style in PowerPoint? A Complete Guide
Credit to Diana.grytsku (on Freepik) for the Featured Image of this Article (edited further)

Change the page layout
You might want to change the size, shape, or orientation of your slides for presentation or to simplify printing. You can choose landscape, portrait, or custom page setups as fits your needs.
(Currently it's not possible to mix landscape and portrait slides in the same presentation. For a suggested workaround, see Use portrait and landscape slide orientation in the same presentation .
If this is a feature you’d like to request, please send us your feedback to help us prioritize new features in future updates. See How do I give feedback on Microsoft 365 for more information.
Change the slide size
On the Design tab, in the Customize group at the far right end, click Slide Size .

Click Custom Slide Size .

In the Slides sized for list , click the size you want to use, or use the Width and Height boxes to select custom sizes.

PowerPoint now asks you to choose between maximizing the size of your content on the new layout (to do this, click Maximize ) or scaling it down so that all of the content fits into the new layout (to do this, click Ensure Fit ).
Note: If you choose to maximize, some content might fall outside the print margins.

Note: Unlike Word document pages, PowerPoint slides don’t have margins that you can adjust to change the slide layout. Your slide stretches from edge to edge. When you print the slides, printer limitations can result in a white edge around the slides. However, you can change the margins inside Text Boxes and Shapes .
Change the slide orientation
Although wide format landscape presentations are most popular, you might find that your slides work better in vertical, portrait mode.
Note: You can change the orientation of the entire presentation only, not individual slides.
On the Design tab, in the Customize group, click Slide Size .

Change the orientation for the slides to Portrait or Landscape .

Note: You can also change the orientation of your notes, handouts, and outline.
Note: If you choose to maximize, some content might fall outside the slide.
Change the size of your slides
Change the margins between text and the edge of a text box or shape
Workaround for printing slides without white edges
Change a slide layout

Need more help?
Want more options.
Explore subscription benefits, browse training courses, learn how to secure your device, and more.

Microsoft 365 subscription benefits

Microsoft 365 training

Microsoft security

Accessibility center
Communities help you ask and answer questions, give feedback, and hear from experts with rich knowledge.

Ask the Microsoft Community

Microsoft Tech Community

Windows Insiders
Microsoft 365 Insiders
Was this information helpful?
Thank you for your feedback.
How to change slide size in PowerPoint
- Written by: Harriet Jones
- Categories: PowerPoint design

Why would anyone want to change the slide size in PowerPoint? You open a file, it’s the perfect 16:9 (no 4:3 fans here!), and you get stuck in, right? Well, it depends what you’re using PowerPoint for…
Presentations are a powerful tool for communicating with your audience. But if you’re making presentations, the chances are you’re also looking for other ways to get your message out there. Perhaps you want to share news on your social media feeds, present a poster at a conference, have downloadable brochures on your website, or create business cards to hand out to unsuspecting members of the public.
You might be thinking, that sounds great, but I don’t have the tools to do all that! Would you believe me if I told you can do all this and more in good-old-PowerPoint?
PowerPoint is easy-to-use, quick to edit, and is super versatile. The feature that makes creating all these different materials possible is the ability to change the size of PowerPoint slides to your desired dimensions. ‘But how?’ I hear you cry. Well, cry no more! In this blog post I’ll teach you how to change slide size in PowerPoint.
If you’re a Google Slides user who’s wandered into the wrong blog post – this one on changing slide size in Google Slides might be what you’re looking for.
Quick guide:
- In the Design tab choose Slide Size . The highlighted box shows the current dimensions of your slides.
- In the Slide Size drop down, select Custom Slide Size .
- Select the slide size you want to use.
Step-by-step:
To know what to change, you need to know where you’re starting. When you open a brand new PowerPoint file, the standard slide dimension is widescreen (16:9). This is ideal for presentations because it matches the size and proportions of most modern screens.

To check your slide dimensions head to the Design tab then choose Slide Size . The highlighted box shows you the current dimensions of your slides.
To change your slide size, under the Slide Size drop down, select Custom Slide Size .

A pop-up box appears, and you can customise the slide size to suit your needs.
What’s helpful is that PowerPoint already has options built in for standard formats, such as Letter paper and A4, so you don’t have to spend time searching the web for the dimensions you need.

Not every combination of width and height is available in this drop down (including the dimensions for popular social media sites). So if you need a truly custom slide size, you can directly input your measurements. Select Custom from the drop-down list and type in the Width and Height you need.

PowerPoint will ask you if you want to ensure fit or maximize fit. Typically you would choose to maximise when increasing the size of your slides, and ensure fit when decreasing slide size.

Maximise will increase the size of any existing content on the slide, but as a result, all the content might not fit on the slide. Ensure fit scales down the size of existing content making it appear smaller but ensuring all the content fits on the slide. This is why it’s best to set the slide size right at the beginning and then you don’t need to worry about this.
After you’ve made your selection, select OK , and hey presto, you’ve done it.
For this example, we’ve chosen the size of a regular square Instagram post.

Converting aspect ratio to dimensions
Just a side note on working out what slide size you need for creating social media posts. When you look up dimensions for an Instagram post, the most popular Google results tell us it’s 1080px by 1080px, but as you can see in the screenshots above, it looks like PowerPoint wants us to input our dimensions as cm. This can be a little confusing, especially for us non-designers out there who don’t know our pixels (px) from our points (pts). There are lots of websites online that can help you convert your measurements, like here – www.unitconverters.net . However, it’s a little know fact that you can enter dimensions in cm, inches or pixels and PowerPoint will convert it for you! Just type the numbers, then a space and then the unit abbreviations (cm, in, px). For a comprehensive guide on all social media image sizes check out this article by Brandwatch .
A regular Instagram post is a square, so that’s easy as the ratio is 1:1, meaning the width is the same as the height. With rectangles, the ratio of width to height will differ. A LinkedIn post for example, can either be portrait 1080 x 1350 or landscape view at 1280 x 720. So for the portrait the ratio is 4:5 and landscape is approximately 16:9. Don’t let this intimidate you. If you divide both sides (width and height) by the same amount you guarantee the ratio will stay the same.
If you’re entering slide size details as centimetres make sure you consider the overall slide size in cm as this will affect the size of an image export, which in turn can affect the quality of your exported image. Put simply an Instagram post made on a 2cm by 2cm slide will be poorer quality than one made on a 10cm by 10cm one. We have a helpful blog post that goes into much more detail on Picture size and resolution in PowerPoint .
Now that you’re a pro on how to change PowerPoint slide size, let’s go through some examples of the awesome things you can do with this new knowledge. But before we do that just a note – there are dedicated software to create a bunch of the things we’ve mentioned in this article. If you have access to it, that’s amazing! Use it! But for many of us, PowerPoint is one of our only design tools and purchasing a handful of other programs isn’t on the cards, so we need to get the most out of PowerPoint that we can.
Academic posters
For researchers and students alike, creating academic posters can be one of the more gruelling tasks on your to-do list. For most people that’s because they struggle to make posters look beautiful and engaging meaning people miss out on reading your incredible work! With your new knowledge of how to change slide size in PowerPoint, you can start making A4 and A3 posters in PowerPoint.
Some things to remember…
A poster should never be an impenetrable wall of text but a visual summary of your work. It should be concise with plenty of white space, accessible, with a clear and logical layout. A great poster is a conversation starter that drives the audience to learn more.

We have a whole blog post on to how to create beautiful and effective academic posters in PowerPoint , so make sure you give that a read for more tips and tricks and a couple of cheeky freebies!
Social media posts
Once you know how to change slide size in PowerPoint you can create graphics for all your social media channels. Whether it’s for Instagram, LinkedIn, Facebook or Twitter… sorry X, we’ve got you covered. Check out this blog post on how to create social media posts in PowerPoint , from colours to image manipulation to animation! In the rapidly changing world of social media, you need to strike a balance between compelling visuals and concise messaging, to get your audience to stop scrolling, pay attention and remember your message.

If you have mind-blowing stats to share, but struggle with data visualisation, spend a little time working on your data vis skills before getting started. Start here .
And, thanks to the wonders of PowerPoint animation, you’re not just limited to static social media materials when creating in PowerPoint. Dynamic GIFs are a cool way to captivate your audience and are easier to make than you might think. When creating your GIF, remember to keep it short to capture and keep attention, and focus on smooth transitions for a polished, professional result.
Honourable mentions
Here’s a few more handy blog posts to check out for extra tips and tricks on creating anything BUT presentations in PowerPoint!
How to get the most out of PowerPoint and PDFs
How to make an infographic in PowerPoint
How to make a PowerPoint memory game
You’ve made it – now you know how to change slide size in PowerPoint and hopefully are inspired to use PowerPoint to create more than just presentations.

Harriet Jones
Communication consultant, related articles, mastering high-impact conference presentations.
- PowerPoint design / Visual communication
Conference presentations are really hard to get right compared to day-to-day presentations. How do you tackle bigger stages, bigger rooms, bigger audiences and higher stakes?

Insights from a presentation templates expert
- PowerPoint design / Industry insights
A PowerPoint template is the foundation on which polished and professional presentations are built. We interview BrightCarbon’s new Templates Lead, Gemma Leamy, and pick her brains on the ideal process for creating robust PowerPoint templates.

115 PowerPoint Christmas cards to download and share!
- PowerPoint design
- Comments: 45
It's Christmas! After a late night with too much eggnog and brandy snaps we set ourselves a challenge to see who could come up with the wildest PowerPoint Christmas card! So it's the day after the night before, and through blurry eyes we can reveal our efforts...

Leave a Reply Cancel reply
Save my name and email in this browser for the next time I comment.
Join the BrightCarbon mailing list for monthly invites and resources
First of all the deck looks great, once again you guys have done an outstanding job. Second, I’d like to comment on the quality of the training provided by your colleagues - quite simply it was exceptional. I have spoken to the whole team and that view is unanimous. Please pass this on. James Bagan MyLife Digital

Critical PowerPoint Shortcuts – Claim Your FREE Training Module and Get Your Time Back!
How to Make a PowerPoint Presentation (Step-by-Step)
- PowerPoint Tutorials
- Presentation Design
- January 22, 2024
In this beginner’s guide, you will learn step-by-step how to make a PowerPoint presentation from scratch.
While PowerPoint is designed to be intuitive and accessible, it can be overwhelming if you’ve never gotten any training on it before. As you progress through this guide, you’ll will learn how to move from blank slides to PowerPoint slides that look like these.

Table of Contents
Additionally, as you create your presentation, you’ll also learn tricks for working more efficiently in PowerPoint, including how to:
- Change the slide order
- Reset your layout
- Change the slide dimensions
- Use PowerPoint Designer
- Format text
- Format objects
- Play a presentation (slide show)
With this knowledge under your belt, you’ll be ready to start creating PowerPoint presentations. Moreover, you’ll have taken your skills from beginner to proficient in no time at all. I will also include links to more advanced PowerPoint topics.
Ready to start learning how to make a PowerPoint presentation?
Take your PPT skills to the next level
Start with a blank presentation.
Note: Before you open PowerPoint and start creating your presentation, make sure you’ve collected your thoughts. If you’re going to make your slides compelling, you need to spend some time brainstorming.
For help with this, see our article with tips for nailing your business presentation here .
The first thing you’ll need to do is to open PowerPoint. When you do, you are shown the Start Menu , with the Home tab open.
This is where you can choose either a blank theme (1) or a pre-built theme (2). You can also choose to open an existing presentation (3).
For now, go ahead and click on the Blank Presentation (1) thumbnail.

Doing so launches a brand new and blank presentation for you to work with. Before you start adding content to your presentation, let’s first familiarize ourselves with the PowerPoint interface.
The PowerPoint interface

Here is how the program is laid out:
- The Application Header
- The Ribbon (including the Ribbon tabs)
- The Quick Access Toolbar (either above or below the Ribbon)
- The Slides Pane (slide thumbnails)
The Slide Area
The notes pane.
- The Status Bar (including the View Buttons)
Each one of these areas has options for viewing certain parts of the PowerPoint environment and formatting your presentation.
Below are the important things to know about certain elements of the PowerPoint interface.
The PowerPoint Ribbon

The Ribbon is contextual. That means that it will adapt to what you’re doing in the program.
For example, the Font, Paragraph and Drawing options are greyed out until you select something that has text in it, as in the example below (A).

Furthermore, if you start manipulating certain objects, the Ribbon will display additional tabs, as seen above (B), with more commands and features to help you work with those objects. The following objects have their own additional tabs in the Ribbon which are hidden until you select them:
- Online Pictures
- Screenshots
- Screen Recording
The Slides Pane

This is where you can preview and rearrange all the slides in your presentation.
Right-clicking on a slide in the pane gives you additional options on the slide level that you won’t find on the Ribbon, such as Duplicate Slide , Delete Slide , and Hide Slide .

In addition, you can add sections to your presentation by right-clicking anywhere in this Pane and selecting Add Section . Sections are extremely helpful in large presentations, as they allow you to organize your slides into chunks that you can then rearrange, print or display differently from other slides.

The Slide Area (A) is where you will build out your slides. Anything within the bounds of this area will be visible when you present or print your presentation.
Anything outside of this area (B) will be hidden from view. This means that you can place things here, such as instructions for each slide, without worrying about them being shown to your audience.

The Notes Pane is the space beneath the Slide Area where you can type in the speaker notes for each slide. It’s designed as a fast way to add and edit your slides’ talking points.
To expand your knowledge and learn more about adding, printing, and exporting your PowerPoint speaker notes, read our guide here .
Your speaker notes are visible when you print your slides using the Notes Pages option and when you use the Presenter View . To expand your knowledge and learn the ins and outs of using the Presenter View , read our guide here .

You can resize the Notes Pane by clicking on its edge and dragging it up or down (A). You can also minimize or reopen it by clicking on the Notes button in the Status Bar (B).
Note: Not all text formatting displays in the Notes Pane, even though it will show up when printing your speaker notes. To learn more about printing PowerPoint with notes, read our guide here .
Now that you have a basic grasp of the PowerPoint interface at your disposal, it’s time to make your presentation.
Adding Content to Your PowerPoint Presentation
Notice that in the Slide Area , there are two rectangles with dotted outlines. These are called Placeholders and they’re set on the template in the Slide Master View .
To expand your knowledge and learn how to create a PowerPoint template of your own (which is no small task), read our guide here .

As the prompt text suggests, you can click into each placeholder and start typing text. These types of placeholder prompts are customizable too. That means that if you are using a company template, it might say something different, but the functionality is the same.

Note: For the purposes of this example, I will create a presentation based on the content in the Starbucks 2018 Global Social Impact Report, which is available to the public on their website.
If you type in more text than there is room for, PowerPoint will automatically reduce its font size. You can stop this behavior by clicking on the Autofit Options icon to the left of the placeholder and selecting Stop Fitting Text to this Placeholder .
Next, you can make formatting adjustments to your text by selecting the commands in the Font area and the Paragraph area of the Home tab of the Ribbon.

The Reset Command: If you make any changes to your title and decide you want to go back to how it was originally, you can use the Reset button up in the Home tab .

Insert More Slides into Your Presentation
Now that you have your title slide filled in, it’s time to add more slides. To do that, simply go up to the Home tab and click on New Slide . This inserts a new slide in your presentation right after the one you were on.

You can alternatively hit Ctrl+M on your keyboard to insert a new blank slide in PowerPoint. To learn more about this shortcut, see my guide on using Ctrl+M in PowerPoint .
Instead of clicking the New Slide command, you can also open the New Slide dropdown to see all the slide layouts in your PowerPoint template. Depending on who created your template, your layouts in this dropdown can be radically different.

If you insert a layout and later want to change it to a different layout, you can use the Layout dropdown instead of the New Slide dropdown.
After inserting a few different slide layouts, your presentation might look like the following picture. Don’t worry that it looks blank, next we will start adding content to your presentation.

If you want to follow along exactly with me, your five slides should be as follows:
- Title Slide
- Title and Content
- Section Header
- Two Content
- Picture with Caption
Adding Content to Your Slides
Now let’s go into each slide and start adding our content. You’ll notice some new types of placeholders.

On slide 2 we have a Content Placeholder , which allows you to add any kind of content. That includes:
- A SmartArt graphic,
- A 3D object,
- A picture from the web,
- Or an icon.
To insert text, simply type it in or hit Ctrl+C to Copy and Ctrl+V to Paste from elsewhere. To insert any of the other objects, click on the appropriate icon and follow the steps to insert it.
For my example, I’ll simply type in some text as you can see in the picture below.

Slides 3 and 4 only have text placeholders, so I’ll go ahead and add in my text into each one.

On slide 5 we have a Picture Placeholder . That means that the only elements that can go into it are:
- A picture from the web

To insert a picture into the picture placeholder, simply:
- Click on the Picture icon
- Find a picture on your computer and select it
- Click on Insert
Alternatively, if you already have a picture open somewhere else, you can select the placeholder and paste in (shortcut: Ctrl+V ) the picture. You can also drag the picture in from a file explorer window.

If you do not like the background of the picture you inserted onto your slide, you can remove the background here in PowerPoint. To see how to do this, read my guide here .
Placeholders aren’t the only way to add content to your slides. At any point, you can use the Insert tab to add elements to your slides.
You can use either the Title Only or the Blank slide layout to create slides for content that’s different. For example, a three-layout content slide, or a single picture divider slide, as shown below.

In the first example above, I’ve inserted 6 text boxes, 3 icons, and 3 circles to create this layout. In the second example, I’ve inserted a full-sized picture and then 2 shapes and 2 text boxes.
The Reset Command: Because these slides are built with shapes and text boxes (and not placeholders), hitting the Reset button up in the Home tab won’t do anything.
That is a good thing if you don’t want your layouts to adjust. However, it does mean that it falls on you to make sure everything is aligned and positioned correctly.
For more on how to add and manipulate the different objects in PowerPoint, check out our step-by-step articles here:
- Using graphics in PowerPoint
- Inserting icons onto slides
- Adding pictures to your PowerPoint
- How to embed a video in PowerPoint
- How to add music to your presentation
Using Designer to generate more layouts ideas
If you have Office 365, your version of PowerPoint comes with a new feature called Designer (or Design Ideas). This is a feature that generates slide layout ideas for you. The coolest thing about this feature is that it uses the content you already have.
To use Designer , simply navigate to the Design tab in your Ribbon, and click on Design Ideas .

NOTE: If the PowerPoint Designer is not working for you (it is grey out), see my troubleshooting guide for Designer .
Change the Overall Design (optional)
When you make a PowerPoint presentation, you’ll want to think about the overall design. Now that you have some content in your presentation, you can use the Design tab to change the look and feel of your slides.
For additional help thinking through the design of your presentation, read my guide here .
A. Picking your PowerPoint slide size
If you have PowerPoint 2013 or later, when you create a blank document in PowerPoint, you automatically start with a widescreen layout with a 16:9 ratio. These dimensions are suitable for most presentations as they match the screens of most computers and projectors.
However, you do have the option to change the dimensions.
For example, your presentation might not be presented, but instead converted into a PDF or printed and distributed. In that case, you can easily switch to the standard dimensions with a 4:3 ratio by selecting from the dropdown (A).
You can also choose a custom slide size or change the slide orientation from landscape to portrait in the Custom Slide Size dialog box (B).

To learn all about the different PowerPoint slide sizes, and some of the issues you will face when changing the slide size of a non-blank presentation, read my guide here .
B. Selecting a PowerPoint theme
The next thing you can do is change the theme of your presentation to a pre-built one. For a detailed explanation of what a PowerPoint theme is, and how to best use it, read my article here .
In the beginning of this tutorial, we started with a blank presentation, which uses the default Office theme as you can see in the picture below.

That gives you the most flexibility because it has a blank background and quite simple layouts that work for most presentations. However, it also means that it’s your responsibility to enhance the design.
If you’re comfortable with this, you can stay with the default theme or create your own custom theme ( read my guide here ). But if you would rather not have to think about design, then you can choose a pre-designed theme.
Microsoft provides 46 other pre-built themes, which include slide layouts, color variants and palettes, and fonts. Each one varies quite significantly, so make sure you look through them carefully.
To select a different theme, go to the Design tab in the Ribbon, and click on the dropdown arrow in the Themes section .

For this tutorial, let’s select the Frame theme and then choose the third Variant in the theme. Doing so changes the layout, colors, and fonts of your presentation.

Note: The theme dropdown area is also where you can import or save custom themes. To see my favorite places to find professional PowerPoint templates and themes (and recommendations for why I like them), read my guide here .
C. How to change a slide background in PowerPoint
The next thing to decide is how you want your background to look for the entire presentation. In the Variants area, you can see four background options.

For this example, we want our presentation to have a dark background, so let’s select Style 3. When you do so, you’ll notice that:
- The background color automatically changes across all slides
- The color of the text on most of the slides automatically changes to white so that it’s visible on the dark background
- The colors of the objects on slides #6 and #7 also adjust, in a way we may not want (we’ll likely have to make some manual adjustments to these slides)

Note: If you want to change the slide background for just that one slide, don’t left-click the style. Instead, right-click it and select Apply to Selected Slides .
After you change the background for your entire presentation, you can easily adjust the background for an individual slide.

Inside the Format Background pane, you can see you have the following options:
- Gradient fill
- Picture or texture fill
- Pattern fill
- Hide background
You can explore these options to find the PowerPoint background that best fits your presentation.
D. How to change your color palette in PowerPoint
Another thing you may want to adjust in your presentation, is the color scheme. In the picture below you can see the Theme Colors we are currently using for this presentation.

Each PowerPoint theme comes with its own color palette. By default, the Office theme includes the Office color palette. This affects the colors you are presented with when you format any element within your presentation (text, shapes, SmartArt, etc.).

The good news is that the colors here are easy to change. To switch color palettes, simply:
- Go to the Design tab in the Ribbon
- In the Variants area, click on the dropdown arrow and select Colors
- Select the color palette (or theme colors) you want
You can choose among the pre-built color palettes from Office, or you can customize them to create your own.
As you build your presentation, make sure you use the colors from your theme to format objects. That way, changing the color palette adjusts all the colors in your presentation automatically.
E. How to change your fonts in PowerPoint
Just as we changed the color palette, you can do the same for the fonts.

Each PowerPoint theme comes with its own font combination. By default, the Office theme includes the Office font pairing. This affects the fonts that are automatically assigned to all text in your presentation.

The good news is that the font pairings are easy to change. To switch your Theme Fonts, simply:
- Go to the Design tab in the Ribbon
- Click on the dropdown arrow in the Variants area
- Select Fonts
- Select the font pairing you want
You can choose among the pre-built fonts from Office, or you can customize them to create your own.
If you are working with PowerPoint presentations on both Mac and PC computers, make sure you choose a safe PowerPoint font. To see a list of the safest PowerPoint fonts, read our guide here .
If you receive a PowerPoint presentation and the wrong fonts were used, you can use the Replace Fonts dialog box to change the fonts across your entire presentation. For details, read our guide here .
Adding Animations & Transitions (optional)
The final step to make a PowerPoint presentation compelling, is to consider using animations and transitions. These are by no means necessary to a good presentation, but they may be helpful in your situation.
A. Adding PowerPoint animations
PowerPoint has an incredibly robust animations engine designed to power your creativity. That being said, it’s also easy to get started with basic animations.
Animations are movements that you can apply to individual objects on your slide.

To add a PowerPoint animation to an element of your slide, simply:
- Select the element
- Go to the Animations tab in the Ribbon
- Click on the dropdown arrow to view your options
- Select the animation you want
You can add animations to multiple objects at one time by selecting them all first and then applying the animation.
B. How to preview a PowerPoint animation

There are three ways to preview a PowerPoint animation:
- Click on the Preview button in the Animations tab
- Click on the little star next to the slide
- Play the slide in Slide Show Mode
To learn other ways to run your slide show, see our guide on presenting a PowerPoint slide show with shortcuts .
To adjust the settings of your animations, explore the options in the Effect Options , Advanced Animation and the Timing areas of the Animation tab .

Note: To see how to make objects appear and disappear in your slides by clicking a button, read our guide here .
C. How to manage your animations in PowerPoint

The best way to manage lots of animations on your slide is with the Animation Pane . To open it, simply:
- Navigate to the Animations tab
- Select the Animation Pane
Inside the Animation Pane, you’ll see all of the different animations that have been applied to objects on your slide, with their numbers marked as pictured above.
Note: To see examples of PowerPoint animations that can use in PowerPoint, see our list of PowerPoint animation tutorials here .
D. How to add transitions to your PowerPoint presentation
PowerPoint has an incredibly robust transition engine so that you can dictate how your slides change from one to the other. It is also extremely easy to add transitions to your slides.
In PowerPoint, transitions are the movements (or effects) you see as you move between two slides.

To add a transition to a PowerPoint slide, simply:
- Select the slide
- Go to the Transitions tab in the Ribbon
- In the Transitions to This Slide area, click on the dropdown arrow to view your options
- Select the transition you want
To adjust the settings of the transition, explore the options in the Timing area of the Transitions tab.
You can also add the same transition to multiple slides. To do that, select them in the Slides Pane and apply the transition.
E. How to preview a transition in PowerPoint

There are three ways to preview your PowerPoint transitions (just like your animations):
- Click on the Preview button in the Transitions tab
- Click on the little star beneath the slide number in the thumbnail view
Note: In 2016, PowerPoint added a cool new transition, called Morph. It operates a bit differently from other transitions. For a detailed tutorial on how to use the cool Morph transition, see our step-by-step article here .
Save Your PowerPoint Presentation
After you’ve built your presentation and made all the adjustments to your slides, you’ll want to save your presentation. YOu can do this several different ways.

To save a PowerPoint presentation using your Ribbon, simply:
- Navigate to the File tab
- Select Save As on the left
- Choose where you want to save your presentation
- Name your presentation and/or adjust your file type settings
- Click Save
You can alternatively use the Ctrl+S keyboard shortcut to save your presentation. I recommend using this shortcut frequently as you build your presentation to make sure you don’t lose any of your work.

This is the standard way to save a presentation. However, there may be a situation where you want to save your presentation as a different file type.
To learn how to save your presentation as a PDF, see our guide on converting PowerPoint to a PDF .
How to save your PowerPoint presentation as a template
Once you’ve created a presentation that you like, you may want to turn it into a template. The easiest – but not technically correct – way, is to simply create a copy of your current presentation and then change the content.
But be careful! A PowerPoint template is a special type of document and it has its own parameters and behaviors.
If you’re interested in learning about how to create your own PowerPoint template from scratch, see our guide on how to create a PowerPoint template .
Printing Your PowerPoint Presentation
After finishing your PowerPoint presentation, you may want to print it out on paper. Printing your slides is relatively easy.

To open the Print dialog box, you can either:
- Hit Ctrl+P on your keyboard
- Or go to the Ribbon and click on File and then Print

Inside the Print dialog box, you can choose from the various printing settings:
- Printer: Select a printer to use (or print to PDF or OneNote)
- Slides: Choose which slides you want to print
- Layout: Determine how many slides you want per page (this is where you can print the notes, outline, and handouts)
- Collated or uncollated (learn what collated printing means here )
- Color: Choose to print in color, grayscale or black & white
There are many more options for printing your PowerPoint presentations. Here are links to more in-depth articles:
- How to print multiple slides per page
- How to print your speaker notes in PowerPoint
- How to save PowerPoint as a picture presentation
So that’s how to create a PowerPoint presentation if you are brand new to it. We’ve also included a ton of links to helpful resources to boost your PowerPoint skills further.
When you are creating your presentation, it is critical to first focus on the content (what you are trying to say) before getting lost inserting and playing with elements. The clearer you are on what you want to present, the easier it will be to build it out in PowerPoint.
If you enjoyed this article, you can learn more about our PowerPoint training courses and other presentation resources by visiting us here .
🔒 Unlock the PowerPoint Shortcuts Trusted by Industry Leaders KKR, American Express, HSBC, and More!
Join over 114,880 professionals from diverse fields including consulting, investment banking, advertising, marketing, sales, and business development who have supercharged their PowerPoint game with our proven methods.
✅ Customize compelling presentations effortlessly.
✅ Master time-saving techniques for faster deck creation.
✅ Boost your career prospects with top-notch PowerPoint skills.
Get FREE access to the Critical PowerPoint Shortcuts module of our premium training course by entering your name and email below.
DISCLAIMER: PC Users Only!
We respect your privacy and will keep your info safe and confidential.
About The Author

Popular Tutorials
- How to Strikethrough Text (l̶i̶k̶e̶ ̶t̶h̶i̶s̶) in Word, Excel & PowerPoint
- How to Make Animated Fireworks in PowerPoint (Step-by-Step)
- Strikethrough Shortcut (l̶i̶k̶e̶ ̶t̶h̶i̶s̶) for Word, Excel & PowerPoint
- How to Create a Flash Card Memory Game in PowerPoint (Like Jeopardy)
- Keyboard Shortcuts Not Working: Solved
PowerPoint Tutorial Categories
- Strategies & Opinions
- Shortcuts & Hacks
- Pictures, Icons, Videos, Etc.
- New Features
- Miscellaneous
- Charts & Data Viz
We help busy professionals save hours and gain peace of mind, with corporate workshops, self-paced courses and tutorials for PowerPoint and Word.
Work With Us
- Corporate Training
- Presentation & Template Design
- Courses & Downloads
- PowerPoint Articles
- Word Articles
- Productivity Resources
Find a Tutorial
- Free Training
- For Businesses
We help busy office workers save hours and gain peace of mind, with tips, training and tutorials for Microsoft PowerPoint and Word.
Master Critical PowerPoint Shortcuts – Secure Your FREE Training Module and Save Valuable Time!
⌛ Master time-saving expert techniques.
🔥 Create powerful presentations.
🚀 Propel your career to new heights.
We value your privacy – we keep your info safe.
Discover PowerPoint Hacks Loved by Industry Giants - KKR, AmEx, HSBC!
Over 114,880 professionals in finance, marketing and sales have revolutionized their PPT skills with our proven methods.
Gain FREE access to a full module of our premium PowerPoint training program – Get started today!
We hate spam too and promise to keep your information safe.
You are currently viewing a placeholder content from Facebook . To access the actual content, click the button below. Please note that doing so will share data with third-party providers.
How-To Geek
How to make a poster using microsoft powerpoint.

Your changes have been saved
Email Is sent
Please verify your email address.
You’ve reached your account maximum for followed topics.
I Tried Using a Windows Clone as a Daily Driver, Here’s How It Went
This is how i fixed the windows update error 0x80070643, cut your presentation time down with the pechakucha method, quick links, define the poster dimensions, design your poster.
Microsoft PowerPoint isn't just for presentations---it also provides all of the creative tools you need to design a beautiful poster. Just set the dimensions, design the poster, and print it out. Here's how to make a poster using PowerPoint.
Posters come in all sizes, but the first thing you need to know is PowerPoint's slide limit is 56-inches x 56-inches, so you'll need to plan accordingly. It's also important to note that you want to set your poster dimensions before you start designing your poster. Otherwise, you might end up having to rework parts of your design due to the size change.
Related: How to Reduce the File Size of a PowerPoint Presentation
Here are some of the standard poster sizes to get you started:
- Small poster: 11" x 17"
- Medium poster: 18" x 24"
- Large posters: 24" x 36" or 27" x 39"
Once you've decided on your poster size, set the dimensions in PowerPoint. To do this, open PowerPoint and navigate to the "Design" tab.

In the "Customize" group, select "Slide Size."

Select "Custom Slide Size" from the dropdown menu.

The "Slide Size" window will appear. Input the width and height specifications to match your required size. Keep in mind that if your height is larger in size than your width, the orientation of the slide will automatically change to "Portrait."
When you're finished, select "OK."

Once selected, a new window will appear giving you two scaling options: Maximize or Ensure Fit. If your slide already has content on it, you'll want to select "Ensure Fit."

Your slide will now be resized.
Your poster design is going to depend completely on you. You'll want to pay attention to the background of the poster, text and image arrangement, font size and style, etc. Essentially, you should treat this part exactly as if you were just creating another slide for a presentation.
Because the design and process of this step is going to differ for everyone, we'd like to offer some of our previous guides to get you started in the design process:
- Insert a picture or other object.
- Use an image as a background.
- Insert an image inside text.
- Get a picture behind text.
- Make a border or frame.
Once your design is ready, all that's left to do is print it out and hang it up!
Related: How to Troubleshoot Printing Issues in Microsoft Word
- Microsoft Office
- Microsoft PowerPoint
- Slidesgo School
- PowerPoint Tutorials
How to Make a Poster in PowerPoint

A poster is always a very good idea to advertise an event, as it allows you to highlight important information and attract the attention of everyone who sees it. With a poster, you can indicate place, time, and a small description of birthday celebrations, concerts, plays, graduation, and, in short, the event you want to present. It is also a fantastic decorative element to decorate.
However, how can we create these creative designs? At Slidesgo , we have some A3 Google Slides and PowerPoint templates ready to be printed to get amazing posters . You can filter your search on our website so that the results you get are A3 or even A4.
However, if you want to learn how to make a poster using PowerPoint and from scratch, we are going to tell you about it in this post. Here are the necessary steps!
How to make a poster in PowerPoint step by step
- The first step to creating your poster is to adjust the size in PowerPoint. To do this, click on Design > Slide Size. In the pop-up window that appears, you can customize or choose the size you need. In the example, we have chosen an A3 paper. In addition, you can choose the orientation of the slides, between portrait and landscape. Finally, Ensure Fit. When you click OK, the slide will appear in the new format.
- Then, the editing possibilities are very numerous. You can change the style of the presentation, add images, texts... whatever you want your poster to include. However, if you need a more professional design, at Slidesgo we have plenty of them, even with formats such as A3 and A4 already defined. Take a look at them!
- Another possibility, in addition to using a template with A3 or A4 format already defined, is to adapt a template in 16:9 format. For this, just follow the first step, but instead of opening a new PowerPoint presentation, open an existing one. In the following example, we have adapted the slide to the A4 landscape format.
- If you want to print your final design, you will need to export it to PDF. Click File > Export > Create PDF/ XPS Document. Save the file with the name of your choice and select Publish.
- From the Options tab, you can set whether to export the whole presentation, a selection of specific slides, or the current slide, in addition to other available options. If you want to know more about how to export a PowerPoint presentation as a PDF file , you can read the tutorial you can find at Slidesgo School .

As you have seen, creating a poster in PowerPoint is very easy. Now that you know, where are you going to place the amazing poster you make? On a high place so that everyone can appreciate the amazing creation!
Do you find this article useful?
Related tutorials.

New feature available: edit our templates with Canva
Whenever you need to create, Slidesgo is there. We’re continually enhancing your presentation design process with templates that are primed to impress for any occasion. And in order to let your ideas flow best, comfort is key. How could Slidesgo help you with this? By making you feel right at home with our resources, no matter your preferred platform.You spoke, and we listened. Now, your favorite slides can be accessed on a new platform: Canva! This new format adds to our existing options (PowerPoint and Google Slides), expanding your ways to utilize our first-rate presentation content. We’ve started with a selection of Canva-ready...

How to print PowerPoint notes
Crafting an impactful PowerPoint slideshow and delivering a captivating presentation are distinct skills. The first focuses on designing appealing visuals to convey a clear message, while the second involves employing effective presentation techniques to ensure the audience grasps the idea. The content of this article will help you with the latter part of this process, guiding future presenters on how to print PowerPoint with speaker notes to enhance your presentations success and effectiveness.

Discover Our Online Presentation Software for Free
We have great news for you today! If you’ve been a Slidesgo fan for years (or months, or weeks, or days, or mere hours, we welcome everyone!), you’ll probably know for now that our templates are available mostly in two formats: for use in Google Slides and PowerPoint.Google Slides is a free tool, since you only need a Google account in order to use it. PowerPoint, on the other hand, is part of the Microsoft Office suite, so it’s not a free program, but that didn’t stop it from being one of the most popular options in the world!What if we...

Webinar: Presentation Audit
With more than 15,000 templates released on Slidesgo and a user base composed of millions of people, we estimate that the total number of presentations created adds up to… um, a lot! Our team of professional designers work very hard to provide you with editable slides so that the only thing you need to do is, well, customize the elements to your liking. Starting from any given template, the results may vary a lot depending on the person who edited the contents.Have you ever wondered “Is my presentation good enough?” and wished that an expert on presentations looked at your template...
Microsoft 365 Life Hacks > Presentations > How many slides does your presentation need?
How many slides does your presentation need?
When you’re creating a presentation, it’s important to consider the amount of information you’re sharing with your audience. You don’t want to overwhelm them, but you also want to be comprehensive and ensure that you’re covering all your bases. Whether you’re giving a 10, 15, or 30-minute presentation, see how many slides your presentation needs to get your point across.

Rules and guidance for PowerPoint presentations
PowerPoint is a powerful visual aid for introducing data, statistics, and new concepts to any audience. In PowerPoint, you can create as many slides as you want—which might sound tempting at first. But length doesn’t always guarantee a successful presentation . Most presentations last around 10-15 minutes, and anything longer than that (such as a 30-minute presentation) may have additional visual aids or speakers to enhance your message.
A handy rule to keep in mind is to spend about 1-2 minutes on each slide. This will give you ample time to convey your message, let data sink in, and allow you to memorize your presentation . When you limit each slide to this length of time, you also need to be selective about how much information you put on each slide and avoid overloading your audience.
For 10-minute presentations
Ten minutes is usually considered the shortest amount of time you need for a successful presentation. For a shorter 10-minute presentation, you’ll need to be selective with your content. Limit your slide count to approximately 7 to 10 slides.
For 15-minute presentations
When preparing for a 15-minute presentation, concise and focused content is key. Aim for around 10 to 15 slides to maintain a good pace, which will fit with the 1-2 minute per slide rule.
For 30-minute presentations
A longer presentation gives you more room to delve deeper into your topic. But to maintain audience engagement, you’ll need to add interactivity , audience participation, and elements like animations . Aim for around 20 to 30 slides, allowing for a balanced distribution of content without overwhelming your audience.

Tell your story with captivating presentations
Powerpoint empowers you to develop well-designed content across all your devices
Using the 10-20-30 rule
The 10-20-30 rule is an effective way to structure your presentation. It calls for no more than 10 slides and no longer than 20 minutes (as well as a 30-point font).
Tips for crafting an effective presentation
No matter how long a presentation is, there are guidelines for crafting one to enhance understanding and retention. Keep these tips in mind when creating your PowerPoint masterpiece:
- Avoid overload: Ensure that each slide communicates a single idea clearly, avoiding cluttered layouts or excessive text.
- Pay attention to structure: Think of slides as bullet points with introductions, endings, and deep dives within each subject.
- Add visual appeal: Incorporate images, charts, and graphics to convey information without using too many words to make your audience read.
- Engage with your audience: Encourage interaction through questions, polls, or storytelling techniques to keep your audience actively involved.
- Put in the practice: Familiarize yourself with your slides and practice your delivery to refine your timing and confidence.
Ultimately, the ideal number of slides for your presentation depends on the allocated time frame and how detailed your content is. By striking a balance between informative content and engaging delivery, you can create a compelling presentation that can teach your audience something new.
Get started with Microsoft 365
It’s the Office you know, plus the tools to help you work better together, so you can get more done—anytime, anywhere.
Topics in this article
More articles like this one.

How to introduce yourself in a presentation
Gain your audience’s attention at the onset of a presentation. Craft an impressionable introduction to establish tone, presentation topic, and more.

How to add citations to your presentation
Conduct research and appropriately credit work for your presentation. Understand the importance of citing sources and how to add them to your presentation.

How to work on a group presentation
Group presentations can go smoothly with these essential tips on how to deliver a compelling one.

How to create a sales presentation
Engage your audience and get them interested in your product with this guide to creating a sales presentation.
Everything you need to achieve more in less time
Get powerful productivity and security apps with Microsoft 365

Explore Other Categories
VIDEO
COMMENTS
Open PowerPoint again. On the File tab of the toolbar ribbon, select New.. The custom theme that you just saved is listed at the top left corner, named Default Theme.The thumbnail image looks like a widescreen slide, but in reality, when you create a new presentation based on that theme, the presentation has the aspect ratio that you've defined for this default theme.
Short Answer. To make a Microsoft PowerPoint presentation A3 size, you can change the slide size in the "Design" tab. Click on the "Page Setup" option in the "Slide Size" group. Then, select the "A3" size from the drop-down menu. To further adjust the size, you can enter the specific measurements in the "Slide Size" dialog box.
In the following video you will learn how to set an A3 size on powerpoint, any size you want to set.
To do this, select Design > Slide Size > Custom Slide Size to display the "Slide Size" options menu. Various preset slide sizes, such as A3 or A4 paper sizes, are shown under the "Slides Sized For" drop-down menu. Select one of these preset options, or set your slide dimensions manually using the "Width" and "Height" option boxes.
That said, you can easily change your slide size to something else. To change your slide size in PowerPoint, simply: Navigate to the Design tab. Open the Slide Size drop down menu. Select 4:3 , 16:9 or Custom Slide Size (see options below) When starting with a blank presentation, you are now good to go.
METHOD 1: The standard way, how to change PowerPoint Slide Sizes in Windows 10 or Mac: Part 1: Before you change your PowerPoint slide size. Step 1: Make sure your presentation is in its original working format. Step 2: Save your Theme color scheme. 1) Click on the View Ribbon, 2) then the Slide Master button
Step 1: Selecting 'Custom Slide Size' to create a custom size for your presentation. Click on the 'Slide Size' option in the 'Design' tab. From the drop-down menu select the 'Custom Slide Size' option. Step 2: Input the Height and Width in the dialogue box and click 'Ok'.
This is a short video explaining how to make page size adjustments in PowerPoint, You can change the size of a page to A4, A3, Letter, or bigger if you are d...
On the Design tab, in the Customize group, click Slide Size. Click Custom Slide Size. Change the orientation for the slides to Portrait or Landscape. Note: You can also change the orientation of your notes, handouts, and outline. Click OK. PowerPoint now asks you to choose between maximizing the size of your content on the new layout (to do ...
PowerPoint Slide Sizes: How To Change & Manage Them Better
In the Design tab choose Slide Size. The highlighted box shows the current dimensions of your slides. In the Slide Size drop down, select Custom Slide Size. Select the slide size you want to use. Step-by-step: To know what to change, you need to know where you're starting. When you open a brand new PowerPoint file, the standard slide ...
In this video , i will show you how to change PowerPoint to a3 size.Thanks for watching, Please like and Subscribe.
Steps. Start a blank presentation in PowerPoint and, in the main menu bar, select the Design tab. Here, click on the Slide Size button on the right and then select Custom Slide Size. Note: Some versions of PowerPoint may have a Page Setup option instead of the Slide Size button. The Slide Size dialogue box that will pop on your screen provides ...
They are using different slide sizes, some in the 16:9 size and most in the 4:3 size. How can I have a different slide size for each slide without changing all the slide sizes to be the same size in one presentation? Thanks for any help you can provide. ~IanWin8. I hope the above information helps. Let us know if you need further assistance.
To do that, simply go up to the Home tab and click on New Slide. This inserts a new slide in your presentation right after the one you were on. You can alternatively hit Ctrl+M on your keyboard to insert a new blank slide in PowerPoint. To learn more about this shortcut, see my guide on using Ctrl+M in PowerPoint.
Landscape is the default page setting in PowerPoint. But sometimes we need to change it to Portrait, or A4 in order to print it out, or in rare cases we mig...
Medium poster: 18" x 24". Large posters: 24" x 36" or 27" x 39". Once you've decided on your poster size, set the dimensions in PowerPoint. To do this, open PowerPoint and navigate to the "Design" tab. In the "Customize" group, select "Slide Size." Select "Custom Slide Size" from the dropdown menu.
In the world of presentations, size matters. Larger formats offer more space for creativity, clarity, and impact. The A3 template, with its generous dimensions, provides a canvas for rich visual…
The first step to creating your poster is to adjust the size in PowerPoint. To do this, click on Design > Slide Size. In the pop-up window that appears, you can customize or choose the size you need. In the example, we have chosen an A3 paper. In addition, you can choose the orientation of the slides, between portrait and landscape.
As Raju says, you can only have one slide/page size and orientation per file. If you want to make a larger printout of one or two slides, go to teh print dialog, choose to print just those slides, pick a larger paper source in Printer Properties and choose the Scale to fit page option. The selected slides will print to the larger sheet size.
In PowerPoint, you can create as many slides as you want—which might sound tempting at first. But length doesn't always guarantee a successful presentation . Most presentations last around 10-15 minutes, and anything longer than that (such as a 30-minute presentation) may have additional visual aids or speakers to enhance your message.
Here's how: In PowerPoint, select the Design tab, then click on Slide Size and choose Custom Slide Size...; In the Slides sized for: dropdown, choose A4 Paper (210x297 mm), then click on OK.; Format the deck for whatever default formatting you want to appear on each presentations. Still on the Design tab, click on the More button in the bottom right corner of the Themes Gallery (looks like a ...