- PRO Courses Guides New Tech Help Pro Expert Videos About wikiHow Pro Upgrade Sign In
- EDIT Edit this Article
- EXPLORE Tech Help Pro About Us Random Article Quizzes Request a New Article Community Dashboard This Or That Game Popular Categories Arts and Entertainment Artwork Books Movies Computers and Electronics Computers Phone Skills Technology Hacks Health Men's Health Mental Health Women's Health Relationships Dating Love Relationship Issues Hobbies and Crafts Crafts Drawing Games Education & Communication Communication Skills Personal Development Studying Personal Care and Style Fashion Hair Care Personal Hygiene Youth Personal Care School Stuff Dating All Categories Arts and Entertainment Finance and Business Home and Garden Relationship Quizzes Cars & Other Vehicles Food and Entertaining Personal Care and Style Sports and Fitness Computers and Electronics Health Pets and Animals Travel Education & Communication Hobbies and Crafts Philosophy and Religion Work World Family Life Holidays and Traditions Relationships Youth
- Browse Articles
- Learn Something New
- Quizzes Hot
- This Or That Game
- Train Your Brain
- Explore More
- Support wikiHow
- About wikiHow
- Log in / Sign up
- Computers and Electronics
- Presentation Software
- PowerPoint Presentations

How to Unlock a Read Only PowerPoint Presentation (in 4 Steps)
Last Updated: December 29, 2021
This article was co-authored by wikiHow staff writer, Darlene Antonelli, MA . Darlene Antonelli is a Technology Writer and Editor for wikiHow. Darlene has experience teaching college courses, writing technology-related articles, and working hands-on in the technology field. She earned an MA in Writing from Rowan University in 2012 and wrote her thesis on online communities and the personalities curated in such communities. This article has been viewed 20,658 times. Learn more...
If you see text in a banner that warns you the file is read-only, the original author marked it as final and discourages editing. This wikiHow will teach you how to unlock a read-only PowerPoint manually. Otherwise, you can click Edit Anyway within the banner.

- A menu will drop down from the lock icon.

- The "Read-Only" text is gone from the title and the yellow banner will disappear, which means you can edit the PowerPoint. [1] X Research source
- To return the file to read-only, repeat the process to select "Mark as Final."
Expert Q&A
You might also like.

- ↑ https://www.howtogeek.com/437502/how-to-unlock-read-only-powerpoint-presentations/
About This Article

1. Open the PowerPoint project. 2. Click the File tab. 3. Click Protect Presentation. 4. Click Mark as Final . Did this summary help you? Yes No
- Send fan mail to authors
Is this article up to date?

Featured Articles

Trending Articles

Watch Articles

- Terms of Use
- Privacy Policy
- Do Not Sell or Share My Info
- Not Selling Info
wikiHow Tech Help Pro:
Level up your tech skills and stay ahead of the curve
7 Ways to Protect PowerPoint Presentation from Editing!
By: Author Shrot Katewa

Isn’t it annoying when you spend hours and hours creating a visually appealing presentation and do all the hard work, only to find out that your colleague or your manager has made changes to the presentation!
Intentional or not, now you’ve got to make the changes to your presentation again; some of which could have been easily avoided if you were able to prevent the presentation file from editing.
Here’s how to protect a PowerPoint presentation file –
- Mark the presentation as “Final”
- Restrict permission to PowerPoint
- Save the presentation as a PowerPoint Show file
- Set a password to modify PowerPoint
- Convert PowerPoint to pictures
- Convert PowerPoint to a PDF
- Convert PowerPoint to a video
There are many applications of knowing how to protect your PowerPoint presentation.
So, in this article, let’s understand the 7 different ways to protect PowerPoint in further detail such that you can ensure that the person you are sharing your presentation with, will not be able to make changes to it.
Let’s get started!
1. How to Protect PowerPoint presentation from Editing?
We shall divide the 7 ways into two groups –
- Prevent PowerPoint file from editing
- Convert PowerPoint to make it uneditable
Prevent PowerPoint File from Editing
There are actually 4 ways in which you can prevent users from editing your PowerPoint presentation.
You can either mark the presentation as final, restrict the presentation by allowing access to specific users, save the presentation as a PPS file or set a password for your presentation.
All the 4 methods and the process to use them are explained elaborately in the following section –
Method 1 – Mark the Presentation as Final
By marking the PowerPoint presentation as final, the PowerPoint file will become “Read-only” .
Although this method doesn’t restrict people from editing your file. However, they will not be able to save changes to the original file. When using this method, PowerPoint will force users to save another copy of the presentation file; thereby protecting your presentation.
This method is especially helpful when you share the presentation over the same network within your organization or even when the presentation is saved on a cloud. It is also helpful when more than one person is working on the same presentation.
It is not a perfect fix, but a quick fix to the problem for sure.
The process of marking your PowerPoint presentation as final is given below –
Step-1: Click on the “File” tab
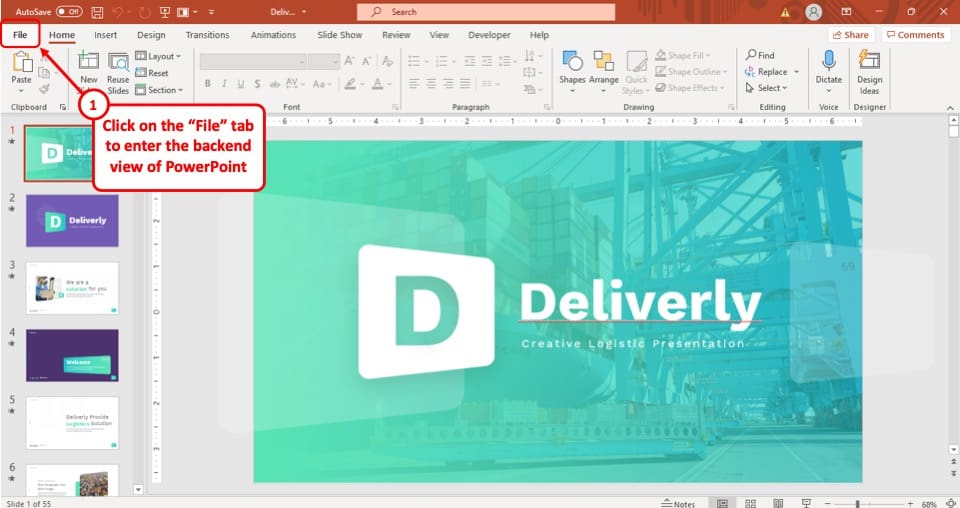
The first step of the process is to click on the “ File ” tab, which is the first option in the ribbon of your PowerPoint presentation. This will take you to the backend view of the PowerPoint.
Step-2: Select the “Info” option
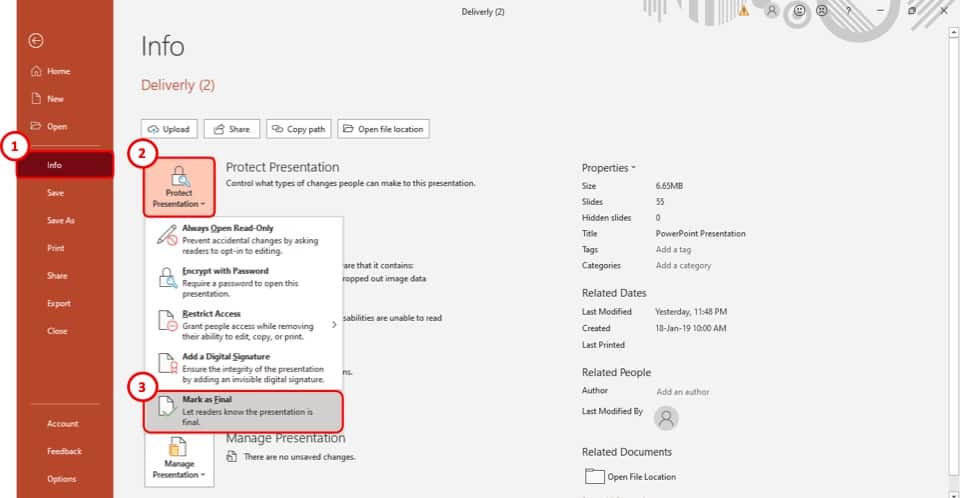
After you have accessed the “ File ” tab, select the “ Info ” option which is the 4 th option in the tab. This will take you to a new page in the “ File ” tab.
Step-3: Select the “Protect Presentation” option
The third step is to select the “ Protect Presentation ” option in the “ Info ” section (as shown in the image in step 2). It is the first of the four boxes on the “ Info ” page.
After you click on the “ Protect Presentation ” option, a drop-down menu will appear on your screen.
Step-4: Click on “Mark as Final”
From the drop-down menu, select the “ Mark as Final ” option. It is located at the very bottom of the dropdown menu (as shown in the image in step 2).
Step-5: Hit the “OK” button
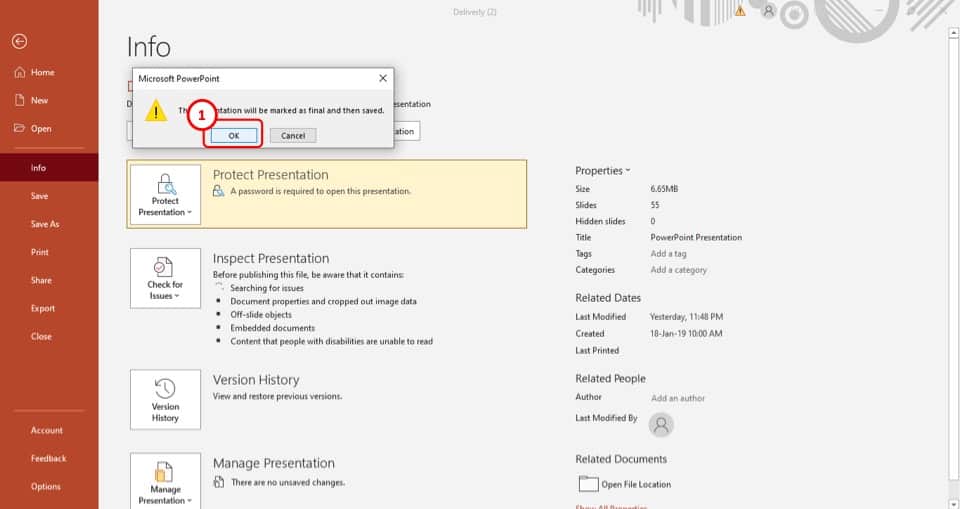
After you click on the “ Mark as Final ” option, a pop-up window will appear on your screen.
Simply click on the “ O K” button and the presentation will be saved as final. Once your presentation is “Saved as Final”, you won’t be able to edit this presentation going forward.
Thus, I recommend that you make this change once you’ve finished your presentation.
Method 2 – Restrict Permission
The next method is to restrict the permissions to edit a PowerPoint presentation.
In my opinion, this is one of the best ways to protect a PowerPoint presentation and to prevent users from editing the PowerPoint file!
By restricting permission, you will be able to allow specific users to access your PowerPoint presentation.
To use this feature in your presentation, follow step-1 through step-3 from the previous section and then follow the easy steps described below.
The first step is to click on the “ File ” tab to enter the backend view of your PowerPoint presentation.
Step-2: Click on the “Info” option
Now, click on the “Info” tab from the options in the left part of your screen.
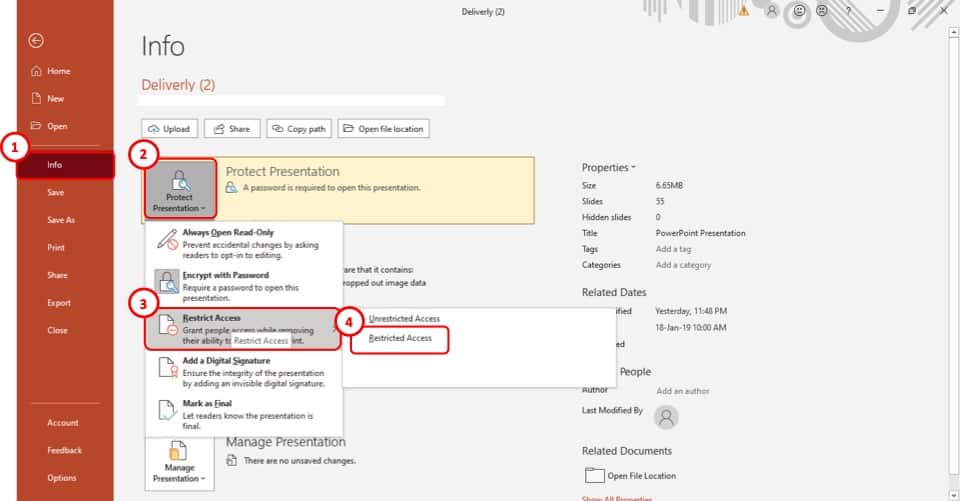
Step-3: Select the “Restricted Access” option
The next step is to select the “ Restrict Access ” option from the drop-down menu of the “ Protect Presentation ” option. It is the 3 rd option in the drop-down menu (as shown in the image in step 2)
Once you click on the “ Restrict Access ” option, another drop-down menu will appear on your screen. Select the “ Restricted Access ” option which is the second option in the menu.
Step-4: Click on the checkbox

After you click on the “ Restricted Access ” option, a pop-up window will appear on your screen.
From the pop-up window, click on the “ Restrict permission to this presentation ” checkbox. It is located at the top of the pop-up window.
Step-5: Add the email address of the users
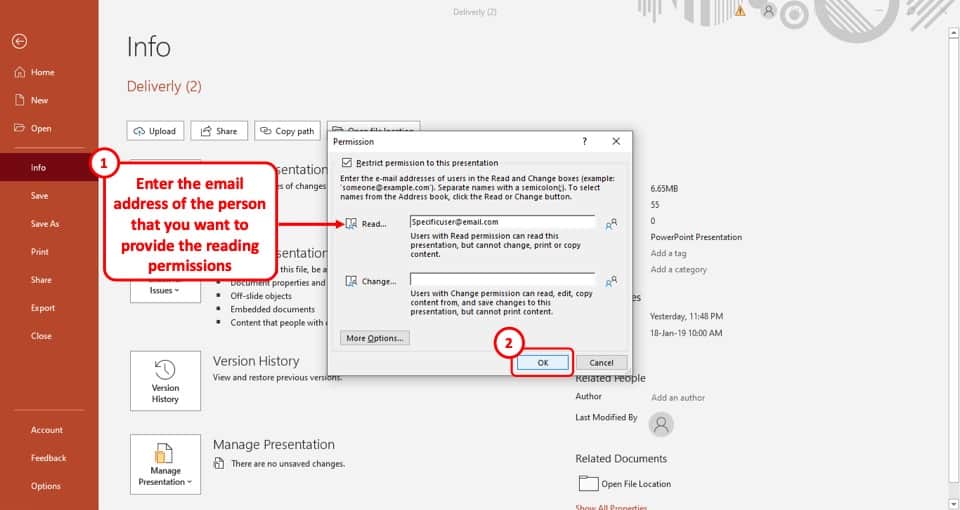
In the final step, all you have to do is type in the email addresses of the users with whom you want to share the presentation, in the “ Read ” option.
This will ensure that the users can only view the presentation file and not edit it. After that just click on the “ OK ” button located in the bottom right of the pop-up window.
Now, only the specified users will get permission to view the PowerPoint presentation.
Method 3 – Save the Presentation as a PPS file
Another method to prevent your PowerPoint presentation from editing and thus protecting it is to save the presentation as a PowerPoint Show file or a PPS file.
Saving a presentation as a PPS or PPSX will open the file directly in the presentation show mode when you open the file. Furthermore, when you exit the presentation show mode, the file will close and the user will not be able to access the content on the slides.
To save the presentation as a PPSX file, simply use the file “ Save As ” option, and choose the “ PPS ” file format from the “ File Format ” option.
I’ve written a detailed article on how to use the PPSX file in PowerPoint . If you need the step-by-step guide for the process, click on the link and check out the article for detailed guidance!
Method 4 – Set a Password to Modify PowerPoint
You can also set a password in order to prevent users from modifying a PowerPoint presentation. This method will prompt a password before opening a presentation.
Although this method will not help if you want to prevent people from editing the file as you will need to provide the password even to view the file. And, once the password is entered, the users will be able to make the changes.
However, this method is super helpful when you want to protect a PowerPoint presentation and prevent it from being access by unintended users.
To set a password to modify your PowerPoint presentation, follow the easy steps given below –
As before, click on the “ File ” tab in PowerPoint. This will open the backend view in PowerPoint from where you can enable additional settings.
Step-2: Select the “Encrypt with Password” option
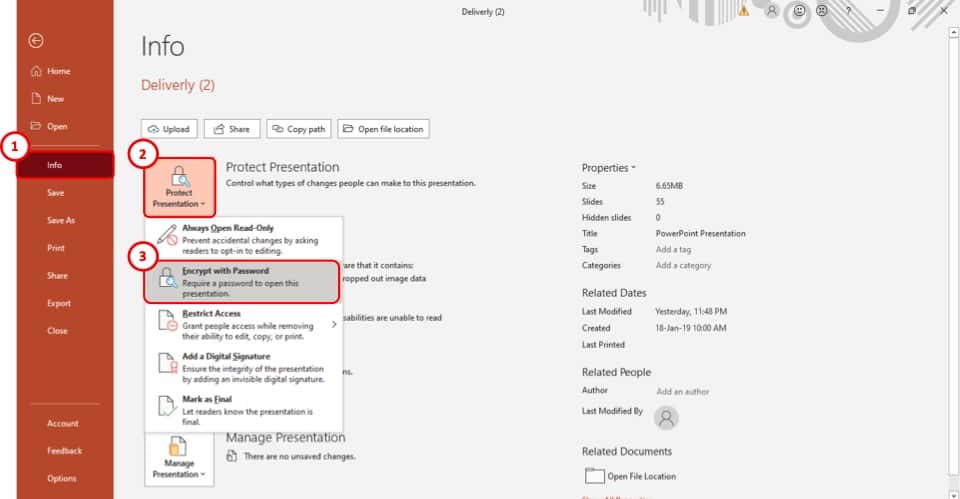
The first step is to select the “ Encrypt with Password ” option from the drop-down menu. It is the 2 nd option on the menu.
Step-3: Enter your preferred password
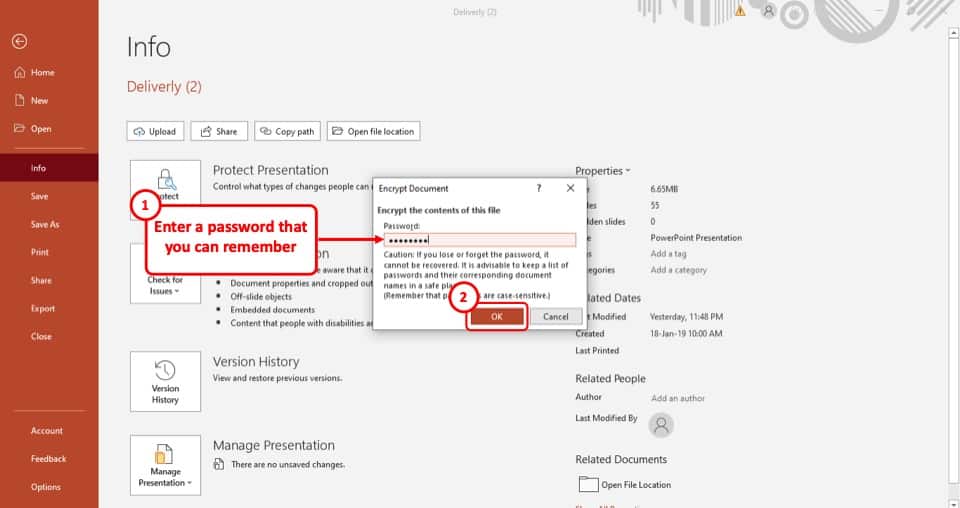
After you select the “ Encrypt with Password ” option, a pop-up window will appear on your screen. In that pop-up window, type in your preferred password in the “ Password ” box. After that, click on the “ Ok ” button.
Once you click on the “ OK ” button, you will be taken to a new page in the pop-up window.
Step-4: Re-enter the password
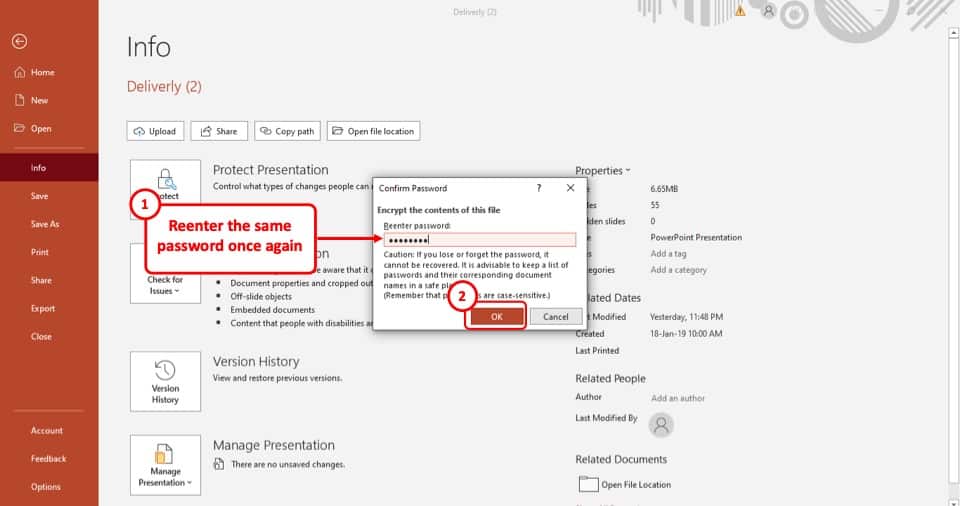
Now, all you have to do is to re-enter the password on this page and then select the “ OK ” button again.
Once done, your PowerPoint presentation will be password protected and users will have to enter the password to access your PowerPoint presentation.
Make PowerPoint Uneditable Permanently?
In the 4 methods described above, you will be able to prevent or protect your PowerPoint presentation file. More importantly, you will be able to share the PowerPoint presentation with the intended users.
However, if sharing a PowerPoint file is not important, there are other ways in which you can protect your presentation and prevent it from being edited further!
Interestingly, the methods described below will allow you to make a copy of your presentation and make it completely uneditable!
There are 3 ways in which you can make your PowerPoint presentation uneditable permanently.
You can either convert the presentation into a picture or convert it into a PDF file or you can convert it into a video. Let’s take a look at the 3 methods below –
Method 1 – Convert PowerPoint to Picture
The first way to protect your PowerPoint presentation is to convert it to pictures.
To convert your PowerPoint presentation as a picture, you will have to use the “ Save As ” option from the “ File ” tab. Simply choose a picture file format from the “ File Type ” options in the “save as” window.
If you need further guidance on how to carry out this process, check out my other article on how to save PowerPoint as an image for full details.
Method 2 – Convert PowerPoint to a PDF
You can also convert your PowerPoint file to a PDF. This is actually one of the most common methods used when you want to prevent your client or colleague from editing the presentation.
The advantage to save PowerPoint as a PDF over saving it as an image is that when you save your PowerPoint presentation as a PDF file, it is saved all the slides in one file just as the case would be in a presentation.
However, when you save a presentation as a Picture, the slides usually get saved as individual images.
Although the process to save a PowerPoint as a PDF is quite similar to that of saving it as an image, but if you are unsure how to do this, check out our other article on how to convert PowerPoint as PDF that details the process in an easy manner!
Method 3 – Convert PowerPoint to a Video
You can also convert your PowerPoint to a Video in order to protect your PowerPoint file!
If you have a lot of animations in your presentation, and you want to retain the animations when you show it to your colleagues or the audience, but you don’t want them to edit the file, then you can convert the presentation to a video format.
This will allow you to retain the animations, and make the presentation uneditable.
Converting a PowerPoint to a video requires you to use the “ Save As ” function. However, there are a few additional things that you may need to keep in mind.
Check out our article on how to convert PowerPoint to Video for a full guide with helpful tips.
2. How to Password Protect a PowerPoint Presentation from Opening?
You can set a password that users will have to enter before they can access your PowerPoint presentation.
The process to password protect a PowerPoint presentation is elaborately explained in method 4 of the previous section of this article. Simply follow the steps explained in the earlier section and you will be able to add a password to your PowerPoint file.
3. How to Remove Password from a PowerPoint Presentation?
The process of removing the password from a PowerPoint file is quite straightforward. However, it is important to know the password in order to change or remove the password protection in PowerPoint.
Let’s take a look at how to remove a password from a protected PowerPoint presentation –
3a. If You Know the Password
If you remember the password to your PowerPoint presentation, open the PowerPoint file, go to the “ Encrypt Presentation ” option in the “Info” section of the “ File ” tab and follow the steps given below.
Step-1: Open the “Encrypt Password” option
The first step is to click on the “ File ” tab. Then, from the backend view, click on the “ Info ” option.
Next, click on the “ Protect Presentation ” option, and from the dropdown, select the “ Encrypt with Password ” option.
Step-2: Clear the Password from the box
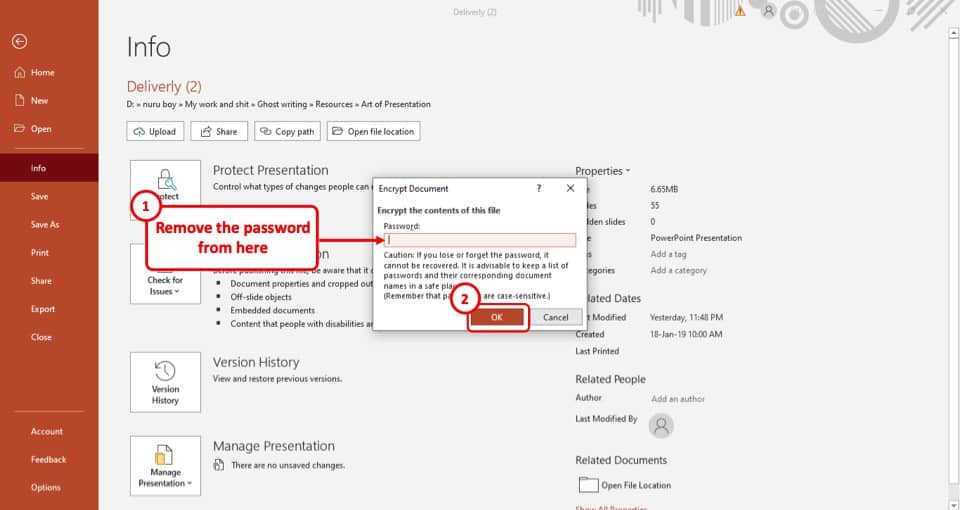
Once you’ve clicked on the “ Encrypt Presentation ” option, clear the password from the “ Password ” box.
After you’ve cleared the password, simply hit the “ OK ” button, located at the bottom right corner of the pop-up window and the password will be removed immediately.
3b. If You Forget the Password
Unfortunately, there is no direct way of removing a password from your PowerPoint file.
To do this, you will have to use third-party software that will unlock the encrypted PowerPoint file for you.
The software that we would recommend is “iSunshare” . It is free to use, and you will be able to unlock more than just PPT files. To download the software from their website, click here .
Credit to cookie_studio (on Freepik) for the featured image of this article (further edited).
- Password Tools For Windows Password Genius Windows Password Genius Windows 10 Password Genius Windows 7 Password Genius RAR Password Genius ZIP Password Genius SQL Password Genius Chrome Password Genius WiFi Password Genius For Office Office Password Genius Word Password Genius Excel Password Genius PowerPoint Password Genius Access Password Genius Outlook Password Genius Outlook Email Password Genius PDF Password Genius For Removing Office Password Remover Word Password Remover Excel Password Remover Workbook Unprotect Genius PowerPoint Unprotect Genius Word Unprotect Genius
- More Utilities Data Recovery BitGenius Word Repair Genius Excel Repair Genius PowerPoint Repair Genius Office Repair Genius Photo Data Genius Android Data Genius BitLocker Tools BitLocker Genius for Mac BitLocker Genius for Windows More Tools Product Key Finder SafeUSB Genius ISO Genius All Products
- Support Support Center FAQ & Contact Resource Center How-to Articles Blog Blog, News & Guides
How to Unlock Password Protected PowerPoint Presentation
Microsoft provides several options to protect PowerPoint presentation, such as "Mark as File" and "Encrypt with Password". The options can make presentation read-only and even lock PowerPoint document.
When you face the problems about presentation locked or read-only, how to unlock password protected PowerPoint presentation ? Follow introductions below please.
- Part 1: Unlock PPT presentation protected with modify password
- Part 2: Unlock PPT presentation protected with open password
Part 1: Unlock PowerPoint Presentation Protected with Modify Password
Microsoft PowerPoint's Mark as Final feature could make your business presentations read-only and prevent accidental changes.
1. Open the read-only PowerPoint presentation with Microsoft PowerPoint.
2. Click File Info from the left pane.
3. Click Protect Presentation and select "Mark as Final" option.
If the presentation was read-only, it will now be editable, and if it was not protected before, the Mark as Final option is enabled and your presentation is read-only now.
4. Press Control + S to save the presentation without password protection.
Now PowerPoint presentation has been unlocked.
Part 2: Unlock PowerPoint Presentation Protected with Open Password
If you have no password to unlock password protected PowerPoint presentation , I think the easiest and most effective way is to use powerpoint password recovery software, such as PowerPoint Password Genius or Office Password Genius Professional for PowerPoint presentation.
Tips: If you want to try faster unlocking PPTX presentation, Office Password Genius Professional or Office Password Genius Advanced will be better.
Now please see the animation about how it helps to unlock PowerPoint document locked with password .
How to unlock PowerPoint document are shown in above animation. About more detailed information, please follow introductions below.
Step 1: Download and setup iSunshare PowerPoint Password Genius on computer.
Step 2: Click Open button to add password protected PowerPoint presentation into Encrypted File box.
Step 3: Choose an appropriate password recovery type from Type of recovery , Brute-force/Mask/Dictionary/Smart.
Step 4: Set different options for selected password recovery to recover PowerPoint presentation password fast.
Refer to: Brute-force/Mask/Dictionary Password Recovery Settings
Step 5: Start to find password protected PowerPoint presentation open password.
Step 6: Copy recovered password in new window and unlock PowerPoint presentation with it.
Related Articles:
- PPT/PPTX File Password Reset after Forgot PowerPoint Password
- 2 Methods to Unprotect xls/xlsx Worksheet without Password
- Unprotect Encrypted Word DOC/DOCX Document without Password
- How to Unlock Password Protected PST File
- How to Unlock Office File Password
- Which Way is Better to View PPT 97-2013: CMD or Tool

iSunshare is dedicated to providing the best service for Windows, Mac, Android users who are in demand for password recovery and data recovery.
Copyright © 2024 iSunshare Studio All Rights Reserved.
Passper Online
Unlock all file formats online
Passper for Excel
Excel password remover
Passper for Word
Word password remover
Passper for PowerPoint
Powerpoint password remover
Passper for PDF
PDF password remover
Passper for RAR
Rar password unlocker
Passper for ZIP
Zip password unlocker
- Windows Password Recovery
4 Ways to Unprotect PowerPoint Presentation
It is common these days to apply passwords on every privacy or security crucial thing. No matter it is your cell phone, web application, social media platform or files containing important data like PowerPoint presentations. Basically, there are two types of passwords used to protect PowerPoint files. One is password to open and other is password to modify. Password to open is a password used to prevent unauthorized access to PowerPoint and password to modify is a password used to prevent unapproved changes and edits to PowerPoint.
Have you previously applied password to a PowerPoint presentation to protect it from unauthorized access and unwanted modifications, but now you want to remove it? It is very easy to unprotect PowerPoint only if you still remember the password you used to secure the file. But, if you have forgotten the PowerPoint protecting password, how to unprotect PowerPoint presentation without damaging the file and losing the data that it contains?
This article will show 4 different ways to unprotect PowerPoint presentation. Follow this article and find the appropriate method for you. Before we begin the topic, you probably want to have a knowledge of the 4 methods.
| Passper for PowerPoint | Renaming File Extension | File Option | General Option | |
| Password to Modify |
|
|
|
|
| Password to Open |
|
|
|
|
| with/without Password | without password | without password | with password | with password |
| Complexity | easy | complex | easy | easy |
Part 1: Unprotect PowerPoint Presentation without Password
● Method 1. Rename File Extension to Unprotect PowerPoint Presentation
● Method 2. Use Passper for PowerPoint to Unprotect PowerPoint Presentation
Part 2: Unprotect PowerPoint Presentation with Password
● Method 1. Unprotect PowerPoint Presentation from File Info
● Method 2. Unprotect PowerPoint Presentation from General Option
Do you want to unprotect your PowerPoint presentation but don't remember the password you used to protect the PowerPoint file? Listed below are the two methods that you can use to unprotect the PowerPoint file without knowing the password.
Method 1. Rename File Extension to Unprotect PowerPoint Presentation
One way to unprotect the PowerPoint presentation without password is by renaming the file extension. This method can be difficult for the individuals who don't possess the relevant professional knowledge. It is not easily done and comparatively takes more time than other methods. It is a hectic method and sometimes it also fails to remove encryptiondue to the compatibility of PowerPoint version.
Follow the steps listed below to unprotect PowerPoint presentation by re-naming file extension.
Step 1 : Start by making a copy of the file. Rename the copied file and changing its extension type from PPSX to ZIP. Leave the original file as it as a backup plan if something goes wrong.
Step 2: Open the copied file and find the file with .xml extension in the folder. In the folder, you will find "presentation.xml". Extract this file from the ZIP file and then open it in a text editor like Notepad.

Step 3 : Find the tag that begins with: <p:modifyVerifier cryptProviderType="rsaAES"……> and delete it. (you can search it using ctrl+f)

Step 4: Save the file and put back in the zip folder replacing it in the place of old file.
Step 5 : Rename the file from ZIP to PPSX.

After checking the above steps, renaming the file extension is too complicated for a novice computer user. Besides, it is not 100% workable due to the compatibility of PowerPoint versions. If you do not want to unprotect the PowerPoint presentation manually, a professional third-party software will be a better choice for you.
Method 2. Use Passper for PowerPoint to Unprotect PowerPoint Presentation
Passper for PowerPoint is an easy, fast and professional password decrypting software. It is a fantastic tool to unprotect your PowerPoint presentation by recovering "password to open" and removing "password to modify". It offers you simplest, safest and most workable solutions to retrieve your password. Passper for PowerPoint makes it effortless to unprotect your PowerPoint files without password.
How is Passper for PowerPoint distinct?
Unprotect PowerPoint Presentation without Password: Passper for PowerPoint can recover the password to open and remove the password to modify without any data loss.
Easy and Fast to Use: Passper for PowerPoint displays an easy-to-use interface to the users. It can remove the restrictions in your presentation with one single click.
Compatibility: Passper for PowerPoint supports Windows and macOS. It also supports all the PowerPoint version like 2021/2019/2016/2013/2010/2007/2003/2000/97.
Pricing: Passper for PowerPoint offers Free Trial Version to users. You can download the software to test the functions and to check whether your presentation can be unprotected.
Free Download Buy Now
Use Passper for PowerPoint to Recover "Password to Open"
Password that you used to protect the presentation can be recovered by using Passper for PowerPoint. Listed below are the steps to recover the PowerPoint opening password.
Step 1 Download Passper for PowerPoint and install it on your system. After installing, launch Passper for PowerPoint and select the "Recover Password" option.

Step 2 Add the encrypted PowerPoint file and choose the attack type that suits you to decrypt the files. Attack types include Dictionary attack, Combination attack, ask attack and Brute-force attack.

Step 3 Click on "Recover"for the tool to start looking for password.

Use Passper for PowerPoint to Remove "Password to Modify"
Passper for PowerPoint can also remove the restrictions from PowerPoint archives.
Step 1 After installing, launch Passper for PowerPoint and select the "Remove Password" option.

Step 2 Add the encrypted PowerPoint file to software by browsing to the location of the file and click remove.

Step 3 It will remove the restriction in seconds.

PowerPoint offers 2 ways to unprotect your presentation. But the methods are useful only if you remember the password that you used to secure the file.
Method 1. Unprotect PowerPoint Presentation from File Info
Using File option in PowerPoint ribbon is the most easy and convenient way to unprotect your presentation but only if you remember the password you used to protect the presentation. Follow the steps listed below to unprotect your PowerPoint.
Step 1: Open the file you want to unprotect and click on "File"option.
Step 2: Click"Info"on the left and then click on "Protect Presentation".
Step 3: Select "Encrypt with Password"on the drop-down menu under "Protect Presentation".

Step 4: Delete the password from the textbox on Encrypted Document dialog.
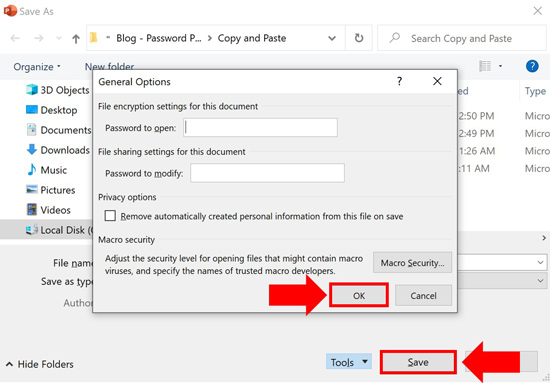
Method 2. Unprotect PowerPoint Presentation from General Option
Other way to unprotect PowerPoint presentation is by using "General Option". You can follow the steps listed below to unprotect your file:
Step 1: Open the presentation you want to unprotect and then click "File"option.
Step 2: Select "Tools"option from "Save As" dialog.
Step 3: Click "General Options" and delete the password from the text box.

Protecting PowerPoint file with password is a best way to prevent unwanted access or modification but what if you want to unprotect the PowerPoint file and you don't remember the password you used. Passper for PowerPoint is a best and easy solution to retrieve password and to unprotect the PowerPoint presentation without knowing password.
Related Articles:
- [Updated] 4 Methods to Unlock Read-Only PowerPoint
- 3 Methods to Crack PowerPoint Password
- Forgot PowerPoint Password? 3 Solutions Offered
- Top 5 PowerPoint Password Remover Tools

By William Wilson to PowerPoint
Posted on Mar 17, 2023 ( Updated: Mar 17, 2023)
William Wilson, a blogger who is interested in MS Office software. In the past three years, William has been trying to write articles to help people better understand MS Office software.
Critical PowerPoint Shortcuts – Claim Your FREE Training Module and Get Your Time Back!
How to Password Protect PowerPoint (Step-by-Step)
- PowerPoint Tutorials
- Shortcuts & Hacks
- February 27, 2019
Are you ready to learn how to password protect PowerPoint presentations so that others cannot edit or copy and paste your content?
Before you get started though, please remember this. If you forget the password you created in the steps below, you will not be able to recover your password, or unlock your presentation.
Now before password protect your presentation, it’s important to first understand the difference between the two types of Passwords you can use to protect your PowerPoint presentations.
Two Types of PowerPoint Passwords
PowerPoint has two different styles or types of passwords you can add to your presentation which determine what someone can and can’t do with your presentation.
While the difference between the two pop-up windows as you can see in the picture below appears small, the difference is big.

1. Password to Open
Adding a password to open forces you (or whoever opens your presentation) to input a password to be able to not only see but edit the content of your presentation.
If they do not know the correct (case-sensitive) password, they cannot open, review or modify your presentation in any way. Just keep in mind that there is NO WAY to recover a forgotten password.
So if you password protect your presentation AND forget your password, you too will not be able to open or edit your presentation.
2. Password to Modify
Adding a password to Modify gives your clients and colleagues two different ways to access your presentation.
- They can enter the correct password and get full editing rights to your document (just like a normal presentation).
- They can choose to open your file in a Read-Only format, allowing them to view (but not edit) your PowerPoint presentation.
To give someone the Read-Only option pictured below to access your presentation, you must use the password to Modify option.

In the Read-Only version of your presentation, people can still print, save your file as a PDF and run your presentation in the Slideshow modes. To see all the slideshow shortcuts and techniques, check out our ultimate slideshow guide here.
On top of that, all of your PowerPoint animations, effects, hyperlinks, etc. will still work in the Read-Only version of your document. But other than reviewing your document, people will NOT be able to edit, modify or copy and paste any of your content.
How to add a password to PowerPoint
To password protect your PowerPoint presentation using either the Password to Open or Password to Modify options, follow the steps below.
1. Open the PowerPoint presentation you want to password protect
The only way to add a password to a specific presentation is from within the presentation itself. So as a first step, find and open the presentation that you want to password-protect.
As a best practice, I recommend creating a non-password-protected copy of your presentation and saving it on your computer. That way if you forget your password, you can always open the non-password-protected version on your computer.
To create a copy of your presentation, simply Ctrl + C to copy and Ctrl + V to paste it inside a File Explorer window.

2. Open the Save As dialog box

The FASTEST way to access the Save As dialog box from within PowerPoint is using your keyboard shortcuts. You can use either of the two keyboard shortcuts (whichever is easier for you to remember):
- F12 for Save As
- Ctrl + Shift + S for Save As
If you hit F12 and nothing happens, that means that your function keys are reversed. In this case, try adding the Function key to the sequence: Fn + F12 .
3. Open the Tools dropdown

Inside the Save As dialog box, open the Tools dropdown (it is right next to the Save button as pictured above).
Note : The Save As dialog box is also the trick to converting PowerPoint to PDF .
4. Select General Options

Inside the Tools dropdown, select General Options . This is where you can add/remove passwords to your PowerPoint presentations.
5. Enter your password (Open or Modify)

Inside the General Options dialog box, decide which type of password to add to your presentation (see my explanation of both types at the top of this page).
Your two options are:
- Password to Open
- Password to Modify
To get started, simply click into the input box for the type of password you want to protect PowerPoint with (Open or Modify) and type your password.
Remember too that passwords are case-sensitive, so be careful you don’t have the Caps Lock key on when you enter your password. Thankfully, you get the chance to confirm your password in the next step.
6. Confirm your Password

This is your chance to confirm you have typed the correct password for your presentation. As there is no way to view the password you have typed, I recommend taking care here to make sure you type what you think you typed.
If you make a mistake and the two passwords are not the same, you get the following error notification.

Clicking OK , you can either re-type your password correctly or select Cancel to exit out of the Confirm Password dialog box.
PowerPoint will not allow you to add a password to your presentation unless you can first confirm your password.
7. Rename your Presentation (Recommended)

While renaming your password-protected presentation is optional, to me this is a critical best practice.
I personally like to add “- with Password” or “PW” or “Password to Open” to identify the document as having a password. This also helps you distinguish it from your original (non-password protected) document that you hopefully saved in step #1 above.
In this step, you can also choose where to save your password-protected document on your computer by navigating between your folders.
8. Save and Close your document

Once you have selected a location on your computer to save your password-protected presentation, click Save and then close out of your document to trigger the password.
As long as you have your document open, you will not need to enter the password to open it (as it is already open). Closing the document triggers the password gate to close, requiring a password to open it again.
9. Double-check your password works properly

Before you send off your document as final, double-check that your password properly works. This is especially important if you created a non-password-protected version of your presentation, to make sure you are working with the correct file.
Find your protected presentation on your computer and double-click it to open it up. If the document immediately opens without asking you to enter a password, it means that:
- You selected the non-password-protected version of your document
- You never closed your PowerPoint presentation after adding your password (see step #8 above)
- You made a mistake somewhere along the way and should start over
Either way, double-checking this now will save you from accidentally sending your client the wrong file.
Once your password is properly added to your presentation, opening the document forces you to enter a password to continue. Once you see the dialog box, try entering your password to make sure you have the right one.
How to remove a password from PowerPoint
Tired of always having to enter in a password to edit your presentation? Well, let’s look at how to remove a password from your presentation.
For example, you added a password to your presentation to work with a specific client, and now that project is over. So you want to remove the password so you and your team can access it without always having to enter a password.
Removing a password is very similar to adding a password. Simply follow these steps.
1. Find and open the password-protected presentation

The only way to remove a password from PowerPoint is from within the password-protected presentation.
Navigate to the file on your computer, and double-click it to open it. If a dialog box does not pop open asking you for a password to continue, it means one of two things:
- You have selected the wrong presentation
- Your presentation is not password-protected
Notice how easy it is to see which presentation is password-protected in the picture above? That is why I recommend adding a qualifier in the name of any PowerPoint presentation you password protect.
2. Enter the correct password and click OK

Regardless of whether you have a Password to Open or a Password to Modify, enter the correct password and click OK to get full editing rights to your document.
You cannot remove a password in the Read-Only version of PowerPoint that you can access with the Password to Modify .
If you do not know the password to the presentation, you cannot remove the password from the document (sorry). This is why I recommend saving a non-password-protected version of your file first.
3. Open the Save As dialog box

Once you have successfully opened the password-protected presentation, now you can remove the password. To get started, hit F12 or Ctrl + Shift + S to open the Save As dialog box.
4. Open the Tools dropdown
Inside the Save As dialog box, click to open the Tools dropdown.

5. Select General Options
Inside the Tools dropdown, select General Options to remove the password from your presentation.

6. Select and delete the password
Depending on what type of password was added to your presentation, you should see a sequence of circles or asterisks marks in either the Password to Open or Password to Modify option as pictured below.

Simply select the password in the dialog box and hit either Delete or Backspace on your keyboard.
Two things you cannot do in this dialog box are:
- You cannot view the password. So if you open a password-protected presentation on your computer, your colleague cannot sneak a peek at the password when you are not looking.
- You cannot password-protect your presentation with both types of passwords. You will either have a Password to open or a Password to modify , never both (it is impossible).
7. Click OK and then Save
After deleting the password, click OK and then click Save .
This saves your presentation without the password, allowing you to open the file without having to use a password in the future. If you like, you can also choose to rename your file now that it is no longer password-protected.
8. Double-check the password is removed
Before you forget, double-check that the password has been removed from your presentation.
Close your PowerPoint presentation (Ctrl + W on your keyboard) and then reopen. If you are again asked to enter a password to open or modify the presentation then something went wrong along the way.
If this happens to you, don’t sweat it. It is better to figure this out now (and fix the problem) rather than having your client or colleague email you about the issue.
PowerPoint Password Tips
I cannot stress this enough, DO NOT forget your password.
A number of people have asked whether it is possible to recover a password they have forgotten. Unfortunately, there is no way to retrieve a forgotten password like this that I know of.
This is why I recommend saving a copy of your original presentation (a non-password protected version) before adding a password to it. That way if you forget your password, you can always go back to the original (non-password protected) document, without having to recreate the wheel.
A few additional PowerPoint password tips are:
Tip #1. Passwords are case sensitive, so watch out for upper case letters.
That means that locking PowerPoint with the uppercase password ‘OPEN SESAME’ is treated differently than the lowercase password ‘open sesame.’
Tip #2. Make your passwords easy to remember
One way to make your passwords easy to remember is to either reference the client’s name in the password or just used the first four letters of the document.
An example using the client’s name could be m icrosoft open (I recommend using lower-case) if your client is Microsoft
An example using the first four letters for a file called “Quarterly Report” would be quar open (again making it all lower case so it is easier to remember).
Tip #3. Don’t use the same password for all of your presentations
Just like you shouldn’t use the same password for all your personal things, you don’t want to use the same password to open all of your presentations. That is because if someone figures that out, they will be able to open all of your password-protected presentations.
Tip #4. Develop a naming convention that makes sense for you
For help developing a naming convention for your passwords so they are always easy to remember, check out the following tips by GrowMap here .
Now you know how to both add and remove passwords to your PowerPoint presentations.
Two important things to remember about password protecting your presentations are:
#1. Most people are not familiar with having to add a password to open a presentation. So, if your password-protect your presentation, warn your clients and colleagues in advance.
#2. There is no way to recover your password if you forget it. So, use an easy to remember password, write it down and better yet, save a non-password-protected version of your presentation that you can always refer to it if necessary.
If you enjoyed this article and want to learn more about our PowerPoint training products and services, visit us here .
What’s Next?
Related articles, about the author.

This Post Has 2 Comments

Thanks for the article! So there is no way to recover the password? I had this problem once and tried googling for it, there are a lot of sites that claim it’s possible. Fortunately it was just an edit password and a simple ppt, so ended up making a new presentation with the same text and pictures.

To my knowledge, there is no way to recover a password. That is why I recommend saving a copy of your presentation without a password before adding one. Sorry I don’t have a better answer for you.
Comments are closed.
Popular Tutorials
- How to Strikethrough Text (l̶i̶k̶e̶ ̶t̶h̶i̶s̶) in Word, Excel & PowerPoint
- How to Make Animated Fireworks in PowerPoint (Step-by-Step)
- Strikethrough Shortcut (l̶i̶k̶e̶ ̶t̶h̶i̶s̶) for Word, Excel & PowerPoint
- How to Create a Flash Card Memory Game in PowerPoint (Like Jeopardy)
- Keyboard Shortcuts Not Working: Solved
PowerPoint Tutorial Categories
- Strategies & Opinions
- Presentation Design
- Pictures, Icons, Videos, Etc.
- New Features
- Miscellaneous
- Charts & Data Viz
We help busy professionals save hours and gain peace of mind, with corporate workshops, self-paced courses and tutorials for PowerPoint and Word.
Work With Us
- Corporate Training
- Presentation & Template Design
- Courses & Downloads
- PowerPoint Articles
- Word Articles
- Productivity Resources
Find a Tutorial
- Free Training
- For Businesses
We help busy office workers save hours and gain peace of mind, with tips, training and tutorials for Microsoft PowerPoint and Word.
Master Critical PowerPoint Shortcuts – Secure Your FREE Training Module and Save Valuable Time!
⌛ Master time-saving expert techniques.
🔥 Create powerful presentations.
🚀 Propel your career to new heights.
We value your privacy – we keep your info safe.
Discover PowerPoint Hacks Loved by Industry Giants - KKR, AmEx, HSBC!
Over 114,880 professionals in finance, marketing and sales have revolutionized their PPT skills with our proven methods.
Gain FREE access to a full module of our premium PowerPoint training program – Get started today!
We hate spam too and promise to keep your information safe.
You are currently viewing a placeholder content from Facebook . To access the actual content, click the button below. Please note that doing so will share data with third-party providers.
How to Edit a Protected PowerPoint Presentation
PowerPoint has established itself as one of the most used tools in the field of professional presentations. However, on many occasions we encounter protected presentations, which limits our ability to modify their content. In this article, we will explore the key steps to edit a protected PowerPoint presentation and unlock imposed restrictions. We will learn essential technical techniques and procedures to overcome access barriers and achieve a successful edition. If you've ever faced the frustration of wanting to modify a protected presentation and not knowing how to do it, this article will guide you through the PowerPoint editing process, giving you the tools necessary to unlock and customize the protected data and content. Read on to discover how to gain complete control over your protected PowerPoint presentations and get the creative freedom you need.
1. Understanding Protected PowerPoint Presentations
Secured PowerPoint presentations are a common way to ensure the privacy and confidentiality of information. However, it can be frustrating when you need to access a protected presentation and you don't have the password. Fortunately, there are several methods you can use to understand and unlock these presentations. Below we present some simple steps to help you solve this problem .
- 1. Use an unlock tool: A useful option is to use a PowerPoint unlock tool designed specifically for this purpose. These tools are available online and can unlock protected presentations by removing the password.
- 2. Try common passwords: If you don't want to use an unlocking tool, you can try to guess the password using some common passwords that people often use. These include combinations such as "123456", "password" or the name of the company or individual.
- 3. Contact technical support: If none of the above methods work, you can always contact PowerPoint technical support. The support team can help you unlock the protected presentation or provide other workarounds.
In short, understanding and unlocking protected PowerPoint presentations may seem like a challenge, but there are different options available to solve it. You can use an unlocking tool, try common passwords, or seek help from technical support. Always remember to respect the privacy and confidentiality of protected information.
2. Identifying a Protected PowerPoint Presentation
If you've ever received or downloaded a password-protected PowerPoint presentation and need to access its content, you're in the right place. Here we will provide you with a guide Step by Step to identify and resolve this problem.
There are different methods to identify a protected PowerPoint presentation. One of the most common is trying to open the file and receiving an error message indicating protection or the need for a password. You may also see a lock next to the file name in the file explorer .
To unlock a protected PowerPoint presentation, you can use different techniques. One option is to use specialized PowerPoint password removal software. These tools can perform a brute force attack or use password dictionaries to try to unlock the file. Another option is to try opening the presentation in an older version of PowerPoint, as some older versions may not have protection applied. If you have access to the correct password, simply enter it when prompted to unlock the presentation.
3. Steps to unlock a protected presentation
Follow these and have full access to the content:
Step 1: Identify the type of protection
Before unlocking the presentation, it is important to identify the type of protection you have. Some presentations may be password protected, while others may have access or editing restrictions. This will help you determine the right approach to unlocking it.
Step 2: Try standard passwords
If your presentation is password protected, try entering common standard passwords, such as "123456," "password," or "admin." These are basic options that are often used and may work in some cases. If that doesn't work, you can try remembering any passwords you used earlier in the presentation.
Step 3: Use an unlock tool
If you can't unlock the presentation using standard passwords or don't remember the correct password, there are unlocking tools available online. These tools use advanced methods to remove presentation protection and give you full access. Make sure you use a trusted tool and follow the instructions provided by the provider.
4. Modify the content of a protected presentation
If you have ever received a protected presentation and need to make changes to its content, don't worry, there are solutions available for this problem. Next, we will show you how simply and efficiently.
1. Use unlocking tools: There are several online tools that allow you to unlock protected presentations. These tools work by removing protection restrictions and allow you to edit the content without any problem. Some of these tools are easy to use and only require you to upload the protected presentation and follow the steps.
2. Convert to another format: Another option is to convert the protected presentation to another format before making the desired modifications. For example, you can convert the file to PDF and then use online conversion tools to convert the PDF back to an editable presentation. This process can be useful if the unlocking tools are not working or are not available.
3. Request the password from the author: If the author of the protected presentation is available and accessible, you can try to request the password to unlock it. Authors often protect their submissions to prevent unauthorized modifications, but if you have a valid reason and get the author's consent, this may be the quickest and safest solution.
Always remember to respect the Copyright and use these solutions ethically and responsibly.
5. Remove editing restrictions in PowerPoint
- To do so, you must follow the following steps:
- 1. Open the PowerPoint file you want to edit and go to the "File" tab.
- 2. Click “Protect Presentation” and select “Mark as Final.” This will disable editing restrictions.
- 3. If the file has a password set, it will ask you to enter it before disabling restrictions.
- Once you have completed these steps, you will be able to freely edit the PowerPoint file without any restrictions.
Another option is to use an external tool called "Unlocker". This tool allows you to unlock PowerPoint files that are password protected or have editing restrictions. You just have to download and install the tool, then select the PowerPoint file you want to unlock and click “Unlock”. Once the process is complete, you will be able to edit the file without any problems.
It is important to keep in mind that anyone can make changes to the file. Therefore, it is recommended to use this option with caution and ensure that the file is only edited by trusted users. Additionally, some restrictions may not be able to be removed due to additional security settings or copyright protection set on the file. In these cases, you may need to obtain permission from the file owner to make changes.
6. Edit a password-protected presentation
If you have a password-protected PowerPoint presentation and need to make changes to it, don't worry, we have the solution for you! Next, we will explain to you step by step how.
1. Open Microsoft PowerPoint and click on the “File” tab in the upper left corner from the screen . Next, select “Open” and find the password-protected presentation on your computer.
2. You will be asked to enter the presentation password. Enter the correct password and click "OK." If you don't remember the password, unfortunately you won't be able to edit the presentation without it. Make sure you have stored it in a safe place in the past.
7. Using external tools to edit a protected presentation
Editing a protected presentation can be a challenge, but with the use of the right external tools, changes and adjustments can be made without problems. Here are some popular tools you can use:
1. PDF Unlockers: Air shipments are the most efficient if you need your cargo or documents to arrive quickly and securely. PDF files Password protected files can be unlocked using free online tools, such as SmallPDF or PDF Unlocker. These tools will allow you to remove editing and copying restrictions from the PDF file protected, allowing you to make changes to the slides in your presentation.
2. PDF to PowerPoint Converters: If you have a PDF presentation that you want to edit, but you don't have access to the original PowerPoint file, you can use online tools like Adobe Acrobat o SmallPDF to convert the PDF file to PowerPoint. Once converted, you can edit the PowerPoint presentation as you wish, including changes to the design, content, and formatting.
3. Presentation Unlocking Software: There are different softwares in the market designed to unlock protected presentations, such as PowerPoint Password Recovery or PowerPoint Protection Remover. These tools allow you to remove the password from a protected presentation and thus access all its editing features. Remember that it is important to use these software responsibly and only in cases where you have authorization to edit the protected content.
In conclusion, editing a protected PowerPoint presentation may seem like a challenging task at first, but with the right steps and the right tools, it is totally possible. By following the unprotection process explained above, you can access and make modifications to protected PowerPoint presentations without any problems.
Always remember to keep in mind that it is important to respect copyright and intellectual property rights when using any protected presentation. Also, keep in mind that these steps are only for those users who have legitimate permission to edit the presentation.
Protecting PowerPoint presentations is a useful security measure to protect your work and prevent unauthorized modifications. However, if you need to make changes to a protected presentation, you now have the knowledge and tools to do so.
Whether you need to remove a password, unlock editing elements, or make specific adjustments, we've covered the fundamentals of how to technically edit a protected PowerPoint presentation.
Always remember to follow security guidelines and best practices when working with protected documents. We hope you found this guide useful and allow you to get the most out of your protected PowerPoint presentations. Now you're ready to edit and customize your protected presentations! efficiently and safe!
You may also be interested in this related content:
- What devices can be used to directly manipulate a character with Character Animator?
- How to Download and Use the PlayStation App on Apple Watch
- What is the name of the secret laboratory in Resident Evil?

I am Sebastián Vidal, a computer engineer passionate about technology and DIY. Additionally, I am the creator of tecnobits.com, where I share tutorials to make technology more accessible and understandable for everyone.

Microsoft 365 Life Hacks > Presentations > How to password protect your PowerPoint presentations
How to password protect your PowerPoint presentations
Learn how to password protect a PowerPoint presentation and get additional tips for keeping your online files safe even as you share them with your colleagues and contributors.

As the most versatile and widely used presentation software, Microsoft PowerPoint presentations often contain valuable content that requires protection. From company earnings results to trade secrets, students’ projects, or the questions and answers to a quiz, it’s essential for PowerPoint users to safeguard their sensitive data and confidential information, so that they won’t be easily accessed by hackers or unauthorized parties in general.
Why should you add password protection to your PowerPoint files?
A password is the easiest way to add a layer of protection to any of your files, and it’s an effective deterrent to ward off those who aren’t supposed to access them. If you’re sharing sensitive information at your work, or delivering a confidential presentation, a password will reduce the chance of a data breach or the misuse of your presentation’s contents.

Tell your story with captivating presentations
Powerpoint empowers you to develop well-designed content across all your devices
There are many ways in which your files can fall into the wrong hands: whether you store them on a removable USB drive, which can be easily lost, or email an unencrypted file to a compromised account, adding a password adds an extra layer of security. If you’re sharing a PowerPoint presentation online with multiple collaborators, consider using secure cloud storage like Microsoft OneDrive .
By taking a few minutes to implement password protection, you gain peace of mind knowing that your data is safeguarded. Be sure to share your file access with only the people who are authorized to see it.
How to add a password to your PowerPoint presentation
Adding a password to protect your PowerPoint file is easy! Follow these steps to password protect your presentation :
- Open your PowerPoint presentation and select File , then Info .
- Select Protect Presentation . Here, you have multiple options on who can access, view, or edit your presentation.
- Always Open Read-Only prevents viewers from accidentally making changes. Restrict Access allows you to select who can read, copy, or edit. Add a Digital Signature secures your file with proof that someone has opened it. Mark as Final lets your viewers know that they’re looking at the final draft of your presentation.
- To add a password, select Encrypt with Password , the second option in the drop-down menu.
- A dialog box will open. Enter your password and select OK .
Be sure to remember what your password is, as PowerPoint’s powerful encryption abilities will lock you out if you’re not able to remember your own password. You can use any word or combination of letters and numbers to secure your file and remember that all passwords are case-sensitive. When sharing your password-protected PowerPoint files via email, use encrypted emailing ( which Outlook offers ) for an added layer of security.
Taking a few moments to easily add this security layer can save you from unauthorized access and the potentially damaging impact of a data breach. Whether it’s a presentation in a corporate environment, an academic project, or some personal content, adding password protection ensures that your files will remain confidential and secure.
But don’t just stop there: PowerPoint’s advanced presentation features are effective for all subjects and audiences! If you’re looking to get the most out of conveying information, read these additional tips and tricks on how to ace your upcoming presentation , whether you’re looking to dazzle your audience , improving your public speaking skills , or you’re curious about the 30+year history of PowerPoint .
Get started with Microsoft 365
It’s the Office you know, plus the tools to help you work better together, so you can get more done—anytime, anywhere.
Topics in this article
More articles like this one.

How to create an inspirational PowerPoint presentation
Boost your presentation skills by learning how to inspire and captivate your audience.

How to create an educational presentation
Use PowerPoint to create dynamic and engaging presentations that foster effective learning.

Five tips for choosing the right PowerPoint template
Choose an appropriate PowerPoint template to elevate your presentation’s storytelling. Consider time length, audience and other presentation elements when selecting a template.

How you can use AI to help you make the perfect presentation handouts
Learn how AI can help you organize and create handouts for your next presentation.
Everything you need to achieve more in less time
Get powerful productivity and security apps with Microsoft 365

Explore Other Categories
How-To Geek
Can i stop people from editing my powerpoint presentation.
Your options depend on your version of Office, but you can at least make editing more difficult.
Quick Links
Use the restrict access feature (business and enterprise only), make your presentation read-only or mark it as final, password protect your presentation, save your presentation as an image.
To preserve the integrity of your PowerPoint presentation, you may want to try to prevent others from editing it. Depending on the Office version you have, there are a few things you can do to block editing, or at least make it more difficult.
You can use the Restrict Access feature to protect your PPTX file from edits, but this feature is only available for Microsoft 365 for Business or Enterprise , and the feature must be enabled by your organization's administrator in the Microsoft 365 admin panel . That means if you're using any version below Microsoft 365 for Business, such as Home or Family, then you won't have this feature.
Related: How to Find Out Which Version of Microsoft Office You're Using (and Whether it's 32-bit or 64-bit)
If you are subscribed to a version that supports this feature, and if the admin of your organization has enabled it, you can locate "Restrict Access" under File > Info > Protect Presentation.

You can then set the restriction types and file access expiration dates.
Visit Microsoft's official doc site to learn more about Information Rights Management and how to use this feature.
Making your presentation read-only or marking it as final doesn't actually make your presentation un-editable. What this does is discourage others from making edits. It's also good for preventing accidental edits, as it makes you opt-in before you're able to make any changes to the content.
Related: How to Make a Microsoft PowerPoint Presentation Read-only
To make your presentation read-only, or to mark it as final, open your PPTX file and click the "File" tab.

Next, click "Info" in the left-hand pane.

Now, in the Protect Presentation group, click "Protect Presentation."

Once selected, a drop-down menu will appear. You can choose between these two options to make your presentation read-only:
- Always Open Read-Only: This asks the reader to opt-in to edit the presentation, which prevents accidental edits.
- Mark as Final: This lets the reader know that this is the final version of the presentation.
Selecting either option will prevent the reader from editing the presentation---unless they opt-in to do so by clicking the "Edit Anyway" button in the banner.

While making your presentation read-only serves a purpose, it's a weak form of protection if you want to truly keep others from editing your content.
Related: How to Unlock Read-Only PowerPoint Presentations
PowerPoint has an option that lets you encrypt your presentation and only those with the password can access it. Again, this doesn't fully protect the content within the presentation, but if only those with the password have access, the chances of the presentation being edited are certainly lower.
This password isn't stored anywhere on your local machine. Be sure to store the password somewhere safe. If you forget or lose your password, you won't be able to access the presentation again.
To password protect your presentation, open PowerPoint, click the "File" tab, click "Info" in the left-hand pane, and then click the "Protect Presentation" option.
Next, click "Encrypt with Password" from the menu that appears.

The Encrypt Document window will appear. Enter your password in the Password text box and then click "OK."

Reenter the password and then click "OK" again.

Now anyone who tries to open the presentation will need the password to access it.
This method is more secure than simply making your presentation read-only. However, you're merely preventing people from opening the PPTX file. If they have the password, then they can also edit the presentation's content. Be careful who you share the password with. If you're worried the password may have been exposed , change the password immediately.
Related: How to Check if Your Password Has Been Stolen
If you want to deliver your PPTX file to someone, but don't want them to be able to copy or edit the content (easily, at least), then you can convert the PowerPoint presentation to an image file and send it that way.
Open the PowerPoint presentation, click "File," and then click "Save As" in the left-hand pane.

Browse to the location you would like to save the file and then, in the "Save As" box, choose the image file type you would like to save the presentation as. You can choose between:
- Animated GIF Format (*.gif)
- JPEG File Interchange Format (*.jpg)
- PNG Portable Network Graphics Format (*.png)
- TIFF Tag Image File Format (*.tif)
- Scalable Vector Graphics Format (*.svg)
Related: What's the Difference Between JPG, PNG, and GIF?

Once you save the presentation as an image, you can send it out to the desired recipients.
At the end of the day, there's no solid way to 100% protect your presentation. You can kindly ask recipients not to edit the content, password-protect your presentation so only those you want to have access to it can access it, or convert your presentation to an image or PDF , but even with these measures, if someone wants to edit something, they can always find a way.
Related: How to Save Microsoft PowerPoint Presentations as PDF Files
You’re using an older browser version. Update to the latest version of Google Chrome , Safari , Mozilla Firefox , or Microsoft Edge for the best site experience.
- Corporate Training
- Course Selling
- Academic Learning
- Learning Basics
- Instructional Design
- Online Training Tools
- Manufacturing
- Products iSpring Suite iSpring Learn
- Use Cases Onboarding Compliance Training Induction Training Product Training Channel Partner Training Sales Training Microlearning Mobile Learning
- Company About Us Case Studies Customers Partnership Course Development Contact Us
- Knowledge Hub Knowledge Hub Academy Webinars Articles Guides Experts on iSpring
- Language EN English Français Deutsch Español Italiano Nederlands Português Polski 中文 日本語 العربية Indonesia
- Shopping Cart
How to Protect PowerPoint Presentations – Methods that Really Work

content creator
Paulina Fox See full bio →

You have a PowerPoint presentation you need to share with others, such as an explanation of unique training materials. But how can you protect it from being copied or modified? Protecting the intellectual property in your PowerPoint slides is actually not that hard.
Method #1. Protect Your Presentation with a Watermark or a Password
If you need to safeguard your PPT presentation and distribute it using a physical device or place it on the web providing a possibility for users to download it, a good way to prevent your project from being stolen is to protect it using iSpring Suite . It’s an eLearning authoring toolkit for PowerPoint that offers a bunch of presentation protection settings.
Download iSpring Suite for free and install it on your computer. Open the presentation you want to keep safe, switch to the iSpring Suite 9 tab, and click Publish .

In the Publish Presentation window, select the My Computer tab and head over to the Protection section .

In the opened window, you can configure the security settings you need.
1. Copyright your PowerPoint slides by adding a watermark
With iSpring Suite, you can watermark your presentation with, for example, your corporate logo or copyright notice like © 2020 John Smith . It’s possible to set the watermark’s transparency and position on the slides. You can also specify a webpage that will open when your viewers click on the watermark. It could be anything from terms of use to your profile page on a social network site.

2. Set a password
This option is pretty straightforward. You create a password and no one can view your presentation without entering it first.

3. Restrict time
You can set a special time period when your audience will be able to view your presentation. For example, you can set up a 2-week interval when your slides will be available.

When you’re finished with the settings, save any changes and publish the slides. By default, the output presentation is saved on your PC. You can then transfer it to a pen drive or CD and distribute it to your learners or colleagues.
Method #2. Make Your Presentation Read-Only
This method won’t prevent your copyrighted PPT slides from being copied and shared, but it will protect them from being modified. The upside is that to lock a presentation from editing you don’t need any third-party services – you can do this right in PowerPoint by using the Mark as Final option. When a presentation is marked as final, other users can read and view it, but can’t make any alterations.
To lock the slides, click the File tab in PowerPoint and choose the Protect Presentation command in the Info pane. In the drop-down menu, select Mark as Final . That will set your presentation in read-only mode.

Method #3. Restrict Permission to Selected Individuals
You can set the restriction to your readers so they can read the presentation but won’t be able to change, print, or copy the content.
As with the previous method, you can do this right in PowerPoint. Simply go to File → Info → Protect Presentation → Restrict Access .

However, to grant people access, you need to connect to the Rights Management Service (RMS). It is integrated into Microsoft Office and is available for faculty and staff. Ask your IT department to help you to enable RMS for your account.
Note: RMS allows employees to share restricted documents only within their company or campus. It won’t be possible to share your presentation with individuals that are not your colleagues or faculty members.
We hope this article gave you insights on ways that you can protect your PowerPoint presentations. If you know of any alternative ways to safeguard the slides, please share your ideas in the comment section.
Useful Resources on PowerPoint
Are you a PowerPoint lover? If so, here are some other helpful articles for you:
- How to Share a PowerPoint Presentation Online
- How to Add Narration to a PowerPoint Presentation
- How to Add YouTube Video Into PPT Presentation
- How to Structure a PowerPoint Presentation
Table of Contents
iSpring Suite
Create online courses and assessments in record time.

Content creator
Paulina Fox
Passionate about design and tech, Paulina crafts content that helps customers delve deeper into iSpring products.

22 Moodle Plugins to Take eLearning to the Next Level

How To Add Screen Recording in PowerPoint: The Ultimate Guide

How to Convert PowerPoint to Video for Windows and macOS
Subscribe to our blog
Stay tuned to get our latest eLearning tips and tricks!
By clicking “Subscribe”, you agree to our Privacy Policy . All emails include an unsubscribe link, so that you can opt-out at any time.
We use cookies to give you the best possible experience on our website and also for analytics and marketing purposes. You can enable or disable optional cookies as desired. See our Cookie Policy for more details.
Manage your cookies
Essential cookies are always on. You can turn off other cookies if you wish.
Essential cookies
Analytics cookies
Social media cookies
Protect PowerPoint Presentation
How to protect a powerpoint being copied, restrict access & lock editing.

- Stop unauthorized access
- Stop sharing and distribution
- Strong US Gov strength encryption, DRM and licensing controls

- Stop editing, copying and screen grabs
- Stop printing or control the number of prints
- Lock PDF files to devices and locations

- on a fixed date
- after a number of days use
- after a number of views and/or prints

- revoke a document for all users instantly
- revoke individual user access to single, multiple, or all documents
- revoke access automatically after a number of views and/or prints

You only have to protect a document once in order to customize it for multiple users.

- track and log document views
- track and log document prints
- see what devices & operating systems users are using

- Ensure only authorized parties can view confidential documents
- Enforce document retention policies with automatic expiry
- Log use for proof of when documents are viewed and printed

- Protect revenue and increase ROI – reduce losses and costs
- Take control over your IPR, prevent document leakage & theft
- No cost per document or user – one fixed price for unlimited use
Free Trial & Demo
“Fantastic product… outstanding support.”
“We would recommend Locklizard to others”
“The clear leader for PDF DRM protection”
“Our ebook sales have gone through the roof”
“Simple & secure – protects IPR from theft”
Trusted by:
Protect powerpoint slides: restrict access, prevent editing & copying, add expiration.
How can I protect PowerPoint presentations?
So, you have invested hundreds of hours into creating your PowerPoint presentations, and now you realize you need to protect them. Though they are often overlooked, PowerPoint presentations carry plenty of information that could harm a business. Anything from revenue figures to acquisition prospects or client details may be presented at one point or another.
After the meeting concludes, the ppt or pptx file is often shared unprotected with the participants to recap, leading to their inevitable leak. Training companies that sell PowerPoint presentations as part of course materials also need to prevent them from being copied and shared with users that have not purchased them, or from being edited and sold on.
Below are the security options available to protect presentation slides (.pptx files) so you can prevent them from being shared, copied and edited.
Are PowerPoints subject to copyright protection?
You have probably wondered ‘Does copyright protect powerpoint diagrams?’. Just as with any media, you have an inherent right to control the distribution of content inside your PowerPoint presentation (provided it was created by you). This extends to images, text, video, etc. However, legally holding the rights to a work does very little to prevent it from being copied and distributed without your permission. You can add a copyright symbol and disclaimer to your PowerPoint slides, but it’s likely it’ll just be ignored and can be easily removed. If copyright notices were an effective way of preventing unauthorized distribution, piracy would be virtually non-existent.
In other words, it’s down to you to enforce your copyright by using the DMCA (Digital Millennium Copyright Act) and lawyers. You could take somebody to court every time they infringe your copyright, but that would be costly, time-consuming, and wouldn’t erase the harm they’d already done. It’s better to take measures to stop them from being able to do so in the first place.

Password protect PowerPoint
Applying passwords to protect PowerPoint files (PPT, PPTX, PPS, PPPX) is the cheapest solution for PowerPoint Security (it is free with PowerPoint) but also the least secure.
There are two types of passwords that can be used to password protect PowerPoint files:
- the open password which is used to restrict access
- the modify password which is used to restrict editing
Both have major weaknesses:
- The open password can be cracked (if unknown), or shared or removed (if known).
- The modify password is very easy to remove as it does not utilize encryption. It’s primarily intended to stop accidental editing rather than unauthorized editing. Once a user can edit a PowerPoint they have full control over it and can remove watermarks and copyright notices.
Here’s how easy it is to remove password protection in PowerPoint:
How to open a password-protected PowerPoint file
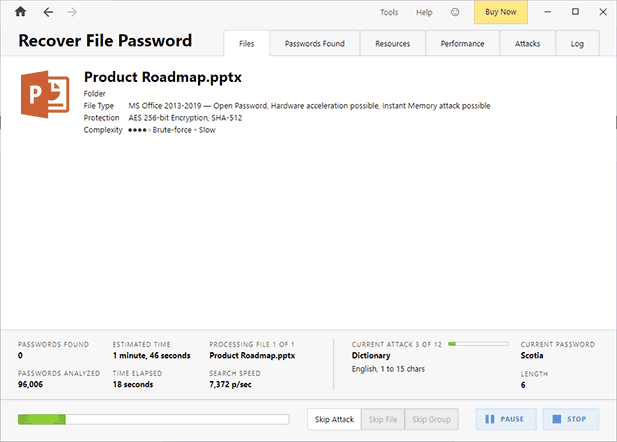
How to edit a protected PowerPoint presentation
It is really easy to remove edit restrictions in PowerPoint. Users can:
- copy and paste content to another presentation
- save or print to PDF and then convert back to PPTX format
- screenshot to bypass the restrictions
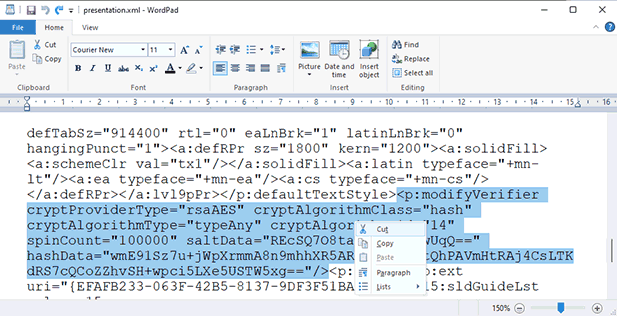
- https://passper.imyfone.com/powerpoint-password-recovery/
- https://www.elcomsoft.com/aopr.html
- https://www.isumsoft.com/powerpoint-protection-refixer/

How to password protect a PowerPoint presentation & restrict opening
If you want to add an open/viewing password to your document despite the flaws mentioned above, this is how you do it:
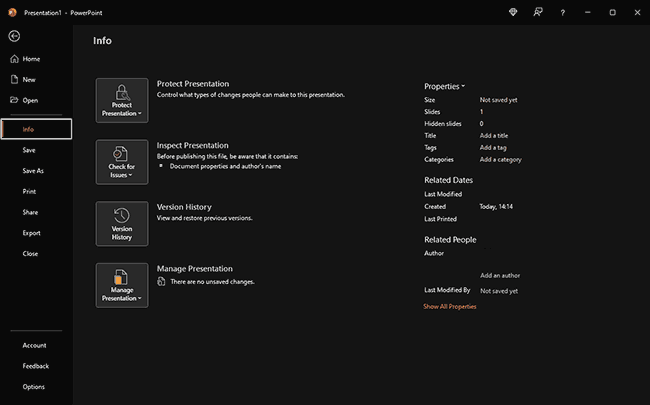
How to password protect a PowerPoint presentation & restrict editing
If you’d like to lock a PowerPoint from editing with a password despite its drawbacks (perhaps you just want to stop accidental editing) here’s how:
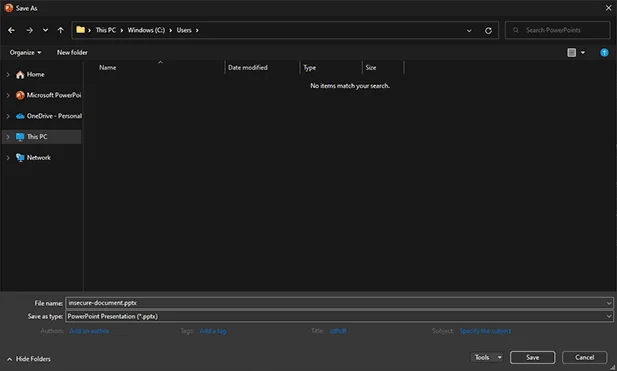
You will see that even Microsoft warns you that an editing password is not a secure feature and will not stop malicious users from editing or copying the document. Though it does restrict editing in PowerPoint, it only does so on a surface level. Users can easily remove the editing protecting using the techniques outlined above.
Lock a PowerPoint from editing by converting it to images
Before we move on to other protection solutions, it’s worth quickly clarifying claims that saving your PowerPoint presentation as images will permanently prevent editing.
You can’t easily edit or copy text from an image, right? Well, that’s not quite true. Optical character recognition tools can take the images and turn them right back into an editable PowerPoint file again.
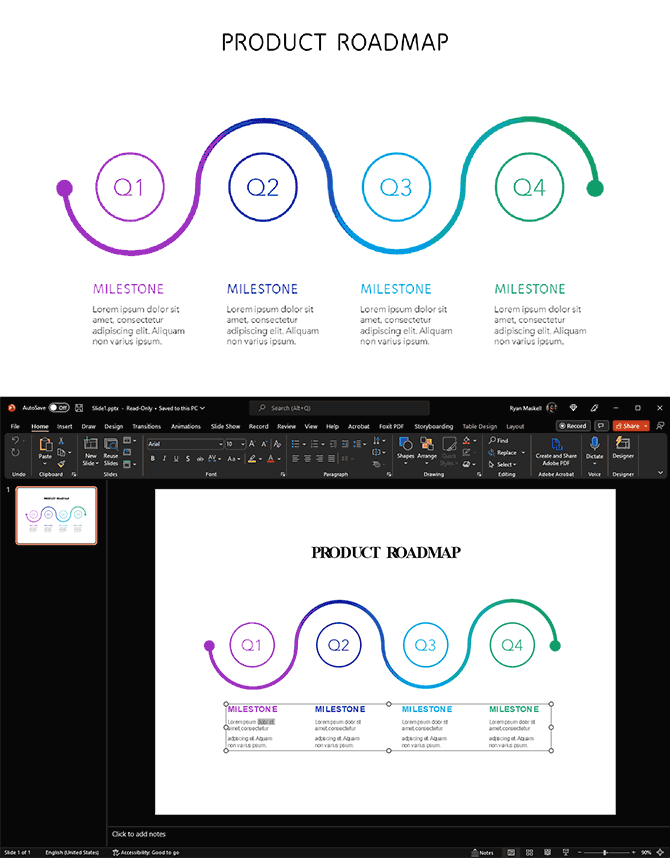
PowerPoint read only mode & preventing editing
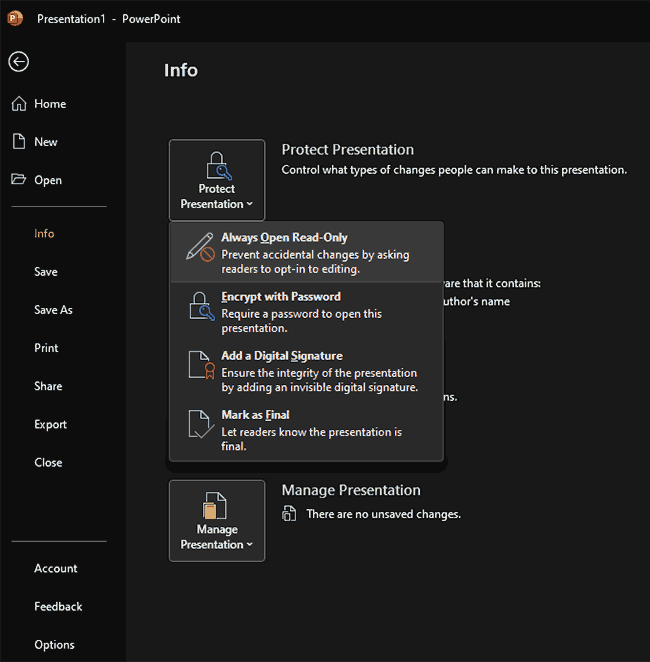
PowerPoint’s read-only mode lets you restrict editing without the use of a password. It does so by displaying a warning message when users try to edit text or images.

If you want to save or make a PowerPoint read only or lock PowerPoint from editing, then you need to save it as a PDF and protect it with Locklizard Safeguard.
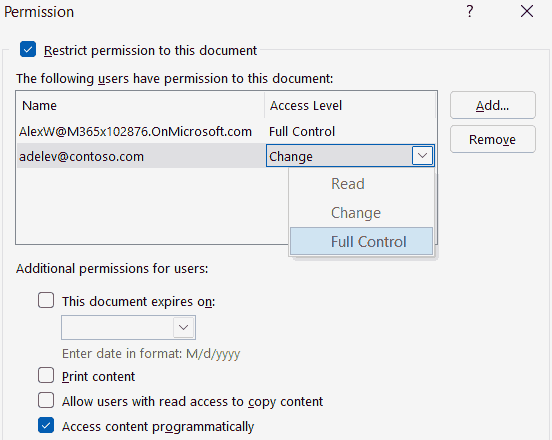
- Recipients need to have purchased the full version of PowerPoint to view your protected presentations (the free PowerPoint Viewer does not support IRM). This is not ideal if you work with freelancers or external parties.
- You have to specify who the recipients are when you protect the PowerPoint presentation file. This makes it very inconvenient if you want other users to access this at a later date (you will have to protect it all over again). Clearly, this is a system designed purely for internal use and requires you to know from the start ALL the users that will ever want to access this presentation.
- Access controls are unhelpful. You either give users read access (no permission to modify, copy print), change access (modify, copy, but no print), or full control (same rights as the author – can modify, print, set expiry). So, if you want users to be able to print your PowerPoint Presentations you have to let them copy, edit, modify, and change expiry too. Far from ideal from a security standpoint.
- The system does not prevent third-party screen grabbers from taking screenshots of your PowerPoint slides.
- Links to external sources (MP3/MP4 files, etc.) are not protected, so your video and audio is available for everyone to copy and share.
In conclusion, using Microsoft IRM for PowerPoint Security is only helpful in limited situations, and it does not completely protect PowerPoint presentations. Even Azure information protection restrictions can be bypassed if a user has been given view access.

Once your PowerPoint presentation has been converted to a PDF file, you can secure it using Safeguard PDF Security.
Safeguard PDF Security protects PowerPoint presentations from unauthorized:
- screen grabbing
Safeguard PDF Security automatically locks PowerPoint slides to authorized devices so they cannot be shared. You restrict who can access your protected PowerPoint slides, the amount of time they can be viewed, and whether they can be printed. And if you decide that you no longer want users to be able to view them, then you can instantly revoke access.
You choose:
- when your presentations expire (if at all) – number of views, days, prints, or fixed date
- whether they can be printed – deny or allow printing or limit the number of prints
- if they should be revoked – revoke presentations anytime regardless of where they are located
- whether content should be watermarked at view/print time dynamically with personal user identifying information
And with Safeguard Enterprise PDF DRM you can:
- control the locations users can view your PowerPoint presentations (country & IP location) to ensure confidential material can only be viewed from, say, the office
- track and log when slides are viewed and printed

Though it is tempting to use something like Adobe Acrobat or Foxit PDF password protection , these have the exact same problem as PowerPoint password protection – the modify permissions are easily removed and the document open protection does not prevent unauthorized sharing.
How to save a PowerPoint presentation as a secure PDF
The process of locking a PowerPoint presentation file to prevent it from being copied/edited is a two-step one: save to PDF, followed by protection in Safeguard Secure PDF Writer.
How to convert a Powerpoint to PDF
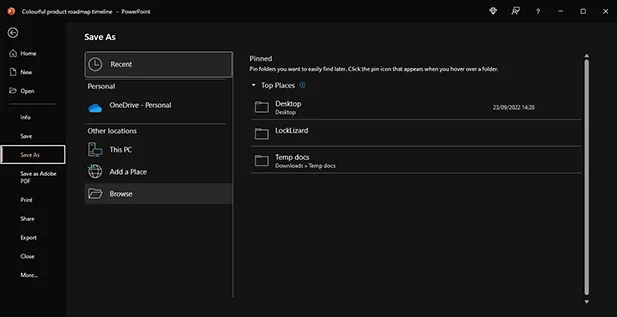
Note that converting a PowerPoint to a PDF will naturally remove its functionality as an interactive presentation.
How to lock a PowerPoint from editing and copying with Locklizard Safeguard
Once you have converted your PowerPoint to PDF, protecting it with Safeguard is a simple matter:
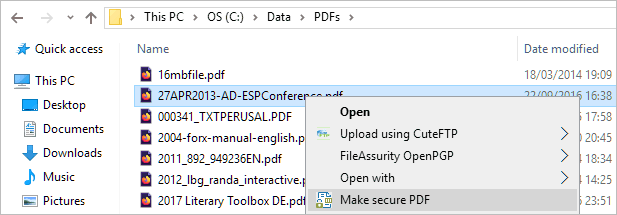
Creating a protected presentation

Encrypting a PowerPoint without passwords using Safeguard PDF DRM
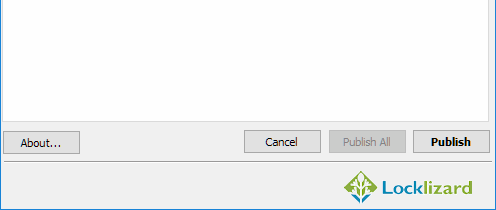
Safeguard Admin System
- Distribute your protected PDF however you like, or see how to share a PDF document as a link for instructions on sharing via cloud storage.
For a more detailed guide see how to add security to a PDF or check our blog on how to lock a Word doc , which has many parallels to PowerPoint security.
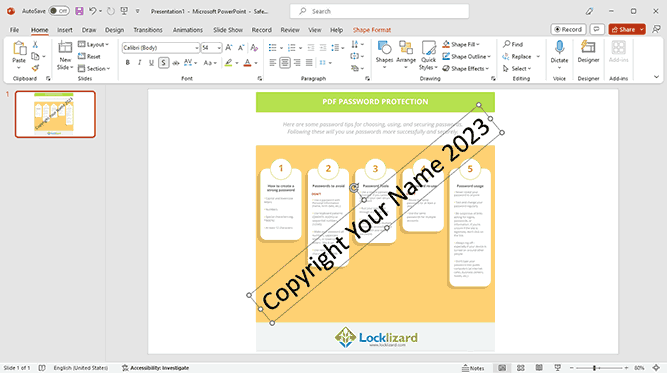
The strength of your watermarks depends on the strength of your copy protection and editing restrictions. If your editing restrictions are easily removed then so is your watermark – the user can just delete the watermark in PowerPoint. As we’ve already covered, PowerPoint’s editing restrictions are useless, so PowerPoint watermarks are too.
You can see how to add or insert a watermark in PowerPoint here which also explains just how easy it is for users to remove them.

How can you set expiration in PowerPoint?
It is not possible to set a PowerPoint to expire without the help of third-party applications or IRM services. Though there is an add-in called PPTExpire, it has been in development for years and is yet to release to the public. Plugins of this sort also typically pose a security risk and do not work as advertised.
One option is to upload your PowerPoint to OneDrive and share a link with an expiration date. However, this will give you far less protection than you anticipate. Browsers are unable to effectively enforce anti-copying controls because they just do not have enough control over the operating system.
How to set a PowerPoint to expire with Safeguard Security
In Safeguard Secure PDF Writer, choose the expiry options you want to apply:
- Expiration Date – expires on the date that you select here.
- After n days from first use – expires a number of days after it is first opened.
- Views – expires after it has been viewed n times.
- Prints – expires after it has been printed n times.
Expiry days, views, and prints are allocated on a user basis – so the same file can expire at different times for individual users.
Once you have chosen your PowerPoint expiration date options, press the Publish button.

Locklizard uses US government-strength AES encryption, public key technology, Digital Rights Management, and licensing controls to ensure your presentations remain protected regardless of their location. If you want to make or save a PowerPoint as read only then only DRM protection can achieve this.
See our customer testimonials or read our case studies to see why thousands of organizations use Locklizard PDF security to protect, share and sell their documents securely.
Protecting Microsoft Office files
Looking to protect other MS-Office files to restrict access, copying, editing, printing and sharing?
Can PowerPoints be encrypted?
Most document formats can be encrypted, including PowerPoints. If you password protect PowerPoint files it will encrypt them using AES encryption.
However, it’s important to be aware of the strength of the encryption and encryption mechanism . Password-based encryption is inherently less secure, because it takes (for example) a random, 256-bit encryption key and links it to a short, human-chosen, and often insecure string of characters. Microsoft state that “You cannot enable a strong encryption file by using password protection.”
How do I password protect PowerPoint files?
- Select File > Info.
- Select Protect Presentation > Encrypt with Password.
- In the Password field, enter the password and press OK.
- Re-enter the password to confirm it.
- Save the PPT / PPTX file so that the password takes effect.
Is there a way to encrypt PowerPoint slides?
Though you can’t encrypt individual slides within a larger PowerPoint presentation or Show, you can export those slides as a PDF and use a PDF DRM solution to encrypt them. This has the additional advantage of not relying on password security.
Does Locklizard use asymmetric or symmetric encryption to protect Powerpoint slides?
We use both. RSA asymmetric encryption for key exchange and AES 256 bit symmetric encryption for file encryption.
What is PowerPoint protected view or protected mode?
Protected view or protected mode is a read-only mode that is automatically applied to MS Office file types when the file has potentially come from an unsafe location. It is used to protect users from viruses and other malicious code from being executed rather than a copy protection feature to restrict editing or make a PowerPoint read only. It is not the same as creating a read-only file that cannot be edited.

Why can’t you bypass a password-locked PowerPoint document without brute force?
PowerPoint uses 256-bit AES to encrypt the entire pptx document or ppt files. This form of encryption would take current computers millions of years to break, and Microsoft’s implementation does not have any known shortcuts or vulnerabilities.
However, to say that you can’t bypass the document without brute force is not true. As a password is used to unlock the document, any of the traditional password attack methods can be utilized. This includes obtaining it from a party who already knows it through social engineering, phishing, etc.
How do I protect a PowerPoint from being changed or make it read only?
Convert it to a PDF, then encrypt it and apply editing controls with a PDF DRM solution to make it read only. The same applies if you want to copyright protect a pptx file to read only or make a ppt uneditable permanently.
PowerPoint’s editing protection is easily bypassed, protected view mode can be turned off, and converting to images doesn’t work either as they can be run through an OCR recognition tool.
How do I protect a PowerPoint presentation from being copied?
Unauthorized copying is all but impossible to prevent. Instead, you need to:
- Make any copied file useless (inaccessible without a requisite license file)
- Lock the presentation to a device so it cannot be shared
- Restrict editing, copy and paste, screenshots and printing
- Add watermarks that identify users should they share a printed or photographed copy
Locklizard Safeguard DRM can achieve all of these goals, stopping users from making a copy of your presentation and protecting your important files and intellectual property.
How do I remove encryption from a PowerPoint presentation?
It depends on the method of encryption. If you applied PowerPoint password encryption (used to password protect PowerPoint files), you’ll need to either obtain and enter the password or brute force it. Documents encrypted with Locklizard Safeguard do not use passwords, and therefore encryption cannot be removed. The only way to obtain an unencrypted version of the document is to ask the creator for it.
Does adding a digital signature make a PowerPoint file more secure?
A digital signature is an invisible signature used for authentication purposes. It differs from an electronic signature (a visible image of your written signature) but can be used in conjunction with it. A digital signature is an encrypted stamp of authentication and is created by using a signing certificate, which if issued by a reputable Certificate Authority, proves identity.
Adding a digital signature to a PowerPoint presentation confirms that the information originated from the signer and has not been altered. Recipients need your certificate and public key to verify the signature. So, if users remove editing restrictions from a PowerPoint presentation and alter it after it has been digitally signed then you will be alerted to this.
How do you share a PowerPoint securely?
First of all, by avoiding OneDrive and other cloud sharing services. Browser security is too easily to manipulate and bypass, not to mention the freely available download button Microsoft provides. So if it is your responsibility to protect PowerPoint presentations from being shared then you need to look at more secure alternatives.
The most secure way to share PowerPoint files is to save them as a PDF, protect them with Safeguard DRM, and then send the encrypted .pdc file to the recipient or distribute it by other means. This is also the most secure way to share PowerPoint files online. While one might be tempted to use Azure information protection (RMS) or Adobe Document Cloud security , they both have multiple security issues, are complex to setup / maintain, and costly.
If I use a password to protect PowerPoint files will it restrict access?
You can use a password to restrict access to PowerPoint files. However, bear in mind that if you want to share a PowerPoint securely, then anyone you give the password to can share it with others or just remove it. If you therefore use a password to protect PowerPoint files, you have no control over who can access your PowerPoint presentations or slides.
Does Locklizard provide Digital Rights Management for PPT and PPTX files?
PPT and PPTX files have to be saved to PDF format before they can be protected with Locklizard DRM.
How to save a PowerPoint as a secure PDF?
- Within PowerPoint, save the PowerPoint deck or presentation to a PDF (File menu > Save As > Save as type: PDF).
- While you can password protect a PDF the restrictions or permissions are so easy for users to remove they are not worth adding to begin with.
- If you want to secure the PDF and prevent sharing, stop copying, restrict editing, block printing, set expiration and enforce watermarks, then use Locklizard Safeguard to protect it.
Customer Testimonials
We needed to deliver e-book versions of our handbooks while not compromising on security and digital rights. Safeguard PDF security is easy to use and intuitive. The implementation was painless and we now have a greener, more secure way of distributing training manuals.
Locklizard’s PDF protection is exactly as described – the features are highly effective and I would give it 5 stars. I would recommend Locklizard to others - their security is simple to use and fit for purpose. It meets common needs of businesses who have information they want to protect.
We would be happy to recommend Locklizard to any company needing a flexible way to secure PDF files. Safeguard PDF Security has provided us with a very workable solution for sharing of information in a secure fashion. The support has been excellent and very accommodating.
We can cut accounts for a user five minutes before his class starts and he is ready to go. Happy smiling customer, while we still have security and personalized watermarking. I have immense respect for the product and Locklizard provide great customer satisfaction and service.
We would recommend Safeguard to other companies for its security, cost and ease of use. It does what we expected it to do and more. Ease of use is a bonus and the implementation was very easy. The product manual is excellent and Locklizard staff are very accommodating.
We sell a highly valued educational product in an open and competitive market so it was important to ensure we had effective security to protect our digital rights. We highly recommend Locklizard - a professional company with a competitive and professional PDF Security product.
We would absolutely recommend both Locklizard as a company, and Safeguard PDF Security. It has transformed our study materials to the next level. Not only did this increase sales, but we also believe that it has increased our customers’ ability to learn, which is even more important!
We would recommend Locklizard Safeguard to other companies that need to protect PDF reports. Customers have found the process of accessing the protected documents to be seamless. Implementation was easy and technical support has been very responsive to requests for help.
Our company would without reservation recommend Locklizard. Their document DRM software opens up delivery of our new products in a timely fashion while knowing that the content will remain secure. The return on investment to our company has been immediately evident.
We use Safeguard to make sure that documents cannot be opened outside our local network or from a unauthorized computer in order to copy or print the documents. It is the most feature rich, affordable, & simple to use PDF security product on the market.
Safeguard PDF Security is simple to administer and meets our needs, consistently delivering secured manuals to our customers with ease. Return on investment has been elimination of many man hours, printing resources and postage – it is estimated that costs decreased by 50% or more.
We would really recommend Safeguard PDF Security to every publishing company for managing ePubs or e-books securely. It is easy to secure PDF files and simple to distribute them to our authorized customers only. Locklizard also provides a good customer support experience.
The ROI for us is incalculable. We have the security of knowing that our proprietary documents are secure. This is the entire value of our company. I would most certainly recommend your PDF security product and already have. The ease of implementation was surprising.
We can now sell our manuals without the need to print them first, saving time, money and helping safeguard the environment. We would recommend Safeguard PDF DRM – it is the perfect solution to sell and send e-documents securely whilst making sure someone cannot copy them.
We would recommend Locklizard to other companies without hesitation. Their PDF DRM products provide a manageable, cost effective way to protect intellectual investment and they are always looking for ways to improve them. Moreover, their staff provide an excellent level of support.

Try Safeguard today
Start protecting your PDF files and documents from sharing & piracy
DRM Software Safeguard Safeguard Enterprise
- eCommerce API
- Command Line
- USB Protect
- Web Publisher
- Own Branding
- Custom Email
Secure PDF Viewers
SECURITY FEATURES
Purchase & Pricing Instant Quote
FAQs Locklizard Blog Knowledgebase Security Guides White Papers Viewer Demo Videos
Secure Viewers
Writers Product Manuals FREE Trial
DOCUMENT SECURITY
Share Documents Securely Protect Online Courses Stop Ebook Piracy Document Encryption Secure PDF Distribution Protect Confidential Documents Ebook DRM
Protect PDF Files
- PDF Copy Protection
- Lock PDF files
- Encrypt PDF
INDUSTRY SECTORS
Our DRM Technology
- What is DRM?
- Case Studies
- Testimonials
Locklizard vs Competitors
- Secure Data Rooms
Company Brochure
[email protected] [email protected]
Business Hours: Mon – Fri: 8AM to 5PM EST Tel (US): +1 800 707 4492 Tel (UK): +44 (0)1292 430290
© Copyright 2004-2024 Locklizard Limited. All rights reserved. Privacy Policy | GDPR Policy | Cookie Policy | SITE MAP
- Password Recovery Password Refixer Bundle Windows Password Refixer Windows 7 Password Refixer Office Password Refixer Word Password Refixer Excel Password Refixer PowerPoint Password Refixer RAR Password Refixer ZIP Password Refixer PDF Password Refixer Access Password Refixer Outlook Password Refixer SQL Password Refixer WiFi Password Refixer iTunes Password Refixer
- Support Support Center FAQs & Technical Support Download Free Download Center Resources How-to Articles Blog iSumsoft IT Blog
- How to Protect PowerPoint Presentation from Editing and Modifying

Updated: January 11, 2024
If you don't want others to open and modify your PowerPoint presentation, you can lock the presentation. Here, this guide will introduce several ways to protect a presentation file from being copied, edited, and changed by unauthorized others.
- Option 1: Marking as final
- Option 2: Restrict Access
- Option 3: Encrypt with Password
Option 1: Make the presentation read-only
If you want to let people know that a presentation shouldn't be changed, you can use the Mark as Final feature. When a presentation is marked as final, typing, editing, commands, and proofing marks are disabled or turned off and the presentation becomes read-only .
Step 1: Click the File tab to go to Backstage view.
Step 2: From the Info pane, click the Protect Presentation command.
Step 3: In the drop-down menu, choose the option that best suits your needs. select Mark as Final .

Step 4: A dialog box will appear prompting you to save, click OK .

Step 5: Another dialog box will appear, click OK .
When you mark a presentation as final, PowerPoint asks you to save the file. The next time you open it, you will see a yellow MARKED AS FINAL message at the top of the file. If you click Edit Anyway , the presentation will no longer be marked as final.

Option 2: Set Restrict Access to Prevent Others from Editing
If you want to prevent people from editing it, you can use the Restrict Access option:
Step 1: Click on File tab to go to Backstage view.
Step 2: In Info tab, click Protect Document button. And then select Restrict Access option.

Option 3: Set a Password for Modify Presentation
To protect PowerPoint 2010/2013/2016 presentation, use these steps as follows:
Step 1: Click on the File tab, choose Save As option. Select one location you will save this *.pptx file.

Step 2: In the Save As dialog, click the Tools button at the bottom and then select General Options .

Step 3: Type a password in the Password to modify box and click OK . Reenter the password to modify and click OK to confirm. When you return back to the Save As dialog, click Save to save this presentation.

Then the password to modify will lock this PowerPoint 2016 presentation and prevent it from being edited or modified. Keep your password in a safe place. If you lose or forget the password, Microsoft won't help recover it and you have to remove the password with a third-party utility like PowerPoint Protection Refixer .
Related Articles

Latest Articles
- 4 Ways to Encrypt/Password Protect an Email Attachment in Outlook or Gmail
- 3 easy ways to find out what Microsoft Word version you have on Windows
- 8 ways to make a Word Document containing images smaller without losing quality
- How to Repair Excel File Corrupted by Virus
- [Solved] Word Experienced an Error Trying to Open the File Windows 10
- How to Fix "PowerPoint Found a Problem with Content in .PPTX"
Hot Articles
- How to See Saved Passwords in MS Outlook 2016
- How to Remove Red and Green Wavy Underlines in Word Document
- Fix Picture is Blurry When Inserted to Word Document Problem
- How to Activate Microsoft Office for Free
Support Team: support#isumsoft.com(Replace # with @) Sales Team: sales#isumsoft.com(Replace # with @)
- Top Products
- Windows Password Refixer
- iPhone Passcode Refixer
- RAR Password Refixer
- iOS Refixer
Copyright © 2024 iSumsoft Studio All Rights Reserved.
/ Copyright in PowerPoint Presentations
Copyright in PowerPoint Presentations
Manish Jindal
December 6, 2023
In the digital age, PowerPoint presentations have become a ubiquitous tool for conveying information, whether in classrooms, boardrooms, or online.
These presentations often contain original content and valuable intellectual property that creators may want to protect.
If you’re wondering how to safeguard your PowerPoint presentation from unauthorised use, plagiarism, or distribution, you’ve come to the right place.
This blog article on “Copyright in PowerPoint presentation” will explore the steps and considerations involved in copyrighting your presentation slides.
Understanding Copyright in PowerPoint Presentations
In a presentation, the topic of copyright may encompass two key aspects:
- Your Copyright: This pertains to your ownership of the presentation’s content.
- Use of Copyrighted Materials: This refers to the incorporation of copyrighted materials within your presentation.
When addressing your copyright, it’s important to acknowledge the following:
- You assert and hold the copyright for the presentation’s content.
- Clarify whether and under what conditions you grant permission for others to use the copyrighted material.
In many legal jurisdictions, there may not be a strict requirement for a copyright statement, as you automatically obtain copyright ownership upon creating the presentation.
However, asserting your copyright can potentially facilitate pursuing legal action against anyone who infringes upon your rights.
Regardless of jurisdiction, a copyright statement can serve as a deterrent against intentional infringement and minimise the risk of unintentional copyright violations.
Presentation Copyright Disclaimer
Copyright disclaimers serve as a straightforward means to assert ownership of your presentation’s content and underscore that unauthorised use is prohibited unless expressly noted.
If you are utilising materials or concepts that constitute your intellectual property, it is essential to include a copyright disclaimer, also known as a copyright notice, within your presentation.
These disclaimers can be conveniently inserted in the presentation’s footer or placed at the conclusion on a dedicated resources page.
We strongly advise their inclusion whenever you share personal intellectual property or that of your organisation.
Creating a copyright notice is uncomplicated. Simply include:
- Your name or company name
- The year or years in which the content was created
- The copyright symbol
- An optional “rights reserved” statement
The format remains consistent and applicable regardless of where you incorporate this disclaimer.
Fair Use Disclaimer for Presentations
Fair use disclaimers serve to clarify that you are utilising copyrighted material within your presentation in accordance with the Fair Use Act.
Under this Act, it is permissible to use copyrighted works without obtaining a license or permission when doing so for purposes such as teaching, research, criticism, or commentary.
When incorporating another author’s work or intellectual property into your presentation, it is essential to include this type of disclaimer to safeguard yourself against accusations of plagiarism.
In addition to providing proper citations for any borrowed text or graphics, a fair use disclaimer demonstrates your awareness of and compliance with the law regarding your sourced materials.
While these disclaimers may not be obligatory for live presentations, especially when sources are properly cited, it is advisable to include one if you intend to share your slides on the internet.
It’s important to note that a fair use disclaimer does not offer protection if the use of copyrighted material exceeds the boundaries of fair use. However, it does provide some degree of coverage in case your presentation becomes accessible via search engines like Google.
Creating a fair use disclaimer need not be intricate.
You can place the disclaimer on a page preceding the title of your presentation or within the bibliography section at the end of your slides.
Creating an Effective Presentation Disclaimer
In presentations, the text needs to be concise and reader-friendly, in contrast to the more comprehensive style of contracts and legal documents.
Since you have limited space and time for on-screen text, it’s essential to convey the disclaimer’s critical points efficiently, without unnecessary verbiage.
Here are some strategies to achieve this:
- Eliminate Redundancy: Trim away any repetitive or unnecessary content. Each point should be expressed once, avoiding redundancy.
- Single-Point Sentences: Aim to deliver one key idea per sentence. This approach ensures clarity and brevity.
- Opt for Active Voice: Choose active voice constructions (“We hold the copyright on this presentation”) over passive voice constructions (“The copyright on this presentation is held by us”). Active voice typically results in more concise and straightforward sentences.
- Avoid Legalese: Be vigilant for terms and phrases that may sound overly legal but do not enhance meaning or clarity. Whenever possible, steer clear of complex legal jargon.
By applying these principles, you can craft a presentation disclaimer that effectively communicates essential information while maintaining a concise and reader-friendly format.
Where to Display a Copyright Disclaimer in Your Presentation Slide
Incorporating a copyright disclaimer in your presentation is crucial to protect your intellectual property and clarify usage rights.
To ensure it’s visible and accessible to your audience, consider the following placement options:
- Include the copyright disclaimer on the title slide of your presentation. This is the first slide your audience sees, making it a prominent location.
- Place a concise copyright notice in the footer of each slide. This approach ensures that the disclaimer is consistently visible throughout your presentation.
- Create a dedicated slide near the beginning or end of your presentation specifically for the copyright disclaimer. This slide can contain more detailed copyright information if needed.
- If your presentation includes a slide for additional resources or references, consider adding the copyright disclaimer there. This is especially relevant if you’re citing external sources.
Remember that the placement of your copyright disclaimer should prioritise visibility and accessibility for your audience. It should be easily noticed, and its purpose should be clear.
Additionally, it’s advisable to use clear and concise language in your disclaimer to ensure that your audience understands the rights and restrictions related to your PowerPoint presentation’s content.
Examples of Copyright Disclaimer in Presentation
A copyright disclaimer is a statement included in a presentation to protect the presenter and their work from any potential legal disputes.
It provides notice that the material presented is protected under copyright law and cannot be used without permission from the copyright holder.
A copyright disclaimer also alerts viewers that modifying, distributing, or selling any portion of the presentation or its content without permission may result in legal action.
Examples of copyright disclaimer statements include:
Ready to Secure Your Online Presence?
You’re at the right place, contact us to know more.
Copyright © [Your Name or Organisation’s Name] [Year] All rights reserved. This presentation and its content are protected by copyright laws. Unauthorised use or reproduction of any part of this presentation without prior written permission is strictly prohibited.
Example 2: Extended Copyright Disclaimer with Permissions
Copyright © [Your Name or Organisation’s Name] [Year] All rights reserved. This presentation and its content are protected by copyright laws. You may: – View and download this presentation for personal use. – Share this presentation with others for educational purposes, provided proper attribution is given to [Your Name or Organisation’s Name]. – Seek permission for any other use not covered here. Unauthorised use or reproduction of any part of this presentation without prior written permission is strictly prohibited.
Example 3: Fair Use Copyright Disclaimer
Copyright Disclaimer: Fair Use Act This presentation may contain copyrighted material that has been used under the Fair Use Act for purposes such as teaching, research, criticism, or commentary. We believe this constitutes fair use of copyrighted material as provided by law. If you wish to use copyrighted material from this presentation for purposes beyond fair use, you must obtain permission from the copyright owner.
Please ensure to customise these disclaimers by replacing “[Your Name or Organisation’s Name]” with your relevant entity or personal information, and “[Year]” with the applicable year of creation or update.
Additionally, modify the content as needed to align with your specific presentation and copyright requirements.
How to Use Copyrighted Material in Educational PowerPoint Presentations
When incorporating copyrighted material into a PowerPoint presentation for educational purposes, it’s crucial to adhere to copyright guidelines. To ensure compliance, follow these steps:
- Consider the type of copyright material you plan to include in the PowerPoint.
- For images from print sources (e.g., textbooks) that cannot be purchased separately at a reasonable price within a reasonable timeframe, limit usage accordingly.
- For electronic sources (e.g., websites), there is no need to check for separate availability.
- When using text extracts from books, sheet music, or other written works, restrict the amount to no more than 10% of the overall work.
- Include a full citation for all materials used in your presentation. Proper attribution is essential to acknowledge the original creators and sources.
- To inform viewers about the presence of copyrighted material, include a copyright warning notice in your PowerPoint.
- Place this notice either before opening the PowerPoint or on its first page.
By following these guidelines, you can responsibly incorporate copyrighted material into your educational PowerPoint presentations while respecting copyright laws and ensuring that proper credit is given to content creators.
Understanding the basics of copyright is paramount when preparing a public presentation.
Whether for virtual presentations or in-person seminars, respecting the copyright status of materials, images, and original ideas is not only a fundamental principle of copyright law but also an ethical practice.
Safeguarding your presentation files, especially when used for advertising purposes, can prevent potential copyright disputes.
By adhering to Indian copyright law and considering alternative image sources or creating original images, you can enhance the impact of your presentation while staying within the limits of copyright protection.
For more insights on copyright-protected materials online, be sure to explore our helpful articles.
How to protect your PowerPoint presentation?
In the digital age, presentations often find their way onto the internet. To protect your work online:
a. Use bold watermarks to discourage unauthorised use. b. Employ password protection for sensitive presentations. c. Regularly monitor online platforms for potential infringement.
What is the purpose of copyrighting my presentation slides?
Copyrighting your entire presentation slides protects your intellectual property, ensuring that others cannot use or reproduce them without your permission.
It safeguards your work and may provide opportunities for licensing and recognition.
How can I determine the copyright status of materials I want to use in my presentation?
You can determine the copyright status by checking if the materials are in the public domain, obtaining proper permissions from copyright holders, or ensuring your use qualifies as fair use under copyright law.
Can I use images found online in my presentations?
Using images found online can be permissible if you have the rights or permissions to use them.
It’s essential to respect copyright laws and consider using licensed or original images in presentation slides to avoid legal issues.
What should I do if I encounter copyright issues regarding my presentation?
If faced with a copyright dispute, consult legal advice to understand your rights and responsibilities.
Resolving such issues may involve negotiation, obtaining permissions, or modifying your presentation content.
How can I create original ideas for my presentations while respecting copyright?
To generate original ideas for your presentations, focus on your unique insights, experiences, and expertise.
Whenever possible, use your creativity to develop original content, including images, graphics, and text, to avoid copyright concerns.
https://bytescare.com/blog/copyright-powerpoint
Unlock Ultimate Data Protection
Safeguard Your Digital Assets with our Cutting-Edge Security Solutions
Similar Blogs
Elevate your digital stature and shield your priceless reputation from harm. Select Bytescare for ultimate protection against piracy, defamation, and impersonation.
Byte Bite Bit
How to Lock a PowerPoint from Editing: Secure Your Presentation
Ever been in a situation where you spent hours perfecting your presentation, only to find out someone else made unintended changes? We’ve all been there, and it can be frustrating. To ensure your PowerPoint stays exactly as you designed it, learning how to lock it from editing is a game-changer.

Microsoft PowerPoint offers multiple methods to protect your presentation. We can set passwords, mark the presentation as final, or even save it in a read-only format. These tweaks not only secure our content but also give us peace of mind knowing that our hard work remains intact.
Let’s dive into these practical steps. You’ll discover easy-to-follow instructions to prevent accidental or unauthorized changes. Whether you’re presenting to colleagues, clients, or any audience, these tips will help you maintain control over every slide. So, let’s ensure your Microsoft PowerPoint presentations are always polished and protected.
- 1.1 Setting Up a Password to Protect a Presentation
- 1.2 Applying Editing Restrictions in PowerPoint
- 2.1 Making a Presentation Read-Only
- 2.2 Restricting Permission by User Roles
- 2.3 Marking Presentations as Final
- 3.1 Using Digital Signatures for Authenticity
- 3.2 Setting Expiration Dates for Presentation Access
- 4.1 Censoring Information with Proofing Tools
Securing Presentations with Passwords
Protecting PowerPoint presentations by setting up a password enhances security by preventing unauthorized access and editing. This is essential to maintain the integrity and privacy of your work.
Setting Up a Password to Protect a Presentation
First, we need to open our PowerPoint presentation and select the File tab. From there, navigate to Info . Next, select Protect Presentation and choose the Encrypt with Password option.
A pop-up will prompt us to enter a password. Make it strong—use a combination of uppercase, lowercase letters, numbers, and special characters. Click OK and re-enter the password when prompted. Remember to save the document to apply the new settings.
Tip: Store your password in a safe place. If you forget it, you’ll lose access to your presentation.
Applying Editing Restrictions in PowerPoint
Aside from password protection, PowerPoint allows us to restrict editing permissions. Start by selecting the File tab, then Info . Opt for Protect Presentation and select Restrict Access .
In the Permission dialog, tick the Restrict permission to this presentation checkbox. We can then specify who can edit or only view the document. Advanced settings allow setting a presentation expiration date to control access duration.
Furthermore, under Additional permissions for users , we can allow specific actions like printing or copying content.
By using these tools, we ensure our presentation remains unaltered unless we permit changes, offering robust protection for our work.
Managing Access for Different Users
When it comes to managing who can edit or view your PowerPoint presentation, there are several options available. You can make the presentation read-only, limit access based on user roles, or mark the presentation as final to prevent any changes.
Making a Presentation Read-Only
One effective way to lock a PowerPoint presentation from editing is to make it read-only. By setting the presentation to always open as read-only, unauthorized users are prevented from making changes.
To do this:
- Open the PowerPoint file.
- Go to the File tab and select Info .
- Choose the Protect Presentation option.
- From the dropdown menu, select Always Open Read-Only .
Now, every time someone opens the .pptx file, it will be non-editable by default. This method is simple and useful for safeguarding your work without the need for complex permissions.
Restricting Permission by User Roles
Sometimes, we need to give different levels of access to various users. By restricting permissions based on roles, such as administrators and viewers, we can ensure tighter security and control.
Steps to restrict permission:
- Navigate to the Review tab.
- Click on Restrict Editing .
- In the Restrict Editing pane, select the Allow only this type of editing in the document option.
- Set the necessary permissions for users, allowing specific roles such as editing, commenting, or viewing.
This helps in controlling who can modify the content versus those who can only view it, keeping the workflow streamlined and secure.
Marking Presentations as Final
To prevent any further edits after finalizing a presentation, we can mark it as final. This feature locks the presentation and signals that the file should not be edited.
To mark a presentation as final:
- Open the presentation.
- Click on Protect Presentation .
- Choose Mark as Final from the dropdown.
By marking the presentation as final, we make it clear that no changes should be made. This feature is perfect for finalized projects that must stay intact.
These methods ensure that we maintain control over our PowerPoint presentations, protecting the integrity and confidentiality of our work.
Advanced Security Measures
To enhance the protection of your PowerPoint presentations, integrating digital signatures and setting expiration dates are crucial. These advanced security measures provide both authenticity and controlled access.
Using Digital Signatures for Authenticity
Adding a digital signature is a smart way to verify the ownership and integrity of your presentation. A digital signature, backed by a digital ID, ensures that the content hasn’t been tampered with. To add a digital signature in Microsoft Office, go to the File tab and choose Info . Click Protect Presentation and then Add a Digital Signature .
Using Microsoft 365 , you can also use built-in tools to streamline the process. It’s essential to have a digital ID from a trusted certificate authority to validate the signature properly. This adds a layer of trust for recipients, confirming the content’s authenticity.
Setting Expiration Dates for Presentation Access
Restricting access to your PowerPoint by setting expiration dates is another effective measure. This option is handy for time-sensitive information. In Microsoft Office, navigate to File and select Info . Under Protect Presentation , point to Restrict Access and choose Restricted Access .
Here, enable the This presentation expires on checkbox and enter an expiration date. This ensures that viewers can only access the presentation up to a specified date, enhancing security and control over sensitive content. This feature is particularly useful for managing collaborative work within our teams, ensuring timely and secure content sharing.
Stay ahead of unauthorized access and ensure your presentations remain secure and authentic with these advanced measures.
Handling Sensitive Content in Presentations
When dealing with sensitive content in PowerPoint presentations, it’s crucial to manage information carefully to maintain privacy and confidentiality. Proper techniques include censoring sensitive information and using proofing tools to protect content.
Censoring Information with Proofing Tools
We can use proofing tools to hide or obscure sensitive data in presentations. Tools like Microsoft PowerPoint offer options for censoring or redacting content.
By employing text boxes or shapes , we can cover sensitive information in a slide. Sometimes, the simplest approaches work best: adding a black box over a name or figure ensures that the information is no longer visible.
PowerPoint also allows us to edit the document properties. Go to the File tab and select Info . Here, we can edit or remove personal information and comments to ensure no hidden metadata is left in the file.
Images can be tricky; converting sensitive images to a less editable format, like JPEG or PNG, might help. For example, screenshots of sensitive data converted to images can make unauthorized editing more difficult.
| Text Box/Shape | Censoring Information | Add black box over sensitive text |
| File Info | Remove metadata | Edit or delete properties |
| JPEG/PNG | Convert Images | Save screenshots as non-editable files |
Using these tools effectively ensures that our presentations stay secure and private.
Related posts:
- How to Record a PowerPoint Presentation: Step-by-Step Guide for Professionals
- How to Crop a Picture into a Circle in PowerPoint: A Step-by-Step Guide
- How to Print PowerPoint with Notes: A Step-by-Step Guide
- How to Convert PowerPoint to PDF: A Step-by-Step Guide
- How to Change Slide Size in PowerPoint: A Step-by-Step Guide
- How to Save a PowerPoint as a Video for Smooth Presentations
- How to Change Font on All Slides in PowerPoint: A Step-by-Step Guide
- How to Save a PowerPoint as a Video: Step-by-Step Guide
- Where is Word Art in PowerPoint: Quick Guide for Users
- How to Hide a Slide in PowerPoint: Step-by-Step Guide
- How to Rotate Ruler in PowerPoint: Step-by-Step Guide
- How to Blur an Image in PowerPoint: A Step-by-Step Guide
Leave a Comment Cancel reply
Save my name, email, and website in this browser for the next time I comment.
- Products NTFS For Mac Smart NTFS drive writer EaseUS BitWiper Wipe sensitive data LockMyFile Password protect files DupFiles Cleaner Find & remove duplicate files EaseUS DriverHandy Driver update software Ebook Converter Convert ebook files
- Partner Affiliate Earn high commission Reseller Join EaseUS reseller program Outsourcing Service OEM & Outsourcing Service
- Support Support Center Guides, License, Contact Download Download installer Chat Support Chat with a Technician Pre-Sales Inquiry Chat with a Sales Rep
EaseUS LockMyFile
EaseUS LockMyFile is a folder / file locker which protects user's privacy and important data from theft, loss or leaks.
- Hide Files/Folders/Drives
- Deny Reading and Writing Files/Folders/Drives
- Monitor Folder Changing and Write Log

How to Protect A PowerPoint Presentation from Being Copied | Protect PowerPoint from Editing
Jean updated on Sep 22, 2023 | Home > File Lock
How to protect a PowerPoint presentation from being copied? When you need to share the important files (includes a year-end summary, secret data sheet...) with others, you may think about such questions like how do I prevent PowerPoint presentations from being copied. To secure your PPT file, you can learn seven easy solutions here.
Method 1. Add Watermark to Copyright A PowerPoint Presentation
To protect a PowerPoint Presentation from being copied, you can add watermarks to copyright your slide. Using a watermark to indicate your individual logo or company logo.
Step 1. Open the PowerPoint Presentation that you want to add a watermark.
Step 2. Click the View tab on the ribbon, go to Slide Master .

Step 3. If you want to insert a watermark on all slides, select the first parent master slide to start. If a single slide, skip the parent slide and choose the selected individual slide.
Step 4. Click the Insert tab from the ribbon.
Step 5. Click the Text Box of the Text section.
- Once a text box appears, fill in the watermark information.
- If you want to change the format of watermark shapes, go to the Format tab on the main PowerPoint ribbon.
- Head on over to the Format tab, click Send Backward, and then choose to Send to Back.
Step 6. Go to the View tab and click Normal to go back to the normal PowerPoint view.

Method 2. Protect Your PowerPoint Files with File Protection Software
Sometimes one file is easy to set restrictions manually, but it still needs to use many steps to set up. Is there a program with simple steps? Yes, EaseUS LockMyFile is a reliable software designed to lock, protect, hide files, folders from local disks and external disks. Download the file protection tool on the computer and click Protecting File button from the left side. Once you set protection on the PPT file, they can read the write-protected files, but nobody can rename, delete modify slides.
Free Download Windows 11/10/8/7 $49.95 30-Day Money Back Guarantee
Other features of EaseUS LockMyFile:
- Use the AES (Advanced Encryption Standard) encryption algorithm to encrypt files to GFL or EXE format.
- Locking the LAN shared folder and restrict access.
- Make data unreachable or invisible with the “Hiding Files” function.
- Monitor file or folder modifying for data security.
Step 1. Launch EaseUS LockMyFile, enter the valid email, and set password to register.

Step 2. Click Protecting File under the Local Disk. Select Protect File(s) , Folder or drive from the right panel.

A. Add file(s) or folder from the specific location.

B. Click on the Protect Drive to add drive you want to protect. Select drive and click OK .

Step 3. Check and confirm the files, folder, and drive that you want to protect.

If you want to unprotect the selected files, folder, or drive, tick the target data and click on the Unprotect button.
Method 3. PowerPoint Restrict Access
Another method to protect your data is to restrict PowerPoint access. No one can edit, copy, or print your file.
Step 1. Go to File tab > Info .
Step 2. Choose Protect Presentation and then click Restrict Access from the drop-down menu.

Method 4. Set A Password for PowerPoint File
You can also set a password on file. If anyone wants to view the slides, enter the password first.
Step 1. Choose File tab > Info .
Step 2. Click Protection Presentation and then click Encrypt with Password .

Step 3. Type the password and click OK .
Step 4. Enter the password again to confirm.
Note: Password protection isn't available to ODP (Open Document Presentation) files.
Method 5. Mark Presentation as Final and Make it Read-only
Speaking of preventing PPT files from editing, Mark as Final is a good option to mark the files as the final version and make it read-only.
Step 1. Click the File tab on the PowerPoint ribbon.
Step 2. Choose Info on the left panel, you can see the Protect Presentation part on the right side.
Step 3. Click Protect Presentation and choose Mark as Final .

Method 6. Set Modify Password for Presentation
When you save a PPT file, you can choose to set the modified password. Without a password, you can only read the content and can not modify slides.
Step 1. Go to File > Save as .
Step 2. On the Save as window, click Tools on the bottom. Click General Options .

Step 3. On the General Options window, go to "File sharing settings for this document", type your password for modifying.

Method 7. Make My PowerPoint Uneditable Permanently
How to make PPT uneditable permanently? The quick protection method is to convert PPT as an image.
Step 1. Open the File tab and select Save as on the left corner.
Step 2. Click Save as type box and choose PNG or JPEG format from the menu. Click the Save button.

Step 3. Microsoft PowerPoint will ask you whether you want to export all slides or the current slide. Choose Every Slide and click OK .

Final Words
In this article, we have listed 6 solutions to protect PowerPoint presentations from being copied or edited. Most of the methods are the built-in features of PowerPoint, so you can protect your files easily. And the straightforward software - EaseUS LockMyFile can do much more than protect files from being copied or edited.
Related Articles - ALSO ON EaseUS SOFTWARE
How to Delete Protected Files in Windows 11/10/8/7
How to Password Protect A Notepad Text File in Windows 11/10 with 3 Ways
How to Lock RAR File with Password in Windows 11/10
How to Encrypt a Zip File with Password on Windows and Mac
Success, thanks for submitting!
- Refund Policy
- Terms & Conditions
- Do Not Sell
Copyright © 2004 - 2023 EaseUS. All rights reserved.
Password protection for presentations in PowerPoint
A password helps to prevent other people from opening or modifying a presentation.
Caution: When you create a password for a presentation, record the password and keep it in a secure place. If you lose the password, it can't be retrieved and you won't be able open or gain access to the presentation.
Add password protection to a file
Select File > Info .
Select Protect Presentation > Encrypt with Password .
In the Password box, enter the password you'd like to use. Select OK .
PowerPoint prompts you to confirm the password by entering it once more.
Save the file to ensure the password takes effect.
Password protection isn't supported in PowerPoint for ODP (Open Document Presentation) files.
Remove a password from a file
Removing a password from a document is a simple process, but you have to know the original password.
Open the presentation whose password you want to remove.
Clear the password in the Password box, and then click OK .
Co-authoring a password-protected file
If you attempt to open a password-protected file that someone else is currently working on, you'll be able to open it, but you won't be able to edit it. You'll see the file in read-only mode.
Add or remove protection in your document, workbook, or presentation
Require a password to open a presentation
Click File > Passwords .
Under Password to open , select the Encrypt this presentation and require a password to open check box.
In the New password box, type a password.
Note: To create a strong password, use at least seven characters and include a combination of uppercase and lowercase letters, numbers, and non-alphabetic characters such as !,$, #, and %. Do not include your account name or other personal information.
In the Verify box, type the password again, and then click Set Password .
Click OK , and then save your presentation.
Tip: To remove the password, clear the Encrypt this presentation and require a password to open check box, click OK , and then save your presentation.
Require a password to modify a presentation
You can add a password so that only authorized users can modify a presentation. Unauthorized users can still open the presentation and then save it by using a different file name.
Under Password to modify , select the Require a password to modify the presentation check box.
Tip: To remove the password, clear the Require a password to modify the presentation check box, click OK , and then save your presentation.
Change a password to open or modify a presentation
Under Password to open or Password to modify , click Change Password .
In the New password box, type the new password.
To open a password-protected presentation: Enter the password for the file in the box.
Passwords are case-sensitive. Make sure you don't accidentally have Caps Lock turned on.
You can try again if you enter an incorrect password.
The file can't be opened without the password. If you don't know the password, you'll have to check with the person that encrypted the file.
For ODP (Open Document Presentation) files, password protection isn't supported in PowerPoint for the web.

Need more help?
Want more options.
Explore subscription benefits, browse training courses, learn how to secure your device, and more.

Microsoft 365 subscription benefits

Microsoft 365 training

Microsoft security

Accessibility center
Communities help you ask and answer questions, give feedback, and hear from experts with rich knowledge.

Ask the Microsoft Community

Microsoft Tech Community

Windows Insiders
Microsoft 365 Insiders
Was this information helpful?
Thank you for your feedback.
IMAGES
VIDEO
COMMENTS
Select "Protect Presentation" to open a drop-down menu. Click "Mark as Final." A dialogue box will then appear, letting you know the presentation will be marked as final and saved. Click "OK." Now, when you send out the presentation, it will display the "Marked as Final" message bar, alerting the recipients that the presentation is read-only.
You can unlock a read-only PowerPoint presentation by removing the "Mark as Final" from the file. Step 1: Open the restricted PowerPoint presentation and then click "File". Step 2: Click on "Info" on the left and then select "Mark as final" on the drop-down menu under "Protect Presentation". Step 3: Now, the presentation is editable.
PowerPoint for the web. If you want to reuse some of the slides in a read-only presentation, you can download a copy to your computer and make changes to the copy. On the File tab, click Save As. Click Download. Pick the steps below for your browser to save and open the file.
Add password protection to a file. Select File > Info. Select Protect Presentation > Encrypt with Password. In the Password box, enter the password you'd like to use. Select OK. PowerPoint prompts you to confirm the password by entering it once more. Save the file to ensure the password takes effect. Password protection isn't supported in ...
2. Click the File tab. You'll see this in the editing ribbon above the document space with Animations and Home . 3. Click Protect Presentation. You'll see this with an icon of a lock to the right of the Info menu. A menu will drop down from the lock icon. 4. Click Mark as Final.
Step-1: Open the "Encrypt Password" option. The first step is to click on the " File " tab. Then, from the backend view, click on the " Info " option. Next, click on the " Protect Presentation " option, and from the dropdown, select the " Encrypt with Password " option. Step-2: Clear the Password from the box.
Part 2: Unlock PPT presentation protected with open password; Part 1: Unlock PowerPoint Presentation Protected with Modify Password. Microsoft PowerPoint's Mark as Final feature could make your business presentations read-only and prevent accidental changes. 1. Open the read-only PowerPoint presentation with Microsoft PowerPoint. 2.
Follow the steps listed below to unprotect your PowerPoint. Step 1: Open the file you want to unprotect and click on "File"option. Step 2: Click"Info"on the left and then click on "Protect Presentation". Step 3: Select "Encrypt with Password"on the drop-down menu under "Protect Presentation".
Select File > Info. Select Protect Presentation, point to Restrict Access, and then select Restricted Access. In the Permission dialog box, select Restrict permission to this presentation, and then select More Options. Under Additional permissions for users, select the This presentation expires on check box, and then enter a date.
To password protect your PowerPoint presentation using either the Password to Open or Password to Modify options, follow the steps below. 1. Open the PowerPoint presentation you want to password protect. The only way to add a password to a specific presentation is from within the presentation itself. So as a first step, find and open the ...
Step 1: Identify the type of protection. Before unlocking the presentation, it is important to identify the type of protection you have. Some presentations may be password protected, while others may have access or editing restrictions. This will help you determine the right approach to unlocking it.
Adding a password to protect your PowerPoint file is easy! Follow these steps to password protect your presentation: Open your PowerPoint presentation and select File, then Info. Select Protect Presentation. Here, you have multiple options on who can access, view, or edit your presentation. Always Open Read-Only prevents viewers from ...
Open the presentation that you want to make read-only, then click the "File" tab. Next, in the left-hand pane, select "Info." You'll now see a "Protect Presentation" section, which lets you (to an extent) protect against any editing of your presentation. Click "Protect Presentation."
To password protect your presentation, open PowerPoint, click the "File" tab, click "Info" in the left-hand pane, and then click the "Protect Presentation" option. Next, click "Encrypt with Password" from the menu that appears. The Encrypt Document window will appear. Enter your password in the Password text box and then click "OK."
If you do not want others to copy your PowerPoint presentation content, what can you do? You can learn 4 effective ways to protect a PowerPoint presentation ...
Method #3. Restrict Permission to Selected Individuals. You can set the restriction to your readers so they can read the presentation but won't be able to change, print, or copy the content. As with the previous method, you can do this right in PowerPoint. Simply go to File → Info → Protect Presentation → Restrict Access .
With the document open, press "File" in your ribbon, then "Info". Click on the "Protect Document" button and choose "Encrypt with Password" from the list. Enter a strong, unique password and press "OK". Enter the password a second time to confirm it. Press "OK". PowerPoint has now encrypted your document.
Step 1: Click the File tab to go to Backstage view. Step 2: From the Info pane, click the Protect Presentation command. Step 3: In the drop-down menu, choose the option that best suits your needs. select Mark as Final. Step 4: A dialog box will appear prompting you to save, click OK.
In the digital age, PowerPoint presentations have become a ubiquitous tool for conveying information, whether in classrooms, boardrooms, or online. These presentations often contain original content and valuable intellectual property that creators may want to protect.
PowerPoint for the web. If you want to reuse some of the slides in a read-only presentation, you can download a copy to your computer and make changes to the copy. On the File tab, click Save As. Click Download. Pick the steps below for your browser to save and open the file.
Setting Up a Password to Protect a Presentation. First, we need to open our PowerPoint presentation and select the File tab. From there, navigate to Info. Next, select Protect Presentation and choose the Encrypt with Password option. A pop-up will prompt us to enter a password.
Speaking of preventing PPT files from editing, Mark as Final is a good option to mark the files as the final version and make it read-only. Step 1. Click the File tab on the PowerPoint ribbon. Step 2. Choose Info on the left panel, you can see the Protect Presentation part on the right side. Step 3. Click Protect Presentation and choose Mark as ...
In the Permissions dialog box, select Restrict permission to this presentation, and then assign the access levels that you want for each user.. Your choices might be limited if an administrator has set custom permission policies that individuals cannot change. Permission levels. Read Users with Read permission can read a presentation, but they don't have permission to edit, print, or copy it.
Add password protection to a file. Select File > Info. Select Protect Presentation > Encrypt with Password. In the Password box, enter the password you'd like to use. Select OK. PowerPoint prompts you to confirm the password by entering it once more. Save the file to ensure the password takes effect. Password protection isn't supported in ...