Delete Recordings on PowerPoint: A Step-by-Step Guide
- Recent Posts
- How to Add Bullet Points in PowerPoint: A Step-by-Step Guide - May 25, 2024
- Where is Slide Master in PowerPoint: A Comprehensive Guide for Beginners - May 25, 2024
- How to Use Copilot in PowerPoint: A Step-by-Step Guide - May 25, 2024
Have you ever recorded audio for a PowerPoint presentation, only to realize later that you need to remove it? Don’t worry, deleting recording on PowerPoint is a simple process. As someone who has had to remove audio from a presentation before, I can attest to the ease of the process. In this article, I will share with you the steps to delete recording on PowerPoint.

To start, let’s clarify what we mean by “recording.” Recording refers to any audio or video that you have added to your presentation, either through the Record Audio or Record Video features in PowerPoint. This could include a voiceover, background music, or any other audio or video content that you have added to your presentation.
Deleting recording on PowerPoint can be done in a few simple steps. Whether you want to remove all audio from your presentation or just delete audio from a specific slide, PowerPoint makes it easy to do so. In the following sections, I will guide you through the steps to delete recording on PowerPoint and provide tips for making the process as smooth as possible.
JUMP TO TOPIC

Preparing Slides and Transitions
Configuring audio and video settings, using the record slide show feature, incorporating narration and timing, adding annotations and gestures, inserting interactive elements, reviewing and editing your recording, exporting and distributing online, setting up your presentation.

Before recording a presentation, it is essential to prepare the slides and transitions, configure audio and video settings, and ensure that everything runs smoothly. In this section, I will guide you through the necessary steps to set up your presentation for recording.
First, you need to create your presentation. To do this, open PowerPoint and create a new file or open an existing one. Once you have your presentation ready, you can start preparing your slides and transitions.
To add a new slide, click on the “New Slide” button on the ribbon. You can choose from a variety of slide layouts to suit your needs. You can also add animations and transitions to your slides to make them more engaging. To do this, go to the “Animations” tab and select the animation or transition you want to add.
Next, you need to configure your audio and video settings. To do this, go to the “Slide Show” tab and click on “Set Up Slide Show.” Under “Show Type,” select “Browsed by an individual (window),” and under “Show Options,” select “Show without narration.” This will ensure that your presentation plays without any narration.
If you want to record your narration, go to the “Record” tab and select “Record Slide Show.” You can choose to record the narration for the current slide or the entire presentation. To start recording, click on the “Record” button and speak into your microphone. You can use the arrow keys on your keyboard to move between slides and animations.
Finally, make sure that your audio and video settings are configured correctly. To do this, go to the “Transitions” tab and select the transition you want to use. You can also adjust the duration of the transition and add sound effects.
In conclusion, setting up your presentation for recording requires careful planning and attention to detail. By following these steps, you can ensure that your presentation is engaging and professional.
Recording Your Slide Show
As a presenter, you may want to record your presentation in PowerPoint for future reference or sharing with others. PowerPoint offers a built-in feature called “Record Slide Show” that allows you to record your presentation with or without narration and timings. In this section, I will guide you through the process of recording your slide show in PowerPoint.
To start recording your slide show, you need to have your presentation open in PowerPoint. Then, follow these steps:
- Click on the “Slide Show” tab in the ribbon at the top of the PowerPoint window.
- Click on the “Record Slide Show” button in the “Start Slide Show” group.
- In the “Record Slide Show” dialog box, choose whether you want to start recording from the beginning or from the current slide.
- Check the boxes next to “Narrations” and “Timings” if you want to include them in your recording.
- Click on “Start Recording” to begin.
Once you start recording, PowerPoint will automatically advance to the next slide after a set amount of time, depending on your timing settings. You can also manually advance to the next slide by clicking your mouse or pressing the arrow keys on your keyboard.
If you choose to include narration and timings in your recording, PowerPoint will record your voiceover and the time you spend on each slide. To record your narration, you will need a microphone connected to your computer. Here’s how to incorporate narration and timing into your recording:
- In the “Record Slide Show” dialog box, check the boxes next to “Narrations” and “Timings.”
- When you’re ready to start recording, click on the “Record” button in the recording toolbar.
- Speak into your microphone to record your narration.
- When you’re finished with the slide, advance to the next slide by clicking your mouse or pressing the arrow keys on your keyboard.
- Repeat steps 4-6 for each slide in your presentation.
PowerPoint will automatically save your recording as a separate file, which you can play back at any time. If you want to edit your recording, you can do so by clicking on the “Playback” tab in the ribbon and selecting “Edit Recording.”
In conclusion, recording your slide show in PowerPoint is a great way to create a reusable presentation that you can share with others. With the “Record Slide Show” feature, you can easily incorporate narration and timing into your recording to create a professional and polished presentation.
Enhancing Your Presentation
When it comes to presentations, the goal is to convey your message in a clear and engaging way. Adding annotations and gestures can help you emphasize important points and keep your audience engaged. Additionally, inserting interactive elements can make your presentation more memorable and impactful.
One way to enhance your presentation is by adding annotations and gestures. This can be done using tools such as the pen, ink, highlighter, eraser, and laser pointer. These tools can help you emphasize key points and draw attention to specific areas of your slide.
For example, you can use the pen or ink tool to draw attention to important text or images. The highlighter tool can be used to emphasize key phrases or concepts. The eraser tool can be used to remove annotations or mistakes. The laser pointer tool can be used to highlight specific areas of your slide during a presentation.
In addition to these tools, PowerPoint also allows you to use ink gestures. Ink gestures are predefined shapes that you can draw on your slide to perform specific actions. For example, you can draw a circle around an object to highlight it, or draw an arrow to point to a specific area of your slide.
Another way to enhance your presentation is by inserting interactive elements. This can include things like quizzes, polls, and interactive diagrams. These elements can help you engage your audience and make your presentation more memorable.
For example, you can use PowerPoint’s trigger feature to create interactive diagrams. Triggers allow you to link objects on your slide to specific actions, such as displaying additional information or playing a video. This can be a great way to create interactive diagrams that allow your audience to explore different concepts and ideas.
You can also use PowerPoint’s animation feature to animate text and other objects on your slide. Animating text can help you emphasize key points and keep your audience engaged. Additionally, you can use animations to reveal information gradually, which can help build suspense and keep your audience interested.
In conclusion, adding annotations, gestures, and interactive elements can help you enhance your PowerPoint presentation and make it more engaging and memorable. By using these tools effectively, you can create a presentation that effectively conveys your message and keeps your audience interested.
Finalizing and Sharing
Once you have recorded and edited your PowerPoint presentation, it’s time to finalize and share it. In this section, I’ll go over the steps you need to take to review and edit your recording, as well as how to export and distribute your presentation online.
Before you finalize your recording, it’s important to review it to ensure that everything is as you want it. To do this, you can preview your recording by playing it back within PowerPoint. You can also trim your recording to remove any unwanted sections or clear the narration altogether.
To preview your recording, simply click on the “Preview” button in the “Recording” tab. This will allow you to play the recording back from the beginning or from a specific slide. If you need to trim your recording, click on the “Trim Audio” button in the same tab. This will open up the “Audio Tools” tab, where you can select the section you want to remove and delete it.
If you want to clear the narration altogether, you can do this by going to the “Slide Show” tab and selecting “Set Up Slide Show.” Under the “Show Options” section, select “Show without narration” and click “OK.” This will remove the narration from your presentation.
Once you’re happy with your recording, it’s time to export and distribute it online. To do this, you can save your presentation as a video file or publish it to Microsoft Stream for live streaming.
To save your presentation as a video file, go to the “File” tab and select “Export.” Under the “Create a Video” section, choose the quality and size of the video you want to create, and click “Create Video.” This will save your presentation as a video file that you can upload to any video sharing platform.
If you want to publish your presentation to Microsoft Stream, you can do this by going to the “File” tab and selecting “Share.” Under the “Publish to Stream” section, select the channel you want to publish to and click “Publish.” This will make your presentation available for live streaming on Microsoft Stream.
Overall, finalizing and sharing your PowerPoint presentation is a straightforward process that can be done in just a few clicks. Whether you want to export your presentation as a video or live stream it on Microsoft Stream, these steps will help you get your presentation in front of your audience.
Leave a Comment Cancel reply
Save my name, email, and website in this browser for the next time I comment.
Stack Exchange Network
Stack Exchange network consists of 183 Q&A communities including Stack Overflow , the largest, most trusted online community for developers to learn, share their knowledge, and build their careers.
Q&A for work
Connect and share knowledge within a single location that is structured and easy to search.
Remove the audio narration from a PowerPoint presentation
I recorded audio for a PowerPoint presentation and now a colleague wants me to send the presentation to him. The file is currently 18 MB and I want to get it down to handy 1 or 2MB by stripping the audio.
The only way I see is to remove the audio in the animation bar slide by slide.
Stripping notes can be done by the "inspect document" feature. But for audio I see no such way.
How can I remove the audio all at once?
- microsoft-powerpoint
3 Answers 3
The solution is to go to the Slide Show menu » Record Slide Show » Clear Narrations.
Simply click on the sound icon on your slide and press SHIFT+DELETE... Do this for each slide
Beside the office button,under quick access toolbar,left click the undo option.You can undo whatever actions is done,including record narration.
- 1 That will only undo the last action, not remove the narration from all slides. – DavidPostill ♦ Jul 12, 2015 at 14:01
You must log in to answer this question.
Not the answer you're looking for browse other questions tagged microsoft-powerpoint ..
- The Overflow Blog
- An open-source development paradigm
- Developers get by with a little help from AI: Stack Overflow Knows code...
- Featured on Meta
- Testing a new version of Stack Overflow Jobs
- What deliverables would you like to see out of a working group?
Hot Network Questions
- Merge function in C
- Contemporary Fantasy w/ Magic Heroine and a Good Vampire boyfriend. Post-Buffy. Pre-Twilight
- I would like to understand association kinetics
- What is known about the theory of natural numbers with only 0, successor and max?
- Dynamic name with glue in mutate call
- Weight controls when boarding TGV InOUI trains
- Best Latin translation of "Onwards and Upwards"
- Ways in which total volume changes
- Create a Windows shortcut without New > Shortcut
- Can a shadow dragon be in both sunlight and dim light at once?
- Second opinion on PCB design for relay made in Altium
- PCB layout for crystal of MSP430FR6047
- How to say "it is thought" in German?
- R squared in logistic regression adjusted for number of predictors
- How to straighten new coiled Ethernet cord?
- Misleading readers on the motives/true personality of a character
- Parade of planets - planetary alignment of 6 planets on 03.06.2024 - observation possibility from Prague
- What is the maximum length of a domain name?
- High atmosphere combat - designing the optimal bomber
- How would you ask "Is there a Klingon word for loneliness?" in Latin?
- How long should it take you to finish a page on average?
- Orderings in Philosophy
- A word for something that is, "Bizarre" but, "Beautiful"
- Chicken vs Egg Symptoms from Daughter's 2005 Suburban 5.3 FlexFuel
Blog > Record voice narration for PowerPoint
Record voice narration for PowerPoint
01.11.21 • #presentation #powerpoint #voiceover #narration.
In this blog post, you'll learn how you can add a narration for your PowerPoint presentation. Adding audio or video narration can be very helpful, especially in a time where many seminars and meetings have to be conducted online. If you would rather give your presentation using a live stream (which has many benefits), scroll down to the bottom and learn how you can do that!
Here's what you need for recording:
- a microphone (your computer's microphone should do)
- a finished set of PowerPoint slides
- a video camera (only if you want to record video as well)
- Open your PowerPoint presentation or create a new one.
- In the taskbar, select Slide Show . Then click Record Slide Show .
- Choose the option Record from Beginning .

- You'll now get to a different view, which we'll call "Recorder View". Here's an overview:

- In the bottom right corner, you'll see three icons. The one on the left is for switching the microphone on/off. Make sure this function is turned on. The icon in the middle is for turning on/off your camera. You can choose if you want to switch the video recording on or not. The last icon is only available if you've chosen the video recording function. If the function is enabled, you'll be able to see a video preview.
- In the top right corner under "Settings", you can choose what microphone (and camera) you'd like to use. This is only relevant if you have an external recording device that you would like to use. If you're recording with your computer, you don't have to set anything here.
- Now it's time to record. Click the big red Record button on the top left and start speaking.
- Tip: You can either record all the slides at once without pressing pause, or you record each slide individually, then click pause, then go on to the next slide and record again. However, it's important to note that PowerPoint creates an individual audio file for each slide, even if you record all at once.
- Important : PowerPoint does not record during transitions, so only speak when you're on a slide.

- You can also draw on your slides with the painting tools on the bottom. These drawings will be saved to your presentations.
- On the bottom left corner, you'll see what slide you're on. You can also see two time counts. The first one is for the recording on the current slide, the second one is for the recording of the presentation overall.
- If you want to delete the whole voiceover, click Clear and Clear Recordings on all Slides . If you only want to delete the recording on the specific slide you are on, click Clear Recording on current Slide.
- If you want to re-record the audio from one slide after deleting it, just go to that slide and click Record again. Record what you want to say, then click Stop when you're done.
- Once you're done, leave the Recorder View. Click the small x in the top right corner or hit Esc .
- You can now either save the presentation as a regular PowerPoint file (just click Save and you're done) or as a video. If you'd like a video, follow the instructions below:
Save Presentation as Video
- Go to File in the PowerPoint taskbar

- Choose Export on the left, then Create a Video .

- Select the quality you'd like. We recommend Full HD (1080p).
- In the following drop-down menu, make sure Use Recorded Timings and Narrations is selected.

- The setting Seconds spent on each slide is only for the slides where there is no recording (if you have recordings on all of your slides, you can just ignore this setting.)
- Click Create Video and choose where the video should be saved. The video creation might take a while, so don't close PowerPoint right away!

Live interaction with polls & quizzes
If you prefer to give a talk where you can also interact with your audience, then the free software SlideLizard is the ideal solution! Using live polls , Q&A and feedback , your presentations will become even more exciting and interactive. SlideLizard integrates directly with PowerPoint, making it a breeze to use.

Can I record a presentation in PowerPoint?
Yes, PowerPoint also allows you to record your presentation with voice and video narration. You can read about how this works in our blog .
How can I record a presentation in PowerPoint with audio and video?
At first create your presentation. For the recording you will need a microphone (the one on your computer should do), your finished presentation and a video camera (if you also want to record a video). We have created a tutorial on our blog where you can read the further steps.
Related articles
About the author.

Pia Lehner-Mittermaier
Pia works in Marketing as a graphic designer and writer at SlideLizard. She uses her vivid imagination and creativity to produce good content.

Get 1 Month for free!
Do you want to make your presentations more interactive.
With SlideLizard you can engage your audience with live polls, questions and feedback . Directly within your PowerPoint Presentation. Learn more
Top blog articles More posts

Create an animated timeline in PowerPoint + Free Template

How to use the morph transition in PowerPoint

Get started with Live Polls, Q&A and slides
for your PowerPoint Presentations
The big SlideLizard presentation glossary
Internal preview.
An Internal Preview is a statement, which is made in the body of the speech, so that the audience knows what the speaker is going to discuss next.
Leading Questions
Leading questions subconsciously make the respondent think in a certain direction.
.pptm file extension
A .pptm file is a macro-enabled presentation created by MS PowerPoint which contains slides with layout, images, texts and embedded macros.
Internal Communication
Internal communication is particularly important for corporate communication. It communicates important information from leadership to staff so that they can do their jobs in the best possible way and work processes run well.
Be the first to know!
The latest SlideLizard news, articles, and resources, sent straight to your inbox.
- or follow us on -
We use cookies to personalize content and analyze traffic to our website. You can choose to accept only cookies that are necessary for the website to function or to also allow tracking cookies. For more information, please see our privacy policy .
Cookie Settings
Necessary cookies are required for the proper functioning of the website. These cookies ensure basic functionalities and security features of the website.
Analytical cookies are used to understand how visitors interact with the website. These cookies help provide information about the number of visitors, etc.
How to Record a PowerPoint Presentation with Narration
Can be helpful in creating a dramatic narrative
Microsoft PowerPoint has a built-in recording tool that allows you to narrate your presentations using recorded audio. You can export and share recorded presentations as video files.
This tutorial covers everything about recording PowerPoint presentations on Windows and Mac computers.

Record PowerPoint Presentation with Narration
Open the PowerPoint file/presentation you want to record and follow the steps below.
Record PowerPoint Presentation on Windows
- Select the slide you want to start recording from on the slide thumbnail pane.

- Head to the Record tab on the ribbon and select the Record button to start recording from the current/selected slide.

To record from the first slide, select the down-facing arrow icon below the Record button and select From Beginning .

You can also record a presentation from the Slide Show tab. Select Slide Show on the ribbon and select Record , From Current Slide , or From Beginning .

That’ll open PowerPoint’s presentation recorder in a fullscreen window.
- Select the Record icon and start speaking after the three seconds countdown.

PowerPoint records the presentation window and captures your voice and webcam feed as you navigate the slides. Select the left-facing and right-facing arrows to move to the previous and next slides in the presentation.
Record PowerPoint Presentation in macOS
- Open the Slide Show tab and select Record Slide Show .

- Select the Record button on the toolbar to start recording your narration.

Use your keyboard arrow keys to move back and forth between slides. Press N or Space Bar to move to the next slide or animation in the presentation. Press P or Backspace to return to the previous slide or animation.
Select Tips in the top-left corner for more keyboard shortcuts and other presentation tips.

Note: The narration tool doesn’t record slide transitions. When moving between slides, wait for the destination slide to appear on the screen before speaking.
PowerPoint Recorder Control/Settings
You’ll find a handful of controls and options on the recording tool. We’ll show you how to use these controls to include voiceovers or audio recordings in your presentation.

Using Presentation Pointer Tools
PowerPoint provides several tools to mark up your slides when narrating your presentation. There’s a pen tool, eraser, laser pointer, and highlighter.
With the Pen tool, you can draw on slides during narration/recording. Press Ctrl + P (Windows) or Command + P (Mac) to use the pen tool. You can also select the Pen icon to convert the pointer to a pen.

The Laser pointer tool converts your cursor to an onscreen laser. Use the laser pointer to draw attention to something on a slide/presentation.
Press Ctrl + L (Windows) or Command + L (Mac) to use the laser pointer. There’s also a Laser pointer icon on the toolbar.

Pressing Ctrl + I (or selecting the Highlighter tool ) converts your cursor to a highlighter.

Use the Eraser tool to remove inks and highlight from slides. Select the Eraser icon or press Ctrl + E and select the ink to erase.

On macOS, select the Erase Pen icon (or press E ) to erase all drawings and highlights on the slide.

You can change the pointer tools ink from the color selection boxes. However, one major limitation is that you can’t change the size of these pointer tools.
Pause and Resume Your Recording
In Windows, press I on your keyboard or select the Pause button in the top-left corner to pause your recording.

Press I again or select the Record icon to resume the recording.

If you use a Mac, select the Pause icon in the top toolbar to pause the recording.

Unmute or Mute Microphone
Check that your microphone is unmuted before recording. Select the microphone icon in the bottom-right corner to mute or unmute your mic.

PowerPoint for Windows allows you to mute and unmute your microphone in real time while recording video/audio narrations. The macOS version of PowerPoint only lets you configure your camera and microphone settings before recording.
Switch Microphone or Camera
Want to record your presentation with an external microphone or camera? Press Ctrl + M or select the audio/camera settings icon in the top-right corner and choose your preferred microphone/camera.

In macOS, select the microphone icon to mute or unmute your microphone. Select the arrow-down icon next to the microphone or camcorder icons to switch input devices.

Enable and Disable Camera
The recorder displays your camera or webcam feed in the bottom-right corner of the presentation slides.
Select the camcorder icon to remove your webcam feed from the recording. Select the icon again to display your webcam feed in the presentation.

You can also use the Ctrl + K keyboard shortcut on Windows computers to enable or disable your camera.
On Mac computers, you’ll find the video control icon on the top toolbar.

Note: The recording tool greys out the camcorder icon if your microphone is turned off.
Enable or Disable Camera Preview
PowerPoint allows you to disable the camera preview without turning off your camera or webcam.
Press Ctrl + J (Windows) or select the Camera Preview icon in the bottom-right corner to disable or enable the camera preview.

End a Recording
Press S on your Windows keyboard or select the Stop icon to end the recording.

Replay or Preview Your Recording
When you end a narration, press V on your keyboard or select Replay to preview or watch the recording.

The recorded narration will include all pen inks, highlights, and laser pointer gestures made during the presentation.
You can also preview/replay the narration outside the recording tool. Open the Slide Show tab and choose to watch the playback From Beginning or From Current Slide .

PowerPoint allows you to preview the playback on individual slides. A speaker/audio icon appears in the bottom-right of PowerPoint slides with narrations.
Choose the slide you want to preview, hover your cursor on the speaker icon in the bottom-right corner, and select Play .

Delete Current Narration/Recording
Did you spot an error when previewing your presentation? Want to delete the current narration and start from scratch?
Select the Clear existing recordings icon and choose whether to Clear Recordings on Current Slide or Clear Recordings on All Slides .

On Mac, select the Bin icon to delete the entire narration/recording.

Close the Narration Tool
Select the X icon on the title bar to close the presentation narration tool and return to Powerpoint.

Select End Show in the top-left corner to close the recording tool on a Mac computer.

Delete Narrations from Slides
Want to delete the narration or timing on an individual slide or the entire presentation? Select the slide with the narration you want to delete and follow the steps below.
- Open the Record tab and select the down-facing arrow below the Record icon.
- Select Clear and choose to clear timing or narration on current or all slides.

Export Recorded or Narrated Presentation
You can export a narrated PowerPoint presentation as a video file. The video output includes ink strokes, recorded audio/video, laser pointer gestures, and webcam/camera recording.
- Open the Record tab and select Export to Video .

Alternatively, open the File menu, select Export on the sidebar, and select Create a Video .

- Choose the quality of the video export in the first drop-down box—Ultra HD (4K), Full HD (1080p), HD (720p), Standard (480p).

- Choose Use Recorded Timings and Narrations in the next drop-down box and select Create Video .

- Give the recorded presentation a file name and select Save .

Narrate Your PowerPoint Presentations
The Microsoft PowerPoint web app doesn’t have a recording tool. As a result, you can only record presentations with narrations using PowerPoint for Windows or Mac.
You might meet issues recording a slide show if you use an outdated version of PowerPoint. Also, the recording tool on older versions of PowerPoint has a different interface and lacks some controls. Update PowerPoint and restart your computer if you cannot record a slide show.

Sodiq has written thousands of tutorials, guides, and explainers over the past 4 years to help people solve problems with Android, iOS, Mac, and Windows devices. He also enjoys reviewing consumer tech products (smartphones, smart home devices, accessories, etc.) and binge-watching comedy series in his spare time. Read Sodiq's Full Bio
Read More Posts:
Leave a Reply
Your email address will not be published. Required fields are marked *
How to Record A PowerPoint Presentation [2022 User Guide]
- Share on Facebook
- Share on Twitter
By Nikolay Kaloyanov
in How-To Tutorials
2 years ago
Viewed 670 times
Spread the word about this article:

If knowing how to record a PowerPoint presentation wasn’t necessary a decade ago, this isn’t how things stand today. The pandemic taught us a valuable lesson – if we don’t catch up with technology, we will fall short.
Fortunately, Microsoft’s app is the global leader in presentation software and provides you with all the required tools to create an excellent presentation you can show in front of your audience. But how to record a presentation on PowerPoint, and is it easy to do so?
Article overview: 1. What are the benefits of recording PowerPoint presentations? 2. How to record a PowerPoint presentation? 3. How to live stream a PowerPoint presentation? 4. Frequently asked questions
1. What are the benefits of recording PowerPoint presentations?
I am are pretty sure that if recording presentations weren’t helpful, PowerPoint wouldn’t offer it to its users. Well, we all know that’s not the case. Recording your PowerPoint slides can bring a ton of benefits. Let’s see which they are:
- Save time – regardless if you’re a lecturer or present in front of colleagues, having a video of your recording will save you many hours. Imagine speaking in front of your marketing team, but 2 members are on summer holidays. It’s fine. They’ll catch up later when they watch your PowerPoint recording.
- Focus on the presentation – usually, if you’re presenting in front of an audience, it’s typical to get asked many questions that you need to answer promptly. But that is a good reason to get distracted from your core information. Thus, it makes sense to record your presentation beforehand.
- Practice before presenting – the best way to carry out a great presentation is to spend some time at home, focusing on key details. When you record your PowerPoint slides, you can find areas of improvement and work on them.
2. How to record a PowerPoint presentation?
There are many tools that you can use to record a PowerPoint presentation. From Loom and Panopto, and even Apple’s basic Quicktime and Windows’ own recording tool. But here we will discuss none of the other options. Why? The answer is simple: PowerPoint has its own in-built, robust recording tool.
Unlike other options, PowerPoint’s recording feature enables you to record slide by slide. This effectively means you can create as many recordings as you like, until you like the playback version, and move on to the next slide.
Pro tip : PowerPoint doesn’t record slide transitions. You need to start recording each slide when it is opened and finish the recording before you move on to the next one.
Let’s see how to record a PowerPoint presentation with video and audio in just a few steps.
Step #1: Open your PowerPoint presentation
The first step is to open the PowerPoint presentation you wish to record. Ensure you have all the necessary slides and information on them. While this seems logical, there aren’t one or two cases when presenters have recorded wrong or unfinished slides, which leads to a disappointing outcome.
Step #2: Prepare your video and audio devices
Before you start the recording, you should check your camera and microphone. Try to make a sound check and see if your camera works properly.
Step #3: Select the slides you wish to record
PowerPoint gives you the option to record a presentation right from the beginning, or from a specifically selected slide.
- Pick “ From Beginning ” (1) from the Record tab of the Ribbon if you wish to start from the first slide.
- Pick “ From Current Slide ” (2) from the same tab in case you would like to start from a selected slide (which isn’t the first one).
- Click the Record button (3) which is positioned in the top right corner, between the Comments and Share buttons. It starts the recording from the slide you have currently selected.

Step #4: Start the recording
Once you click on one of the options, you are ready to start narrating your PowerPoint presentation. You will see a countdown timer, after which you can start narrating slides.

Step #5: Manage your PowerPoint recording
You have probably seen a couple of other options aside from the recording one. Let’s see which they are:
- Timer with a grey/red light – if you are recording your narration, you will see a timer and a small circle with a red light that indicates you are recording. If you pause, the small circle indicator will become grey again and the timer will stop counting.
- Refresh icon – right next to the timer there is a refresh-like icon but it serves a different purpose – to re-take the recording. You have the option to record again the current slide or all slides.
- Start/Stop button – the big red button serves as a start/stop button for your recordings. Only stop the recording when you want to move on to the next slide.
- Pause button – if you would like to stop the slide recording, in order to drink some water or read your speaker notes, you can use the Pause button, and then resume the recording. Bear in mind you cannot pause and move to the next slide. You have to stop the recording, to indicate you have finished with the current slide.
- Camera button – clicking the camera button will work as a toggle on/off.
- Microphone Button – clicking the microphone button will work as a toggle on/off.
- Ellipsis – this is the place where you can select camera and microphone settings, as well as erase recordings from the current slide or all slides.

Step #6: Export your PowerPoint video recording
The last button from the menu is the Export setting. You can export your narration as an mp4 file in Full HD size by default. However, you can customize your export and get your narration in 4 sizes – 480p, 720p (HD), 1080p (Full HD – standard), and 4K. We don’t recommend Ultra HD exports.
Pro Tip : Exporting 4K PowerPoint presentation recordings doesn’t necessarily mean you will get better quality (unless you have 4K resources within your presentation) but it does guarantee a significantly larger file size – up to 4 times more than on standard Full HD recordings.

3. How to live stream a PowerPoint presentation?
If you have already honed your skills and would like to stream your PowerPoint slides directly to your audience, there are many ways to do so. We are going to cover two of them.
3.1. How to stream a PowerPoint presentation from OneDrive?
Microsoft has invested a lot of resources to make OneDrive a powerful cloud service, and so far they have been quite successful. Let’s see how to record a PowerPoint presentation in front of live audiences.
Step 1 – save your PowerPoint presentation in OneDrive.

Step 2 – open your PowerPoint slides from PowerPoint online.

Step 3 – go to Present Live from the Slideshow Ribbon tab.

Step 4 – share a live link with your audience.

3.2. Stream your PowerPoint presentation in Zoom

Zoom is one of the most popular conference call apps which has plenty of tools, including live streaming presentations. Since PowerPoint is the leading presentation program in the world, Zoom developers have created some amazing things, like PowerPoint presentation recording with a web camera on a transparent background. If you’re interested, you can check our guide on how to record a Zoom presentation .
Does PowerPoint have a screen recording?
PowerPoint has a screen recording window and you can select the area you would like to be recorded. Go to Record (from the Ribbon), then select Screen Recording , choose the area and start recording.
Can I view speaker notes while recording narration?
You are able to access your speaker notes if you have created them beforehand. To insert speaker notes, you have to go to View -> Notes Page and you will have a text box that you can utilize for speaker notes.
What format does PowerPoint use for video?
PowerPoint records videos in mp4 format. The default resolution is 1080p (Full HD).
Recording your PowerPoint presentations can make the difference between a successful and smooth speech and a bad narration. Being able to record each slide means you can get the best narration possible for your whole presentation.
And if you would like to stream your presentation live, there are more than enough options to do so – both via the online version of PowerPoint or via third-party apps like Zoom.
If you found this article helpful, you can also check some of our other PowerPoint tutorials:
- Add Audio to PowerPoint: The Quick Step-by-Step Guide
- Insert GIFs into PowerPoint – a 2022 Pocket Guide
- How to Convert Your PowerPoint Presentation into Google Slides ?

Add some character to your visuals
Cartoon Characters, Design Bundles, Illustrations, Backgrounds and more...
Like us on Facebook
Subscribe to our newsletter
Be the first to know what’s new in the world of graphic design and illustrations.
- [email protected]
Browse High Quality Vector Graphics
E.g.: businessman, lion, girl…
Related Articles
Character animator tutorials part 1: introduction, how to create table of contents in powerpoint: ultimate guide, how to make google slides vertical and change the perspective, the top 24 figma tutorials to create a killer design in 2022, how to convert your powerpoint presentation into google slides, enjoyed this article.
Don’t forget to share!
- Comments (0)
Nikolay Kaloyanov
Nikolay is a copywriter with vast experience in Technology, Marketing, and Design. When he isn't playing with words and crafting texts, he watches sports and asks questions. He is a funny person...until you put him on a diet.

Thousands of vector graphics for your projects.
Hey! You made it all the way to the bottom!
Here are some other articles we think you may like:

How-To Tutorials
11 seo and keyword tips for your best google ranking.
by Bilyana Nikolaeva

Beginners Guide to Adobe Character Animator
by Lyudmil Enchev

8 Google Classroom Tutorials for Teachers to Start Online Lessons
Looking for design bundles or cartoon characters.
A source of high-quality vector graphics offering a huge variety of premade character designs, graphic design bundles, Adobe Character Animator puppets, and more.
How-To Geek
How to hide the audio icon in a microsoft powerpoint slideshow.
If you don’t need to use the audio icon during your presentation, simply hide it.
Quick Links
Hide the audio icon in powerpoint on your desktop, hide the audio icon in powerpoint on the web.
When you add audio to your Microsoft PowerPoint presentation , you might set it to play automatically or in the background. You might not need to see the sound icon in these cases, so why not hide it?
You can easily hide the audio icon during your PowerPoint slideshow if you don't plan to use it. And you can do this in the desktop version of PowerPoint on Windows and Mac as well as in PowerPoint on the web.
Whether you use Microsoft PowerPoint on Windows or Mac, the steps to hide the audio icon are the same.
So, open your presentation, choose the slide, and click the sound icon to select it. Then, go to the Playback tab that appears.
If you don't see the Playback tab, make sure that you've selected the sound icon.
Check the box for "Hide During Show" in the Audio Options section of the ribbon.
You can hide the sound icon in your presentation using Microsoft PowerPoint online just as easily. First, click the icon to select it, and then go to the Audio tab that displays.
If you don't see the Audio tab, make sure that you've selected the sound icon.
Click "Audio Options" to display the drop-down list, and then check the box for "Hide During Show."
Be sure to check out how to pause audio during your PowerPoint presentation, both with and without the sound icon.
How to video record yourself presenting a PowerPoint

What type of content do you primarily create?
Recording yourself presenting a PowerPoint can be challenging, especially getting the technical aspects right. You need to capture your screen, webcam, and audio seamlessly while delivering your content naturally and avoiding awkward transitions between slides.
Finding a tool that integrates all these components can seem daunting. However, recording yourself presenting a PowerPoint doesn't have to be reserved for the tech-savvy or professional speakers.
Whether you're a teacher creating online lessons, a marketer producing a product demo, or someone looking to improve their presentation skills, this guide will walk you through user-friendly tools and strategies that will teach you how to video record yourself presenting a PowerPoint.
- Recording yourself presenting a PowerPoint can be challenging, but it doesn't have to be reserved for experts.
- Video recording offers unlimited reach, repurposing opportunities, and a more engaging experience.
- Use PowerPoint's built-in recording feature or tools like Descript for a polished presentation.
- Other tools like Zoom, Loom, OBS Studio, Clipchamp, and Quick Time Player can also be used for recording.
- Tips include practicing your script, using slide notes, ensuring high-quality audio and lighting, and incorporating storytelling techniques.
Why video record yourself presenting a PowerPoint?
Video recording your PowerPoint presentations offers several advantages:
- Unlimited reach : Unlike in-person presentations confined to a specific time and location, recorded videos allow your message to reach audiences globally at their convenience.
- Repurposing opportunities: Recorded presentations can be repurposed as evergreen content across multiple platforms, such as social media, online courses, webinars, and internal training materials, maximizing their value.
- Personal and engaging : Recording yourself narrating a presentation adds a personal touch and dynamic element that static slides alone cannot replicate. Your viewers can see and hear you deliver the content, creating a more immersive and engaging experience.
How to record your presentation with the PowerPoint app
Built-in recording feature in powerpoint.
1. Open the PowerPoint slide you want to record.
2. Click on the Record tab of the top toolbar.
3. Click on the Record button and choose from any of the following options:
- From Current Slide
- From Beginning
4. You'll see the PowerPoint screen recording window.
5. Select the microphone and camera from the icon on the top-right.
6. Click the Stop and Replay buttons to end or replay your recording.
7. To export your presentation's recording, click Export to Video within the Recording tab.
Benefits : Easy to use, no external tools needed
Limitations : Limited editing capabilities.
How to make a more polished recording of your presentation with Descript
While PowerPoint's built-in recording features are helpful, they may not produce the refined result you want for your presentation. That's where Descript comes in handy.
It’s a whole production studio at your fingertips, with video recording, transcription, and editing capabilities, ready to transform dull PowerPoint slides into an engaging experience for your audience. Descript also has a built-in screen recorder.
You can use Descript on Windows, Mac, or even straight from your web browser.
Here's step-by-step guide to recording your PowerPoint presentation with Descript.
Set up your screen recording
1. Install and open Descript. At the top of the editor, click and open the Record panel.
2. Select Screen.
3. Set Recorder settings:
Adjust the default recording settings to your liking, including the transcription language, the maximum recording resolution, and more.
4. Set recording options. Choose which audio and video sources to record (e.g., microphone, computer audio, camera). Remember to turn the camera on to capture your talking head video alongside your PowerPoint presentation.
5. Click the Additional Settings icon for
- Studio Sound (Optional): Enhance audio quality with noise reduction and background removal
- Transcription (Optional): Enable automatic transcription for easier editing
- Recording separate audio tracks
6. Add (optional) Speaker labels for each audio track (e.g., "Narrator," "Expert") by typing them in the text box next to your audio inputs.
Capture your screen recording
1. Select the right recording option:
- Recording into script : Choose this if you haven’t recorded anything yet.
- Replace selection : Choose this if you already have a script and want to replace a specific section with a new recording.
- Record new layer : Pick this for recording your video as a new layer on top of an existing recording.
2. Click Record at the bottom of the Record panel.
3. Drag over the area of your screen you wish to record. Click Start Recording. Press Space to start recording the full screen.
4. Click Stop to finish recording
Bonus: Descript creates separate tracks for camera, microphone, and computer audio. You can edit each track individually for more precise control.
- Do a short test recording to ensure everything is set up correctly.
- Set your recording to transibe for easier editing.
Editing and polishing your PowerPoint recording in Descript
Descript's AI video editing tool makes it a breeze to trim, cut, and splice your video footage, ensuring a seamless flow from start to finish. You can add smooth transitions and other visual effects to make your presentation pop.
Here’s a glimpse of how to edit and polish your PowerPoint recording in Descript:
Edit your recording like a doc
Did you make a mistake during a slide transition? No problem. Just delete those sections in the text transcript (created automatically by Descript) and the video will adjust to match.
Remove filler words
Sound smoother and more confident by easily removing filler words like "um" and "uh" from the transcript.
Fix voiceover mistakes by typing
Didn't nail your delivery on a specific slide? No need to start from scratch! Descript's Overdub feature lets you simply type in the correct narration and replace the audio on that slide with AI voice cloning.
Boost video quality and engagement :
- Crisp up audio quality by reducing background noise and room reverb with the AI-powered Studio Sound feature.
- Replace your background completely with the Green Screen Video Editor —look like you're presenting in a sleek studio or broadcasting from a beach.
- Enable Eye Contact simulation with AI, so it appears you're making direct eye contact with viewers, even if you’re looking or reading something off-camera.
Other ways to video record yourself presenting a PowerPoint
Use Zoom’s meeting recording feature to record yourself giving a PowerPoint presentation. Start a Zoom meeting with yourself, share your PowerPoint window, and enable recording
Loom is a handy screen recording tool that also offers a webcam overlay. Launch the Loom app or Chrome extension and set it to record your screen and webcam. Expect high-quality recordings but no advanced editing features. The free plan offers only five minutes of recording at a stretch.
3. OBS Studio
OBS Studio is a free, open-source screen recorder/streaming software with a steeper learning curve. It’s popular among advanced or tech-savvy users who need granular customization and control.
To record your presentation, add a "Screen Capture" source to capture your PowerPoint window and a "Video Capture Device" source for your webcam.
4. Clipchamp: Recording natively in Windows
You can use Microsoft’s Clipchamp , the built-in screen recorder and video editor for Windows, to simultaneously capture your computer screen, webcam, and audio for recording your PowerPoint presentation. It’s also available as a browser-based app. You can record up to 30 minutes on screen and webcam recordings.
Users can also adjust the screen and webcam recordings in the editing timeline separately.
5. Quick Time Player Recording natively in Mac
Use Mac’s Quick Time Player to record your PowerPoint presentation. It’s not as straightforward as the other options on this list, so here’s a quick guide to help you out:
- Launch Quick Time Player.
- Select File and go to New Movie Recording.
- You'll be recording your entire screen in addition to recording your face, so adjust the size and location of the recording window so that it's in a nonintrusive corner of your PowerPoint.
- Go to View and select Float on Top .
- Next, go to File and select New Screen Recording.
- On the menu that appears, select Record Selected Portion and drag a border around your PowerPoint and the webcam recording window.
- Press Record and start presenting.
- You can adjust the video quality and the audio source in the webcam recording window.
How to turn your PowerPoint presentation slides into a video
Did you know PowerPoint lets you save your presentation as a video, too?
Here's a breakdown of the two ways you can do so—keeping all the presentation elements (narration, animation, pointer movements, timings, and so on) intact in the presentation itself.
Save your PowerPoint presentation as a video
This creates a separate video file (MP4 or WMV) that anyone can play, even without PowerPoint.
Follow these steps:
- Save your presentation
- Go to File > Export > Create a Video
- Ultra HD (4K): Best for large screens (if you have Windows 10+)
- Full HD (1080p): Great for computers and TVs
- HD (720p): Good for streaming online or on DVDs
- Standard (480p): Smallest size, good for phones
4. Decide on narration
- If you haven't recorded yourself talking, choose "Don't Use Recorded Timings and Narrations" from the dropdown menu
- If you have a recording, choose "Use Recorded Timings and Narrations." You can also set how long each slide shows for (default is 5 seconds)
5. Click Create Video
6. Name your video, pick a folder to save it in, and choose a file type (MPEG-4 or Windows Media Video)
Creating the video might take a while, especially for longer presentations. You can even leave it running overnight. Once done, find your video in the chosen folder and double-click to play it.
Save your PowerPoint presentation as a slideshow
This saves your presentation as a special file (PPSX) that starts playing automatically on full screen when opened. It only works with PowerPoint.
Here’s how it works:
- Make sure your presentation is saved (regular PowerPoint file)
- Go to File > Save As .
- Pick a folder to save the slideshow in.
- Under Save as type, choose PowerPoint Show (*.ppsx) .
- Click Save .
Now when someone opens the file, it will automatically play the slideshow.
Pro tips for making better video PowerPoint presentations
Practice your script.
Recording a flawless PowerPoint video rarely happens in one take. The key is practice.
Record practice run-throughs and watch them back. Make notes on areas that need improvement or parts lacking clarity. The more you drill your script, the more confident and natural you'll sound in the final recording.
Take advantage of PowerPoint's built-in Speaker Coach . The feature shows you whether your pace is too fast or slow, your use of filler words like "um," and suggestions to improve your voice modulation.
Use slide notes for coherent delivery
Wouldn’t a personal teleprompter make presentations so much easier? That’s what slide notes are for.
Having your thoughts and talking points organized within your PowerPoint file lets you have all crucial information and prompts readily available when recording.
Go ahead and add detailed notes or even a full script for each slide. This will help you stay on track and provide a handy transcript reference if you need to do any editing or voiceover work in post-production.
Use high-quality audio equipment or turn on Studio Sound
Poor audio recording quality is a surefire way to make even the most visually polished video feel amateurish. Do your presentation justice by investing in a decent external or Bluetooth microphone and audio interface to capture clear voiceover audio.
If you must use a built-in mic, record in a quiet environment to minimize background noise pickup. Or better yet, pair up with an AI-powered audio enhancement tool like Descript's Studio Sound , which reduces background noise , reverb, and other artifacts.
Ensure a clean background and even lighting
Ditch cluttered backgrounds. You want people to focus on the content of your PowerPoint and not be distracted by the funny shapes and colors in your video.
Your video lighting and framing matters, too. Position yourself facing a natural light source or bring supplemental video lighting to eliminate weird shadows and squinting-level glare.
Look directly into the camera or turn on Eye Contact
Looking directly into the camera is essential to create a sense of connection with the audience. Position your webcam or camera at eye level and imagine you're talking to a friend. If you're using Descript, enable the Eye Contact feature to auto-adjust your gaze towards the camera.
- Dress professionally and maintain a good posture to project confidence and authority.
- Use visuals, animations, and multimedia elements to enhance your presentation and keep your audience engaged.
- Consider adding closed captions or subtitles to your video for better accessibility and engagement, especially for those watching without sound.
- Speak clearly and at a moderate pace, using vocal variety to emphasize key points and maintain interest.
- Incorporate storytelling techniques, real-life examples, or personal anecdotes to make your video presentation more relatable and memorable .
Take your PowerPoint presentations from amateur to amazing
Recording yourself virtually presenting a PowerPoint allows you to distribute your message using the most engaging type of content: video. And there are many screen recording tools out there that can capture your screen and web camera footage with just a few clicks.
But how do you stand out?
By focusing on the presentation's depth, your delivery, and the video's quality. The first two are the bare minimum to communicate your message effectively.
But the right screen capture software and all-in-one video creation tool like Descript can help you with third. Use the tool to improve the quality of your recorded PPT presentations.
With Descript, it's easier than ever to record your screen, polish up the audio, and create stunning visuals all in one place. So why wait?
Sign up for Descript today and simplify your workflow while creating a PowerPoint presentation video that sticks with your audience in the long term.
How do you make a presentation video with your face?
To create a presentation video with your face, follow these steps:
- Open your presentation in PowerPoint.
- Go to the Slide Show tab.
- Click on Record and choose From Current Slide or From Beginning .
- Choose your microphone and camera by clicking on a sound icon on the top-right.
- Start recording by clicking on the record button.
- Speak into your microphone to narrate the presentation.
- Your webcam will capture your face during the recording.
- Click Stop when you finish recording.
- Export your recorded presentation by clicking on File> Export>Create a video.
How do you present yourself in PowerPoint?
To present yourself effectively in PowerPoint, follow these steps:
- Determine the key information to include in your presentation.
- Design and prepare your PowerPoint slides with a cohesive theme.
- Craft a compelling introduction to engage your audience.
- Tailor your presentation to different time constraints for flexibility.
- Capture the audience's attention before you begin speaking.
Related articles

Featured articles:
10 excellent Loom alternatives to record your screen
Looking for the best ways to record your screen without Loom? Find out 10 Loom alternatives, their features, and pricing.

How to record a YouTube video: A guide for all devices
If you want to record a YouTube video for personal use or fair-use repurposing, here are the steps to get started.

For Business
Social media video marketing: Everything you need to know
Learn how to win over potential customers (and the algorithms) with the right social media video marketing tools, strategy, and optimizations.

How to record a podcast on Zoom: A beginner’s guide
Follow this step-by-step guide on how to record a podcast on Zoom, then learn about why it may not be your best recording option.

How to record a Microsoft Teams meeting: 5 easy ways
Learn how to record a Microsoft Teams meeting on any device and get answers to common problems.

10 effective how-to videos to engage your audience
How-to videos are a great way to educate your audience. Whether you’re recording a software demo or training instructions, here’s how to create a how-to video.

Articles you might find interesting
Product Updates
How to Zoom in on a Video Using Descript
If you forgot to zoom while recording, video editing software makes it a snap to quickly and easily zoom in on video after the fact. Here are a few things to consider when applying zoom in on a video.

Marketing Strategy and Planning: Learn How to Promote and Grow Your Business
What is a marketing strategy plan, and how do you make one? We’ll go through all the basics right here and cover a few key terms.

How to buy ads for your podcast (if you have the money)
There are tons of ways to market your podcast for free, but money is a great way to kick things into gear. There are right and wrong ways to spend anywhere from $50 to $50,000. Here are some of those ways.

From stills to motion: A step-by-step guide on how to make a video with pictures
From GIFs to slideshows, image-based videos are compelling video formats used by many creators. Here’s how to make a video using photos.

Video advertising: A beginner’s guide
If you’re running video advertising for your business, this guide is for you. Learn how to run video ads with high ROI.

AI for Creators
The rules around using AI content on YouTube, Spotify & Audible
YouTube, Spotify, and Audible all have different rules about whether AI generated content is allowed on the platform. Learn their guidelines.

Join millions of creators who already have a head start.
Get free recording and editing tips, and resources delivered to your inbox.
Related articles:
Share this article

Record your presentation
You can record your PowerPoint presentation—or just a single slide—and capture voice, ink gestures, and your video presence. The completed recording is like any other presentation. You can play it for your audience in Slide Show or you can export it as a video file. So instead of just handing the deck to someone, people can see your presentation with all your passion and personality intact.
Record is an improved version of Record Slide Show for PowerPoint for Windows. The feature replaces the older experience and provides enhanced capabilities for capturing your presentations for later viewing.

What's new?
New access points for recording a video of the presentation .

New features added for recording video
The new Record window has two screens: Record and Export .
When you select Record , the Record screen opens by default.

If you select Export in the top right of the Record screen, the Export screen opens.

You can switch between the Record and Export screens using the Record and Export buttons in the top bar of the window.
New features added to the Record window
You'll see the following new features in the Record window:

You can also use the seek bar to skip to any point while you're previewing the video on the current slide.
New Export window
The Export window is another change with the Record feature. After recording, you’ll be lead through instructions to create a shareable video file of your presentation. By default, the video is in Full HD 1080p resolution in an mp4 format and will be saved to the same location where the presentation is stored.

The exported video includes all recorded timings, narration, animations, transitions, media, ink, and laser pointer gestures. If there's no recorded timings for a slide in the presentation, the slide will be displayed for 5 seconds in the exported video by default.
By default, the exported video has the same filename as the presentation, but you can create a unique filename for the exported video, if you want.
Depending on the size of your presentation, it may take a few minutes to export. After the export starts, you can track its progress in the Export window. You can also exit the Record window and track the progress in the status bar in PowerPoint.
The Customize Export button takes you to the backstage export menu to change resolution and time spent on each slide in the exported video.
Recording tips
Recordings are added to the presentation on a per-slide basis. If you want to change a recording, you can re-record one or more slides. You can rearrange the order of slides in a recorded presentation without having to re-record anything. This also means it's easy to pause for a break while recording a presentation.
PowerPoint doesn't record audio or video during transitions between slides, so be sure not to narrate while advancing the slide. There's also a brief buffer of silence at the beginning and the end of each slide.
Use video preview to make sure everything is set up correctly before recording.
Presentation recording works best with touch-screen PCs that have a web camera but you can use an external webcam and/or microphone.
If you're using PowerPoint on a tablet or laptop and you're inking with a stylus, you can use an external camera and microphone to minimize stylus noise.
After you finish your first slide recording, play it back to make sure your audio and video are set up the way you expect.
You can adjust and edit the size of video and ink in edit view.

Need more help?
Want more options.
Explore subscription benefits, browse training courses, learn how to secure your device, and more.

Microsoft 365 subscription benefits

Microsoft 365 training

Microsoft security

Accessibility center
Communities help you ask and answer questions, give feedback, and hear from experts with rich knowledge.

Ask the Microsoft Community

Microsoft Tech Community

Windows Insiders
Microsoft 365 Insiders
Was this information helpful?
Thank you for your feedback.
How to Delete Text Boxes Fast in PowerPoint
Learn expert tips on deleting PowerPoint text boxes. Resolve common issues, select multiple boxes easily, & maintain... read more

#ez_toc_widget_sticky--1 .ez-toc-widget-sticky-container ul.ez-toc-widget-sticky-list li.active{ background-color: #ededed; } Steps To Follow
Get Trainings
Advance your Microsoft Excel & Office Skills with the MyExcelOnline Academy!

The Importance of Text Box Proficiency
Having a solid handle on managing text boxes can be a game-changer in crafting compelling PowerPoint presentations. It’s like having the right tools in your belt—knowing how to add, format, and especially delete text boxes means you can swiftly adapt your slides to be as clear and engaging as possible. Remember, with great power comes great responsibility: as they wield the capability to make or break a presentation’s design, be sure to use text boxes wisely!
Download our 141 Free Excel Templates and Spreadsheets !
Key Takeaways
- To delete a text box in PowerPoint , click on the box to select it, indicated by a border with handles, and then press the ‘Delete’ key on your keyboard.
- If a deletion is made by mistake, the ‘Undo’ function can be immediately accessed with the keyboard shortcut Ctrl+Z to restore the text box.
- An alternative method for deleting a text box is to right-click on the selected text box and then click the ‘Delete’ option from the contextual menu that appears.
Common Text Box Frustrations and Solutions
Everyone who’s worked with PowerPoint knows the drill: the text box that just won’t do what you want it to. You go to delete it, and nothing happens, or you find your text inconveniently formatted. Common issues include unselectable text boxes, unexpected layering that blocks access, or grouped objects that refuse to be edited independently.
The solution often lies in the details:

Table of Contents
Step-by-Step Instructions for Deleting Text Boxes
How to identify and select unwanted text boxes.

Tips for Ensuring Successful Deletion

Advanced PowerPoint Techniques for Text Box Control
Handling stubborn text boxes that won’t delete.

Utilizing Slide Master to Manage Global Text Issues

Streamlining Your Workflow with Text Box Shortcuts
Keyboard shortcuts for faster text box editing.
Speed up your game with keyboard shortcuts—they’re the secret weapon for faster text box editing. Once you highlight the troublesome text box, smash that ‘Delete’ key to send it packing. Control your workflow better by also using ‘Ctrl+X’ to cut or ‘Ctrl+Z’ to undo an action immediately, without moving your hands from the keyboard.
It’s these little snippets of time you save that can add up to hours over the course of editing a large PowerPoint file. Work smarter, not harder, and let your fingers do the dance—your efficiency will soar!
PowerPoint Add-Ins to Enhance Text Box Management
For those looking to turbocharge their text box management, PowerPoint add-ins are like having a pit crew for your presentations. These handy tools integrate seamlessly into PowerPoint, offering advanced features beyond the basics. Whether you’re after smart alignment, batch editing, or intricate text box animations, there’s an add-in for that.
Popular choices include ToolsToo and Power-user , which pack a punch with their ability to manipulate multiple text boxes simultaneously and add a sprinkle of design pizzazz. Just be sure your add-in is compatible with your version of PowerPoint before installing, for smooth sailing.
Avoiding Common Pitfalls When Working with Text Boxes
Preventative measures to simplify text box editing.
Taking preventative measures now can save you a heap of headaches later. Start with the habit of naming your text boxes in the Selection Pane right after creation; this makes them easier to find and manage later on. Also, think twice before copying and pasting text boxes from different sources to avoid formatting mishaps—stick with the ‘Keep Source Formatting’ option to maintain uniformity.
Always align and distribute your text boxes properly from the get-go using the align tools. This approach not only makes your slides visually appealing but also simplifies future editing when text boxes are neatly organized and positioned.
Best Practices for Text Box Consistency Across Multiple Slides
For that polished, professional look, you need consistency in your text boxes across slides. Establish a style guide and stick to it like glue: use the same fonts, colors, and sizes for similar text elements. Make use of Slide Master to set these styles, ensuring uniform headers, footers, and body text.
Apply layouts from the Slide Master when creating new slides to maintain this consistency. And before finalizing your presentation, do a slide-by-slide walk-through to double-check alignment and format—consistency is king!
Why can’t I delete a text box on my PowerPoint slide?
If a text box just won’t budge when you try to delete it, it could be locked by the Slide Master or part of a group of objects. Ensure it’s not currently being used in an animation or linked to other slides’ content. Check these, ungroup if needed, and attempt deletion again. If all else fails, reach out to the Slide Master or try a different selection method.
How do I delete multiple text boxes at once in PowerPoint?
To delete several text boxes simultaneously, hold down the ‘Shift’ or ‘Ctrl’ key and click on each one. This groups your selection, allowing you to press the ‘Delete’ key or right-click and choose ‘Cut’ to remove them all in one swift move. Quick and tidy!
John Michaloudis
John Michaloudis is a former accountant and finance analyst at General Electric, a Microsoft MVP since 2020, an Amazon #1 bestselling author of 4 Microsoft Excel books and teacher of Microsoft Excel & Office over at his flagship Academy Online Course .
Related Articles
The Ultimate Guide to Keyboard Outlook Shortcuts
How to Print PowerPoint Outlines for Handouts
Get Character Count for Microsoft Word Docs Fast
Get Video Training
Dramatically Reduce Repetition, Stress, and Overtime! Exponentially Increase Your Chances of a Promotion, Pay Raise or New Job! Learn in as little as 5 minutes a day or on your schedule.
Introducing Copilot+ PCs
May 20, 2024 | Yusuf Mehdi - Executive Vice President, Consumer Chief Marketing Officer
- Share on Facebook (opens new window)
- Share on Twitter (opens new window)
- Share on LinkedIn (opens new window)

An on-demand recording of our May 20 event is available .
Today, at a special event on our new Microsoft campus, we introduced the world to a new category of Windows PCs designed for AI, Copilot+ PCs.
Copilot+ PCs are the fastest, most intelligent Windows PCs ever built. With powerful new silicon capable of an incredible 40+ TOPS (trillion operations per second), all – day battery life and access to the most advanced AI models, Copilot+ PCs will enable you to do things you can’t on any other PC. Easily find and remember what you have seen in your PC with Recall, generate and refine AI images in near real-time directly on the device using Cocreator, and bridge language barriers with Live Captions, translating audio from 40+ languages into English .
These experiences come to life on a set of thin, light and beautiful devices from Microsoft Surface and our OEM partners Acer, ASUS, Dell, HP, Lenovo and Samsung, with pre-orders beginning today and availability starting on June 18. Starting at $999, Copilot+ PCs offer incredible value.
This first wave of Copilot+ PCs is just the beginning. Over the past year, we have seen an incredible pace of innovation of AI in the cloud with Copilot allowing us to do things that we never dreamed possible. Now, we begin a new chapter with AI innovation on the device. We have completely reimagined the entirety of the PC – from silicon to the operating system, the application layer to the cloud – with AI at the center, marking the most significant change to the Windows platform in decades.
YouTube Video
The fastest, most secure Windows PCs ever built
We introduced an all-new system architecture to bring the power of the CPU, GPU, and now a new high performance Neural Processing Unit (NPU) together. Connected to and enhanced by the large language models (LLMs) running in our Azure Cloud in concert with small language models (SLMs), Copilot+ PCs can now achieve a level of performance never seen before. They are up to 20x more powerful [1] and up to 100x as efficient [2] for running AI workloads and deliver industry-leading AI acceleration. They outperform Apple’s MacBook Air 15” by up to 58% in sustained multithreaded performance [3] , all while delivering all-day battery life. With incredible efficiency, Copilot+ PCs can deliver up to 22 hours of local video playback or 15 hours of web browsing on a single charge. [4] That is up to 20% more battery in local video playback than the MacBook Air 15”. [5]
Windows now has the best implementation of apps on the fastest chip, starting with Qualcomm. We now offer more native Arm64 experiences than ever before, including our fastest implementation of Microsoft 365 apps like Teams, PowerPoint, Outlook, Word, Excel, OneDrive and OneNote. Chrome, Spotify, Zoom, WhatsApp, Adobe Photoshop, Adobe Lightroom, Blender, Affinity Suite, DaVinci Resolve and many more now run natively on Arm to give you great performance with additional apps, like Slack, releasing later this year. In fact, 87% of the total app minutes people spend in apps today have native Arm versions. [6] With a powerful new emulator, Prism, your apps run great, whether native or emulated.
Every Copilot+ PC comes secured out of the box. The Microsoft Pluton Security processor will be enabled by default on all Copilot+ PCs and we have introduced a number of new features, updates and defaults to Windows 11 that make it easy for users to stay secure. And, we’ve built in personalized privacy controls to help you protect what’s important to you. You can read more about how we are making Windows more secure here .
Entirely new, powerful AI experiences
Copilot+ PCs leverage powerful processors and multiple state-of-the-art AI models, including several of Microsoft’s world-class SLMs, to unlock a new set of experiences you can run locally, directly on the device. This removes previous limitations on things like latency, cost and even privacy to help you be more productive, creative and communicate more effectively.
Recall instantly
We set out to solve one of the most frustrating problems we encounter daily – finding something we know we have seen before on our PC. Today, we must remember what file folder it was stored in, what website it was on, or scroll through hundreds of emails trying to find it.
Now with Recall, you can access virtually what you have seen or done on your PC in a way that feels like having photographic memory. Copilot+ PCs organize information like we do – based on relationships and associations unique to each of our individual experiences. This helps you remember things you may have forgotten so you can find what you’re looking for quickly and intuitively by simply using the cues you remember. [7]
You can scroll across time to find the content you need in your timeline across any application, website, document, or more. Interact intuitively using snapshots with screenray to help you take the next step using suggested actions based on object recognition. And get back to where you were, whether to a specific email in Outlook or the right chat in Teams.
Recall leverages your personal semantic index, built and stored entirely on your device. Your snapshots are yours; they stay locally on your PC. You can delete individual snapshots, adjust and delete ranges of time in Settings, or pause at any point right from the icon in the System Tray on your Taskbar. You can also filter apps and websites from ever being saved. You are always in control with privacy you can trust.
Cocreate with AI-powered image creation and editing, built into Windows
Since the launch of Image Creator, almost 10 billion images have been generated, helping more people bring their ideas to life easily by using natural language to describe what they want to create. Yet, today’s cloud offerings may limit the number of images you can create, keep you waiting while the artwork processes or even present privacy concerns. By using the Neural Processing Units (NPUs) and powerful local small language models, we are bringing innovative new experiences to your favorite creative applications like Paint and Photos.
Combine your ink strokes with text prompts to generate new images in nearly real time with Cocreator. As you iterate, so does the artwork, helping you more easily refine, edit and evolve your ideas. Powerful diffusion-based algorithms optimize for the highest quality output over minimum steps to make it feel like you are creating alongside AI. Use the creativity slider to choose from a range of artwork from more literal to more expressive. Once you select your artwork, you can continue iterating on top of it, helping you express your ideas, regardless of your creative skills.

Take photo editing and image creation to the next level. With Restyle Image, you can reimagine your personal photos with a new style combining image generation and photo editing in Photos. Use a pre-set style like Cyberpunk or Claymation to change the background, foreground or full picture to create an entirely new image. Or jumpstart your next creative project and get visual inspiration with Image Creator in Photos. On Copilot+ PCs you can generate endless images for free, fast, with the ability to fine tune images to your liking and to save your favorites to collections.
Innovative AI experiences from the creative apps you love
We are also partnering with some of the biggest and most-loved applications on the planet to leverage the power of the NPU to deliver new innovative AI experiences.
Together with Adobe, we are thrilled to announce Adobe’s flagship apps are coming to Copilot+ PCs, including Photoshop, Lightroom and Express – available today. Illustrator, Premiere Pro and more are coming this summer. And we’re continuing to partner to optimize AI in these apps for the NPU. For Adobe Creative Cloud customers, they will benefit from the full performance advantages of Copilot+ PCs to express their creativity faster than ever before.

DaVinci Resolve Studio
Effortlessly apply visual effects to objects and people using NPU-accelerated Magic Mask in DaVinci Resolve Studio.

Remove the background from any video clip in a snap using Auto Cutout running on the NPU in CapCut.
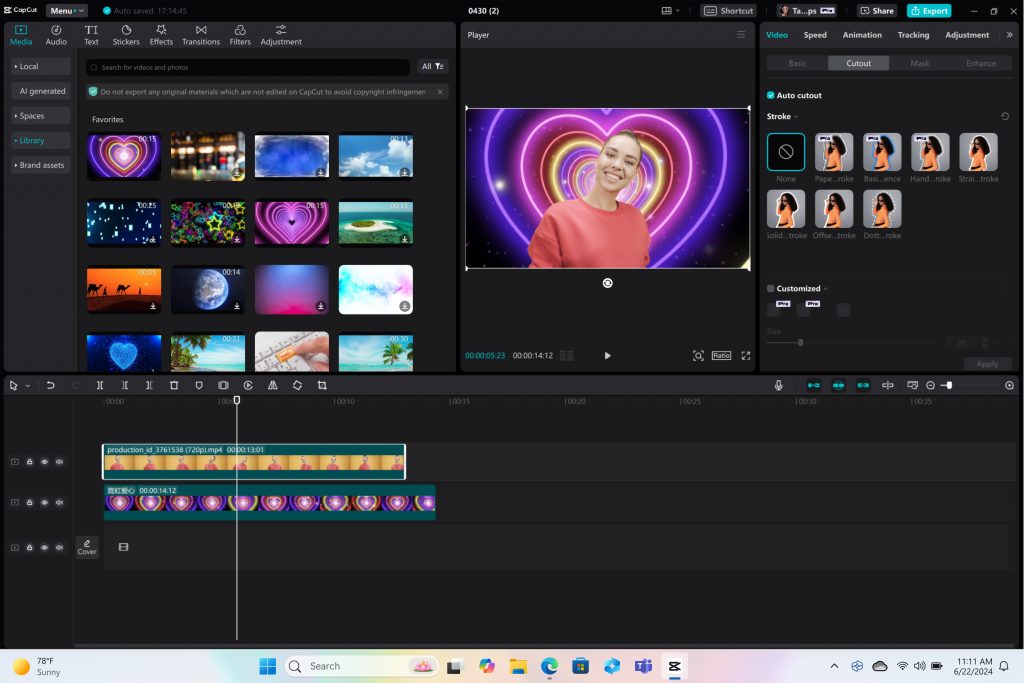
Stay in your flow with faster, more responsive adaptive input controls, like head movement or facial expressions via the new NPU-powered camera pipeline in Cephable.

LiquidText
Make quicker and smarter annotations to documents, using AI features that run entirely on-device via NPU, so data stays private in LiquidText.

Have fun breaking down and remixing any music track, with a new, higher-quality version of NeuralMix™ that’s exclusive to NPU in Algoriddim’s djay Pro.

Connect and communicate effortlessly with live captions
In an increasingly connected and global world, Windows wants to bring people closer together. Whether catching up on your favorite podcast from a different country, or watching your favorite international sports team, or even collaborating with friends and colleagues across the world, we want to make more content accessible to more people.
Live Captions now has live translations and will turn any audio that passes through your PC into a single, English-language caption experience, in real time on your screen across all your apps consistently. You can translate any live or pre-recorded audio in any app or video platform from over 40 languages into English subtitles instantly, automatically and even while you’re offline. Powered by the NPU and available across all Copilot+ PCs, now you can have confidence your words are understood as intended.
New and enhanced Windows Studio Effects
Look and sound your best automatically with easily accessible controls at your fingertips in Quick Settings. Portrait light automatically adjusts the image to improve your perceived illumination in a dark environment or brighten the foreground pixels when in a low-light environment. Three new creative filters (illustrated, animated or watercolor) add an artistic flare. Eye contact teleprompter helps you maintain eye contact while reading your screen. New improvements to voice focus and portrait blur help ensure you’re always in focus.
Copilot, your everyday AI companion

Every Copilot+ PC comes with your personal powerful AI agent that is just a single tap away on keyboards with the new Copilot key. [8] Copilot will now have the full application experience customers have been asking for in a streamlined, simple yet powerful and personal design. Copilot puts the most advanced AI models at your fingertips. In the coming weeks, get access to the latest models including GPT-4o from our partners at OpenAI, so you can have voice conversations that feel more natural.
Advancing AI responsibly
At Microsoft, we have a company-wide commitment to develop ethical, safe and secure AI. Our responsible AI principles guided the development of these new experiences, and all AI features are aligned with our standards. Learn more here .
New Copilot+ PCs from Microsoft Surface and our partners
We have worked with each of the top OEMs — Acer, ASUS, Dell, HP, Lenovo, Samsung — and of course Surface, to bring exciting new Copilot+ PCs that will begin to launch on June 18. Starting at $999, these devices are up to $200 less than similar spec’d devices [9] .
Surface plays a key role in the Windows ecosystem, as we design software and hardware together to deliver innovative designs and meaningful experiences to our customers and fans. We are introducing the first-ever Copilot+ PCs from Surface: The all-new Surface Pro and Surface Laptop.

The new Surface Laptop is a powerhouse in an updated, modern laptop design with razor-thin bezels, a brilliant touchscreen display, AI-enhanced camera, premium audio, and now with a haptic touchpad.
Choose between a 13.8” and 15” display and four stunning colors. Enjoy up to 22 hours of local video playback on Surface Laptop 15” or up to 20 hours on Surface Laptop13.8” on top of incredible performance and all-new AI experiences.
The new Surface Pro is the most flexible 2-in-1 laptop, now reimagined with more speed and battery life to power all-new AI experiences. It introduces a new, optional OLED with HDR display, and ultrawide field of view camera perfect for Windows Studio Effects. The new Surface Pro Flex Keyboard is the first 2-in-1 keyboard designed to be used both attached or detached. It delivers enhanced stability, with Surface Slim Pen storage and charging integrated seamlessly, as well as a quiet, haptic touchpad. Learn more here.
New Copilot+ PCs from the biggest brands available starting June 18:
- Acer : Acer’s Swift 14 AI 2.5K touchscreen enables you to draw and edit your vision with greater accuracy and with color-accurate imagery. Launch and discover AI-enhanced features, like Acer PurifiedVoice 2.0 and Purified View, with a touch of the dedicated AcerSense button.
- ASUS : The ASUS Vivobook S 15 is a powerful device that brings AI experiences to life with its Snapdragon X Elite Platform and built-in Qualcomm® AI. It boasts 40+ NPU TOPS, a dual-fan cooling system, and up to 1 TB of storage. Next-gen AI enhancements include Windows Studio effects v2 and ASUS AiSense camera, with presence-detection capabilities for Adaptive Dimming and Lock. Built for portability, it has an ultra-slim and light all-metal design, a high-capacity battery, and premium styling with a single-zone RGB backlit keyboard.
- Dell : Dell is launching five new Copilot+ PCs, including the XPS 13, Inspiron 14 Plus, Inspiron 14, Latitude 7455, and Latitude 5455, offering a range of consumer and commercial options that deliver groundbreaking battery life and unique AI experiences. The XPS 13 is powered by Snapdragon X Elite processors and features a premium, futuristic design, while the Latitude 7455 boasts a stunning QHD+ display and quad speakers with AI noise reduction. The Inspiron14 and Inspiron 14 Plus feature a Snapdragon X Plus 1and are crafted with lightweight, low carbon aluminum and are energy efficient with EPEAT Gold rating.
- HP : HP’s OmniBook X AI PC and HP EliteBook Ultra G1q AI PC with Snapdragon X Elite are slim and sleek designs, delivering advanced performance and mobility for a more personalized computing experience. Features include long-lasting battery life and AI-powered productivity tools, such as real-time transcription and meeting summaries. A 5MP camera with automatic framing and eye focus is supported by Poly Studio’s crystal-clear audio for enhanced virtual interactions.
- Lenovo : Lenovo is launching two AI PCs: one built for consumers, Yoga Slim 7x, and one for commercial, ThinkPad T14s Gen 6. The Yoga Slim 7x brings efficiency for creatives, featuring a 14.5” touchscreen with 3K Dolby Vision and optimized power for 3D rendering and video editing. The T14s Gen 6 brings enterprise-level experiences and AI performance to your work tasks, with features including a webcam privacy shutter, Wi-Fi 7 connectivity and up to 64GB RAM.
- Samsung : Samsung’s new Galaxy Book4 Edge is ultra-thin and light, with a 3K resolution 2x AMOLED display and Wi-Fi 7 connectivity. It has a long-lasting battery that provides up to 22 hours of video playback, making it perfect for work or entertainment on the go.
Learn more about new Copilot+ PCs and pre-order today at Microsoft.com and from major PC manufacturers, as well as other leading global retailers.
Start testing for commercial deployment today
Copilot+ PCs offer businesses the most performant Windows 11 devices with unique AI capabilities to unlock productivity, improve collaboration and drive efficiency. As a Windows PC, businesses can deploy and manage a Copilot+ PC with the same tools and processes used today including IT controls for new features and AppAssure support. We recommend IT admins begin testing and readying for deployment to start empowering your workforce with access to powerful AI features on these high-performance devices. You can read more about our commercial experiences here .

AI innovation across the Windows ecosystem
Like we’ve always done with Windows, we have built a platform for our ecosystem partners to build on.
The first Copilot+ PCs will launch with both the Snapdragon® X Elite and Snapdragon® X Plus processors and feature leading performance per watt thanks to the custom Qualcomm Oryon™ CPU, which delivers unrivaled performance and battery efficiency. Snapdragon X Series delivers 45 NPU TOPS all-in-one system on a chip (SoC). The premium integrated Qualcomm® Adreno ™ GPU delivers stunning graphics for immersive entertainment. We look forward to expanding through deep partnerships with Intel and AMD, starting with Lunar Lake and Strix Point. We will bring new Copilot+ PC experiences at a later date. In the future we expect to see devices with this silicon paired with powerful graphics cards like NVIDIA GeForce RTX and AMD Radeon™, bringing Copilot+ PC experiences to reach even broader audiences like advanced gamers and creators.
We are at an inflection point where the PC will accelerate AI innovation. We believe the richest AI experiences will only be possible when the cloud and device work together in concert. Together with our partners, we’re setting the frame for the next decade of Windows innovation.
[1] Based on snapshot of aggregated, non-gaming app usage data as of April 2024 for iGPU-based laptops and 2-in-1 devices running Windows 10 and Windows 11 in US, UK, CA, FR, AU, DE, JP.
[2] Tested April 2024 using Phi SLM workload running 512-token prompt processing in a loop with default settings comparing pre-release Copilot+ PC builds with Snapdragon Elite X 12 Core and Snapdragon X Plus 10 core configurations (QNN build) to Windows 11 PC with NVIDIA 4080 GPU configuration (CUDA build).
[3] Tested May 2024 using Cinebench 2024 Multi-Core benchmark comparing Copilot+ PCs with Snapdragon X Elite 12 core and Snapdragon X Plus 10 core configurations to MacBook Air 15” with M3 8 core CPU / 10 Core GPU configuration. Performance will vary significantly between device configuration and usage.
[4] *Battery life varies significantly by device and with settings, usage and other factors. See aka.ms/cpclaims*
[5] *Battery life varies significantly based on device configuration, usage, network and feature configuration, signal strength, settings and other factors. Testing conducted May 2024 using the prelease Windows ADK full screen local video playback assessment under standard testing conditions, with the device connected to Wi-Fi and screen brightness set to 150 nits, comparing Copilot+ PCs with Snapdragon X Elite 12 core and Snapdragon X Plus 10 core configurations running Windows Version 26097.5003 (24H2) to MacBook Air 15” M3 8-Core CPU/ 10 Core GPU running macOS 14.4 with similar device configurations and testing scenario.
[6] Based on snapshot of aggregated, non-gaming app usage data as of April 2024 for iGPU-based laptops and 2-in-1 devices running Windows 10 and Windows 11 in US, UK, CA, FR, AU, DE, JP.
[7] Recall is optimized for select languages (English, Chinese (simplified), French, German, Japanese, and Spanish.) Content-based and storage limitations apply. Learn more here .
[8] Copilot key functionality may vary. See aka.ms/keysupport
[9] Based on MSRPs; actual savings may vary
Tags: AI , Copilot+ PC
- Check us out on RSS

Google Slides: How to delete a text box
G oogle Slides is Google's version of Microsoft Office. It gives you tools to create effective presentations and collaborate with others in minutes. Google Slides works across a variety of devices, including contemporary Android tablets , and it's free. Sometimes, the creative process can go awry, and a redundant text box could ruin your thought process. This guide explains how to remove a text box in Google Slides.
Delete a Google Slides text box
Deleting a text box in Google Slides is straightforward. However, the process differs slightly depending on the device you use. Below are the steps for deleting a text box on the web and the Android app.
Delete a Google Slides text box on the web
On your web browser, go to Google.com and follow the steps below.
- Click Go to Slides .
- Go to the upper-left corner and choose Blank presentation .
- Choose a slide with a text box in it.
- Right-click the text box you want to delete.
- Choose Delete from the menu that appears. The slide is now gone.
- Left-click the Undo button at the top of the screen to revert your changes.
Alternatively, when you open Google Slides:
- Right-click the slide that you want to delete.
- Choose Edit from the menu in the upper-left corner.
- Select Delete from the menu that appears.
Delete a Google Slides text box using the mobile app for Android or iOS
We've used an Android for this part of the tutorial, but iPhone users should be able to follow along easily.
Google Slides is also available on the App Store and Google Play Store, so you can create or edit your presentation from your phone or tablet Deleting a text box in Google Slides in the mobile app is a bit different, though just as simple.
- Open the Google Slides app and open your presentation. Close
- Tap the slide and tap Edit slide . Close
- Tap the desired text box. A menu appears at the top.
- Tap Delete to remove the text box from your slide.
Alternatively:
- Tap and hold the text box. Close
- Tap the trash bin in the upper-right corner of the screen.
Regardless of the option you use, the text box disappears.
The best Google Slides templates for work, school, and home
Everyone loves a presentation with less text and more pictures.
Adding text to your Google Slides is a great way to make your presentation more informative. Adding too much can distract from its purpose. Removing a text box takes no more than a click. You can also improve your presentation with Google Slides templates and themes .

Microsoft Learn Q&A needs your feedback! Learn More
May 20, 2024
Microsoft Learn Q&A needs your feedback!
Want to earn $25 for telling us how you feel about the current Microsoft Learn Q&A thread experience? Help our research team understand how to make Q&A great for you.
Find out more!
Contribute to the Microsoft 365 and Office forum! Click here to learn more 💡
April 9, 2024
Contribute to the Microsoft 365 and Office forum!
Click here to learn more 💡
PowerPoint Forum Top Contributors: Steve Rindsberg - John Korchok - Bob Jones AKA: CyberTaz ✅
May 10, 2024
PowerPoint Forum Top Contributors:
Steve Rindsberg - John Korchok - Bob Jones AKA: CyberTaz ✅
- Search the community and support articles
- Microsoft 365 and Office
- Search Community member
Ask a new question
Black box in lower RH corner when exporting narrated presentation to video
When I export my narrated presentation to video, there is a black box in the lower right-hand corner. It is not there in presentation mode, or in any other way, only when recording. My video was turned off for the voiceover. What can I do to get rid of the black box?
- Subscribe to RSS feed
Report abuse
Reported content has been submitted
Replies (1)
- Microsoft Agent |
Hello Peterd-ct,
Welcome to the Microsoft Community.
The black box appearing in the lower right-hand corner of your video export from PowerPoint is likely related to the video recording or playback settings. Here are some steps you can take to try and remove the black box:
1. Check Video Playback Settings:
- Go to File > Options > Advanced in PowerPoint.
- Under the Display section, ensure that the options for Disable hardware graphics acceleration and Disable Slide Show hardware graphics acceleration are unchecked.
2. Adjust Narration Recording Settings:
- If the black box appears during the recording of narrations, it might be related to the webcam video settings. Even if the video was turned off, ensure that the settings do not display a placeholder or default image.
3. Remove Default Narrator Video:
- In some cases, PowerPoint may include a default video of the narrator in the exported video. Check if there's an option to turn off the narrator's video in the recording settings.
4. Re-Export the Presentation:
- After making the necessary adjustments, try exporting the presentation to video again. Make sure to select the correct resolution and aspect ratio that matches your presentation.
5. Use a Different Format:
- If the issue persists, consider saving the presentation in a different video format, if available, and see if the black box still appears.
6. Update PowerPoint:
- Ensure that you have the latest version of PowerPoint installed, as updates often fix bugs that could cause such issues.
Have a try and see whether these steps work or not. Please feel free to share the results with me. If you need any further assistance, please let me know and I'll provide more advice.
Best Regards,
William Yu | Microsoft Community Support Specialist
Was this reply helpful? Yes No
Sorry this didn't help.
Great! Thanks for your feedback.
How satisfied are you with this reply?
Thanks for your feedback, it helps us improve the site.
Thanks for your feedback.
Question Info
- Norsk Bokmål
- Ελληνικά
- Русский
- עברית
- العربية
- ไทย
- 한국어
- 中文(简体)
- 中文(繁體)
- 日本語
IMAGES
VIDEO
COMMENTS
Turn off the narration. On the Slide Show tab, in the Set Up group, clear the Play Narrations check box. Alternatively, you can click Set Up Slide Show, and under Show Options select the Show without narration check box. This action has the same effect as step 1. Tip: To turn the narration back on, ensure that the Show without narration check ...
Select the audio icon and then select the Playback tab. Then select which options you'd like to use: To trim the audio, select Trim and then use the red and green sliders to trim the audio file accordingly. To fade in or fade out audio, change the number in the Fade Duration boxes. To adjust volume, select Volume and select the setting you ...
Then, follow these steps: Click on the "Slide Show" tab in the ribbon at the top of the PowerPoint window. Click on the "Record Slide Show" button in the "Start Slide Show" group. In the "Record Slide Show" dialog box, choose whether you want to start recording from the beginning or from the current slide.
A short tutorial showing how to delete recorded narrations from PowerPoint slides. Become a Patreon of my work: https://www.patreon.com/doryvideoAll footage ...
Open the slide you want to start recording from. Near the upper right corner of the PowerPoint window, select Record. When you're ready, select the round, red Record button, wait for the countdown, then start speaking. To record from a specific slide, go to it, and then select Record. Note: Narration isn't recorded while the transition between ...
Step 1: Removing Narration. Image Credit: Image courtesy of Microsoft. Switch to the Slide Show tab, click the arrow below Record Slide Show, select Clear and then click Clear Narrations on All Slides to remove the narration from all slides simultaneously. Video of the Day. To remove the narration from only the selected slide, click Clear ...
I recorded audio for a PowerPoint presentation and now a colleague wants me to send the presentation to him. The file is currently 18 MB and I want to get it down to handy 1 or 2MB by stripping the audio. The only way I see is to remove the audio in the animation bar slide by slide. Stripping notes can be done by the "inspect document" feature.
Tutorial. Open your PowerPoint presentation or create a new one. In the taskbar, select Slide Show. Then click Record Slide Show. Choose the option Record from Beginning. You'll now get to a different view, which we'll call "Recorder View". Here's an overview: In the bottom right corner, you'll see three icons.
You can delete the cameo window and re-record your narration to do this. Author of "OOXML Hacking - Unlocking Microsoft Office's Secrets", ebook now out. John Korchok, Production Manager. [email protected]. LF. Louise Frend. Replied on July 31, 2023. Report abuse. In reply to John Korchok's post on July 31, 2023.
Record narration and timings for your presentation in Microsoft PowerPoint to give it a professional and polished feel. Record narration and timings:1. Selec...
Hi Tobias, If you need to export each slide as individual video instead exporting the whole presentation as one video file, using converter can be a cumbersome workaround. And there is no built-in feature can remove the video like the "Clear Timings/Narrations" feature in PowerPoint. In this case, I'd like to suggest you post your idea in ...
You could try recording the entire presentation. Then go back and re-record only the individual slides where you made mistakes. Or you could exit record mode, then click on the From Current Slide button and record the rest: Author of "OOXML Hacking - Unlocking Microsoft Office's Secrets", ebook now out.
Select the Record button on the toolbar to start recording your narration. Use your keyboard arrow keys to move back and forth between slides. Press N or Space Bar to move to the next slide or animation in the presentation. Press P or Backspace to return to the previous slide or animation.
Let's see how to record a PowerPoint presentation in front of live audiences. Step 1 - save your PowerPoint presentation in OneDrive. Step 2 - open your PowerPoint slides from PowerPoint online. Step 3 - go to Present Live from the Slideshow Ribbon tab. Step 4 - share a live link with your audience.
In the Options dialog box, click the Customize Ribbon tab on the left. Then, in the right-hand box that lists the available ribbon tabs, select the Recording check box. Click OK. To get ready to record, select Record on either the Recording tab or the Slide Show tab of the ribbon.
You can hide the sound icon in your presentation using Microsoft PowerPoint online just as easily. First, click the icon to select it, and then go to the Audio tab that displays. If you don't see the Audio tab, make sure that you've selected the sound icon. Click "Audio Options" to display the drop-down list, and then check the box for "Hide ...
Learn how to record a PowerPoint Presentation with audio and video simply by using the build-in PowerPoint functionalities and tools. You will learn how to...
On how you can remove the cameo from all of your slides in your PowerPoint presentation: 2. Click on "Slide Master" in the "Master Views" section. 3. In the slide master view, locate the slide layout that has the cameo you want to remove. 4. Click on the cameo to select it. 5.
Here's step-by-step guide to recording your PowerPoint presentation with Descript. Set up your screen recording. 1. Install and open Descript. At the top of the editor, click and open the Record panel. 2. Select Screen. 3. Set Recorder settings:
Wait for your recording to upload. On the next screen, you can do the following: Share a link to your recording: Click Copy link. Download your recording: Click Download. Delete your recording: Click Discard. Save your recording and go back to the editor: Click Save and exit. A Public view link is automatically created when you record a talking ...
You can record your PowerPoint presentation—or just a single slide—and capture voice, ink gestures, and your video presence. The completed recording is like any other presentation. You can play it for your audience in Slide Show or you can export it as a video file. So instead of just handing the deck to someone, people can see your ...
To delete a text box in PowerPoint, click on the box to select it, indicated by a border with handles, and then press the 'Delete' key on your keyboard. If a deletion is made by mistake, the 'Undo' function can be immediately accessed with the keyboard shortcut Ctrl+Z to restore the text box.
Hi sstirling, We understand that you wanted to disable the camera when recording a PowerPoint slideshow. Let's see what we can do to help this situation. In line with your concern, it seems that you would need to do some changes to the group policy to make this work. Please refer to this article under Turn off camera recording by default.
An on-demand recording of our May 20 event is available. Today, at a special event on our new Microsoft campus, we introduced the world to a new category of Windows PCs designed for AI, Copilot+ PCs. Copilot+ PCs are the fastest, most intelligent Windows PCs ever built. With powerful new silicon capable of an incredible...
For a client we need to remove all the recording options in powerpoint. That is really difficult. By GPO, it is possible to turn off recording ribbon, but at that point, the tools are still available via the search function! So not really helpfull. We have now blocked snipping tools, screen recording tool msosrec (what is also in use by onenote)
Delete a Google Slides text box . Deleting a text box in Google Slides is straightforward. However, the process differs slightly depending on the device you use.
I created my PowerPoint (2016) presentation. I recorded narration. I want to keep the narration, but I don't want the small video of me reading the narration to appear in the lower right corner. If I select and delete the the small video it deletes the narration. Is it possible to record narration without the video of me reading narration showing?
3. Remove Default Narrator Video: - In some cases, PowerPoint may include a default video of the narrator in the exported video. Check if there's an option to turn off the narrator's video in the recording settings. 4. Re-Export the Presentation: - After making the necessary adjustments, try exporting the presentation to video again.