- PRO Courses Guides New Tech Help Pro Expert Videos About wikiHow Pro Upgrade Sign In
- EDIT Edit this Article
- EXPLORE Tech Help Pro About Us Random Article Quizzes Request a New Article Community Dashboard This Or That Game Popular Categories Arts and Entertainment Artwork Books Movies Computers and Electronics Computers Phone Skills Technology Hacks Health Men's Health Mental Health Women's Health Relationships Dating Love Relationship Issues Hobbies and Crafts Crafts Drawing Games Education & Communication Communication Skills Personal Development Studying Personal Care and Style Fashion Hair Care Personal Hygiene Youth Personal Care School Stuff Dating All Categories Arts and Entertainment Finance and Business Home and Garden Relationship Quizzes Cars & Other Vehicles Food and Entertaining Personal Care and Style Sports and Fitness Computers and Electronics Health Pets and Animals Travel Education & Communication Hobbies and Crafts Philosophy and Religion Work World Family Life Holidays and Traditions Relationships Youth
- Browse Articles
- Learn Something New
- Quizzes Hot
- This Or That Game
- Train Your Brain
- Explore More
- Support wikiHow
- About wikiHow
- Log in / Sign up
- Computers and Electronics
- Presentation Software
- PowerPoint Insertions

How to Put a Hyperlink in Microsoft PowerPoint
Last Updated: June 6, 2024
wikiHow is a “wiki,” similar to Wikipedia, which means that many of our articles are co-written by multiple authors. To create this article, 32 people, some anonymous, worked to edit and improve it over time. This article has been viewed 430,025 times. Learn more...
Do you want to add a link to a website or document to your PowerPoint presentation? Adding hyperlinks to PowerPoint slides is incredibly easy. This wikiHow will teach you how to insert hyperlinks into PowerPoint slides using Windows and macOS.
Select a slide.

Select the hyperlink text.

- You can also make an image a hyperlink—just click the desired image to select it.
Click the "Insert" tab.

Click the "Link" icon.

Add a location or address to link to.

- To link to a file or website, select Existing File or Web Page at the top-left. Then, enter the full URL of the website or select the document.
- To link to another location in your presentation, select Place in This Document , then select a slide title.
- To create an email hyperlink, select E-mail address , then enter an email address. Clicking the link will simply compose a new message to this address.
Click "OK" to create the link.

Community Q&A
You Might Also Like

- ↑ https://support.microsoft.com/en-us/office/add-a-hyperlink-to-a-slide-239c6c94-d52f-480c-99ae-8b0acf7df6d9
About This Article
- Send fan mail to authors
Is this article up to date?

Featured Articles

Trending Articles

Watch Articles

- Terms of Use
- Privacy Policy
- Do Not Sell or Share My Info
- Not Selling Info
wikiHow Tech Help Pro:
Level up your tech skills and stay ahead of the curve
Windows PPT Shortcut: Ctrl+K: Insert a Hyperlink
One useful Windows PPT Shortcut to master is Ctrl+K, which allows you to easily insert hyperlinks into your slides.
We will also explore the benefits of using this shortcut, such as saving time, creating interactive presentations, and easy editing of hyperlinks.
Key Takeaways:
What is the ctrl+k shortcut in windows ppt.
The Ctrl+K shortcut in Windows PPT is a key combination used for hyperlinking text or objects within a presentation, allowing users to seamlessly navigate between slides or external resources.
This shortcut is especially useful in scenarios where a presenter wants to direct viewers to supplementary materials or detailed information without cluttering the slide with unnecessary text. It streamlines the presentation process, offering a professional and efficient way to share additional content.
How to Use the Ctrl+K Shortcut in Windows PPT?
Then, press Ctrl+K on your keyboard – this will bring up the ‘Insert Hyperlink’ dialog box.
For better accessibility, avoid using ‘click here’ or ‘read more’ as anchor texts; instead, provide the context of where the hyperlink leads for all users to understand.
Step 1: Select the Text or Object to Hyperlink
The first step in using the Ctrl+K shortcut in Windows PPT is to select the text or object that will serve as the hyperlink destination within the presentation.
Step 2: Press the Ctrl+K Shortcut
After selecting the desired text or object, users can proceed to press the Ctrl+K shortcut key combination to initiate the hyperlinking process within Windows PPT.
Step 3: Enter the URL or File Path
When entering a URL , ensure it starts with the correct protocol such as ‘http://’ or ‘https://’. It is crucial to add the complete address, including the domain name and extension. Avoid typos or extra spaces that might break the link. For local file paths , be precise in specifying the file location on your system. Use forward slashes ‘/’ or backslashes ‘\\’ depending on the platform. Remember that inaccuracies in URLs or file paths can lead to broken links, hampering the user experience during presentations.
Step 4: Click ‘OK’ to Insert the Hyperlink
To finalize the hyperlink insertion process, users should click on the ‘OK’ button within the hyperlink dialog box to confirm and insert the hyperlink effectively.
What Are the Benefits of Using the Ctrl+K Shortcut in Windows PPT?
Utilizing the Ctrl+K Shortcut in Windows PPT offers numerous benefits, including time-saving features, enhanced interactivity in presentations, and easy management of hyperlinks for a seamless user experience.
This streamlined process not only saves time but also increases user engagement by allowing presenters to include interactive elements that encourage audience participation and retention of key information.
The ability to easily edit and update hyperlinks through the Ctrl+K Shortcut ensures that presentations remain current and relevant, especially when sharing resources or referencing external content that may change over time.
Saves Time and Effort
By simply selecting the text or object that needs to be hyperlinked and pressing Ctrl+K, users can swiftly add links to web pages, email addresses, files, or even other slides within the presentation.
This feature eliminates the need to manually navigate through multiple menu options, streamlining the hyperlinking process significantly. For example, instead of right-clicking, selecting ‘Hyperlink,’ and then pasting the URL, users can accomplish the same task with just a quick keystroke, enhancing overall workflow efficiency.
Creates Interactive Presentations
Interactivity plays a crucial role in presentations as it fosters a two-way communication channel, making the content more memorable and impactful. To maximize user engagement through hyperlinked content, it’s essential to ensure that the links are relevant and concise, and add value to the presentation. Incorporating interactive elements not only enhances the overall experience but also encourages audience interaction and participation.
Easy to Edit and Update Hyperlinks
When working on a presentation, time is often of the essence, and the Ctrl+K shortcut provides a quick and efficient way to manage hyperlinks without disrupting the flow of your content creation. This feature simplifies the task of modifying URLs, ensuring that all embedded links direct users to the correct resources. By enabling real-time updates, users can swiftly adjust hyperlinks as needed, guaranteeing that audiences always have access to accurate information at their fingertips. Consistency in hyperlink maintenance is crucial for a seamless user experience, so remember to regularly review and validate all links to uphold the integrity of your presentation.
What Are the Other Useful Windows PPT Shortcuts?
Along with the Ctrl+K shortcut, Windows PPT offers a range of other useful keyboard shortcuts that can enhance user productivity and streamline presentation creation.
Ctrl+C: Copy Selected Text or Object
By simply highlighting the desired text, shape, image, or object and pressing Ctrl+C , users can quickly store a copy of the selected content in the system’s clipboard. This functionality is akin to creating a virtual clone, preserving the original while allowing manipulation or reuse of the copied information.
Utilizing Ctrl+C extensively can streamline tasks like replicating a complex diagram across multiple slides or effortlessly reusing standard text segments. For instance, when creating a series of slides with similar layouts but varying text details, Ctrl+C aids in maintaining consistency without repetitive manual content re-entry.
Ctrl+V: Paste Copied Text or Object
By simply using this convenient keyboard shortcut, users can quickly insert content from external sources, such as websites or documents, directly into their slides without the need for additional formatting. This efficient method not only saves time but also ensures a consistent look and feel throughout the presentation.
Ctrl+Z: Undo Previous Action
Imagine you are working on a crucial presentation and accidentally delete a vital slide. Instead of panicking, you can simply press Ctrl+Z to bring back the deleted content instantly. This shortcut can also be a lifesaver when formatting errors occur, such as mistakenly changing the font style throughout the slides. With Ctrl+Z, you can swiftly correct these issues without losing valuable time. Whether it’s unintentional deletions, misplaced edits, or formatting mishaps, Ctrl+Z ensures that your presentation stays accurate and error-free.
Ctrl+B: Bold Selected Text
By using the Ctrl+B shortcut in Windows PPT, users can quickly apply bold formatting to selected text, emphasizing key information and enhancing text visibility within presentations.
Ctrl+I: Italicize Selected Text
The Ctrl+I shortcut in Windows PPT allows users to italicize selected text, adding emphasis and visual variation to content for improved presentation aesthetics.
Italicizing text using Ctrl+I is a simple yet powerful tool in presentation design. By strategically applying italics, presenters can draw attention to key points, create a visual hierarchy, and break the monotony of plain text. For instance, when highlighting statistics or key takeaways, italicizing the figures can make them stand out and become more memorable to the audience. Similarly, when addressing quotes or foreign words, using italics can aid in differentiating them from the main text, providing clarity and enhancing comprehension.
Ctrl+U: Underline Selected Text
Text underlining is a powerful tool in presentation design as it helps create a visual hierarchy and guides the audience’s attention to critical information. For instance, in a sales pitch slide, underlined figures or statistics can stand out, showcasing the key data. When listing essential steps in a process, underlining each step can aid in better comprehension and retention for the viewers.
Ctrl+S: Save Presentation
The Ctrl+S shortcut in Windows PPT allows users to save their presentations efficiently, ensuring that their work is preserved and protected against potential data loss.
Ctrl+P: Print Presentation
By utilizing the Ctrl+P shortcut in Windows PPT , users can quickly print their presentations, allowing for physical copies to be distributed or archived as needed.
When using the Ctrl+P shortcut, it triggers the printing dialog, offering users a range of options to customize their print settings. Users can specify the number of copies needed, choose the printer they want to use, select the page range to print, and opt for color or black-and-white output.
Ctrl+X: Cut Selected Text or Object
The Ctrl+X shortcut in Windows PPT enables users to cut selected text or objects, allowing for seamless content removal or relocation within presentations.
By simply selecting the desired content or object and pressing Ctrl+X, users can instantly remove it from its current location. This feature is particularly useful when refining the flow of information or restructuring slides to enhance the overall presentation structure.
Ctrl+A: Select All Text and Objects
The Ctrl+A shortcut in Windows PPT enables users to select all text and objects within a presentation, facilitating bulk editing and formatting operations for increased efficiency.

Frequently Asked Questions
What is the windows ppt shortcut: ctrl+k used for.
This shortcut is used to insert a hyperlink into a PowerPoint presentation.
How do I use the Windows PPT Shortcut: Ctrl+K?
Can i use the windows ppt shortcut: ctrl+k to link to any website, can i use the windows ppt shortcut: ctrl+k to link to a specific slide within my presentation.
Yes, you can use this shortcut to create internal hyperlinks within your PowerPoint presentation. Simply select the text or object you want to link from and enter the slide number or title in the “Slide” tab in the Insert Hyperlink window.
Can I edit or remove a hyperlink created with the Windows PPT Shortcut: Ctrl+K?
Is there another way to insert a hyperlink in powerpoint besides using the windows ppt shortcut: ctrl+k, similar posts, web ppt shortcut: ctrl+spacebar: remove formatting, windows ppt shortcut: f5: start slide show, mac ppt shortcut: option+left arrow: rotate ccw 15°, windows ppt shortcut: ctrl+shift+tab: outline/thumbnail, mac ppt shortcut: ⌘+option+shift+b: send backward, windows ppt shortcut: shift+right: select right char.
How to Hyperlink in PowerPoint? [The Complete Guide!]
By: Author Shrot Katewa
![How to Hyperlink in PowerPoint? [The Complete Guide!]](https://artofpresentations.com/wp-content/uploads/2022/03/Featured-Image-How-to-Add-Hyperlink-in-PowerPoint.webp "shortcut key to make a hyperlink in powerpoint presentation")
If you wish to jump a few slides when delivering your PowerPoint presentation, you will need to make use of the “Hyperlink” feature in PowerPoint!
To insert a hyperlink in PowerPoint, first, select and highlight the text or object. Next, right-click and choose the “Link” option. Select the destination of the link. You can link to an existing file, web page, or a specific slide within the presentation. Once the destination is chosen, click “OK”.
In this article, you will get to understand the hyperlink feature in PowerPoint in great detail. I’ll share with you how to add a hyperlink (in further detail), how do you edit a hyperlink, and even how to link to files outside of PowerPoint! That and much more!
So, let’s get started!
1. How to Add a Hyperlink in PowerPoint?
Let’s get straight to the key reason why you are here reading this article i.e. how do you insert a hyperlink in PowerPoint?
A hyperlink is a link added to a text or image that leads to a new document or a new section within the document when clicked on.
In Microsoft PowerPoint, even though you can add a hyperlink to texts or images, the process of doing so is quite similar for both.
Let’s take a look at the step-by-step process involved in adding a hyperlink in PowerPoint.
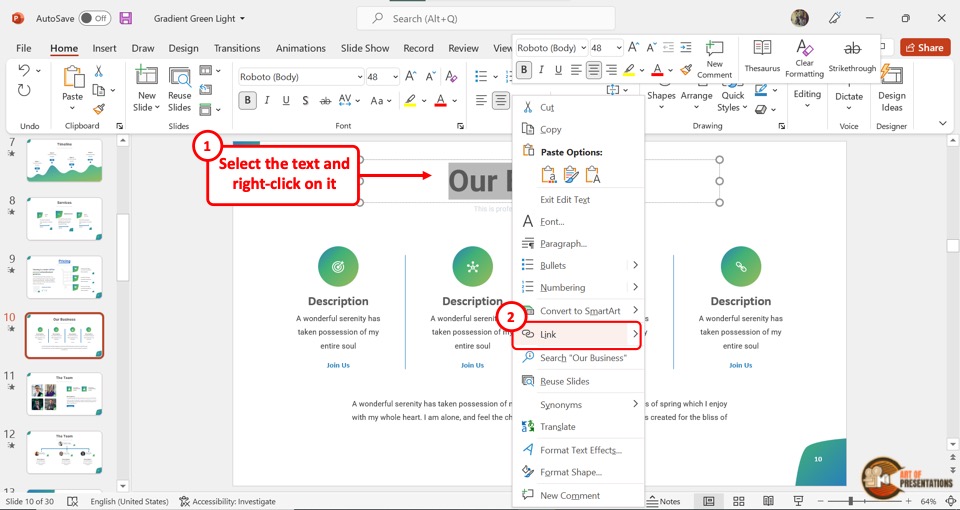
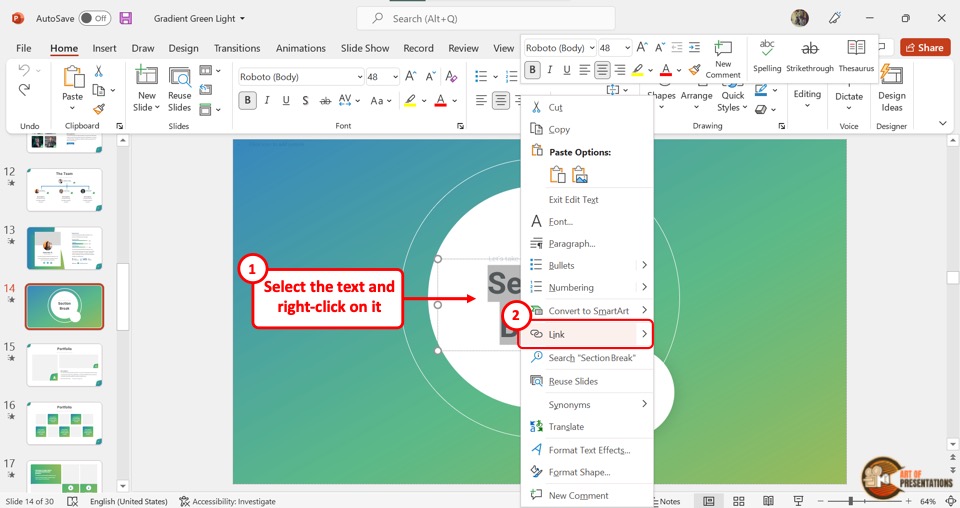
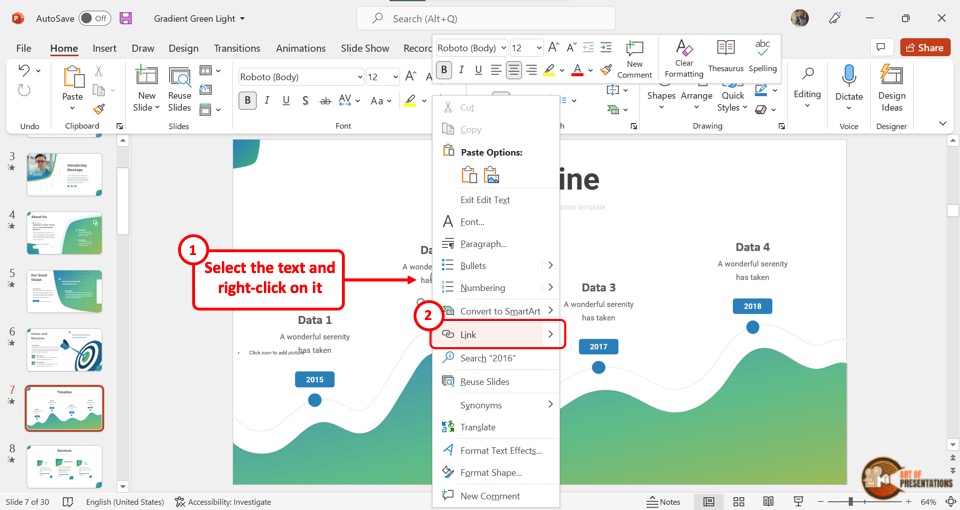
Step-1: Select the Text and Click on the “Link” option

The first step is to “Right Click” on the text or image where you want to add the hyperlink. In the dropdown menu, click on the “Link” option. Alternatively, you can press the “Ctrl+K” keys on your keyboard.
You can also click on the “Insert” tab in PowerPoint , and click on the “Link” option from the ribbon. You can use any of the three methods, and you will be prompted with the “Insert Hyperlink” window.
Step-2: Choose the Destination of the Link
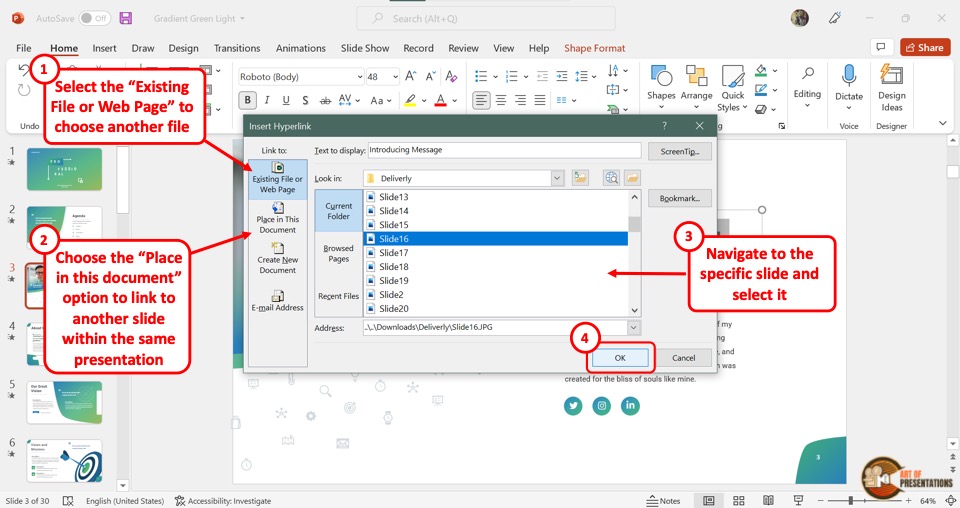
In the “Insert Hyperlink” dialog box, you can either link a file from your computer or an online source by clicking on the “Existing File or Web Page” button. Then, navigate to the folder containing the file, click on the file to select it, and click “ OK “.
Alternatively, you can also click on the “ Place in this document ” option to link to an existing slide. (I shall show the exact steps later in this article).
2. How to Edit Hyperlink Text in PowerPoint?

In PowerPoint, adding a hyperlink does not change the behavior of text or the text box. Thus, the process of editing a hyperlink text is similar to the way you would edit the text in PowerPoint normally.
All you have to do is click inside the text box and delete or add text. You can also change the appearance of the hyperlink text by using the tools in the “Font” section of the “Home” tab in PowerPoint .
3. How to Edit the Hyperlink in PowerPoint?
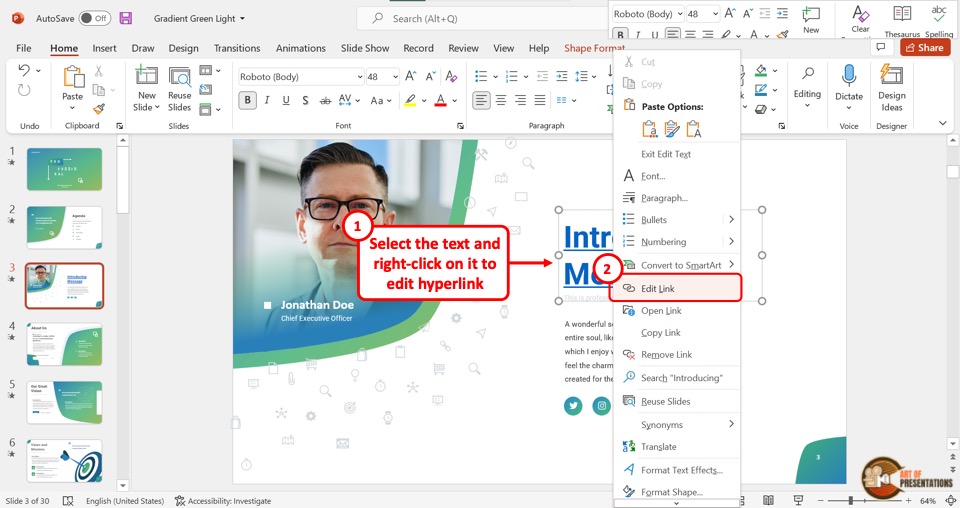
Once a hyperlink is added to a text or image in a PowerPoint slide, you can go back and edit it. To do so, “Right Click” on the hyperlinked text and select the “Edit Link” option from the dropdown menu.
This will open the familiar “Insert Hyperlink” dialog box that we saw in section 1 of this article. Simply select another file or slide from the presentation in order to edit the link.
4. How to Remove Hyperlink in PowerPoint?
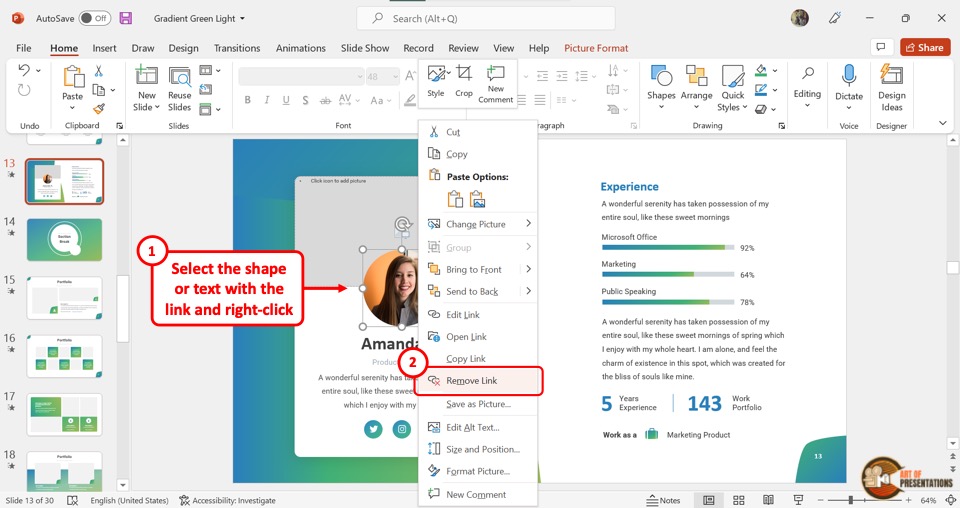
In Microsoft PowerPoint, you can remove the hyperlink from a text or an image with only one click. “Right Click” on the text or image to open the dropdown menu.
Now all you have to do is click on the “Remove Link” option to remove the hyperlink.
5. How to Hyperlink to Another Slide in PowerPoint
As mentioned earlier in the article, you can even link one slide to another within the same presentation using the hyperlink feature. This has great benefits especially when you want to specifically jump to a section in the presentation that you want to show in further detail.
Here’s what you need to do in order to link to another slide within the same presentation using the hyperlink feature in PowerPoint –
Step-1: “Right Click” on the selected text or image
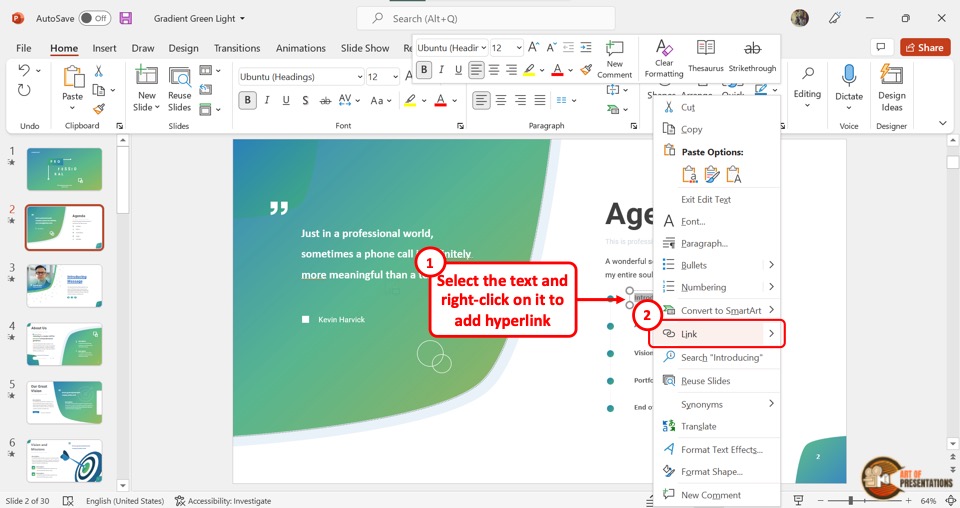
In the selected slide, “Right Click” on the text or image where you want to link another slide. Then click on the “Link” option from the dropdown menu.
You can alternatively press the “Ctrl+K” keys on your keyboard. This will open a dialog box.
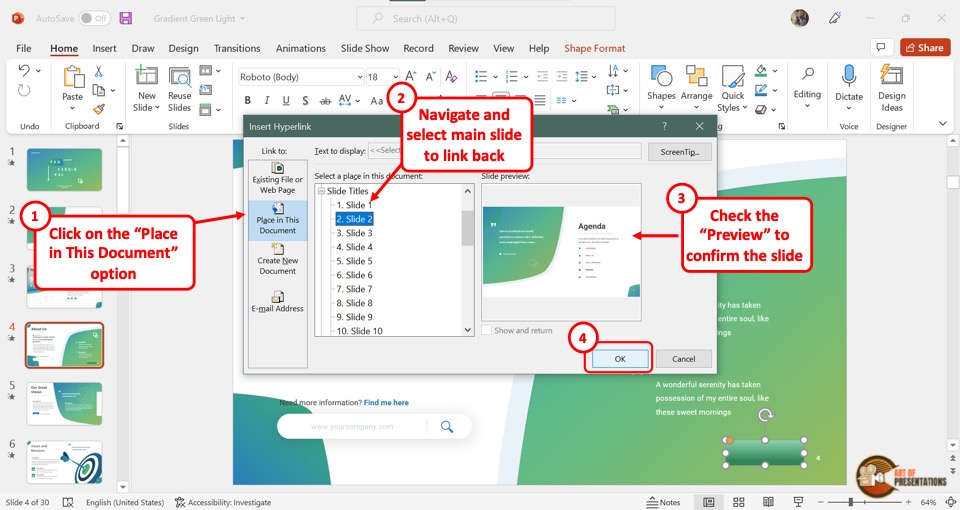
Step-2: Click on the “Place in This Document” option
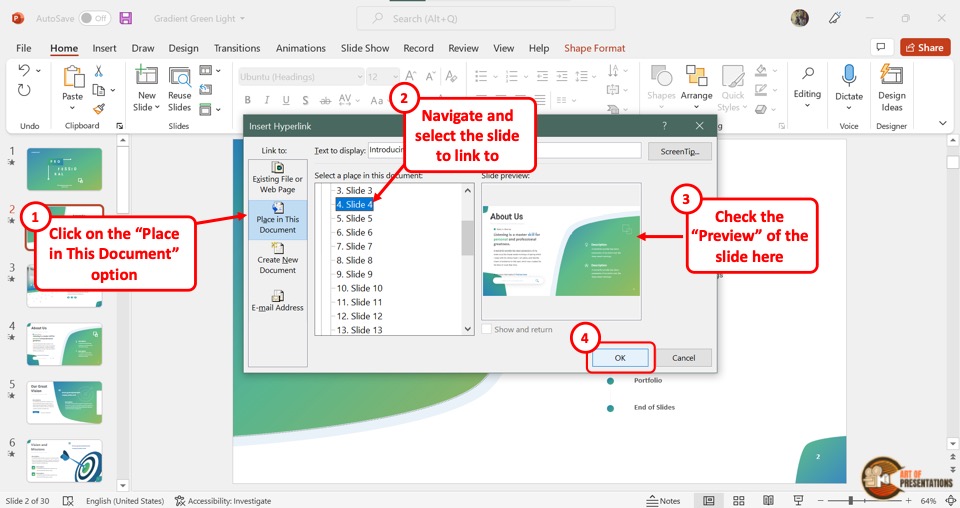
In the “Insert Hyperlink” dialog box, click on the “Place in This Document” option from the left sidebar. Then select the slide you want to link.
You can see the selected slide in the “Slide preview” section in the dialog box. Finally, you have to click on the “OK” button to finish the process.
5a. How to Return Back to the Main Slide?
During a presentation, it may be important to return to the main slide in one click after jumping to the linked slide. To do so, you can add a shape and hyperlink it back to the main slide.
Here’s how to create a hyperlink back to the main slide –
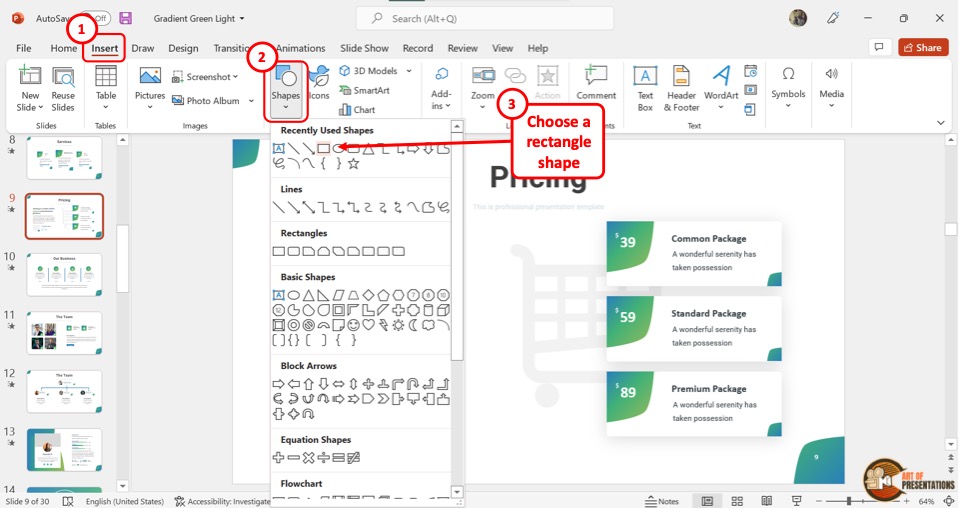
Step-1: Click on the “Shapes” option
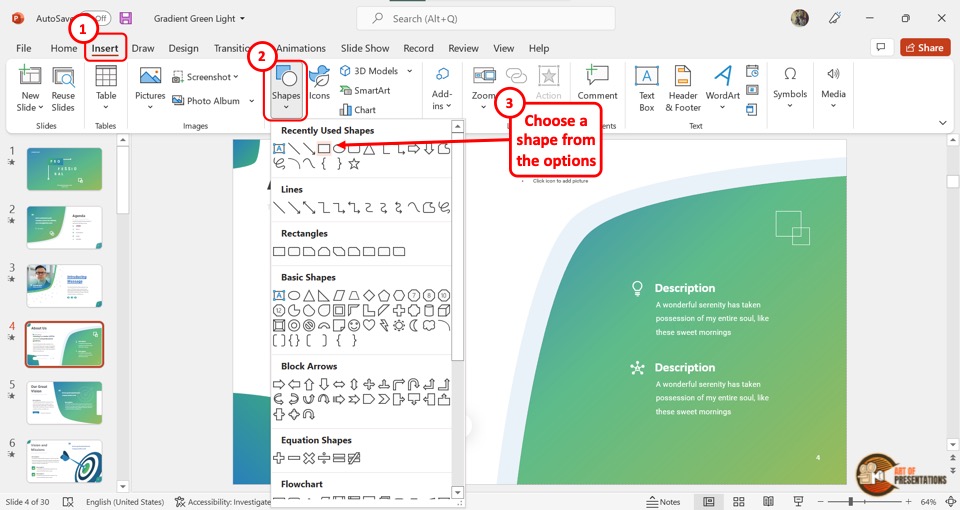
The first step is to open the linked slide. Then click on the “Insert” tab from the menu ribbon located at the top of the screen. In the “Insert” menu, click on the “Shapes” option and select your preferred shape from the dropdown menu.
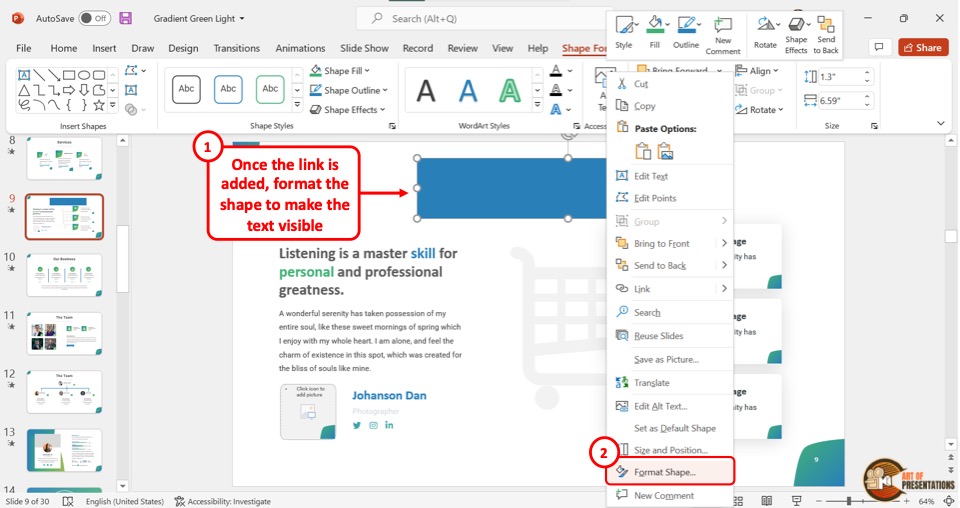
Step-2: Edit the shape
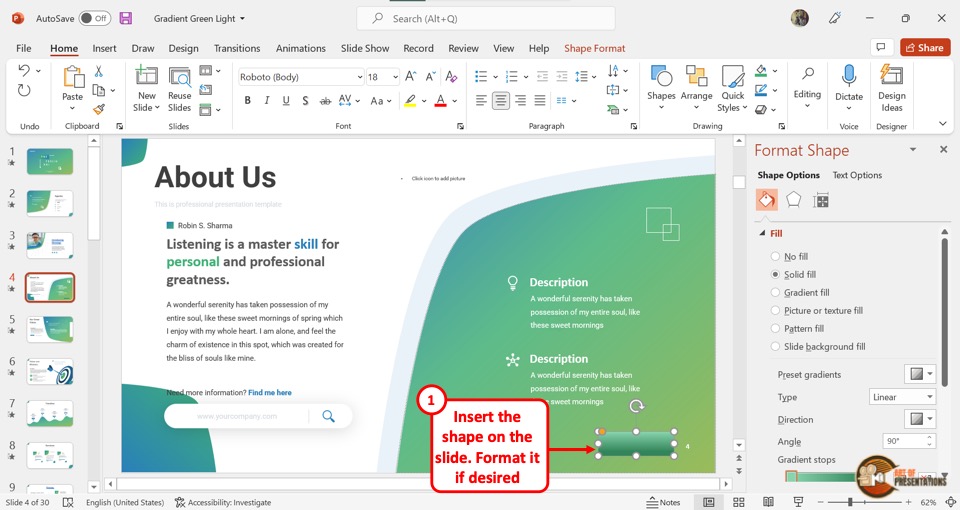
Now you can select the shape and click on the “Shape Format” tab from the menu ribbon. In the “Format Shape” sidebar located on the right side of the screen, edit the color and of the shape to visually match the rest of the slide.
I would highly recommend adding a text to the shape something to the effect of “Go back to slide X” (where “X” is the slide number of the main slide you want to return). This will help you and others take note of why a shape exists on the slide and prevent others from deleting it accidentally.
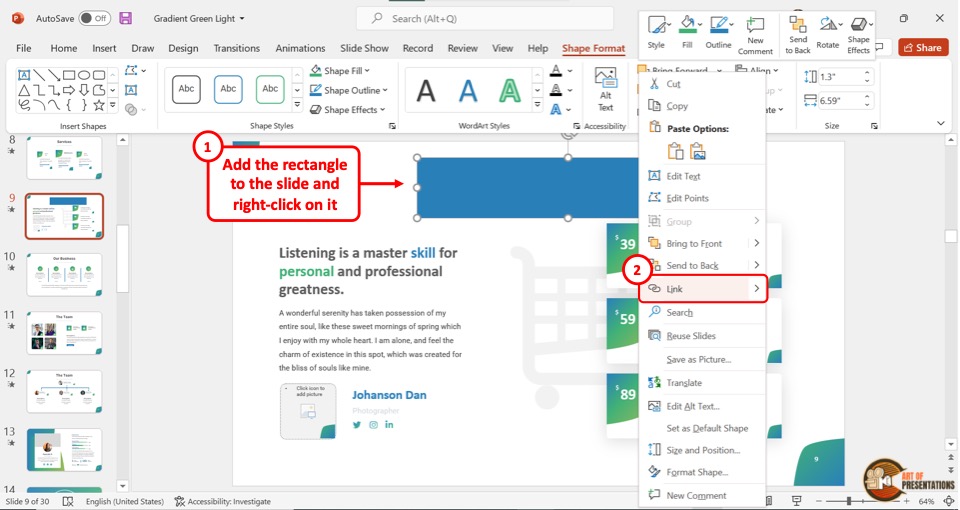
Step-3: “Right Click” on the shape
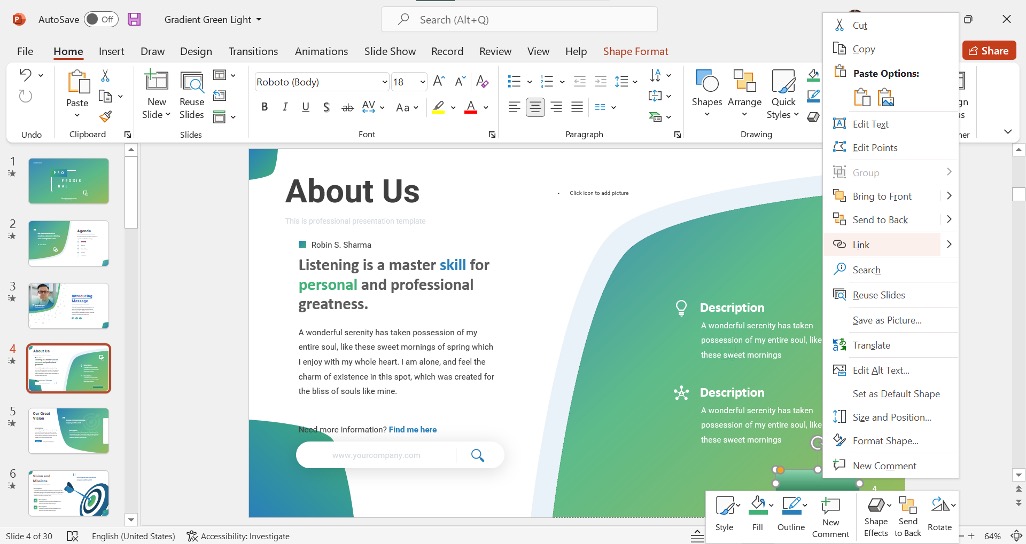
Now, all we need to do is simply create a hyperlink that links back to the original slide.
Select the shape and “Right Click” on the shape. Then, click on the “Link” option. You can alternatively press the “Ctrl+K” keys on your keyboard to open the “Insert Hyperlink” dialog box.
Step-4: Hyperlink the main slide
In the “Insert Hyperlink” dialog box, click on the “Place in This Document” button from the sidebar located on the left side. Then select the main slide and click on the “OK” button.
Now all you have to do is click on the shape to return to the main slide during the presentation.
Note that this link will only work when you are viewing the presentation in slideshow mode!
6. How to Hyperlink Without Underline?
In Microsoft PowerPoint, you cannot hyperlink text without the underline directly. However, there is a workaround.
To add a hyperlink without underlining a text in PowerPoint, you will need to use a transparent shape. Insert a shape over the text. Right-click and add a hyperlink to the shape. Then, select the “No Fill” options to remove the “Fill” and “Line” colors in the “Format Shape” settings.
Here’s a detailed step-by-step process that you will need to follow –
Step-1: Click on the “Remove Link” option

The first step is to remove the hyperlink from the text. “Right Click” on the hyperlink text and select the “Remove Link” option from the dropdown menu.
This will ensure that the underline from the text gets removed.
Step-2: Click on the “Shapes” option
Now click on the “Insert” tab from the menu bar and click on the “Shapes” button in the “Insert” menu. From the dropdown menu, select the “Rectangle” option.
Then insert the rectangle shape over the hyperlink text.
Step-3: Add a hyperlink to the shape
The next step is to add the hyperlink to the shape instead of the text.
“Right Click” on the shape and click on the “Link” option. Alternatively, you can press the “Ctrl+K” keys on your keyboard.
In the “Insert Hyperlink” dialog box, paste the link that was previously on the text (as we did before in the previous sections). Then click on the “OK” button.
Step-4: Click on the “Format Shape” option
Now all you have to do is “Right Click” on the shape and click on the “Format Shape” option at the bottom of the dropdown menu.
This will open a “Format Shape” sidebar located at the right side of the screen.
Step-5: Click on the “No fill” and “No line” options
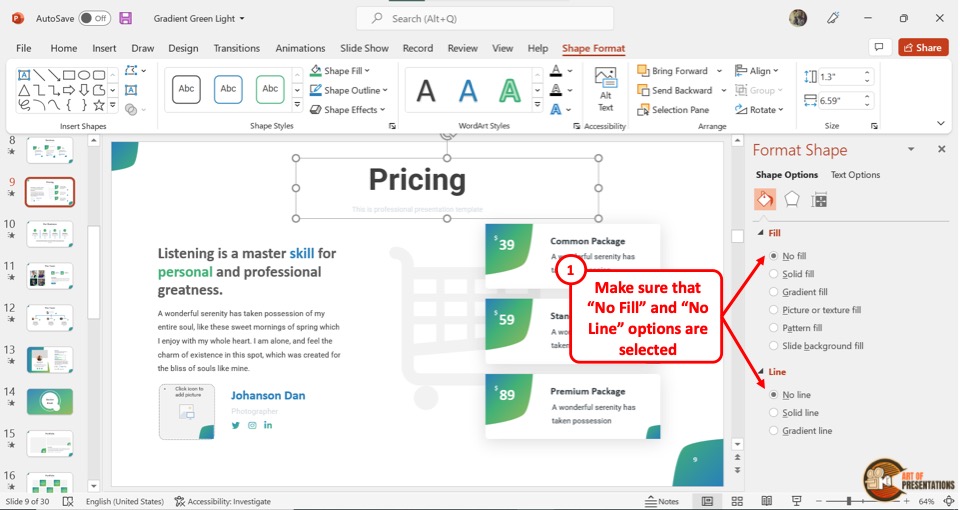
In the “Format Shape” sidebar, click on the “No fill” option under the “Fill” section. Then click on the “No line” option under the “Line” section.
This will make the shape completely transparent and make the text visible while removing the underline from the text. You can now click on the text and access the hyperlink in the slideshow mode.
7. How to Add a YouTube Link in PowerPoint?
To add a Youtube link in a PowerPoint slide, you have to first open the Youtube video that you want to link and copy the link address. Then follow the 2 quick steps.
Step-1: Click on the “Link” option
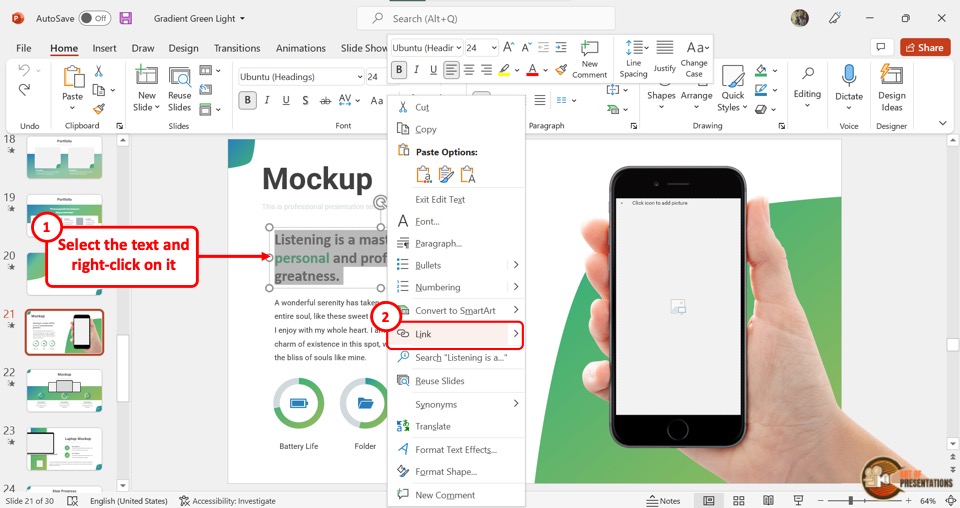
First, you have to select the text to hyperlink. Then “Right Click” on the selected text and click on the “Link” option. Alternatively, you can press the “Ctrl+K” keys on your keyboard.
Step-2: Paste the Youtube link
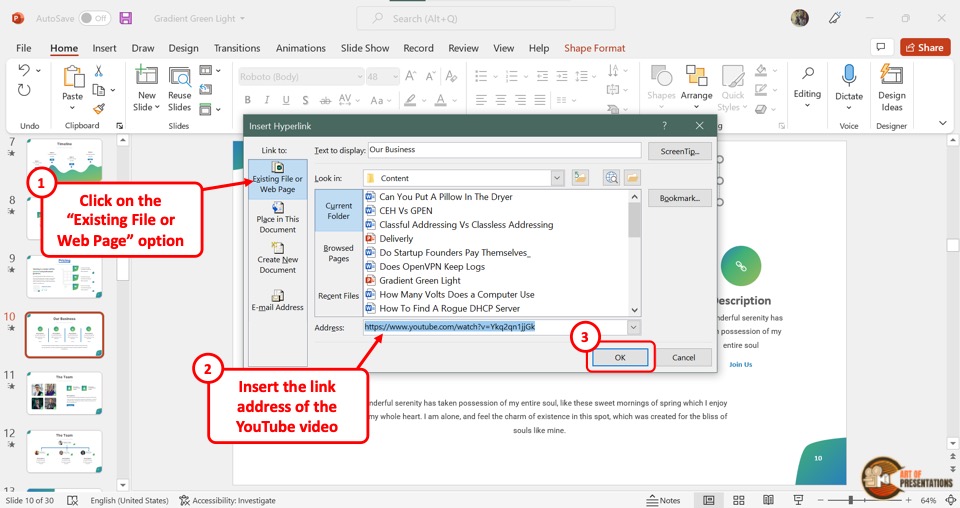
Click on the “Existing File or Web Page” option in the “Insert Hyperlink” dialog box. Then paste the Youtube link in the “Address” box at the bottom.
Now all you have to do is click on the “OK” button to hyperlink the Youtube video.
8. How to Insert a Website Link in PowerPoint?
In Microsoft PowerPoint, you can hyperlink to any resource available on the web. To insert a website link, you have to first obtain the link from the website. Then follow the 3 easy steps.
Step-1: Click on “Link”
In the open slide, select the text or image which you want to hyperlink. Then “Right Click” on the selected text or image. Click on the “Link” option from the dropdown menu. Alternatively, you can press the “Ctrl+K” keys on your keyboard.
Step-2: Paste the link to the website
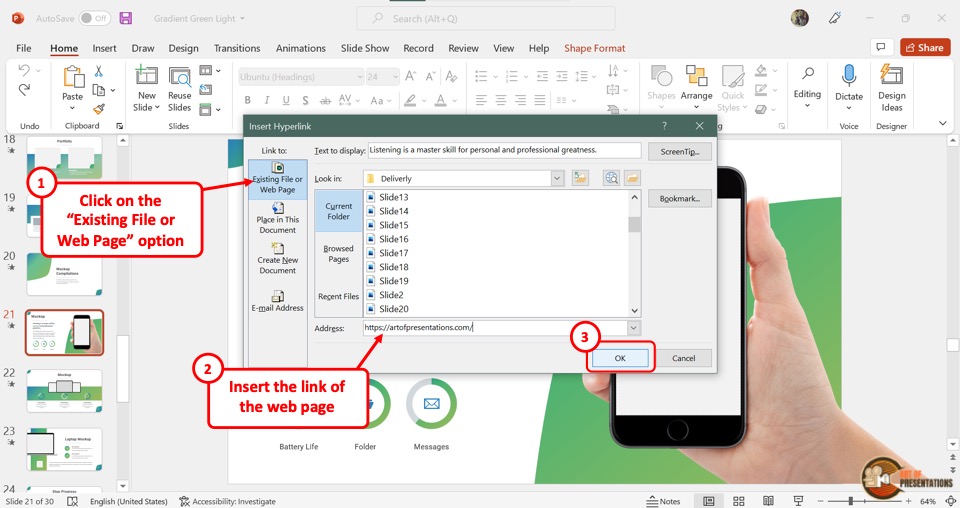
The next step is to paste the website link in the “Address” box in the “Insert Hyperlink” dialog box. “Right Click” on the “Address” box and click on the “Paste” option from the dropdown menu.
This will paste the copied website link. You can alternatively press the “Ctrl+V” keys on your keyboard.
Step-3: Click on the “OK” option
Now all you have to do is click on the “OK” button at the bottom of the “Insert Hyperlink” dialog box to insert the link to the website (as shown in the image in step 2).
9. How to Hyperlink in PowerPoint to an Excel File?
Microsoft PowerPoint allows you to add both links from the web as well as links to existing files in your computer as a hyperlink. To hyperlink to an Excel file in a slide, follow the 3 simple steps.
Step-1: “Right Click” on the selected text
The first step is to select the text or image where you want to insert the link. Then you have to “Right Click” on it. From the dropdown menu, click on the “Link” option.
Step-2: Click on the “Browse for File” option
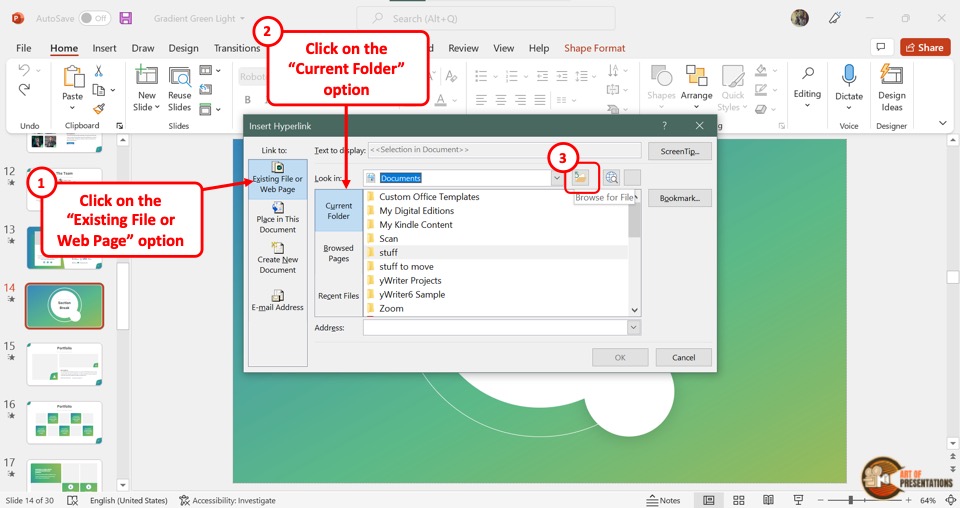
The next step is to click on the “Browse for File” option in the “Insert Hyperlink” dialog box. It is the third icon at the right side of the “Look in” box and looks like a folder.
This will open another dialog box.
Step-3: Click on the “Search Documents” box
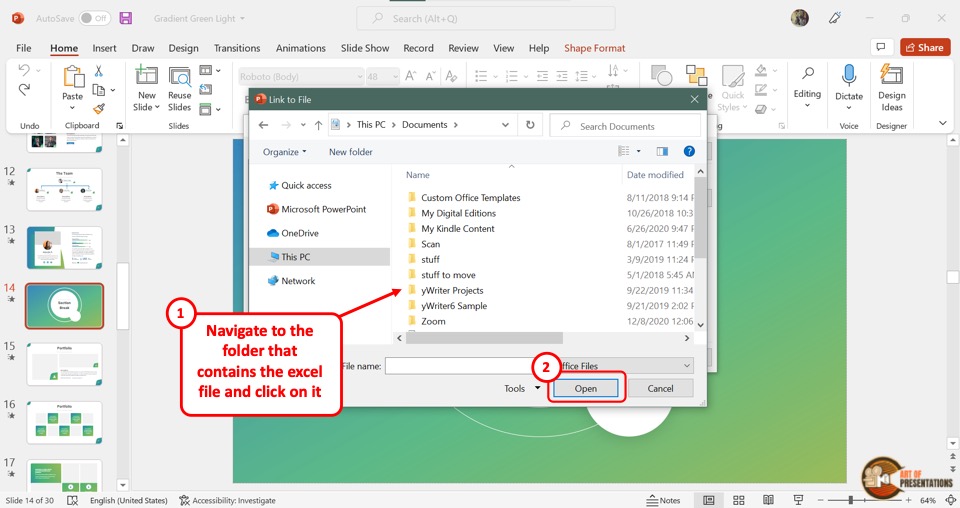
In the “Link to File” dialog box, click on the “Search Documents” box located at the top and right corner. Then type in the name of the Excel file you want to hyperlink.
Select the Excel file and click on the “Open” button at the bottom of the dialog box to insert the link to the Excel file.
10. How to Hyperlink in PowerPoint to a PDF File?
In Microsoft PowerPoint, you can add a hyperlink to a PDF file. This can be an efficient way for you to link to references for your presentation content.
The process is similar to that of adding a link to an excel file. Here’s what you need to do –
You have to first select a text or image and then “Right Click” on it. Click on the “Link” option from the context menu. Alternatively, you can press the “Ctrl+K” keys on your keyboard.
Step-2: Click on “Browse for File”

In the “Insert Hyperlink” dialog, click on the “Browse for File” option which is the icon that looks like a folder. It will open the “Link to File” dialog.
Step-3: Click on “Search This PC”
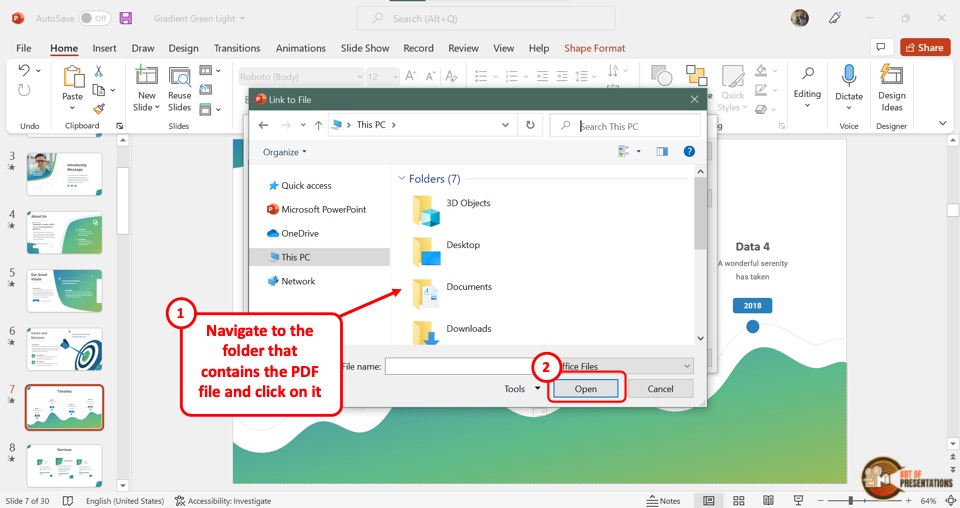
In the “Link to File” dialog box, click on the “Search This PC” option and type in the name of the PDF file you want to link.
Then select the PDF file and click on the “Open” button at the bottom of the dialog box. This will hyperlink the PDF file to the presentation.
11. How to Open a Hyperlink in PowerPoint?
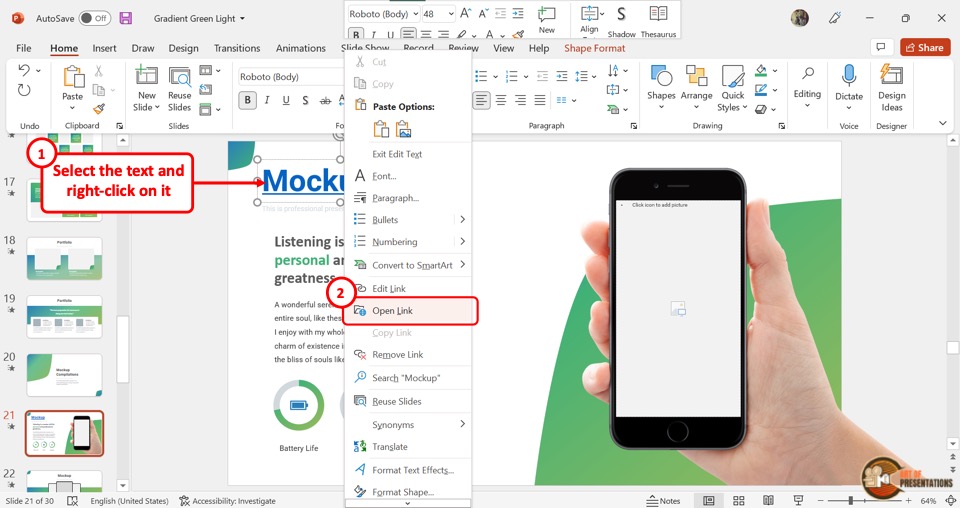
To open a hyperlink, “Right Click” on the hyperlink text or image. From the dropdown menu click on the “Open Link” option. This will open the hyperlink in a new window.
Alternatively, you can press down the “Ctrl” key on your keyboard and click on the hyperlink text or image simultaneously to open the hyperlink.
Using the keyboard shortcut is more practical in the “Slide Show” screen during a presentation.
12. Hyperlink Not Working in PowerPoint
When inserting or accessing a hyperlink in Microsoft PowerPoint, sometimes, you might run into some issues. For instance, the option to hyperlink a text or image may be greyed out and you may not be able to insert a hyperlink.
These and other issues can be solved quite easily.
12a. Hyperlink is Greyed Out
In the “Insert” menu, you may find that the “Link” option is greyed out. But, this problem can be easily fixed! Here’s what you need to do –
Step-1: Click on the “Insert” tab

In the open PowerPoint presentation, click on the “Insert” tab in the menu ribbon located at the top of the screen. In the “Links” section of the “Insert” menu, you will notice that the “Link” option is greyed out.
Step-2: Click on an object
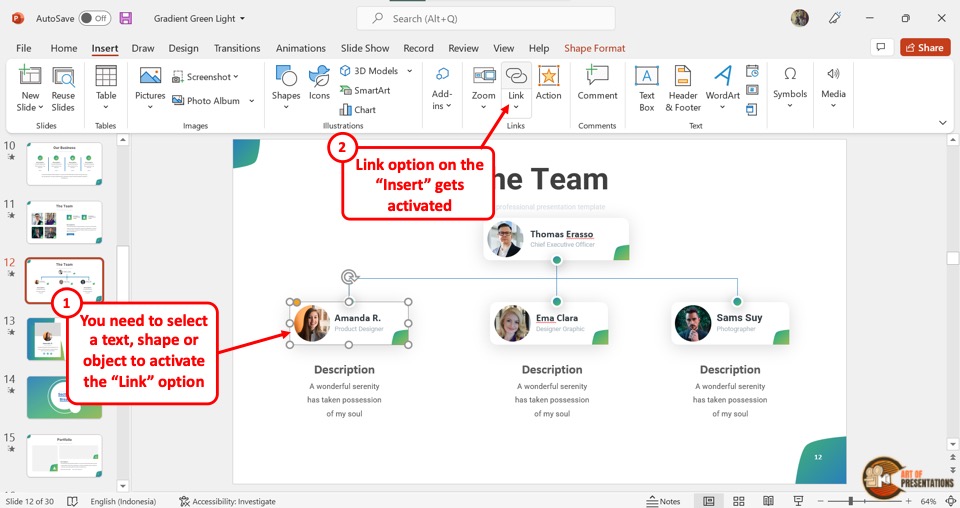
The “Link” option is usually greyed out because there are no objects selected yet. In Microsoft PowerPoint, you cannot insert a hyperlink to a slide. You can only insert hyperlinks to an object.
To be able to insert a hyperlink, all you have to do is click on any object in the open slide. You will now see that the “Link” option is no longer grayed out, and you can click on it.
12b. Hyperlink in PowerPoint is Not Clickable
After inserting a hyperlink in a PowerPoint presentation, you will notice that the hyperlink is not clickable. This is because you cannot click on the hyperlink in “Normal View” .
In Microsoft PowerPoint, “Normal View” is the default view where you can edit the slides. You can fix this problem in 3 easy methods.
Method-1: Click on “Ctrl+Save”
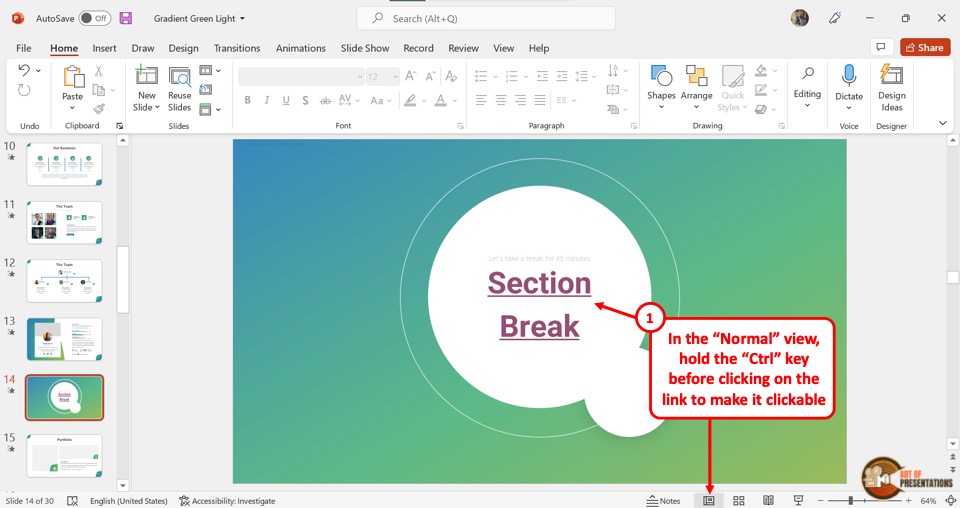
In the “Normal View” , you cannot open a hyperlink with a click. Instead, you have to press the “Ctrl” key on your keyboard and click on the hyperlink simultaneously. This will allow you to access the link.
Method-2: Click on the “Slide Show” tab
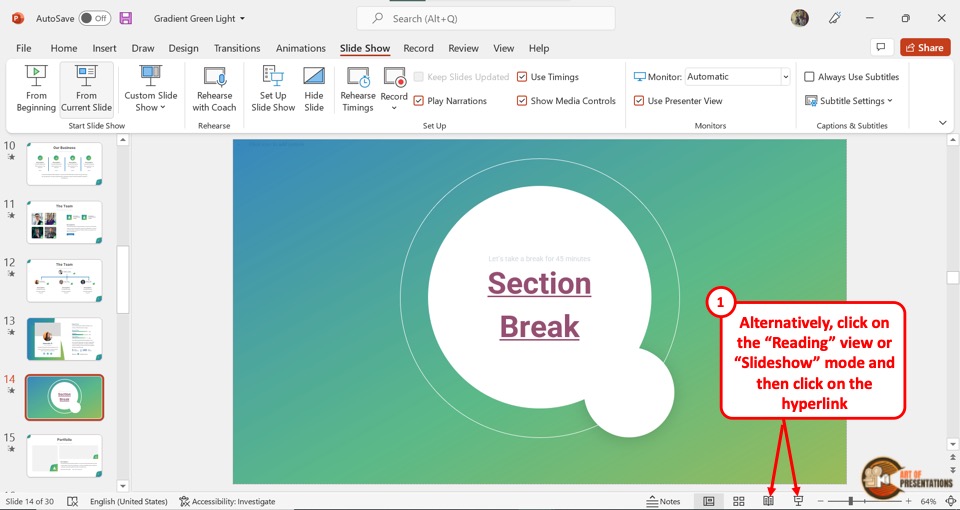
In the menu ribbon located at the top of the screen, click on the “Slide Show” tab. Then click on the “From Current Slide” option in the “Slide Show” menu.
Alternatively, you can press the “Shift+F5” keys on your keyboard. This will start the slideshow where the hyperlink is clickable.
Method-3: Click on the “Reading View” option
In the menu ribbon, click on the “View” tab. Then click on the “Reading View” option from the “Presentation Views” section (as shown in the image in method 2 above).
For the shortcut, all you have to do is click on the “Reading View” option which is the icon that looks like an open book in the status bar located at the bottom of the screen.
This will open the reading view screen where the hyperlinks are clickable.
Credit to cookie_studio (on Freepik) for the featured image of this article (further edited)

How to Hyperlink in PowerPoint (Insert, Remove or Edit Links)

Insert and Manage Links or Hyperlinks to Create Interactive PowerPoint Presentations
by Avantix Learning Team | Updated October 14, 2022
Applies to: Microsoft ® PowerPoint ® 2010, 2013, 2016, 2019, 2021 and 365 (Windows)
You can easily add links or hyperlinks in PowerPoint presentations to add interactivity and make it easy for users to click a button or link to jump to another slide in your deck, to another presentation, to an Excel file or to a web site. You can edit hyperlinks at any time and remove hyperlinks if necessary. In PowerPoint, hyperlinks become active when you run a slide show (normally by clicking the Slide Show button on the bottom right of the screen). In newer versions of PowerPoint, the term link is used as an alternative to hyperlink (although the dialog box displays Hyperlink).
Hyperlinks can be displayed as full source URLs or internet addresses such as http://abccompany.ca, as descriptive text, as an image or as a shape.
In this article, we'll be using the Link or Hyperlink command to insert hyperlinks, not Action Settings (an alternative method for adding hyperlinks).
Recommended article: How to Crop a Picture in PowerPoint (4 Ways)
Do you want to learn more about PowerPoint? Check out our virtual classroom or in-person classroom PowerPoint courses >
Insert a text hyperlink
If you select text and use it as a hyperlink on a PowerPoint slide, it appears underlined and in a color (normally blue) and coordinates with the color theme in your document. The text color changes automatically after you click hyperlink text in a slide show (again based on color theme settings). Shapes or images with hyperlinks do not change color.
Insert a hyperlink to a slide in the current presentation
To insert a link or hyperlink to a slide in the current presentation:
- In Normal View or Slide Master View, select the text, shape or image you want to use as a hyperlink. If you are using a shape that contains text, click its edge.
- Click the Insert tab in the Ribbon.
- In the Links group, click Link or Hyperlink. You can also press Ctrl + K. The Edit Hyperlink dialog appears.
- Under Link to, select Place in This Document.
- Under Select a place in this document, select the slide you'd like to link to.
- If you are using a text hyperlink, enter the descriptive text that will become the link text in the Text to display box (if necessary).
- Click Slide Show on the bottom right of the screen to run your slide show. You can also press Shift + F5.
- Click the link to test it.
- Press ESC to exit the slide show.
Below is the Edit Hyperlink dialog box with a link to another slide in the current presentation:

Insert a hyperlink to another PowerPoint presentation
To insert a link or hyperlink to another PowerPoint presentation:
- Under Link to, select Existing File or Web Page.
- Click Browse (yellow file folder icon).
- Navigate to the other presentation and double-click it.
Below is the Edit Hyperlink dialog box with a link to another presentation:

Insert a hyperlink to an Excel workbook
To insert a link or hyperlink to an Excel workbook:
- Navigate to the Excel workbook and double-click it.
Below is the Edit Hyperlink dialog box with a link to an Excel workbook:

Use relative or absolute addresses to external files
If you are creating hyperlinks to external files such as another PowerPoint presentation or an Excel workbook, it's important to understand the difference between a relative and absolute address. A relative hyperlink uses the address relative to the address of the containing document whereas an absolute hyperlink uses the full address of the destination document including the drive location.
The following example uses an absolute hyperlink address (full path address):
C:\Documents\January\Budget.docx
The following relative hyperlink contains only the relative address or path to a Budget document in the same folder as the presentation.
January\Budget.docx
You may want to use a relative hyperlink address or path if you want to move or to copy your files to another location such as another server.
Insert a hyperlink to a web site
To insert a link or hyperlink to a web site:
- In the Address box, enter the web address or url. You can also copy the web address from a browser or select from the drop-down menu of recent web sites.
Below is the Edit Hyperlink dialog box with a link to a web site:

Create a hyperlink using the context menu
Another method of creating or editing hyperlinks is to right-click and use the context menu (you can also press Shift + F10 to display the context menu).
To insert a hyperlink using the context menu:
- Right-click and choose Link or Hyperlink from the dropd-down menu and then select Insert Hyperlink or Insert Link. The hyperlink dialog appears.
- Select the appropriate option under Link to. If you are creating an external link to a webpage or another document, select Existing File or Web Page. If you are creating an internal link within the document, select Place in This Document.
- In the address field, enter or choose the address or location where the link should lead. For external references, enter or copy the URL in the Address field. For place in the same document, select the appropriate item.
Jump to a hyperlink location
Hyperlinks become active when you run a slide show or save your presentation as a PDF (portable document format). Simply click the hyperlink to jump to the hyperlink location.
Edit a hyperlink
To edit a hyperlink:
- In Normal View or Slide Master View, right-click the hyperlink and select Edit Hyperlink or Edit Link from the drop-down menu. The Hyperlink dialog box appears.
- Select the desired options.
You can also select a hyperlink and press Ctrl + K to edit it.
Create a screen tip
You can also create a screen tip that will pop up when you hover over a hyperlink during a slide show.
To create a screen tip for an existing hyperlink:
- In Normal View or Slide Master View, right-click the hyperlink.and select Edit Hyperlink or Edit Link from the drop-down menu. The Edit Hyperlink dialog box appears.
- Click ScreenTip (on the top right). A dialog box appears.
- Enter a screen tip.
- Click OK twice.
Remove a hyperlink
To remove a hyperlink:
- In Normal View or Slide Master View, right-click the hyperlink you want to remove.
- In the context menu, select Remove Hyperlink or Remove Link.
Hyperlinks can add a new dimension of interactivity to your decks and when a PowerPoint file is saved as a PDF, they become active hyperlinks.
Subscribe to get more articles like this one
Did you find this article helpful? If you would like to receive new articles, JOIN our email list.
More resources
How to Insert Slide Numbers in PowerPoint
How to Use the Built-in Laser Pointer in PowerPoint (with Shortcuts)
How to Cut a Shape Out of an Image in PowerPoint (Mask a Picture)
How to Remove the Background of an Image in PowerPoint (2 Ways)
How to Break, Update or Change Links to Excel Charts or Worksheets in PowerPoint
Related courses
Microsoft PowerPoint: Intermediate / Advanced
Microsoft PowerPoint: Design for Non-Designers
Microsoft PowerPoint: Animations Bootcamp
Microsoft PowerPoint: Accessible PowerPoint Presentations
VIEW MORE COURSES >
Our instructor-led courses are delivered in virtual classroom format or at our downtown Toronto location at 18 King Street East, Suite 1400, Toronto, Ontario, Canada (some in-person classroom courses may also be delivered at an alternate downtown Toronto location). Contact us at [email protected] if you'd like to arrange custom instructor-led virtual classroom or onsite training on a date that's convenient for you.
Copyright 2024 Avantix ® Learning
You may also like

How to Insert or Type I with an Accent Mark in Word (Í, í, Ì, ì, Î, î, Ï, or ï)
You can insert or type i with an accent mark in Word using built-in tools or keyboard shortcuts (including Alt code shortcuts). The letter i can be inserted with an accent in both upper or lower case. The following are common accents in upper or lower case – Í, í, Ì, ì, Î, î, Ï, or ï.

How to Insert or Type A with an Accent Mark in Word (À, Á, Â, Ä, à, á, â, or ä)
You can insert or type a with an accent mark in Word using built-in tools or keyboard shortcuts (including Alt code shortcuts). The letter a can be inserted with an accent in both upper or lower case. The following are common accents in upper or lower case – À, Á, Â, Ä, à, á, â, or ä.

10 Word Shortcuts to Select Text Using a Keyboard
You can use several shortcuts in Word to select text in your documents using only your keyboard. When you select text, it will typically be highlighted in grey. After you select text, you can cut, copy, or delete the selected text or apply character or paragraph formatting.
Microsoft, the Microsoft logo, Microsoft Office and related Microsoft applications and logos are registered trademarks of Microsoft Corporation in Canada, US and other countries. All other trademarks are the property of the registered owners.
Avantix Learning |18 King Street East, Suite 1400, Toronto, Ontario, Canada M5C 1C4 | Contact us at [email protected]
Our Courses
Avantix Learning courses are offered online in virtual classroom format or as in-person classroom training. Our hands-on, instructor-led courses are available both as public scheduled courses or on demand as a custom training solution.
All Avantix Learning courses include a comprehensive course manual including tips, tricks and shortcuts as well as sample and exercise files.
VIEW COURSES >
Contact us at [email protected] for more information about any of our courses or to arrange custom training.
Privacy Overview
Pin it on pinterest.
- Print Friendly
- Shop Early Amazon Prime Day Deals
- I Tried Both: Ring vs Nest Doorbell
Add Hyperlinks to PowerPoint Presentations
Link to another slide, presentation file, website, or file on your computer
- Brock University
In This Article
Jump to a Section
Insert a Hyperlink
- Add a Hyperlink to a Slide
- Add a Hyperlink to Another File
Add a Hyperlink to a Website
- Add a Screen Tip to a Hyperlink
Create links to quickly access all kinds of things in your presentation. Link to a slide in the same PowerPoint presentation , another presentation file, a website, a file on your computer or network, or an email address. To help explain the purpose of the link, add a screen tip to the hyperlink .
Instructions in this article apply to PowerPoint for Microsoft 365, PowerPoint 2019, PowerPoint 2016, PowerPoint 2013, PowerPoint 2010, PowerPoint 2016 for Mac, and PowerPoint 2011 for Mac.
To use text or a picture as a hyperlink:
Open a file in Powerpoint that you want to add a link to.
Select the text or graphic object that will contain the hyperlink.
Select Insert .
Select Hyperlink or Link. The Insert Hyperlink dialog box opens.
Use the keyboard shortcut Ctrl + K to open the Insert Hyperlink dialog box.
Decide what type of link you want to insert. Your options include Existing File or Web Page , Place in This Document , and Email Address .
Add a Hyperlink to a Slide in the Same Presentation
To add a link to a different slide in the same presentation:
In the Insert Hyperlink dialog box, select Place in This Document . The options include:
- First Slide
- Previous Slide
- Slide Titles
Choose the slide that you want to link to. A preview of the slide appears to help you make your choice.
Select OK to close the dialog box and create the link.
If you want to edit the hyperlink, select the link text and select Insert > Link or Insert > Hyperlink to open the Edit Hyperlink dialog box.
Add a Hyperlink to Another File on Your Computer or Network
You are not limited to creating hyperlinks to other PowerPoint slides . Create a hyperlink to any file on your computer or network, no matter what program was used to create the other file.
There are two scenarios available during your slide show presentation:
- If the hyperlink goes to another PowerPoint presentation, the linked presentation opens and is the active presentation on the screen.
- If the hyperlink is to a file created in another program, the linked file opens in its corresponding program. It is then the active program on the screen.
Choose Existing File or Web Page in the Insert Hyperlink dialog box.
Locate the file on your computer or network that you wish to link to and select it.
If the linked file is located on your local computer, the hyperlink will be broken when showing the presentation on a different device. Keep all files that are needed for a presentation in the same folder as the presentation and copy these files to the other device.
To open a website from your PowerPoint presentation, enter the complete internet address (URL) of the website.
In the Insert Hyperlink dialog box, select Existing File or Web Page .
In the Address text box, enter the URL of the website you want to link to.
Select OK .
To prevent typing errors, copy the URL from the address bar of the web page and paste it into the Address text box.
Add a Screen Tip to a Hyperlink on Your PowerPoint Slide
Screen tips add additional information to hyperlinks on a PowerPoint slide. When the viewer hovers over the hyperlink during the slideshow, the screen tip appears.
In the Insert Hyperlink dialog box, select ScreenTip .
In the Set Hyperlink ScreenTip dialog box, enter the ScreenTip text you want to appear.
Select OK to save the screen tip text and return to the Insert Hyperlink dialog box.
Select OK to exit the Insert Hyperlink dialog box and apply the screen tip.
Start a screen show and hover over the link to test the hyperlink screen tip.
Get the Latest Tech News Delivered Every Day
- How to Add and Edit Links in Word Documents
- How to Use Portrait and Landscape Slides in the Same Presentation
- Adding Excel Hyperlinks, Bookmarks, and Mailto Links
- Simple Quizzes in PowerPoint
- How to Link to Other Slides or Websites in PowerPoint
- Create Family Trees Using PowerPoint Organization Chart
- How to Insert PDF Files Into PowerPoint Presentations
- Use This PowerPoint Template for a Multiple Choice Quiz
- How to Hyperlink in Word Documents
- How to Link Slides in Google Slides
- Hyperlinks, Bookmarks, and Cross-References in Microsoft Office
- Add Rolling Credits to a PowerPoint Presentation
- How to Do a Voiceover on PowerPoint
- How to Add an Excel Chart to a PowerPoint Presentation
- How to Add Hyperlinks to PDF Files
- How to Copy a PowerPoint Design Template to Another Presentation
PowerPoint Keyboard Shortcuts to Make Your Life Easier
September 10, 2014 / Blog, PowerPoint Tips powerpoint keyboard shortcuts, Powerpoint tips
Using PowerPoint doesn’t have to be complicated. If you take the time to learn as much as you can, you’ll quickly become a PowerPoint expert. One thing you can try is to learn several keyboard shortcuts. In the past , we discussed combinations you can use to help create your slide. But there are also several shortcut to help you facilitate your presentation.
Compiled by Guiding Tech , use these shortcuts and combinations to navigate through your deck without using your mouse:
Basic slideshow keyboard shortcuts
These shortcuts allow you to perform basic PowerPoint functions during your presentation:
- To start slideshow , press F5
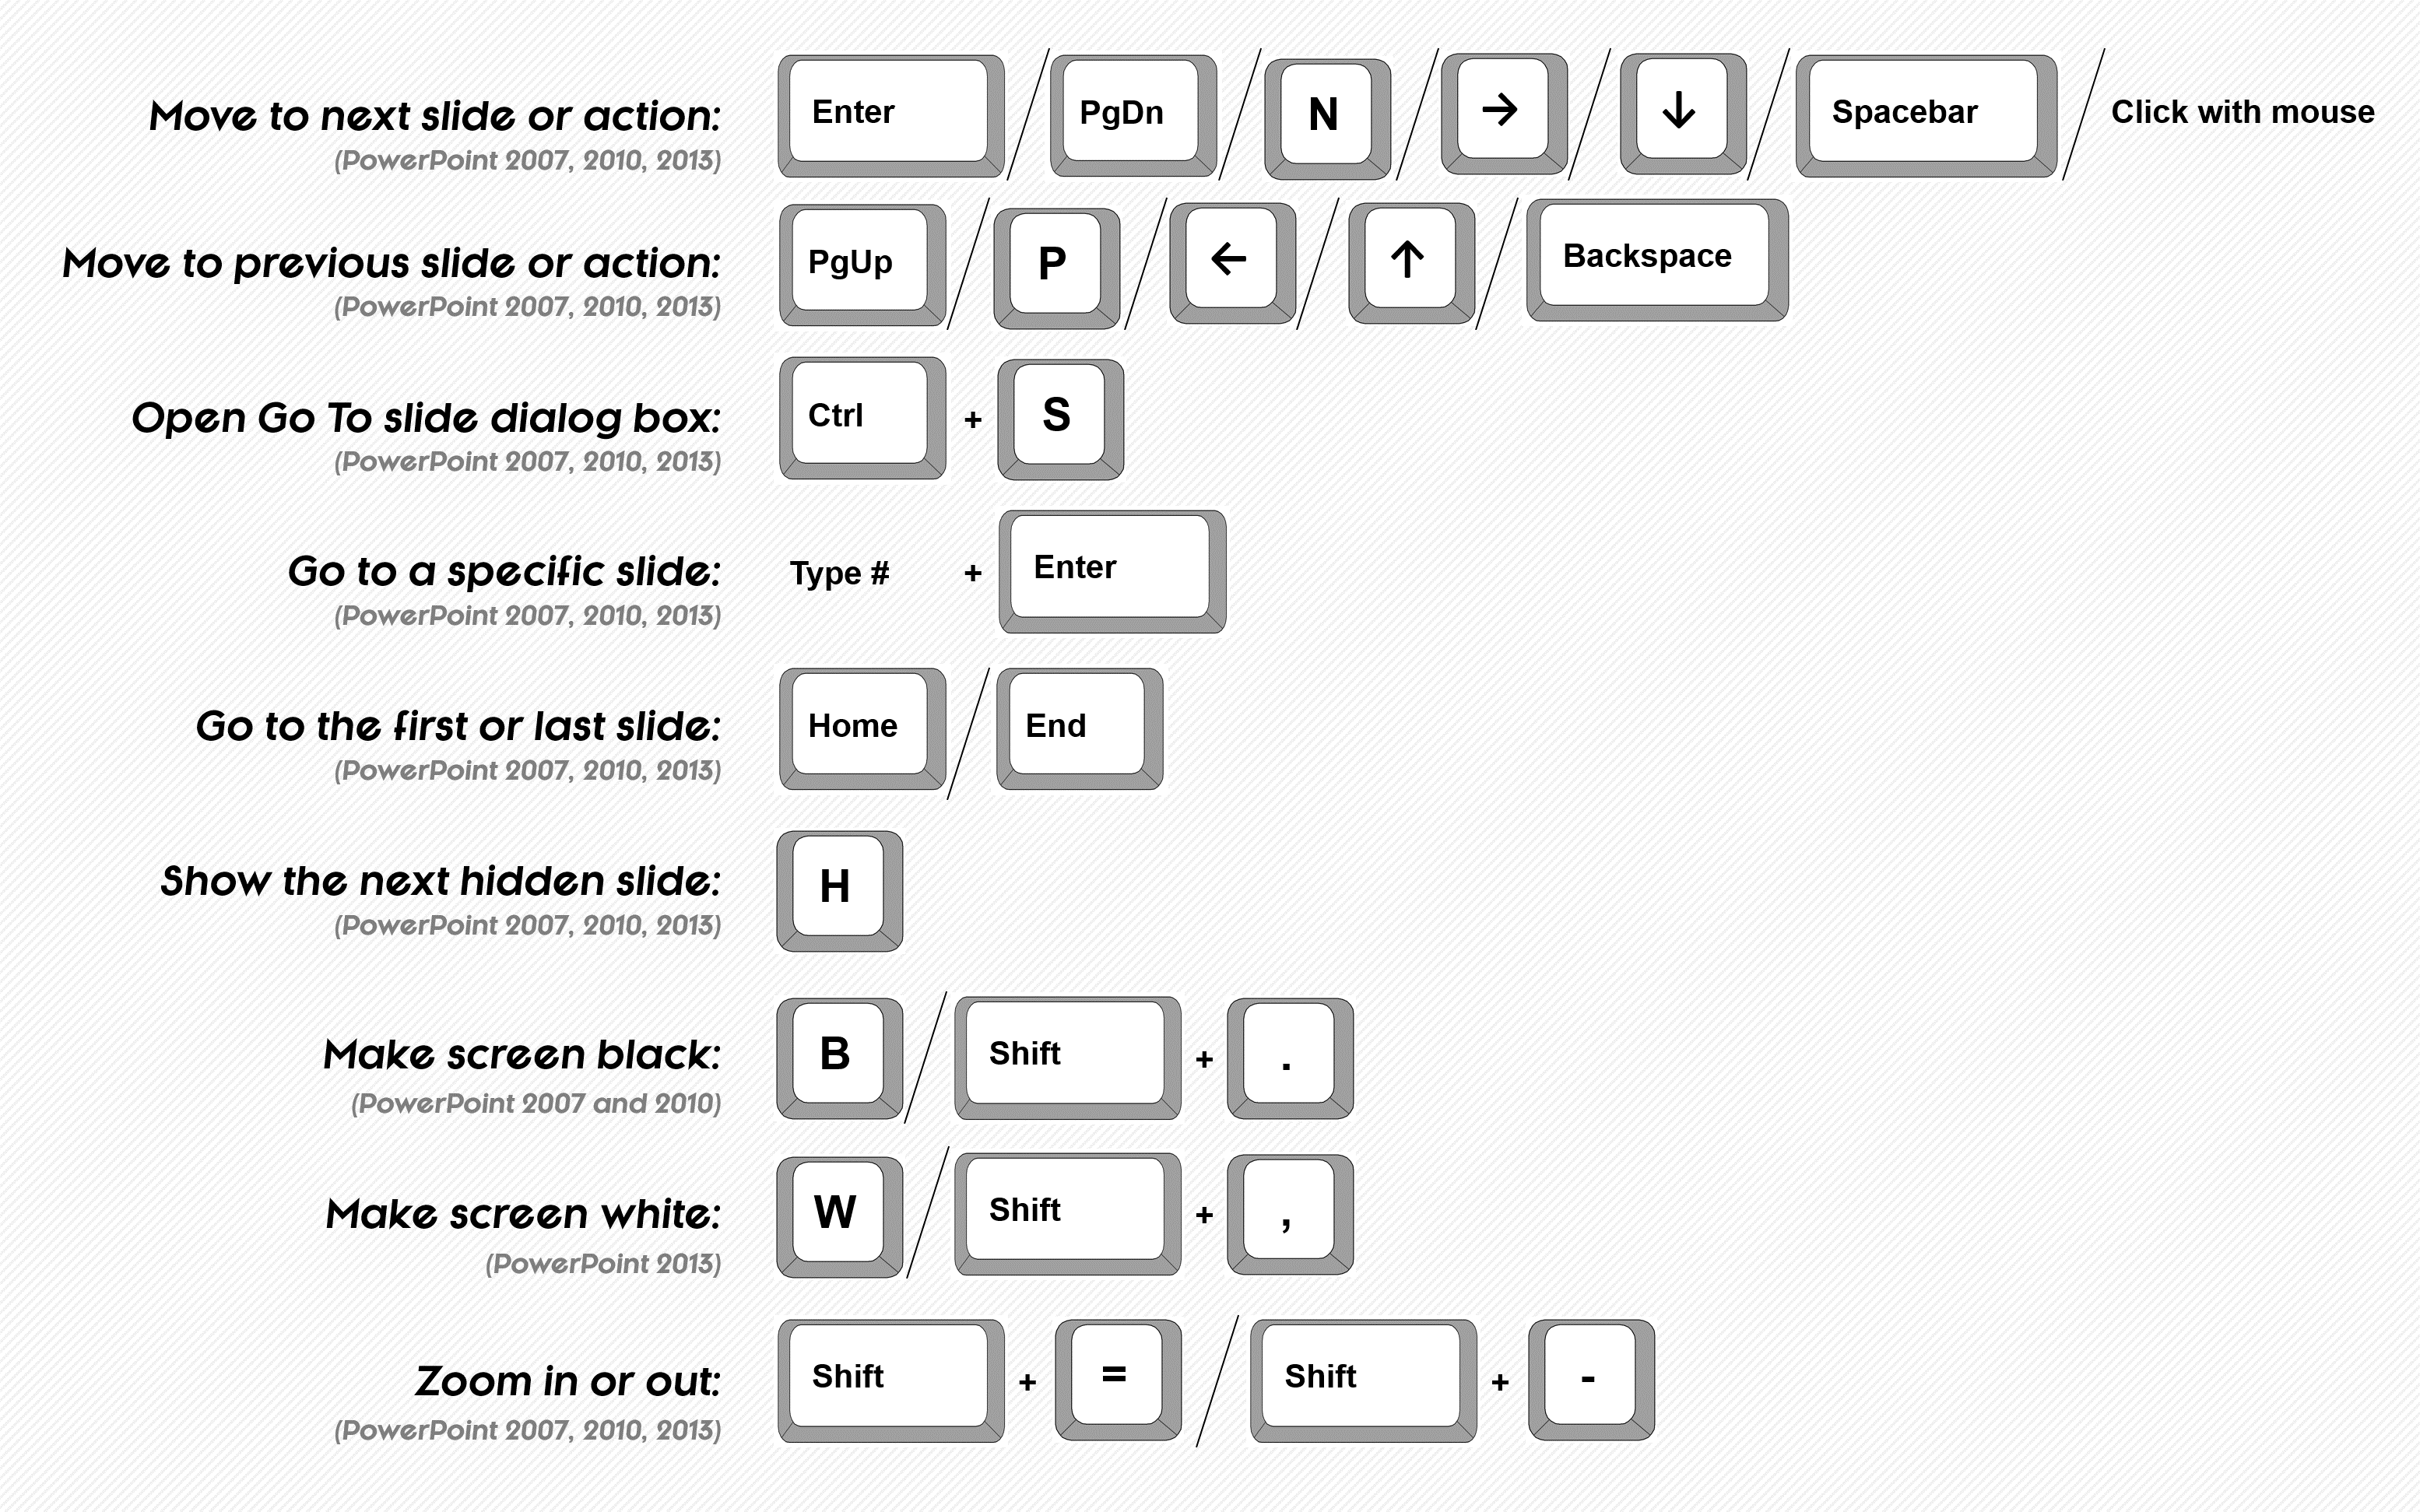
- To move on to the next slide or animation sequence , press either N , Right Arrow , or Spacebar
- To return to the previous slide , press either P , Left Arrow , or Backspace
- To jump to a specific slide , press the slide number + Enter
- To exit slideshow , press ESC
- To stop or restart an automatic presentation, press S
- To show hidden slide , press H
- To blackout the screen, press either B or Period (.)
- To show a blank white screen , press either W or Comma (,)
- To zoom in to a slide, press CTRL + Plus (+)
- To zoom out of a slide, press CTRL + Dash (-)
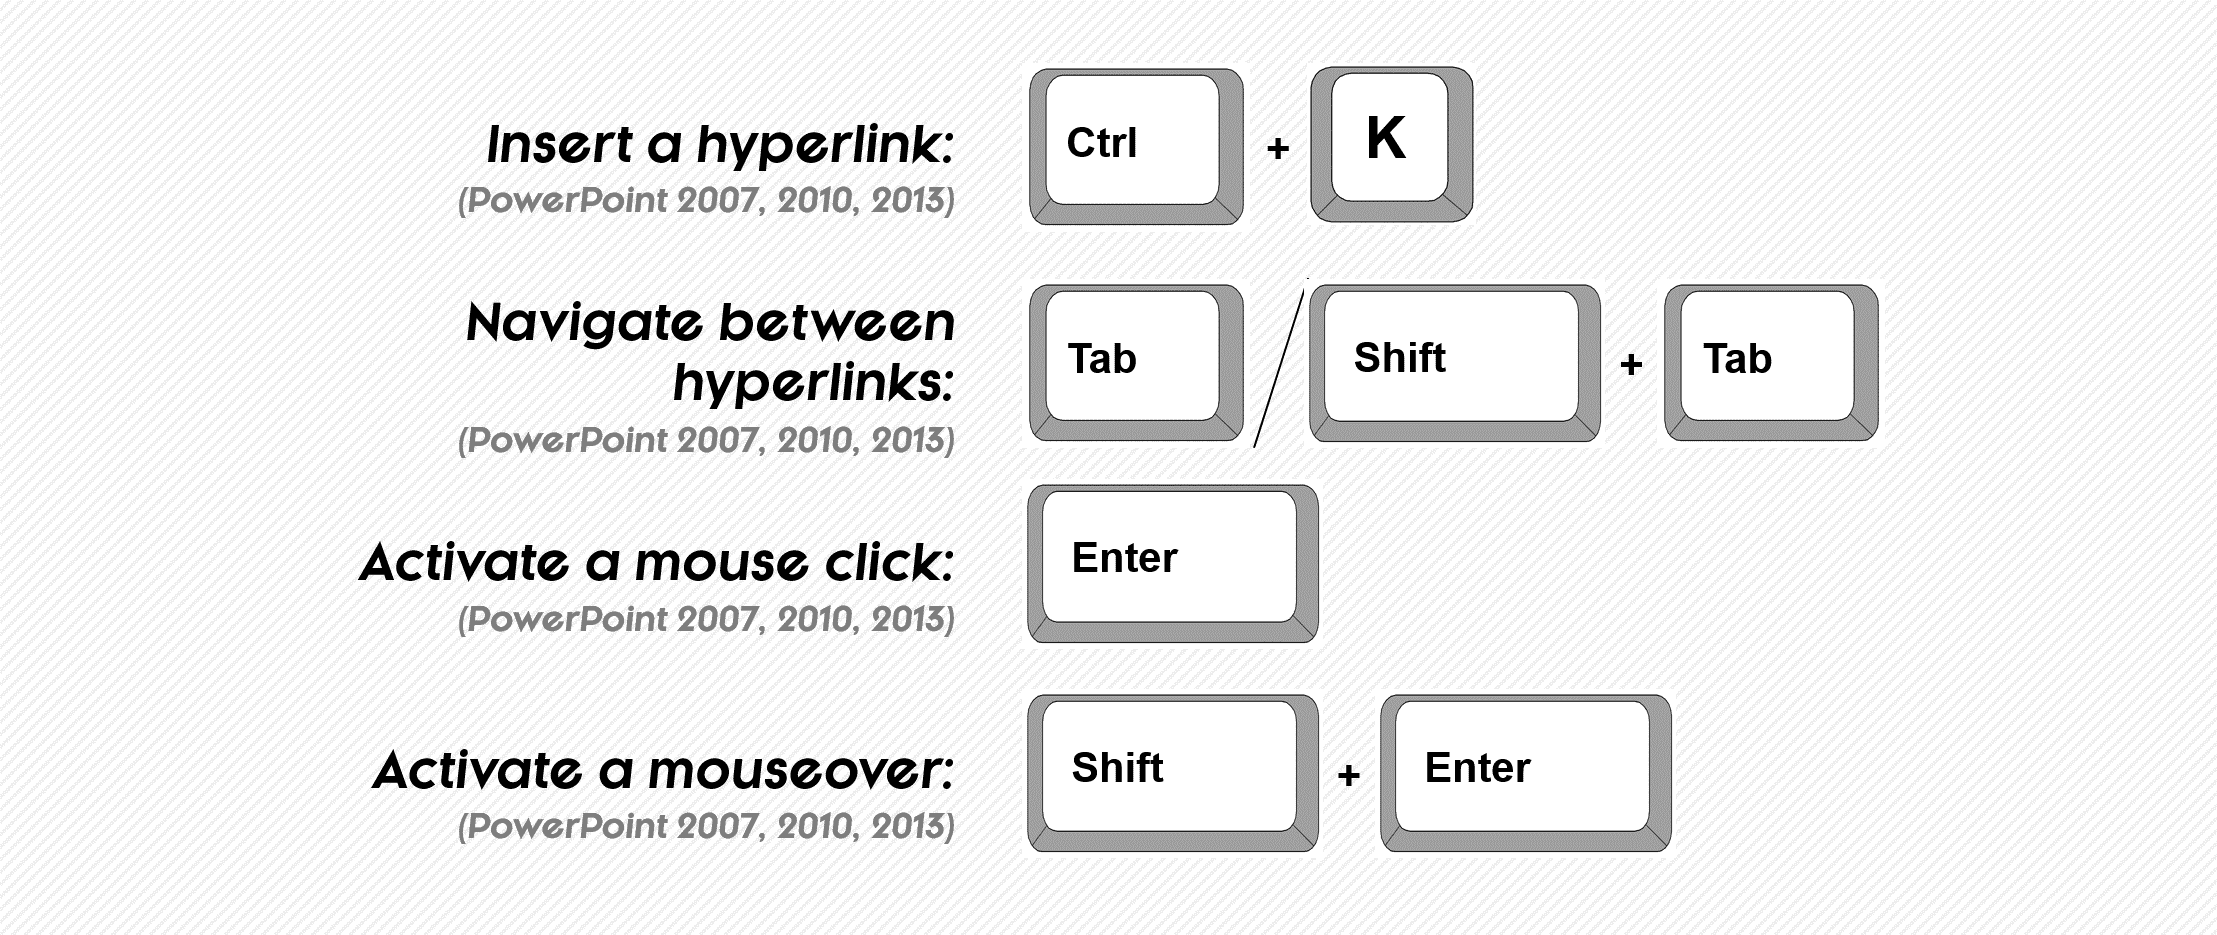
Hyperlink keyboard shortcuts
Use these shortcuts to access a hyperlink on your slide:
- To select a link, press TAB (If you have several links in a single slide, continue pressing TAB until you reach the one you want to access)
- To return to a previous link , press SHIFT + TAB
- To open a hyperlink, press ENTER
Keyboard shortcuts for Pointer Options
Use these shortcuts to enable the use of a pen or pointer during your presentation:
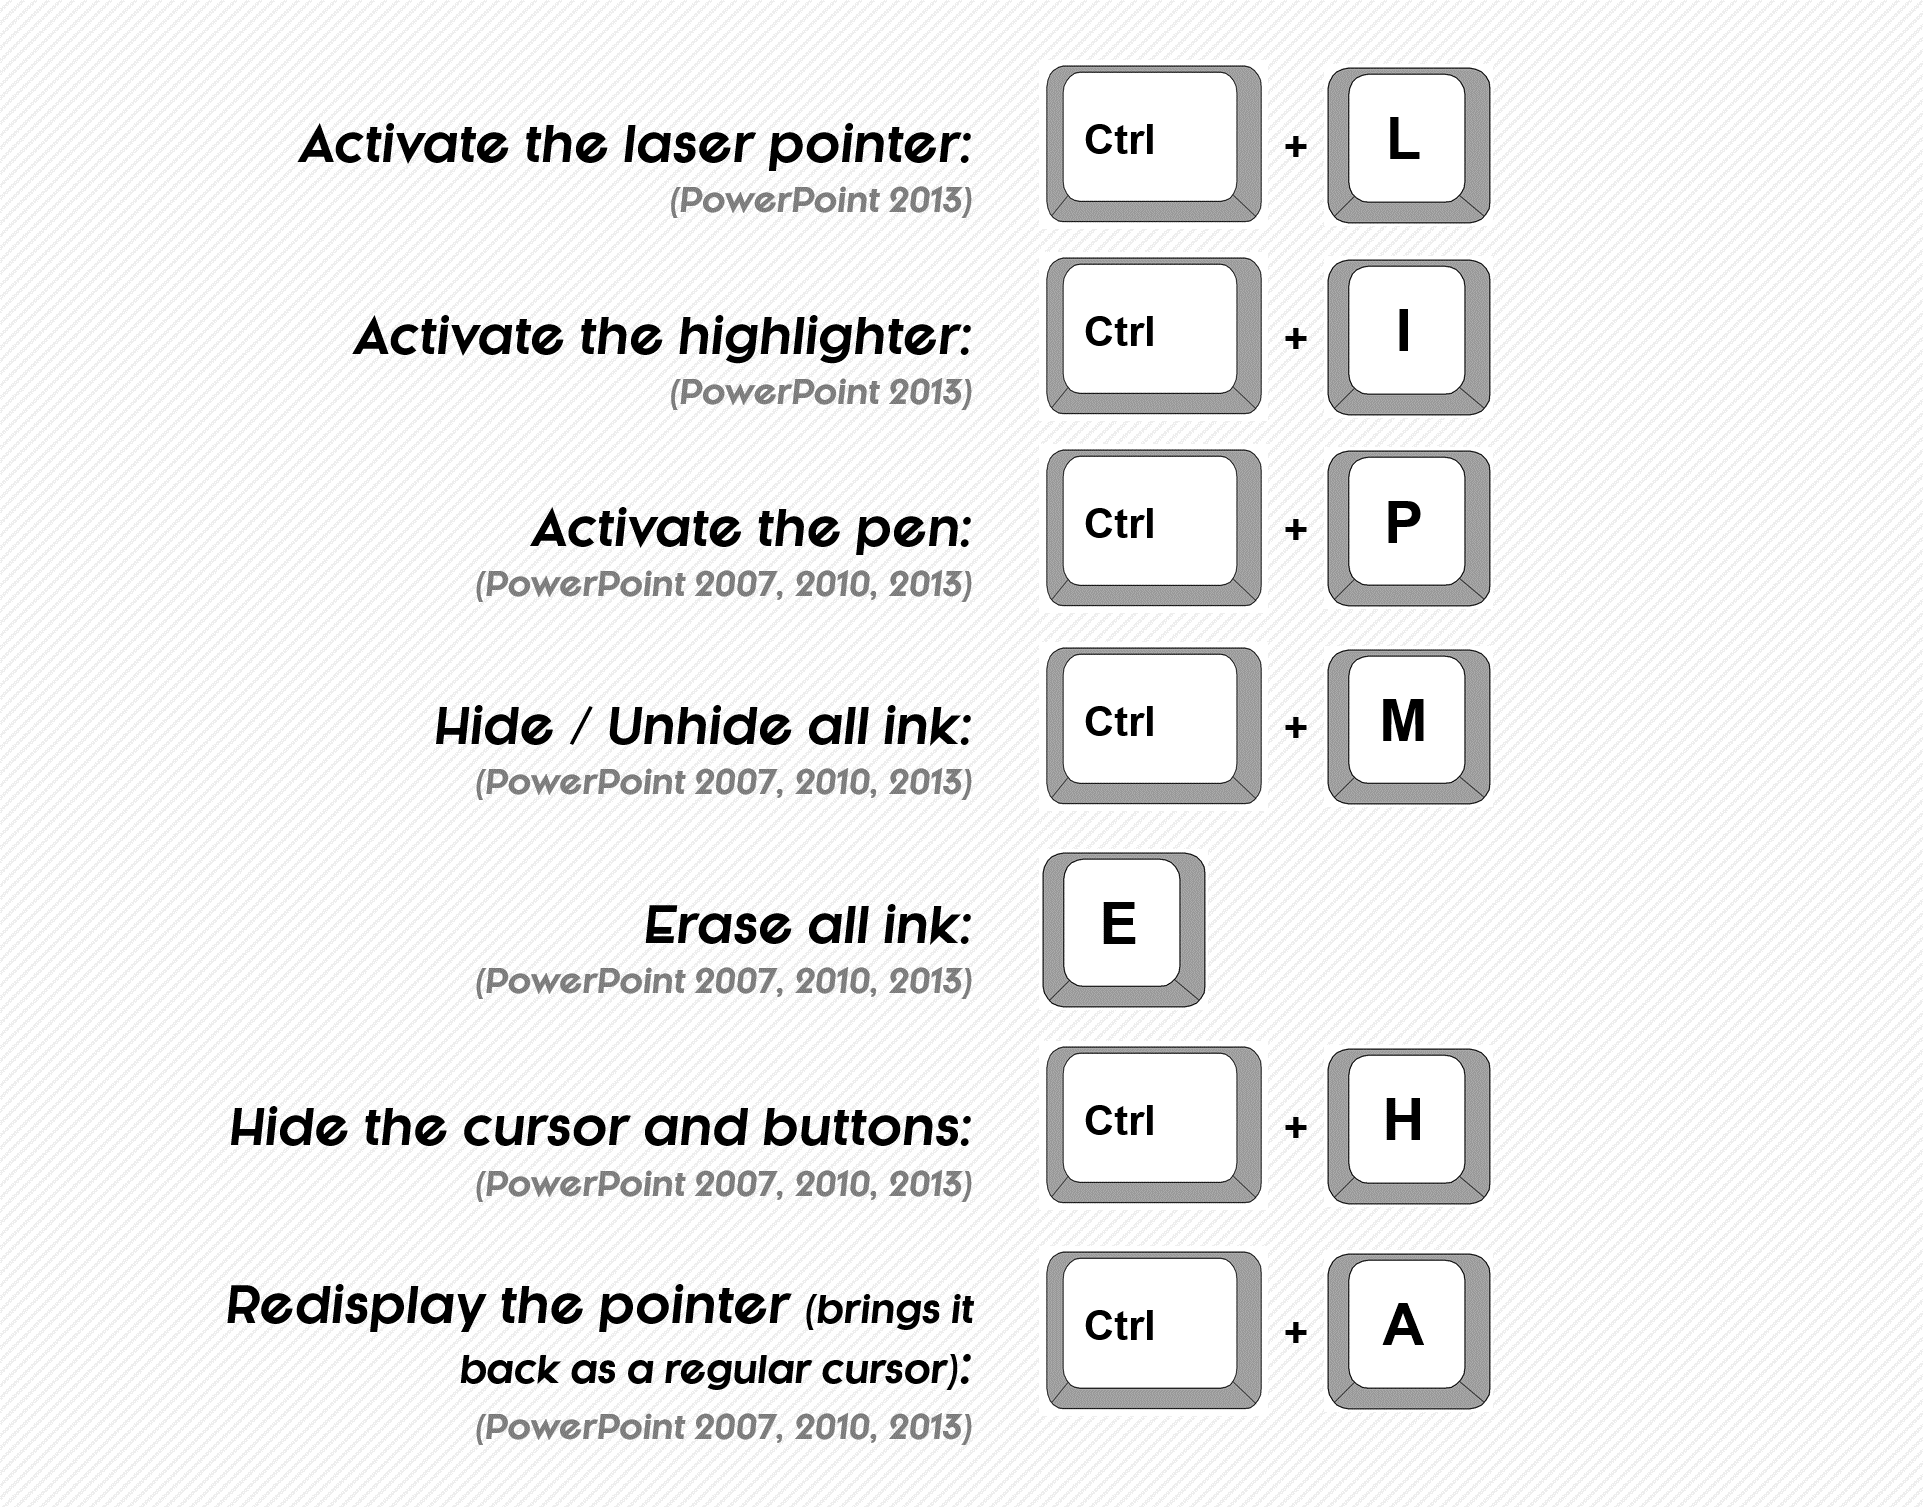
- To enable Pen , press CTRL + P
- To enable Laser , press CTRL + L
- To enable Arrow , press CTRL + A
- To enable Highlighter , press CTRL + I
- To erase notes made with pen or highlighter, press CTRL + E
- To hide pointer , press CTRL + H
Keyboard shortcuts for media files
These shortcuts allow you to control media files you have on your deck:
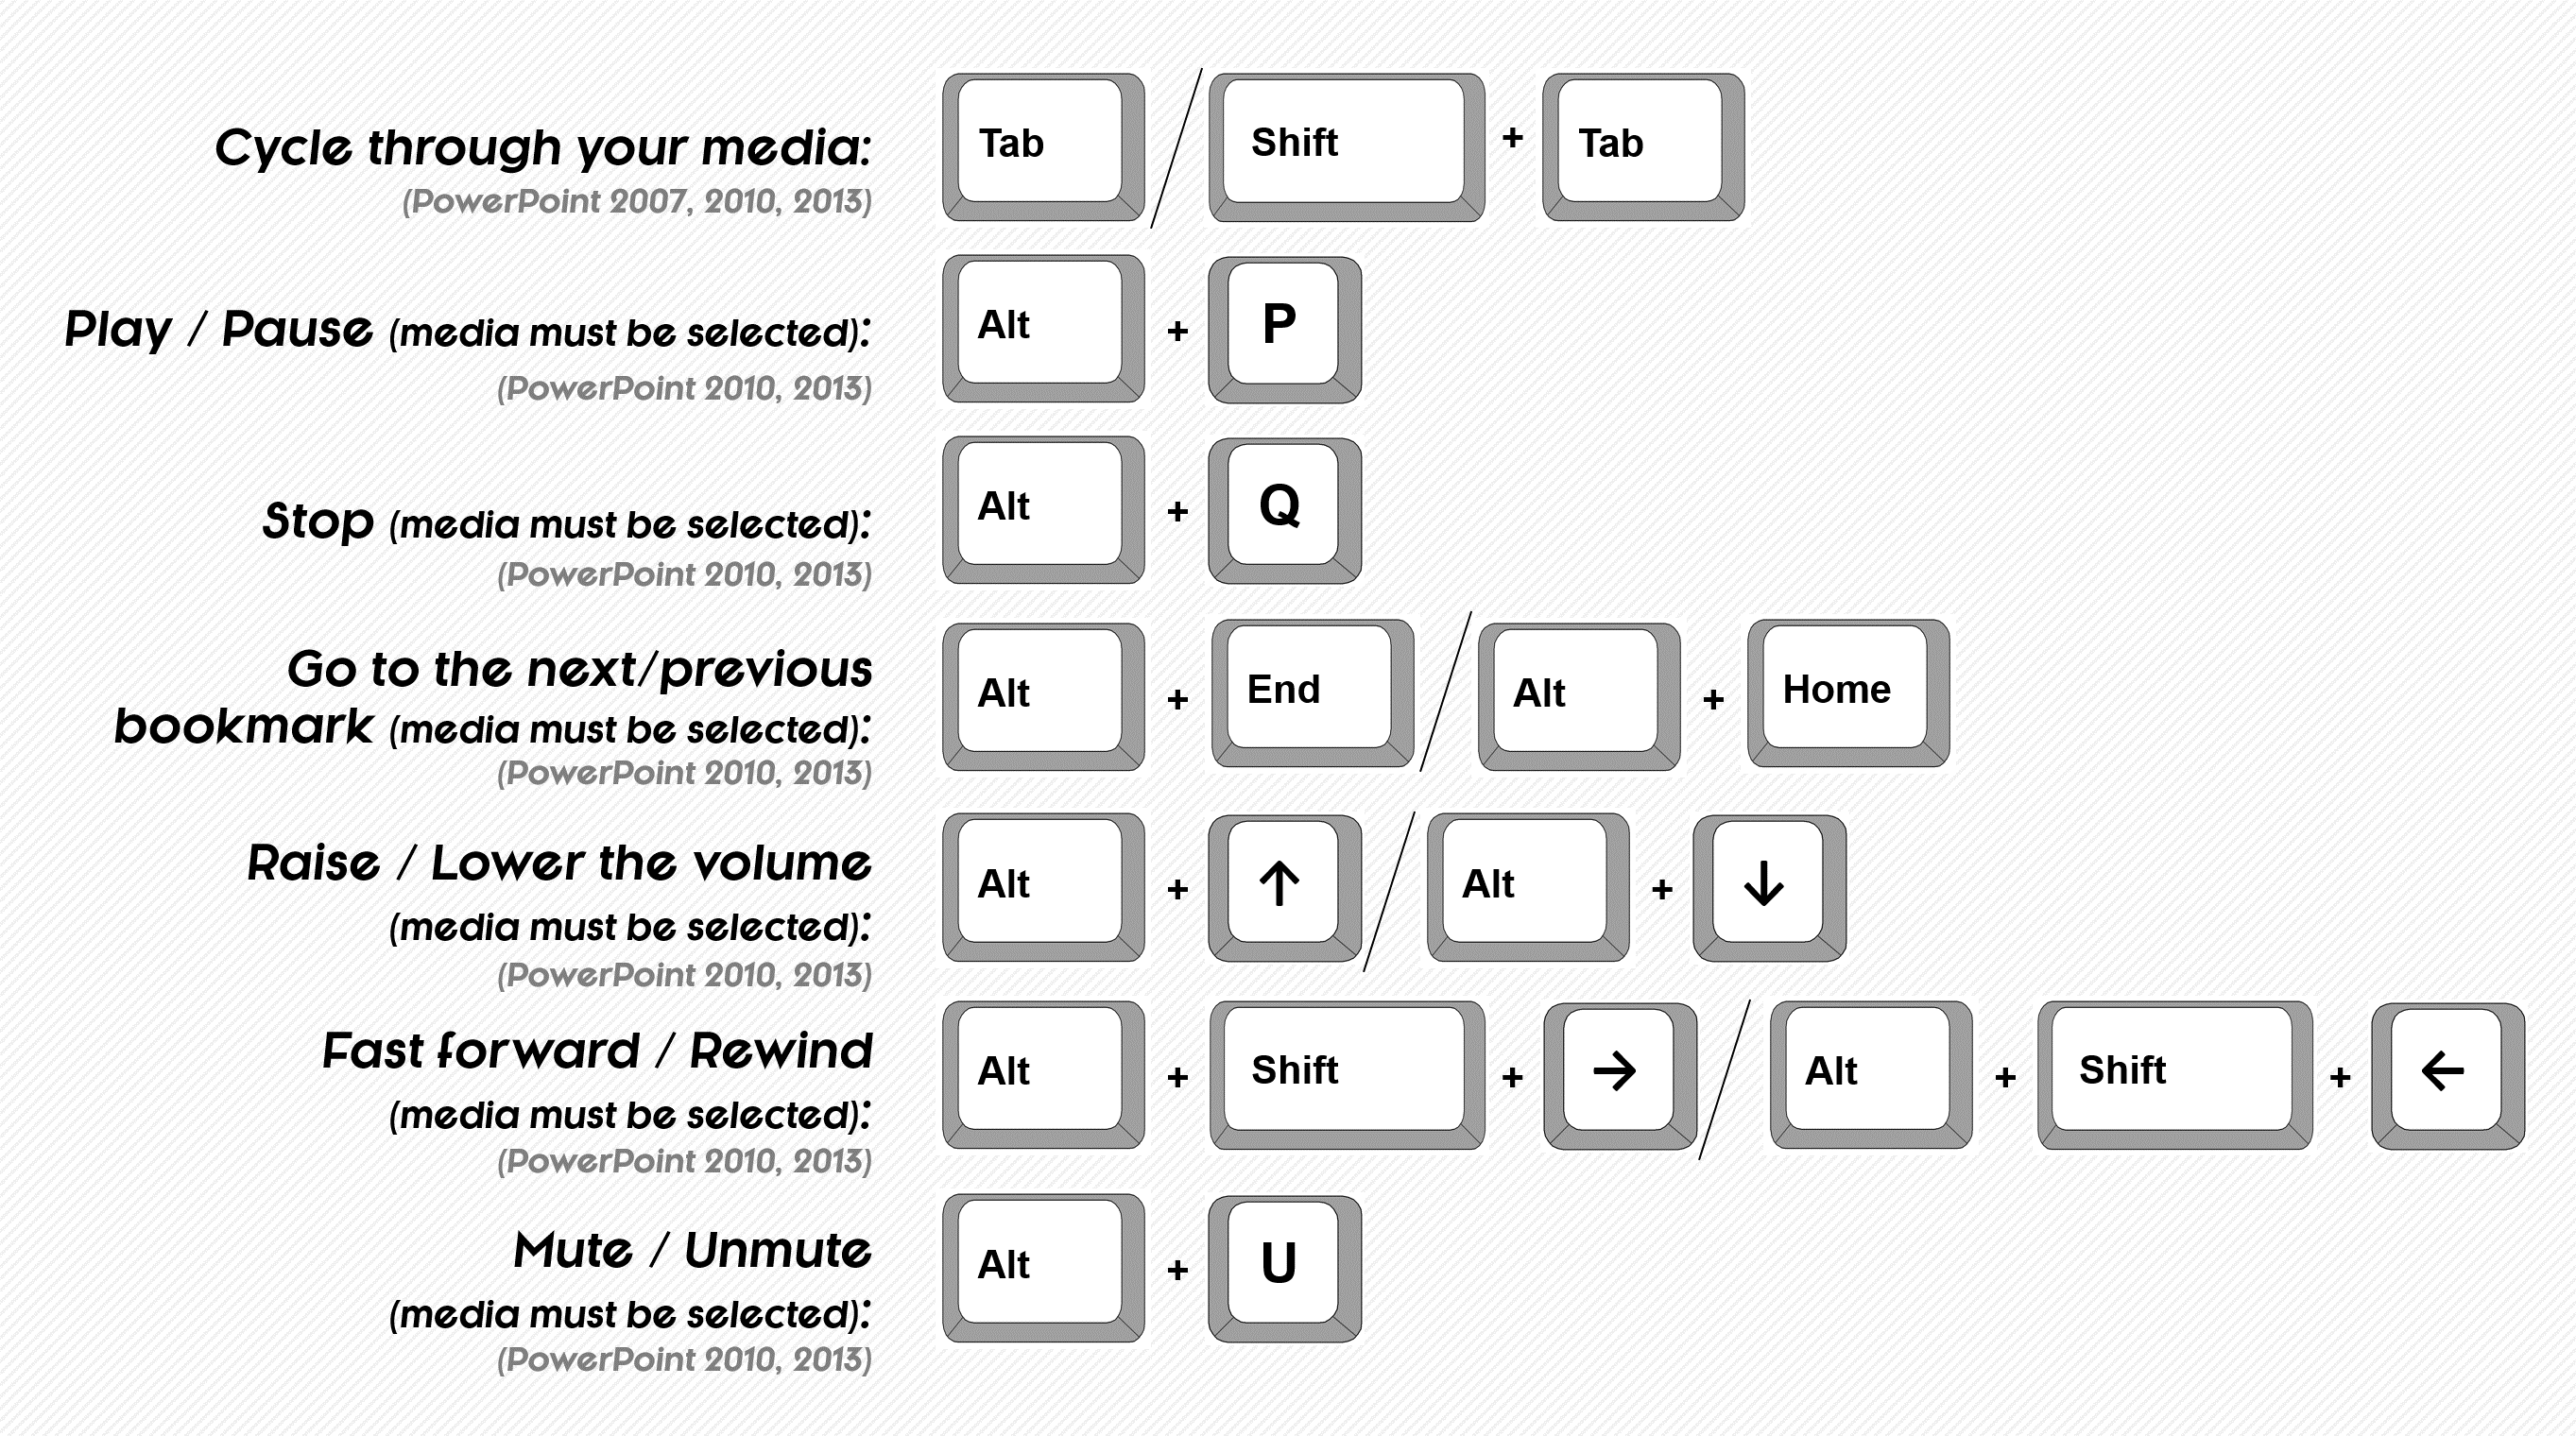
- To play or pause a file, press ALT + P
- To stop , press ALT + Q
- To increase volume , press ALT + Up Arrow
- To decrease volume , press ALT + Down Arrow
- To fast-forward , press ALT + SHIFT + Right Arrow
- To rewind , press ALT + SHIFT + Left Arrow
- To enable or disable mute , press ALT + U
Use these PowerPoint keyboard shortcuts to deliver your presentations with ease. Learn more PowerPoint tips to make your presentation experience easier by reading our previous blog entries.
Read More: The Best Keyboard Shortcuts to Master PowerPoint [Guiding Tech]
Featured Image: John Ward via Flickr
Popular Posts

Common Challenges in Tailoring Presentations—and Solutions

Dos and Don’ts of Pre-Seed Pitch Deck Creation

How to Write a Teaser Pitch Deck that Captivates

Tips for a Persuasive How It Works Slide

What Not to Do When Presenting Funding History

Why Raising Funds Without a Pitch Deck Can Backfire
Microsoft PowerPoint: Easy Navigation with Hyperlinks

How can you make your PowerPoint presentations more interactive and easier to navigate?
Adding hyperlinks to a PowerPoint presentation is an easy way to simplify navigation or to provide additional resources. For example, hyperlinks on an agenda slide are a fast way for a presenter or viewer to move to another slide or presentation. Or a hyperlink could direct the viewer to supporting documents or websites.
To work with hyperlinks in PowerPoint, follow the steps below or watch my video:
Creating a more interactive presentation with hyperlinks is especially useful if the presentation is delivered by different presenters or shared as a self-service resource. Another easy navigation option is an action button which creates a visual object to link to another slide, presentation, or resource. Find out more in my blog post on action buttons (includes a video) .
Inserting a Hyperlink in a Slide
When you click it, a hyperlink or link in PowerPoint lets you move to or display another location, slide, document, or Web page.

To insert a hyperlink:
- Select a title, text entry, or even a graphic on a slide that describes the goal or purpose of the link.
- Pick Insert > Link or press [Ctrl] + K .
- The Insert Hyperlink dialog box appears.
- Choose the kind of link to insert. Options include: Existing File or Web Page: Navigate to the location and file you want to link to in the presentation or add the web address in the prompt near the bottom of the dialog box. Place in This Document (another slide): Select the presentation slide you want to link to. E-mail Address: Enter the e-mail address and subject line that will display in a message when the presenter or user selects the hyperlink.
- Pick OK to complete the hyperlink.
- Press [Ctrl] + [F5] to run the slide show from the current slide.
- From the slide show, click the hyperlink to test that it goes to the specified location or result.
Adding more interaction and navigation to your presentations is easy with hyperlinks in PowerPoint.
Find out how to add engagement and interaction by adding action buttons into a presentation .
Was this PowerPoint tip helpful? Discover more PowerPoint techniques and shortcuts at TheSoftwarePro.com/PowerPoint .
© Dawn Bjork, MCT, MOSM, CSP®, The Software Pro® Microsoft Certified Trainer, Productivity Speaker, Certified Speaking Professional

Related Posts
PowerPoint: How to Launch a Presentation Automatically as a Slide Show February 12, 2022
PowerPoint Hide Slide: How to Customize Your Presentations July 6, 2022
Adding Action Buttons to a PowerPoint Presentation 23 Mar at 9:23 pm
Join Our Tips Newsletter
Receive 477+ shortcuts & more!

Free Online Microsoft Training
Free tips and tricks for using Microsoft Office and Windows
How to create links between slides in PowerPoint
- By The Training Lady
- 27 May 2024
- Updated: 30 May 2024
- No Comments

Whenever we create a presentation, we want to captivate our audience and highlight the important information we are delivering. While many users are familiar with the basics of creating slides, many users are not aware that you can create links between slides. This process can elevate your presentation to a whole new level of professionalism and interactivity. This is especially important in presentations which are meant to be browsed at the leisure of the audience (sometimes referred to as a kiosk or interactive presentation), rather than delivered by a presenter with a live audience.
Today we are going to explore the use of links between slides in a Microsoft PowerPoint presentation, and provide step-by-step instructions to help you utilise this feature.
Why include Links Between Slides?
- The main reason is enhanced navigation. Including links between slides allows for seamless navigation throughout your presentation. Instead of users starting at slide 1 and working their way through in order, they will be able to jump to specific sections or topics which enhances the flow and organisation of your content.
- Links provide strategic interactivity, engaging your audience on a deeper level. By directing viewers to relevant slides based on their interests or questions, you can create a more personalised and engaging experience.
- The use of link allows you to distribute content across multiple slides and link them together for easy access. This is especially useful for presentations which contain a large amount of information.
Create links between slides
Now that you understand some of the reasons why you might include links in a presentation, let’s get to the important part of how we add links.
- Open Microsoft PowerPoint .
- Open the presentation you would like to add links to, or create a simple opening slide such as below:

- If you are creating a sample file, add 3 x additional slides to add a heading.

- For more in-depth presentations, ensure that your slides are organised in a logical sequence before adding links between them.
- Return to Slide 1, or the slide where you want to insert the link. This could be a title slide, agenda slide, or any other slide where you want to begin navigation.
- Insert an object (such as a text box, image or shape) that you want to use as a link. This could be a word, phrase, or icon that prompts the viewer to navigate to another slide. Create one for each link you plan to create.
I have inserted shapes for my links and have added text to them by right-mouse clicking each shape and choosing Edit Text from the menu. I have also chosen a different Fill Color for each from the Shape Format tab on the Ribbon.

- Click to select text or object, then select the Insert tab from the ribbon.
- Click the Link button, or you can press Ctrl + K on your keyboard.
- The Insert Hyperlink dialog box will appear:

- Select the Place in This Document option on the left-hand side.
- A list of available slides in your presentation will appear.
- Click on the slide you want to link to, then press OK to confirm your selection.
Preview the Slide Show
Now that you have added a link, you will want to test the link to make sure it works as expected.
- Select the Slide Show tab from the Ribbon.
- Choose to run the slideshow From Beginning or From Current Slide . Alternatively you can press F5 on the keyboard to run the slide show from beginning.
- Click and test the links work correctly.
- Press Esc to exit Slide Show mode.
- Continue adding links between slides as necessary.
Create a link back to the start
When adding links to a presentation, you may want to consider if you need/want users to be able to navigate back to the slide they came from. In my example, Slide 1 has the option of choosing between 3 links. But once a user has read each individual slide, I want them to come back to Slide 1 and choose another option.
- Select the first slide where you want to provide a link back to Slide 1 or the equivalent.
- Repeat the process and add a shape, or text box to link back, or alternatively, PowerPoint provides a Home button which will automatically link back to Slide 1.
- Click the Insert tab from the Ribbon.
- Choose Shapes from the ribbon and scroll to the bottom of the Shapes gallery to find the Action Buttons .

- Select the button containing the House icon.
- Click on the Slide to insert the action button.
- The Action Settings dialog box will appear:

- By default, the Hyperlink to option is selected and First Slide is selected. Leave as is, or if you want to link to a different slide, use the drop-down menu to change the setting.
- Copy and paste the button to any other slides where you want users to be able to navigate back to Slide 1.
Save your presentation
Now that all links have been added, and tested, ensure you have saved your presentation.
- Select the File tab and choose Save or press Ctrl + S on the keyboard.
- If you have not saved the presentation before, the Save as dialog will appear.
- Choose a location to save your presentation.
- Enter a File name .
- Click Save .
Other Examples
Another great example of using links between slides is my Concentration Game and my Choose your own adventure game in PowerPoint.
I hope you have enjoyed learning about the use of links within a PowerPoint presentation, comment below with any questions.
- Microsoft PowerPoint
Leave a Reply Cancel reply
Your email address will not be published. Required fields are marked *
Please enter an answer in digits: twenty + thirteen =
This site uses Akismet to reduce spam. Learn how your comment data is processed .
Recent Posts

- Microsoft Excel (38)
- Microsoft Forms (9)
- Microsoft OneNote (10)
- Microsoft Outlook (34)
- Microsoft PowerPoint (32)
- Microsoft Sway (9)
- Microsoft Teams (10)
- Microsoft Windows (23)
- Microsoft Word (31)
Critical PowerPoint Shortcuts – Claim Your FREE Training Module and Get Your Time Back!
120 PowerPoint Shortcuts: Learn More, Be Faster, Save Time
- PowerPoint Tutorials
- Shortcuts & Hacks
- December 12, 2017

In this article you’re going to learn all of the Microsoft PowerPoint shortcuts that are available to you.
And this is important, because based on our experience, the PPT average only knows between 10 to 30 PowerPoint shortcuts.
This shortcut guide covers over 120 shortcuts in PowerPoint that will dramatically improve your productivity!
This guide is NOT designed to be consumed in one sitting…this is not a cram session for some pretend PowerPoint exam… and we are not handing out gold stars here.
Instead, pick a PowerPoint activity you frequently perform, learn its shortcuts and save time… And once you have one activity’s shortcuts down, come back and pick up another one.
Use this Microsoft PowerPoint shortcut guide, learn how to REALLY use it and shine!
See you at Happy Hour!
If you’re using PowerPoint for work, then learning shortcuts (including some hidden and bad ass ones), is a must!
Looking for a specific shortcut? Check out the complete shortcut index here.
To see a break out a shorter list of our 80 favorite PowerPoint shortcuts, see our guide here .
Duplicating slides and objects shortcuts
You are currently viewing a placeholder content from Youtube . To access the actual content, click the button below. Please note that doing so will share data with third-party providers.

Header, footer, and date & time shortcuts

Inserting a new slide shortcuts

New slide shortcuts – PowerPoint pro tips
Inserting and navigating hyperlink shortcuts.
How to Create a Hyperlink in PowerPoint
Chart formatting and moving shortcuts, formatting a specific chart element, copying and pasting formatting and animations, copy paste formatting: a little-known but awesome shortcut.
An almost unknown set of PowerPoint shortcut keys, what I call the “Format Dipper”, allows you to pick up or copy (CTRL + SHIFT + C) an object’s formatting (font style, shape fill, outline, etc.) and quickly apply it to another shape (CTRL + SHIFT + V).
This hotkey has been around FOREVER….and sadly, almost no one is using it.
This is similar to copying (CTRL + C) and pasting objects (CTRL + V) in PowerPoint except it includes the SHIFT key.
Tweak this shortcut just slightly (so ALT + SHIFT + C) and you can copy a sequence of PowerPoint animations too! Hitting this shortcut activates the animation painter, which allows you to then apply your sequence of animations to other objects in PowerPoint.
This two shortcuts will save you HOURS of otherwise annoying and repetitive rework. These are critical for anyone who wants to save time in PowerPoint.
PowerPoint Pro Tip
When copying an object’s formatting (CTRL + SHIFT + C), the formatting stays with you, regardless of how many actions you perform, until you pick up or copy another object’s formatting.
As such, you can pick up your standard formatting for your entire presentation and carry it with you throughout your work session, applying it whenever needed with CTRL + SHIFT + V.
Cut, copy, clipboard, paste and paste special shortcuts
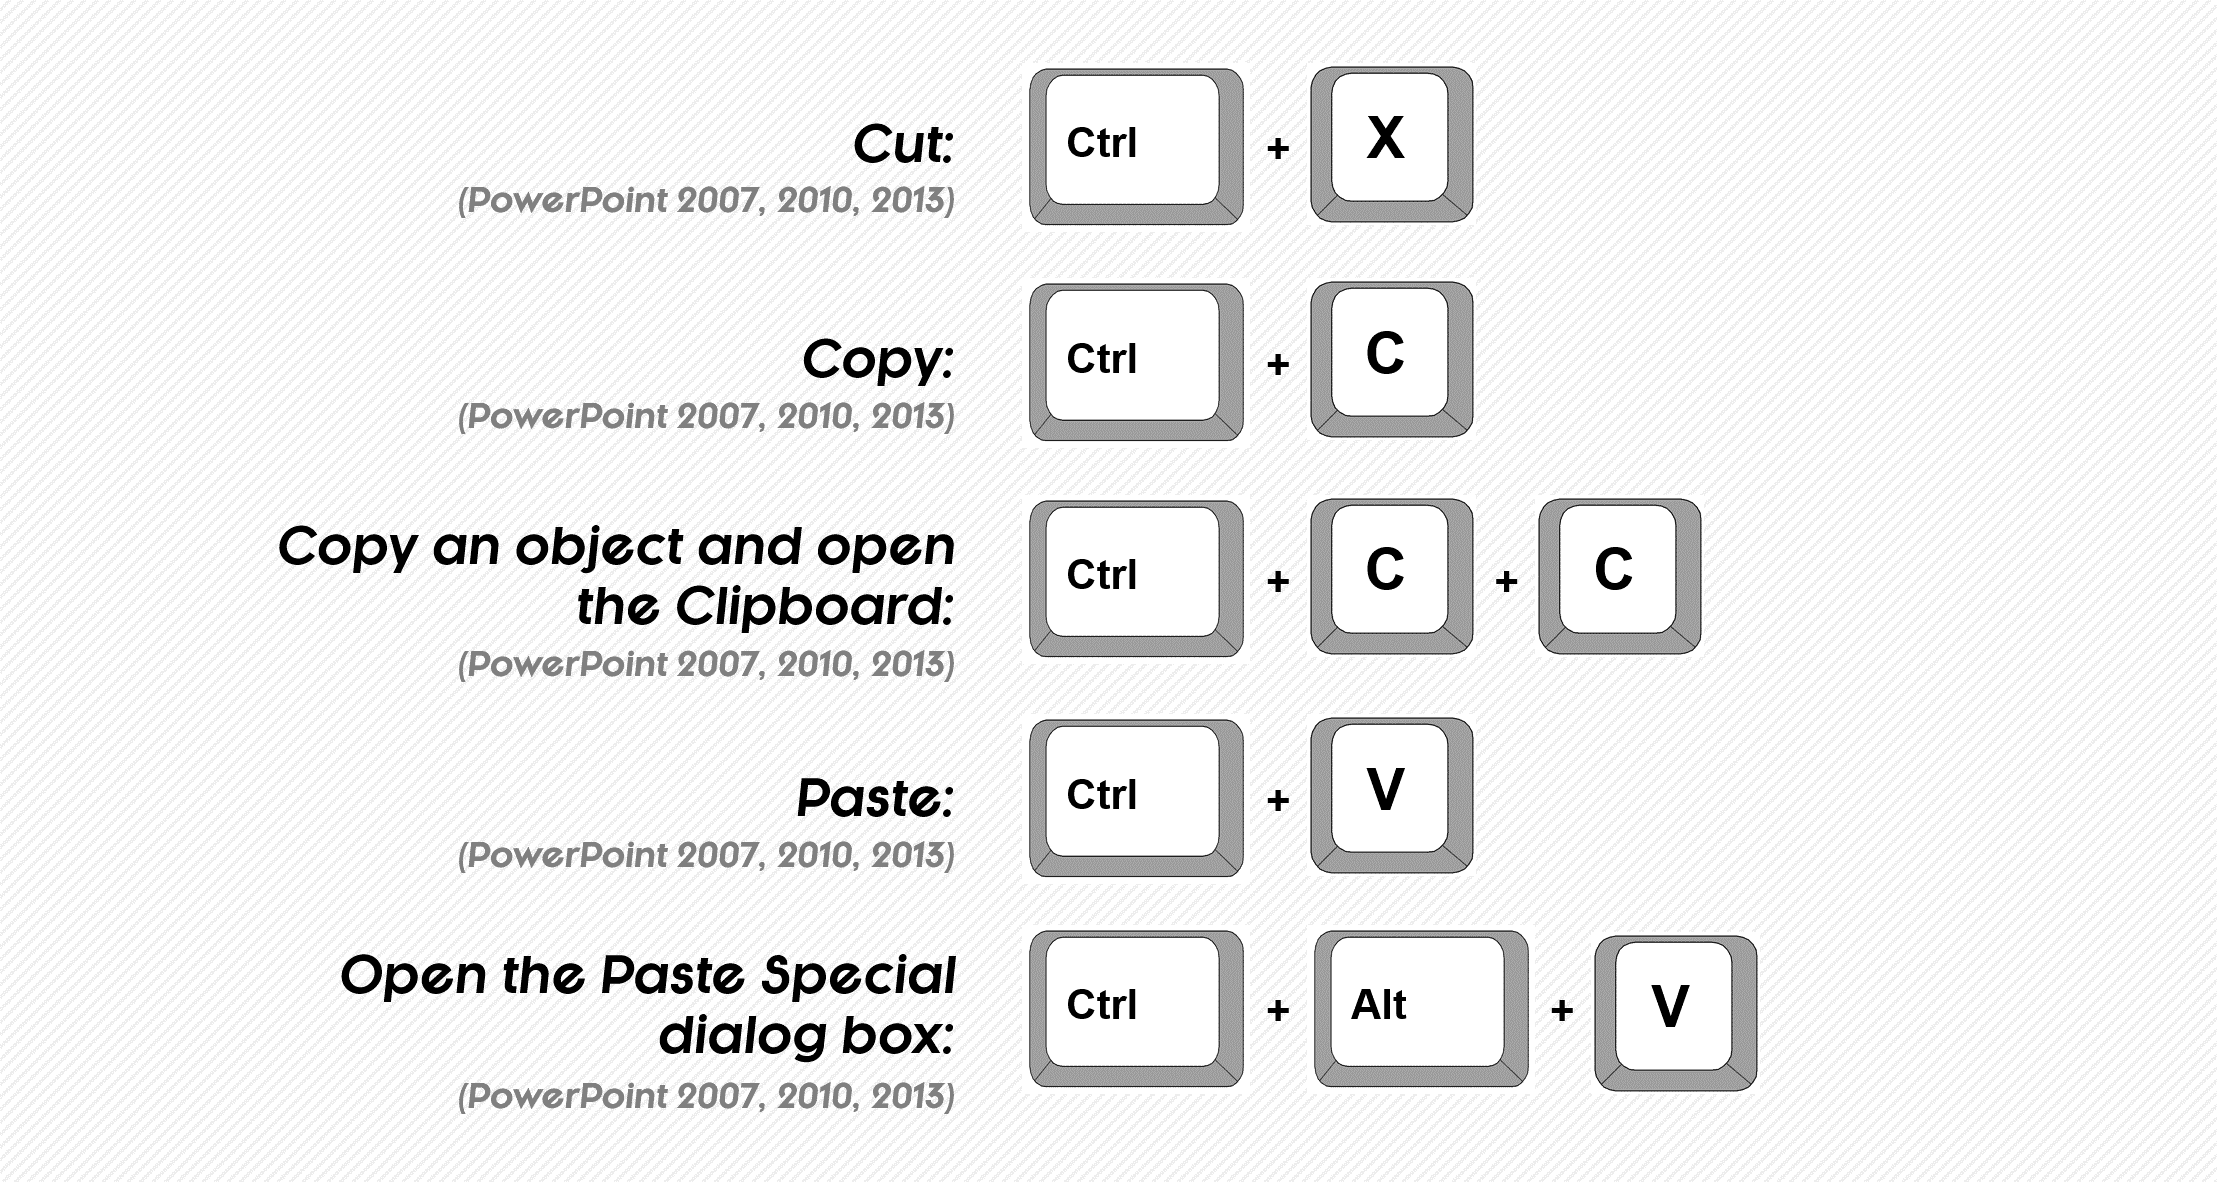
Clipboard Copy Shortcut
- From the Home tab, click the downward facing arrow in the Clipboard group, which opens up the clipboard.
- At the bottom of the clipboard, click on Options
- Make sure that the ‘Show Office Clipboard when Ctrl+C is pressed twice’ is selected.
Paste Special PowerPoint Shortcut
Grouping and ungrouping shortcuts.
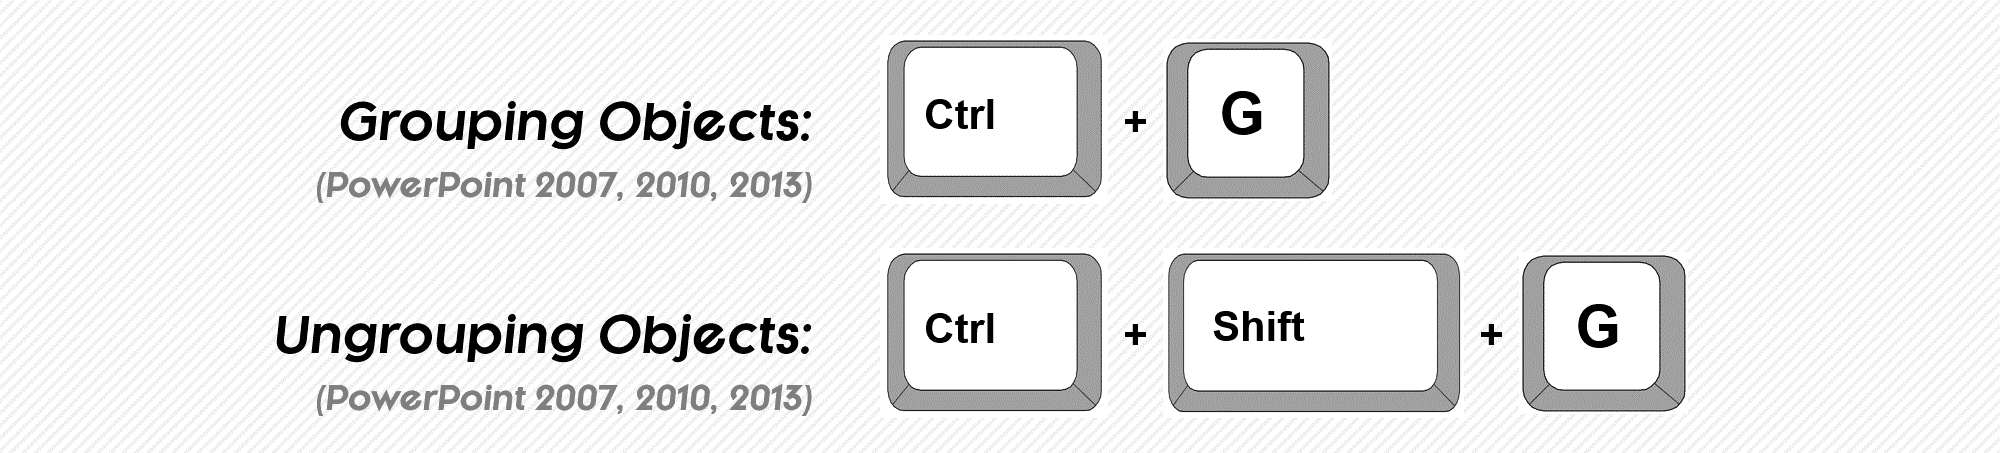
How to Group Things in PowerPoint
CTRL + G is the keyboard shortcut for how to group things in PowerPoint, and it works in all versions of PowerPoint. This is a CRITICAL shortcut to learn as it allows you to quickly move and/or resize multiple objects at the same time as a single group, instead of wasting time moving things around piece by piece.
Objects can also be part of more than one group. For example, you can first group two rectangles together (as a box layout) and then take that box layout and group it together with a chart.
To learn more about grouping in PowerPoint, see our guide here .
Not all PowerPoint objects can be part of a group
You can group most PowerPoint objects: charts, tables, pictures, shapes, lines text boxes, etc.
That said, a few PowerPoint objects that CANNOT grouped (or be part of a group) are: #1) tables, #2) any content containers set on your Slide Master (slide titles, page numbers, footers, etc.) and, #3) SmartArt graphics.
How Do You Ungroup in PowerPoint?
The inverse of grouping objects in PowerPoint is ungrouping them, which you can easily accomplish with the CTRL + SHIFT + G shortcut keys.
In addition to ungrouping already grouped objects, you can also:
- Ungroup SmartArt graphics, which breaks the graphic down into shapes, lines and text boxes.
- Ungroup vector graphics, which breaks them down into shapes
- Ungroup tables and charts if you first paste them as Metafiles
Manipulating shapes shortcuts
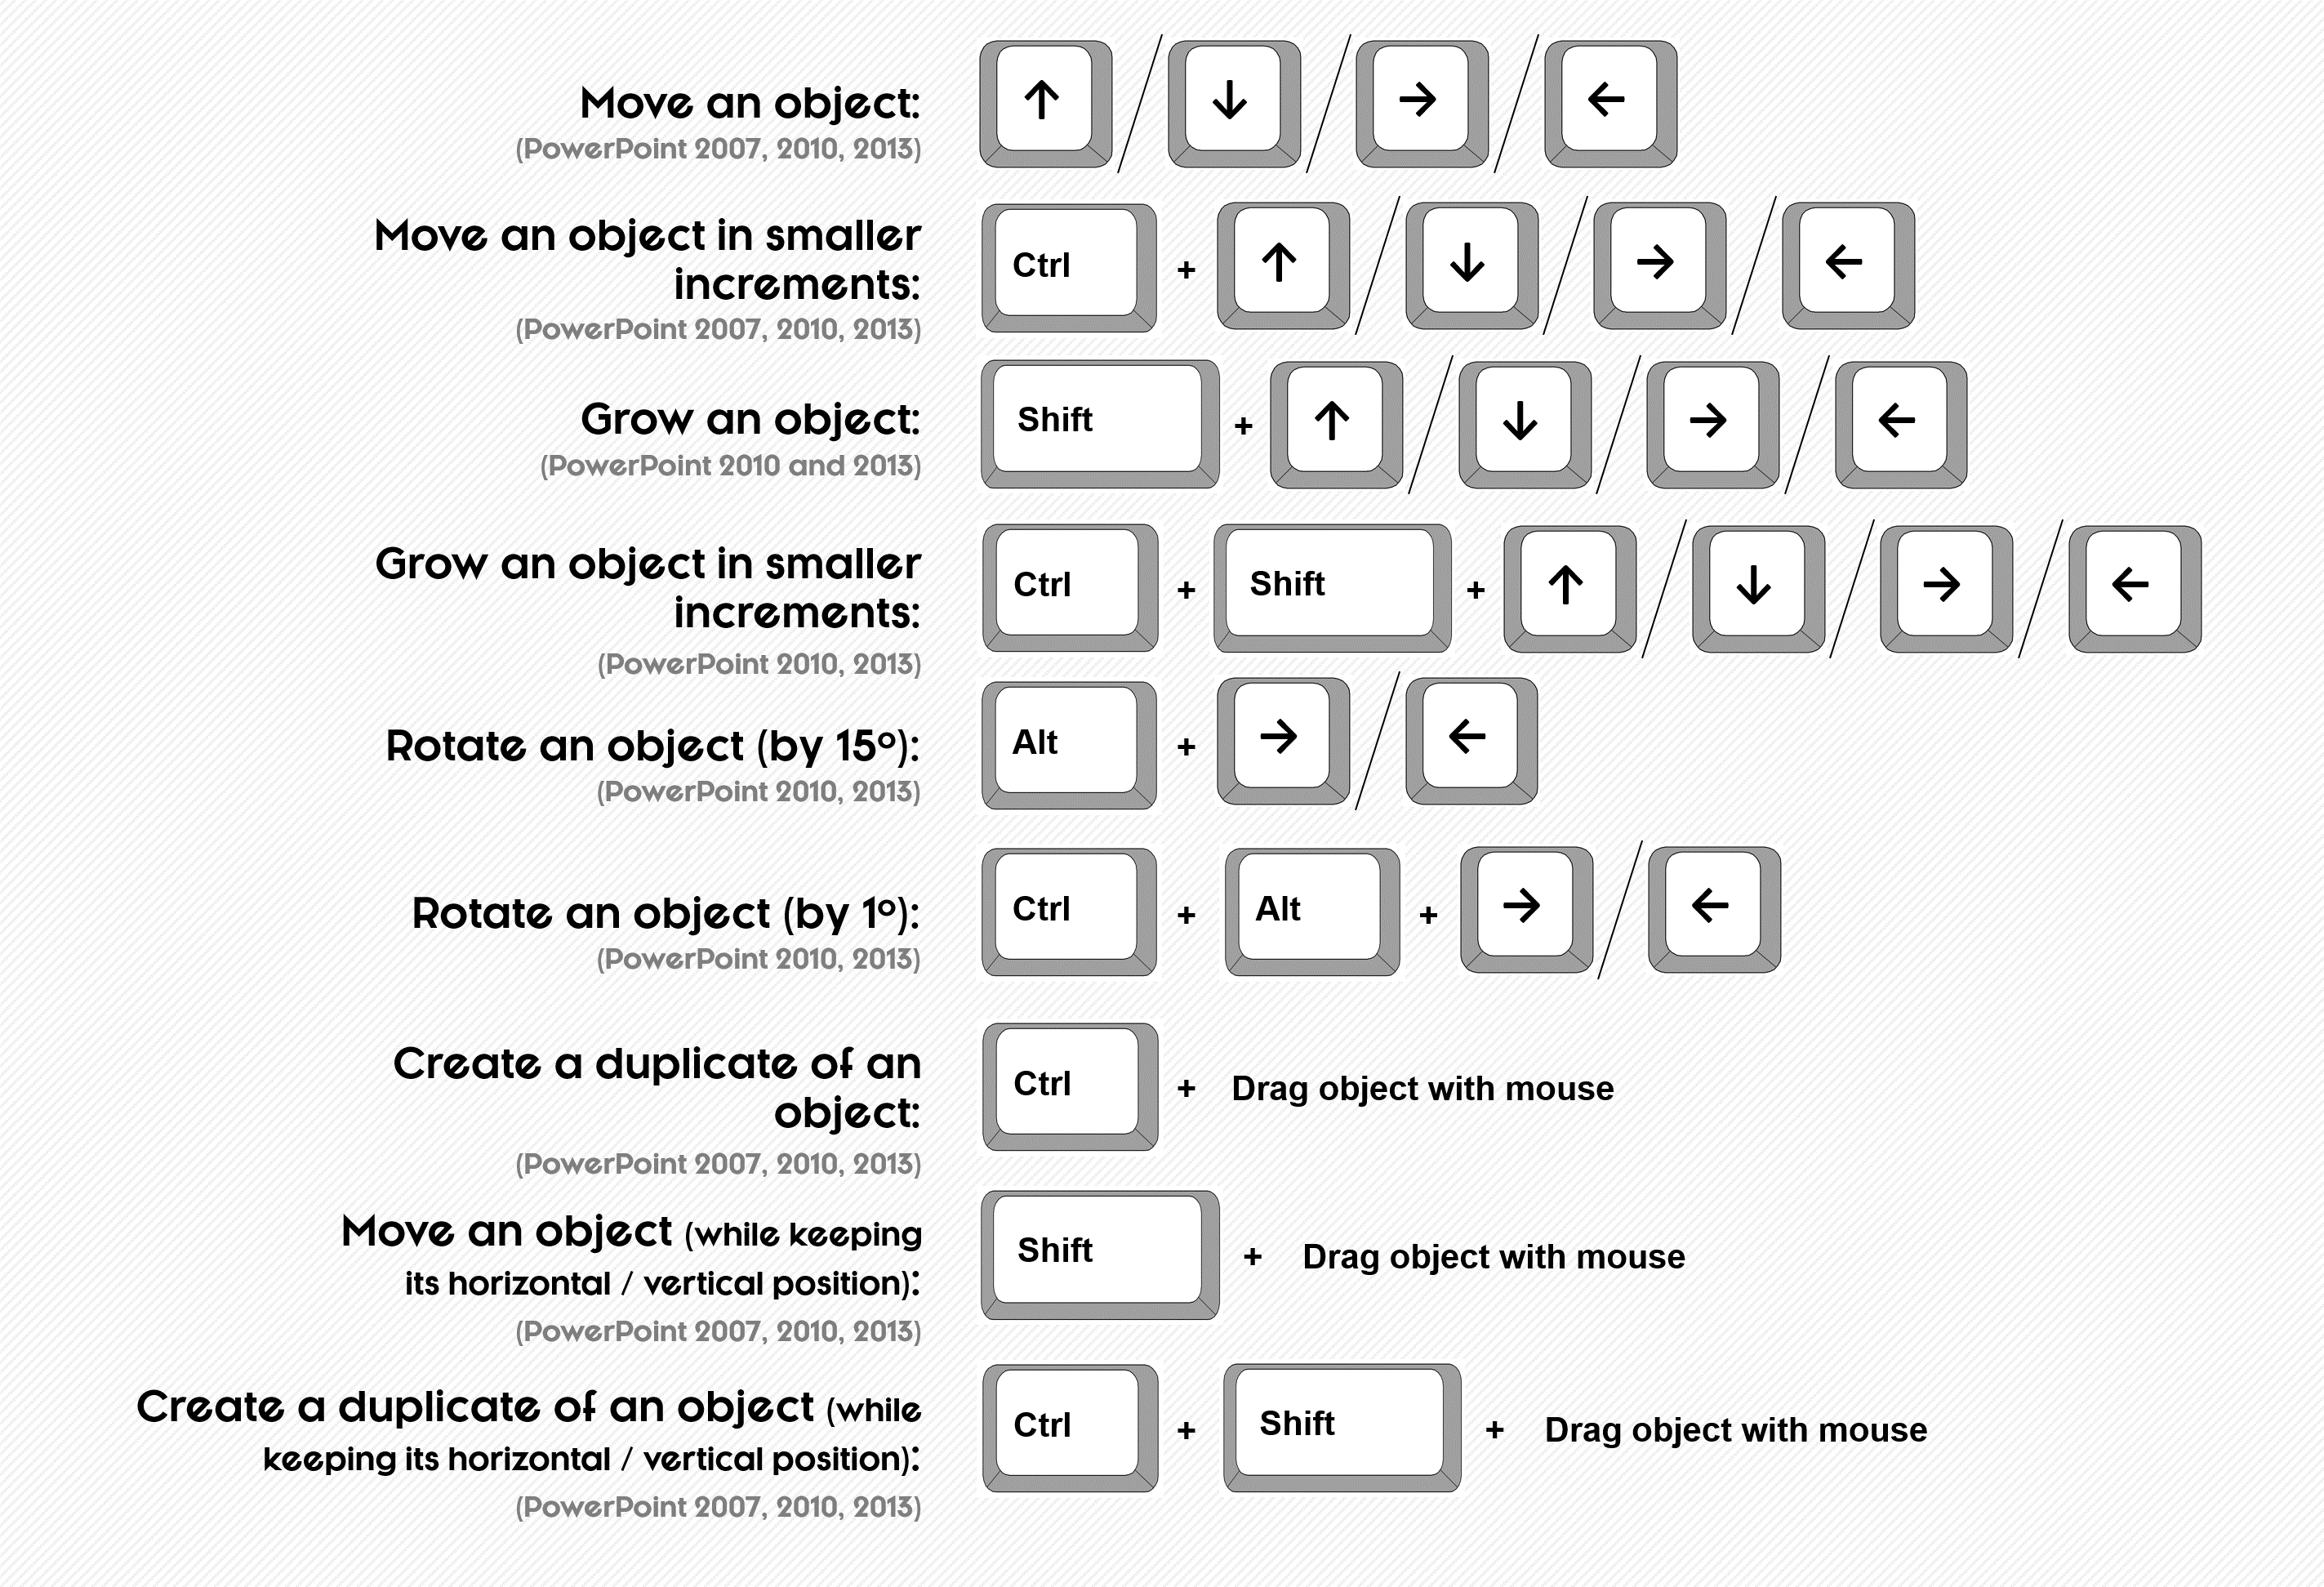
Moving, Growing, Rotating, and Duplicating Shapes in PowerPoint
These shortcuts are incredibly simple, and yet, so powerful. Once you learn them, you will never want to reach for your mouse to manipulate your shapes again!
Selection Pane shortcuts
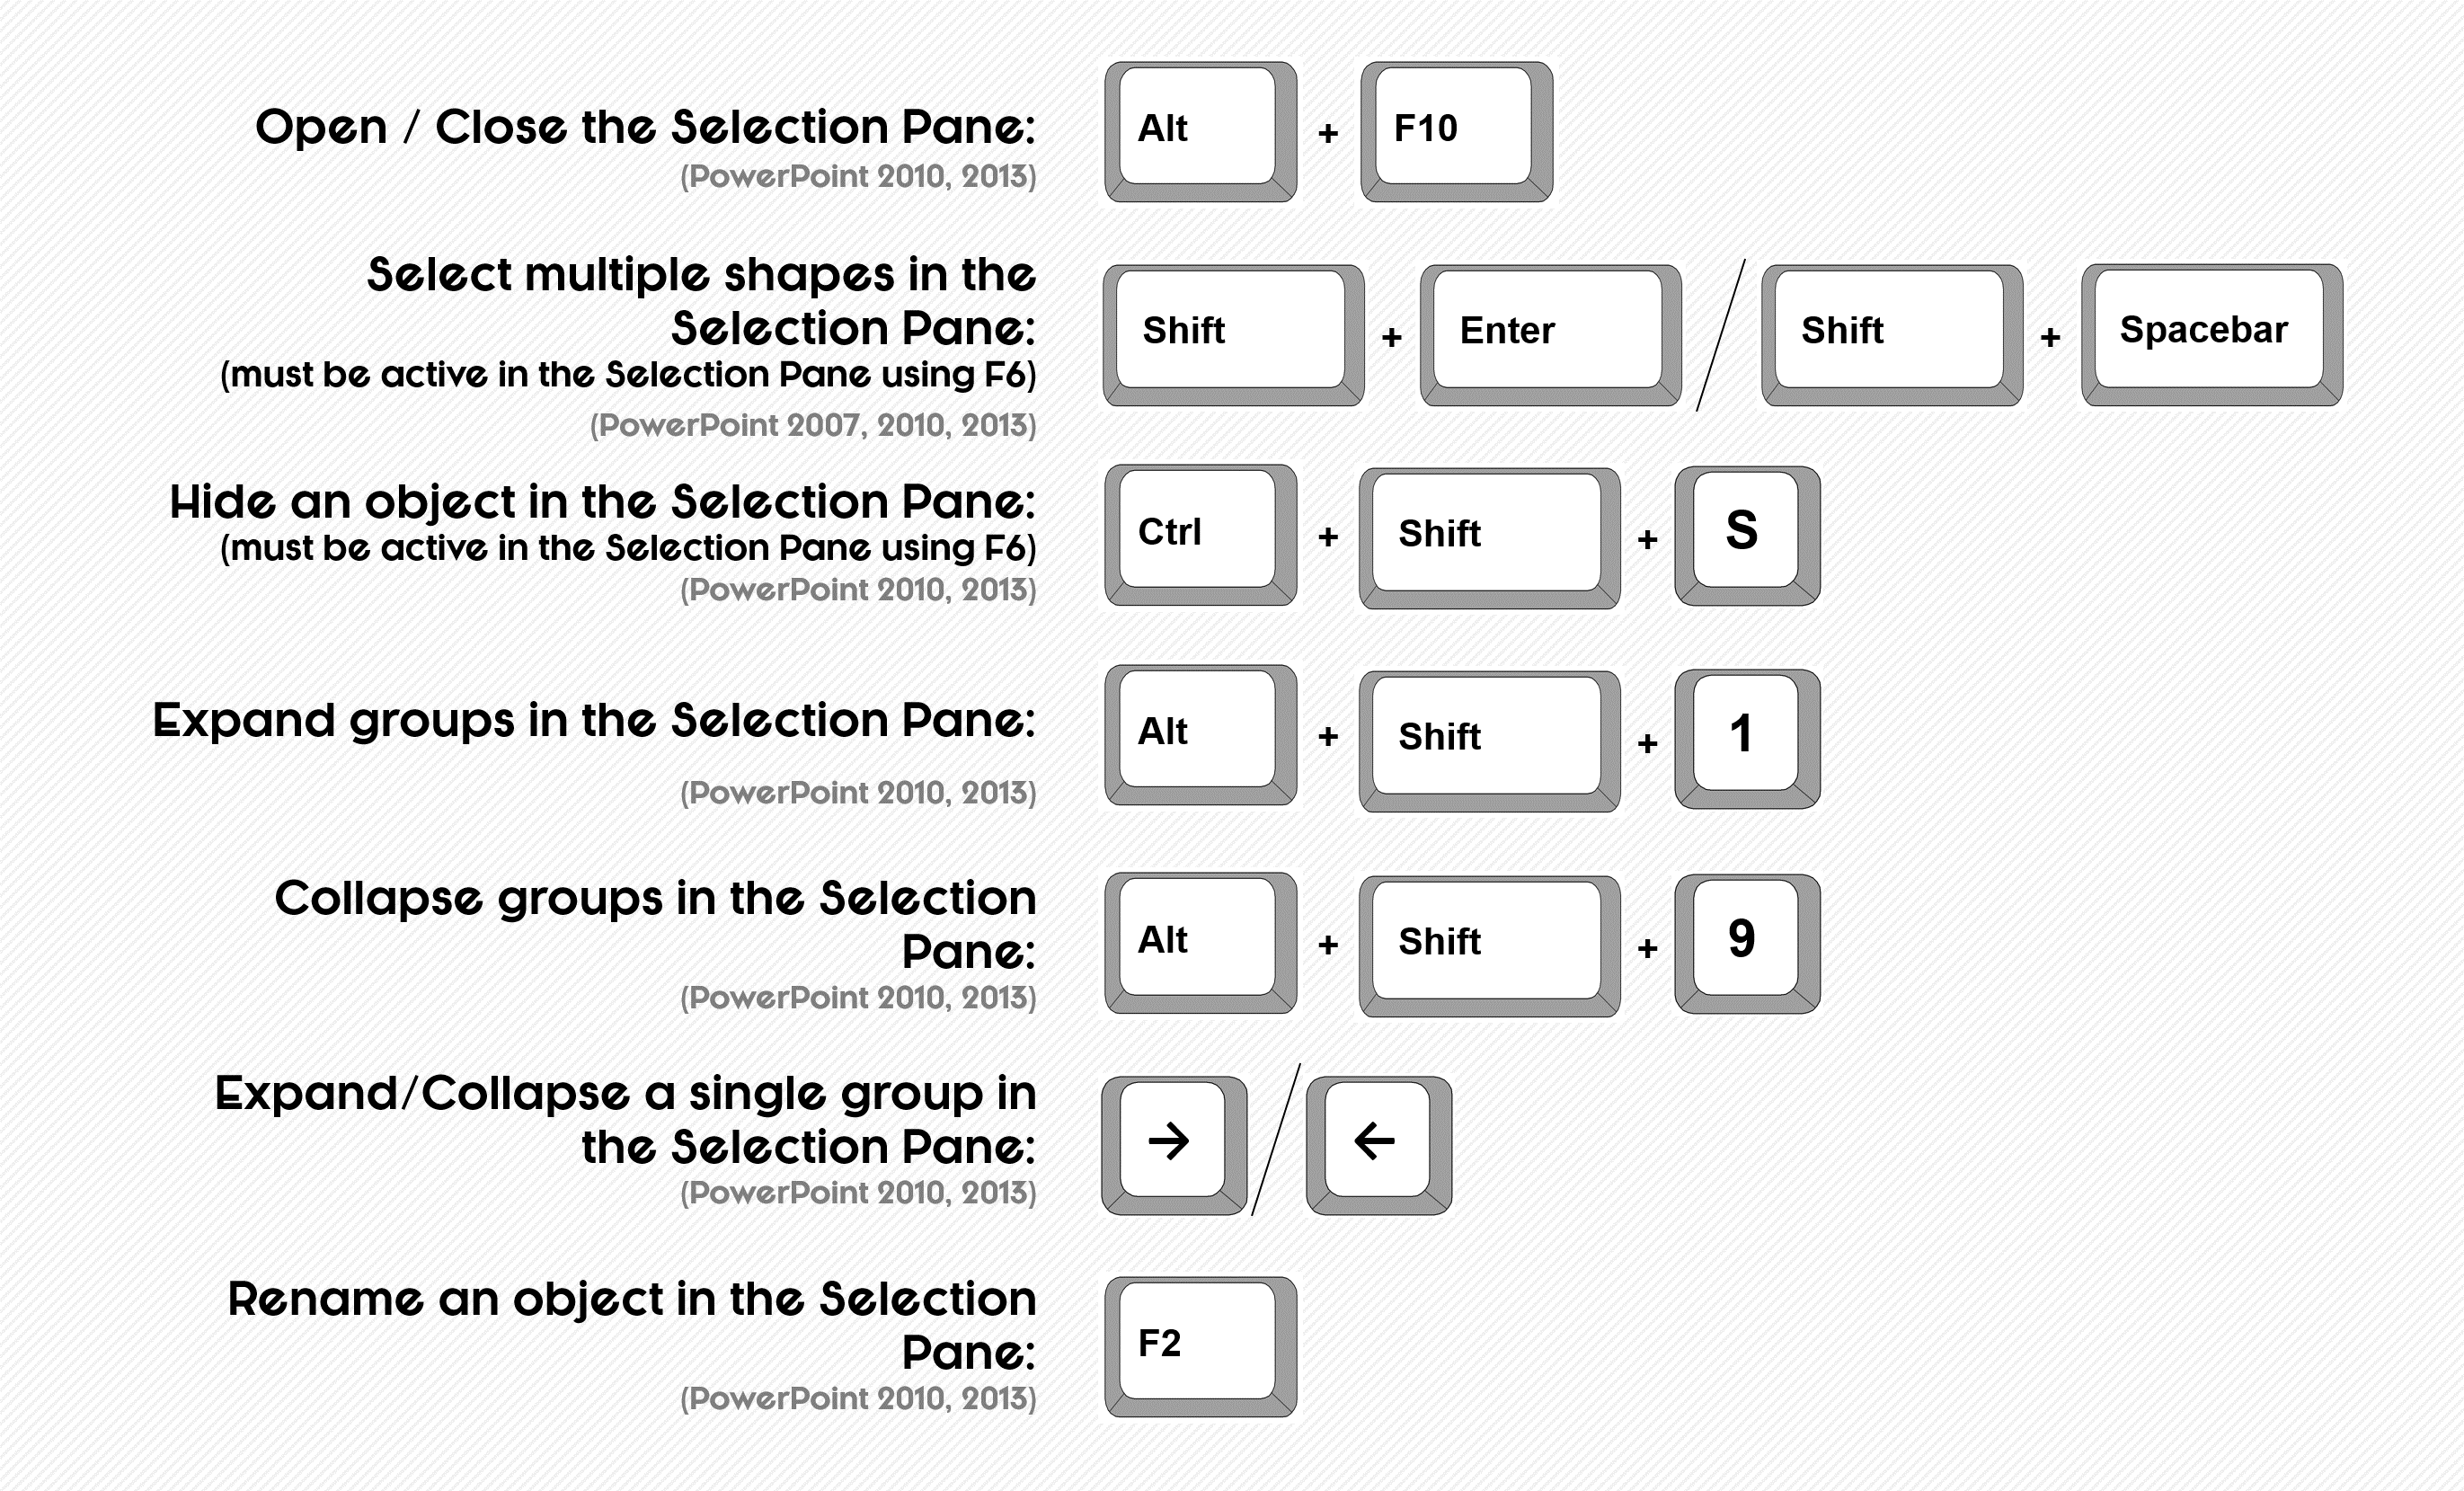
How to use the Selection Pane in PowerPoint
The most useful of the Selection Pane shortcuts in PowerPoint 2010 and 2013 is simply opening and closing it with the ALT + F10 keyboard shortcut. Once the pane is open, you can either navigate ti with your keyboard (for the more advanced keyboard users), or simply use your mouse (which is good enough for most things).
In PowerPoint 2007, the Selection Pane is known as the ‘Selection and Visibility’ pane and must be opened with your mouse (there is no keyboard shortcut for opening and closing it).
To open the pane in PPT 2007, from the Home tab, select the Arrange tool drop down and then select the Selection Pane at the bottom of the dropdown.
Selection Pane Pro Tip
To use ALL of the Selection Pane shortcuts (like collapsing and expanding groups) in PowerPoint 2010 and 2013, you need to get to the Selection Pane by rotating through active panes from your keyboard (using F6)… which is SUPER weird, but that’s how it is.
Let me quickly explain.
Normally, you can click something with your mouse to activate it in PowerPoint. Right? Well this doesn’t work with the a couple of shortcuts for the Selection Pane.
Instead you need to hit F6 on your keyboard to rotate to it… otherwise some of the keyboard shortcuts shown above won’t work.
Subscripts, superscripts, font dialog box, and text formatting shortcuts
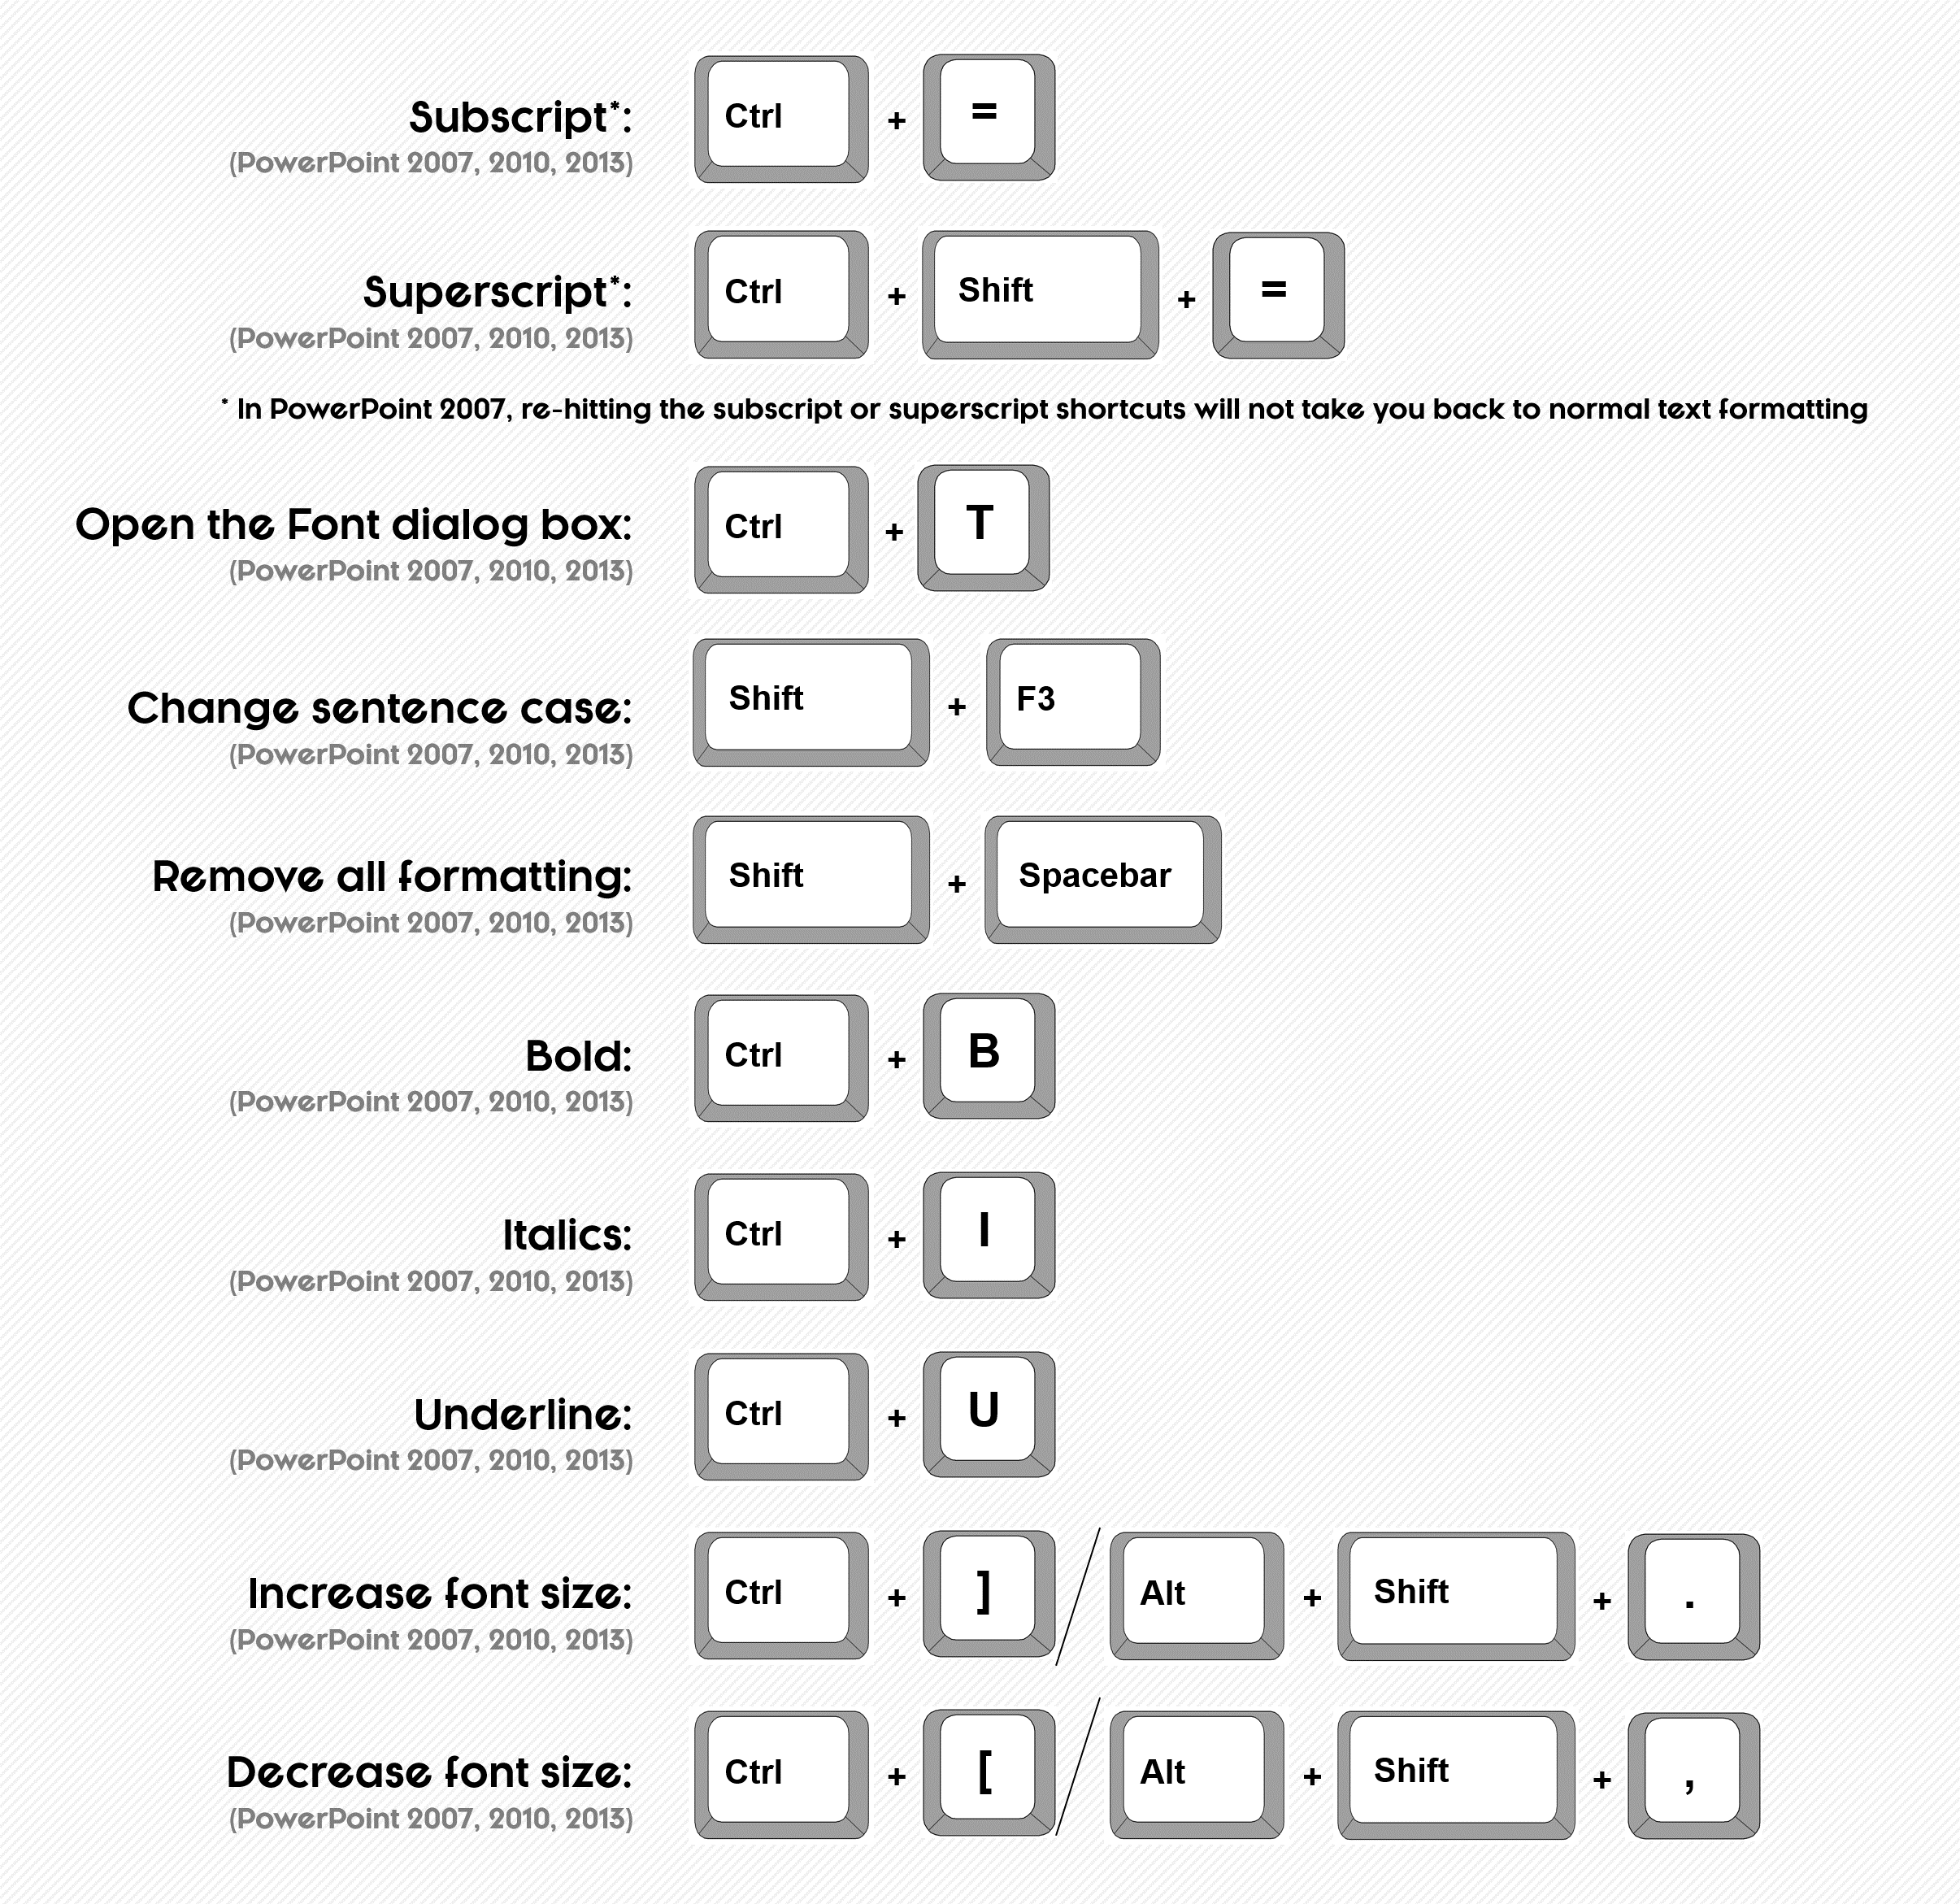
How to create subscripts and superscripts in PowerPoint
In PowerPoint 2010 and 2013, you can turn subscript writing on and off with the CTRL + ‘=’ keyboard shortcut, and superscripts on and off with the CTRL + SHIFT + ‘=’ keyboard shortcut.
These same shortcuts work in PowerPoint 2007 to make superscripts and subscripts, except to turn them back off you need to launch the font dialog box, CTRL + T on your keyboard.
Font dialog box pro tip: The Font dialog box is keyboard driven, so after opening it (CTRL + T) you can continue to navigate your options directly from your keyboard.
Look for the underlined letters in the words within the dialog box, which you can activate by holding the ALT key and hitting those letters on your keyboard.
For example, to select the “strikethrough” command within the dialog box, hit ALT + K.
To learn how to use the strikethrough shortcut click here
Text alignment shortcuts
Aligning text in PowerPoint
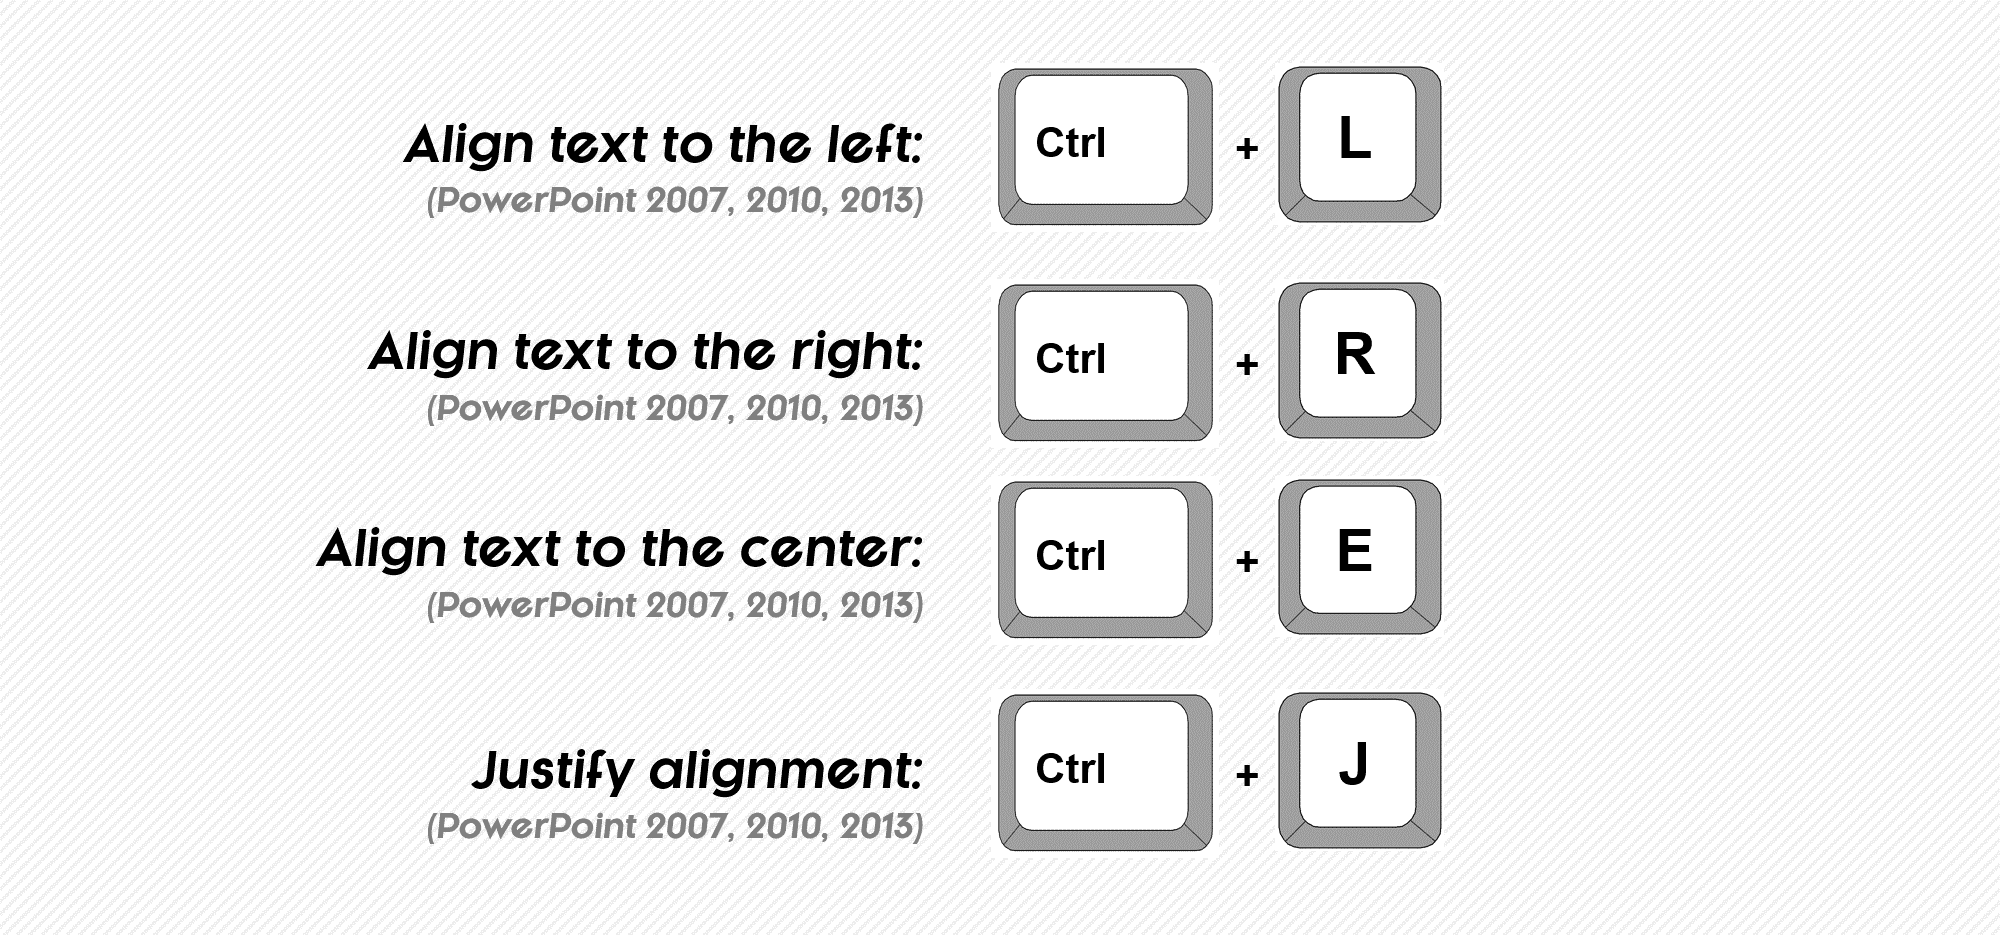
There are four text alignment shortcuts that allow you to quickly change how you lay your text out within your slide’s text boxes or shapes:
Center Align Text (CTRL + E) is often used for titles, and will align your text in the center of its container.
Left Align Text (CTRL + L) is the most common text alignment option, starting your text alignment form the left.
Right Align Text (CTRL + R) aligns your text to the right, which is useful when building your own titles for bar charts, for example.
Justify Align Text (CTRL + J) spreads your text out between the margins you have set. It’s important to note that the last hanging lines in your paragraphs will not be justified, as that would create weird text spacing.
Working with blocks of text
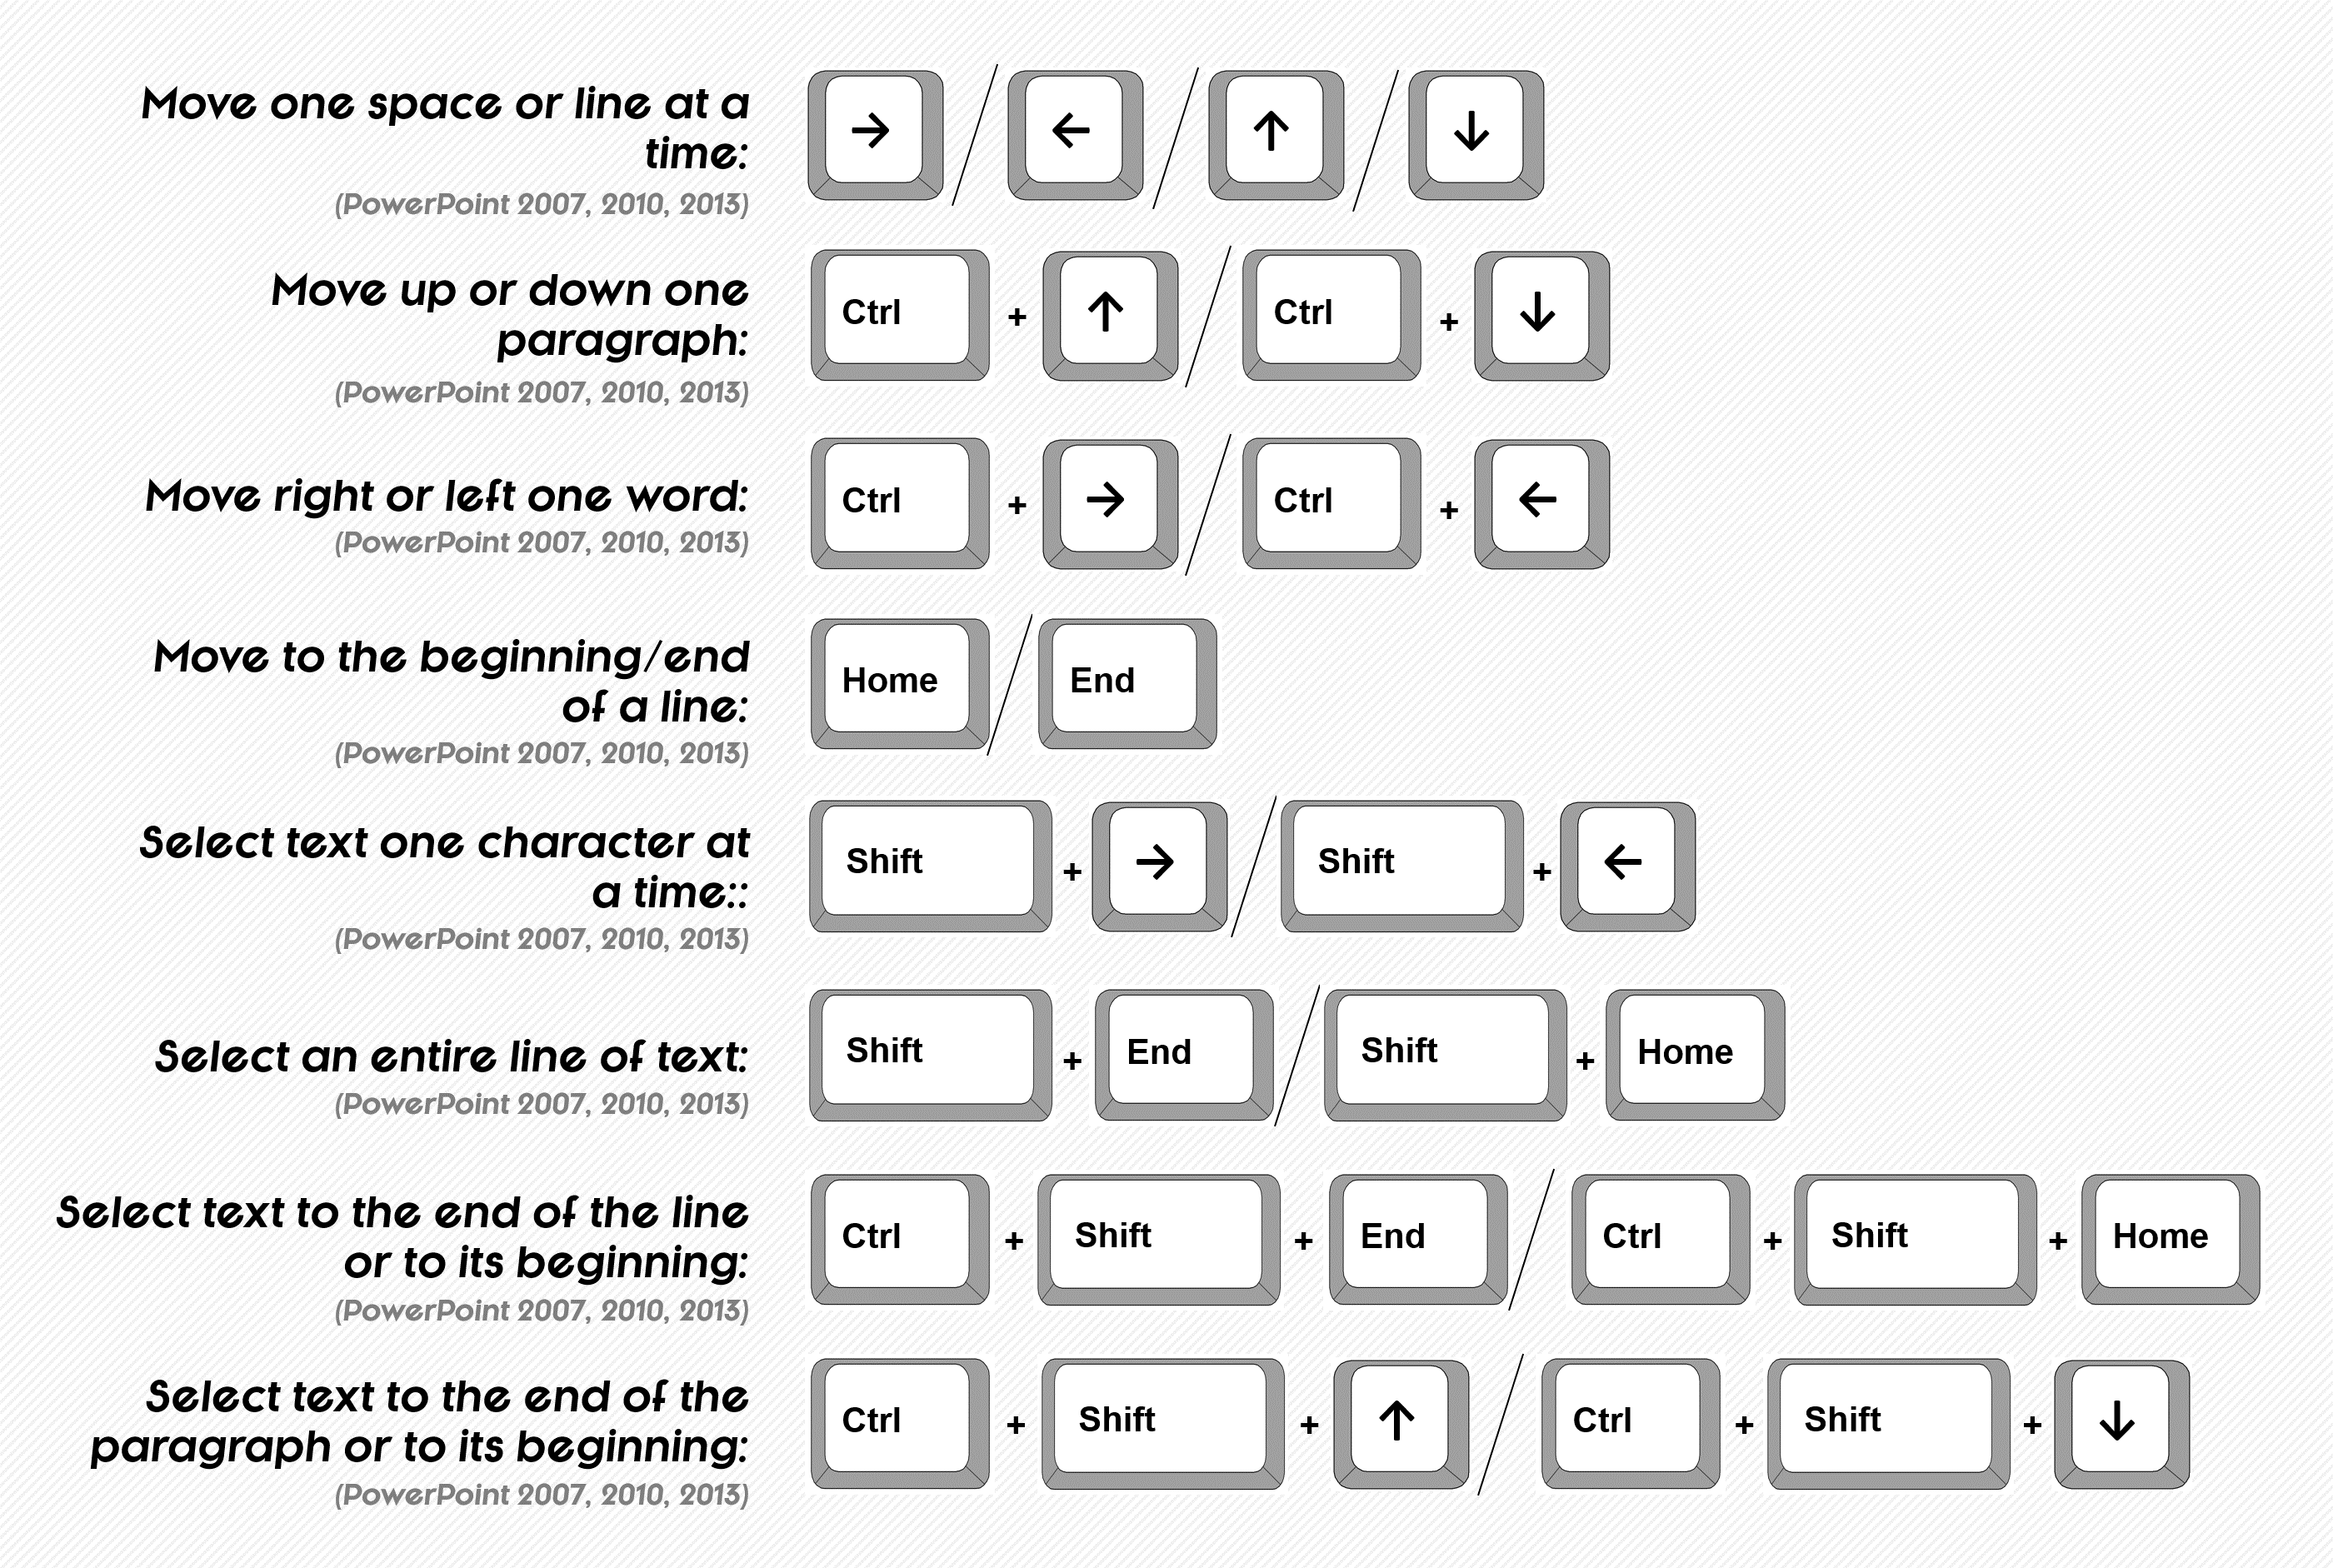
How to navigate and manipulate text from the keyboard
The above shortcuts are VITAL to your ability as an office worker to increase your word processing speed, whether you are typing in Microsoft PowerPoint or in Microsoft Word.
These shortcuts allow you to quickly navigate, select, edit and rearrange blocks of text… which is likely what you are dong ALL DAY long.
Learning the above shortcuts will DRAMATICALLY improve the speed at which you type and process text.
Arranging PowerPoint windows shortcuts
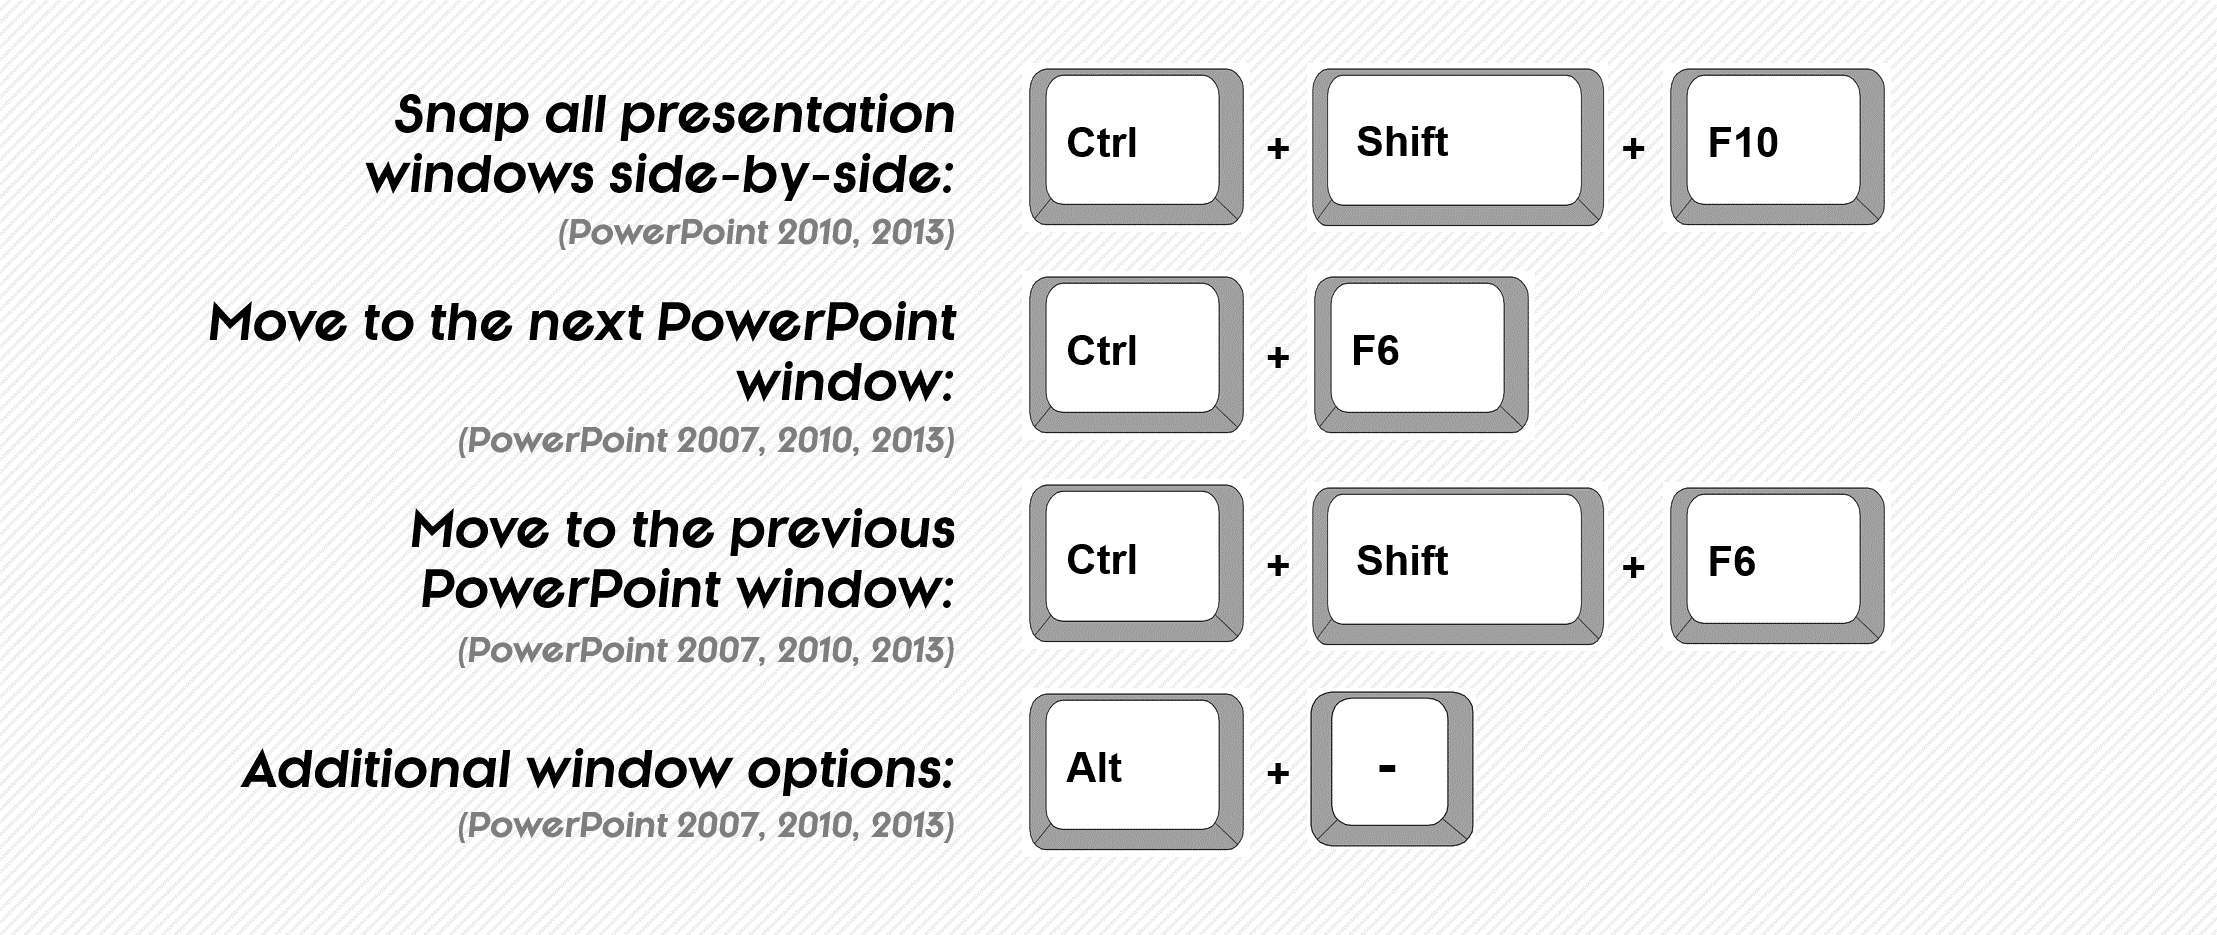
When working with multiple presentations open at the same time, knowing how to cycle forward through them (CTRL + F6) and quickly snap them all side-by-side (CTRL + SHIFT + F10 in PowerPoint 2010 and 2013) is a lifesaver.
Of all the places to lose time when working under a tight deadline, the last thing you want to stumble on is simply flipping through and arranging your presentations.
‘Distraction Free Mode’ and collapsing the Ribbon shortcuts

Clearing the clutter from your workspace
These two shortcuts are a great way to create some visual space on your screen so that you can more easily work on what Cal Newport calls ‘Deep Work’: Professional activities performed in a state of distraction free concentration that push your cognitive capabilities to their limit. These efforts create new value, improve your skill and are hard to replicate.
For more details about these two shortcuts (including the brand-new 2016 one), see our article here .
Gridlines, guides and rulers shortcuts
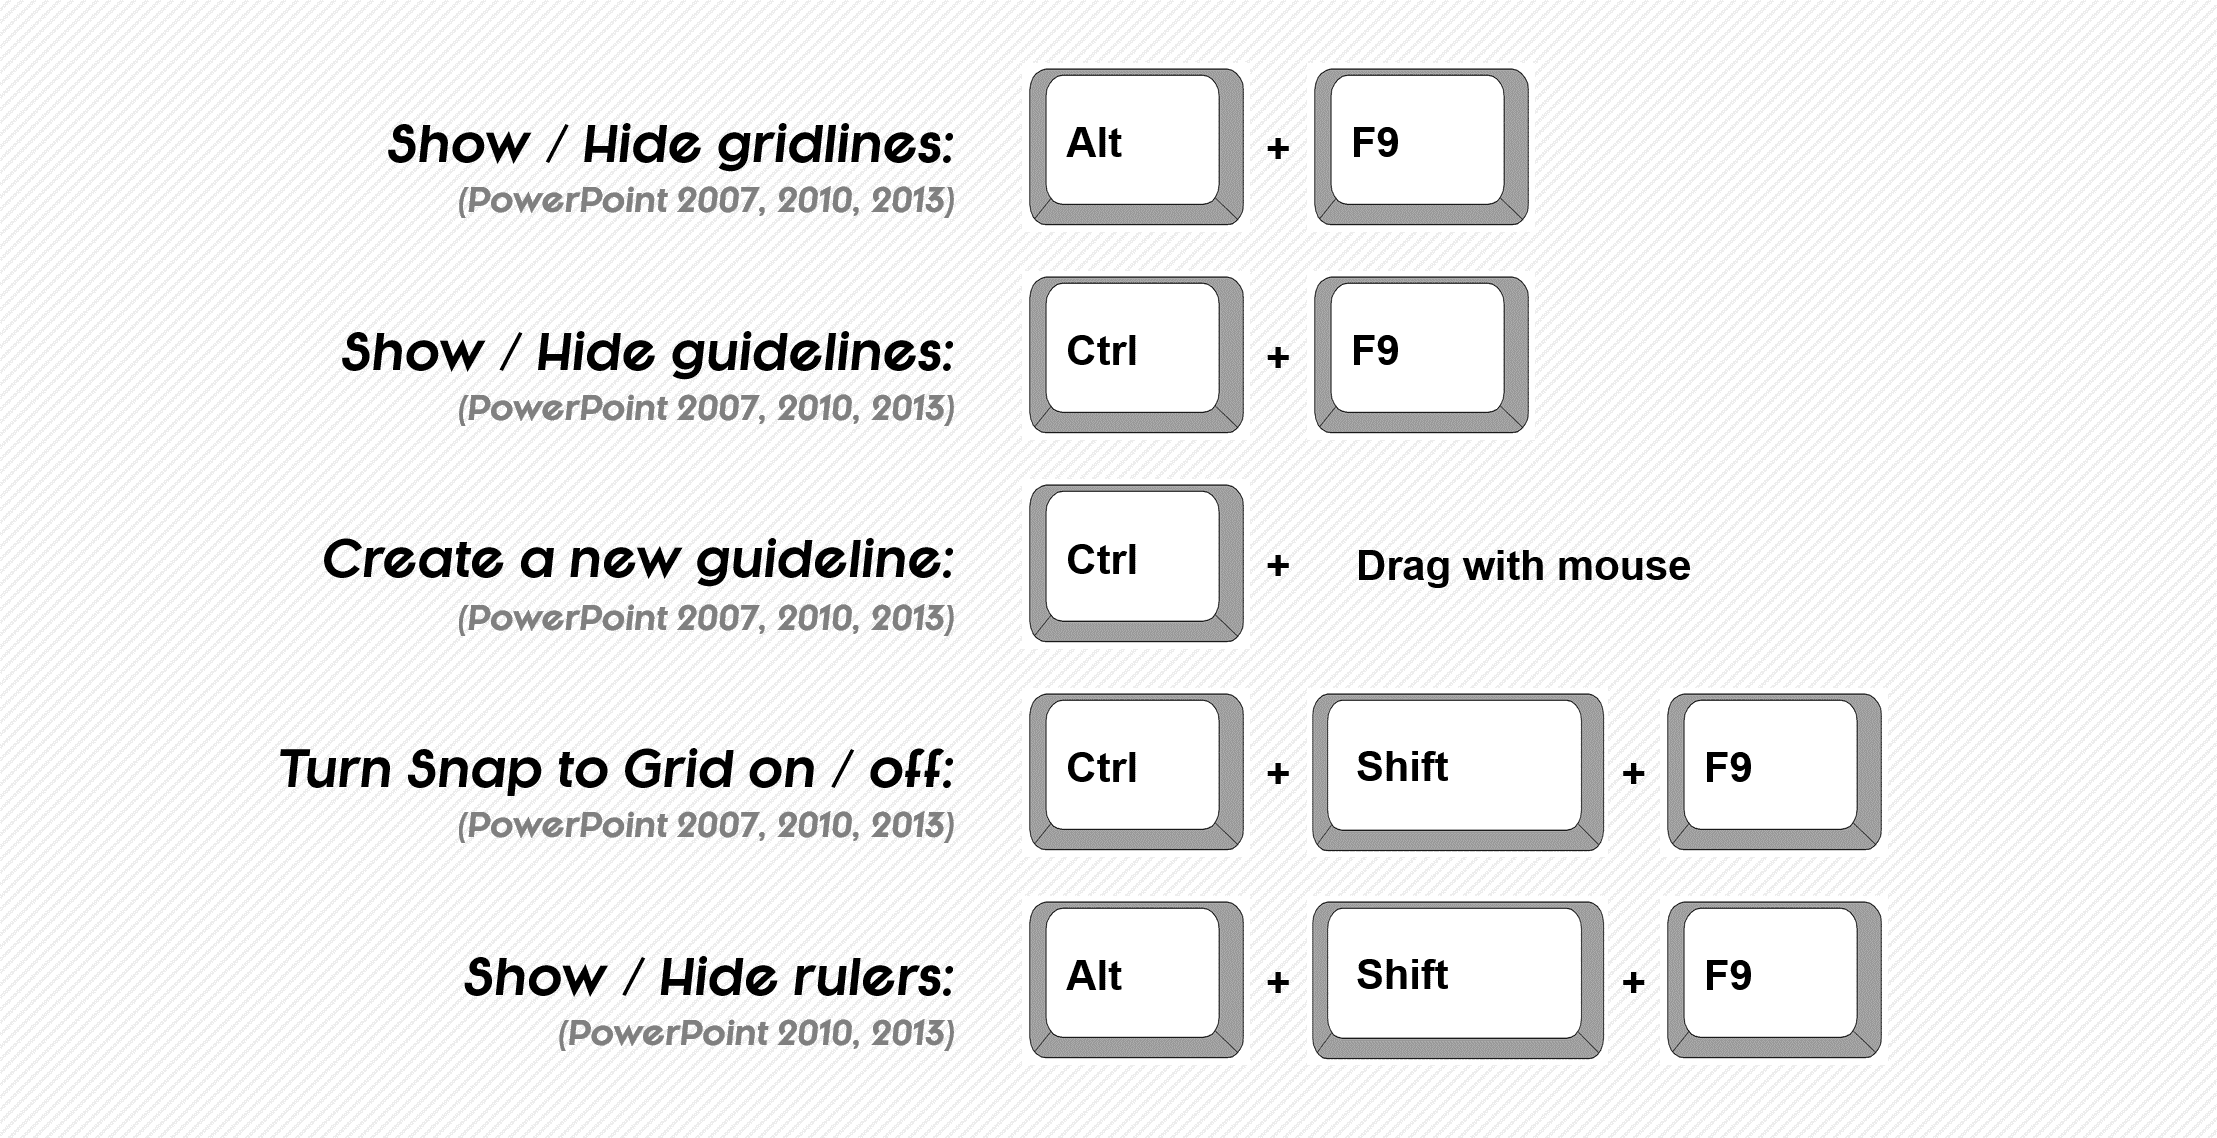
Better layout options for your presentations
The PowerPoint gridlines (SHIFT + F9), PowerPoint drawing guides (ALT + F9) and PowerPoint ruler (ALT + SHIFT + F9), are all features to help you better layout your content across your slides, improving the professionalism of your presentation.
I find the drawing guides (ALT + F9) much easier to use than the gridlines (SHIFT + F9), as you can manually adjust their position on your slide and quickly add new ones by holding the CTRL key and dragging with your mouse.
An example of using the drawing guides is setting the left side of your slide where you want all of your objects to start on each and every slide. Once the line is set, you can then see that line on all of your slides and layout your content accordingly.
Drawing guides PowerPoint 20013 – New features
PowerPoint 2013 introduced some new (handy) drawing guide features, including:
- Allowing you to change the color of the drawing guides by right-clicking them, making it easier to see what you have laid out on your slide.
- Allowing you to set them on your slide master, so that they cannot be nudged or moved in the normal view.
Turning your PowerPoint ruler on and off is also a convenient shortcut when you are working on a small screen (ALT + SHIFT + F9). Typically you only need the ruler for adjusting your bullet point spacing, so having a quick way to turn it on and off is handy.
Navigating active panes shortcuts

What these do is allow you to rotate between the open panes in the PowerPoint environment (of which there are five default ones) and any other panes or dialog boxes that you have open.
The default panes in order are:
- The Workspace
- The command bar (at the bottom of your workspace)
- The Notes pane
- The slide thumbnail view on the left side of your screen
You can cycle forward through these panes with the F6 key, or backwards through them with SHIFT + F6, allowing you to get at the various commands in these views directly from your keyboard… sorry mouse!
Rotating to the Outline View and the Selection Pane
I find these shortcuts are best used in combination with the Selection Pane (ALT + F10) and Outline View (CTRL + SHIFT + TAB) shortcuts, as these are the panes most of us need to frequently get to. Also, both of these panes have very useful keyboard shortcuts associated with them.
For example, to use some of the Selection Pane shortcuts, after opening the Selection Pane (ALT + F10), you need to make it the active pane before you can use the other shortcuts associated with it.
So after opening it, hit F6 on your keyboard and you will rotate to it, and use your other select pane shortcuts.
The same is true for the Outline View, except that instead of rotating forwards to it, you need to rotate backwards to it… Don’t ask me why. So after opening the Outline View (CTRL + SHIFT + TAB), you can activate it from you keyboard by hitting SHIFT + F6.
Outline View shortcuts
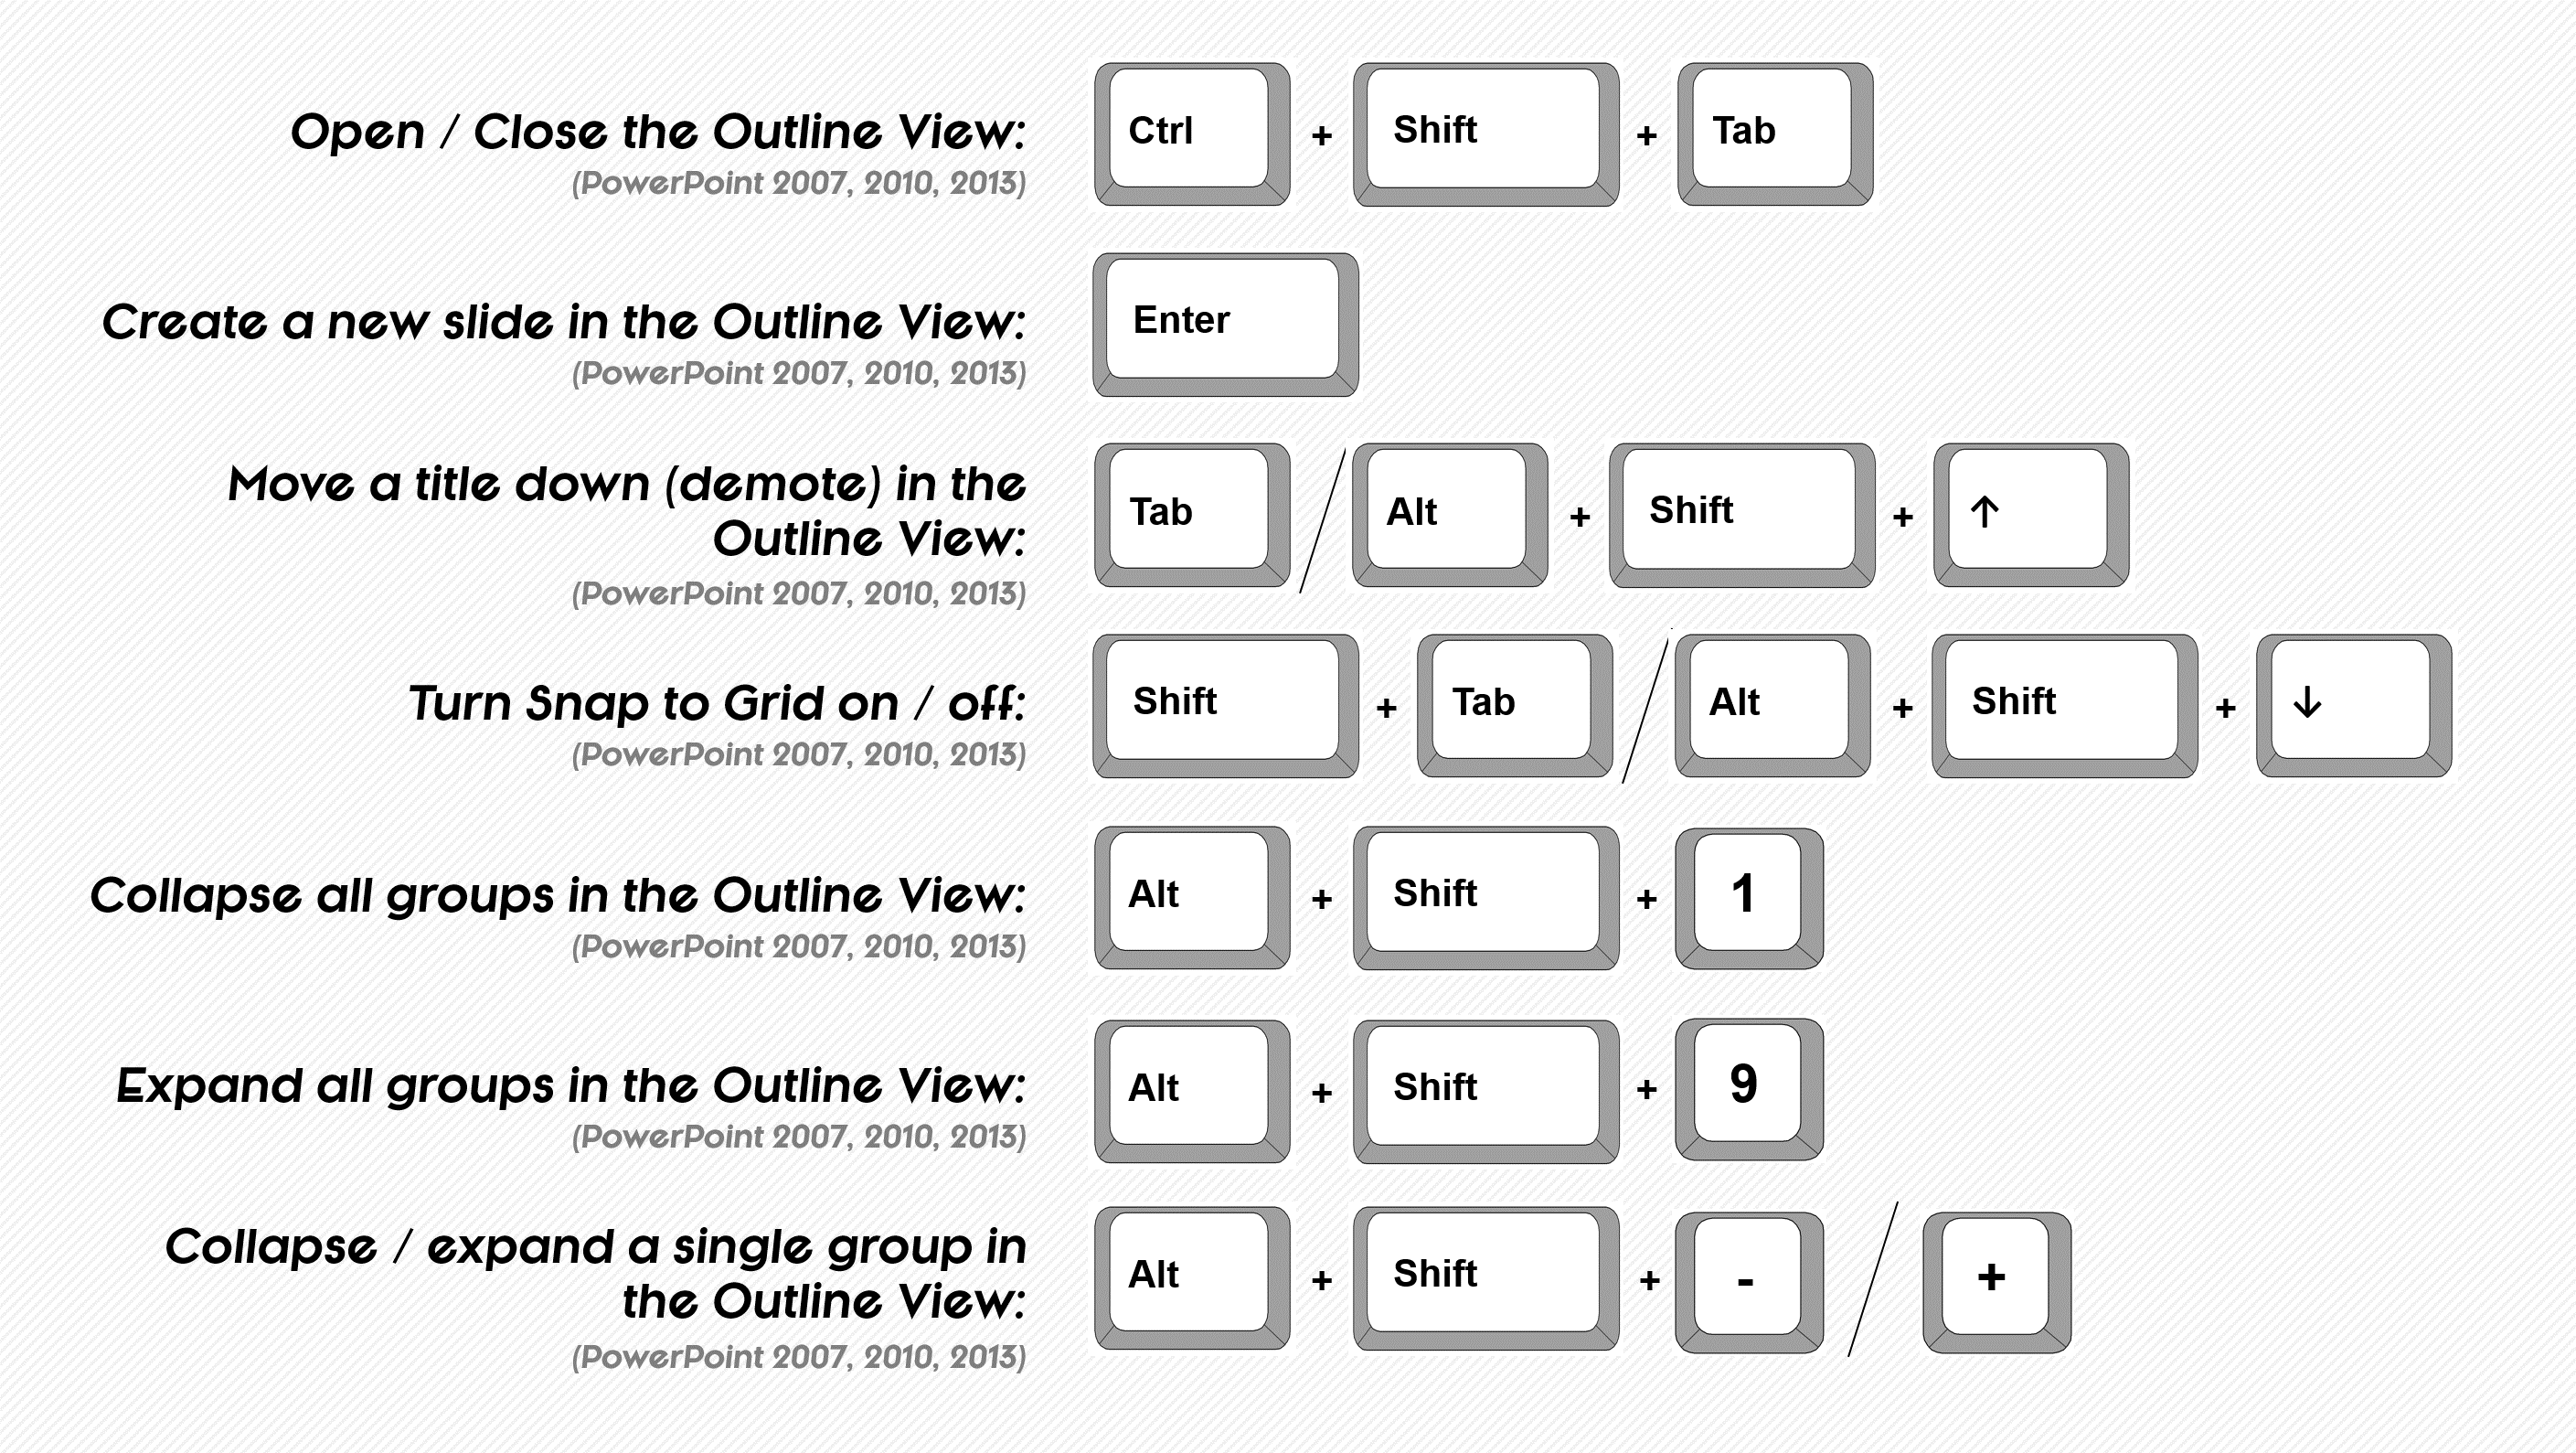
PowerPoint Outline View
The Outline View is great for managing large presentations, as it allows you to quickly cycle through, rearrange and evaluate your content at a 30,000 foot view.
It’s also a great way to insert and quickly update your content (titles, subtitles and content containers) as a bulleted list.
To quickly open or close the Outline View in any version of PowerPoint, simply use the CTRL + SHIFT + TAB keyboard shortcut.
Using ALL of the Outline View shortcuts
To use all of the Outline View shortcuts, you need to be active in the Outline View from your keyboard… you cannot just select it with your mouse.
After opening the Outline View (CTRL + SHIFT + TAB), you can rotate to it by hitting SHIFT+F6 on your keyboard.
See the Navigating Active Panes shortcuts for more.
To expand your knowledge and learn more about using Outline View in PowerPoint, read our guide here .
Shortcuts for closing and quitting PowerPoint
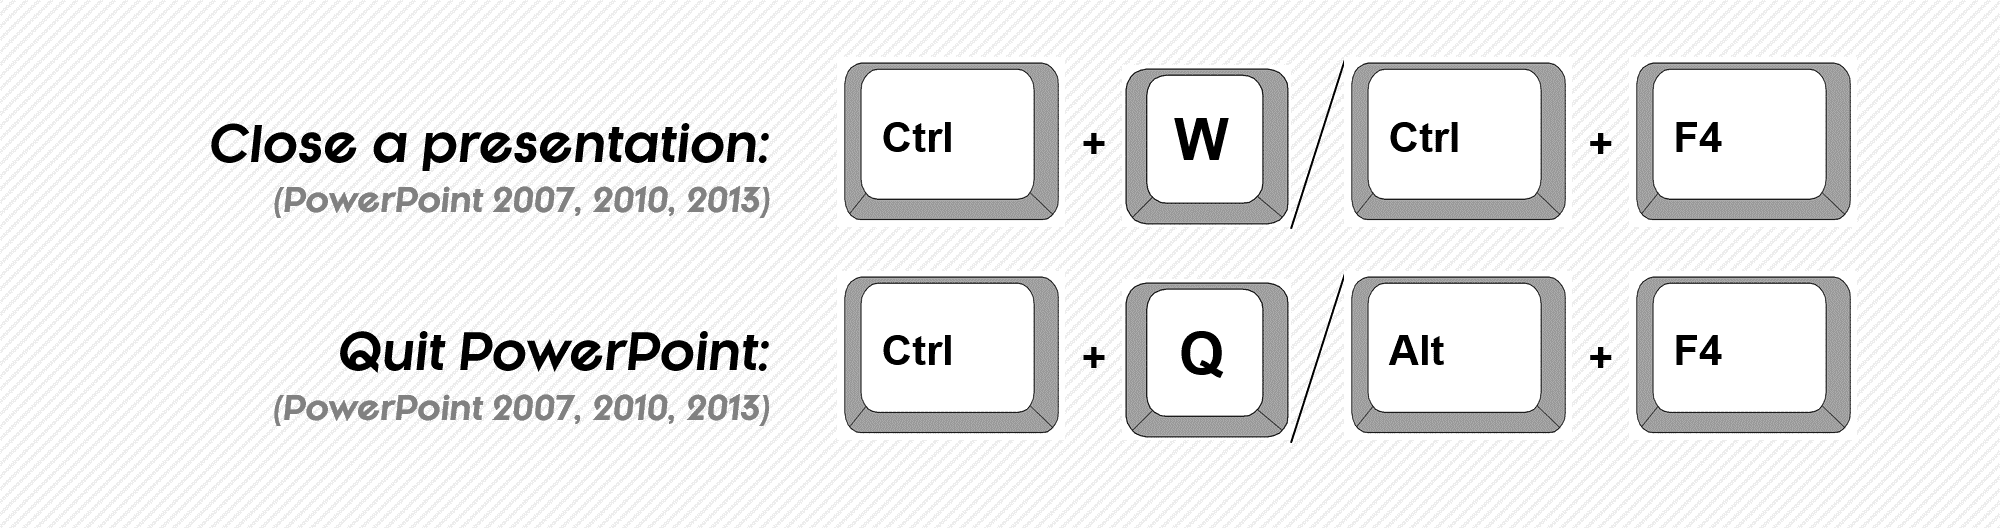
NOT unique to PowerPoint: these ‘close file’ and ‘close application’ shortcuts work for all Microsoft Office Programs (Word, Excel, Outline, etc.), and the ALT + F4 shortcut will work for any open window in Windows.Creating and opening presentations
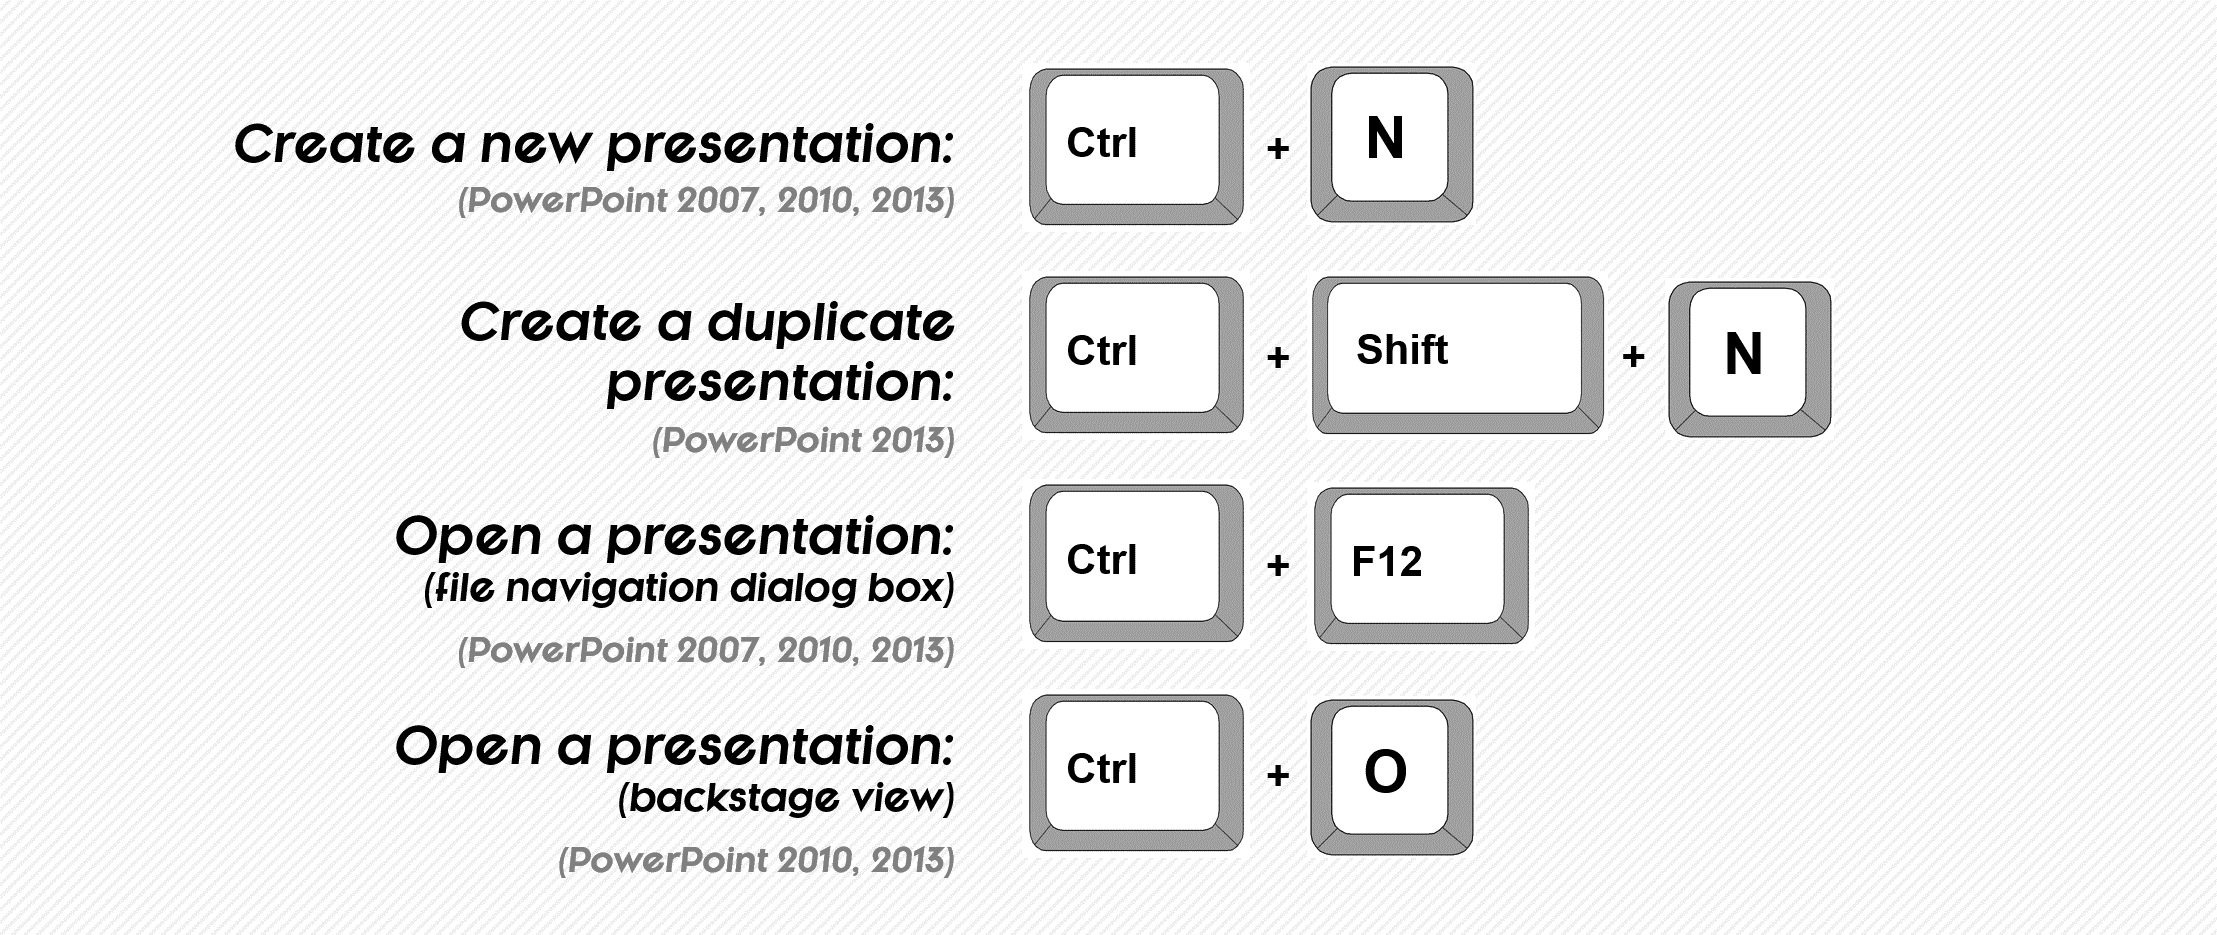
Two shortcuts for opening a presentation
>Here is another subtle difference for the hardcore shortcut user:
- CTRL + O will take you the backstage view in PowerPoint to open a presentation, which is ideal for opening a recent presentation.
- CTRL + F12 will take you directly to a file navigation dialog box to find a presentation on your computer.
It is a subtle difference, but if you are frequently opening and closing presentations, these shortcuts will help you jump start your search more effectively (depending on where you want to start).
Pro tip for remembering these shortcuts
The F12 key is directly above the ‘O’ key, so these are actually pretty easy to remember.
Saving and printing shortcuts
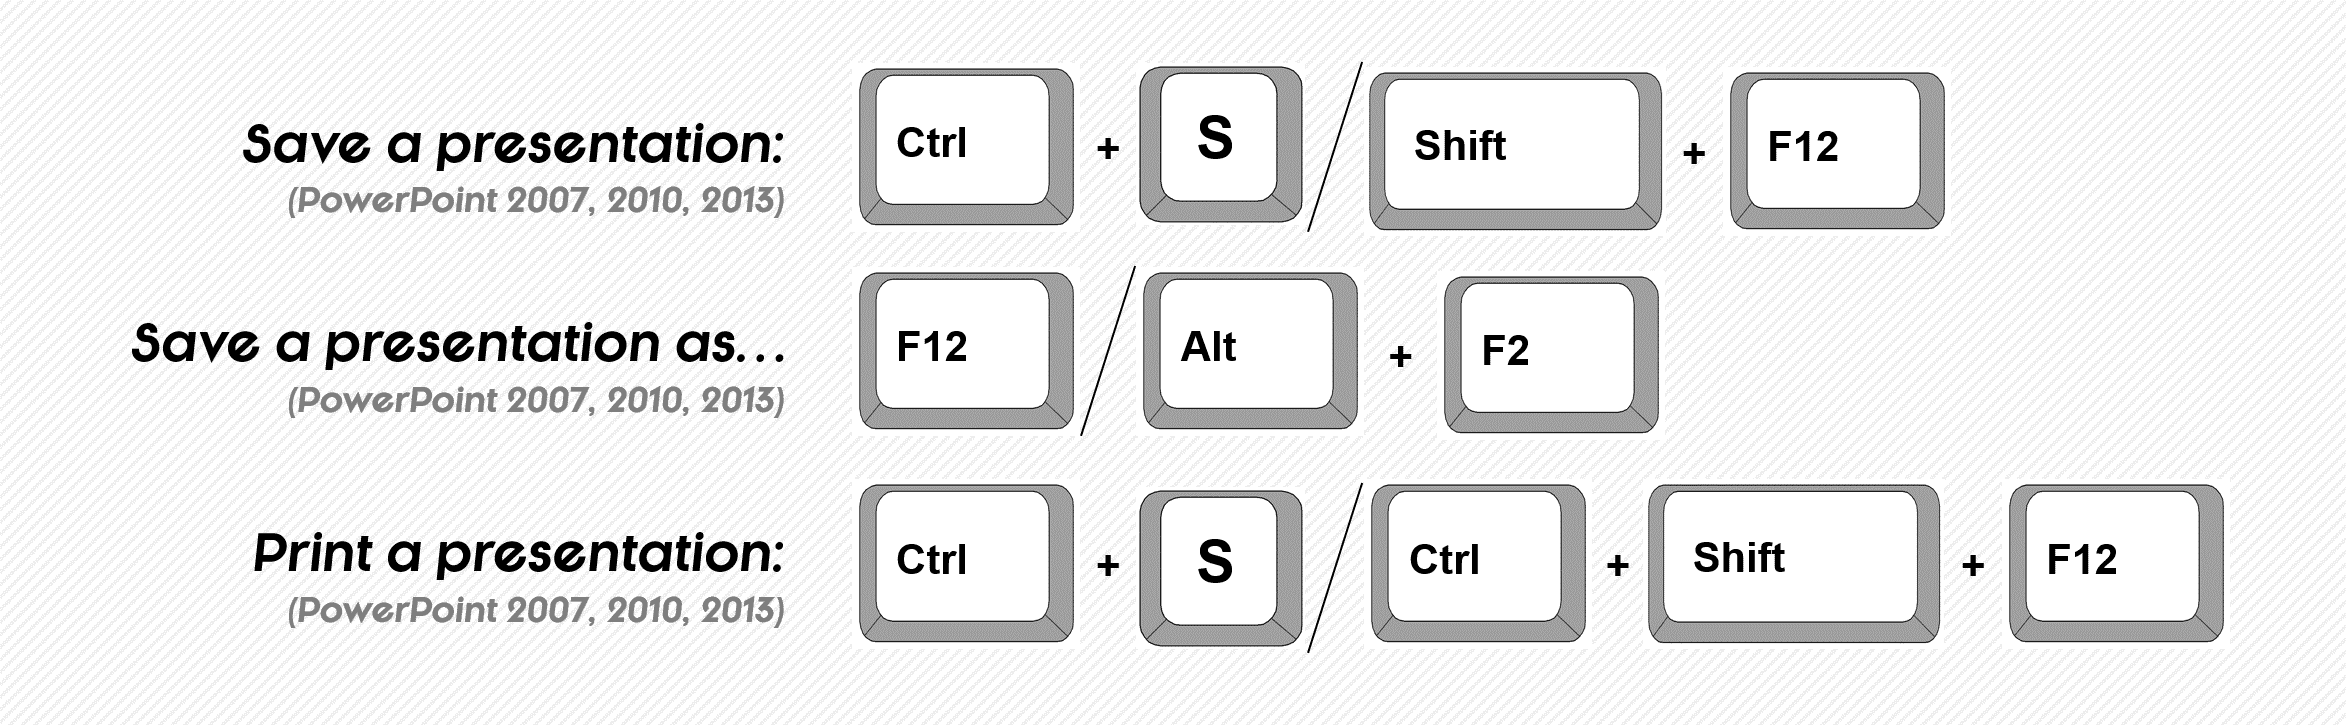
These three shortcuts work across the ENTIRE office suite and are MANDATORY shortcuts for any knowledge worker: Save (CTRL + S) is your best friend as there is little more aggravating than spending hours editing a document to later find that you lost all your work because you forgot to save it. CTRL + S as often as you can while working on a presentation
Save As (F12) is a slightly more advanced version of the Save shortcut, as it allows you to save your file with a new name, change its save location or change its file type. The most frequently used alternative file type is the PDF file format, which you can select in the drop down.
Print (CTRL + P) takes to you the backstage view where you can choose among various printing options. Two of the often overlooked printing options are the Notes pages and the Outline View.
To learn how to print multiple slides per page using the Print dialog box, read our guide here .
Protecting your presentation
You can use the Save As (F12) shortcut to protect your presentation by saving it as the Picture Slideshow file type. Doing so turns your presentation into pictures that someone can run natively in PowerPoint in Slideshow mode, but cannot edit. To learn more click here .
Shortcuts for inking and highlighting your presentation
Inking your presentation
You have two inking options in PowerPoint (the pen and the highlighter) which allow you draw on your slides during your presentation to make your point visually.
Once the ink is on your slide, you can either:
- Save the ink in your presentation – Simply hit ESC to exit Slideshow Mode and select Save Ink. Saving the ink turns your annotations into object that you can then resize and position on your slides.
- Hide the ink on the screen – Hit CTRL + M to hide the onscreen ink. Hitting CTRL+M a second time will unhide the ink (i.e. make it reappear).
- Erase the ink on the screen – Hit E on your keyboard and any ink that you have added in Slideshow Mode will be erased. Be careful when using this shortcut though as you cannot undo the erase action.
Pre-inking your presentation… sneaky trick alert!
Besides adding ink to your slides in Slideshow Mode, you can also pre-ink your slides and still use your CTRL + M shortcut to hide and show your ink.
To pre-ink your slide, simply open the ink tools, which you can find on the Review tab. You can then draw on your slides (however you like) and make your notes.
After you have inked your presentation, in Slideshow Mode you can hide or display the ink by hitting CTRL + M on your keyboard… pretty sneaky, no?
Start slideshow shortcuts
How to start a slideshow in PowerPoint
The different shortcuts for starting a slideshow give you flexibility in terms of where you are in your deck and in what View you’re in when you want to start your slideshow.
Start Slideshow from Beginning – Slideshow Shortcuts
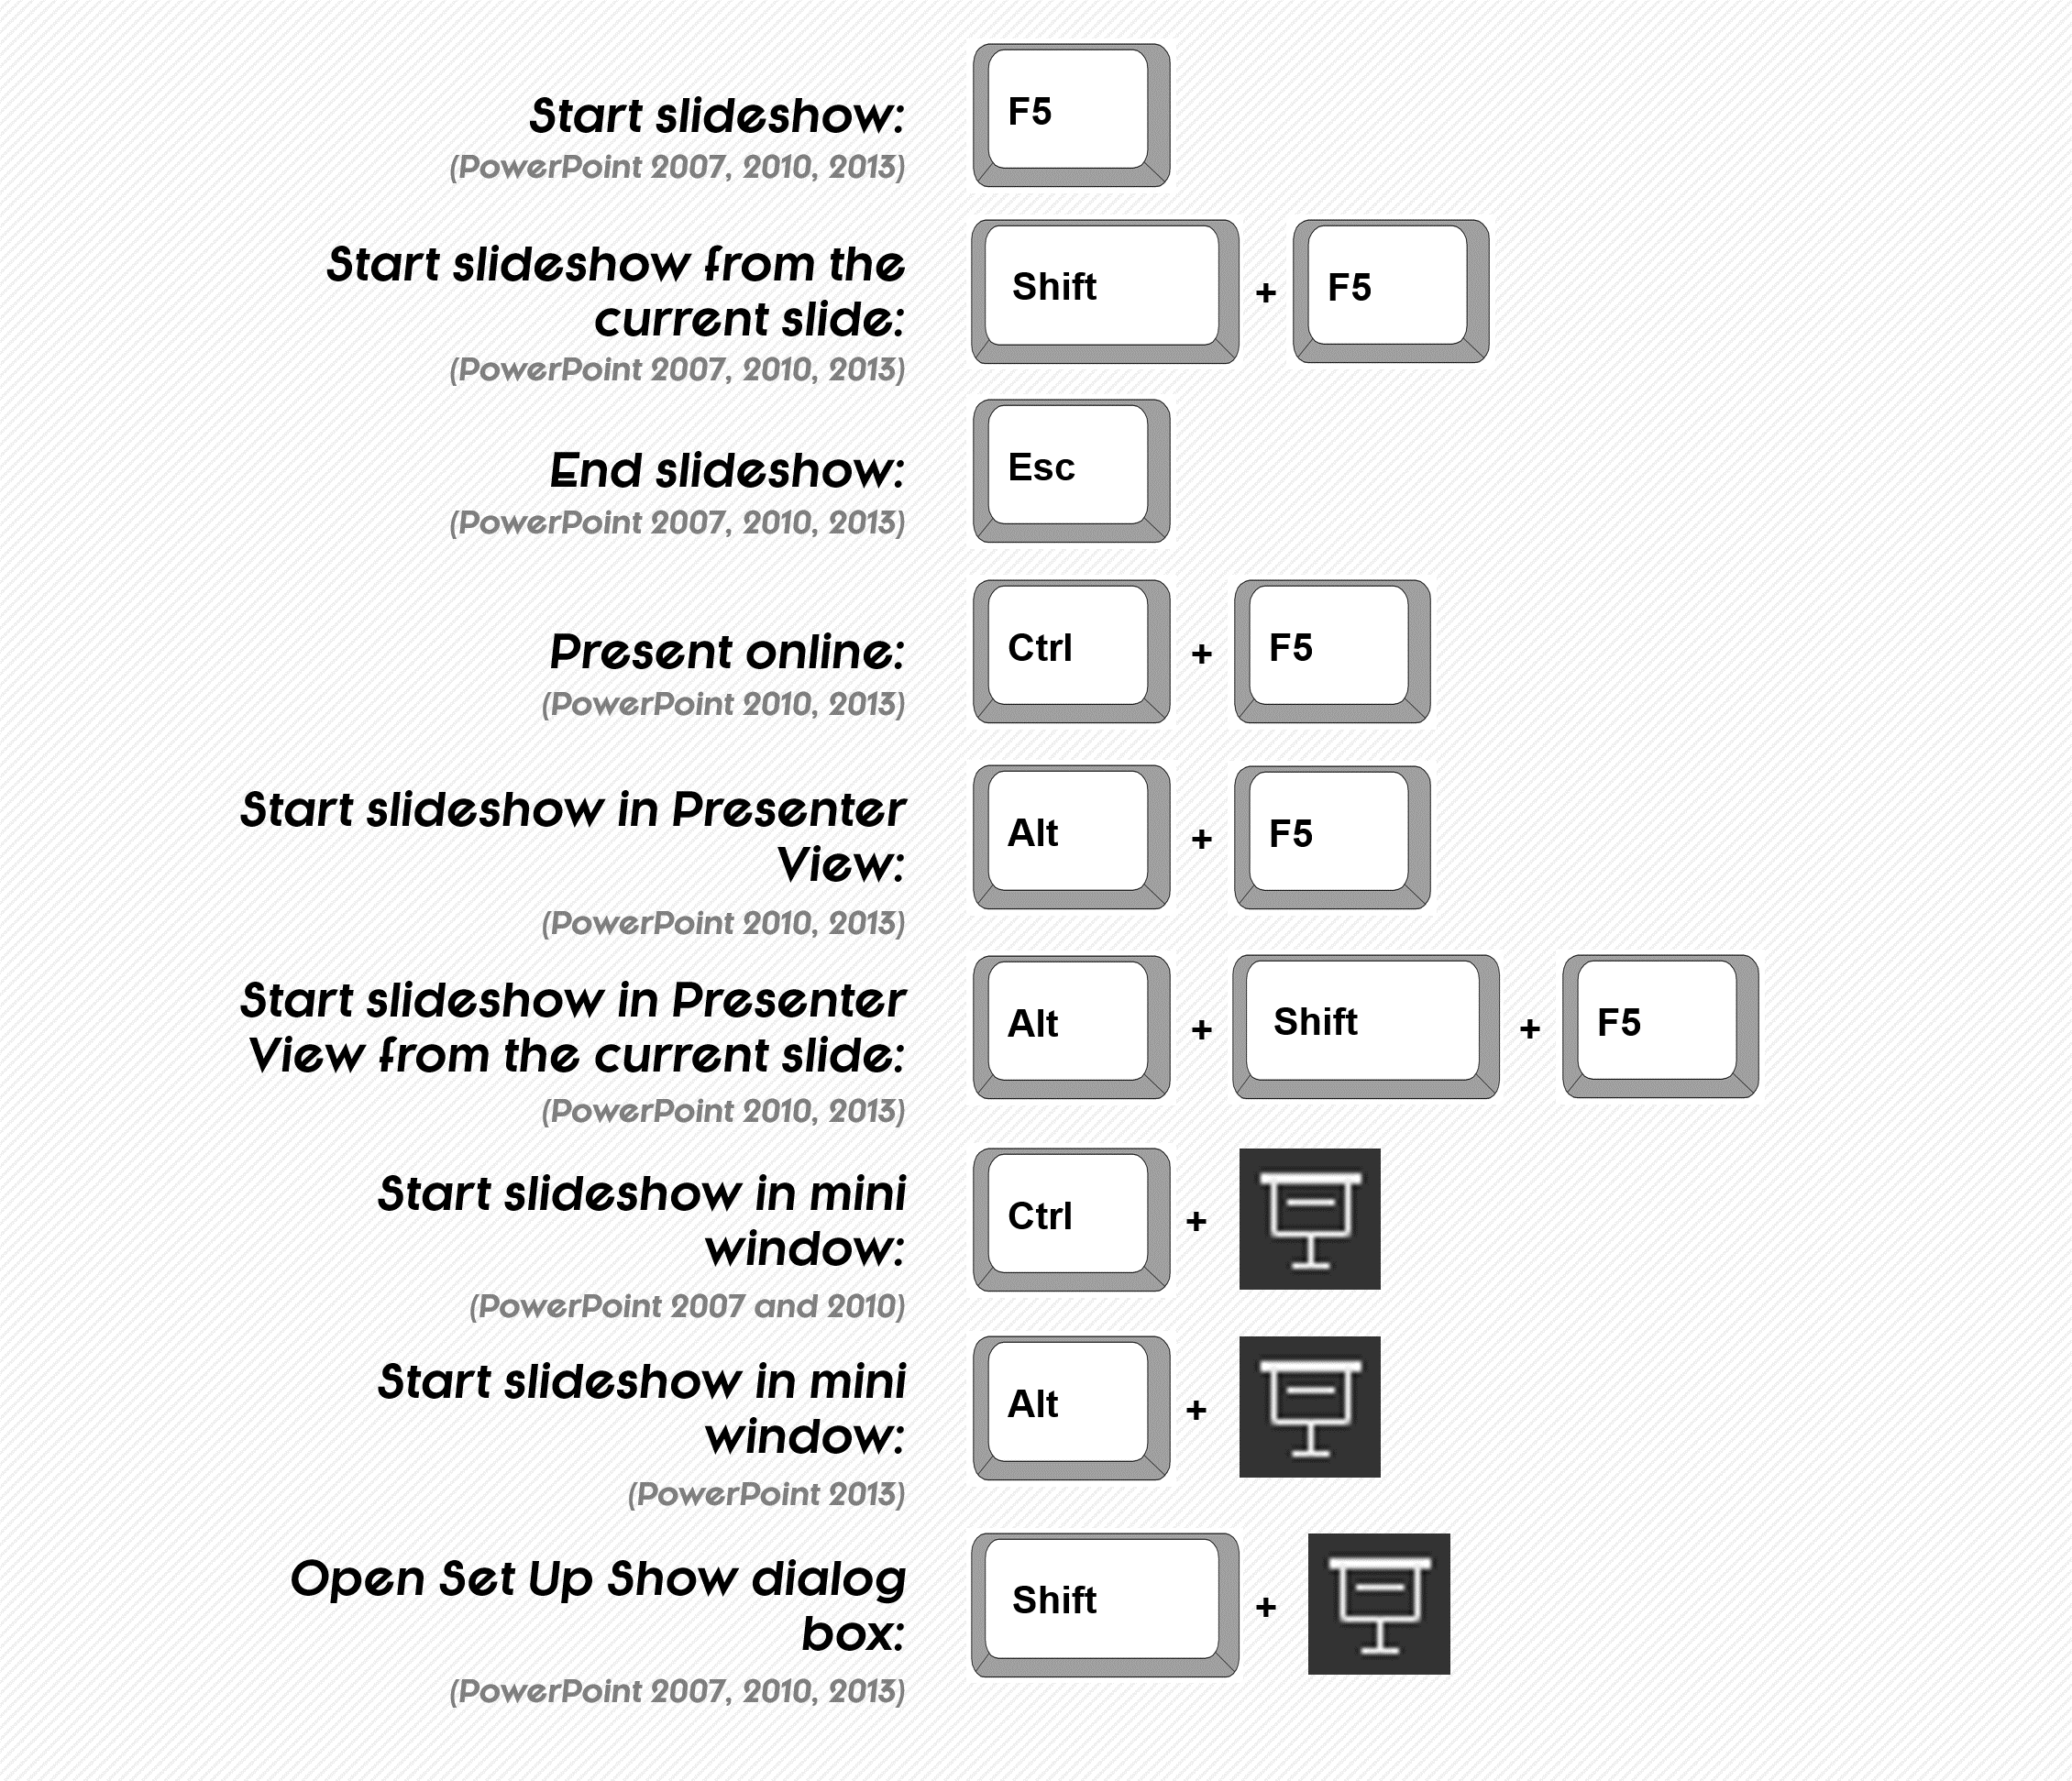
- Presentation Mode – F5 will start your slideshow from the beginning of your presentation.
- Presenter View – ALT + F5 will start your slideshow from the current in the normal presentation mode.
Start Slideshow from Current Slide – Slideshow Shortcuts
- Presentation Mode – SHIFT + F5 will start your slideshow from the beginning of your presentation in the Presenter View. This view works in PowerPoint 2013 and in PowerPoint 2010 if you are hooked up to an external monitor.
- Presenter View – ALT + SHIFT + F5 will start your slideshow from the current slide in the new Presenter’s View. This works in PowerPoint 2010 if you are hooked up to an external monitor and in PowerPoint 2013.
I find the Start from Current Slide the most flexible for spot checking your content in fullscreen mode, and rehearsing individual slides in the new Presenter View.
Spot checking for errors
When spot checking your presentation for errors in Slideshow Mode, it’s a best practice to go through your deck multiple times, each time looking for a single type of error (unaligned titles, wrong formatting, etc.).
Although it might appear to take more time, it makes spotting embarrassing presentation errors significantly easier when you are simple-mindedly focused on a specific error.
Navigating slides in a slideshow shortcuts
Navigating your slides in a slideshow
The two easiest ways to jump between the slides in your presentation in Slideshow Mode are:
Method #1: Assuming you know the slide’s number, hit the number on your keyboard and then hit ENTER. For example, if you want to jump to slide number 22, hit 2, then 2, and then ENTER and you will jump to slide #22.
Method #2: Assuming you don’t know your slide’s number, you can hit CTRL+S on your keyboard to see a list of all the different slides and use this dialog box to jump around within your presentation.
A third option is to use hyperlinks, which you can also navigate to from your keyboard in Slideshow mode. See our guide here for details
PowerPoint pro tip: Use the black and white screen shortcuts to save ink
Using the ‘B’ or ‘W’ keys to make your screen black or white during your presentation is much better than adding black or white slides to your presentation for two reasons:
- It gives you more flexibility as to when you blank out your screen to manage your audience.
- It cuts down the size of your deck and SAVES your printer’s toner cartridge, especially if you are using black slides to blank out your screen.
I’ve seen people print decks with many completely black slides (i.e. the points at which the presenter wanted to pause during the presentation) and completely killed the printer’s toner cartridge.
Video and audio playback shortcuts
PowerPoint video and audio shortcuts
PowerPoint 2010 and 2013 now lets you control the multimedia in your presentation directly from your keyboard including pausing and playing your videos or audio (ALT + P), controlling the volume (ALT + ↑↓), and jumping between bookmarks in your videos (ALT + Home / END).
How to create a bookmark in your video
To add a bookmark to your video, select it in PowerPoint, and follow these steps:
- Place the play bar on the video’s timeline in the place where you want your bookmark to be
- Navigate to the Video Tools Playback Tab in the Ribbon
- Select ‘Add Bookmark’
Find and replace shortcuts
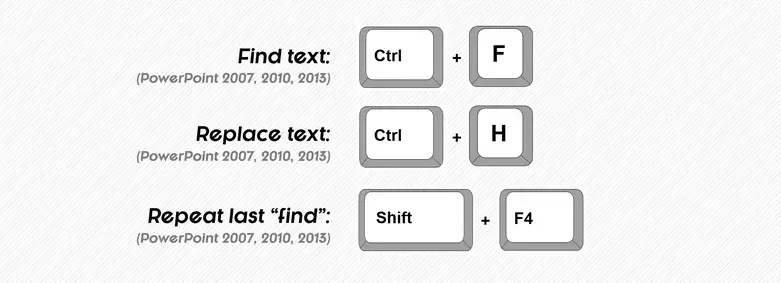
Using the find and replace keyboard shortcuts
Find (CTRL + F) is good for finding text strings within your presentation. For example, you could search for the name of your product to jump to its description.
Replace (CTRL + H) is good for finding AND replacing text strings within your presentation. For example, if you are scrubbing a deckto remove your client’s name, you could search for your client’s name and replace it with ‘The Company’.
Find Again (SHIFT + F4) will find the next instance of the text string that you previously searched for… without reopening the Find dialog box. It’s good for continuing to cycle through your presentation and make edits.
Pro PowerPoint tip: Word of caution with ‘Replace All’
When using the Replace dialog box (CTRL + H), you have a ‘Replace All’ option.
If you use this option, PowerPoint will sweep through your ENTIRE presentation, including your Slide Master, and replace every instance of the word you are searching for and replacing. This can be good if that’s what you are trying to do, but NIGHTMARE if you are not 100% sure. So just be careful.
If you accidentally do ‘Replace All’ you can thankfully CTRL + Z to undo all of the replacements.
Undo and Redo

Using the Undo and redo shortcuts
The Undo and Redo commands are Microsoft Office essentials! As you know, Undo is CTRL + Z.
As for Redo, or Repeat Last Action, there are two flavors of the shortcut that work across the entire Office suite (PowerPoint, Excel, Word, etc.). You have CTRL + Y and F4, both of which are best used in PowerPoint when working in a sweeping technique.
By a sweeping technique, I simply mean working through your slides accomplishing a single task at a time, like changing font or fill colors, outlines, text size, etc.
When sweeping through your deck, if you use one of the Repeat Last Action commands, you can simply repeat your last action over and over again, saving yourself a lot of clicking around and wasted time.
Setting the number of ‘undo’s’
As demonstrated in the video above, you can change the limit of how many Undo commands you can perform.
- Navigate to the File menu
- Select Options at the bottom of the menu
- Select Advanced on the left
- In the ‘Editing Options’ section, type in the number of Undo’s you’d like in the box next to ‘Maximum number of undos’
Complete indexed list of shortcuts (from A to Z)
Want a fast way to find a shortcut? Hit Ctrl + F on your keyboard to search the page.
| Action | Shortcut | Versions of PowerPoint |
|---|---|---|
| Activate a hyperlink (like clicking it) while in Slideshow View | ENTER | All (since 2007) |
| Activate Highlighter while in Slideshow View | CTRL+I | All (since 2007) |
| Activate Laser Pointer while in Slideshow View | CTRL+L | All (since 2007) |
| Activate Pen Pointer while in Slideshow View | CTRL+P | All (since 2007) |
| Active a mouse-over hyperlink while in Slideshow View | SHIFT+ENTER | All (since 2007) |
| Bold | CTRL+B | All (since 2007) |
| Bring selected object(s) forward in the Selection Pane | CTRL+SHIFT+F | All (since 2007) |
| Center align paragraph | CTRL+E | All (since 2007) |
| Change sentence case | SHIFT+F3 | All (since 2007) |
| Close presentation | CTRL+W | All (since 2007) |
| Close the presentation | CTRL+F4 | All (since 2007) |
| Close the Visua Basic dialog box | ALT+F4 or ALT+Q | All (since 2007) |
| Collapse / expand a single group in Outline View | ALT+SHIFT+= / ALT+SHIFT+- | All (since 2007) |
| Collapse all groups in Outline View | ALT+SHIFT+1 | All (since 2007) |
| Collapse groups in the Selection Pane | ALT+SHIFT+1 | 2010 and later |
| Collapse the Ribbon | CTRL+F1 | All (since 2007) |
| Copy | CTRL+C | All (since 2007) |
| Copy formatting | CTRL+SHIFT+C | All (since 2007) |
| Copy object’s animations | ALT+SHIFT+C | 2010 and later |
| Create a duplicate presentation | CTRL+SHIFT+N | 2013 & 2016 |
| Create a new slide in Outline View | ENTER | All (since 2007) |
| Create a new guideline | CTRL+Drag with mouse | All (since 2007) |
| Cut | CTRL+X | All (since 2007) |
| Cycle through videos / media while in Slideshow View | TAB / SHIFT+TAB | All (since 2007) |
| Decrease font size | CTRL+[ or ALT+SHIFT+COMMA | All (since 2007) |
| Demote a slide title in Outline View | SHIFT+TAB or ALT+SHIFT+→ | All (since 2007) |
| Distraction Free Mode (hiding the Ribbon) | CTRL+SHIFT+F1 | 2016 |
| Draw a perfect shape (height = width) | SHIFT+Drag a shape | All (since 2007) |
| Draw a straight line | SHIFT+Draw a line | All (since 2007) |
| Duplicate a slide | CTRL+SHIFT+D | All (since 2007) |
| Duplicate an object | CTRL+D | All (since 2007) |
| End slideshow | ESC | All (since 2007) |
| Erase annotations while in Slideshow View | E | All (since 2007) |
| Expand all groups in Outline View | ALT+SHIFT+ 9 | All (since 2007) |
| Expand groups in the Selection Pane | ALT+SHIFT+9 | 2010 and later |
| Find text | CTRL+F | All (since 2007) |
| Format a chart element | CTRL+1 | All (since 2007) |
| Go to a slide while in Slideshow View | Slide Number + ENTER | All (since 2007) |
| Go to first slide while in Slideshow View | HOME | All (since 2007) |
| Go to last slide while in Slideshow View | END | All (since 2007) |
| Go to the previous / next bookmark in a video while in Slideshow View | ALT+HOME / ALT+END | 2010 and later |
| Group objects | CTRL+G | All (since 2007) |
| Hide an object in the Selection Pane | CTRL+SHIFT+S | 2010 and later |
| Hide cursor and lower lefthand buttons while in Slideshow View | CTRL+H | All (since 2007) |
| Hide or unhide your ink while in Slideshow View | CTRL+M | All (since 2007) |
| Hide the thumbnail view | CTRL+SHIFT Normal View command (lower right-hand corner) | All (since 2007) |
| Increase font size | CTRL +[ or ALT+SHIFT+Period | All (since 2007) |
| Insert a hyperlink | CTRL+K | All (since 2007) |
| Insert a new slide | CTRL+M | All (since 2007) |
| Insert a new slide (after cycling through your content containers) | CTRL+ENTER | All (since 2007) |
| Italics | CTRL+I | All (since 2007) |
| Justify paragraph | CTRL+J | All (since 2007) |
| Left align paragraph | CTRL+L | All (since 2007) |
| Move a chart like an object | CTRL+Select the chart | All (since 2007) |
| Move a title down in Outline View | ALT+SHIFT+↓ | All (since 2007) |
| Move a title up in Outline View | ALT+SHIFT+↑ | All (since 2007) |
| Move to the next PowerPoint window | CTRL+F6 | All (since 2007) |
| Move to the previous PowerPoint window | CTRL+SHIFT+F6 | All (since 2007) |
| Mute / unmute video / media while in Slideshow View | ALT+U | 2010 & 2013 |
| Navigate between hyperlinks while in Slideshow View | TAB or SHIFT+TAB | All (since 2007) |
| Open / close the Outline View | CTRL+SHIFT+TAB | All (since 2007) |
| Open / close the Selection Pane | SHIFT+F10 | 2010 and later |
| Open a presentation (backstage view) | CTRL+O | 2010 and later |
| Open a presentation (Open dialog box) | CTRL+F12 | All (since 2007) |
| Open additional window options | ALT+- | All (since 2007) |
| Open Font dialog box | CTRL+T or CTRL+SHIFT+P or CTRL+SHIFT+F | All (since 2007) |
| Open Set Up Show dialog box | SHIFT+Slideshow View Command (lower right-hand corner) | All (since 2007) |
| Open Slideshow Options dialog box | SHIFT+Reading View Command (lower right-hand corner) | All (since 2007) |
| Open the available slides to work with while in Slideshow View | CTRL+S | All (since 2007) |
| Open the Handout Master View | SHIFT+Slide Sorter View Command (lower right-hand corner) | All (since 2007) |
| Open the Header and Footer dialog box | ALT+SHIFT+D | All (since 2007) |
| Open the Outline View in fullscreen | CTRL+SHIFT+Slide Sorter View command (lower right-hand corner) | All (since 2007) |
| Open the Slide Master View | Alt, W, M or SHIFT+Normal View command (lower right-hand corner) | All (since 2007) |
| Open the Visual Basic dialog box | ALT+F11 | All (since 2007) |
| Paste | CTRL+V | All (since 2007) |
| Paste formatting | CTRL+SHIFT+V | All (since 2007) |
| Paste and open the Paste Special dialog box | CTRL+ALT+V | All (since 2007) |
| Perform next animation or advance to next slide | ENTER or PAGE DOWN or RIGHT ARROW or DOWN ARROW or SPACEBAR or Click with mouse | All (since 2007) |
| Play / Pause video / media while in Slideshow View | Alt+P | 2010 and later |
| Present online | CTRL+F5 | 2010 and later |
| CTRL+P or CTRL+SHIFT +F12 | All (since 2007) | |
| Promote a slide title in Outline View | SHIFT+TAB or ALT+SHIFT+← | All (since 2007) |
| Quit PowerPoint | CTRL+Q or ALT+F4 | All (since 2007) |
| Redisplay cursor and/or change the cursor to an arrow while in Slideshow View | CTRL+A | All (since 2007) |
| Remove all formatting | CTRL+Spacebar | All (since 2007) |
| Rename an object in the Selection Pane | F2 | 2010 and later |
| Repeat the last ‘find’ action | CTRL+A | All (since 2007) |
| Repeat last action (redo) | CTRL+Y or F4 | All (since 2007) |
| Replace text | CTRL+H | All (since 2007) |
| Rewind video / media while in Slideshow View | ALT+SHIFT+← | 2010 and later |
| Right align text | CTRL+L | All (since 2007) |
| Save | CTRL+S or SHIFT+F12 | All (since 2007) |
| Save as | F12 OR ALT+F12 | All (since 2007) |
| Select multiple shapes in the Selection Pane | SHIFT+Spacebar or SHIFT+ENTER | All (since 2007) |
| Send selected an object(s) backwards in the Selection Pane | CTRL+SHIFT+B | All (since 2007) |
| Show / hide gridlines | ALT+F9 | All (since 2007) |
| Show / hide guidelines | SHIFT+F9 | All (since 2007) |
| Show / hide rulers | ALT+SHIFT+F9 | 2010 & 2013 |
| Show the next hidden slide while in Slideshow View | H | All (since 2007) |
| Skip forwards in a video / media while in Slideshow View | ALT+SHIFT+→ | 2010 and later |
| Snap all presentation windows side-by-side | CTRL+SHIFT+F10 | 2010 and later |
| Start Presenter View from current slide | ALT+SHIFT+F5 | 2010 (with second monitor only), 2013, 2016 |
| Start Presenter View from first slide | ALT+F5 | 2010 (with second monitor only), 2013, 2016 |
| Start slideshow from current slide | SHIFT+F5 | All (since 2007) |
| Start slideshow from the first slide | F5 | All (since 2007) |
| Start slideshow in mini-window | CTRL+Slideshow View command (lower right-hand corner) | 2007 & 2010 |
| Start slideshow in mini-window | ALT+Slideshow View command (lower right-hand corner) | 2013 and later |
| Stop video / media while in Slideshow View | ALT+Q | All (since 2007) |
| Subscript | CTRL+= | All (since 2007) |
| Superscript | CTRL+SHIFT+= | All (since 2007) |
| Switch to the next open pane | F6 | All (since 2007) |
| Switch to the previous open pane | SHIFT+F6 | All (since 2007) |
| Turn Snap to Grid on / off | CTRL+SHIFT+F9 | All (since 2007) |
| Turn your screen black while in Slideshow View | B or Period | All (since 2007) |
| Turn your screen white while in Slideshow View | W or Comma | All (since 2007) |
| Underline | CTRL+U | All (since 2007) |
| Undo last action | CTRL+Z | All (since 2007) |
| Ungroup object | CTRL+SHIFT+G | All (since 2007) |
| Volume down while in Slideshow View | ALT+↓ | 2010 and later |
| Volume up while in Slideshow View | ALT+↑ | 2010 and later |
| Zoom in / out while in Slideshow View | = / – | 2013 and later |
What’s Next?
Related articles, about the author.

This Post Has 4 Comments

What could be a shortcut key for “save as picture” which is appeared using right click to any picture.

Hi Atif! There’s no direct shortcut for that, unfortunately. However, there is what we call a Hybrid Shortcut. If you right-click an image, you can then hit S on your keyboard, and it will launch the Save As dialog box. If you want to do that for a text box or shape, you’ll have to right-click, then hit S, and then hit Enter. Hope that helps!
Cool! Thanks
My pleasure, Atif!
Comments are closed.
Popular Tutorials
- How to Strikethrough Text (l̶i̶k̶e̶ ̶t̶h̶i̶s̶) in Word, Excel & PowerPoint
- How to Make Animated Fireworks in PowerPoint (Step-by-Step)
- Strikethrough Shortcut (l̶i̶k̶e̶ ̶t̶h̶i̶s̶) for Word, Excel & PowerPoint
- How to Create a Flash Card Memory Game in PowerPoint (Like Jeopardy)
- Keyboard Shortcuts Not Working: Solved
PowerPoint Tutorial Categories
- Strategies & Opinions
- Presentation Design
- Pictures, Icons, Videos, Etc.
- New Features
- Miscellaneous
- Charts & Data Viz
We help busy professionals save hours and gain peace of mind, with corporate workshops, self-paced courses and tutorials for PowerPoint and Word.
Work With Us
- Corporate Training
- Presentation & Template Design
- Courses & Downloads
- PowerPoint Articles
- Word Articles
- Productivity Resources
Find a Tutorial
- Free Training
- For Businesses
We help busy office workers save hours and gain peace of mind, with tips, training and tutorials for Microsoft PowerPoint and Word.
Master Critical PowerPoint Shortcuts – Secure Your FREE Training Module and Save Valuable Time!
⌛ Master time-saving expert techniques.
🔥 Create powerful presentations.
🚀 Propel your career to new heights.
We value your privacy – we keep your info safe.
Discover PowerPoint Hacks Loved by Industry Giants - KKR, AmEx, HSBC!
Over 114,880 professionals in finance, marketing and sales have revolutionized their PPT skills with our proven methods.
Gain FREE access to a full module of our premium PowerPoint training program – Get started today!
We hate spam too and promise to keep your information safe.
You are currently viewing a placeholder content from Facebook . To access the actual content, click the button below. Please note that doing so will share data with third-party providers.
How-To Geek
How to link to another slide in the same powerpoint presentation.

Your changes have been saved
Email Is sent
Please verify your email address.
You’ve reached your account maximum for followed topics.
Top Tips for Creating Quality Meeting Minutes in Word
I tried the ps5's hidden browser so you don’t have to, this new android 15 feature is going to save my battery life, quick links, linking to another slide in the same presentation, using the zoom feature.
If you know you'll be referring to the content of a previously-viewed slide at some point during your presentation, it might be useful to insert a link pointing back to that slide for quick access. Here's how to set it up.
Open your presentation and navigate to the slide that will contain the hyperlink. Once there, highlight the text, object, shape, or image to which you want to attach the link.

Next, head over to the “Insert” tab and click the “Link” button.

In the Insert Hyperlink window that opens, select “Place in This Document” on the “Link To” list on the left.

On the right, under the “Select a place in this document” list, select the destination slide.
The four options at the top of the list let you select the first or last slide in the presentation or the slide that comes right before or after the slide containing the link.
If you need to link to a different slide, expand the “Slide Titles” category. This shows you a list of all the slides in your document. If a slide has a title, the list shows the title. If a slide does not have a title, the list shows it as something like "Slide 7."
Click the slide to which you want to link.

A preview of the selected slide will appear in the window to the right. If you’re unsure which slide it was that you needed to link back to, this will come in handy.
Once you’re finished, click “OK” and PowerPoint will insert your link.

As a matter of good practice, double-check to make sure the link is working properly. To test the link in the regular slide editing view, Ctrl-click the linked object. To test the link when playing your presentation, you don't have to hold the Ctrl key; just click the linked object.
If for some reason you need to remove the hyperlink, right-click the object and then select “Remove Link.”

If you’re using PowerPoint for Office 365 or PowerPoint 2019, then you can take advantage of the new “Zoom” feature, which lets you seamlessly transition to any slide in the presentation by placing it inside another slide.
First, go to the slide that you'll be linking from. Using “Normal View,” click and drag the slide you want to insert from the left-hand pane to the current slide.
Once the slide is inserted, a new “Format” tab will appear. Click it.

In the “Zoom Options” group, check the box next to “Zoom Transition.” You’re also able to specify the duration of the transition, with 01.00 being the default.

Now let’s take a look at what happens when we click that slide during our presentation.
As you can see in the above GIF, clicking the “Introduction” slide that we placed inside our “Information” transitions back to the "Introduction" slide. Clicking again brings us back to the original "Information" slide.
- Microsoft Office
- Office 2016
How to open a hyperlink in PowerPoint without holding down the Ctrl key
In PowerPoint, you might need to add hyperlinks to redirect to a specific web page or to add a mailing option. PowerPoint doesn’t allow you to configure the key which can be used to open that link. You have to press Ctrl+Click to open the link or in some cases, it will allow you to directly click to open the link. We will see which scenarios PowerPoint will allow opening link by clicking it without holding Ctrl Key.
Table of Contents
Presentation Views and its properties with hyperlinks
In Normal View and Outline View if you are editing the presentation, then the hyperlinks will open with Ctrl+Click.

In Reading View and Slide Show if you have opened the presentation, then the hyperlinks will open with a direct click, and no need to hold the Ctrl key.

Steps to change Presentation Views
Step 1: Go to the View menu, in the Presentation Views tab you can see Normal , Outline View, and Reading View . Select the view as per your need. As mentioned above, in Reading View there is no need to hold the Ctrl key to open the hyperlink.

Step 2: Same can be achieved with the bottom toolbar. In the Bottom Toolbar, you can see Normal View and Reading View Options. Select as per your need.
Step to start Slide Show
Step 1: Go to the Slide Show menu, in the Start Slide Show tab, click From Beginning or Current Slide as per your need. In Slide Show to open hyperlink just click on it, without the Ctrl key.
Step 2: In the bottom toolbar also you will find an option for Slide Show. Click it to start the Slide show.
Hope this tip helps you to open the hyperlink without holding the Ctrl key. Happy Reading!! Leave us a comment if you found this article useful.
- How To Disable Ctrl + Click to open hyperlinks in…
- How to Add / Remove Security Options from…
- How To Use The Insert Key Instead Of Ctrl-V To Paste…
- Fix: Require Users to press Ctrl+Alt+Delete is…
- How to fix Video Lag in PowerPoint Presentation
- How to Create a Timeline Using MS PowerPoint
Open hyperlink without holding Ctrl in PowerPoint
PowerPoint always has the next two opportunities:
1. If you edit your presentation in the Normal mode or the Outline View mode, when you move the mouse over the hyperlink, you can press Ctrl+Click to follow link to:

2. If you show or preview your presentation in the Reading View mode or the Slide Show mode when you move the mouse over the hyperlink, you can just Click to follow link to:

Note : You can choose the mode in which you want to work:

There are four options in the status bar: Normal mode, Slide Sorter mode, Reading View , and Slide Show mode.
Please, disable AdBlock and reload the page to continue
Today, 30% of our visitors use Ad-Block to block ads.We understand your pain with ads, but without ads, we won't be able to provide you with free content soon. If you need our content for work or study, please support our efforts and disable AdBlock for our site. As you will see, we have a lot of helpful information to share.

How to add additional information to your presentation
- Accessories
- Entertainment
- PCs & Components
- Wi-Fi & Networks
- Newsletters
- Digital Magazine – Subscribe
- Digital Magazine – Info
- Smart Answers
- Amazon Prime Day
- Best laptops
- Best antivirus
- Best monitors
- Laptop deals
- Desktop PC deals
When you purchase through links in our articles, we may earn a small commission. This doesn't affect our editorial independence .
Become a PowerPoint pro: 7 must-know tips and tricks

Microsoft’s PowerPoint is extremely popular in schools, universities, and the corporate world, but it has never been as popular with home users. Not surprising since it’s all about creating presentations, something a private person doesn’t have to do very often.
So, if you suddenly find yourself needing to make a PowerPoint presentation and have no idea how to make it good, rest assured that you aren’t alone and there’s hope for you.
Microsoft Office 365 Home

These days, PowerPoint is more than just a basic slideshow—it can be used to create video presentations with voice-over narration, and it even has an AI-based helper called Designer that gives suggestions on how to make your presentation better.
Here are several smart tips and tricks you can use to improve your PowerPoint presentations and come off as a pro.
1. Customize Quick Access
Have you noticed that PowerPoint—and the other apps in Microsoft 365 for that matter—have a small, narrow toolbar at the very top of the application window? By default, you’ll find shortcut buttons for toggling Auto Save and basic actions like Save, Undo, Repeat, etc.
This nifty toolbar also comes with some app-specific actions that you may or may not use frequently. In PowerPoint, for example, there’s a shortcut to start slideshows from the beginning.
This toolbar is called Quick Access and you can actually customize what actions show up here. You can add frequently used actions while removing the ones you never use.
This can make it easier to find important functions that you would otherwise have to rummage around the ribbon to find.

To customize Quick Ass, select File > Options and then Quick Access Toolbar . The box on the right shows the actions currently on it and their order. The box on the left has all the available actions you can add.
Select an action you want in Quick Access and click on Add . To change the order, highlight the action you want to move and use the the arrow buttons on the right side of the window.
2. Use custom themes and templates
PowerPoint comes with a bunch of ready-made templates for presentations, which have also been themed.
A theme is a collection of settings for typography, colors, and effects that make it easy to maintain a consistent style across presentations. A template is a theme plus ready-made content that makes it easier to make a particular type of presentation again in the future.

For example, a company may have a theme that defines the colors and fonts employees should use in presentations, plus a number of templates for product presentations and quarterly reports.
A template may have a number of ready-made slides with images, charts, and everything else already laid out. When you create a new presentation from a template, you will find these individual page templates in New slide in either Start or Insert .
Creating your own custom theme
New themes can be added at any time as long as you have a presentation open—even if it’s a blank presentation.
Select the Design tab and click on the small down arrow with a dash over it on the right side of the Variants section. This shows the four categories of settings you can designate for a theme.

Select Colors > Customize Colors… and the Create new theme colors dialog box will open. A complete set of theme colors includes two pairs of text and background colors (dark/light, to be used either for dark text on a light background or vice versa), six spot colors used for graphic elements, and two colors for hyperlinks. Enter a name at the bottom and click Save when you are done.
If you also want to change the font, select Fonts > Customize Fonts… and you’ll be able to designate a Heading font and a Body font . I recommend a neutral, easy-to-read font for both.
Under Effects , you can choose the style of effects but there’s no way to customize or create a completely new effect. Under Background Styles , you can select Format Background… to tweak backgrounds.

When you’re done, go to the Themes section of the Design tab and click the down arrow with a line above it, then select Save Current Theme… to save your new theme. Give it a name and save and your new theme will appear among the available themes in the Design tab of all presentations.
Create your own custom templates
To create a new PowerPoint template, you can start from either a blank presentation or an existing template. Don’t add any content of your own yet. Instead, go to the View tab and click on Slide Master .
Start by changing the theme of your new template, under the Themes button. If you created your own theme as described above, it will normally be at the top of the list of available themes.

PowerPoint uses the term layouts for slide templates. Click on the Insert Layout button to create a new slide template.
New layouts are automatically given a header and a footer, but you can remove them if you wish (either by selecting and deleting the elements manually or via checkboxes in the Slide Background tab).
To delete an existing layout, right-click on it in the list and select Delete Layout or select it in the list and press Backspace.

To add new design elements to a layout, click the Insert Placeholder button in the ribbon and select the element type you want. You can then position and resize it, and change the placeholder text for it.
If you want to make per-layout changes, make sure to select that layout in the list before tweaking. For example, you can change a layout’s color theme or switch between the four background formats.
When you’re happy, save the template by selecting File > Save As and changing the format to Powerpoint Template (*.potx) . Templates can be stored either locally on your computer or in OneDrive—and since the theme is included, you can freely share the template with others.

3. Link to Excel data
If you’re making a presentation with figures in tables or charts, you can make your life easier by linking PowerPoint to Excel.
To do this, start by copying a chart in Excel, then switching over to PowerPoint and navigating to the Home tab in the ribbon. Select Paste > Paste Special… , then choose the Paste Link option, select Microsoft Excel Chart Object and finish by clicking OK .

A linked chart, table, or other Excel object can be instantly updated with up-to-date information as the data in the Excel document changes, all without having to copy and paste all over again.
To update the Excel object, right-click on it in PowerPoint and select Update Link . PowerPoint will retrieve the latest data to be reflected in the Excel object. This makes it easy to build a data-heavy report in PowerPoint that can be kept up-to-date with zero hassle.
4. Edit and apply effects to images
Basic slide editing in PowerPoint isn’t difficult, but there are a few tricks you can learn to make your slides both behave the way you want them to and do new things you may not have realized were possible.
For example, did you know that PowerPoint has built-in editing features that can change brightness, contrast, and sharpness of images?

Select an image in a slide and the Picture Format tab will open. Here you’ll find several adjustments you can make:
- Corrections alters brightness, contrast, and sharpness
- Color applies color filters
- Artistic Effects stylizes the image (but apart from the useful Blur effect, most of these feel pretty old-fashioned)
- Transparency makes the image more or less transparent
- Picture Styles can format the image in various ways (e.g., frame, shadow, rounded corners, perspective, etc.)
One thing you’ll notice when you add an image is that PowerPoint automatically generates alternative text—that is, descriptive text that gets read aloud for users with visual impairments. You can set this text to whatever you want, and it’s nice that Microsoft has thought about accessibility in this way.
5. Fill a shape with an image
PowerPoint makes it easy to fill a vector graphic shape with an image instead of just a solid color or gradient.
Create the shape as you want it, then make sure it’s selected before navigating to either the Home or Figure Format tabs in the ribbon. Select Shape Fill > Picture… , then select From a File to pick an image that’s saved on your computer.

If you aren’t satisfied with the positioning of the image in the shape, you can open the Picture Format tab and select Crop > Crop to resize and move the image in relation to the shape, allowing you to center it at a different point and even zoom in or out.
6. Incorporate audio and video
These days, PowerPoint isn’t just for presentations on screen or with a projector—it’s increasingly common to export finished presentations as videos to be sent to recipients, uploaded to the web, embedded in mobile apps, and more.

To make such presentations more vivid and interesting, you can record voice-over audio and/or video from a connected webcam to be placed on top of slides. You can find these features in the Record tab, where PowerPoint has also placed the Export to Video function.
The export function allows you to set the video resolution as well as how long each slide will display in the video.
More on this: How to turn a PowerPoint presentation into a video
7. Get AI help with Designer
Designer is the new name for Design Ideas, a feature that has been around since PowerPoint 2016 and uses machine learning to analyze the content of presentations and suggest improvements.
You can find it as a button in the Home and Design tabs, with Designer itself appearing in a column on the right.

This feature continuously analyzes your presentation and displays a list of suggested changes for the current slide. If you don’t like any of the suggestions, you can click on See More Design Ideas at the bottom and it will generate additional suggestions.
How attractive and useful are the suggestions? Well, it varies. When I tested it myself, they’ve rarely been results that I could use straight away—but the suggestions were helpful in that they gave me several great ideas that I hadn’t thought of myself.
For example, in the image above, you can see a suggestion for a color filter on a photo that looks like it could work really well with bright text and maybe a little blur.
Further reading: PowerPoint keyboard shortcuts worth knowing
This article originally appeared on our sister publication PC för Alla and was translated and localized from Swedish.
Author: Anders Lundberg , Contributor

Anders writes news, reviews and buying guides that touch most categories of consumer tech.
Recent stories by Anders Lundberg:
- How to master Excel: From beginner to pro
- Getting started with Microsoft 365: Everything you need to know
- 8 advanced Microsoft Word tricks you probably missed
May 2024 meeting
Select Section
Instructions for downloading and installing JAWS
These instructions are for ASU affiliates only. You must have an ASU email to download JAWS.
Installing JAWS for Windows Users
JAWS only works with Windows. If you have a Mac and want to create a virtual Windows machine on it, follow the steps in Mac Instructions (below).
- From your Windows machine, use this link to download a free version of JAWS . In the Email Address field, you must use your ASU email address to qualify for the free version.
- Install JAWS according to the instructions.
- Try playing around with JAWS, using this keyboard shortcut cheat sheet from Deque . Remember: To temporarily silence JAWS, tap the Control key.
Mac Instructions
If you don’t have access to a Windows machine, you can still download and use JAWS on a Mac, but it requires a little extra time and steps.
- Install a virtual desktop. Download software to create a virtual machine on your Mac. Parallels has a free 14-day trial version . VMWare Fusion’s trial version is 30 days .
- Install Windows on the virtual machine. You will need a licensed copy of Windows. Follow the instructions to install.
- Download JAWS using the link above but don’t install it yet. Continue reading and choose option A or B to provide a substitute Insert key.
Mac Issue: Lack of an Insert Key
In JAWS, the Insert key is a special key called the “JAWS key.” Unfortunately, the Insert key is not available on Mac keyboards. To get around this, you can use (A) the Caps Lock key OR (B) another key in place of the JAWS key.
Option A: Use the Caps Lock key as the JAWS key
This method is quicker but sometimes can cause problems with other software. During the JAWS installation, you’ll be asked to choose a “Keyboard Layout.” Select the Laptop setup rather than the Desktop. The Caps Lock key will now act as your JAWS (Insert) key.
NOTE: If you miss this step and/or JAWS is already installed, you can still make the Caps Lock key the JAWS key with the following steps:

- Press Enter or Tab down to the OK button, then press Enter. The Caps Lock key will now act as your JAWS (Insert) key.
Option B: Use another key as the JAWS key
If you have trouble using the Caps Lock key as the JAWS key, you can “remap” another key to act as the JAWS key. This article from TPGi discusses ways you can remap your keys .
For example, I remapped my right Command key to the Insert key, and this has worked well for me. I use Sharpkeys to remap my laptop’s keys. Here are instructions:
- From inside Parallels and Windows, download the sharpkeys394.zip file.
- Launch SharpKeys by selecting its icon from the Start menu. Once Sharpkeys loads, select the Add button.

- Click OK. Then click on the “Write to Registry” button.
- Restart the virtual machine, and your new key mapping should work.
Whether you use the Caps Lock or right Command key as your JAWS key, remember to substitute it for the Insert key when trying new keyboard shortcuts in JAWS.
If you have any questions, please ask on the #accessibility Slack channel so that everyone can benefit from the answers.
Accessibility Connections
- For accessibility in online learning and education, join the UDAT working group .
- Connect with us on ASU's #accessibility Slack channel.
- Subscribe to ASU's ITACCESS mailing list .
- Insert WordArt Article
- Add a hyperlink to a slide Article
- Create a PowerPoint presentation from an outline Article
- Check spelling in your presentation Article
- Create and format a table Article
- Insert a linked Excel chart in PowerPoint Article
- Add slide numbers, page numbers, or the date and time Article
- Set text direction and position in a shape or text box Article

Add a hyperlink to a slide
The fastest way to create a basic web hyperlink on a PowerPoint slide is to press Enter after you type the address of an existing webpage (such as http://www.contoso.com ).
You can link to a webpage, or you can link to a new document or a place in a existing document, or you can begin a message to an email address.

Link to a website
Select the text, shape, or picture that you want to use as a hyperlink.
Select Insert > Link > Insert Link .
Select Existing File or Web Page , and add the:
Text to display : Type the text that you want to appear as hyperlink.
ScreenTip : Type the text that you want to appear when the user hovers over the hyperlink (optional).
Current Folder , Browsed Pages , or Recent Files : Select where you want to link to.
Address : If you haven't already selected a location above, insert the URL for the web site you want to link to.
If you link to a file on your computer, and move your PowerPoint presentation to another computer, you'll also need to move any linked files.
4. Select OK .
Link to a place in a document, new document, or email address
Select Insert > Link > Insert Link and select an option:
Place in This Document : Link to a specific slide in your presentation.
Create New Document : Link from your presentation to another presentation.
E-mail Address : Link a displayed email address to open up a user's email program.
Fill in the Text to display , ScreenTip , and where you want to link to.
Select OK .
Change the color of a hyperlink
You can change the color of a hyperlink if you like. If you want to change the display text of a link, right-click it and select Edit Link .
Select the hyperlink you want to re-color.
On the Home tab of the ribbon, select down arrow next to the Font Color button to open the menu of colors.

Select the color you want for the hyperlink.
Test the hyperlink
Once you've inserted the link, you can test it (in Normal view) by right-clicking the hyperlink and selecting Open Hyperlink .
Show and return
The Show and return box is grayed out unless you are linking to a Custom Show in your presentation.
If you're a Microsoft 365 subscriber and want to use a feature like show and return , click here to read about linking to another slide by using Zoom for PowerPoint , and see the "Choose to return" feature discussed near the end of that article.
Remove the underline from hyperlink text
Change the color of hyperlink text throughout a presentation
Bookmark a slide and link to it from elsewhere in the presentation
You can link to a web page, link to a different place in your presentation, open a different presentation, or begin a message to an email address.
Link to a web page
In Normal view, select the text, shape, or picture that you want to use as a hyperlink.
On the Insert tab, select Link .
The Insert Hyperlink dialog appears.

1 - Text to Display : The linked text in the document.
2 - ScreenTip : Text shown when you point your mouse at the linked text on the slide.
Enter the web address in the Address box. (Example: https://www.contoso.com )

Link to a slide in the same presentation
In the Insert Hyperlink dialog box, click This Document .
Under Select a place in this document , click the slide you want to link to.
Link to a different presentation
In the Insert Hyperlink dialog box, click Web Page or File .
Click Select and then click the presentation or file you want to link to.
Note: PowerPoint for macOS can't link to a specific slide on another presentation.
Link to an email address
In the Insert Hyperlink dialog box, click Email Address .
In the Email address box, type the email address that you want to link to, or in the Recently used email addresses box, click an email address.
In the Subject box, type the subject of the email message.
Highlight the text that you want to be the hyperlink.

The Link dialog box opens.
In the Display text box, type the text you want to be visible on the slide for the hyperlink.

Select Insert .
To test the hyperlink, select the Slide Show tab on the ribbon, and then select Play from Beginning .
(If you've turned off the Simplified Ribbon, you don't have a Slide Show tab; instead use the View tab to start Slide Show.)
You can also create a hyperlink to an email address. Instead of entering the web address in the Address box (step 4 above), type mailto:// followed by the complete email address.
Insert a hyperlink
On the slide, tap where you want to add the link.
On the Insert tab of the ribbon, select Link .
Select Insert Link .
Or: You can make a link to a recent web address or recently open file by selecting the item from the Recent Items list that appears.
In the Text to display box, enter the text that will be the hyperlink.
In the Address box, enter the address you want to link to. (Example: https://www.contoso.com )
|
This feature is available to only right now. |
On the Home tab of the ribbon, tap the Font Color button to open the menu of colors.

Tap the color you want for the hyperlink.
On the Home tab of the ribbon, tap the arrow next to the Font Color button to open the menu of colors.
On the slide, enter the text you want to turn into a hyperlink.
Select the text.
Or: You can make a link to a recently open file by selecting it from the Recent Items list that appears.
In the dialog box that opens, in the Address box, enter the address you want to link to. (Example: https://www.contoso.com )

Need more help?
Want more options.
Explore subscription benefits, browse training courses, learn how to secure your device, and more.

Microsoft 365 subscription benefits

Microsoft 365 training

Microsoft security

Accessibility center
Communities help you ask and answer questions, give feedback, and hear from experts with rich knowledge.

Ask the Microsoft Community

Microsoft Tech Community

Windows Insiders
Microsoft 365 Insiders
Was this information helpful?
Thank you for your feedback.
Microsoft 365 Life Hacks > Presentations > How to introduce yourself in a presentation
How to introduce yourself in a presentation
A well-executed presentation should captivate your audience and listeners. The first step to gaining their attention is creating an engaging introduction. Learn why presentation introductions are important and how to properly execute one for your presentation.

Why are presentation introductions important?
Presentation delivery impacts your audience’s reception and listening skills. A dull delivery can deter listeners and potentially leave them disinterested. Conversely, an effective delivery can engage your audience, promote active listening, and stimulate substantive discussion.
Presentation introductions also help to establish the outline of your presentation and give the audience an idea of what is to come. Introductions play a crucial role in captivating listeners from the onset and building momentum. They address who you are, why the audience should be invested, state the topic, establish credibility, preview the main points, and establish the cadence and tone of your presentation. Before you dive into the content of your presentation, ensure you establish an effective introduction to captivate your audience.

Tell your story with captivating presentations
Powerpoint empowers you to develop well-designed content across all your devices
How to begin a presentation introduction
To establish rapport with your audience, here are some tips to effectively introduce yourself and your presentation:
Be clear and concise
A succinct introduction makes it easier for your audience to follow. Keep your introduction simple, short, and include only necessary information. State your name and topic clearly so your audience knows you from the beginning. Avoid unnecessary details or lengthy anecdotes in your introduction to keep things focused and to the point.
Provide pertinent background information
In addition to your name and topic, highlight anything else that is relevant. You can include your education, work background, qualifications, and other information. Most importantly, ensure the information you disclose is directly relevant to yourself and presentation.
Create a hook or attention getter
Once you’ve established your name and topic, create an engaging hook or attention getter. Your introduction can be funny, clever, or it can captivate your audience. Have fun creating an introduction, but be sure to align your tone and delivery to your audience.
Outline your presentation
Let your audience know what your will be discussing. Establish a roadmap of your presentation: outline your contents, topics, and main points in an easily digestible format. This makes it easier for your audience to follow your presentation and prepare for its contents.
Practice and refine
Once you’ve created a solid introduction, rehearse your introduction until the delivery is organic and smooth. Confidence is key for an optimal delivery. Speak clearly, practice eye contact, and use storytelling to engage your audience.
Be authentic
Above all, be yourself—authenticity helps you build trust and connection with your audience. Carry you character, speech, and personality into your presentation to draw in your audience.
A successful introduction establishes tone, cadence, topic, and showcases your personality. Gain your audience’s attention and effectively deliver your presentation with an effective introduction. For more ways to engage your audience and improve presentation delivery , learn more presentation tips .
Get started with Microsoft 365
It’s the Office you know, plus the tools to help you work better together, so you can get more done—anytime, anywhere.
Topics in this article
More articles like this one.

How to add citations to your presentation
Conduct research and appropriately credit work for your presentation. Understand the importance of citing sources and how to add them to your presentation.

How to work on a group presentation
Group presentations can go smoothly with these essential tips on how to deliver a compelling one.

How to create a sales presentation
Engage your audience and get them interested in your product with this guide to creating a sales presentation.

7 tips for creating and presenting a webinar
Everything you need to achieve more in less time
Get powerful productivity and security apps with Microsoft 365

Explore Other Categories
IMAGES
VIDEO
COMMENTS
Select the text, shape, or picture that you want to use as a hyperlink. Select Insert > Link > Insert Link and select an option: Place in This Document: Link to a specific slide in your presentation. Create New Document: Link from your presentation to another presentation. E-mail Address: Link a displayed email address to open up a user's email ...
To link to a file or website, select Existing File or Web Page at the top-left. Then, enter the full URL of the website or select the document. To link to another location in your presentation, select Place in This Document, then select a slide title. To create an email hyperlink, select E-mail address, then enter an email address.
Along with the Ctrl+K shortcut, Windows PPT offers a range of other useful keyboard shortcuts that can enhance user productivity and streamline presentation creation. For instance, pressing Ctrl+M in PowerPoint instantly inserts a new slide in the presentation, making it handy for adding content seamlessly during a presentation creation session.
Frequently used shortcuts. The following table itemizes the most frequently used shortcuts in PowerPoint. To do this. Press. Create new presentation. Ctrl+N. Add a new slide. Ctrl+M. Apply bold formatting to the selected text.
Learn how to insert a hyperlink in PowerPoint using your keyboard shortcuts.🚀 UNLOCK the critical PowerPoint shortcuts trusted by industry leaders like KKR,...
Step-1: Select the Text and Click on the "Link" option. The first step is to "Right Click" on the text or image where you want to add the hyperlink. In the dropdown menu, click on the "Link" option. Alternatively, you can press the "Ctrl+K" keys on your keyboard.
If you are using a shape that contains text, click its edge. Click the Insert tab in the Ribbon. In the Links group, click Link or Hyperlink. You can also press Ctrl + K. The Edit Hyperlink dialog appears. Under Link to, select Existing File or Web Page. In the Address box, enter the web address or url.
Well, get ready to be even fancier (and more productive) because we've curated 100 of the best PowerPoint keyboard shortcuts. Learn Microsoft PowerPoint Download PDF ... Insert hyperlink - Microsoft PowerPoint shortcut. With text already selected in PowerPoint, you can use this shortcut to attach an immediately click-able hyperlink to your ...
If you do not like keyboard shortcuts, you can alternatively open the Insert Hyperlink dialog box using your Ribbon. To add a link to an object (or block of text) using the PowerPoint Ribbon, simply: Select your text or object that you want to use as the anchor for link. Click the Insert tab. Open the Link drop down.
To add a link to a different slide in the same presentation: In the Insert Hyperlink dialog box, select Place in This Document. The options include: Choose the slide that you want to link to. A preview of the slide appears to help you make your choice. Select OK to close the dialog box and create the link.
Use these shortcuts to enable the use of a pen or pointer during your presentation: To enable Pen, press CTRL + P. To enable Laser, press CTRL + L. To enable Arrow, press CTRL + A. To enable Highlighter, press CTRL + I. To erase notes made with pen or highlighter, press CTRL + E. To hide pointer, press CTRL + H.
Select Insert > Link. The drop-down menu shows any links copied to your clipboard and recent files. Choose what you want or select Insert Link at the bottom. Select Existing File or Web Page, and add the: Text to display - Type the text that you want to appear for your hyperlink. ScreenTip - Type the text that you want to appear when the user ...
Pick Insert > Link or press [Ctrl] + K. The Insert Hyperlink dialog box appears. Choose the kind of link to insert. Options include: Existing File or Web Page: Navigate to the location and file you want to link to in the presentation or add the web address in the prompt near the bottom of the dialog box. Place in This Document (another slide ...
Click the Link button, or you can press Ctrl + K on your keyboard. The Insert Hyperlink dialog box will appear: Select the Place in This Document option on the left-hand side. A list of available slides in your presentation will appear. Click on the slide you want to link to, then press OK to confirm your selection.
Same - Same But Different These two PowerPoint shortcuts both create duplicates of things in PowerPoint, but there is a strategic difference worth mentioning. First off though, these two shortcuts work in all versions of Microsoft PowerPoint. They also work on a Mac. The duplicate shortcut (CTRL + D) creates a duplicate or copy, any PowerPoint object that you have selected (tables, charts ...
Linking to Another Slide in the Same Presentation. Open your presentation and navigate to the slide that will contain the hyperlink. Once there, highlight the text, object, shape, or image to which you want to attach the link. Next, head over to the "Insert" tab and click the "Link" button. In the Insert Hyperlink window that opens ...
Step 1: Go to the View menu, in the Presentation Views tab you can see Normal, Outline View, and Reading View. Select the view as per your need. As mentioned above, in Reading View there is no need to hold the Ctrl key to open the hyperlink. Step 2: Same can be achieved with the bottom toolbar. In the Bottom Toolbar, you can see Normal View and ...
1. If you edit your presentation in the Normal mode or the Outline View mode, when you move the mouse over the hyperlink, you can press Ctrl+Click to follow link to: Open a hyperlink: Create an e-mail: 2. If you show or preview your presentation in the Reading View mode or the Slide Show mode when you move the mouse over the hyperlink, you can ...
To do this. Press. Start a presentation from the beginning. F5. Start a presentation from the current slide. Shift+F5. Start the presentation in Presenter View. Alt+F5. Perform the next animation or advance to the next slide.
There is no Keyboard Shortcuts group. The writer may have installed an Add-in that creates such a group. PowerPoint doesn't allow keyboard shortcut creation. The best you can do (without an add-in) is to add commands to the Quick Access Toolbar. If an icon is in the 5th position from the left, Alt + 5 will activate it.
To create a new PowerPoint template, you can start from either a blank presentation or an existing template. Don't add any content of your own yet. Instead, go to the View tab and click on Slide ...
JAWS only works with Windows. If you have a Mac and want to create a virtual Windows machine on it, follow the steps in Mac Instructions (below). From your Windows machine, use this link to download a free version of JAWS. In the Email Address field, you must use your ASU email address to qualify for the free version.
You can open a hyperlink during a slide show by clicking the link. Click Slide Show > From Beginning to start your slide show presentation. When you see a hyperlink in the presentation, click the underlined text to open, or follow, the hyperlink. The slide show remains active when the link opens. You might need to close the linked webpage or ...
Select the text, shape, or picture that you want to use as a hyperlink. Select Insert > Link > Insert Link and select an option: Place in This Document: Link to a specific slide in your presentation. Create New Document: Link from your presentation to another presentation. E-mail Address: Link a displayed email address to open up a user's email ...
How to create an educational presentation. Use PowerPoint to create dynamic and engaging presentations that foster effective learning. Learn more. March 29, 2024. Five tips for choosing the right PowerPoint template. Choose an appropriate PowerPoint template to elevate your presentation's storytelling. Consider time length, audience and other ...