How to Convert An InDesign File to a PowerPoint Presentation

Adobe InDesign is one of the best software for creating graphic content. You can create amazing presentations and even showcase them as interactive PDFs.
However, PowerPoint is the most popular software for presentations and is still the easiest way to share your slides with an audience.
So, if for some reason or another, you want to change your presentation’s medium, here’s a quick guide on how to convert your InDesign presentation into a PowerPoint, and vice-versa.
In this article you’ll find:
- A step-by-step guide on how to export InDesign into PowerPoint for free
- A quick overview of how to use plug-ins to convert InDesign files to PowerPoint
- How to convert PowerPoint to InDesign
Are you ready? Then let’s go straight into how to convert InDesign to PowerPoint!


Can you export from InDesign to PowerPoint?
Yes, you can convert an InDesign file to a PowerPoint slide presentation! However, there’s no direct way to do it, meaning you’ll have to use other tools as an intermediary.
There are two main ways to export InDesign to PowerPoint: through a PDF editor or with the help of a plug-in that allows you to export your files.
Take into account that converting InDesign to PowerPoint is not a very seamless process. The result you’ll get will probably still need a bit of tweaking to make it look presentation-ready.
Luckily for you, 24Slides can help you out with that! Our professional presentation designers are experts at creating outstanding presentations that will leave an impression on your audience.
And, they are masters at cleaning up and converting slides from other formats as well! You can save yourself from all the work of converting your own slides and have your presentation ready to go in 24 hours, for as little as $11 per slide.
How to convert InDesign to PowerPoint for free
If you want to convert an InDesign file to PowerPoint for free, what you’ll need is a PDF editor. You’ll need to export your InDesign file to a PDF format, and only then you’ll be able to convert it to PowerPoint.
For this, any PDF editor with an export option will do. The most important aspect is that they must have OCR conversion . Optical Character Recognition is what will enable them to recognize your InDesign elements separately and make them fully editable when exporting them to a PowerPoint presentation.
You can use PDF convertors without OCR conversion. However, take into account that this will export your PDF file into a PowerPoint as a generic image, meaning you’ll not be able to edit specific elements of your design after you’ve converted it to a slide format.
If you’re working with InDesign, there’s a chance you already have access to Adobe Acrobat through the Adobe Suite , which will allow you to open your InDesign file in PDF format.
If you don’t have Adobe Acrobat, don’t worry! PDF editors like ExpertPDF and Wondershare, among many others, also have OCR conversion capabilities. And while many of these software are paid, they also offer free trial versions, which are perfect for one-time users looking to export a specific InDesign file into PowerPoint.
Step 1. Export InDesign File to PDF
Open your InDesign file and go to File > Export and pick Adobe PDF (Interactive) .
A window will pop up so you can tweak your export, but the default setting will do, so you can just click Export directly.
Step 2. Convert PDF to PowerPoint
Next, open your PDF editor. In this case, we’ll be using Adobe Acrobat. Go to Export To > Microsoft PowerPoint Presentation .
Step 3. Tweaking your PowerPoint
Now you should have your InDesign file converted into PowerPoint!
The simpler your design, the most likely it'll be that the results match the original file. However, chances are that you’ll still need to fix and tweak it to make it look presentable.
Make sure your different elements are aligned, make sure colors have been exported correctly, and overall compare both your documents to guarantee your slides are exactly as you want them to be.
If you need help with this, check out 24Slides’ fix-up service to get your presentation ready with just a couple of clicks!

How to export InDesign to PowerPoint using plug-ins
Plug-ins are small tools that support existing software and add extra functionalities to them. There are plug-ins for almost everything, and of course, converting InDesign to PowerPoint is no exception!
The ID2Office plug-in from Recosoft is one of the best options for this task. It’ll help you export your InDesign file to PowerPoint directly, without the need for an intermediate PDF editor, and still keeping it fully editable.
ID2Office is a paid plug-in. However, there’s a free trial version for those looking for a quick one-time fix!
Can you convert PowerPoint to InDesign?
What about the other way around? Just like in the case of ID2Office, Recosoft offers a plug-in for converting PowerPoint to InDesign, in this case, called DecksMoveIn . Just like ID2Office, it’s a paid feature, but you can try it for free.
You can also export your PowerPoint presentation into a PDF File, to then convert it to InDesign through the multipage PDF script (Window > Utilities > Scripts > Samples > JavaScript > PlaceMultipagePDF.jsx). However, take into account that the result of this process will not be editable.
In short, you can convert your InDesign file into a PowerPoint presentation, but you’ll need some extra tools and a bit of patience to make sure the result is optimal.
Whether it’s a PDF editor or an external plug-in, there will be a couple of intermediate steps in order to successfully export InDesign into PowerPoint.
It’s way easier to create your presentation in the same format you’ll be editing it in. However, in case of an unexpected change, hopefully this guide will help you take your file from InDesign to PowerPoint.
If you’re having problems with your presentation, why not call in the experts? You won’t need to convert your presentations any longer with the help of 24Slides amazing designers. You’ll get a fully editable, presentation-ready, slide deck that will wow your audience from the get-go!

You might also like these articles:
- How to Convert an Adobe Illustrator File to PowerPoint
How To Convert Google Slides To PowerPoint and Vice Versa
- How To Convert Keynote To PowerPoint
- How to Insert Hyperlinks in PowerPoint
Create professional presentations online
Other people also read

Tutorial: Save your PowerPoint as a Video
How To Add Animations To PowerPoint

We do not use any AI writing tools. All our content is written by humans, not robots. See our editorial process .
How to Convert InDesign to Powerpoint
InDesign is a very powerful piece of layout design software, but if it has a flaw, it’s the limited number of export options that are available once you’re finished creating your masterpiece. InDesign’s primary export format is the reliable standard Portable Document Format (PDF), but unfortunately, it doesn’t have the ability to export files as Powerpoint slideshows.
There are a number of complex technical reasons for this, but the simplest way to explain it is that Adobe and Microsoft have very different app development styles.
Microsoft Powerpoint is intended for simple business presentations that can be easily edited by the typical computer user, while Adobe InDesign focuses on creating highly-designed documents that prioritize visual quality over ease of use.
This mismatch of approaches makes it almost impossible to convert an InDesign document directly into a Powerpoint slideshow, but there is at least one way around it – as long as you’ve got Adobe Acrobat.
Table of Contents
Step 1: Export to PDF
Step 2: adobe acrobat, step 3: polishing in powerpoint, using third-party plugins to convert indesign to powerpoint, do you really need powerpoint , a final word, convert indesign to powerpoint with adobe acrobat.
Before we get started, it’s important to point out that this is a very rough workaround instead of a smooth and seamless solution. PDF conversion will only give you a rough start to your Powerpoint presentation.
If you absolutely must use Powerpoint, then the best way to create your presentation is by using Powerpoint from the very beginning.
Now that we’ve managed the expectations let’s take a look at how you can use this workaround. To complete the conversion, you’ll need access to Adobe InDesign , Adobe Acrobat , and Microsoft Powerpoint .
If you have access to InDesign through a subscription to the All apps plan from Adobe, then you’ve also got access to the full version of Adobe Acrobat, so be sure to check your Adobe Creative Cloud app to see if it can be installed.
If you subscribe to InDesign through another plan, you should be able to use the trial version of Acrobat, although the trial is time-limited, so it’s not a long-term conversion solution.
Note: This process will not work with the free Adobe Reader app .
Once you’re finished designing your document using InDesign, you’ll need to export it as a PDF file.
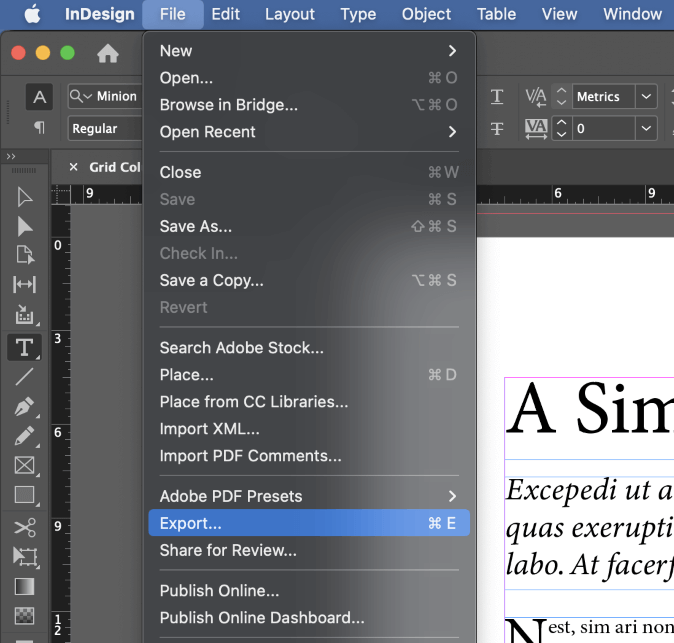
Make sure that you’ve saved your document, then open the File menu and click Export .
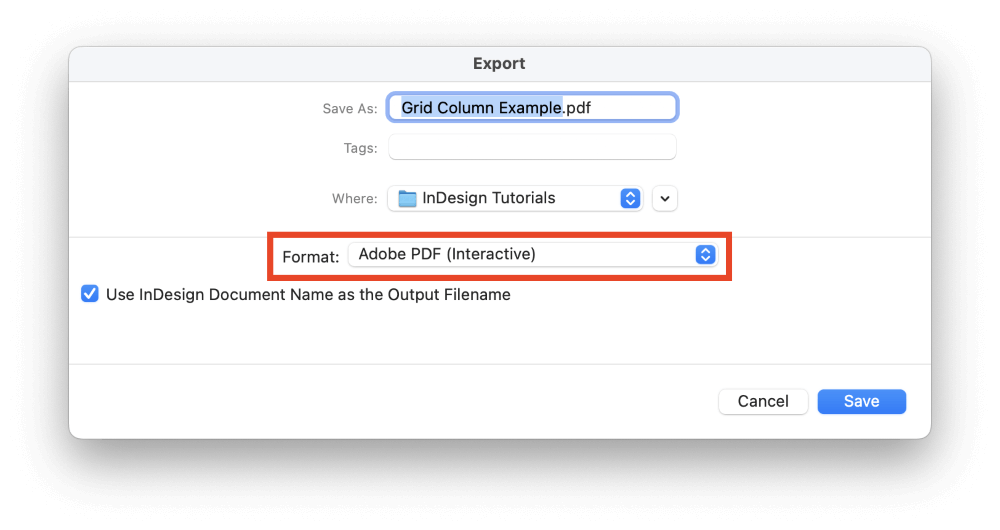
In the Export dialog window, open the Format dropdown menu and select Adobe PDF (Interactive) , then name the file and click the Save button.
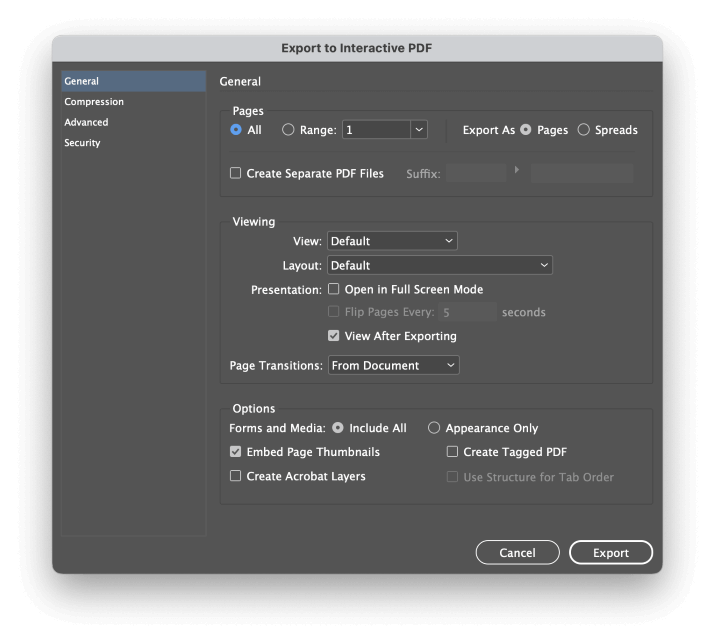
InDesign will open the Export to Interactive PDF dialog, which has some useful options for configuring your PDF file as a presentation in case you decide not to use the converted Powerpoint file in the end. For now, just click the Export button.
Next, switch apps to Adobe Acrobat. In the File menu, click Open , then browse to select the PDF file you just created.
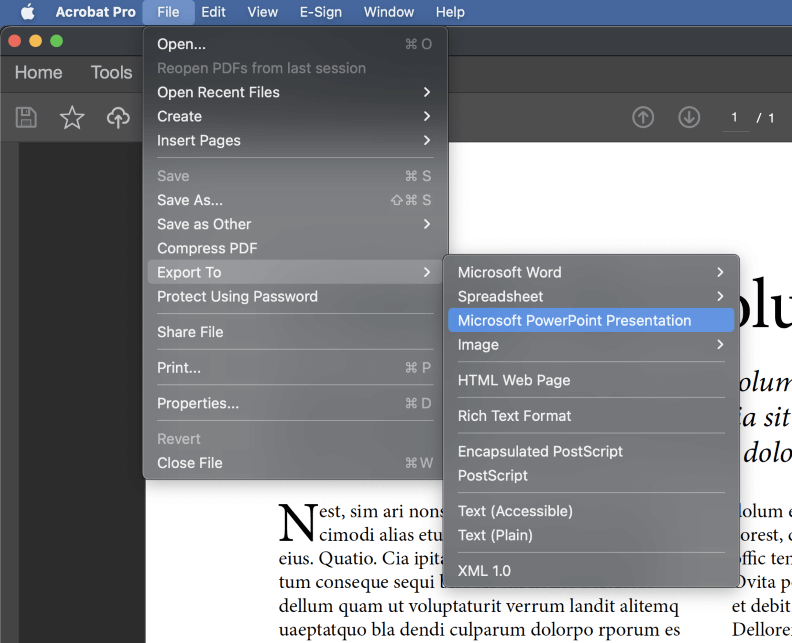
Once your PDF file has loaded, open the File menu again, select the Export To submenu, and choose Microsoft Powerpoint Presentation .
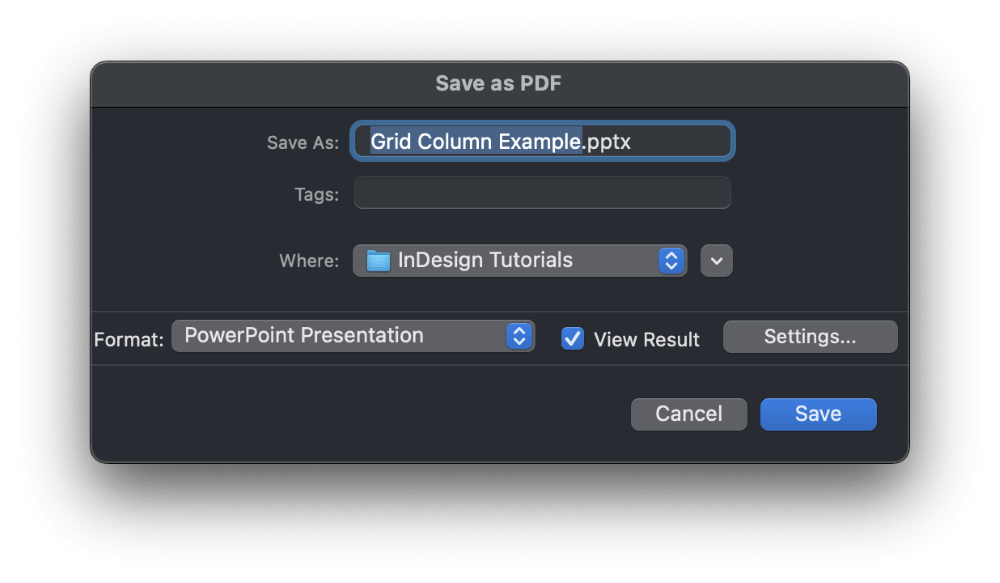
Give your new presentation a name, and click Save .
Now comes the real work! Open your new Powerpoint presentation in Powerpoint, and compare the look of the two documents. Some graphical elements may not have converted properly, colors may be off, and even the text characters may require some adjustment too.
If you’re lucky, and your InDesign file was very simple, then you may have good success with the conversion process, and there won’t be much to do. But if you’re starting with a more complex layout with lots of graphics, spot colors, and fancy typography, you may find yourself looking at a jumbled mess in Powerpoint.
I tested this conversion process using a number of different PDFs that I had lying around, and only the most basic PDF files were converted acceptably. All the PDFs that had complex layouts and graphics had conversion issues, ranging from poor object placement to missing characters to completely missing objects.
The unfortunate reality is that Powerpoint and InDesign are intended for two very different markets, and apparently, neither Adobe nor Microsoft see much point in creating better interoperability between the two apps.
While Adobe and Microsoft don’t want to tackle this conversion issue, they’re far from the only software developers in the world. InDesign and Powerpoint are two very popular programs, so there’s a tiny industry of third-party developers who create conversion plugins to solve this problem.
However, despite the fact that they market themselves as problem solvers, you may not get better results than you do from the PDF conversion method described earlier. If you’re curious, though, Recosoft offers a plugin named ID2Office that might do what you need.
I strongly recommend that you test out the free trial before purchasing the plugin , though, because you may discover that it’s not up to the job.
Powerpoint has some good points (haha), but it’s far from the only way to create a good presentation. InDesign also allows you to create interactive PDFs that are perfect for on-screen presentations.
The only trick is to treat each page as though it’s a slide, and then you can take advantage of all of InDesign’s advanced layout and design features while creating a PDF presentation that can be viewed on any device.
Before you spend a lot of time trying to convert your InDesign file to a Powerpoint file, consider whether or not you can simply keep your file in the InDesign format and still get the results you need.
That covers everything that there is to know about converting InDesign files into Powerpoint files! While I wish there was a simpler process that created perfect Powerpoint files, the simple truth is that the two apps are intended for different markets.
It doesn’t sound quick and easy, but it’s essential to use the proper app for the job from the very beginning. You’ll save yourself a lot of time and frustration!
Submit a Comment Cancel reply
Your email address will not be published. Required fields are marked *
Unsupported browser
This site was designed for modern browsers and tested with Internet Explorer version 10 and later.
It may not look or work correctly on your browser.
- Design & Illustration
- Graphic Templates
How to Make an InDesign Presentation Template
Ready to present your amazing business ideas? This InDesign presentation template will help you get what you need to launch your next project.
In this tutorial, you'll learn how to create an InDesign presentation template. You will learn how to create a multi-page document and organize it with multiple layers. Paragraph styles will come in handy, making it easy for you to apply formats to lengthy amounts of text.
If you are looking into creating your own templates, you'll pick up some essential tips here. By organizing your file, you'll be making it easier for other people to use your templates and edit them. Ready to start designing your first template?
In a hurry? We’ve got amazing InDesign templates and presentation folder templates in InDesign over at Envato Elements and GraphicRiver . Go check them out!

What You Will Need for Your InDesign Presentation Template
You'll need access to Adobe InDesign; if you don't have the software, you can download a trial from the Adobe website . You'll also need:
- Smiling Arabic entrepreneur
- Thoughtful young businesswoman
- Young Asian businesswoman
- Portrait of a black woman
- Portrait of a young African American woman
- Group of young entrepreneurs
- Hexagon logo template
- Ardent Sans
Download the assets and make sure the font is installed on your system before starting. When you are ready, we can dive in!
1. Setting Up an InDesign Presentation Template
In InDesign , go to File > New . Name the document Presentation Template and set the file to the following dimensions:
- Width to 21 cm
- Height to 29.7 cm
- Orientation to Portrait
- Units to Centimeters
- Check Facing Pages
- Margins: 1.5 cm
- Bleeds to 0.3 cm
Click Create.

For this open presentation template tutorial , we will work with three Layers. Organizing layers is an important practice when designing a template as they will make it easier for the user to edit.
Bring up the Layers panel by going to Window > Layers. Double-click on Layer 1 and rename it Background.
On the Layers panel main menu, select New Layer. Name it Images. Click OK.
Additionally, create a new layer named Copy. Click OK.

Head over to Window > Color > Swatches to expand the Swatches panel. Choose New Color Swatch button from the main menu. Set the Swatch Name and values to the following:
- Light Blue: C=70 M=20 Y=0 K=0
- Dark Blue: C=90 M=80 Y=20 K=40
Click Add and OK after you input each of the color values.

For this tutorial, we will create a list of Paragraph Styles that we will use to format the presentation template.
Head over to Window > Styles > Paragraph Styles to open the Paragraph Styles panel. On the main menu, select New Paragraph Style , and set the Style Name to Title . Select the Basic Character Formats option from the left side menu. Use the following settings:
- Font Family: Ardent Sans
- Font Style: Extra-Bold
- Size: 30 pt
Select the Character Color option from the left side menu. Set the color to the Dark Blue swatch. Click OK.

Create a New Paragraph Style, set the Style Name to Intro. Set the Basic Character Formats option to the following:
- Font Style: Book
- Size: 14 pt
- Leading: 20 pt
Select the Character Color option from the left side menu. Set the color to the Light Blue swatch. Click OK.
Create a New Paragraph Style , and set the Style Name to Copy. Set the Basic Character Formats option to the following:
- Leading: 12 pt
- Tracking: 10 pt
Select the Indents and Spacing option from the left side menu. Set the Space Between Paragraph Using Same Style to 0.2 cm.
Create a New Paragraph Style , and set the Style Name to Pull-quote. Set the Basic Character Formats option to the following:
- Font Style: Regular
- Leading: 33 pt
Select the Character Color option from the left side menu. Set the color to the [Paper] swatch. Click OK.

2. Setting Up Parent Pages for Your InDesign Portfolio Template
Head over to the Pages panel (Window > Pages) and double-click on the A-Parent pages.
Go to Layout > Create Guides. In the Create Guides option window, use the following settings:
- Columns Number: 3
- Columns Gutter: 0.5 cm
- Fit Guides to: Margins

On the Layers panel, select the Copy layer to create a folio. The folio is the page number indicator.
Using the Text Tool (T), create a text frame and add content. To add a page number, right-click while in the text frame, and select Insert Special Character > Markers > Current Page Number.
Place the text frame in the bottom left corner of the left page.

Using the Character panel (Window > Type & Tables > Character), format the frame with the following settings:
On the Swatches panel, select the Dark Blue swatch.

Select the folio and press Option-Shift and drag towards the right page. Option will duplicate, while Shift will maintain the same horizontal position of the object.
Using the Paragraph panel (Window > Types & Table > Paragraph) , set the text frame to align right. Move the page number towards the outside of the spread for consistency.

3. Designing the Cover for Your InDesign Presentation Template
Before we start working on the cover page, we need to delete the folio that was created on the A-Parent page. Press Shift-Command as you click on the folio and press Delete. This will override the item to either delete or customize it.
On the Layers panel, select the Background layer.
Using the Rectangle Tool (M), create a rectangle that measures 12.6 cm in Width and 20 cm in Height. I am setting the color to the Dark Blue swatch so you can see the changes easily.
Select the object and head over to Object > Transform > Shear. On the Shear window, set the Shear Angle to 35°. Select the Vertical Axis and click OK.
Position the object towards the top of the page, leaving a small gap at the bottom.

Select the object and press Command-D to Place an image. Navigate to the Smiling Arabic entrepreneur and click Open.
On the Control panel, set the Scale X and Y percentages to 55%.

Select the object and press Command-C to Copy and Option-Shift-Command-V to Paste in Place. Using the Direct Selection Tool (A), delete the image in the frame.
On the Effects panel (Window > Effects), set the Blending Mode to Color.

Select the Polygon Tool from the toolbar . Click on the board to open the Polygon options window. Under Options, set the Width to 10.8 cm and the Height to 7.63 cm.
Under Polygon Settings, set the Number of sides to 3. Click OK.

On the Swatches panel, set the color to Dark blue.
Head over to the Control panel and set the Rotation Angle to -90° .
Place the rectangle on the lower left side of the image. Resize evenly as you need by pressing Shift and dragging from any of the points.

Below, I added a couple more triangles to create a balanced composition.

Select all the objects on the page and head over to the Layers panel. If you’ve been working on the wrong layer, you can move the objects to a different layer. Drag the square on the right side of the highlighted layer to the layer you want to move the objects to.

Press Command-D to Place a logo of your choice, placing it on the right side of the page.

Using the Text Tool (T), create a text frame under the logo to add a title. Use the Paragraph Styles to format the text. In this case, I used the Intro style for ‘Presentation.’ On the Control panel, change the Font Family to Extra-Bold.

4. Designing the Inside Spreads of Your InDesign Presentation Template
Select the sheared object from the cover and Copy and Paste it to the inside spread. Using the Selection Tool (V), make the object shorter by dragging the top or bottom middle point.
On the Swatches panel, set the color to Dark Blue. On the Control panel, lower the Opacity to 10%.
Lock the Background layer and select the Copy layer.

Select the Text Tool (T) from the toolbar. Draw a text frame that covers the width of the page. Add content and use the Paragraph Styles panel to format the text. Use the Title and Intro styles.

Create a second text frame for the body copy. Add copy and use the Paragraph Styles panel to format the content to Copy.
While selecting the text frame, press Command-B to open the Text Frame Options window. Set the Number of Columns to 2 and click OK.

Using the Rectangle Tool (M), create a rectangle that covers the right page on the spread.
Using the Swatches panel, set the color to Dark Blue.
Move this to the Background layer. Lock the Background layer.

Duplicate the triangle from the front cover by pressing Command-C to Copy and Command-V to Paste.
Resize the rectangle, and feel free to add your own spin. Press Shift to resize the triangle proportionally.
While selecting it, press Command-D to Place an image. Navigate to the Thoughtful young businesswoman image and click Open.
Using the Direct Selection Tool (A), select the image and head over to the Control bar. Set the Scale X and Y Percentage to 45%. Set the Rotation Angle to -35°.

Duplicate the triangle and, using the Direct Selection Tool (A), delete the image. Set the color of the new triangle on the Swatches panel to Dark Blue. On the Effects panel, set the Blending Mode to Color.

Duplicate the triangle once more. Head over to the Control bar and set the Rotate Angle to 90°. On the Swatches panel, set the color to Dark Blue and Tint to 50%. On the Effects panel, make sure the Blending Mode is set to Normal.

Select the Copy layer on the Layers panel.
Using the Text Tool (T), create a text frame and add copy. Using the Paragraph Styles panel, format the text frame to the Pull-Quote style.

On the Layers panel, select the Images layer.
Using the Rectangle Tool (M), draw a rectangle that measures 28 cm in Width and 15 cm in Height.
Using the Direct Selection Tool (A), select the two points on the right. Head over to Object > Transform > Shear. In the Shear option window, set the Shear Angle to 35° and the Axis to Horizontal. Click OK.

Press Command-D to place an image within the object. Navigate to the Group of young entrepreneurs image. Select the image with the Direct Selection Tool (A) and head over to the Control panel. Set the Scale X and Y Percentage axis to 60%.

Duplicate the object by pressing Command-C to Copy and Command-C to Paste. On the Swatches panel, set the color to Dark Blue. On the Effect panel, set the Blending Mode to Color.

Duplicate the shape once more. This time, set the Blending Mode to Normal.
Head over to the Control panel, and select the Flip Horizontal and Flip Vertical buttons.
On the Layers panel, lock the Images layer and select the Copy layer.

Select the text frames from page 2. Press Command-C to Copy and Command-V to Paste the two frames on page 4. Shorten the two-column frame.

You will notice that the text frame now has a red plus sign on the bottom right corner. Click on it and proceed to draw a text frame on page 5.
While selecting the new frame, press Command-B to open the Text Frame option window. Set the Columns Number to 2.

Duplicate the pull-quote from page 3 onto page 5. Place it next to the top image. Using the Paragraph panel, set the text to align Right.

Using the Rectangle Tool (M), create a rectangle that measures the Width of the column and 6.5 cm in Height.
Press Command-D to Place an image. Navigate to the Young Asian businesswoman image and click Open. Select the image with the Direct Selection Tool (A) and resize evenly by holding down Shift and dragging from any of the points.

Duplicate the rectangle and set the color to [Black] from the Color Swatches.

Duplicate one of the sheared shapes used on the top portion of the page by pressing Command-C to Copy and Command-V to Paste. Rotate the shape with the Rotate Tool (R) until the shear/angle is at the top. Resize the shape with the Selection Tool (V) to fit the width of the profile picture.
On the Swatches panel, set the color to Light Blue and the Tint to 30%.

Create a text frame with the Text Tool (T) and add copy. Use the Paragraph Styles panel to style the text frame to the Copy style. On the Control panel, set Font Family of the first line to Extra-Bold and the second line to Regular Italic.

Duplicate the three objects by selecting all three, pressing Option-Shift , and dragging towards the right.
Select each additional profile and press Command-D to Place new images. Navigate to the Portrait of a black woman and Portrait of a young African American woman images. Click Open.

5. Designing the Back Cover of Your InDesign Portfolio Template
Press Shift-Command to override the page number and press Delete.
Duplicate the sheared shape from the previous spread. On the Control panel, set the Rotation Angle to 180°. Use the Selection Tool (V) to resize the shape.

Using the Text Tool (T), add a text frame over the blue background.
Format the text using the Paragraph Styles panel, and select the Intro style. On the Control panel, set the Font Family to Extra-Bold.
On the Swatches panel, set the color to [None].

Create a text frame with the Text Tool (T). Place this frame on the bottom left corner of the page. Add copy and format the text with the Copy style from the Paragraph Styles panel.

6. How to Export a File for Printing
When you are done designing your presentation template, you might want to export it for professional printing. Take a look around all the edges to make sure all the images and vectors bleeding out are touching the bleeds.
To export the file, go to File > Export. Name the file Presentation Template and choose Adobe PDF (Print) from the Format dropdown menu. Click Save.

In the Export Adobe PDF window, set the Adobe PDF Preset to Press Quality.

On the left side of the panel, select Marks and Bleeds. Check All Printer’s Marks and Use Document Bleed Settings. Click Export. You will have a ready-to-print PDF file.

Great Job! You’ve Finished This Tutorial!
In this tutorial, you learned how to make an InDesign presentation template. We covered key tools that will help anyone edit a template quickly and easily. Today, you learned to:
- set up a ready-to-print InDesign file
- organize a file with multiple layers
- add color swatches
- use paragraph styles to format text
- format text frames into multiple columns
If you are new to InDesign and need InDesign templates right away, head over to Envato Elements and GraphicRiver . We’ve got many options to explore!

If you liked this tutorial, you might like these:

- in5 Main Page
- in5 Customer Stories
- in5 Download
- in5 Pricing
- in5 Support
- in5 Account Login
- in5 (Interactive InDesign)
- in5 Online Account Login
- Adobe Scripts
- Additional Products...
- Ajar Academy Video Courses
- Digital Publishing Course
- Blog Articles
- InDesign UX Resources
Create Awesome Slides from InDesign using in5’s Presentation Mode

Adobe InDesign has long had methods for publishing presentations—directly from InDesign using the Presentation Mode or via PDF using Full Screen Mode —but these methods never reached the level of sophistication and control found in Powerpoint and Keynote presentations.
That’s because those methods didn’t support many of InDesign’s powerful interactive features like Animation and Multi-State Objects. They simply produced static slideshows with no controllable transitions between slides.
In the past, I’ve modified my in5 output from InDesign so that I could present slides using HTML and include interactivity in my presentations.
When I noticed that my favorite conference— Creative Pro Week —now includes an entire day on presentations (dubbed the Click conference) it got my wheels turning about adding explicit presentation capabilities to in5.
Presentation expert, Mark Heaps , is heading up that section of the conference and also presenting an InDesign session on presentations.
I reached out to Mark and asked him what it would take to make InDesign an awesome presentation tool. You can see the results of our discussions below.
This first video shows a simple presentation in action.
Why Make Presentations with InDesign?
Here are a few reasons why you might want to create presentations with InDesign and export them to HTML using in5 .
- Sophisticated Master Pages.
- Unlimited Paragraph and Character Styles for your text.
- The ability to create interactivity ( e.g., Object States and Buttons).
- The ability to create Animation (and connect it to Buttons).
- The ability to share your presentation on your own site, including on mobile devices.
- Option to embed HTML ( e.g., complex animation from Adobe Animate or Tumult Hype).
- Option to easily port your presentation to Sales Enablement platforms, kiosks, and retail displays (more on that below).
Setting up Presentation Mode within InDesign
Once you have the latest version of in5 installed, you find two new menu items under in5 > Enhancements .
The first one is the Presentation Mode panel.
This panel enables all of the settings shown in the video above, such as Slide Builds using bullet items and animations.
It also sets up the typical slide navigation (keyboard presses and clicking) and enables full screen mode.
It even lets you enable the Save to Home Screen —the closest thing to full screen on iOS —a capability on iPhones and iPads in case you want to take your presentation mobile. When you save to the Home Screen, you can also have a custom icon on the desktop and your presentation launches without the web browser interface (without going through the App Store).
Check out how the Presentation Mode panel works in the video below.
Presentations of all shapes and sizes
Presentations aren’t limited to slide decks that are presented to a live audience.
Consider these other types of slide-driven presentations.
- Museum displays
- Interactive kiosks
- Retail Store displays
- Tradeshow booth
There are two other types of presentations that I want to address in a bit more depth.
Sales Enablement (what the heck is that?)
Sales Enablement is a process or a platform that makes it easier to sell a product, especially a complex product.
Many sales enablement platforms come with a Content Management System (CMS), shared directories, and mobile apps.
The mobile apps let salespeople access up-to-date presentations on their mobile device (offline) so that they can present to potential customers (even in an elevator).
Thus, Sales Enablement is a bridge between content creators ( i.e., marketing & design) and the people inside their business who need to use that content ( i.e., salespeople).
Marketing & Design > cloud repository > salesperson’s mobile device > in-person pitch
There are several platforms that support HTML content for sales presentations.
- Mobile Locker
Self-Running Slideshows
Some presentations don’t need someone clicking through them to be useful.
David Blatner, co-host of Creative Pro Week, asked about adding an autoplay feature so that he could show InDesign-based slides with animation between presentations at the conference.
Check out the autoplay features in the video below.
Custom Slide Transitions
Part of my discussions with Mark Heaps centered around the ability to create “push transitions” (almost like parallax scrolling) where one slide seems to shove another slide over with a continuous background.
You can see examples of that effect, and how to create it in the video below.
To create these effects, there’s now a Custom Slide Transitions panel under in5 > Enhancements .
The panel lets you control in and out transitions for each slide (InDesign page).
How to make those push transitions super easy
Slicing up a big image into multiple images is doable from Photoshop or InDesign, but it’s time consuming.
Why not make it easier?
That’s what the Slice Multi-page Image dialog can do.
It automatically cuts up the image for you, and optionally arranges on the pages (adding new pages when necessary) and applies push transitions based on the position of the slices.
See it do the cutting, layout, and push detection in the video below.
Note that the Enhancements described in this article are available to in5 Pro plans (or higher).
in5 Export Settings
Once last thing to make life even a little easier.
I’ve bundled up the export Presets to use with the in5 dialog for presentations.

Drop your email address below and I’ll send you the presets that you can import into your own copy of in5.
Success! Now check your email to confirm your subscription and get those presets.
There was an error submitting your subscription. Please try again.
How to Convert Adobe Indesign to Powerpoint

B.A.W. Kemp
Adobe InDesign and Microsoft PowerPoint are both powerful tools for creating visually engaging content. InDesign excels in page layout and editorial design, while PowerPoint shines in presentation creation and slide-based storytelling. Converting InDesign projects to PowerPoint format allows you to utilize PowerPoint’s presentation features while retaining the essence of your InDesign designs.
Method 1: Exporting to PDF and Importing into PowerPoint
- Export to PDF: Open your InDesign document and go to “File” > “Export”. Select “PDF (Print)” as the file format. Choose the desired PDF settings and click “Export”.
- Import PDF into PowerPoint: Launch PowerPoint and open the exported PDF file. PowerPoint will attempt to convert the PDF elements into corresponding PowerPoint slides.
- Review and Refine: Review the imported slides and make necessary adjustments. This may include text formatting, object positioning, and layout modifications.
Method 2: Copying and Pasting Elements
- Copy InDesign Elements: Select the elements you want to convert, such as text boxes, shapes, or images, in your InDesign document. Copy the selected elements using “Command + C” (Mac) or “Control + C” (Windows).
- Create New PowerPoint Presentation: Launch PowerPoint and create a new presentation.
- Paste Elements: Paste the copied InDesign elements into the new PowerPoint presentation using “Command + V” (Mac) or “Control + V” (Windows).
- Edit and Enhance: Edit the pasted elements to ensure they fit the PowerPoint format and maintain the desired visual appeal. This may include text formatting, object positioning, and layout adjustments.
Method 3: Utilizing Third-Party Plugins
- Install Plugin: Explore and install a reliable third-party plugin designed to convert InDesign documents to PowerPoint presentations.
- Launch Plugin: Open the plugin application and select the InDesign file you want to convert. Follow the plugin’s instructions to initiate the conversion process.
- Import Converted File: Once the conversion is complete, import the generated PowerPoint file into PowerPoint for further editing and refinement.
Considerations for Conversion
- Color Profiles: Ensure both InDesign and PowerPoint use the same color profile to maintain consistent color representation.
- Linked Images: Linked images embedded in InDesign documents may not be automatically converted to PowerPoint format. You may need to manually relink the images in PowerPoint.
- Complex Layouts: Complex InDesign layouts may require more manual adjustments and refinements when imported into PowerPoint.
- Text Formatting: Text formatting may not be perfectly preserved during conversion, and you may need to reapply text styles in PowerPoint.
By following these methods and considering the factors mentioned, you can effectively convert Adobe InDesign projects to PowerPoint presentations, seamlessly transferring your designs into a presentation-friendly format. Remember that each method has its advantages and limitations, so choose the approach that best suits your specific needs and project requirements.
Level up your PDF game
Upgrade to Adobe Acrobat Pro to do everything PDF. Edit, convert, combine files, and so much more — so much easier. Get Started. Edit Easily edit text and images without leaving your PDF. You can even do it on your tablet or phone. Create Convert Microsoft Word, Excel, and PowerPoint files
Do the digital work
Make short work of your PDFs with these free tools in Adobe Acrobat Reader. Fill and sign. No more paperwork. Fill out any form digitally and even add your e-signature. Share and comment. Easily annotate documents and collect comments from multiple reviewers in a single PDF. Choose your cloud. Manage
Mastering Magnification in Adobe Fresco (Zooming)
Adobe Fresco empowers artists with a vast digital canvas for their creations. But sometimes, you need to get up close and personal with the finer details. That's where zooming comes in! This article dives deep into the various ways to zoom in and out on your artwork within
Does Adobe Fresco Have Symmetry?
For digital artists who crave perfect symmetry in their creations, Adobe Fresco presents a bit of a conundrum. As of May 5, 2024, the software does not include a dedicated symmetry tool. This functionality is a staple in many art programs, allowing for efficient creation of mirrored designs, mandalas, and
Adobe Community
- Global community
- 日本語コミュニティ Dedicated community for Japanese speakers
- 한국 커뮤니티 Dedicated community for Korean speakers
- Discussions
- How to convert an Indesign presentation into a Pow...
How to convert an Indesign presentation into a PowerPoint presentation seamlessly?

Copy link to clipboard


- Home /
- Images /
Importing a Powerpoint file into InDesign
is now part of CreativePro.com!
*** From the Archives ***
Susan Writes:
How do I convert a PowerPoint into a format where I can reformat it and bring it into InDesign. I need to reformat the slides and make them look not like a PowerPoint.
It seems logical that it would be easy to import an PowerPoint file into InDesign since Microsoft Word and Excel files import well. Unfortunately, there is not a native import for PowerPoint files.
Given this, we are left with two options – PDF Export or Manual.
1. PDF Export Method.
If you only need each slide as a non-editable graphic inside InDesign, this is the best option. From PowerPoint, save the presentation as a PDF (file save as > PDF). Inside InDesign, place the PDF from each slide on each page or use the place multipage PDF script that comes with InDesign.
This will get your presentation placed into InDesign, but it will not be editable. If you need the file to be editable, you will have to do some manual work.
2. Manual Method
If you want each slide to be editable, manually bringing everything over is your only option. The problem, is that you can’t just copy the whole slide because it will paste into InDesign as one large embedded image.
Graphics A better idea is to save out each graphic element one at a time from PowerPoint. Right click on the graphic and choose “save as picture.” You can choose from PNG, JPG, PDF, GIF & BMP. I recommend PDF for vector and JPG for bitmaps.

If your PowerPoint document does not contain any vector images, you do have another option. Using Acrobat Professional you can quickly export all of your bitmap graphics. Inside Acrobat Professional, go to the advanced menu > document processing > export all images. This will quickly export all of the images out of the PDF into a specified folder. This option will only grab bitmap graphics – therefore, it may not work if your file has a lot of vector data.

Text There is no easy way to bring all of the text over. I end up just copy and pasting the text over. If you want to keep the formatting from PowerPoint, edit your clipboard handling preferences and choose ?all information? when pasting text from other applications.

Note – I have had some experiences in the past when I pasted the text it came in as an embedded graphic. To avoid this you can always just copy and paste into TextEdit (or notepad) and then back into InDesign.
Making it not look like PowerPoint.
I loved the second part of the question – “I need to reformat the slides and make them look not like a PowerPoint.”
PowerPoint is one of those words that strikes fear into the soul of designers. Let’s say it together now, “PowerPoint is not a design program.” Now, doesn’t that feel better.
Rather than ramble on about design, I will just recommend that you stay away of defaults. Most PowerPoint presentations scream POWERPOINT because they are using a default theme that includes default fonts, colors and clip-art that is used by millions of people everyday. For more help on design principles I would recommend the book The Non-Designer’s Design Book – by Robin Williams
Recommended For You
From InDesign to HTML5 via Flash
The Presentation Design Conference 2024
How to Make Plaid Flannel Patterns in Photoshop
Working in Microsoft Word

How I go about it is I convert my Powerpoint file to PDF and import the PDF with the PDF2ID plugin from Recosoft. Although, James’ post is accomplished without the use of a plugin.
I do this regularly, but go via Word by exporting the outline of the presentation. I then assign a range of named styles to the text (this can usually be done through search and replace as at least some formatting comes across from Powerpoint).
Once the formatting is sorted out and I have added any notes text that I want, I then place the text into an ID template which already has a set of defined styles to match the ones in the Word document. The final step is to bring across the graphics, some by cutting and pasting, some by exporting, and some (where the graphic was done in Illustrator, by placing the original ID file.
I have not tried going direct from Powerpoint to ID – perhaps I should.
@Jules – From my experience the PowerPoint to Word route usually loses some of the information and I end up just copy and pasting text anyway.
Hey all. I work in a printing place and get files occasionally as powerpoint. How about this, either make/print to eps files and display pages in Illustrator – what the use of having integration between softwares and not using! InDi and Illustrator are similar in display but use Indesign to impose and print to film and/or digital. Another option is to go to pdf and similar to before thru Illustrator. All depends on what is in Powerpoint. For more interesting way: export your file as a web page into a folder. The export will give you the html page for the text and all images in two versions, original size and resized copy. I do this often in Word to extract photos to use in Indi. (I have not tried complex file but small ones).
I tend to export to PDF and use my PDF editor to remove the background and then save as a new PDF. I then open the original PDF in the PDF editor again and remove everything but the background and again save as a new PDF. This gives me the ability to scale the background so the slides have a bleed once placed into InDesign.
Also, when I have to use a Word or PowerPoint file in any other program, I tend to copy images into a blank document, scale them back to (as close to) their real size as possible and then export as a PDF to get the images from. This lets me re-place them on top of the placed PDFs and alter when necessary without having to deal with a PDF’s broken-up image pieces.
This sounds like one of those Markszware products ( https://www.markzware.com/products/ ) in the making (PPT2ID?)…
What few people realize is that PowerPoint – like all other MS Office products – has a very extensive and powerful scripting language which allows you to automate tasks, recurse over files, slides and objects, and even do many things you can’t do through the menus.
Powerpoint macros are often overlooked and ignored, but can be very useful and real time savers.
The VBA macro language even allows for outside control from other applications – Perl as an example.
So it is absolutely possible that you can control PowerPoint directly from InDesign with a bit of clever scripting – or alternatively, control InDesign from VBA code.
Either way, I would explore the options if you have more than a simple one-timer to do.
Unquestionably consider that that you stated. Your favorite justification seemed to be at the internet the simplest thing to understand of.
I say to you, I certainly get irked at the same time as other folks think about issues that they just do not know about. You managed to hit the nail upon the highest and also outlined out the entire thing without having side-effects , other people could take a signal. Will probably be back to get more. Thank you
Session expired
Please log in again. The login page will open in a new tab. After logging in you can close it and return to this page.
To provide the best experiences, we use technologies like cookies to store and/or access device information. Consenting to these technologies allows us to process data such as browsing behavior or unique IDs on this site. Not consenting or withdrawing consent, may adversely affect certain features and functions.
To provide the best experiences, we and our partners use technologies like cookies to store and/or access device information. Consenting to these technologies will allow us and our partners to process personal data such as browsing behavior or unique IDs on this site and show (non-) personalized ads. Not consenting or withdrawing consent, may adversely affect certain features and functions.
Click below to consent to the above or make granular choices. Your choices will be applied to this site only. You can change your settings at any time, including withdrawing your consent, by using the toggles on the Cookie Policy, or by clicking on the manage consent button at the bottom of the screen.
Advanced Search
Forgot Password?
Not a member?
You have to be logged in to save.
Not a member? Join Today - it's FREE!
- UNC Libraries
- Design & Creation
- Designing Effective Posters
- Getting Started With PowerPoint and Adobe InDesign
Designing Effective Posters: Getting Started With PowerPoint and Adobe InDesign
- Classes and Tutorials
- Layout and Text
- Images and Graphics
- Adding and Revising Content: PowerPoint
- Adding and Revising Content: InDesign
- Evaluation Checklist
- Before & After Examples
- Printing Your Poster
- Archiving Your Poster
- Poster Templates
Media & Design Center
Homepage Hours FilmFinder Streaming Media Book Equipment Book Podcast Space

Microsoft PowerPoint was originally designed for created slide presentations, not posters. But it can also be used to create a poster. When you create a poster with PowerPoint, you are creating the poster on only ONE slide (a very large slide).
Getting Started

- PowerPoint will then ask you concerning scaling your slides. For posters, you want to select Ensure Fit. You want to make sure all of your poster content will fit.

Important Notes on Poster Sizing:
The maximum slide size in PowerPoint is 56 inches x 56 inches.
The standard size for PRINT academic posters is 48 inches wide by 36 inches tall.
DIGITAL posters may be STANDARD (4:3) or WIDESCREEN (16:9). PowerPoint has pre-sets for these that you may use. The poster will automatically adjust to fit the screen you are using. If you think you'll print out your poster, you may want to adjust the sizing. To fit these proportions, a 4:3 poster would be 56 inches wide by 42 inches high, and a 16:9 poster would be 56 inches wide by 31.5 inches high.
If you want a poster that is longer or wider than 56" we suggest that you create your poster at half-size. Then when you print it, print it at 200% size. For example, if you want your finished poster to be 40" by 80", set your poster size to 20" by 40". Then print it at 200%. Keep in mind that if you are creating your poster at half-size, everything in it (text, heading, charts, images) will end up being twice as large in your finished poster. So, for example, if you create a title that has a font size of 48 points, in the final poster it will be 96 points.
Getting Started with InDesign
Students at UNC can download the Adobe Creative Cloud library of products, including InDesign, for free. To sign up for access, visit https://adobe.unc.edu . You will go through a purchase process, but the cost is $0.
Once you have downloaded the Creative Cloud software, you will need to download the InDesign program to your computer.
For information and tutorials about the latest features of Adobe InDesign, see http://www.adobe.com/products/indesign.html .
Creating a New InDesign Document
To create a new InDesign document, click on New File when the program opens.

The New Document dialog box appears. Look first at the Units drop down box and change it to Inches if it is not already. Enter in values for the page size, margins, and number of columns. Typical for a poster would be a page size of 60 inches wide and 36 inches tall, 3 columns, and margins of 0.5 inches on all four sides (top, bottom, left, and right). Be sure your orientation is set correctly.

Moving around in the display
Press spacebar to access the hand tool when using another tool (except the text tool)
Working With Guides
Guides are useful for aligning the elements in your poster. Guides are lines that appear on the screen but do not print. To add guides, first make sure the rulers are visible ( View menu > Show Rulers ). Then click in a ruler and drag to where you want to place the guide.
To hide or lock the guides, choose View menu > Grids and Guides > Hide Guides or Lock Guides .
Digital Posters
If you are making a digital poster, the exact slide size isn't necessarily important. You won't need to change the inches of the slide size. Instead, you'll want to focus on the type of screen you'll be presenting on: Standard or Widescreen. PowerPoint has two ratios to fit these sizes:
- Standard is a 4:3 ratio and is more square
- Widescreen is a 16:9 ratio and is more rectangular
- Last Updated: Feb 21, 2024 11:06 AM
- URL: https://guides.lib.unc.edu/posters
COMMENTS
Step 1. Export InDesign File to PDF. Open your InDesign file and go to File > Export and pick Adobe PDF (Interactive). A window will pop up so you can tweak your export, but the default setting will do, so you can just click Export directly. Step 2. Convert PDF to PowerPoint. Next, open your PDF editor. In this case, we'll be using Adobe Acrobat.
1. Set your page dimensions. Click on File in the InDesign main menu, then New Document. A dialog box will open. If you're not sure what dimensions to use, set the page width to 12 in and the page height to 9 in. These are good general dimensions for a slide deck. Click Create and a blank page will appear.. 2.
Drag and drop Photoshop (PSD) files, PDFs, Illustrator (AI) files, JPEGs, PNGs, or GIFs into the image frames. To add text, just copy and paste text files or select the Type tool from the toolbar and type directly into the text frame. Add page numbers. Insert page numbers to keep you and your audience on the same page.
With a little assist from Acrobat, David show how content created in InDesign can be opened—and edited!—as a native PowerPoint document. It's the best of both worlds, really. This tutorial was taken from David's "InDesign for Building Presentations" session at CreativePro Week 2022.
In this InDesign video, David Blatner demos how you can migrate your InDesign content to PowerPoint. This can be super handy if you're more comfortable worki...
You don't need Microsoft Powerpoint - you can use Adobe InDesign for Powerpoint instead. You can create slides inside it and use it to present on an overhead...
In the process, you have the option to scale or adapt the content to the new dimension. Open the document in InDesign and export it as a PDF. Open the exported PDF with Acrobat Pro. Click on File, select Export to and then click on Microsoft PowerPoint Presentation. There are not a lot of options here.
Table of Contents. Convert InDesign to Powerpoint with Adobe Acrobat. Step 1: Export to PDF. Step 2: Adobe Acrobat. Step 3: Polishing in Powerpoint. Using Third-Party Plugins to Convert InDesign to Powerpoint. Do You Really Need Powerpoint? A Final Word.
I will teach you how to properly ADOBE INDESIGN CC this tutorial is for complete beginners. Also with this video you will learn how to apply the grid theory...
Step 2. Select the object and press Command-D to Place an image. Navigate to the Smiling Arabic entrepreneur and click Open. On the Control panel, set the Scale X and Y percentages to 55%. Select the object and press Command-C to Copy and Option-Shift-Command-V to Paste in Place.
Step 3. Start a new PowerPoint presentation then go to: Design tab > Slide size. Check that the ratio matches your InDesign file (normally 16:9, 16:10 or A3) Step 4. With a single blank slide showing go to your Insert tab > Photo album > New Photo Album…. On the Photo Album window select the button labeled File/Disk.
Here are a few reasons why you might want to create presentations with InDesign and export them to HTML using in5. Sophisticated Master Pages. Unlimited Paragraph and Character Styles for your text. The ability to create interactivity (e.g., Object States and Buttons). The ability to create Animation (and connect it to Buttons).
Export to PDF: Open your InDesign document and go to "File" > "Export". Select "PDF (Print)" as the file format. Choose the desired PDF settings and click "Export". Import PDF into PowerPoint: Launch PowerPoint and open the exported PDF file. PowerPoint will attempt to convert the PDF elements into corresponding PowerPoint slides.
This Skillshare class is all about Adobe InDesign and how to create powerful presentations.It's a class for creatives who wants to learn how to create stunni...
5. Create a New Document: The very first thing we need to do is to create a new document. So open up InDesign and let's create a document that suits our purpose. In this class, we will create a digital presentation that the client also might want to be able to print in a standard size.
Engaged , Nov 19, 2018. Here's a trick for you and it is free. Download the free ID Util. Drop your InDesign file that you want in PowerPoint onto the ID Util icon.You will get a handy preview. Then choose "Export" circled in red in the above picture. Then choose which format you want each page to be exported as.
Drag and drop Photoshop (PSD) files, PDFs, Illustrator (AI) files, JPEGs, PNGs or GIFs into the image frames. To add text, just copy and paste text files or select the Type tool from the toolbar and type directly into the text frame. Add page numbers. Insert page numbers to keep you and your audience on the same page.
Unfortunately, there is not a native import for PowerPoint files. Given this, we are left with two options - PDF Export or Manual. 1. PDF Export Method. If you only need each slide as a non-editable graphic inside InDesign, this is the best option. From PowerPoint, save the presentation as a PDF (file save as > PDF).
Follow along in this tutorial and #learn how to create interactive slide presentations for mobile platform, using #Adobe InDesign. Topics covered in this les...
Get presentation templates that impress for InDesign & Illustrator. Wow audiences with slick presentation design templates for Adobe InDesign & Illustrator. Explore InDesign.
When you create a poster with PowerPoint, you are creating the poster on only ONE slide (a very large slide). Getting Started. Launch PowerPoint by clicking its program icon. Start from scratch by selecting Blank Presentation. When you start a new presentation, you may see default text boxes in the slide window.