
How To Export Canva Presentation Slides To PowerPoint
Here’s how to make awesome twitch emotes with canva in your browser..
Canva is an incredible online design software that allows you to create many things including stunning presentations.
But if you’re a PowerPoint user you might be wondering how to export your Canva slides as a PowerPoint presentation?
In this article, we’ll take you through the process step by step, including how to keep your animated elements from Canva.
Let’s dive right in.
Jump to a specific section:
Step 1: Download your Canva slides
Step 2: open the .pptx doc in powerpoint, step 3: copy or add animation.
If you haven’t created your presentation in Canva yet – check out these incredible Canva presentation slide templates to get started.
If you have, open up your Canva slides document, and once you’ve made all your updates and you’re happy with it you can now download it.
You can download as a PDF file, or publish it online, or if you want to export it as a PowerPoint presentation (.pptx) you can do that too. Here’s how:
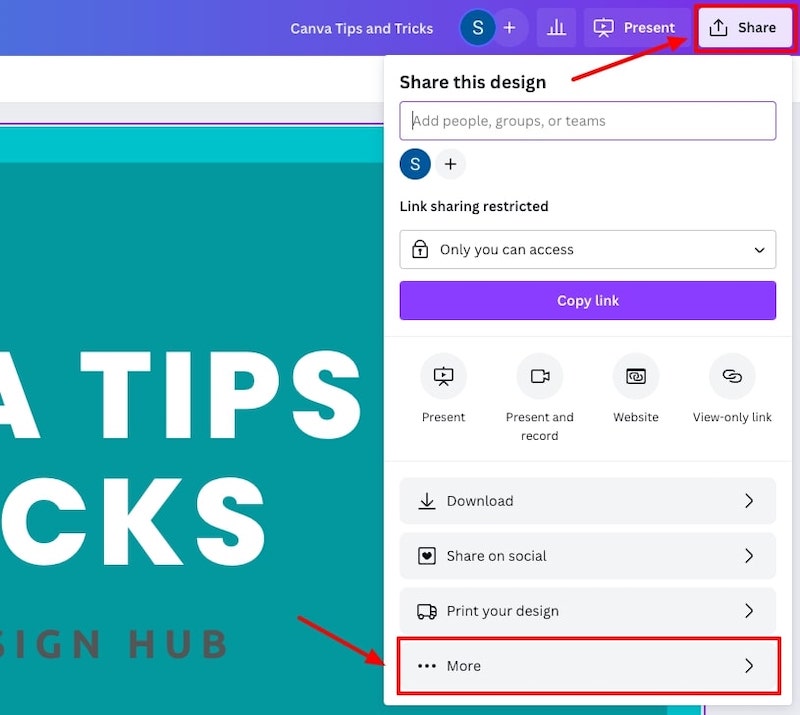
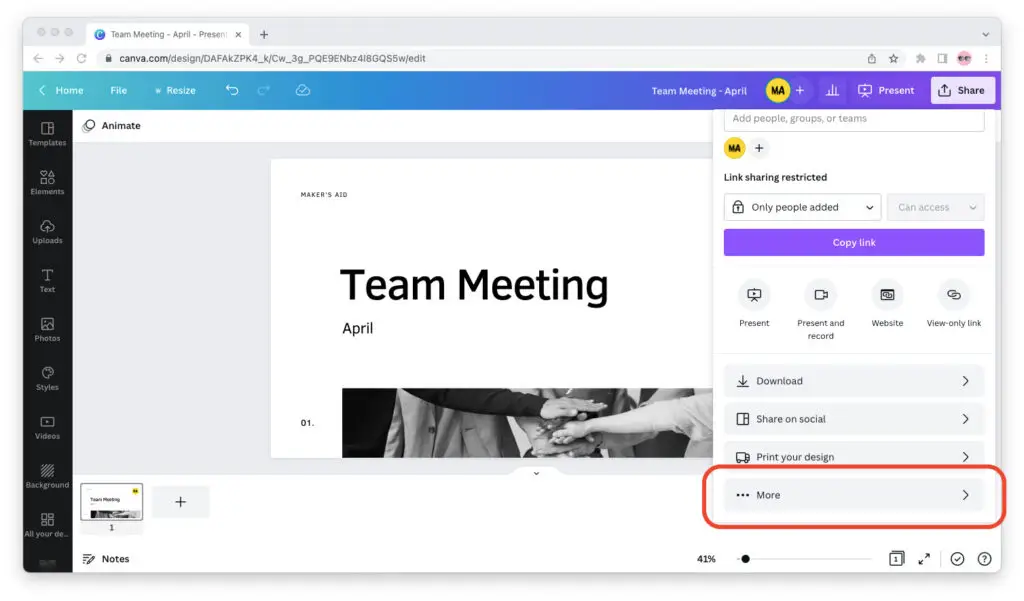
Go to the ‘Share’ button at the top right and click ‘More’:
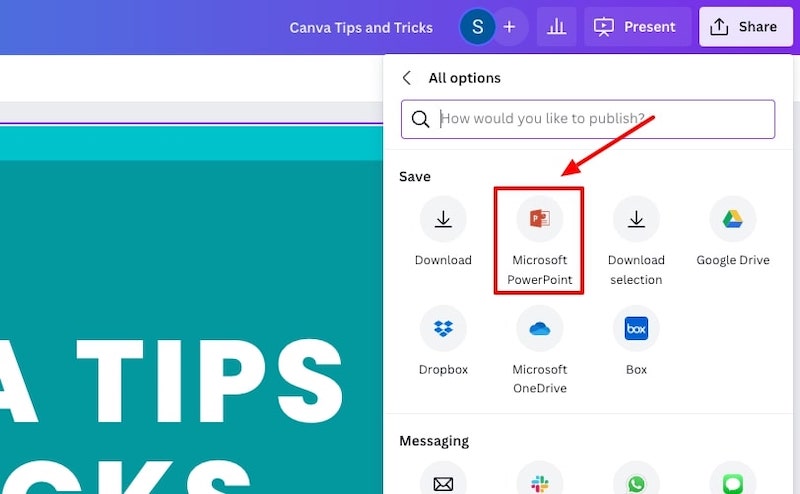
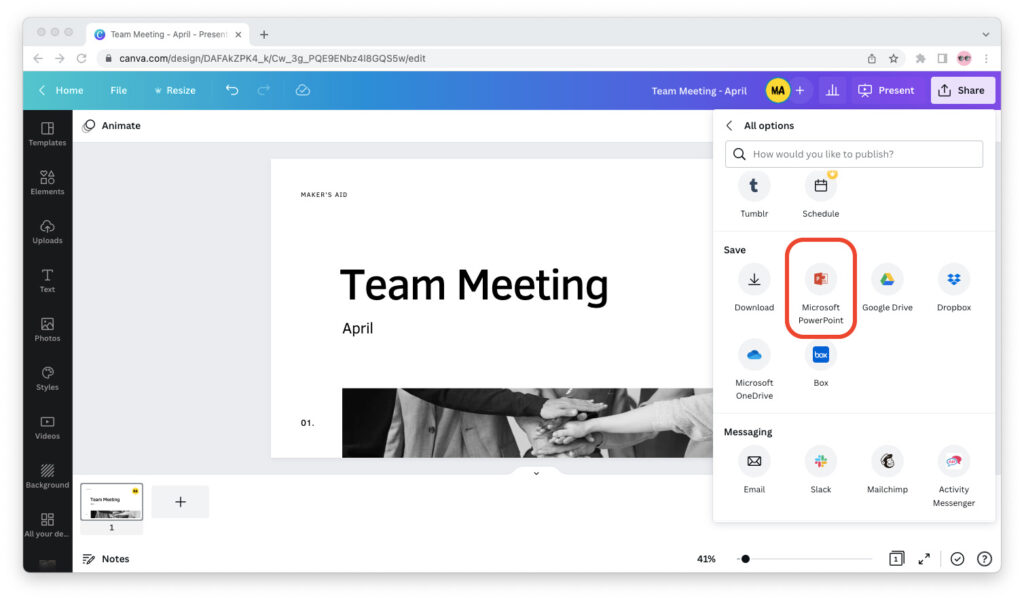
Scroll down to the ‘Save’ options and choose ‘Microsoft PowerPoint’:
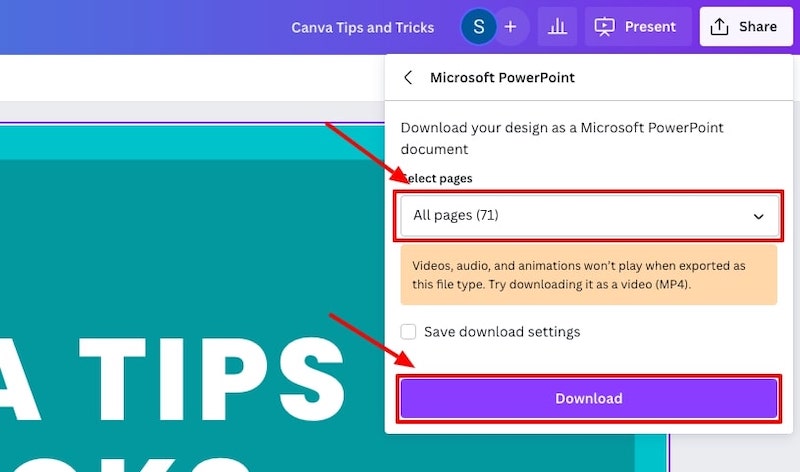
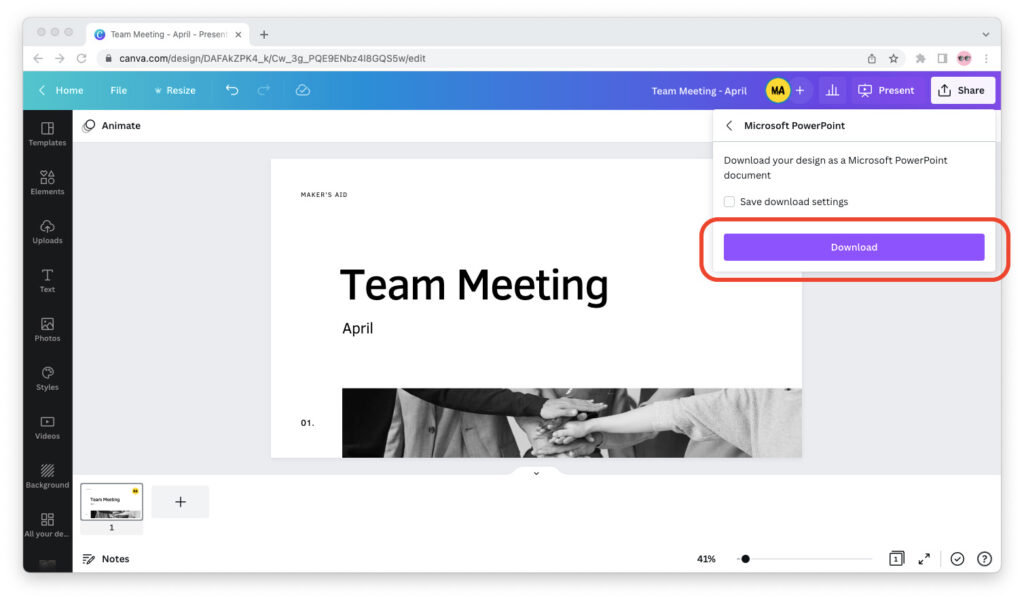
Choose the slides you want to download, and hit the download button:
You will now have a PowerPoint presentation (.pptx) file in your downloads folder that you can open up.
The next step is to check if everything in your presentation was exported from the Canva slides to a PowerPoint presentation correctly.
In the past, elements such as the text fonts, graphs, videos, and some graphics didn’t export correctly but Canva has mostly fixed these issues so your export will likely be completely fine.
It’s worth checking though!
As an example, our .pptx export contained a couple of videos in one of the slides. One of the videos remained in that format:
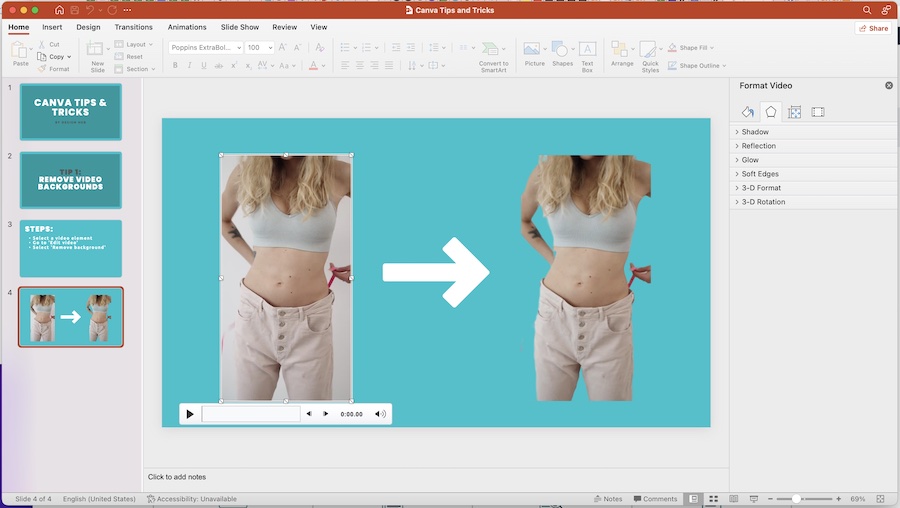
Whilst the other one was converted into an image element:
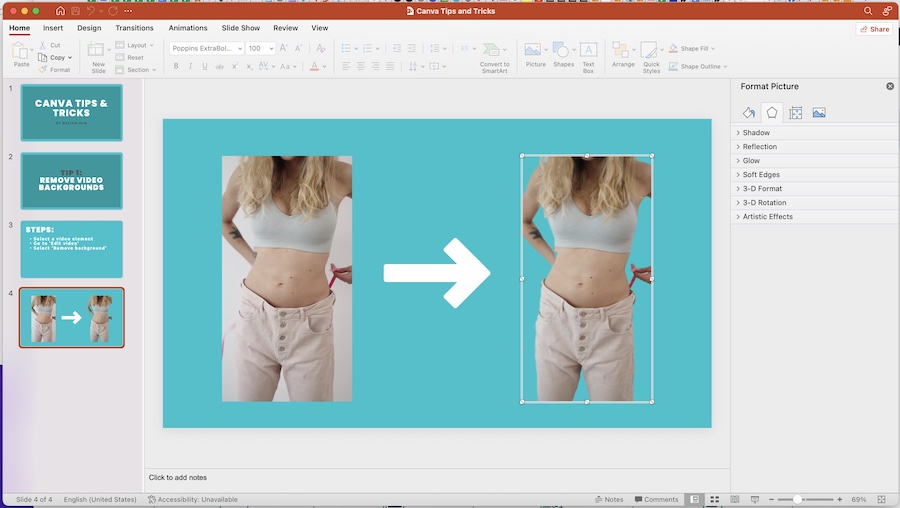
Most of the elements will be converted properly but as you can some elements such as animations and videos might not convert correctly.
There is a workaround for this, which we’ll cover in the next step.
To convert Canva slides with animation into PowerPoint presentation slides here’s what you have to do:
First, go back to your Canva presentation, and download the pages with animation as GIFs. Simply, go to ‘Share’ then ‘Download’ and select the page or pages that you want to download:
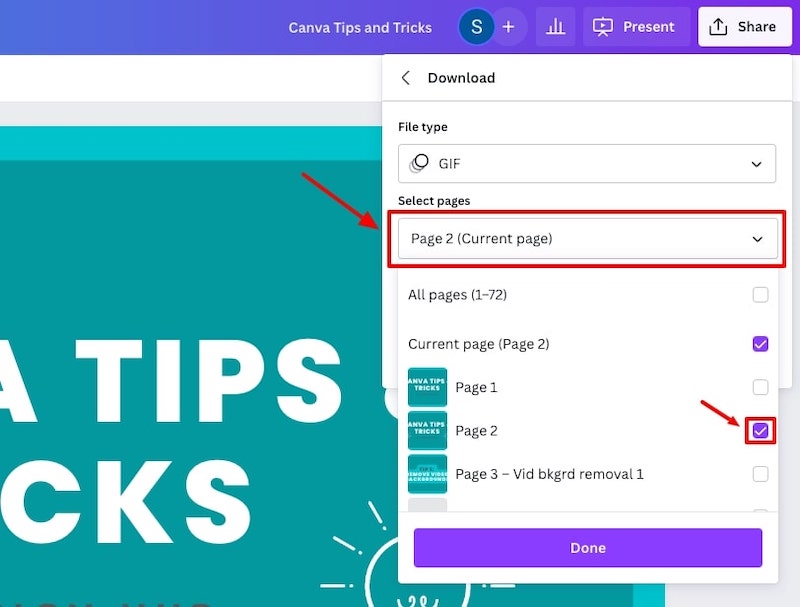
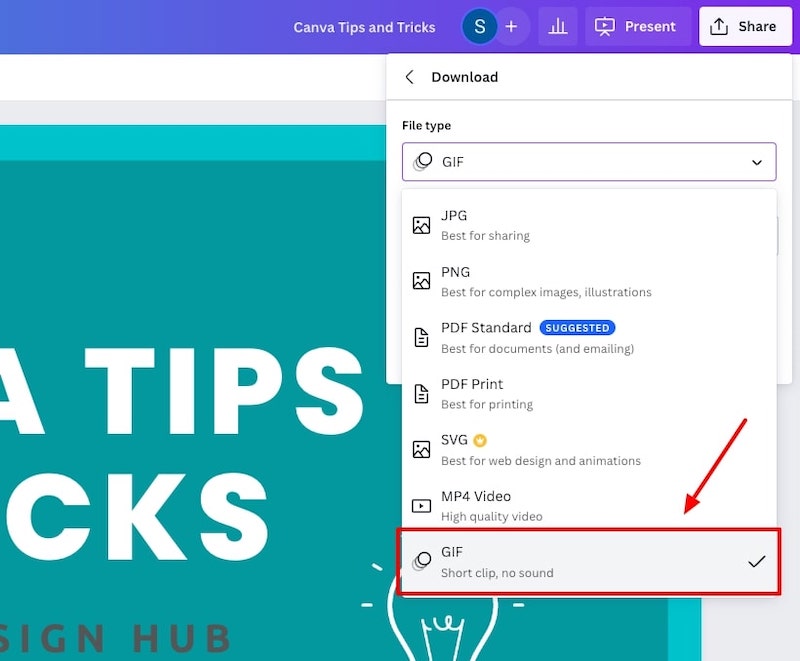
Then, select GIF as your file type, and hit the download button:
The last step is to add a blank slide in your PowerPoint presentation, upload the downloaded GIF image into that new blank slide and adjust it to cover the PowerPoint page and that’s it!
You’ll now have an animated slide in your PowerPoint presentation.
Adding animations in PowerPoint
You can also simply download the full Canva presentation and convert it to a PowerPoint presentation and then add animations within PowerPoint instead.
Here’s a great video showing you how to add animations in PowerPoint:
Related articles
If you’re new to Canva, here are some other articles that might be of interest to you:
- How to use Canva: Beginners tutorial
- Canva tips and tricks
- How to draw on Canva
Wrapping things up
So, there you have it, that’s how you can quickly and easily convert your Canva presentations into PowerPoint presentations, including how to keep your animations.
We hope this tutorial was helpful for you!
Enjoy creating! If you have any questions or suggestions leave a comment below.

Written by Sam McCraw
Leave a reply cancel reply.
Your email address will not be published. Required fields are marked *
Save my name, email, and website in this browser for the next time I comment.
By using this form you agree with the storage and handling of your data by this website. *
How to Use Canva: Tutorial For Beginners
How To Create A 3D Pop Out Effect in Canva
© 2024 by Design Hub
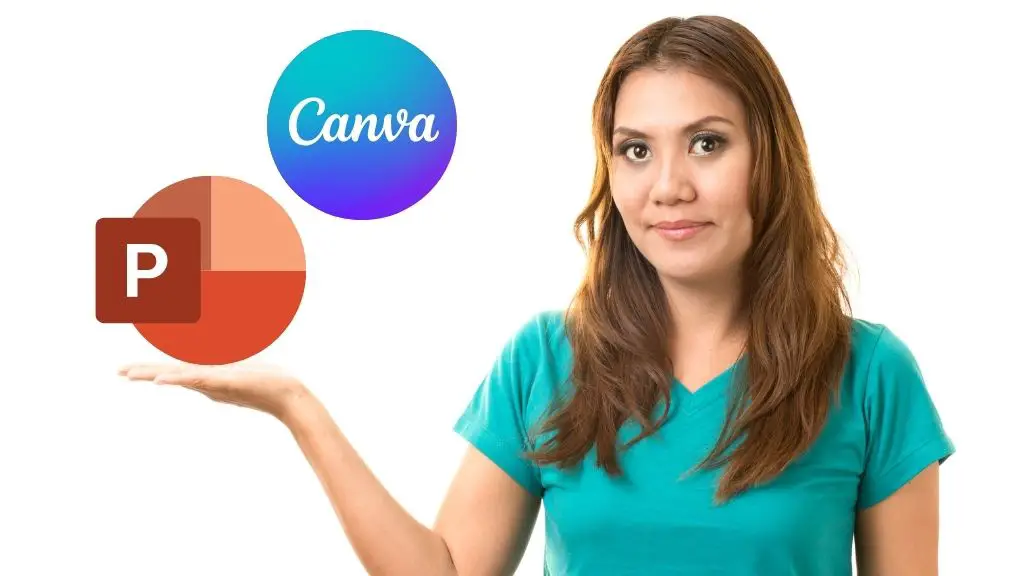
Home Blog Design How to Use Canva and PowerPoint for Presentations
How to Use Canva and PowerPoint for Presentations

Creating the perfect presentation design is a challenge that speakers often aim to achieve, only to find themselves lacking graphic design knowledge. Although high-tier options like Adobe Photoshop and Adobe Illustrator help users worldwide to put their ideas into pixels, the reality is they are not user-friendly interfaces for people outside the graphic design industry, namely business professionals, marketers, and educators. Hence, the need to find an alternative for making powerful graphics to use in our presentations – and here’s where Canva comes into the picture.
This web-based graphic design tool has quickly become the preferred choice of teachers, social media influencers, and small business owners due to its free-tier plans and pro plans at a convenient subscription-based fee.
In this article, we will see how to use Canva presentation in PowerPoint and how to export Canva to PPT, to create visually appealing presentations.
Table of Contents
Canva vs. Microsoft PowerPoint: Pros and Cons for Presenters
Designing with canva, how to export a canva presentation to powerpoint, how to use canva-made graphics in powerpoint, final words.
Although presenters often see Canva as an alternative to PowerPoint, the reality is that they differ in one single aspect: Canva is a graphic design tool, whereas PowerPoint is a presentation design software. Some of the tools available in PowerPoint are not there in Canva, and vice versa.

Going into more technical aspects, here are the Pros and Cons of working with either software as a presenter.
Pros of Canva as a Presentation Tool
User-friendly interface.
Canva’s drag-and-drop feature makes it easy for non-designers to create presentations by using its library of shapes, graphics, text styles, and other resources.
Wide Range of Templates
It offers a vast library of Canva templates, which can be easily customized in their online editor, saving time on design. There’s a con associated with this point, which we shall discuss later.
Magic Studio for Canva was released mid-Q3 this year with the idea of powering designs with AI tools. This tool is available in Canva search features and in the editor at the bottom right corner, which features the list options:
- AI text generation
- Suggested graphics to match your design
- Suggested photos to match your design
Collaboration Feature
Allows multiple users to simultaneously work on the same presentation, which is great for small team projects. Compared with PowerPoint, it does not require all users to be Premium to collaborate online.
Web-Based Platform
Being an online platform, it allows users to work from any device with Internet access without needing software installation. This particularly helps users with legacy computers who cannot install current versions of Microsoft Office.
Integrated Stock Library
Provides access to a broad selection of stock photos, illustrations, and icons within the platform. Just like with the Canva templates, there’s also a con to this point.
Customization Options
Users can upload images and fonts, enabling brand consistency across presentations. Note: The upload fonts feature is only available for Canva Pro users.
Photo Editing and Animation Features
Canva lets users tweak their graphics with simple-to-use controls. These options help us to adjust opacity, apply photo filters, add animation effects, add bevels and shadows, and more.
Cross-Platform Compatibility
Can export presentations to various formats (as a PDF document, as a video presentation in MP4 format, or even as images), making them viewable on different devices and platforms. The export options allow us to post directly into social media, create printables, post to the web, etc. While some export formats require an upgrade to a Canva Pro subscription (like the ability to export to SVG format), the basic export features are enough for simple presentations and beginners.
Cons of Canva as a Presentation Tool
Limited offline functionality.
Requires an internet connection for full functionality, which can be a limitation in areas with poor connectivity, for business people working on an airline flight, while using Airplane mode, or for people traveling in other zones without Internet access.
Fewer Animation and Transition Options
Unlike PowerPoint, the available options for animations and transitions are limited. Users can find this reiterative, which may be unappealing to using these effects in our presentations.
Premium Content
Although the Canva library is extensive in terms of assets, the reality is that most of these elements are only available for premium users. This applies to templates, shapes, images (mostly), and exporting options. Resizing the graphics you create in Canva to repurpose your design is only available to premium users.
Template Overuse
Popular templates can be overused, making presentations look similar to many others. This is of particular interest to business professionals, as people tend to easily associate some designs as being made with Canva.
Design Decisions
Unlike using a PowerPoint template , you have to work your way with Canva content, as the PPT templates tend to be quite generic and do not offer tools for data representation. Consequently, you have to know how and where to introduce those elements on your own rather than working with a presentation template that already assigned the space for such graphics.
Lack of Advanced Multimedia Integration
Integrating complex multimedia elements like videos is not as seamless as in some desktop applications. You won’t find options to link to source elements; you need to upload the content to your personal Canva library and manually add the resource to the slide. Presenters can also lose third-party integrations via plugins for some multimedia resources.
Pros of PowerPoint as a Presentation Tool
Widespread use and familiarity.
PowerPoint is the leading market tool for presentations, making most audiences and presenters are familiar with it at a basic operational level. This can help us to outsource technical issues quickly rather than aiming to use web-based interfaces to share Canva-created content.
Offline Access
PowerPoint can be used offline, which is ideal for people traveling, areas where the Internet connection is unreliable, or simply because we want to focus on creating the slides rather than facing distractions via the Internet.
Integration with Other Microsoft Office Tools
Seamlessly integrates with other Microsoft products like Excel and Word, making it easy to import data and documents. This is ideal for creating complex graphics for data representation, where the content can be synced, importing databases, working with Gantt Charts in software like Microsoft Project, and more.
Also, Microsoft PowerPoint has the same text editing capabilities as Microsoft Word – a striking contrast with Canva’s limited features.
Templates and Design Options
This is PowerPoint’s forte: the capability of using third-party presentation templates, like the ones provided by SlideModel . Users can buy pre-designed slide decks from professional vendors and ease the need to make design-related decisions. On top of that, Microsoft already includes some basic templates with its 365 subscription.
Advanced Features
Offers a broad range of features, including detailed animations and transitions, which can enhance presentations. For example, the ability to work with SVG graphics allows presentation designers to make pixel-perfect presentations without losing image quality. This is available to all users, unlike Canva, which requires a subscription to unlock certain elements.
Multimedia Capabilities
Supports embedding of various multimedia elements like audio, video, and images directly into presentations. You can use hyperlinks to embed content or work with third-party plugins for specific tasks.
Extensive Support and Resources
As a long-established tool, users can find tutorials everywhere, support communities, and additional resources available online.
Cons of PowerPoint for Presenters
Some features can be complex to use, and the interface may be overwhelming for new users. In particular, this is linked to editing PowerPoint Shapes and graphs, working with Slide Master , applying advanced animation effects and so on.
Unlike Canva or Google Slides, PowerPoint requires purchasing Office 365 or a standalone license.
Heavy Files
PowerPoint files, especially those with multimedia content, can become large and difficult to share via email. As a side effect, those heavy files can be complicated to handle in computers that lack sufficient RAM and processing power. Moreover, they require significant free disk space on your PC.
Time-Consuming
Creating a high-quality presentation with custom animations and graphics can be time-consuming. That’s the reason why we highly recommend users work their way with PowerPoint templates, and mix and match designs to create a unique slide deck .
Learning Curve
Users need to invest time in learning the software to fully utilize its advanced features. This applies to both acquiring the knowledge and practicing the skills you learned. And still, for some users, it feels frustrating not to achieve results relatively quickly.
In this section, we will learn how to use Canva to create graphics for a product presentation. The idea is to create placeholder graphics containing images of a product; then, we will export that content to continue creating our presentation in PowerPoint.
After creating our Canva account, we find ourselves at the Home screen. Go to Templates, and you will see something similar to this UI.

We can go straight to the Presentations (16:9) option or use the search bar to locate the template we want. In this case, we will opt for that scenario and search “Product.”
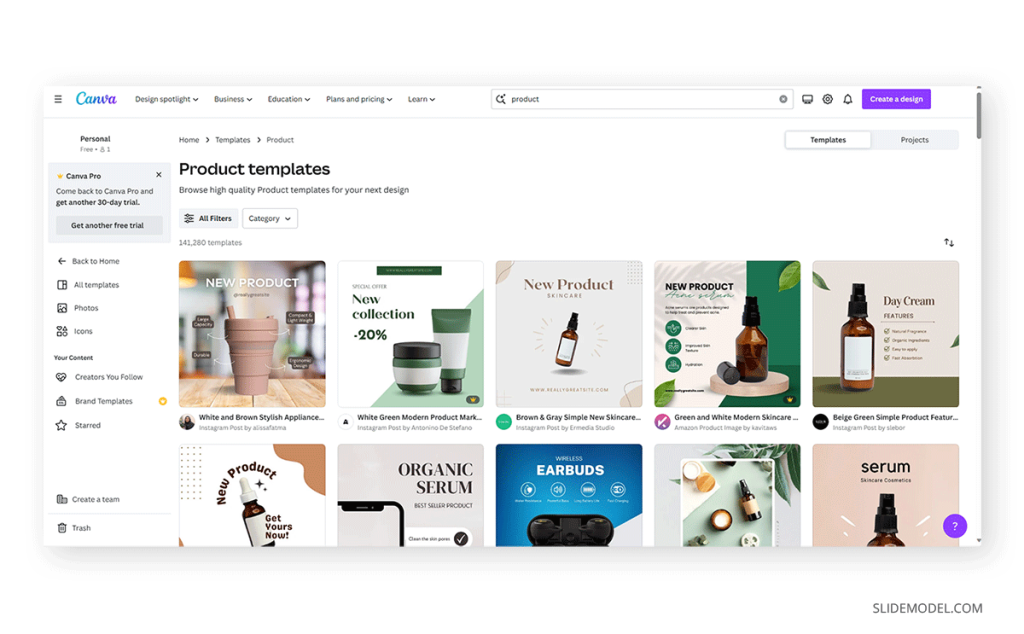
The images that show a little crown at the low right corner are premium templates, which means we cannot use them with a free account. We will pick a template that fits the needs of our presentation by clicking over it. At the contextual window that opens, select Customize this template .

The Canva builder may take a bit to load, especially if your internet connection is slow. You will find yourself with a window like this one, opened at the Design tab, which offers alternatives for other templates similar to the one you chose.

The Styles tab allows us to quickly change the layout, altering color themes and fonts. Sometimes, that can suit our needs immediately; sometimes, it requires extra work to customize to our preferences.

We can click on any element in this design and customize its content. Depending on the element type, the options are available for us. For this presentation, we will change the text and images, and alter font color at the button to make it stand out.

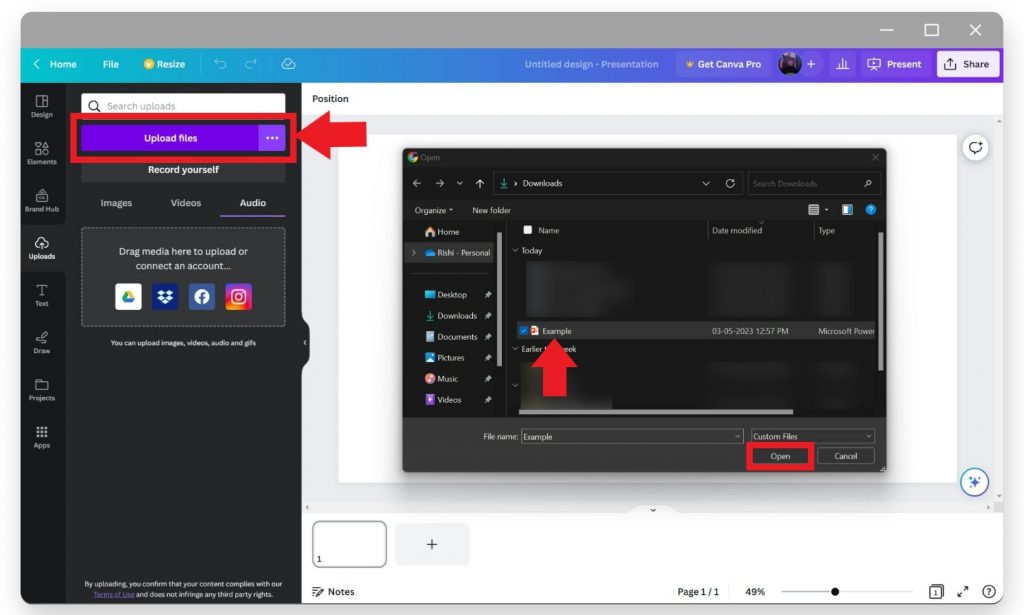
Next, it’s time to replace the images. We can drag and drop the image into Canva, or we can go to the Uploads button and add the content from there.

In this case, we’re using DALL-E-generated images for this product presentation, you can also use illustrations, photos, videos, or Midjourney illustrations . Once the images are uploaded, drag and drop them to replace the images in the placeholder areas. To complete this design, we removed the shape that came with the template – you can add a new shape by going to Elements > Graphics .

Learning how to use Canva for PowerPoint is pretty straightforward. Download your Canva design as a PowerPoint presentation, which you can do by accessing your design and going to the top-right corner to locate the button Share . Click on it, and then click on Download .
Under File Type , we will select PPTX , as it’s PowerPoint’s native format. Click on Download , and wait for the process of downloading the file to be completed. Depending on the graphic assets included, it can take a while.

At this point, don’t be surprised if you’ll be prompted to upgrade your Canva plan (if you don’t have a premium account). The reason is that Canva will charge you for exporting what they call premium graphics, and since most of the Canva presentation templates use premium graphics, this will be a limitation when exporting your Canva slides to PowerPoint.
A simple workaround is removing the premium graphics before exporting from Canva to PowerPoint. Although, take in mind this may affect the overall design of your presentation.
As you can see below, the PowerPoint file is entirely editable. Something to consider is that unless you have the font installed on your computer, PowerPoint will reassign to a generic font.

Remember the design we created before? Well, it’s time to use that image as part of a marketing deck presentation , which will represent a social media post to be used by the marketing team to promote the brand.
The first step is to download the design we created as PNG. We can close Canva after that.

We opened our PPT template, which is the Annual Marketing Plan PowerPoint Template , and customized the PowerPoint theme colors . Go to Insert > Pictures > This Device .

Select the image we created in Canva and upload it here. We will add some image shadow effects via Shape Format, and a textbox below that describes what the image is about.

And that’s how easily we can use graphics from Canva in our PowerPoint presentations. Remember, it’s best to work with PNG images rather than JPG to reduce file size and preserve image quality.
You can invite others to collaborate on your design by sharing a link to the editable design or by adding them via email as team members on your Canva account.
Canva uses standard cloud storage security measures to protect your data, but like any online platform, it’s important to use a strong password and follow good security practices.
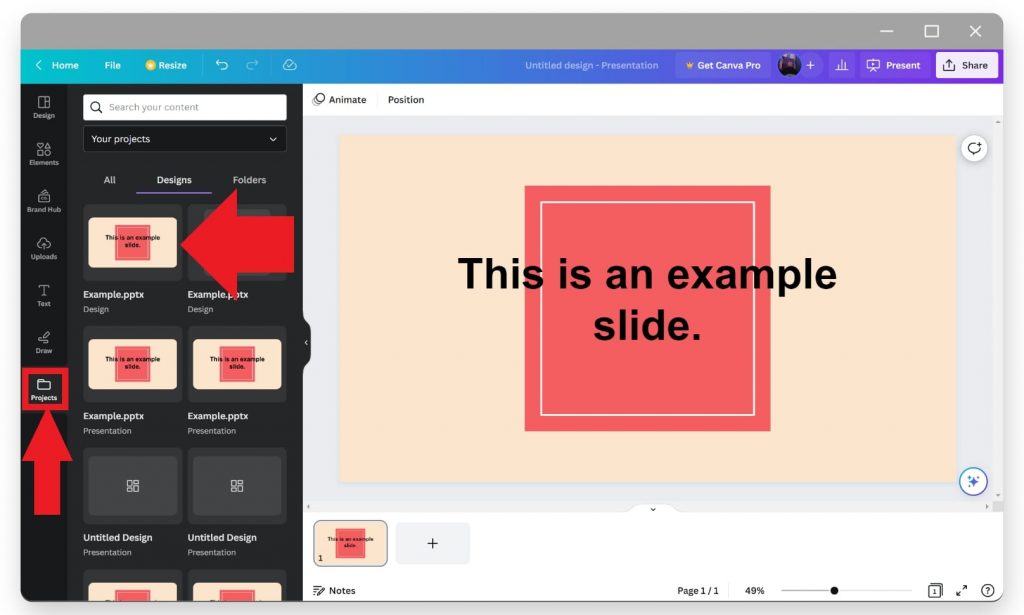
There are two methods for this. You can upload a PPT template into Canva via the Canva Homepage by clicking on Projects , and then go to the Uploads folder. Drag and drop or click on Upload, as we’ve seen before. Once imported, you must click on that file to open it in the Canva editor. The second method is on the editor: go to the Uploads button and upload your PPT file as if it were an image or another media asset.
Yes, you can use SlideModel presentation templates in Canva. As a SlideModel subscriber, you can download .pptx files to import into Canva presentations. This way, you can enjoy the creative slide templates and graphics provided by SlideModel in your Canva presentations
Unfortunately, no, as Canva doesn’t have the same toolset to enable editing functions. That also applies to changing color, so we highly recommend you work with a final PPT file before switching to Canva.
Objects like charts, SmartArt, 3D objects, and WordArt aren’t supported in Canva and won’t be rendered if you upload a slide that contains them.
Yes, all users can download Canva presentations to PPTX format. In case the original Canva design isn’t a presentation file, like a banner or social media post, you won’t be able to resize for that output unless you have a premium account.
Yes, the file must be smaller than 70 MB, and you can import up to 300 slides.
Canva and PowerPoint can collaborate as complementary tools to help presenters overcome the limitations of each individual tool. It takes a while to create your desired workflow, but once that’s accomplished, you can elevate the quality of your PowerPoint or Google Slides presentations with Canva.
We don’t advise using Canva as an alternative to PowerPoint as the current state-of-the-art indicates it won’t support data representation or other PowerPoint stellar tools that make part of most PPT templates.

Like this article? Please share
Design, Microsoft PowerPoint Filed under Design
Related Articles

Filed under PowerPoint Tutorials • May 14th, 2024
How to Create a Roadmap in PowerPoint
Learn how to create effective roadmap presentations in PowerPoint with this step-by-step guide and recommended templates.

Filed under PowerPoint Tutorials • May 10th, 2024
How to Copy a Slide in PowerPoint
Optimize your slide deck creation process by learning how to copy a slide in PowerPoint. Detailed instructions with screenshots here.

Filed under Google Slides Tutorials • April 23rd, 2024
How to Align Objects in Google Slides
Optimize your layouts by learning how to align objects in Google Slides presentations. Step-by-step guide with screenshots.
Leave a Reply
How to Convert Canva Slides to PowerPoint
Do you have a Canva presentation that you need to use in PowerPoint? Here's how to convert it in just a few clicks.
Canva’s presentation tool makes it easy to put together a professional and visually engaging slide deck, regardless of your level of expertise. However, at some point, you may need to convert your Canva slides to PowerPoint to accommodate certain requirements, take advantage of more advanced features, or collaborate with others who prefer to work with PowerPoint.
Whatever the case, this article has got you covered. In this comprehensive guide, we'll walk you through the step-by-step process of seamlessly transitioning your Canva presentations to PowerPoint, ensuring that your hard work and creativity are preserved.
After you’ve created the perfect professional presentation in Canva , here is how you can export it as a PowerPoint file. Click the Share button in the top-right corner and select More from the drop-down menu.
Scroll down the list and click on Microsoft PowerPoint .
You can type PowerPoint in the search bar at the top to quickly find it.
By default, all the slides in your presentation will be selected to be exported. However, if you only want to export specific slides, click on the drop-down arrow under Select Pages . Disable the check marks beside the slides you don’t want to include, and click Done . Now click Download to export your selected slides.
In the file explorer window that pops up, choose a location for your file, give it a suitable name, and click Save . Your Canva slide deck will now be downloaded to your computer as a PowerPoint (PPT) file.
This method of exporting your Canva presentation into a PPT file has a few limitations. The fonts you used may change if you don’t already have them on your computer.
In addition, if you’ve applied standard animations or used Canva’s animation tool to create custom animations for certain elements, these elements will be removed in the PPT document. In the next few sections, we’ll walk through how to work around these limitations.
How to Convert Canva Slides to PowerPoint (Without Changing Fonts)
Depending on the fonts you use, your Canva slide deck won’t look the same in PowerPoint if you don’t have those exact fonts saved on your computer. PowerPoint will automatically replace those custom fonts with default fonts.
If you want to still stick with the custom fonts, one way to go about it is to explore the font library in PowerPoint to see if you would find similar-looking fonts.
Another way to go about this is to first find out the name of the font in Canva or use any of the five best sites for identifying fonts online . From here, you can download the fonts to your computer from any of the best free font websites . The process of adding your new fonts to PowerPoint is similar to that of adding new fonts to Microsoft Word .
How to Convert Canva Slides to PowerPoint (With Animations)
If you don’t want to lose all the cool animation you’ve added to your Canva presentation, you’ll have to export them as a GIF. Here’s how.
Click the Share button and select Download from the drop-down menu.
Ensure GIF is selected under File type. With this method, you’ll have to select one page at a time (under Select pages) to export as a GIF. When you’re done, click Download .
In the file explorer window that appears, choose a file location, give it a suitable name, and click Save . Your Canva slide will now be downloaded to your computer as a GIF file.
You have to repeat the same process for each page in your Canva slide deck. If your slides aren’t many, this shouldn't be much of a problem. However, if you’re working with a bunch of slides, this can be a bit tedious.
If you want to maintain the animated elements without the animations, you can go through a similar process but this time around, save your entire slide deck as a PNG file.
This will export each slide as a PNG file and place it in a zipped folder. From here you can extract the files, then drag and drop them into PowerPoint. Compared to exporting each slide as a GIF, this method will save you lots of time.
While the method of exporting your Canva slide deck into a .PPTX file removes animated elements, this method doesn’t let you modify slide elements in PowerPoint since they’re in GIF or PNG format. Keep these limitations in mind as you decide which method you want to use.
Converting Canva Slides to PowerPoint Is Easy
By following the steps outlined in this article, you can seamlessly transition your Canva presentations to PowerPoint, and get the best of both worlds! Whether you're working in Canva or PowerPoint, you can also choose to convert your presentations into videos.
Maker's Aid
Can You Edit and Present Canva Slides in PowerPoint?
Opening a Canva presentation in PowerPoint? Yes, it’s possible. Here’s how to pull it off.
Until recently, Microsoft PowerPoint was the only decent presentation design app you could use for school assignments, startup pitch decks, or your company’s annual investor report.
But not anymore!
Canva came along and—with presentation templates you’ll actually want to use and access to millions of royalty-free stock photos , videos, and design elements—it stole the show.
And yet not everyone has Canva. And you can’t use it from every computer, especially in a corporate setting or if you don’t have a reliable Internet connection.
Did you know that you can download your Canva slide deck in PPTX format so that you can view, edit, and present it in Microsoft PowerPoint?
This tutorial will show you how to do this in just four steps, with screenshots.
How to Download Canva Presentation as a PowerPoint File
Step 1: Open your Canva presentation, then click on the “Share” button in the upper right corner of the screen.
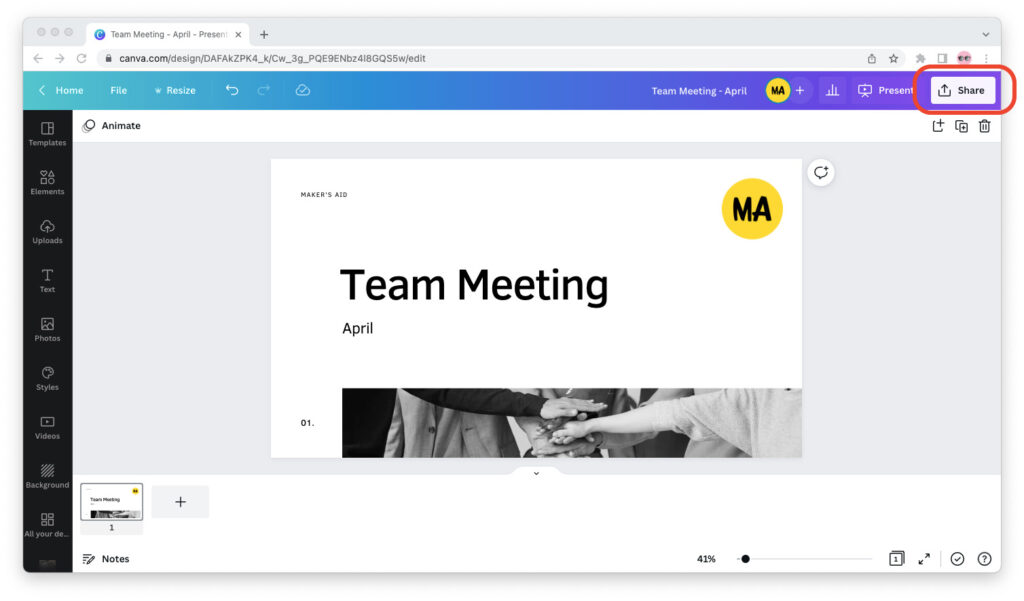
Step 2: The “Share this design” menu will pop up. Scroll down to the bottom of the menu and click “More.”
Step 3: Scroll down until you can see “Microsoft PowerPoint” under “Save.”
Step 4: Click on “Microsoft PowerPoint,” then select “Download.”
Once you go through these steps, you’re all set!
The Canva presentation will download to your device as a PPTX file. You can view, edit, and present this PPTX file from Microsoft PowerPoint on your computer.
If the fonts you used in Canva are not installed on your computer, remember that Microsoft PowerPoint must replace them with other fonts when you open the deck.
So if you have to present on a device that doesn’t have Canva and you want to keep your fonts, you can export the presentation in PDF format. You will, however, have to forgo slide transitions and animations.
Can You Present From Canva?
If you created a presentation in Canva, you can present it from Canva to your device.
Open the presentation in Canva, click on the “Present” tab in the upper right corner, then select the type of type of presentation you’d like to make and click on the purple “Present” button.
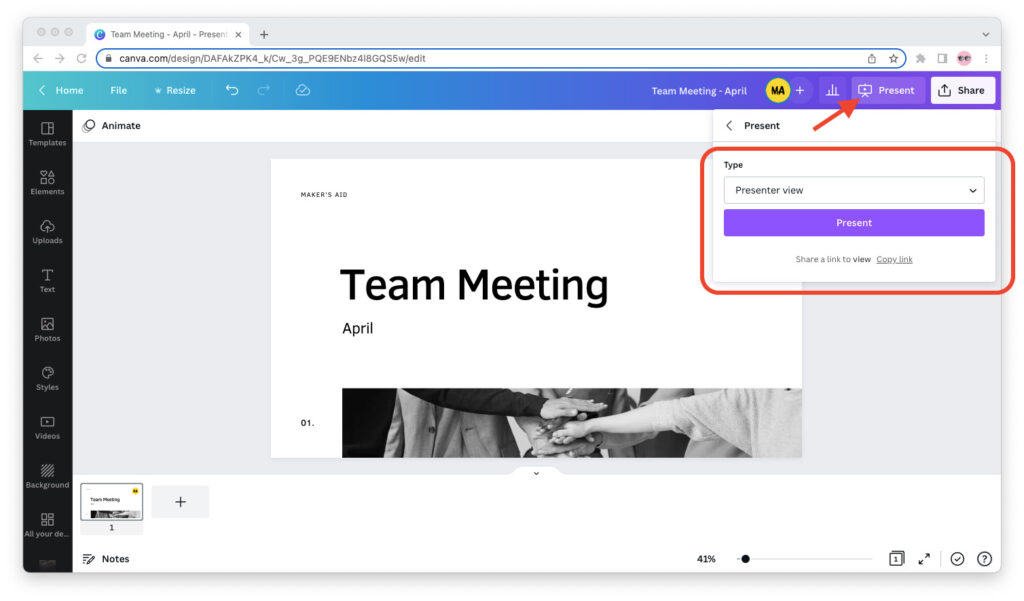
To be able to present on Canva, your device must be connected to the Internet.
You can choose from three presentation modes in Canva:
- Standard mode, which expands your slides to full screen and lets you switch between them at your own pace.
- Presenter view mode, which lets you view your presenter’s notes and get a sneak peek into the upcoming slides.
- Present and record mode, which lets you record yourself as you present.
As long as the device you’re presenting on has Internet access and you can use Canva on it, presenting your slide deck directly from Canva is your best option.
Final Words
Yes, you can view, edit, and present Canva slide decks in PowerPoint. To do this, simply download the Canva presentation as a PPTX file and open it in PowerPoint.
Leave a comment Cancel reply
Your email address will not be published. Required fields are marked *
To provide the best experiences, we and our partners use technologies like cookies to store and/or access device information. Consenting to these technologies will allow us and our partners to process personal data such as browsing behavior or unique IDs on this site and show (non-) personalized ads. Not consenting or withdrawing consent, may adversely affect certain features and functions.
Click below to consent to the above or make granular choices. Your choices will be applied to this site only. You can change your settings at any time, including withdrawing your consent, by using the toggles on the Cookie Policy, or by clicking on the manage consent button at the bottom of the screen.

How to convert a Canva design to Powerpoint presentation

Table of Contents
Streamline your design-to-presentation process with this comprehensive guide on converting your Canva designs to PowerPoint presentations. Elevate your workflow by seamlessly transferring your creative content, ensuring a smooth transition between platforms. This step-by-step guide empowers you to effortlessly transform your Canva designs into professional PowerPoint presentations, enhancing efficiency and providing a clear path for effective communication and presentation delivery.
1. Select your desired Canva design.

2. Now, press the 'Share' button.

3. Click the 'More' option.

4. Choose the desired format for your presentation.

5. Hit 'Download' and celebrate, your Canva design is now a PPT!

6. An alternative is to use the 'Google Drive' option.

7. Click on 'File type'.

8. Select 'PPTX' as your file type.

9. Finally, tap on 'Pay and Save' to add the PPT to your Google Drive.

Create your own step-by-step demo
Scale up your training and product adoption with beautiful AI-powered interactive demos and guides. Create your first Supademo in seconds for free.
Create beautifully interactive product demos in minutes.
Start a 14-day free trial, no credit card required.
Related articles
How to use the semrush keyword gap tool, how to create a zoom account, how to create a campaign in mailerlite, get the fastest, easiest interactive demo platform for teams.
Natalie Ducey
How to Change/Convert a Canva Presentation into a PowerPoint Presentation!
Canva Tips · Marketing Tips and Resources · Uncategorized · Writing Tips and Resources
If you’re using Canva, you know how intuitive the design platform is. Its tools and features make creating designs and presentations efficient and fun.
I love sharing timesavers in the design and presentation process, and this is a goodie! ♥
We can easily convert our Canva Presentation into a PowerPoint Presentation in seconds!
Watch the Tutorial via YouTube
Canva’s Presentations
Canva’s easy-to-use presentation templates and layouts make the design process fun, and we can easily present directly using the platform. But if this is not your preference for presenting, it’s good to know you have options.
You can view/access the various presentation templates here . If you’re new to Canva, you can easily create a free account using the link below.
How to Convert a Canva Presentation to a PowerPoint Presentation!
If you prefer the ease and familiarity of PowerPoint to present your work, you can easily harness the creativity and intuitiveness of both platforms.
Okay, let’s go through the few steps.
Once you created your presentation and are ready to convert, click on Share .
Then scroll down and click on More.

This will show all options.
Scroll down to the Save category and click on the PowerPoint option.

Next, select the pages you’d like to download.
I selected All Pages.
Click on Download .
NOTE: Videos, audio, and animations will not convert in this process.

You’ll find your PowerPoint file in your download folder or designated location.
Just click on it to open your PowerPoint Presentation. Tada!
TIP : If your graphic(s) doesn’t convert as designed…
If you’re using a Canva graphic that has multiple elements and it doesn’t convert well, just save and download your graphic as a PNG file with Transparent background .
Then insert your graphic in the relevant slide in your PowerPoint Presentation. On two occasions my Canva graphic with 20+ elements didn’t convert clearly. The PNG file was my solution.
And you’re done!
If you haven’t been using this feature in Canva , I hope this post encourages you to do so. It’s a fantastic intuitive tool to quickly convert a Canva Presentation into a PowerPoint Presentation.
For more Canva tips stop by ~ Creative & Design Tips!
Have a tip you’d like to share? Please feel free to share in the comments below.
If you’re using Instagram and/or Pinterest and would like to connect, please share a link to your profile in the comments below. Let’s connect!
Until next time … happy creating, my friends! ♥
Free Download
Blogging essentials guide.
After seven years of blogging, I thought I’d put together a Resource Guide with a list of essential tools and resources I use in hopes that it may prove helpful to fellow bloggers – newbies and/or not-so-newbies alike. After all, we’re always learning in this form of engagement. ♥

Thanks for sharing!
Reader interactions.

August 10, 2022 at 7:48 am
Thanks for sharing, Natalie! You’re awesome! 🙂

August 11, 2022 at 9:52 am
Thank you, Yvette! Always a joy to share. Thanks for sharing, too. I appreciate you! 🙂

August 10, 2022 at 12:06 pm
Thank you for the great information, Natalie! I love using Canva 🙂
August 11, 2022 at 9:56 am
It’s so awesome! I couldn’t believe how simple changing a file to PPT is. Jackpot! Thanks so much for stopping by and for sharing, too. I appreciate you! 🙂

August 11, 2022 at 1:27 am
Thanks for this great tip, Natalie – I didn’t even know that you could make a presentation in Canva. Toni x
August 11, 2022 at 10:01 am
Always a joy to share, Toni! Canva is my favourite design tool now. Its ease-of-use is just awesome. The presentation templates are so easy to work with, too. Happy to help in any way. Cheers! xo

August 15, 2022 at 4:14 pm
Thanks Natalie. Another one for the folder <3
August 16, 2022 at 12:33 pm
Awesome, Debby. Cheers! 🙂
August 16, 2022 at 12:42 pm

August 26, 2022 at 12:21 pm
I use PowerPoint to make book trailers, Natalie, and didn’t know that Canva could help with that process. Thanks for the “how to.” Have a wonderful weekend. <3
August 30, 2022 at 1:06 pm
Most welcome, Diana! I was excited to discover this feature and had to share. Thanks for stopping by. Wishing you a lovely day! 🙂
We are all friends here. Join the conversation! Cancel reply
Quick search, natalie ducey.
- GRAPHIC DESIGN STUDIO
- PEACE BY PIECE PUZZLES
- POETRY BY NATALIE
- FREE RESOURCE LIBRARY
- PRIVACY POLICY
Contact and/or Follow for Helpful Tips!
Free blogging guide.

How Do I Insert a Canva Presentation Into PowerPoint?
Last updated on September 27, 2022 @ 10:45 pm
If you’re looking to add some pizazz to your PowerPoint presentation, you may be wondering how to insert a Canva presentation. Canva is a user-friendly graphic design tool that can help you create professional-looking slideshows, infographics, and more. Here’s how to insert a Canva presentation into PowerPoint:
- First, open your PowerPoint presentation and select the slide where you want to insert the Canva graphic.
- Next, click on the Insert tab and then click Object .
- When the Insert Object window appears, select Create from file and then click Browse .
- Locate the Canva graphic you want to insert and then click Open . PRO TIP: Please be aware that inserting a Canva presentation into PowerPoint can be problematic and may not work as expected.
- Finally, click OK . Your Canva graphic will now be inserted into your PowerPoint slide!
Now that you know how to insert a Canva presentation into PowerPoint, you can start adding more engaging and visually appealing content to your slideshows. If you’re not familiar with HTML, you can use the <p> tag , which is used to create paragraphs, or the <u> tag , which is used to underline text. You can also use the <b> tag , which is used to bold text.
Canva is a great way to add visuals to your PowerPoint presentations without having to hire a professional designer. With a few clicks of the mouse, you can insert high-quality graphics that will make your slideshows more engaging and visually appealing.
6 Related Question Answers Found
How do i transfer a canva presentation to powerpoint, how do i open a canva presentation in powerpoint, how do i download a canva presentation to powerpoint, how do i download canva presentations to powerpoint, how do i download a canva template in powerpoint, how do i save a canva presentation as a powerpoint.

Dale Leydon
Sysadmin turned Javascript developer. Owner of 20+ apps graveyard, and a couple of successful ones.
How Do I Use Canva Templates in PowerPoint?

Are you tired of creating PowerPoint presentations from scratch? Do you want to make your presentations more visually appealing and professional? Well, look no further! With Canva templates, you can easily enhance your PowerPoint presentations with stunning designs and layouts. In this tutorial, we will walk you through the steps to use Canva templates in PowerPoint.
Step 1: Choosing a Template
First, visit the Canva website and browse through their extensive collection of templates. Whether you need a template for a business presentation, educational slideshow, or even a personal project, Canva has got you covered. Once you find a template that catches your eye, click on it to open it in the editor.
Step 2: Customizing the Template
Canva provides an intuitive interface that allows you to customize each element of the template. From changing colors and fonts to adding or removing images and text, the possibilities are endless. Simply click on any element within the template to modify it according to your needs.
If you want to emphasize certain parts of your presentation, make use of bold text . It helps draw attention and highlights important information.
Underlined Text:
To add an extra layer of emphasis or importance to specific text within your slides, consider using underlined text . It helps create visual hierarchy and guides your audience's focus.
Step 3: Downloading Your Design as PowerPoint
Once you have customized the template to your satisfaction, it's time to download it as a PowerPoint file. Simply click on the "Download" button located at the top right corner of the Canva editor. Choose "PowerPoint" as the file format, and Canva will convert your design into a PowerPoint presentation.
Step 4: Importing the Template into PowerPoint
Now that you have your customized template in PowerPoint format, open Microsoft PowerPoint on your computer. Create a new presentation or open an existing one where you want to use the Canva template. Then, go to the "File" menu and select "Open" to locate and import the downloaded Canva template into PowerPoint.
- bullet points
Step 5: Editing the Imported Template in PowerPoint
After importing the Canva template into PowerPoint, you can further customize it if needed. You may want to tweak certain elements such as text size, positioning, or even add additional content specific to your presentation.
Subheaders:
This syntax.
Congratulations! You have successfully learned how to use Canva templates in PowerPoint. By utilizing the power of Canva's templates and customizing them according to your needs, you can create visually stunning presentations with minimal effort. So go ahead and impress your audience with professional designs that leave a lasting impact!

About the author:

Related posts
How Do I Use Canva in PowerPoint? Canva is a popular online design tool that allows users to create stunning graphics, presentations, and documents with ease. While Canva provides... October 5, 2023 canva -->
How Do I Download a Canva Template in PowerPoint? Downloading a Canva template in PowerPoint is a simple process that allows you to access and edit professionally designed templates for your... October 4, 2023 canva -->
How Do I Use Canva Templates in Google Slides? How Do I Use Canva Templates in Google Slides? Google Slides is a powerful tool for creating presentations, but sometimes you may want to add a... October 4, 2023 canva -->
How Do I Sell a Canva Template on Etsy? Selling Canva templates on Etsy can be a great way to monetize your design skills. With the increasing demand for customizable templates, many... October 2, 2023 canva -->
How Do I Share a Canva Template on Etsy? Are you a creative entrepreneur looking to sell your Canva templates on Etsy? Sharing your designs with others can be a great way to monetize your... October 4, 2023 canva -->
How Do I Use Canva as a Poster? Using Canva as a Poster Canva is a versatile graphic design tool that allows users to create stunning visuals, including posters. Whether you are... October 4, 2023 canva -->
How Do I Use Canva to Create a Website? Canva is a fantastic tool for creating stunning and professional designs, but did you know that you can also use it to create a website? With... October 4, 2023 canva -->
How Do I Convert Canva to PowerPoint? Are you looking for a simple way to convert your Canva designs into a PowerPoint presentation? It's actually quite easy to do! With just a few... February 9, 2023 canva -->
How Do I Sell a Canva Template on Canva? If you are a Canva user and have created some stunning templates, you might be wondering how to sell them on Canva. Selling your Canva templates can... October 5, 2023 canva -->
How Do I Use Canva Templates for Instagram Stories? If you're looking to create stunning Instagram Stories but don't have the time or design skills to start from scratch, Canva templates are here to... October 4, 2023 canva -->
You haven't yet saved any bookmarks. To bookmark a post, just click .
How To Make a PowerPoint in Canva? (Step-By-Step Guide)
Are you looking for an easy and cost-effective way to create stunning presentations? Look no further than Canva! Canva is a powerful design platform that makes creating professional-looking presentations a breeze – and in this step-by-step guide, we’ll show you just how easy it is to create a beautiful PowerPoint in Canva.
From exploring the benefits of using Canva, to customizing the design, adding text, images, and other elements, and exporting the presentation – we’ll cover it all! So let’s get started and make a presentation you’ll be proud to share.
Table of Contents
Short Answer
Creating a PowerPoint in Canva is easy and straightforward.
First, log in to your Canva account and select the “Create a Design” option.
Choose the PowerPoint icon and select a template that you want to use.
Add text, images, shapes, charts, and other elements to your presentation.
When you’re finished, click “Download” to save the PowerPoint to your computer.
Benefits of Creating a PowerPoint in Canva
Creating a PowerPoint presentation in Canva has a number of advantages.
For starters, Canvas user interface is intuitive and easy to use, making it simple for anyone to quickly create a presentation that looks professional and polished.
Additionally, Canva has a wide selection of templates to choose from, allowing users to create presentations that are tailored to their specific needs.
Furthermore, Canva makes it easy to add text, images, and other elements to further enhance the presentation.
And lastly, the ability to export the presentation as a PDF or PPT file makes it simple to share with others.
With Canva, creating a stunning presentation is a breeze.
Overview of Canva
Canva is an online platform for creating stunning visuals quickly and easily.
It has an intuitive user interface and a wide selection of templates for creating professional presentations.
With Canva, you can create high-quality presentations in minutes, with no prior design experience needed.
Canva offers a range of editing tools, including text, images, shapes, and more, which can be used to customize your presentation to your exact needs.
You can also access a library of royalty-free images and graphics to make your presentation truly unique.
Once youve finished your presentation, you can easily export it as a PDF or PPT file to share with your audience.
With Canva, creating a professional presentation has never been easier.
Choosing a Template
When creating a PowerPoint presentation in Canva, the first step is to choose a template.
Canva offers a wide selection of templates to choose from, ranging from classic and professional designs to more modern and creative layouts.
No matter what type of presentation youre creating, theres a template to match it.
Each template offers a variety of customization options, allowing users to make the presentation their own.
For instance, users can choose their own colors, fonts, and backgrounds to suit their needs.
Plus, if youre feeling extra creative, you can even upload your own images and logos to make your presentation truly unique.
Once youve chosen your template, its time to start customizing.
Canva makes it easy to add text, images, and other elements to your presentation.
You can customize the design to your liking, or use the pre-designed elements to create a professional-looking presentation in minutes.
Now that youve chosen a template, youre ready to start creating your PowerPoint presentation in Canva.
With its intuitive user interface and wide selection of templates, Canva makes it easy to create a stunning presentation in no time.
Customizing the Design
When it comes to creating a PowerPoint presentation in Canva, customizing the design is the key to making a great presentation.
Canva offers a wide range of templates that can be customized to your liking.
You can choose from a variety of layouts, fonts, colors, and graphics to make your presentation unique.
You can also add text, images, and other elements to further enhance the design.
To make the most of this feature, you can experiment with different combinations of layouts, fonts, colors, and graphics until you find the perfect combination for your presentation.
Once youve found the perfect design, you can save it and use it for future presentations.
Canva also makes it easy to adjust the size of elements within your presentation.
You can select an element and drag it to make it larger or smaller.
This allows you to adjust the size of graphics, text, images, and other elements to create a seamless look throughout your presentation.
Additionally, you can adjust the opacity of an element or the background color to make your presentation stand out.
By being creative with the design elements of your presentation, you can create something truly unique and eye-catching.
Adding Text
Adding text is one of the key elements of creating a PowerPoint presentation in Canva.
Canva makes it easy for users to add text to their slides, with a wide range of fonts and font sizes to choose from.
Additionally, users can customize the color, alignment, and other aspects of the text to make it stand out.
To add text to a slide, users can either type it directly into the slide or use the text box tool to create a text box.
The text box tool allows users to adjust the size and position of the text box, as well as the font and font size.
Additionally, users can adjust the color of the text and the background of the text box using the color picker tool.
Once the text is in place, users can further customize it by adding effects such as shadows, outlines, and gradients.
These effects can be used to make the text stand out and draw the viewer’s attention.
Additionally, users can add animations to the text, such as fade-ins and fade-outs, to make the presentation more engaging.
Adding Images and Other Elements
Adding images and other elements to your presentation is a great way to make it more engaging and interesting.
With Canva, you can easily search for and add images directly from the platform.
You can also add charts, diagrams, and other elements to further enhance the presentation.
To add an image, click on the Uploads tab and select Upload Image.
Alternatively, you can search for images from the Search tab or browse the library of free images.
To add an element, click on the Elements tab and select your desired element.
You can also customize the size, orientation, and color of the element.
Once youre done, click on the Done button to save the changes.
Finally, you can add text to your presentation by clicking on the Text tab and selecting your desired text.
You can customize the font, size, color, alignment, and other text settings to make it look just the way you want.
With Canva, adding images and other elements to your presentation is a breeze.
Exporting the Presentation
Creating a stunning PowerPoint presentation is now a breeze with Canva.
Exporting the presentation is the final step in the process.
Once you have completed the design of your presentation and are happy with the results, its time to export it.
Canva allows users to export their presentation as a PDF or PPT file.
Exporting is simple and straightforward.
To export, simply click on the Download button on the upper right-hand corner of the Canva page.
A drop-down menu will appear with the option to export as a PDF or PPT file.
Choose the desired format and click on Download.
When you export as a PDF, Canva will generate a high-quality PDF file that can be printed or shared electronically.
The PDF file will include all of the elements of your presentation, such as images, text, and graphics.
When you export as a PPT file, Canva will generate a PowerPoint file that is compatible with both Microsoft PowerPoint and Google Slides.
The PPT file will also include all of the elements of your presentation.
Once you have exported the presentation, you are ready to share it with your audience.
No matter which format you choose, your presentation will look professional and polished.
With Canva, creating a PowerPoint presentation is now quick and easy.
Final Thoughts
Creating a PowerPoint presentation in Canva is a great way to make a professional-looking presentation quickly and easily.
With its intuitive user interface and wide selection of templates, users can customize and enhance their presentations with text, images, and other elements.
Exporting the presentation as a PDF or PPT file is also simple.
With Canva, making a presentation is a breeze.
So don’t wait – get started on your own presentation today with Canva!
James Wilson
James Wilson has extensive knowledge in the information technology industry.His second love, besides dealing with computers, is smart home technology. He is continually updating information to better comprehend this problem and has a deep understanding of the apartment’s support system.
Recent Posts
Is Airtable a Public Company? Unveiling the Truth
No, Airtable is not a public company. As of now, Airtable is a private company that has raised funds from various investors but has not gone through an initial public offering (IPO) to be listed on...
How to Make Money with Airtable: Top Strategies and Success Stories
To make money with Airtable, you can offer consulting services to businesses looking to optimize their workflows through the platform. You can also create and sell templates or automation scripts...
How To Import PowerPoint in Canva – What’s possible and how?
Kevin Goedecke
If you’re like me and you’ve spent countless hours creating PowerPoint presentations then it can be really frustrating to adopt to a new design platform like Canva. However, Canva offers many benefits, like powerful editing tools in the browser, ready-made templates, and a lot more. Recreating entire designs, slides or presentations you’ve meticulously put together in PowerPoint in Canva sounds super annoying. So let’s explore different ways to convert and import PowerPoint (or PPT files as you may call it) in Canva.
Importing your PowerPoint files in Canva can be challenging if you don’t follow the right steps. This article will provide you with very easy step-by-step instructions for importing and converting your files.
This should help you speed up your workflows and save your hours valuable time recreating designs in Canva. Let’s get started with our guide on how to import PowerPoint in Canva with ease 🚀
Step-by-Step Guide To Import PowerPoint in Canva
Before we proceed further with the process, make sure to make that you have a Canva account and have your Microsoft PowerPoint presentation ready. Here are the detailed steps on how to import PowerPoint (PPTX or PPT) files in Canva:
Step 1: Log in with your account in Canva.
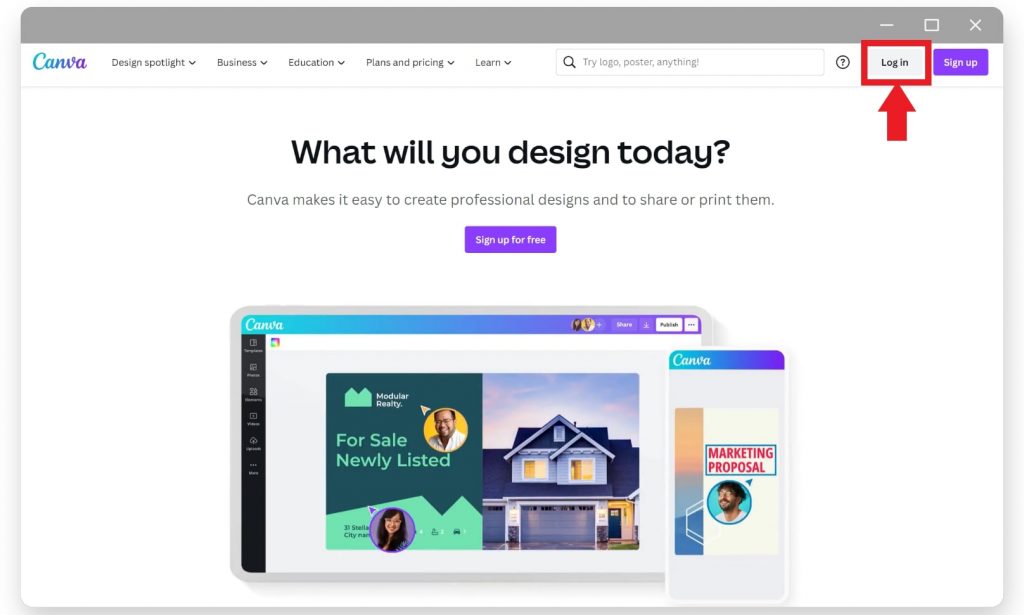
Before you go ahead with the process of importing your PowerPoint slides into Canva, you’ll need to log in. Just go to the Canva homepage and click on the “Login” button to get to your dashboard.
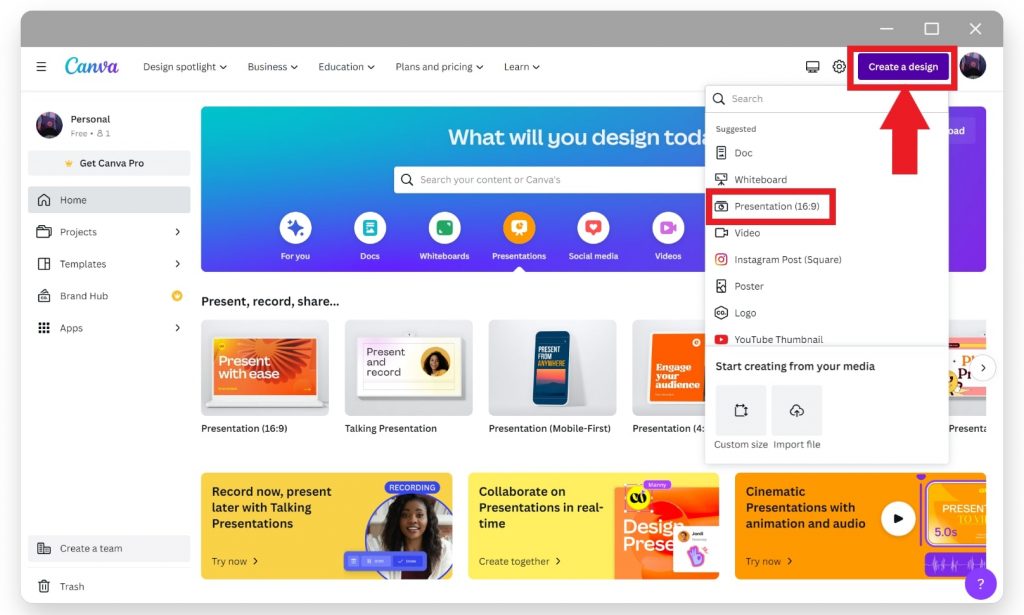
Step 2: Create a new Canva design.
Once you’ve opened the Canva dashboard, click on the “Create a design” button in the top-right corner of the webpage. This will open up a list of choices. Select “Presentation (16:9)” since we’re trying to recreate a PowerPoint presentation.
Step 3. Upload the PowerPoint file to Canva.
After the Canva editor has loaded up you should now see the “Upload” tab present on the left side. Select the presentation file (Canva supports importing .ppt and .pptx file formats) you want to import. Just drag-and-drop or select the file by using the file manager interface of your browser.
Step 4. Add the slides to your Canva presentation.
Once the PPT (PowerPoint) file was uploaded, you’ll see the thumbnail images of your PowerPoint slides in the “Projects” tab. Drag and drop or double-click on each slide to insert them in a blank Canva whiteboard.
Step 5. Edit your PowerPoint slides in Canva.
Your Microsoft PowerPoint slides have been imported to Canva, and you can customize the slides using the powerful design tools that Canva offers. This can help you add images, texts, templates, and many more design elements to improve your presentations.
Re-download the edited Canva design as PowerPoint
It’s also possible to download the edited slides as PowerPoint files after making changes. Simply Click on the “Download” button under the “File” tab and choose your preferred file format (.ppt or .pptx) to download your Canva presentation. If you want to share the file you can click on the “Share” button and allow other members to collaborate on the file.
Note: It’s not possible to download Canva Website templates as PowerPoint.
Final Words
With this step-by-step guide, importing and converting your PowerPoint slides into Canva should be a smooth and straightforward process. This article even helped you understand how to open PPT files in Canva and use the slides in your Canva workspace. We’ve put together a small FAQ section below in case you have any questions left …
FAQs on How To Import PowerPoint in Canva
Can i import powerpoint animations into canva.
No, Canva does not support importing PowerPoint animations, and you’ll need to recreate the animations using Canva’s built-in tools. However, you can create animations in Canva and export them as a PowerPoint-compatible file.
Will my fonts and formatting be preserved when importing PowerPoint slides into Canva?
Canva may not have the exact same fonts and formatting options as PowerPoint, so some adjustments may be required after importing. However, most of the format and font will be converted and preserved.
Can I import multiple PowerPoint presentations into one Canva project?
Yes, you can import and convert slides from multiple PowerPoint presentations by repeating the steps listed above. Plus, the “Projects” tab houses all your imported files and slides for future use.
CEO & Founder of Magicul – We help creative teams be more productive.
One response to “How To Import PowerPoint in Canva – What’s possible and how?”
[…] We’ve previous published an article about how to convert PowerPoint to Canva here. […]
Leave a Reply Cancel reply
Your email address will not be published. Required fields are marked *
Save my name, email, and website in this browser for the next time I comment.
We use essential cookies to make Venngage work. By clicking “Accept All Cookies”, you agree to the storing of cookies on your device to enhance site navigation, analyze site usage, and assist in our marketing efforts.
Manage Cookies
Cookies and similar technologies collect certain information about how you’re using our website. Some of them are essential, and without them you wouldn’t be able to use Venngage. But others are optional, and you get to choose whether we use them or not.
Strictly Necessary Cookies
These cookies are always on, as they’re essential for making Venngage work, and making it safe. Without these cookies, services you’ve asked for can’t be provided.
Show cookie providers
- Google Login
Functionality Cookies
These cookies help us provide enhanced functionality and personalisation, and remember your settings. They may be set by us or by third party providers.
Performance Cookies
These cookies help us analyze how many people are using Venngage, where they come from and how they're using it. If you opt out of these cookies, we can’t get feedback to make Venngage better for you and all our users.
- Google Analytics
Targeting Cookies
These cookies are set by our advertising partners to track your activity and show you relevant Venngage ads on other sites as you browse the internet.
- Google Tag Manager
- Infographics
- Daily Infographics
- Popular Templates
- Accessibility
- Graphic Design
- Graphs and Charts
- Data Visualization
- Human Resources
- Beginner Guides
Blog Education How to Create a PowerPoint Presentation
How to Create a PowerPoint Presentation
Written by: Aditya Rana May 14, 2024

What if I told you PowerPoint was not built for presentations but as a tool to brainstorm ideas? I know it sounds crazy now, but that’s exactly what Microsoft intended in 1987.
Fortunately, professionals saw a better use case — a way to make attention-grabbing presentations that effectively communicates information with employees, clients, and stakeholders.
A well-made (and well-delivered) presentation is key to organizational success as it informs, persuades, and facilitates decision-making.
In this post, I’ll show you how to create a PowerPoint presentation (for a better alternative to PowerPoint, use our Presentation Maker and presentation templates to make more effective slide decks).
Click to jump ahead:
- How to create a PowerPoint presentation
How to create a PowerPoint presentation step-by-step
To create a PowerPoint presentation, follow these steps.
Open PowerPoint
- Create a blank slide
Select a template
- Choose your theme
- Add a header and sub-header
- Add your contact information (optional)
- Insert additional slides
- Add text to each slide
Add images and videos
Insert graphs and charts , add transitions and animations.
- Use presenter notes
- Arrange your slides
- Save your presentation:
- Deliver your presentation
The make a PowerPoint presentation, you first need to open the program.
To do this, click on the Start menu on your desktop and scroll through the list of apps until you find PowerPoint (hint: you can search for it and pin for faster access in the future).
If you’re using a Mac, click the Spotlight search bar on the top right of your screen and type PowerPoint.

Create a blank presentation
In PowerPoint, you can design presentations from scratch for maximum control over layout, color scheme, icons, and graphics.

If you don’t have time or lack design skills to design a presentation from scratch, PowerPoint offers presentation templates for a quick start.
To find presentation templates, click on the New tab on the welcome screen and type in a keyword that relates to the style or theme of your presentation such as “business” or “education”.

Choose a theme
Make sure you pick a template that reflects the theme of your presentation to standardize appearance of slides in terms of fonts, colors, and layout.
To pick a theme for your presentation, consider the audience and the context of the presentation.
For example, a formal theme is apt for business presentations while something more colorful would suit educational presentations like this nature-themed template.

Add a title and subtitle
The title and subtitle of your presentation is crucial to set the right tone and influence engagement.

Here’s how to optimize your presentation title and subtitle.
- Title : A good title is concise (under 10 words) and grabs attention with powerful, action-oriented words or intriguing phrases.
- Subtitle : The subtitle should provide additional information that clarifies or expands on the title.
Add your contact information (optional):
Though not always necessary, adding contact details to presentations is a good strategy when follow-up is anticipated or necessary.
Some types of presentations where you can include contact details include business, academic or research, and sales and marketing presentations.
Typically, contact details should be placed on the last slide of your presentation but you can also add it to your open slide.
Insert slides
If you’re editing a presentation template, you should already have multiple professionally-designed slides ready to edit.
If you want to replicate these slides, go to the Home tab and click New Slide (the top part of the button).
But if you’re creating a presentation from scratch or want to add a slide with a different layout for text, images, and charts, here’s what you need to do.
Go to the Home tab and click on New Slide but this time click the bottom section of the button (small arrow) to see different slide layouts options.

Add text to your slides
Though presentations are generally visual, text is crucial for communicating your message effectively.
To add text to your slides, click on a text placeholder and begin typing. If you need to add a new text box, go to the Insert tab, select Text Box, and then click where you want the text box to appear.
To format text, go to Home tab and look for the Font group. This is where you can change the font style, size and color which is important to ensure your text is attractive and legible.

Tip: Use bullet points and numbered lists to organize your text. Bullet points are great for listing items and making the slide look neat and organized, while numbered lists are ideal for steps or processes.
Here’s a great example of a slide deck that uses bullet points to great effect.

Visuals, such as images, graphs, charts, and graphics make presentations effective and engaging if they are relevant to the topic.
Here’s an example of a presentation that uses graphics to make slides more eye-catching to look at.

Inserting images in PowerPoint is a straightforward process. Simply click on Insert and then select Pictures to either add visuals from your computer or from the web.

PowerPoint also provides basic image formatting options such as resizing, repositioning, and ability to add style and effects such as brightness, contrast, effects, and borders.
You can image formatting options by selecting a visual and selecting the Picture Format option.

Adding charts and graphs to presentations is a great option when you want to present data, whether it be company data or results from a scientific study.
PowerPoint allows you to add several chart types , including common options such bar charts , line graphs , and pie charts .

To insert a chart in PowerPoint, click on Insert and select Chart. You will then be prompted to select a chart type that best suits the data you want to present.

Adding transitions in presentations is a powerful way to control movement between slides and enhance flow of information, maintain audience engagement, and emphasize key points.
When choosing a transition, keep the following points in mind.
- Define your audience: Consider your audience and the context of your presentation. For example, a professional presentation should use subtle transitions like fade or push as they are less distracting.
- What purpose does it serve: Dynamic transitions such as 3D effects make sense when you want to highlight a major point or a shift in topic.
To add a transition between slides, click on the slide you want to apply it to and then click on the Transitions tab. The transition will affect how this slide appears as you move to it from the previous slide.

Besides transitions, you can also add animations to text and objects in your presentation to emphasize key points and keep the audience engaged.
Use presenter notes
Presenter notes allow creators to add information and reminders to slides but keep it hidden from the audience.
To add presenter notes, select the Click To Add Notes option on the bottom of a slide.

Arrange your slides (if needed)
Reordering slides in PowerPoint is straightforward and can be done via a drag-and-drop interface. This makes it easy to structure your presentation to suit your narrative.
Save your presentation
Once you’ve completed your presentation, it’s time to save it for future use. To do this, click on File and select Save As (Ctrl + S if you prefer to fast). If you have already saved the file and are updating it, click Save.
Make sure to use a clear and descriptive name that reflects the content of your presentation.

Deliver your presentation
Delivering a presentation is as important as its content and design. To ensure an engaging delivery, here are some essential tips to consider.
- Maintain eye contact: There’s nothing wrong with using presenter notes but don’t become too reliant on a script.
- Control the pace : Speak clearly and at a moderate pace to ensure the audience has time to absorb the information.
- Use non-verbal cues: Body language can influence how your message is received so make sure to use gestures and movement to make your presentation more dynamic.
Conclusion: Make better presentations using Venngage templates and wow your audience
PowerPoint presentations, though great, are outdated. Everyone has seen the same templates thousands of times which makes it difficult to make presentations engaging.
To spice up your presentations, why not use a Presentation Maker that offers appealing presentation templates that require no design skills to edit. With Venngage, impactful presentations that inform, persuade, and help drive decisions are guaranteed!
Discover popular designs

Infographic maker

Brochure maker

White paper online

Newsletter creator

Flyer maker

Timeline maker

Letterhead maker

Mind map maker

Ebook maker
Got any suggestions?
We want to hear from you! Send us a message and help improve Slidesgo
Top searches
Trending searches

11 templates

20 templates

holy spirit
36 templates

9 templates

25 templates

memorial day
12 templates
Business Presentation templates
Engage your audience in your business presentations with our free customizable ppt templates and google slides themes. they’re perfect for business plans, office meetings, pitch decks or project proposals., related collections.

Company Profile
565 templates

598 templates

Business Plan
818 templates

470 templates

495 templates

567 templates

369 templates

Project Proposal
614 templates

It seems that you like this template!
Credit card project proposal.

Monthly Strategy Review Meeting
The results from last month were great for the company, now we must keep it up! If you'll be discussing the strategy to follow during your next meeting, prepare a presentation and have the agenda and the different points to be talked about ready. We didn't want something too serious,...

Premium template
Unlock this template and gain unlimited access
Simple Business Plan
Boosting sales, attracting new customers, expanding the market... All of these are goals that businesses want to achieve. Aim high in your next presentation for your business plan, especially if you put your trust in this free template by Slidesgo.

5G Wireless Technology Pitch Deck
Download the 5G Wireless Technology Pitch Deck presentation for PowerPoint or Google Slides. The education sector constantly demands dynamic and effective ways to present information. This template is created with that very purpose in mind. Offering the best resources, it allows educators or students to efficiently manage their presentations and...

Investment Business Plan
Rewards come after a great investment, and this applies especially to companies. You’ll need to attract potential investors and other people to put their trust in your project. With this free presentation template, you can explain your business plan, your market research and everything you need to strike a new...
.jpg "how to put a canva presentation in powerpoint")
Public Consulting
Consulting services are essential for many businesses and organizations. Promote yours by showing your audience a presentation created out of this dynamic template. The illustrations are isometric, which is always a good innovation. All the layouts, graphs and infographics included are very helpful when it comes to defining your potential...

Macari Company Profile
Making your business known in all areas is not easy, but not impossible either. Clear, concise, direct and minimalist: this is the aesthetics of this presentation with which you can create your company profile department by department, down to the smallest detail. With only three colors (white, black and red)...

Investment Company Business Plan
A business plan sets the strategy, resources, goals and plans for your company. If you focus on using money to fund new projects, get huge returns, make ideas possible and getting new forms of income, this template for investment companies is the one that best will reflect your ideals! With...

Pastel Organic Doodle Marketing Plan
Download the Pastel Organic Doodle Marketing Plan presentation for PowerPoint or Google Slides. This incredible template is designed to help you create your own marketing plan that is sure to impress your entire team. Using this amazing tool, you'll be able to analyze your target audience, assess your competitors, map...

Internship Report
Download the "Internship Report" presentation for PowerPoint or Google Slides. The world of business encompasses a lot of things! From reports to customer profiles, from brainstorming sessions to sales—there's always something to do or something to analyze. This customizable design, available for Google Slides and PowerPoint, is what you were...

Project Status Update Meeting
Download the Project Status Update Meeting presentation for PowerPoint or Google Slides. Gone are the days of dreary, unproductive meetings. Check out this sophisticated solution that offers you an innovative approach to planning and implementing meetings! Detailed yet simplified, this template ensures everyone is on the same page, contributing to...

Law Consulting Sales Pitch
To ensure that people act according to what they’re allowed to do, law consulting firms offer their helpful legal services. When it comes to demonstrating your strong points and attracting new clients, there’s nothing like a sales pitch, and this new free business template is cut out for that job.

Design Inspiration Newsletter
Download the "Design Inspiration Newsletter" presentation for PowerPoint or Google Slides. Attention all marketers! Are you looking for a way to make your newsletters more creative and eye-catching for your target audience? This amazing template is perfect for creating the perfect newsletter that will capture your audience's attention from the...

Technology Consulting
If you want to attract new clients to your technology company and to keep them satisfied, design your own consulting sales pitch with these minimalistic slides.

Work Program Project Proposal
Download the "Work Program Project Proposal" presentation for PowerPoint or Google Slides. A well-crafted proposal can be the key factor in determining the success of your project. It's an opportunity to showcase your ideas, objectives, and plans in a clear and concise manner, and to convince others to invest their...

Medical Dentists Students Meeting
Download the Medical Dentists Students Meeting presentation for PowerPoint or Google Slides. Gone are the days of dreary, unproductive meetings. Check out this sophisticated solution that offers you an innovative approach to planning and implementing meetings! Detailed yet simplified, this template ensures everyone is on the same page, contributing to...

Colorful Candy Shop Company Profile
Do you like candies? It’s time to sweeten your presentation with a very fun template! The pastel colors and wavy abstract shapes will make your information stand out and frame your data into a cool candy-land. Present your candy shop to potential investors, clients or at an industry level and...

Co-operative Company Business Plan
Having a good business plan can open many doors. At Slidesgo we know that, and that’s why we have created this co-operative company business plan, to help you structure your information. Start with an overview of market trends and competitors. Then edit the graphs to talk about your potential clients...
- Page 1 of 326
Great presentations, faster
Slidesgo for Google Slides :
The easy way to wow

Register for free and start editing online

5 Ways To Make Your Own Animated GIFs
Y ou're messaging your friend, and they just told you the juiciest gossip you've ever heard. It's so utterly surprising that words simply won't cut it. So what do you do instead? You send a GIF of Chris Pratt's iconic surprised expression (from that one scene in "Parks and Recreation"), and it perfectly conveys your shock without typing a single word or needing to film a reaction video. That's the beauty of GIFs — they can easily get the message across without much of a hassle. Besides messaging, GIFs are also great for other use cases like giving flair to your otherwise static and boring presentation or serving as a fun social media post announcing your small business's new opening hours.
While the web is loaded with GIFs for nearly every mood or moment, sometimes you just won't find the exact expression for your situation. That's where making your own GIF can come in handy. We'll walk you through five ways to create a custom animated GIF using Photoshop and Photoshop alternatives like GIMP and Canva.
Read more: The 20 Best Mac Apps That Will Improve Your Apple Experience
Using Photoshop
When it comes to editing photos, Photoshop is one of the top software of choice. However, you can also use it to turn your videos or photos into GIFs. To make an animated GIF in Photoshop , here's what you need to do:
- Create a new file in Photoshop.
- Drag and drop your video file into Photoshop.
- (Optional) Change the size via Image > Image Size. Adjust the width and height to your preferred dimensions. Then, press OK. When prompted to transform the video layer to a smart object layer, select Convert.
- (Optional) Trim the video down by adjusting the start and endpoints of the video in the Timeline window.
- Press the play button on the Timeline window to preview the video.
- Import your photos as separate layers via File > Scripts > Load Files into Stack. In the Load Layers dialog box, press Browse and choose the photos you need for your GIF. Hit OK to confirm.
- Navigate to Window > Timeline.
- Press the Create Frame Animation button in the Timeline window that opens.
- Still in the Timeline window, select the hamburger menu at the top-right.
- Enable Make Frames From Layers.
- Change the time each frame is displayed by clicking on "0 sec." under each frame in the Timeline window and setting it to your desired duration.
- (Optional) Drag and drop the frames to rearrange them.
- To save your GIF, navigate to File > Export > Save for Web (Legacy). In the Save for Web dialog box, ensure that GIF is selected (found at the top) and Looping Options is set to Forever (located at the bottom) before hitting Save.
GIMP is a standout choice for those in need of advanced photo-editing capabilities but without the hefty Photoshop price tag. And just like Photoshop, GIMP allows you to make a custom GIF. Follow these steps to do so:
- Open your photos in GIMP by going to File > Open as Layers and selecting all the images you'll be using.
- Drag the layers to rearrange your photos in the desired order, with the top layer appearing first in your GIF.
- If necessary, adjust subsequent layers to ensure a smooth transition from the first layer.
- Rename each layer in the Layers panel to include the frame duration you want in parentheses. That means the first layer can be "frame 1(500ms)" and the second layer "frame 2(300ms)."
- To check your animation, navigate to Filters > Animation > Playback, then click the play button.
- Reduce your image's file size by selecting Filters > Animation > Optimize (for GIF).
- Go to File > Export As.
- Press Select File Type.
- Choose GIF image from the options.
- Hit Export.
- In the Export Image as GIF dialog box, enable As animation and Loop forever.
- If you didn't set frame durations earlier, specify your desired delay in "Delay between frames where unspecified." Check "Use delay entered above for all frames" for uniform timing.
- For "Frame disposal where unspecified," select "One frame per layer (replace)" and ensure "Use disposal entered above for all frames" is enabled.
- Click Export to save your custom GIF.
Using Canva
One thing you probably didn't realize you can do in Canva is make animated GIFs. Here's how:
- Log into Canva if you haven't already.
- Click on Create a design at the top.
- Search for "animated social media" if you want a square GIF or "video" if you want a landscape rectangle GIF.
- Upload your video to Canva. Alternatively, select one from Elements > Videos or Design > Templates.
- Drag and drop the video onto your empty page.
- Adjust the position as necessary.
- (Optional) Increase the playback speed by selecting Playback at the top and changing the Video speed.
- Shorten your video to the desired length by dragging the edges of the video. Free accounts can download up to one-minute GIFs and paid accounts up to two-minute GIFs, but generally, short five-second GIFs work best.
- (Optional) Add a text and animate it.
- Upload the photos you want to use.
- Place each photo on a separate page.
- Adjust the position and size as needed.
- Click on the time indicator at the top.
- Set it to one second per page.
- Turn on Apply to all pages.
- Add any elements you like. Animated stickers are best, but you can also use static graphics.
- Adjust the GIF duration by clicking on the time at the top and entering your preferred time.
- To animate the entire page, select the Animate button and choose your style.
- Download your creation by selecting Share > Download, changing the File type to GIF, and pressing the Download button.
Using PowerPoint
Aside from helping you make presentations for your boss or school, PowerPoint is also a surprisingly great tool for creating GIFs. Here's a step-by-step guide to turning your PowerPoint slides into animated GIFs:
- Start with a blank presentation.
- Change the slide size by going to Design > Slide Size > Custom Slide Size. Adjust the width and height to your liking.
- Go to the Insert tab.
- Select Media on the far right of the ribbon.
- Choose Video > This Device.
- Position the video on your slide.
- (Optional) Use the Video Format tab to adjust the video's size, border, shape, color, and brightness.
- (Optional) Trim the video or add a fade duration by selecting the video and clicking the Playback tab that appears at the top.
- To save your presentation as a GIF, navigate to File > Save as. Choose the destination and make sure to change the file type from PPTX to Animated GIF Format.
- Upload your photos to PowerPoint from Insert > Pictures > This Device.
- Place a different photo on each slide for a sequence or use just one and animate it. To animate your photo, head to the Animations tab and pick your effect. Adjust the Duration and Delay based on your preferences. Hit the Preview button to check out how your animation looks.
- (Optional) Add an animated text via Insert > Text Box. Type in your text and change the font, size, color, highlight, background, and alignment in the Home tab. Then, go to Animations and apply your effect of choice.
- To save as a GIF, go to File > Export > Create an Animated GIF. Choose the quality, set the time per slide, decide which slides to include, and if needed, make the background transparent. Hit Create GIF.
Using GIPHY
GIPHY is most people's go-to database for ready-to-use GIFs, but it also comes complete with a nifty GIF maker should you want to create your own. Follow these steps to use it:
- Head over to the GIPHY Create page .
- Sign up for a free account if you don't have one already.
- In the GIF section, click on Choose File. You can use JPG, PNG, GIF, MP4, MOV, or WebM formats.
- Trim your video by dragging the edges or entering the start and end timestamps. Do note that you can make GIFs for up to 30 seconds only.
- Hit the "Continue to Create" button.
- (Optional) Decorate your GIF with a text, sticker, or filter.
- (Optional) Switch the Loop Type to Reverse to reverse the video.
- Adjust the GIF's size as necessary.
- Transform your static photo into a GIF by adding an animated sticker. Select Sticker (folded circle icon), search for the sticker you want to use, and click on it to place it on your photo.
- (Optional) Add a text by clicking on the Aa icon. Type in your caption and change the font style, color, outline, and alignment.
- (Optional) Apply a filter for extra visual appeal.
- Change the aspect ratio of the photo as needed.
- Once you're happy with the custom GIF, press Download at the bottom to save it to your device.
Read the original article on SlashGear .

IMAGES
VIDEO
COMMENTS
In this tutorial, you will learn how to save your Canva presentation as a PowerPoint presentation in a few simple steps. Skip navigation. Canva home. Design spotlight Design spotlight. Visual documents. Visual Suite. Docs. Presentations. Whiteboards. PDF editor. Graphs and charts. Photos and videos. Video editor ...
In this Canva tutorial for beginners, you'll learn how to seamlessly convert your Canva presentation into a PowerPoint file (PPT). That way, you can export o...
Go to the 'Share' button at the top right and click 'More': Downloading the presentation - Part 1. Scroll down to the 'Save' options and choose 'Microsoft PowerPoint': Downloading the presentation - Part 2. Choose the slides you want to download, and hit the download button: Downloading the presentation - Part 3.
#canva #PowerPoint #canvalove In this video, you'll learn how to convert your @canva presentations into PowerPoint files in just a few simple steps. Canva i...
Today you'll learn how to Convert a Canva Presentation to PowerPoint // You really can have the best of both worlds now: create a canva presentation and expo...
Download your Canva design as a PowerPoint presentation, which you can do by accessing your design and going to the top-right corner to locate the button Share. Click on it, and then click on Download. Under File Type, we will select PPTX, as it's PowerPoint's native format.
Canva's presentation tool makes it easy to put together a professional and visually engaging slide deck, regardless of your level of expertise. However, at some point, you may need to convert your Canva slides to PowerPoint to accommodate certain requirements, take advantage of more advanced features, or collaborate with others who prefer to ...
How to Download Canva Presentation as a PowerPoint File. Step 1: Open your Canva presentation, then click on the "Share" button in the upper right corner of the screen. Step 2: The "Share this design" menu will pop up. Scroll down to the bottom of the menu and click "More.". Step 3: Scroll down until you can see "Microsoft ...
Select your desired Canva design. 2. Now, press the 'Share' button. 3. Click the 'More' option. 4. Choose the desired format for your presentation. 5. Hit 'Download' and celebrate, your Canva design is now a PPT!
Win-win! Okay, let's go through the few steps. Once you created your presentation and are ready to convert, click on Share. Then scroll down and click on More. How to change a Canva Presentation to a PowerPoint Presentation! This will show all options. Scroll down to the Save category and click on the PowerPoint option.
Step 4: Select the "Powerpoint" Option. After clicking on the "Download" button in Canva, a dropdown menu will appear with various file format options. Look for the "Powerpoint" option in the dropdown menu and select it. This will ensure that your Canva presentation is downloaded in a Powerpoint-compatible format.
Here's how to insert a Canva presentation into PowerPoint: First, open your PowerPoint presentation and select the slide where you want to insert the Canva graphic. Next, click on the Insert tab and then click Object. When the Insert Object window appears, select Create from file and then click Browse. Locate the Canva graphic you want to ...
Step 4: Importing the Template into PowerPoint. Now that you have your customized template in PowerPoint format, open Microsoft PowerPoint on your computer. Create a new presentation or open an existing one where you want to use the Canva template. Then, go to the "File" menu and select "Open" to locate and import the downloaded Canva template ...
Create your own stunning presentation design for free with Canva's impressively easy to use online presentation maker. ... To convert your Canva presentation to PowerPoint, select the three dots on the upper right corner of the editor screen. Next, select 'Microsoft PowerPoint.' ... Kudos for all the love and effort you've put into it's ...
First, log in to your Canva account and select the "Create a Design" option. Choose the PowerPoint icon and select a template that you want to use. Add text, images, shapes, charts, and other elements to your presentation. When you're finished, click "Download" to save the PowerPoint to your computer.
In this Canva tutorial for beginners, learn how to save a Canva presentation as a Powerpoint presentation file.👑 View our full written tutorial: https://est...
From the editor. Drag and drop your presentation file to the editor. On the top corner of the editor, click on File > Upload a file. On the editor side panel, click on the Uploads tab, then click on Upload files. Select the files you want to upload, or drag and drop them in the Uploads tab. To use the file in your design, click on it from the ...
Step 2: Create a new Canva design. Once you've opened the Canva dashboard, click on the "Create a design" button in the top-right corner of the webpage. This will open up a list of choices. Select "Presentation (16:9)" since we're trying to recreate a PowerPoint presentation. Step 3. Upload the PowerPoint file to Canva.
Open PowerPoint. The make a PowerPoint presentation, you first need to open the program. To do this, click on the Start menu on your desktop and scroll through the list of apps until you find PowerPoint (hint: you can search for it and pin for faster access in the future).
Non-linear presentations can also be created in other presentation software, making the need for Prezi obsolete. 4. Canva. Canva is a well-known cloud-based graphic design software, but it's not too popular for presentations. While it still has the "capabilities" for presentation design, it's main focus is on social media graphics.
Learn how to design a captivating and shareable PowerPoint presentation using Canva! In this tutorial, we'll walk you through the process of creating a viral...
Download and open in Canva . ... Aim high in your next presentation for your business plan, especially if you put your trust in this free template by Slidesgo. 16:9 / ... Download the Project Status Update Meeting presentation for PowerPoint or Google Slides. Gone are the days of dreary, unproductive meetings. ...
In this video I will show you how to upload, import, or convert a Powerpoint file into Canva so you can edit and save your design. This is a simple process ...
1. Open the template in Canva. 2. In Canva click on "Share" at the top right-hand corner, then click "More" 3. Scroll down further and you will see "Google Drive" button. 4. Choose the "PPTX" or Powerpoint file type. Make sure to click "All Pages" on select pages. 5. Your template is exported to Google Slides!
This is ideal for those who want to see their presenter notes while presenting to a group of people. Choosing the presenter view opens two windows. Audience window: shows the design in standard view. Presenter window: displays page notes and the upcoming slides. Moving the slides on the presenter window will reflect on the audience window.
In this Canva Tutorial, I'll show you How to Import PowerPoint Slides in Canva without Losing Formatting. Try Canva - https://www.canva.com/join/door-retirem...
Use the same 'banner' or title font throughout your design. Have the same 'frame' or 'grid' throughout your design. Apply the same background throughout your design. Use consistent fonts. 2. Work smarter, not harder. Create a template page for your presentation to keep all the points above about consistency in line.
Trim your video by dragging the edges or entering the start and end timestamps. Do note that you can make GIFs for up to 30 seconds only. Hit the "Continue to Create" button. (Optional) Decorate ...
Do you have Google Slides, PowerPoint slides, or Keynote slides that you'd like to edit in Canva? If so, watch this video. Dozens of more Canva tips are avai...