Expert Advice On Improving Your Home
We recommend the best products through an independent review process, and advertisers do not influence our picks. We may receive compensation if you visit partners we recommend. Read our advertiser disclosure for more info.

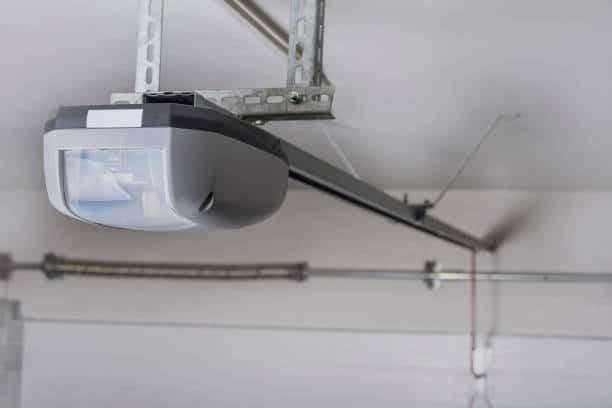
Fix Your Garage Door Opener: 6 Common Problems And Solutions

Matt Greenfield
Matt Greenfield is an experienced writer specializing in home improvement topics. He has a passion for educating and empowering homeowners to make informed decisions about their properties. Matt's writing focuses on a range of topics, including windows, flooring, HVAC, and construction materials. With a background in construction and home renovation, Matt is well-versed in the latest trends and techniques in the industry. His articles offer practical advice and expert insights that help readers tackle their home improvement projects with confidence. Whether you're a DIY enthusiast or a seasoned professional, Matt's writing is sure to provide valuable guidance and inspiration.
April 29, 2024

Image credit: Canva
Why You Can Trust Us
Today’s Homeowner exists to help you maintain or improve your home safely and effectively. We uphold strict editorial standards and carefully vet the advice and resources referenced in our articles. Click below to learn more about our review process and how we earn money.
If you have owned a garage door opener long enough you have probably experienced pressing the button and very little, or nothing, happens. Sometimes you can hear the motor or see some movement, and other times the light won’t even come on. Today, we’ll discuss what causes a garage door opener to fail and what you as a homeowner can do about it.
How to Find The Source Of The Problem with Your Garage Opener
A garage door opener essentially consists of the head unit and the rail system. The head unit contains the circuitry, gears, an electric motor, and is essentially the brain of the opener. The rail system runs from the head unit to the door, connecting the two.
The openers you will often see today are likely to be belt-driven, chain-driven, or worm gear-driven (direct drive). There are a few types of garage door openers , but they all do the same job. Some openers are designed to control commercial-size doors, but most of the openers in use today are designed for light residential use. Those are the openers we will discuss here.
What Do I Look For When My Garage Door Opener Won’t Work?
Diagnosing a problem is a fairly straightforward task. Fortunately, garage door openers perform a basic function, so when they don’t perform that function the cause is usually simple. That doesn’t necessarily mean correcting the issue is within the skills of a typical do-it-yourselfer, however. Knowing what you can safely perform and what should be left to professionals is important.
When diagnosing a problem with an opener, asking yourself a few key questions can help narrow down the suspected problem. Here are a few common issues and how to identify them.
Problem #1. The Interior Wall Panel Doesn’t Work
- Check to see if there is power to the opener. If the opener has power, the safety sensors may have sensed either an obstruction, or cannot see each other. Most sensors have lights to let you know they are working. If they are not illuminated, or are flashing, check for a broken wire, re-align the sensors, and wipe off anything that could block the light.
- If the opener does not have power, the most likely cause is a tripped circuit breaker. Locate the circuit breaker, turn it off until it clicks, and turn it back on. If the circuit breaker instantly turns off again, there is a short in the electrical system that must be corrected before proceeding.
- If the opener runs normally, but the door won’t open, a common cause will be an issue with the carriage. The carriage will be an odd shaped unit attached to the chain, belt, or worm drive and will have the red emergency disconnect cord hanging from it. Check to make sure the cord is engaged by pulling down and back on the cord. If the carriage looks damaged, or the emergency disconnect cord will not engage, the carriage is damaged and should be replaced.
- If the emergency cord is engaged, check if the belt or chain is moving. If it isn’t, the issue is likely internal to the opener and you should contact a professional.
Problem #2. Garage Door Won’t Close
If the opener runs and the door tries to close, but suddenly stops and reverses, the problem is usually either too little downward force from the opener, or an obstruction is blocking the sensors from seeing each other. The first solution is to eliminate the obstruction if there is one and re-test. If that is not the cause, the door itself may be causing an unusual amount of friction. This happens as doors age, bolts loosen, and components stretch.
- First, check all the bolts in the rollers on the door and if any are bent, won’t roll, or seem to be scraping the track, replace them. Most large home improvement stores will have standard parts available.
- Lubricate any moving parts of the door with a spray lubricant. The pros use silicon or lithium grease. The use of mechanic’s grease or oil is not recommended, as these lubricants will trap dust and grime, making the problem worse over time. Read our guide on what parts of your garage door you should lubricate regularly to avoid issues in the future.
- Once all the parts are determined to be in working order, locate the down adjustment knob on the head of the opener. If needed, turn the knob a notch or two towards the arrow and retest until the door fully closes.
Do not lubricate the inside of the track. Doing so may cause the rollers to simply slide instead of roll.
Problem #3. Garage Door Sensor Lights Are Off or Blinking
The safety sensors essentially send a beam of light across the floor where the door touches the concrete. Regardless of the reason, if this beam of light is broken, the opener will not work and the overhead light will flash. This is an extremely important safety feature, so don’t ever try to bypass it.
Each sensor will have a glowing light if it is connected to the opener. Different manufacturers use different color lights, but if one or both sensors are off or flashing, it indicates that the opener must not be used until the issue is corrected.
This is usually just dirt on the lense(s), or a misalignment of the sensors. Just a quick swipe with a damp cloth will often fix the problem. However, if the sensors have been bumped out of alignment, check to make sure the bracket(s) are not bent. If one, or both are they can usually be gently bent back to their original position.
If neither of these corrects the alignment, you can loosen the bolts holding the sensor to the bracket and align them manually. On most brackets, a simple turn of a wingnut will allow the sensor to be adjusted. The pros will typically move one sensor at a time until the sensors align.
Problem #4. Door Gets Stuck
If your garage door is closed and refuses to move, but the opener appears to be working, the usual culprit is a disconnect of the drive system from the door. Here’s a checklist of possible causes:
- Check that the emergency cord is engaged.
- Ensure that the door is not locked.
- Make a visual check of the track and rollers. Confirm that there are no broken parts causing friction.
- Look for a broken spring or slacking cables. If your door has torsion springs, they will be located directly over the door. The majority of systems have one or two springs, so if yours appears to have three or more, you have a broken spring and it must be replaced. Most pros will recommend replacing both springs, because when one spring fails, the other will usually follow. If your system has extension (side mounted) springs, look for slack in the cable , as it should be taught. There should also only be one spring on each side, so if you see two spring sections on the same side, your spring is broken and must be replaced.
- If you have recently performed work on the door, the spring system, or the opener itself, an adjustment to the upward force of the opener may be required. These adjustments are often done with a simple turn of a knob or screw on the opener. Make a small adjustment and retest the operation before more adjustments are made.
Problem #5. Opener Doesn’t Turn On
If your opener seems to do nothing when you use the wall panel, the exterior wall panel, nor the remote control , it may be getting no power. As mentioned previously, check the breaker first, as this is the most common cause. However, you can also check the plug and make sure it hasn’t worked its way out of the outlet. More often than not, the outlet is actually facing the floor, so all the small vibrations can cause the plug to become just loose enough to disconnect. Simply unplug it, wait ten seconds or so and plug it back in to test it.
Another common cause is dead batteries in either the exterior wall unit or the remote control. This seems like a silly problem to fret over, but busy families may need to change out the batteries more than once a year. It is a good idea to replace the batteries in both once a year anyway, because many people use their remote control almost as a door key. If you are the type that does, and your batteries are dead, you don’t want to get locked out of your home over something easily preventable.
A feature found on some openers will allow you to lock your opener when you are away from home using your keypad or remote.
This is to prevent any stray radio signals from opening your door unexpectedly. If you plan to be away from home and utilize this feature, a smart move is to set a reminder to turn it back off when you return.
Problem #6. Opener Makes Weird Noises
The opener should not make weird noises on its own. If you hear a whirring noise, or if the opener sounds like it is in a bind, stop the opener and investigate. One of the most common parts on an opener to fail is the belt, or chain, depending on your system. When it fails, there is usually a grinding noise near the head unit. Sometimes the issue is a broken belt or chain, and sometimes the drive gear inside the head unit shears off. All openers will have a small door, or very often, a removable light cover. This is easily identified as the location of the light bulb. This is also a likely place for the drive gear. On some openers, this gear is plastic and occasionally snaps off a tooth. If this happens, it will have an effect similar to a broken belt or chain. In either case, the repair is best undertaken by a professional.
If you have a direct drive opener making noises , the issue is usually with the drive gear and the repair is best undertaken by a pro. These units utilize a worm gear, which is just a very long screw. In these systems there is no belt, nor chain, reducing the number of moving parts. This makes diagnosing a problem easier, as a simple visual inspection will often reveal any issues.
Proper Maintenance Is Key
Garage door openers are a small, but highly useful aspect of our daily lives. When one fails to operate, the results can be frustrating and highly inconvenient. Making regular inspections at least once a year can alert us to potential issues lurking around the corner. A simple visual check and yearly lubrication of our entire garage door system will often prevent many of the common problems described here. As with any home repair project, addressing small problems before they can become big ones is always your best bet.
How to Seal the Bottom of Your Garage Door
April 11, 2024

17 Garage Door Styles: Every Option You Have
April 1, 2024

Get a Grip On Your Garage
April 15, 2024

ICF Concrete Block Garages: The Benefits of Building Your Garage with ICF
March 26, 2024

Best Garage Door Openers

Garage Doors Play Key Role in Curb Appeal on Homes

8 Best Garage Vacuums for Effective and Easy Cleaning
December 25, 2023

A Quick Guide for Your Garage Makeover

How to Choose Garage Door Lock for Maximum Security
March 27, 2024
- CALL OR TEXT (405)237-8713
Free In–Home Estimates
- (405) 237-8713
- Garage Door Services , Local Business
A Step-by-Step Guide to Garage Door Opener Troubleshooting: Fixing Common Issues
Garage door openers are a convenient and essential part of our everyday lives, providing easy access to our homes. However, like any mechanical device, they can experience issues from time to time. Understanding how to troubleshoot common problems can save both time and money. In this step-by-step guide, we will explore the most common issues with garage door openers and provide you with a comprehensive troubleshooting process to fix them.
Common Issues with Garage Door Openers
Before diving into the troubleshooting process, it’s essential to familiarize yourself with some of the common problems that can occur with garage door openers. By identifying these issues, you can better understand the potential causes and solutions.
One common issue is the garage door opener not responding to the remote control. This can be frustrating when you are trying to open or close your garage door. Another problem is the garage door opener not functioning when using the wall switch. This issue may indicate a problem with the opener’s electrical circuitry. Additionally, the safety sensors, which are designed to prevent the door from closing on objects or people, can also malfunction. Other issues include a noisy or slow-opening garage door, as well as a door that reverses after closing.
Step 1: Checking the Power Source
The first step in troubleshooting your garage door opener is checking the power source. Ensure that the opener is plugged in and that there is power reaching the outlet. If the opener is hardwired, check the circuit breaker to ensure it hasn’t tripped. If the power source is not the issue, move on to the next step.
Step 2: Inspecting the Remote Control
If your garage door opener is not responding to the remote control, the problem may lie with the remote itself. Start by replacing the batteries in the remote and testing it again. If the remote still doesn’t work, try reprogramming it according to the manufacturer’s instructions. If none of these steps resolve the issue, it may be time to consider purchasing a new remote control.
Step 3: Testing the Wall Switch
If your garage door opener is not functioning when using the wall switch, there may be an issue with the electrical circuitry. Begin by inspecting the wiring connections between the wall switch and the opener. Ensure that all wires are securely connected and that there are no signs of damage. If the wiring appears to be intact, you may need to replace the wall switch itself.
Step 4: Evaluating the Safety Sensors
The safety sensors on your garage door opener are designed to detect objects or people in the path of the door, preventing it from closing and causing potential harm. If your garage door is not closing or if it reverses immediately after closing, the safety sensors may be the culprit. Start by checking for any obstructions in front of the sensors, such as dirt or debris. Clean the sensors and ensure they are properly aligned. If the issue persists, there may be a problem with the sensors themselves, and they may need to be replaced.
Step 5: Lubricating the Garage Door Opener
A noisy or slow-opening garage door can be a sign of insufficient lubrication. To address this issue, apply a silicone-based lubricant to the rollers, hinges, and springs of the garage door. Avoid using oil-based lubricants, as they can attract dirt and debris, leading to potential issues down the line. Lubricating the garage door opener regularly can help ensure smooth operation and prevent unnecessary wear and tear.
Step 6: Adjusting the Travel and Force Settings
If your garage door is not opening or closing all the way, or if it is reversing before reaching the fully closed or open position, you may need to adjust the travel and force settings on your opener. Consult your opener’s user manual for instructions on how to make these adjustments. Be cautious when adjusting the force settings, as setting them too high can pose a safety risk. It’s always best to follow the manufacturer’s guidelines.
Step 7: Replacing Worn-Out Parts
Over time, the components of your garage door opener can wear out and require replacement. This can include the springs, cables, rollers, and other moving parts. If you notice any signs of damage or wear, such as frayed cables or rusty springs, it may be necessary to replace these parts. Consult a professional or refer to your opener’s user manual for guidance on replacing worn-out components.

Step 8: Calling a Professional for Complex Issues
While many garage door opener issues can be resolved through troubleshooting and DIY repairs, there may be complex issues that require the expertise of a professional. If you have followed all the previous steps and the problem persists, it’s time to call in a garage door repair specialist. They have the knowledge and experience to diagnose and fix more complicated problems safely.
Preventive Maintenance Tips for Garage Door Openers
In addition to troubleshooting and fixing common issues, it’s essential to perform regular preventive maintenance on your garage door opener to prolong its lifespan and prevent future problems. Here are a few tips to keep your opener in optimal condition:
- Keep the tracks clean and free from debris.
- Check the tension of the springs regularly and adjust if necessary.
- Inspect the cables for signs of wear and replace as needed.
- Test the safety sensors periodically to ensure they are functioning correctly.
- Lubricate the moving parts of the garage door opener annually or as recommended by the manufacturer.
By following these preventive maintenance tips, you can minimize the risk of unexpected issues and keep your garage door opener operating smoothly.
Garage door opener troubleshooting doesn’t have to be a daunting task. By following this step-by-step guide, you can identify and fix common issues with your opener, saving both time and money. Remember to start with the basics, such as checking the power source and inspecting the remote control, before moving on to more complex troubleshooting steps. And don’t forget the importance of regular preventive maintenance to keep your garage door opener in top shape. If all else fails, don’t hesitate to reach out to a professional garage door opener repair in Oklahoma City OK for assistance. With the right knowledge and approach, you can ensure that your garage door opener operates reliably for years to come.
If you require professional assistance with your garage door opener troubleshooting or repairs, don’t hesitate to contact our experts at CCM Overhead Door . With our expertise and experience, they can diagnose and fix any complex issues you may be facing. Visit our website or call their hotline to schedule an appointment and get your garage door opener back in working order.
Recent Posts

The Ultimate Guide: How to Reset Your Garage Door Opener with Ease

The Ultimate Guide to Garage Door Spring Replacement: Ensuring Smooth and Safe Operations

Getting Quality Yet Affordable Garage Door Repair
We’ll make your vision stand out.
Your vision for your home is something special and you deserve all the help that you can get. As the number one garage door company in Oklahoma City, we have the tools to provide you with that help. Whether it’s through garage door installation, repair, maintenance, or any other garage door-related service, you can count on us as we are equipped with the necessary skills, knowledge, and experience to make your vision not just a reality, but actually stand out!
With various options and products of the highest quality, CCM Overhead Doors is here to provide you with a garage door that makes your home stand out from all the rest!
Quick Links
- Garage Door Repair
- Residential Garage Doors
- Commercial Garage Doors
- Garage Door Opener Repair
Contact Information
- 1000 NW 80th St #73114, Oklahoma City, OK 73114
Map Location

Copyright © 2018 – 2024 CCM Overhead Doors All rights reserved
- Terms & Conditions
- Privacy Policy
REQUEST APPOINTMENT
Someone will get in touch to you soon to confirm your exact appointment time.
Garage Door Won't Open or Close: 15 Reasons and Solutions
Troubleshooting and Repair for Garage Door Opener Problems
Lee has over two decades of hands-on experience remodeling, fixing, and improving homes, and has been providing home improvement advice for over 13 years.
:max_bytes(150000):strip_icc():format(webp)/headshots_FINAL_lee-wallender-739d21a7b6ed4aa1b895c684e193494c.png "garage door opener problem solving")
The Spruce / Ana Cadena
When the garage door won’t open or for garage door opener issues, the cause of the problem is usually simple and the solution can be low-cost and easy—without the need to call a garage door company. Learn why the garage door won't open and how to fix it with this list of 15 common garage door opening problems and solutions.
Photo Eye Is Misaligned
BanksPhotos / Getty Images
When a garage door won't close, often the safety sensors may need adjustment or realignment. Near the bottom of the door track on both sides are electronic eyes that require a clear line of view between them.
If the sightlines are clear between the eyes, the door will close smoothly all the way to the floor. However, if the brackets holding the electronic eyes are out of alignment, the door will fail to descend all the way. In most cases, the door will stop or reverse, and lights will flash to tell you there is a problem.
Adjust the safety sensors or brackets by hand so that there is a clear line of sight between each.
Photo Eye Is Dirty
When a garage door will not close, sometimes leaves or debris are blocking the sensors. Make sure there is nothing in the sight path between the two electronic sensors. Gently wipe off the "eye" portion of each sensor. Make sure that you do not misalign the sensors.
Garage Door Remote or Keypad Aren't Working Properly
If a garage door won't open, often a wireless remote control or mounted keypad has stopped operating the opener.
If the door opens with the hardwired wall switch, it's likely that the battery needs replacing in the remote control or keypad. If the battery is fine, make sure that the loose wire antenna on the motor unit is hanging downward and is not damaged in any way.
You may need to reprogram the remote control or keypad. The sensitive electronics in the remote control or keypad can sometimes lose their programming and may need to be reset. Each garage door opener has a slightly different method of reprogramming, so consult the instructions or look online for brand-specific instructions.
Get expert help on all things garage doors
You don't have to go at it alone! Find and compare quotes from top-rated professionals near you.
Get a Quote
Garage Door Rollers May Need Lubrication
A garage door that lowers will sometimes fail to open, especially in winter. In winter or in other cold months, the rollers may stiffen up and the door may open slowly or refuse to open altogether.
If this happens, look for a screw on the motor unit to adjust the sensitivity of the opener. Methods for adjusting sensitivity vary; so consult the owner's manual for directions.
Lubricating rollers can also help with this problem. Use white lithium or silicone lubricant as these types of lubricants will not cake up or attract dirt.
Garage Door Rollers May Need to Be Replaced
Debbie Ann Powell / Getty Images
Rusted or damaged rollers can cause the door to bind in the tracks so that the door will fail to open. Replacing damaged rollers or lubricating them with silicone lubricant or white lithium lubricant can correct this problem.
Damaged or rusted rollers can create extra friction, signaling the door opener to stop prematurely. Make sure the rollers are in good shape and well lubricated to prevent this problem.
Garage Door Opener Motor Is Unplugged
Robin Gentry / Getty Images
When the garage door fails to open when the remote or wall switch is pressed, the power source has been disrupted in some way. In many cases, the motor unit has been unplugged. Plugs can loosen over time. Moving items in and out of the garage may snag the cord and unplug it. Check the ceiling outlet where the door opener is plugged in, and make sure the cord is plugged in all the way.
Power to Garage Door Motor Has Been Disrupted
If the garage door cord is plugged in, it's possible that the circuit breaker, fuse, or GFCI outlet powering the door opener circuit has tripped or burned out. If you find that other lights or electrical circuits in the garage aren't operating, this is the likely cause, and you'll need to reset the breaker or GFCI or replace the faulty breaker or burned-out fuse. If the circuit breaker or GFCI is tripping repeatedly, it's a sign that there is a short circuit somewhere in the system—possibly even the garage door opener itself.
Up-Limit Switch Needs to Be Moved Closer to the Motor
When the garage door partially opens and stops short of being fully open, the up-limit switch may need to be moved toward the motor unit. This switch is usually a touch-lever mounted on the end of the track near the motor unit.
If the switch is too far away, the motor will stop the door before it fully opens. The solution is to move the switch closer to the motor unit. This is a somewhat rare problem, and will usually show itself immediately after a new garage door opener is installed.
Up-Limit Switch Needs to Be Moved Away From the Motor
If the garage door opens but the motor does not stop running, this usually means the up-limit switch needs to be moved away from the motor unit.
This problem will usually be noticed when you first install the garage door opener, though it can occur if or when the gears inside the motor unit have been stripped, which causes the motor to run without moving the door.
Garage Door Close-Limit Switch Needs Adjustment
If the garage door opens correctly but fails to close completely, the close-limit switch may need adjusting . The garage door has set-limit switches that instruct the motor when to stop running—both when it is opening, and when it is closing. If the close-limit switch is set wrong, it may prevent the door from closing. It can also cause the opener to reverse or pull back up when you attempt to close it.
The close-limit switch is a safety measure that keeps people from having the door close on them—it is a necessary and required device for all garage door openers. Adjusting the limit switch will stop your garage door from behaving erratically.
The close-limit switch is usually a screw feature on the motor unit that is turned to adjust how far the door descends.
Garage Door Close-Force Screw Needs Adjustment
When a garage door reverses before it even touches the floor, the issue may be with the garage door adjustment screw.
Garage door openers have an adjustment screw that controls the closing force—the pressure with which a door is allowed to descend before the motor switches off. When the door reverses before it even hits the floor, this is often because the close-force setting needs adjustment. The friction of the door rollers within the tracks is fooling the door opener into thinking the door has reached the floor, and the opener needs to be adjusted for less sensitivity.
When the garage door immediately leaps upward after touching the floor, this too is a close-limit switch problem. Adjust the close-limit adjustment screw on the door opener motor in small increments until the door stops upon touching the floor.
Garage Door Opener Motor Needs Replacement
Dániel Balogh / Getty Images
If the garage door won't open, it's possible the garage door opener's motor has burned out and isn't operating at all. You can replace your own garage door motor or call a service technician to do the job for you.
Garage Door Springs Need Adjustment or Replacement
If the garage door won't open, sometimes the problem is with the torsion or extension springs. The torsion spring is located above the garage door opening, while the extension springs are on either side of the garage door.
Torsion springs are difficult and dangerous to replace, so it's usually best to have a garage door technician do the job. Extension springs can be replaced by most homeowners for $40 to $120. Most home centers carry replacement extension springs.
Garage Door Cable Has Snapped
Kyryl Gorlov / Getty Images
The garage door springs work in conjunction with the door cables to safely lift the garage door. Sometimes, the garage door cables will snap or fall out of alignment.
While the garage door may open with a snapped cable, it is dangerous to do so. Have a garage door company replace the cable.
Garage Door Is Off Track
Lex20 / Getty Images
If the garage door won't open, sometimes the reason is that the door is off track due to a loose track. The problem may be preceded by balky or slow movement or by squeaks and unusual noises.
To get a garage door back on track, loosen the screws that hold the track to its frame. Use a block of wood or a rubber mallet to gently tap the track back into place. Then, retighten the screws.
More from The Spruce
- 10 Reasons Your Garage Door Is Opening By Itself
- How Much Does It Actually Cost to Replace a Garage Door Spring?
- The 8 Best Garage Door Openers of 2024
- How to Install a Garage Door Opener Yourself
- How to Open a Garage Door Manually Without Power
- How to Repair Your Washing Machine
- How to Balance a Garage Door
- How to Build a Carport: What You Should Expect
- Is Insulating a Garage Door Necessary?
- How to Replace Garage Door Springs: Torsion and Extension
- The 5 Best Garage Heaters of 2024
- The 7 Best Smart Locks of 2024
- Guide to Garage Door Sizes
- How to Paint a Garage Door So It Looks Brand New
- The 7 Best Pool Alarms of 2024, Tested and Reviewed
- How to Install a Garage Door
- (480) 662-3315
- [email protected]

Troubleshooting Common Garage Door Opener Issues: A Comprehensive Guide
Garage door openers play a crucial role in our daily lives, providing convenience and security for homeowners. They allow us to easily open and close our garage doors with just a push of a button, saving us from the hassle of manually operating heavy doors.
However, like any mechanical device, garage door openers can encounter issues that may disrupt their smooth operation.
In this comprehensive guide, we will explore common garage door opener problems and provide troubleshooting solutions to help you resolve them effectively.
Understanding common garage door opener issues
Before delving into the troubleshooting process, it is essential to familiarize yourself with common garage door opener issues. By understanding the root causes, you can better diagnose and address the problem. Some common problems you may encounter include:
- Garage door opener won’t open or close: This issue may arise due to power supply problems, faulty sensors, or issues with the opener’s motor.
- Garage door opener is making strange noises: Unusual noises such as grinding, squeaking, or rattling can indicate problems with the opener’s gears, springs, or rollers.
- Garage door opener is not responding to remote control commands: If your garage door opener fails to respond to remote control commands, it could be due to signal interference, faulty remote batteries, or a malfunctioning receiver, necessitating garage door repair .
- Garage door opener is opening or closing partially: When your garage door only opens or closes partially, it may be due to misaligned tracks, damaged rollers, or faulty limit switches.
- Garage door opener is reversing unexpectedly: If your garage door reverses immediately after hitting the floor, the issue may lie with the opener’s force settings or misaligned safety sensors.
- Garage door opener is running but not moving the door: In this scenario, the opener’s motor may be functioning correctly, but there could be issues with the drive belt, chain, or gears.
- Issues with garage door opener safety features: Problems with safety sensors, auto-reverse mechanisms, or emergency release systems can compromise the safety of your garage door opener.
By identifying the specific issue you are facing, you can proceed with the appropriate troubleshooting steps.
Troubleshooting a garage door opener that won’t open or close
When your garage door opener refuses to open or close, it can cause frustration and inconvenience. However, before panicking, there are several troubleshooting steps you can take to address the problem:
- Check the power supply: Ensure that the opener is properly plugged in and that there is power supply to the outlet. If necessary, try plugging another device into the same outlet to verify its functionality.
- Inspect the safety sensors: Garage door openers are equipped with safety sensors that prevent the door from closing if an object or person is in the way. Make sure the sensors are clean, properly aligned, and free from obstructions.
- Check the remote control batteries: Replace the batteries in your remote control to rule out any battery-related issues.
- Inspect the opener’s motor: If the opener’s motor does not respond at all, it may be a sign of a faulty motor. In this case, it is best to seek professional assistance.
- Test the wall switch: Try operating the garage door using the wall switch. If it works, the problem may lie with the remote control or its batteries.
By following these troubleshooting steps, you can often resolve the issue and restore the functionality of your garage door opener.
Fixing a garage door opener that is making strange noises
If your garage door opener is producing strange noises, it is important to address the issue promptly to prevent further damage. Here are some steps you can take to fix a noisy garage door opener:
- Inspect the opener’s hardware: Check for loose bolts, nuts, or screws and tighten them if necessary. Loose hardware can contribute to vibrations and noise.
- Lubricate moving parts: Apply a silicone-based lubricant to the opener’s chain, gears, and other moving parts. Lubrication helps reduce friction and quietens the operation.
- Replace worn-out parts: If you notice damaged or worn-out parts such as rollers or hinges, consider replacing them. Old or damaged components can cause excessive noise during operation.
- Check the opener’s motor: Noises can also originate from a malfunctioning motor. If you suspect motor issues, it is advisable to consult a professional technician for inspection and garage door repair .
By addressing these potential causes of noise, you can restore your garage door opener to its quiet and smooth operation.
Addressing a garage door opener that is not responding to remote control commands
When your garage door opener fails to respond to remote control commands, it can be frustrating. However, there are several troubleshooting steps you can take to resolve the issue:
- Check the batteries: Begin by replacing the batteries in your remote control. Weak or dead batteries can prevent the signal from reaching the opener.
- Inspect the remote control: Ensure that the remote control is not damaged or malfunctioning. If necessary, consider purchasing a new remote control.
- Reset the opener’s codes: Follow the manufacturer’s instructions to reset the codes between the remote control and the opener. This process can re-establish the connection and resolve communication issues.
- Check for signal interference: Other electronic devices or nearby structures can interfere with the signal between the remote control and opener. Move any potential sources of interference away from the opener.
- Inspect the receiver: If the above steps do not resolve the issue, it is possible that the opener’s receiver is faulty. In this case, seeking professional assistance is recommended.
By following these troubleshooting steps, you can often regain control over your garage door opener using the remote control.
Dealing with a garage door opener that is opening or closing partially
A garage door that only opens or closes partially can be a frustrating issue. However, several troubleshooting steps can help you address this problem:
- Check the tracks: Inspect the tracks on both sides of the garage door for any obstructions or debris. Clear away any dirt, debris, or other objects that may be blocking the door’s movement.
- Inspect the rollers: Damaged or worn-out rollers can cause the door to operate unevenly. Consider replacing any rollers that show signs of wear or damage.
- Adjust the limit switches: The limit switches control the distance the door travels during opening and closing. If the switches are out of alignment, it can cause the door to stop prematurely. Follow the manufacturer’s instructions to adjust the limit switches properly.
- Test the force settings: Garage door openers have adjustable force settings that determine how much force the opener applies when moving the garage door . If the force settings are too low, the door may not open or close fully. Adjust the force settings as per the manufacturer’s instructions.
- Verify the balance of the door: An imbalanced door can put additional strain on the opener and cause it to operate inconsistently. Conduct a balance test by disconnecting the opener and manually operating the door. If the door does not stay in place when partially open, it may require professional adjustment.
By following these troubleshooting steps, you can often resolve the issue of a garage door opener that opens or closes partially.

Fixing a garage door opener that is reversing unexpectedly
If your garage door opener reverses immediately after hitting the floor, it can indicate a safety issue. Follow these troubleshooting steps to address the problem:
- Check the safety sensors: Inspect the safety sensors located near the bottom of the garage door tracks. Ensure that they are aligned properly and free from any obstructions. Clean the sensors to remove any dirt or debris.
- Adjust the sensor alignment: If the sensors are misaligned, they may not detect obstacles correctly, causing the door to reverse unexpectedly. Use a level to ensure that the sensors are aligned properly.
- Inspect the sensor wiring: Check the wiring connections between the sensors and the opener. Loose or damaged wiring can disrupt the sensor’s functionality. Repair or replace any faulty wiring as necessary.
- Test the force settings: If the force settings of the opener are too high, it can cause the door to reverse unexpectedly. Follow the manufacturer’s instructions to adjust the force settings properly.
If these troubleshooting steps do not resolve the issue of unexpected door reversal, it is advisable to consult a professional technician to ensure the safety of your garage door opener.
Troubleshooting a garage door opener that is running but not moving the door
When your garage door opener is running but fails to move the door, it can be a frustrating experience. Troubleshoot the problem using these steps:
- Inspect the drive belt or chain: Check for any damage, looseness, or disengagement of the drive belt or chain. Replace or reattach them as necessary.
- Lubricate moving parts: Apply lubrication to the opener’s drive belt, chain, and gears to ensure smooth operation. Friction due to dry components can prevent the door from moving.
- Check the opener’s gears: If the opener’s gears are worn or damaged, they may not engage properly with the drive belt or chain. Replace any faulty gears to restore functionality.
- Verify the functionality of the motor: If the motor is running but not moving the door, it may be a sign of a faulty motor, indicating the need for professional assistance, especially for tasks like garage door repair .
By following these troubleshooting steps, you can often identify and resolve the issue of a garage door opener that runs but does not move the door.
Addressing issues with garage door opener safety features
Garage door openers are equipped with various safety features to protect users and property. If you encounter issues with these safety features, it is crucial to address them promptly. Follow these troubleshooting steps:
- Check the safety sensor alignment: Misaligned safety sensors can prevent the door from closing or cause it to reverse unexpectedly. Ensure that the sensors are properly aligned and facing each other.
- Clean the sensors: Dirt or debris on the safety sensors can interfere with their functionality. Clean the sensors using a soft cloth or mild cleaner to remove any obstructions.
- Inspect the sensor wiring: Check the wiring connections between the sensors and the opener. Loose or damaged wiring can affect the sensors’ ability to detect obstacles. Repair or replace any faulty wiring as necessary.
- Test the auto-reverse mechanism: Place an object, such as a block of wood, in the door’s path and test the auto-reverse mechanism. If the door fails to reverse upon contact with the object, adjust the sensitivity settings as per the manufacturer’s instructions.
- Verify the emergency release system: Test the emergency release system to ensure it is functioning correctly. The emergency release should disengage the opener, allowing you to manually operate the door in case of power outages or emergencies.
By addressing these troubleshooting steps, you can ensure that the safety features of your garage door opener are functioning properly, providing you with peace of mind.
Preventive maintenance tips for garage door openers
To avoid future issues with your garage door opener, regular preventive maintenance is essential. Follow these tips to keep your opener in optimal condition:
- Lubricate moving parts: Apply lubrication to the opener’s chain, gears, and rollers at least once a year. This helps reduce friction and extends the lifespan of these components.
- Check and tighten hardware: Regularly inspect the hardware, including bolts, nuts, and screws, and tighten them if necessary. Loose hardware can cause vibrations and affect the opener’s performance.
- Clean the tracks: Remove any dirt or debris from the garage door tracks using a soft brush or cloth. Obstructions in the tracks can impede the door’s movement and strain the opener.
- Test the safety features: Periodically test the functionality of the safety sensors, auto-reverse mechanism, and emergency release system. This ensures that these features are working correctly and providing optimal safety.
- Avoid excessive door weight: Do not exceed the weight limit specified by the manufacturer when installing or storing items in your garage. Excessive weight can strain the opener and lead to premature failure.
By following these preventive maintenance tips, you can prolong the lifespan of your garage door opener and reduce the likelihood of encountering future issues.
When to call a professional for garage door opener repairs
While many garage door opener issues can be resolved through troubleshooting, there are instances where professional assistance is necessary. Consider contacting a professional technician in the following situations:
- Motor issues: If the opener’s motor is faulty or requires replacement, it is best to seek professional help. Motor repairs or replacements are complex tasks that require specialized knowledge and expertise.
- Electrical problems: If you suspect electrical issues with your garage door opener, such as faulty wiring or control board problems, it is advisable to consult a professional technician. Electrical repairs can be hazardous if not handled correctly.
- Safety concerns: If you encounter safety-related issues with your garage door opener, such as malfunctioning safety sensors or auto-reverse mechanisms, seek professional assistance. Ensuring the safety of your garage door system is crucial for your wellbeing and peace of mind.
- Complex repairs: If the troubleshooting steps do not resolve the issue or if you are unsure about the underlying problem, it is recommended to contact a professional technician. They have the expertise and tools to diagnose and repair complex garage door opener issues effectively.
Remember, professional assistance ensures that the repairs are done correctly and minimizes the risk of further damage or accidents.
Conclusion: Maintaining a well-functioning garage door opener for long-term convenience and safety
A well-functioning garage door opener provides convenience and enhances the security of your home. By understanding common garage door opener issues and following the troubleshooting steps outlined in this comprehensive guide, you can resolve many problems and keep your opener in optimal condition.
Regular preventive maintenance and timely professional garage door repair in Mesa, AZ when needed will ensure the longevity and reliability of your garage door opener. Take the necessary steps to maintain your garage door opener, and enjoy the convenience and peace of mind it brings.
Leave a Reply Cancel reply
Your email address will not be published. Required fields are marked *
Save my name, email, and website in this browser for the next time I comment.
- Claim Center
- Get Coverage
- Start a Claim
- 800.648.5006
- What We Cover
- Choosing Your Own Licensed Contractor
- Home Warranty Pricing
- Blog + Tips
- News + Reviews
- For Real Estate Professionals
- For Home Builders
- For Contractors
A beginner’s guide to garage door opener troubleshooting
Your garage door opener makes your garage a functional part of your home. When it works properly, you can easily move your cars in and pull your bikes or storage totes out; when it’s due for maintenance, you’d be hard-pressed not to notice the inconvenience quickly.
According to Home Depot, paying to repair or replace your garage door opener can cost of between $50 and $500 in parts alone. Keep some money in your pocket with these helpful ideas for garage door opener maintenance .
Troubleshooting your garage door opener
A malfunctioning garage door opener can be a real pain, but with these easy ways to troubleshoot common garage door opener problems , you can keep it and its remote working well for ages to come.
Common Problem #1: Garage door opener is not sending a signal
This issue is most often caused by a dead battery. Replacement batteries should be available at your local hardware or grocery store. Reference your owner’s manual to find out which ones you need.
Common Problem #2: Garage door opener is not able to fully lift the door
Most garage doors operate on a pulley system that uses torsion or extension springs to keep it balanced. This balance makes your garage door easy to lift manually or by the garage door opener when it receives a signal.
If your garage door opener begins to struggle when raising your door, check your springs to see if they’re in need of replacement.
Pro Tip: Now is also a good time to make sure your garage door opener type is best suited for your garage door.
Common Problem #3: The photo eye is misaligned or blocked
Most garage door openers use a safety feature called a photo eye (also called a photoelectric system), which is located on both sides of the inside of your garage door.
This system sends an invisible beam of light from one photo eye to the other, and if the coast is clear, it allows the garage door opener to operate. But if something is blocking the signal or the lenses are misaligned, your door will not open or close. The easiest way to let the photo eyes know it’s safe to operate is by keeping them both unblocked, and testing them regularly to make sure they’re working properly.
Garage door opener maintenance
Making time for routine maintenance can help you save hundreds of dollars and add years to the life of your garage door opener. In just a few minutes twice a year, you can keep things rolling.
Check your garage door auto-reverse feature
Modern garage door openers are equipped with an auto-reverse feature to prevent injury of any human or pet who is under the door while the garage door is in motion.
To test this safety mechanism, use the troubleshooting tips under Common Problem #3 , and make sure the two sensors of the photo eye are aligned. Both sensors should be red.
It's common for garage door openers to have this second garage door auto-reverse feature–the ability to stop and raise the door when it touches an object in its path.
To check this, bring your garage door all the way up, then set a brick, concrete block, or piece of wood on the ground where your door lands. Press the remote to lower your garage door and see if it automatically changes directions once it touches the object. If it does not reverse direction, refer to your owner’s manual or call a professional to resolve this issue. Better safe than sorry!
Check and replace your garage door opener light bulb
Don’t get caught having to fumble your way indoors—make sure your bulb shines brightly when you need it most. During the day, lift your garage door to check the brightness of your bulb, and change as needed. These bulbs should be available at your local grocery or hardware store.
Check the backup battery
Sometimes, your main garage door opener battery will die or malfunction, which is why many of them use a backup battery. While the main one is still working, test your backup battery to avoid a frustrating situation.
- Unplug the garage door opener
- Use the wall button or garage remote to try to open the garage door
- If it opens, the backup battery is functional
- If the garage door does not open, unplug the battery, and replace it with a new one
- Garage door opener batteries should be available at your local hardware store
Bonus: Check your garage door for evenness
An uneven garage door is more likely to make your garage door opener work harder. Visually inspect your garage door for the following concerns.
- One side of the garage door hanging lower than the other
- Metal or rubber components of your garage door system are cracked, worn, or bent out of place
- Overstretched and/or rusty springs
- Squeaking or grating sounds when the garage door opens or closes
If your garage door opener’s chain needs lubrication, refer to your owner’s manual to see which lubricant is preferred. If it doesn’t specify, you can use a lithium-based lubricant on your garage door’s hinges and rollers, and brake cleaner on its tracks.
Pro Tip: Though it can be fairly easy to look for signs of garage door wear and tear, it’s best to have it repaired or reset by a professional.
That’s it! Now, you’ve got the solutions you need to fix any minor garage issues and keep your garage door opener in tip-top shape.
Visit us on Facebook , LinkedIn , Twitter or Instagram to tell us your thoughts!
Related Articles
Summer maintenance tips: how to care for your....
This time of year, everyone’s green space is on display.
Gutter cleaning tips for homeowners
We’re well into the new year, right in the middle of the foggy period between the sunset
Summer storage for students and parents: Pack...
School is back in session, lunches are being packed all over America—and it’s time to put away all th

- Garage Door Repair in Los Angeles
- Emergency Garage Door Repair
- Garage Door Installation
- Garage Door Opener Repair
- Garage Door Springs Repair
- Garage Door Tracks Repair
- Automatic Gates Services
- Commercial Garage Door Repair
- Roll Up Door Repair
- December 31, 2023
- Garage door repair
Garage Door Opener Troubleshooting Guide

Welcome to our comprehensive Garage Door Opener Troubleshooting Guide. We are here to provide you with expert tips and advice to help you resolve common issues with your garage door opener. With our step-by-step troubleshooting guide, you can get your garage door opener back in perfect working order.
Key Takeaways:
- Regular maintenance is essential for optimal performance.
- Understanding garage door opener components can help in troubleshooting.
- DIY repairs can be done for simple issues.
- Don’t hesitate to seek professional assistance if needed.
Understanding Garage Door Opener Components
Before we start troubleshooting your garage door opener, let’s get a basic understanding of its different components. A garage door opener consists of several parts, including motors, sensors, and remote controls. Each component plays a crucial role in the opener’s operation, and any malfunction can cause issues.
The motor is the primary component of your garage door opener, responsible for lifting and lowering the door. The sensors detect the door’s position and ensure that it doesn’t close on anything in its path. The remote controls allow you to operate the door from a distance, with some models even featuring smartphone compatibility.
Other essential parts include the rail, which guides the door, and the trolley, which connects the motor to the door. The chain or belt is responsible for moving the trolley and the door, and the emergency release allows you to open the door manually in case of a power outage.
Now that we understand the different components let us dive into some specific problems and provide troubleshooting tips to address them effectively.
Common Garage Door Opener Problems
Garage door openers are a convenient and reliable way to access your garage. However, they can encounter some problems. In this section, we will address the most common garage door opener problems and offer step-by-step solutions to fix them.
By familiarizing yourself with these common problems, you can quickly identify and resolve any issues you may encounter with your garage door opener. If you’re still having issues, do not hesitate to contact your local garage door opener experts like Local Garage Door Experts to help you find a solution.
For more garage door opener troubleshooting tips and advice, continue reading through the other sections of this guide.
Troubleshooting a Malfunctioning Garage Door Opener
If you have a garage door opener that is not working, don’t panic, we’ve got you covered. In this section, we will guide you through the troubleshooting process, covering various scenarios, such as the opener not responding to remote control commands, failing to open or close the door, or exhibiting unusual behavior. Follow our step-by-step troubleshooting guide to diagnose the problem and find a solution.
If the garage door opener is not responding to the remote control commands, try replacing the remote control batteries first. If that doesn’t work, check for any obstacles that might be blocking the signal from the remote control to the opener. If all else fails, refer to the user manual to reprogram the remote control.
If the garage door is not opening or closing, check to see if the sensors are blocked or misaligned. Clean the sensors and make sure they are properly aligned. If the door still won’t close, disconnect the opener and try manual operation. If the door opens and closes smoothly, the problem is likely related to the opener rather than the door itself.
If the opener is exhibiting unusual behavior, such as making loud noises or vibrating excessively, inspect the opener’s components, including the motor, springs, and tracks for damage or wear and tear. If you identify any issues, consider replacing the damaged parts.
When troubleshooting a garage door opener, always prioritize safety. Keep children and pets away from the area, and avoid operating the garage door opener until you have identified and resolved the problem.
By following our troubleshooting guide, you can identify and resolve common garage door opener issues and restore your opener to its optimal performance. However, if you have tried all the troubleshooting steps and the problem persists, it’s time to call in the professionals. Contact Local Garage Door Experts for expert garage door opener repair services.
Inspecting and Testing Garage Door Opener Sensors
Garage door opener sensors play a crucial role in the smooth operation of your opener. However, faulty sensors can lead to several problems, such as the door not closing all the way or unexpectedly reversing. In this section, we will guide you through a step-by-step process of inspecting and testing your garage door opener sensors.
The first step is to check the sensors for any damage, misalignment, or obstruction. Inspect the sensors carefully, making sure they are clean and free of debris. If you notice any damage or obstructions, remove them immediately to ensure proper functioning.
Next, test the sensors’ alignment by using a level or plumb line. The sensors should be precisely aligned with each other, facing each other, and positioned no higher than six inches above the ground. Adjust them if necessary to ensure correct alignment.

Finally, test the sensors’ functionality by opening and closing the door using the opener’s remote control. Place an object, such as a cardboard box, in the doorway, in the path of the door’s closing space, then attempt to close the door. If the sensors are working correctly, the door should reverse or stop before hitting the object.
Following these troubleshooting steps for garage door openers should help you identify and fix issues with your garage door opener sensors. If you are still experiencing problems, it may be time to call in a professional like Local Garage Door Experts for further assistance.
Maintaining Your Garage Door Opener for Optimal Performance
Regular maintenance is essential to ensure that your garage door opener operates smoothly. Neglecting maintenance can lead to malfunctions, resulting in the garage door opener not working properly when you need it the most. Here are some maintenance tips and guidelines that can help you prevent potential problems with your garage door opener:
- Lubrication: Apply a silicone-based lubricant to the drive chain and the opener’s moving parts at least once every six months to keep them properly lubricated and avoid rust.
- Visual inspection: Inspect the opener’s components at least once every three months. Look for signs of wear and tear, rust, or damage. If you notice any issues, have them repaired immediately to avoid further damage.
- Test the auto-reverse feature: Test the auto-reverse feature of your garage door opener by placing an object, like a wooden block, under the closing door. If the door doesn’t reverse, it’s time to have the auto-reverse feature repaired.
- Check the photo eyes: The photo eyes are the sensors on each side of the garage door that detect objects in the door’s path. Check them periodically to ensure that they are clean and aligned properly. Misaligned photo eyes can also cause the garage door opener not working properly .
- Check the battery life of remote control: Check the battery life of your remote control at least once every six months. Replace the batteries if needed to avoid remote control malfunctions.
By implementing these maintenance practices, you can minimize the need for troubleshooting and extend the life of your garage door opener.
Refer to the following table for a summary of recommended maintenance practices:
In the next section, we’ll provide guidance on common DIY repairs for your garage door opener.
DIY Garage Door Opener Repairs
If you are experiencing garage door opener issues , you may be able to fix them yourself. In this section, we will guide you through some common fixes that you can safely do on your own.
Adjusting the door travel limits: If your garage door opener is not working properly, it may be due to incorrect door travel limits. Follow these steps to adjust the limits:
- Locate the limit adjustment screws on the side of the opener
- Use a screwdriver to turn the adjustment screws until the door opens and closes smoothly, making small adjustments as necessary
- Test the door’s travel limits by opening and closing it several times
Replacing batteries: If your garage door opener remote control is not working, it may be time to replace the batteries. Follow these steps to change the batteries:
- Locate the battery compartment on the back of the remote control
- Remove the old batteries
- Insert new batteries, making sure to align them properly
- Test the remote control to ensure it’s working correctly
Troubleshooting remote control issues: If your garage door opener is working fine but the remote control is not responding, these steps may help:
- Check if the remote control needs new batteries and replace them if necessary
- Make sure the remote control is within range of the opener and pointed towards it
- Check if the antenna on the opener is damaged or blocked and clear any obstructions
- If the above steps don’t work, try reprogramming the remote control or resetting the opener
Remember, safety should always come first. Before starting any garage door opener repairs, be sure to read the manufacturer’s instructions and take all necessary safety precautions. If you are not comfortable making the repairs yourself, don’t hesitate to call a professional.
For more informative guides like this and professional garage door opener services, visit Local Garage Door Experts.
When to Seek Professional Help
At times, despite following the troubleshooting guide, you may encounter complex issues that require professional assistance. Failure to seek professional help may cause unnecessary expenses and worsen the problem. Knowing when to call in the experts is critical in maintaining the optimal performance of your garage door opener.
If you are facing issues such as garage door opener not working properly or any other persistent problems that seem to recur, it’s time to seek the help of trained garage door opener experts. At Local Garage Door Experts, we specialize in diagnosing and resolving various garage door opener issues . Our team of experts has the required tools, experience, and skills to handle complex electrical and mechanical problems.
Do not hesitate to contact us if you experience any of the following:
- Unusual noises or vibration
- Garage door suddenly stopping mid-operation
- Garage door reversing or not closing properly
- Remote control malfunctioning despite changing batteries
Our team of professionals is readily available to provide garage door opener troubleshooting services and help you get your opener working efficiently in no time.
In conclusion, troubleshooting your garage door opener doesn’t have to be complicated. As we have outlined in this guide, understanding the key components of your opener, identifying common problems, and performing regular maintenance can help keep your opener in optimal working condition.
Remember, if you are not comfortable with DIY repairs or encounter complex issues, it’s always best to seek professional assistance. At Local Garage Door Experts, we offer comprehensive garage door opener services, including installation, repair, and maintenance to ensure your opener operates smoothly.
By following our expert tips and advice, you can save time and money by avoiding potential problems with your garage door opener. We hope you found this guide informative and useful. If you have any additional questions or need further assistance with your garage door opener, please do not hesitate to contact us.
Thank you for choosing Local Garage Door Experts for all your garage door needs.
Related Posts

- February 6, 2024
How to Install Garage Door Opener Bracket: Easy Guide

- February 5, 2024
How to Tighten Chain on Garage Door – Quick Guide

- February 3, 2024
Lock Garage Door: How to Secure Your Home
Popular posts.

Don’t Repair Your Garage Door Yourself

Replacing or Fixing Your Garage Door: What to Know

What to Do if Your Garage Door Springs Break
Areas we serve.
- Enter ZIP code or choose your city
- Westlake Village
- Santa Clarita
- Huntington Beach
- Palm Desert
- Woodland Hills
- Rancho Cucamonga
- Victorville
- San Juan Capistrano
- West Hollywood
- Los Angeles
- Moreno Valley
- San Clemente
- Thousand Oaks
- San Fernando
- Santa Monica
- Simi Valley
- Laguna Niguel
- Newport Beach
- ... more cities
This site is protected by reCAPTCHA and the Google Privacy Policy and Terms of Service apply.
- West Virginia
- New Hampshire
- Massachusetts
- Rhode Island
- South Carolina
- Mississippi
LiftMaster Garage Door Opener Troubleshooting: Step by Step Guide
LiftMaster garage door openers are some of the most popular options we have today. And if you own one of those, chances are you’ve experienced an issue with it before, one way or the other.
That is completely normal. Garage door openers have safety features that sometimes affects the regular operation of the garage door. While these features are there to prevent accidents and the LiftMaster opener from damaging, it can be frustrating. So this post is your actionable guide on LiftMaster garage door opener troubleshooting. Let’s get into it.
These are the most common problems you may encounter with your Liftmaster garage door opener.
- Garage door reverses when opening or closing
- The garage door opens partially
- Garage door opener not working
We will discuss these common issues in detail and teach you how to troubleshoot your LiftMaster garage door opener when you encounter them.
There is an additional guide for the “not so common” Liftmaster issues which will be discussed after addressing the three most common problems.
Table of Contents
Garage Door Reverses when opening or closing.
If your garage door reverses anytime you open or close it, there could be a problem with your safety sensor, incorrect force settings, or there is an obstruction on the doorway.
Safety sensor issue
To prevent the garage door from injuring someone in the door, or damaging an item in the way of the door, all models of LiftMaster garage door openers come installed with a safety sensor.
For the door to close correctly without reversing, the safety sensors need to be aligned perfectly, and there should be nothing in the way of the light beam.
When the safety sensor is not properly aligned, or something is obstructing the light beam, the garage door will fail to close. The LiftMaster garage door opener lights will flash for ten times.
To troubleshoot your LiftMaster safety sensors
- Check if something is blocking the way of the safety sensor. Eliminate any item in between the sensors
- Now, check if the safety sensors are misaligned. If the LED lights on the sensors are off or flickering, it means the sensors are not properly aligned
- To align the safety sensors, loosen the wing nut and keep adjusting the position of the sensor until the green LED light turns on. Tighten the wing nut to hold the sensor in place.
- Now try closing the door again with your remote or door control
The safety sensor troubleshooting steps should solve the issue for most homeowners. However, if it does not fix yours, try the next one.
Open and Close Travel Limits
If your garage door fully closes, touches the floor, and then reverses back up, then you need to decrease the travel limit. Think of a garage door’s travel limit as the distance it needs to travel to close or open entirely.
When the travel limit exceeds the distance the door travels, the LiftMaster garage door opener assumes there is an obstruction in the way of the door, so it reverses.
To troubleshoot this issue
- Find a step ladder and place it beneath your LiftMaster garage door opener.
- Locate the two Travel Limit dials on either the left or right side of your garage door opener, depending on where you are facing. They are denoted by a garage door with an arrow pointing up or down.
- To reduce the travel limit, turn the dial with a flat screwdriver in the direction opposite to the arrow shown beneath the dial. A full turn of the dial means you are reducing the travel limit by 2inches.
- Test run your garage door. If the door closes entirely without reversing, the issue has been fixed, else repeat step 3.
- After you reduce the travel limit, and the door doesn’t reach the floor when you close, increase the closing travel limit. At this stage, it’s all about fine-tuning till your garage closes properly without reversing.
Repeat the same steps if your garage door opens and reverses. But this time use the Opening travel limits dial (Icon with the arrow pointing up)
The garage door opens partially.
LiftMaster garage door openers are designed to stop if it senses a resistance or an obstruction while opening. This feature prevents the motor inside the garage door opener from damaging.
Check Power Door Lock
The power door lock must be deactivated anytime you open the garage door. If that’s not the case, then the door won’t open fully. So, verify that the power door lock deactivates when you open the door.
Damaged garage door tracks, jamb or rollers
The resistance can be in the form of a damaged garage door tracks, door jambs, or garage door rollers . To fix this issue and get your LiftMaster garage door opener working again, follow these troubleshooting steps.
- Close the door, with either the door control or the remote control
- Pull the emergency release handle down and back towards the garage door opener. This will disconnect the garage door opener from the door
- Slowly open the garage door manually, with your hand, checking to see if there is any resistance or obstruction, making it hard to open the door.
- Examine the tracks, jambs and garage door rollers, and pay attention to the areas where the garage door is stopping
- If the door is sticking or binding, fix the issue on your own if you consider yourself handy with tools. Else call a garage door technician to fix it.
- To reconnect the garage door to your LiftMaster garage door opener, manually close the garage door, pull the emergency release handle down. Now press the remote control. This will cause the trolley to move into position and reconnect to the garage door.
- Try opening the garage door with the remote and see what happens
These steps should fix most doors. However, if your door still does not open fully, the next troubleshooting steps should solve the issue.
Force Adjustment Settings
If there were no issues found with the previous troubleshooting steps, great, it’s time to increase the force settings of your LiftMaster garage door opener. Increasing the force setting means giving your garage door opener more energy to open or close your garage door.
Before you adjust the force setting of your garage door opener, ensure your garage door tracks, jambs, and rollers are in good condition. You might damage the motor of your garage door opener if there is a lot of resistance from the door tracks.
- Locate the Manual Force Adjustment dials at the back of the LiftMaster garage door opener. They are usually blue in color
- Increase the Opening Force setting slightly
- Now try opening the garage door once again with the remote control. Repeat step 2 if the garage door still does not open fully
- If the door opens at least 5ft, you may need to increase the opening travel limit
Garage Door Opener Not Working
If you tried operating your Liftmaster garage door opener with the remote control or door control and it didn’t work. Here are some troubleshooting tips.
1. Check Power Supply to Garage Door Opener
When your garage door opener is not responding to any command from the remote or the door control, you need to check if the opener has electricity. A simple way to do this is to unplug the garage door opener and then plug in another device, say your phone or a light bulb, to see if it lights up.
Another place to check is the fuse or the circuit breaker of the garage. Verify that there is no break in the circuit.
2. Check the Door Locks
Perhaps you have an automatic garage door locks installed for the door. If that fails to unlock, the garage door opener won’t work. That’s because there’s no way it can lift a locked door. So, verify that the door locks are disabled
3. Check if the Garage Door is Frozen
During the winter, it comes as no surprise when the garage door gets frozen to the ground. The garage door seal always sits on the floor when the door is fully closed. This can easily get frozen and prevent your Liftmaster opener from working. If it is frozen, you need to melt the ice before you attempt to open it again. It might be a little time consuming, but that’s the only way forward.
4. Check if Garage Door Spring is Broken
The weight of the garage door is too heavy for a garage door opener to lift. The garage door spring does most of the heavy lifting, and then the opener simply pushes or pulls the garage door. So when the spring is broken, the opener won’t work. So, verify if the spring is broken.
If it is broken, we have a complete guide on how to replace the garage door spring. If you are someone who loves to DIY, then you can check it out. See here . But for most people, I recommend you call a garage door technician to replace it for you.
Additional Troubleshooting Guide
Besides the three most common problems with Liftmaster garage door openers that we have discussed, there are still a ton of issues that can happen to your opener. And certainly, we haven’t covered it yet. So in this section, I’m going to mention the problem in a heading, and then give you the step by step process of fixing them. Let’s get into it.
Remote Control Does Not Activate the Opener
This is a regular issue. It doesn’t happen too often, but sometimes it just occurs. Here are some troubleshooting tips. For best results, follow the steps as it is written
- Activate the opener with the door control: The first thing to do is to try operating the garage door opener with the door control unit. If it works, then it means the problem is not with the opener.
- Check if the door lock feature is activated: This is a feature that disables the ability to use remote controls to operate the garage door opener. So, the garage door opener will not respond to any command from the remote if it is activated. If the Pushbar LED indicator on the door control unit is blinking, then the door lock feature is activated. To deactivate it, hold the lock button for about 3 seconds. The LED should stop flashing.
- Reprogram the remote control: We have a dedicated guide on how to program all Liftmaster remotes to the garage door opener. I recommend you read it here .
- Check the remote battery: If your attempt to program the remote didn’t work, the chances are that the remote battery is dead, and you need to have it replaced. Replacement batteries for garage door remotes are dirt cheap, and you can pick some up for 15 bucks or less. The Duracell CR2032 3V Coin Battery (on Amazon) is an excellent choice for garage door remotes, and you’ll get extra batteries for future use.
Garage Door Opens and Closes Automatically by Itself
This is not a common problem at all, but it could happen. When your Liftmaster garage door opener opens and closes by itself, here are the troubleshooting tips you need to follow.
- Disconnect the control station: Remove the bell wire from the single button control station’s terminals, and operate the garage door opener from the remotes. If this solves the problem, then the control station is faulty, or there is a short circuit in the wire. It would be best if you had them replaced. The Liftmaster Multi-Function Control Panel (on Amazon) is an upgrade to the single button control station. They give you much more functionality, like the ability to turn on or off the opener lights, and a vacation mode lock button. They are compatible with all Liftmaster models
- Erase and reprogram remotes: Sometimes, your remote controls may be sending signals that you may not be aware of. Erase all remotes from the garage door opener’s memory and reprogram them, one at a time. Learn how to do that here .
The Garage Door Opens But Won’t Close.
As a homeowner, you may encounter this issue at least once in your life with garage doors. But here is how to fix it.
- If you own a Wall Mount garage door opener, like the Liftmaster 8500, for example, the first thing to check is the cable tension monitor. Make sure it’s properly installed. This might not be the issue if a professional installed it, and it was working fine.
- Check if the safety sensor is connected to the opener, properly aligned, and there is nothing in the way of the door. If the light blinks when you attempt to close, then it is definitely a safety sensor issue.

Garage Door Pedia
Why Your Garage Door Opener Won’t Close All the Way and How to Fix It? Solving the Mystery
A malfunctioning garage door opener can be a source of frustration for homeowners. If you find yourself in a situation where your garage door opener won’t close all the way, understanding the possible causes and solutions is crucial. In this comprehensive guide, we will explore the reasons behind this issue and provide practical tips to get your garage door closing smoothly.

Diagnosing the Problem – Garage Door Opener Won’t Close All the Way
When your garage door opener refuses to close completely, several factors could be contributing to the problem. Let’s investigate the common issues associated with “Garage Door Opener Won’t Close All the Way”:
- Misaligned Safety Sensors: Garage doors are equipped with safety sensors that prevent them from closing if an obstruction is detected. Misaligned sensors can give a false signal, causing the door to stop prematurely. Check the alignment of the sensors and ensure they are clean and free from obstructions.
- Limit Switch Adjustment : The limit switch on your garage door opener controls how far the door travels during both opening and closing. If the switch is misadjusted, it may prevent the door from closing fully. Consult your opener’s manual to learn how to properly adjust the limit switch.
- Obstructions in the Door’s Path: Even small objects in the door’s path can trigger the safety mechanism and prevent it from closing. Inspect the area around the door for any debris, tools, or other items that might be obstructing the path.
- Worn-Out Rollers or Hinges: If the rollers or hinges on your garage door are worn or damaged, they can impede the smooth movement of the door. Inspect these components and replace any that show signs of wear.
- Issues with the Garage Door Tracks: Misaligned or damaged tracks can hinder the door’s movement. Examine the tracks for any misalignments, gaps, or damage. Make the necessary adjustments or repairs to ensure the door glides smoothly along the tracks.
Solutions for a Smooth Closure
Now that we’ve identified potential issues, let’s explore practical solutions to address the “Garage Door Opener Won’t Close All the Way” problem:
- Sensor Realignment: Align the safety sensors so that they face each other directly. Clean the sensor lenses and ensure there are no obstructions in their path. This simple adjustment can often resolve the issue.
- Limit Switch Adjustment: Refer to your garage door opener’s manual to locate the limit switch. Make small adjustments as needed, testing the door after each adjustment until it closes completely.
- Clear the Door’s Path: Regularly inspect the area around your garage door and remove any objects that might be blocking its path. This includes tools, toys, or other items that could trigger the safety mechanism.
- Roller and Hinge Inspection: Check the rollers and hinges for signs of wear or damage. Replace any components that are no longer functioning correctly to ensure smooth door operation.
- Track Maintenance: Inspect the tracks for misalignments or damage. Use a level to straighten any misaligned sections and tighten loose bolts. Lubricate the tracks to reduce friction and promote smooth movement.
Read too: Why Your Chamberlain Garage Door Opener Closes, Then Opens Again, and How to Fix It? Decoding the Dilemma
Conclusion:
A garage door opener that won’t close all the way can be a frustrating problem, but with a systematic approach to troubleshooting and maintenance, you can often identify and resolve the issues. By addressing misaligned sensors, adjusting limit switches, and maintaining the various components of your garage door, you can enjoy a smoothly operating system that provides both convenience and security for your home.
Garage Door Repair Pine Bluff Ar: Ensuring Smooth Functionality for Your Home

When it comes to the security and functionality of your home in Pine Bluff, Arkansas, every detail matters, including your garage door. A properly functioning garage door not only enhances curb appeal but also provides convenience and safety for your family. That’s why residents trust…
Garage Door Repair Hot Springs Village: Your Go-To Solution for Reliable Service

In the scenic community of Hot Springs Village, where picturesque landscapes meet cozy neighborhoods, ensuring the smooth functioning of your garage door is crucial. A malfunctioning garage door not only disrupts your daily routine but also compromises the security of your property. That’s where expert…
Garage Door Repair in Great Falls, MT: Your Ultimate Guide

When it comes to maintaining the integrity and functionality of your home, often one aspect that can be overlooked is the garage door. However, ensuring that your garage door is in optimal condition is not only crucial for convenience but also for security and safety.…
Leave a Reply Cancel reply
Your email address will not be published. Required fields are marked *
Save my name, email, and website in this browser for the next time I comment.
- Products by Manufacturer
- Products by Category
Genie Door Opener Support / Assistance
- Troubleshooting Guides
- Programming Instructions
- FAQ Frequently Asked Questions
- Shipping Special Rate Information
In this section we try to provide you with help in garage door troubleshooting , programming instructions and Frequently Asked Questions about garage door openers and their parts. You can click on any of the above links for more information concerning these subjects. If you do not find your answers in the help section we have provided, you can email us by clicking on the Contact link on our main menu across the top of each page. We will get back to you in a timely manner to answer your questions.
For purchasing repair parts for your garage door opener, please go to the correct Manufacturer listed on the side of the page, or shop by using our Product listings, located below the Manufacturer list. You can also locate a garage door opener part by using our Site Search to type in the part name or its part number.
- myQ-Connected Garage Door Openers
- Smart Garage Hub
- myQ Diagnostics
- myQ Connected Garage
- myQ Community App for Residents
- Partners & Dealers
- Register a Product
- Garage Door Openers
- Keypads & Remotes
- Light Controls
- Belt Replacement
- Register a product
LiftMaster Garage Door Openers Troubleshooting & Support
All Content
Product Type
- Wall Mount Garage Door Opener (106)
- Wi-Fi Garage Door Opener (189)
- Belt Drive Garage Door Opener (220)
- Chain Drive Garage Door Opener (227)
- Screw Drive Garage Door Opener (109)
- Battery Backup (51)
- Corner-To-Corner Lighting (24)
- Secure View Video Garage Door Opener (32)
Support Objective
- Compatibility (55)
- Installation (238)
- Parts List and Diagrams (56)
- Programming (158)
- Troubleshooting (274)
- Right Arrow
myQ Products & Accessories
Liftmaster garage door opener, liftmaster residential gate operator, liftmaster remote controls, liftmaster accessories, chamberlain garage door opener, chamberlain remote controls, chamberlain accessories, access master, garage master, garage access, moore-o-matic, master mechanic, extreme garage, my brand is not listed.
Click to Chat Now
Residential Consumer ›
For homeowners, please contact us here.
Technician or Installer ›
If you are a Partner, Technician or Installer, contact us here.

How To Program a Garage Door Opener
M ost people don't spend much time thinking about their garage door opener remote. But when an old remote stops working or you lose it completely, you'll need to know how to reset it and connect it to a new remote.
Here's the good news: Programming your garage door opener remote is extremely easy, and only takes a few minutes.
The not-so-good news: Describing the specifics of programming a garage door opener is surprisingly difficult.
The basics of modern garage opener synching is about as simple as it gets: Just press two buttons. But any given model can have slightly different requirements. You might need to hold one of those buttons for a number of seconds, or press a button more than once. None of that is difficult, but can be tricky to explain.
But don't let that scare you off! Here, I'll give you all the info you need to tackle the vast majority of openers. And if you do run into issues, we've included links for information from specific manufacturers.
Check Garage Door Opener and Compatibility
First and foremost, determine the type and brand of your garage door opener. This is usually easy, since it tends to be printed in large letters on the side of the opener.
Of course, use a remote that's compatible with your opener. Keep in mind some manufacturers produce more than one line of openers. Chamberlain also makes LiftMaster and Craftsman openers, and many Chamberlain remotes are compatible with all three brands. There are also secondary-market "universal remotes" that work with most major opener brands. We'll touch on those later.
Let's get started!
Prepare the Garage Door Opener and Remote
Begin by running a couple of tests to make sure you're not missing something simple.
- Change the remote batteries. If this fixes the issue, you're all set!
- Try opening the garage door using the wired wall button. If the door still won't open, there's a bigger issue beyond the remote. You'll have to find another fix or call a pro.
Locate the Garage Door Opener's Program Button
Most garage door openers have a button that puts it into programming mode. You'll probably need a ladder, so use appropriate caution.
- Look for a prominent button on the rear of the opener or beneath a plastic shroud. Typically called a Learn or Program button, it's usually bright red, yellow or green.
- If you have an opener made before 1995, it may use a DIP switch instead. Around the size of your thumb, a DIP switch features eight to 12 tiny switches along its length.
How To Program a Remote
This is about as easy as it gets!
- Typically, a single push is all that's needed, although some manufacturers require you hold it down a specific length of time.
- There will be some acknowledgement that it's in Learning mode, like a blinking LED or clicking noise.
- If the remote and opener talk to each other, there will be another acknowledgement; usually the overhead light on the opener will blink.
- If your opener doesn't have an overhead light, it will usually signal completion with an audible click.
- If you have a second remote to program, repeat the above steps.
What if you have a DIP switch? The steps are a little different. (Remember, this will only come into play with openers made before 1995.)
- Locate the DIP switch on the opener.
- Using a small screwdriver, paper clip or similar tool, set the DIP switch to any sequence you like.
- Locate the DIP switch on the remote.
- Using the same tool, set the switch to match the sequence on the opener.
How To Program a Universal Remote
A universal remote can work with many types of garage doors and openers. Check how universal your remote actually is. Many limit compatibility to a few major brands. Yours may be fine, but it's worth double-checking.
- Press the Learn/Program button on the opener, then press the button on the universal remote.
- Consult the remote's instructions for specifics.
- You may need to press the remote button a set number of times, depending on which manufacturer/model of opener you have.
How To Program a Keypad
Typically, keypads are programmed the same way as remotes.
- Press the Learn/Program button.
- Enlist a helper. This way you don't have to scramble down the ladder and rush to the keypad.
How To Reset a Garage Door Opener
If you've moved to a new home , you likely inherited an opener from the previous owner. Just as it's a good idea to change the locks, it's a good idea to reprogram the opener. Most modern openers have a reset function that works similar to this:
- Locate the Learn/Program button.
- Different manufacturers/models have different hold times. Wait for the indicator before releasing the button.
- Program your remote as described in the section above.
Security and Safety Considerations
Modern garage door openers come with a high level of built-in security. Older openers with DIP switches lock the opener and remote onto a single code. But modern openers use a more secure rolling code, meaning the code changes over time.
Tommy Mello, founder of A1 Garage Door Service , describes it like this, "Every time the opener button is pressed, rolling code technology changes the access code. Because there are billions of possible combinations, it is almost impossible for hackers to steal the code for a garage door opener and use it to get into a home."
If you have an older opener and would like to boost your security, consider installing the Genie Girud-1T . This easy-to-install device upgrades your garage security to rolling codes without buying an entire opener. Learn how to fix a garage door keypad .
More Info for Your Specific Opener
You'll set up the vast majority of openers with the instructions above, but it's always a good idea to check the documentation for your specific opener. Here are some links to popular brands.
- Chamberlain;
- LiftMaster;
If your opener isn't included on this list, a quick internet search should point you in the right direction.

- Tools & Home Improvement
- Building Supplies
- Building Materials
- Garage Doors, Openers & Parts
- Keypads & Remotes
Enjoy fast, free delivery, exclusive deals, and award-winning movies & TV shows with Prime Try Prime and start saving today with fast, free delivery
Amazon Prime includes:
Fast, FREE Delivery is available to Prime members. To join, select "Try Amazon Prime and start saving today with Fast, FREE Delivery" below the Add to Cart button.
- Cardmembers earn 5% Back at Amazon.com with a Prime Credit Card.
- Unlimited Free Two-Day Delivery
- Streaming of thousands of movies and TV shows with limited ads on Prime Video.
- A Kindle book to borrow for free each month - with no due dates
- Listen to over 2 million songs and hundreds of playlists
- Unlimited photo storage with anywhere access
Important: Your credit card will NOT be charged when you start your free trial or if you cancel during the trial period. If you're happy with Amazon Prime, do nothing. At the end of the free trial, your membership will automatically upgrade to a monthly membership.
Image Unavailable

- To view this video download Flash Player

Kingdder 5 Pcs 894LT Four Button Learning Garage Door Opener Remote, Compatible with Liftmaster Garage Door Opener, Replacement for 972LM/974LM/372LM/374LM/, Clone 811LM, 61LM or 361LM
Purchase options and add-ons.
- Compatibility: 894LT garage door opener remote control is compatible with Liftmaster, compatible with chamberlain and compatible with craftman garage opener with yellow (890 series)/red (970 series)/purple (370 series) learning button; It is also available individually with DIP switches 61LM (390MHz), 361LM (390MHz) and 811LM; Also a replacement for the 972LM/974LM/372LM/374LM for use with garage door openers, door operators and compatible with MyQ lights
- Programming: the garage door opener remote is compatible with Liftmaster garage door openers with yellow/red/purple learn buttons and DIP switches, each button can also clone different DIP code remote (811LM, 61LM or 361LM); The garage door opener remotely emits a security code and is easy to use; When you start programming, make sure the garage door is closed; Please stay close to your garage door opener or you may not be able to successfully program it
- Code/Frequency for Direct Programming: the garage door remote for cloning 811LMX Programmable DIP (in following modes): p 811LM Encryption DIP Switch P 361LM DIP Switch 315 MHz P 61LM DIP Switch 390 MHz
- Safe and Reliable: the 894LT remote is compatible with garage door openers manufactured after January 1, 1993; When programming, you only need to follow the instructions for a few minutes to complete; But first, you need to confirm your garage door opener type (learn button or dip switch) rolling code technology virtually eliminates radio interference and provides enhanced range, security and reliability
- Multi Frequency Control: multi frequency control, independent button programming allows for different frequencies and codes, the garage door remote control features rolling code technology that helps users press a button to get a new code every time they open the door
Similar items that may deliver to you quickly

Product information
Technical details, additional information, warranty & support, looking for specific info, product description.
Features: Enough quantity for back up: Get 5 garage door opener remote in one pack. Share one with family for seamless access to the garage even when you're away. Keep the second as a backup in case of loss or damage. Visor clip: Our remote controls comes with visor clips, allowing you to conveniently attach the remote to the sun visor above your car seat, so you can easily control your garage door while driving. Specifications: Color: black mainly Size: as shown in picture Package includes: 5 x Garage door opener remote Notes: Manual measurement, please allow slight errors on size. The color may exist a slight difference due to different screen displays.
Compare with similar items
Customer reviews.
Customer Reviews, including Product Star Ratings help customers to learn more about the product and decide whether it is the right product for them.
To calculate the overall star rating and percentage breakdown by star, we don’t use a simple average. Instead, our system considers things like how recent a review is and if the reviewer bought the item on Amazon. It also analyzed reviews to verify trustworthiness.
- Sort reviews by Top reviews Most recent Top reviews
Top review from the United States
There was a problem filtering reviews right now. please try again later..

- Amazon Newsletter
- About Amazon
- Accessibility
- Sustainability
- Press Center
- Investor Relations
- Amazon Devices
- Amazon Science
- Sell on Amazon
- Sell apps on Amazon
- Supply to Amazon
- Protect & Build Your Brand
- Become an Affiliate
- Become a Delivery Driver
- Start a Package Delivery Business
- Advertise Your Products
- Self-Publish with Us
- Become an Amazon Hub Partner
- › See More Ways to Make Money
- Amazon Visa
- Amazon Store Card
- Amazon Secured Card
- Amazon Business Card
- Shop with Points
- Credit Card Marketplace
- Reload Your Balance
- Amazon Currency Converter
- Your Account
- Your Orders
- Shipping Rates & Policies
- Amazon Prime
- Returns & Replacements
- Manage Your Content and Devices
- Recalls and Product Safety Alerts
- Conditions of Use
- Privacy Notice
- Consumer Health Data Privacy Disclosure
- Your Ads Privacy Choices
IMAGES
VIDEO
COMMENTS
When garage door openers are plugged in, but the door does not close or open, there may be a problem with the external controls, such as the wall switch, keypad or remote control.; Test all of the controls to determine if only one is faulty but the others work. If the garage door opener motor has an antenna for the remote control, make sure that it is undamaged and in the correct position.
3.6. Garage door opener light not working. If the light on your garage door opener fails to turn on, try the following troubleshooting steps: Replace the light bulb: Remove the old light bulb and replace it with a new one. Make sure to use a bulb with the correct wattage and type as specified by the manufacturer.
Once again, double-check that your garage door isn't locked or unplugged—and that the wall switch itself, if it is battery powered, has new batteries. If all those tests pass, your problem may be with the switch itself, or its wiring. To see which, you'll need to take the switch off the wall using a screwdriver.
Problem #2. Garage Door Won't Close . If the opener runs and the door tries to close, but suddenly stops and reverses, the problem is usually either too little downward force from the opener, or an obstruction is blocking the sensors from seeing each other. The first solution is to eliminate the obstruction if there is one and re-test.
Step 1: Check the Battery. It's a good idea to install a new battery in your opener remote about every two years. If you haven't replaced the battery in several years or you can't remember the last time you replaced it, install a new one now.
Preventive Maintenance Tips for Garage Door Openers. In addition to troubleshooting and fixing common issues, it's essential to perform regular preventive maintenance on your garage door opener to prolong its lifespan and prevent future problems. Here are a few tips to keep your opener in optimal condition: Keep the tracks clean and free from ...
03 of 15. If a garage door won't open, often a wireless remote control or mounted keypad has stopped operating the opener. If the door opens with the hardwired wall switch, it's likely that the battery needs replacing in the remote control or keypad. If the battery is fine, make sure that the loose wire antenna on the motor unit is hanging ...
Troubleshoot the problem using these steps: Inspect the drive belt or chain: Check for any damage, looseness, or disengagement of the drive belt or chain. Replace or reattach them as necessary. Lubricate moving parts: Apply lubrication to the opener's drive belt, chain, and gears to ensure smooth operation.
No Power. Loss of power is the most frequent reason for a garage door not opening. And it's one of the easiest to diagnose, because absolutely nothing happens when you press the remote or wall switch. No lights come on and the motor makes no noise. Here's what to do: Make sure the door opener is plugged in. Check the circuit breaker and ...
Slide off the old trolley, and slide on the new one. Reattach the chain and adjust the chain tension. Replacing the trolley on a belt drive and replacing it on a screw drive are similar procedures. A new trolley will cost $25 to $40 depending on your model. 9 / 12.
Remove the spring from its hanger. If the garage door was closing too quickly, move the spring to the next higher hole on the bracket. If the garage door was opening too quickly, move it to the next lower hole. Adjust the springs on both sides of the door the same amount. Retest the door balance, as you did in Step 1.
3.The garage door will open and close if I use the wall button, but not with the remote If the garage door opener is working, but the remote is not, the most likely culprit is a dead battery in the remote. The easiest thing to do here is replace the battery and see if that solves the problem.
Troubleshooting your garage door opener. A malfunctioning garage door opener can be a real pain, but with these easy ways to troubleshoot common garage door opener problems, you can keep it and its remote working well for ages to come. Common Problem #1: Garage door opener is not sending a signal. This issue is most often caused by a dead battery.
In this section, we will address the most common garage door opener problems and offer step-by-step solutions to fix them. Common Problem Solution; Door not closing or opening properly: Check the tracks and rollers for any obstructions. Adjust the track alignment if necessary. Examine the springs, cables, and pulleys for any damage or issues.
Common reasons your garage door opener may not be working properly: The batteries in the remote control need to be replaced. The door needs lubrication. The safety sensors are out of alignment. The track is not aligned properly. The garage door's path may be blocked. The springs are broken. Contact a LiftMaster dealer to diagnose the problem ...
If the door won't close or open all the way, you can use the remote to reset the open and close limits. On most models, you can also do this manually by locating the limit dials on the motor housing. Turn the close limit dial counterclockwise to lengthen the close limit, and turn the open limit dial clockwise to lengthen the open limit.
9. How to Set Limits on the new line of Genie Garage Door Openers. Garage Door Troubleshooting Guides Setting Genie Chain Drive Limits 1. My garage door will not go down using my transmitters. I can only get the door down by holding down on the wall button. When the infra-red sensors are malfunctioning, usually one of the sensor lights will be ...
To fix this issue and get your LiftMaster garage door opener working again, follow these troubleshooting steps. Close the door, with either the door control or the remote control. Pull the emergency release handle down and back towards the garage door opener. This will disconnect the garage door opener from the door.
Limit Switch Adjustment: Refer to your garage door opener's manual to locate the limit switch. Make small adjustments as needed, testing the door after each adjustment until it closes completely. Clear the Door's Path: Regularly inspect the area around your garage door and remove any objects that might be blocking its path.
Helpful links for troubleshooting your Genie Garage Door Opener: Find Genie owners manuals programming support, and helpful answers to your garage door opener product questions here. Genie Excelerator® Series Garage Door Opener Self-Diagnostic Troubleshooting; Troubleshooting Guide- for models 1022, 1024, 1042, 2022, 2024, 2042, 2027
This video provides quick and easy solutions that can help you with troubleshooting your myQ Smart Garage Door Opener when it is plugged into a power outlet and none of the indicator lights are on. Channel: myQ Length: 01:27. Troubleshooting Guide for Connecting a myQ Smart Garage Door Opener to the myQ App | Support.
Genie Door Opener Support / Assistance Troubleshooting Guides Programming Instructions FAQ Frequently Asked Questions Shipping Special Rate Information In this section we try to provide you with help in garage door troubleshooting, programming instructions and Frequently Asked Questions about garage door openers and their parts. You can click on any of the above links for
Welcome to Sears Home Services, your premier source for solving garage door opener problems. We understand the frustration when your garage door opener refuses to function due to power issues. This guide provides easy-to-follow steps for troubleshooting power issues in garage door openers, helping you get back to smooth operations in no time.
LiftMaster Garage Door Openers Troubleshooting & Support. Get the LiftMaster garage door support you need from Chamberlain Group. Whether you have a belt drive, chain drive or wall-mount model, find helpful resources for your LiftMaster garage door opener and parts - manuals, videos and more - to help you diagnose and fix the problem.
Here's the good news: Programming your garage door opener remote is extremely easy, and only takes a few minutes.. The not-so-good news: Describing the specifics of programming a garage door ...
Kingdder 5 Pcs 894LT Four Button Learning Garage Door Opener Remote, Compatible with Liftmaster Garage Door Opener, ... step-by-step troubleshooting guides, and help videos. By solving product issues, we help the planet by extending the life of products. Availability of support options differ by product and country.