Create Professional Science Figures in Minutes
Join the largest science communication research community.


THOUSANDS OF ICONS
Browse over 50,000 icons and templates from over 30 fields of life science, curated and vetted by industry professionals.
DRAG AND DROP
Simple drag-and-drop functionality enables you to create scientific figures up to 50 times faster.

CUSTOM ICONS
Find icons you need for even the most specialized fields of life science, or we’ll create it in as little as 48 hours ( conditions apply ).

Figure: During HSV infection, memory CD4-T-cells respond to antigens in neural tissue by secreting IFN-γ and loosening tight junctions between endothelial cells, allowing antibodies to cross the blood-brain-barrier.

Ready to get started?
Get in touch
555-555-5555

Limited time offer: 20% off all templates ➞

How to Make Good Figures for Scientific Papers
Creating good figures for scientific publications requires using design best practices to make each figure clearly show the main point of your data story.
This article reviews important design principles that will help you create effective figures. However, if you want step-by-step tutorials on how to create the scientific illustrations and Excel graphs using Adobe Illustrator and PowerPoint, read these articles instead:
- Free Graphical Abstract Templates and Tutorials
- Free Research Poster Templates and Tutorials

Four Rules to Create High-Quality Figures
The best data visualizations for scientific papers use a combination of good design principles and storytelling that allows the audience to quickly understand the results of a scientific study. Below are four rules that will help you make effective research figures and save you time with the final journal formatting. There are also practical tips on how to find the purpose of your figure and how to apply design best practices to graphs, images, and tables.

Rule 1: Clearly show the main purpose to your audience
For every graph or figure you create, the first step is to answer the question: what is the purpose of my data? Clearly defining the main purpose of your scientific design is essential so that you can create and format the data in ways that are easy to understand.
The most common purposes for scientific publications are to explain a process or method, compare or contrast, show a change, or to establish a relationship. Each of these purposes should then lead you to select graph types. For example, if the goal of your figure is to explain a method, you will likely want to choose process-focused graph types such as flow charts, diagrams, infographics, illustrations, gantt charts, timelines, parallel sets, or Sankey diagrams. Below are examples of the most common graph types that you can use for different data purposes. Read more articles to learn how to choose the right data visualizations and data storytelling .

Rule 2: Use composition to simplify the information
After you define the purpose of your graph or figure, the next step is to make sure you follow composition best practices that make the information clear. Composition best practices include following the journal rules and formatting from left to right, top to bottom, or in a circle. You should also review your designs to remove or adjust distracting data, lines, shadows, and repeated elements. Applying good composition means spending time reviewing your layout and simplifying the story using these techniques.
Data Composition Best Practices:
- Design flow should be left to right, top to bottom, or in a circle
- Make sure most important data is the focus of the design
- Remove or adjust excess data and text
- Make text easy to read
- Reduce contrast of bold lines
- Remove repeated elements
- Remove shadows

The example below shows how to design a figure that applies the composition best practices by taking an initial layout of a figure on the left and then use formatting to fill the space, simplify information, and reorder the data to more clearly show the main purpose of the research.

Follow Science Journal Formatting Requirements:
In order to organize the graphs, charts, and figures, you will also need to know the requirements of the scientific journal. You will need to know the limits of the figure sizes, the maximum number of figures, as well as color, fonts, resolution, and file type requirements. You can find different journal requirements by going to the Journal’s homepage and then finding the link to the author’s guidelines from there. If you Google the journal’s formatting requirements, make sure you find the most up-to-date page.
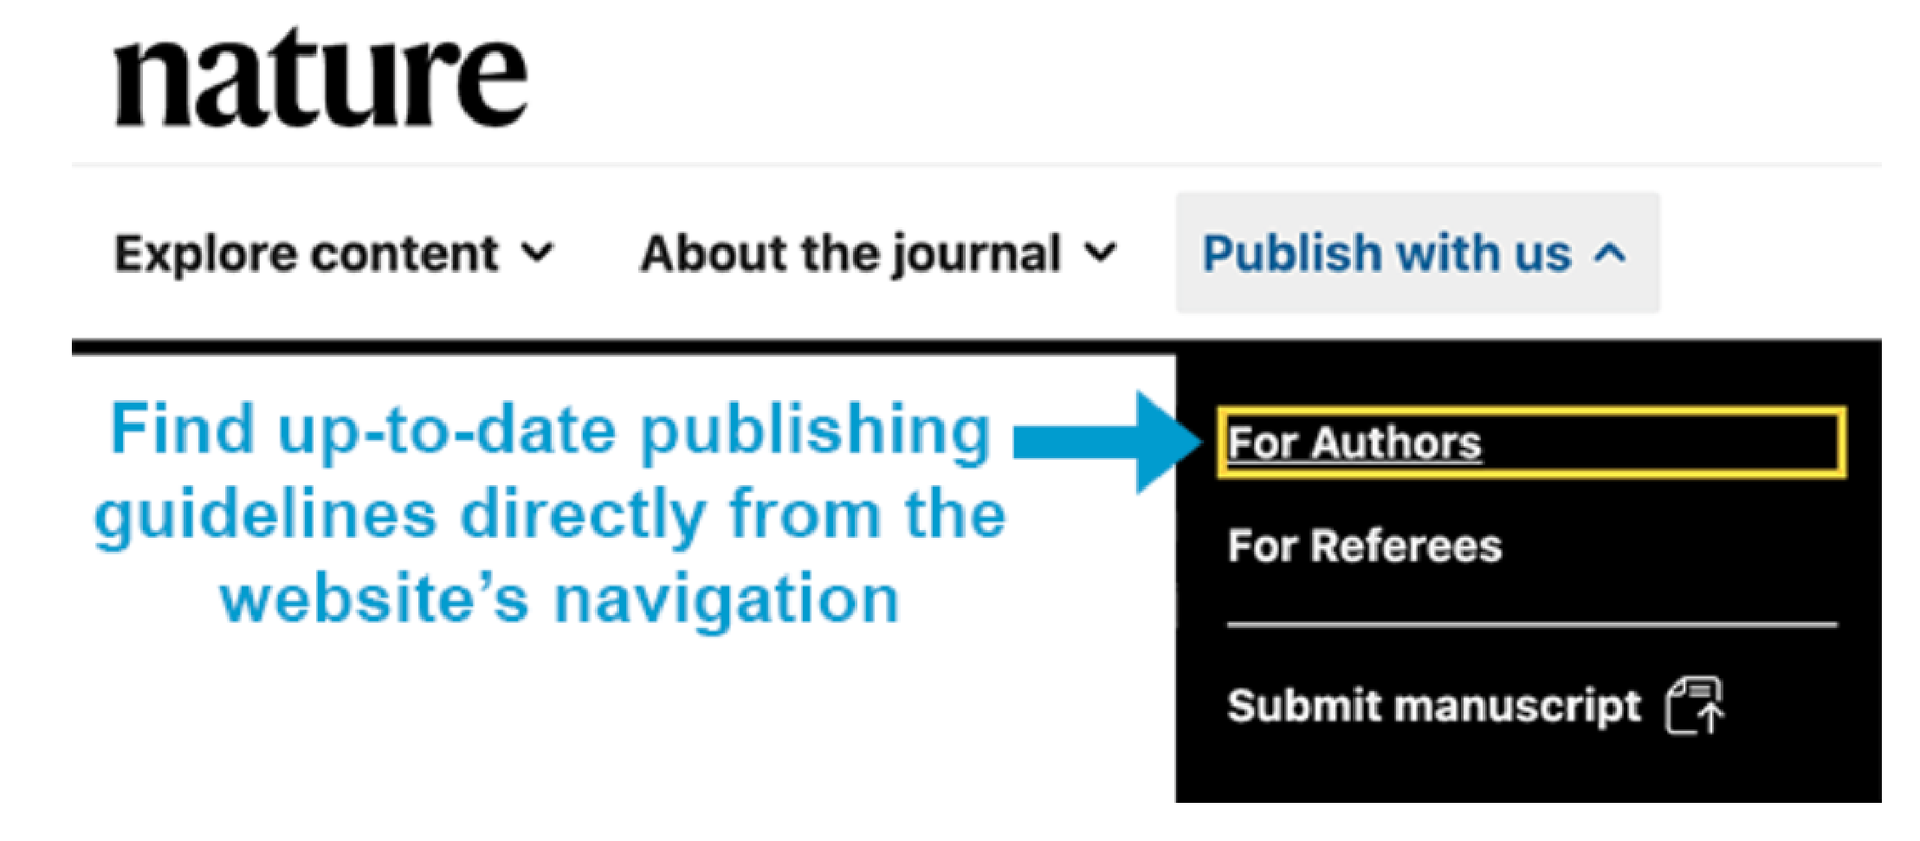
For example, the academic journal Science allows a maximum of 6 figures and requires that they have a width of 55 mm (single column) or 230 mm (double column). In contrast, the journal Nature only allows 3-4 figures or tables with maximum widths of 89 mm (single column) and 183 mm (double column). If you planned to submit your scientific publication to Nature, you would need to carefully plan which graphs and tables will best tell your scientific story within only four figures.
Rule 3: Use colors or grayscale to highlight the purpose
Color is one of the most powerful data storytelling tools. When used properly, color enhances understanding of your graphs and when used poorly, it can be very distracting.
Scientific Color Design Tips:
- If possible, limit your design to 1-2 colors that make the main point of the data stand out from the rest
- Make colors accessible to people with color blindness

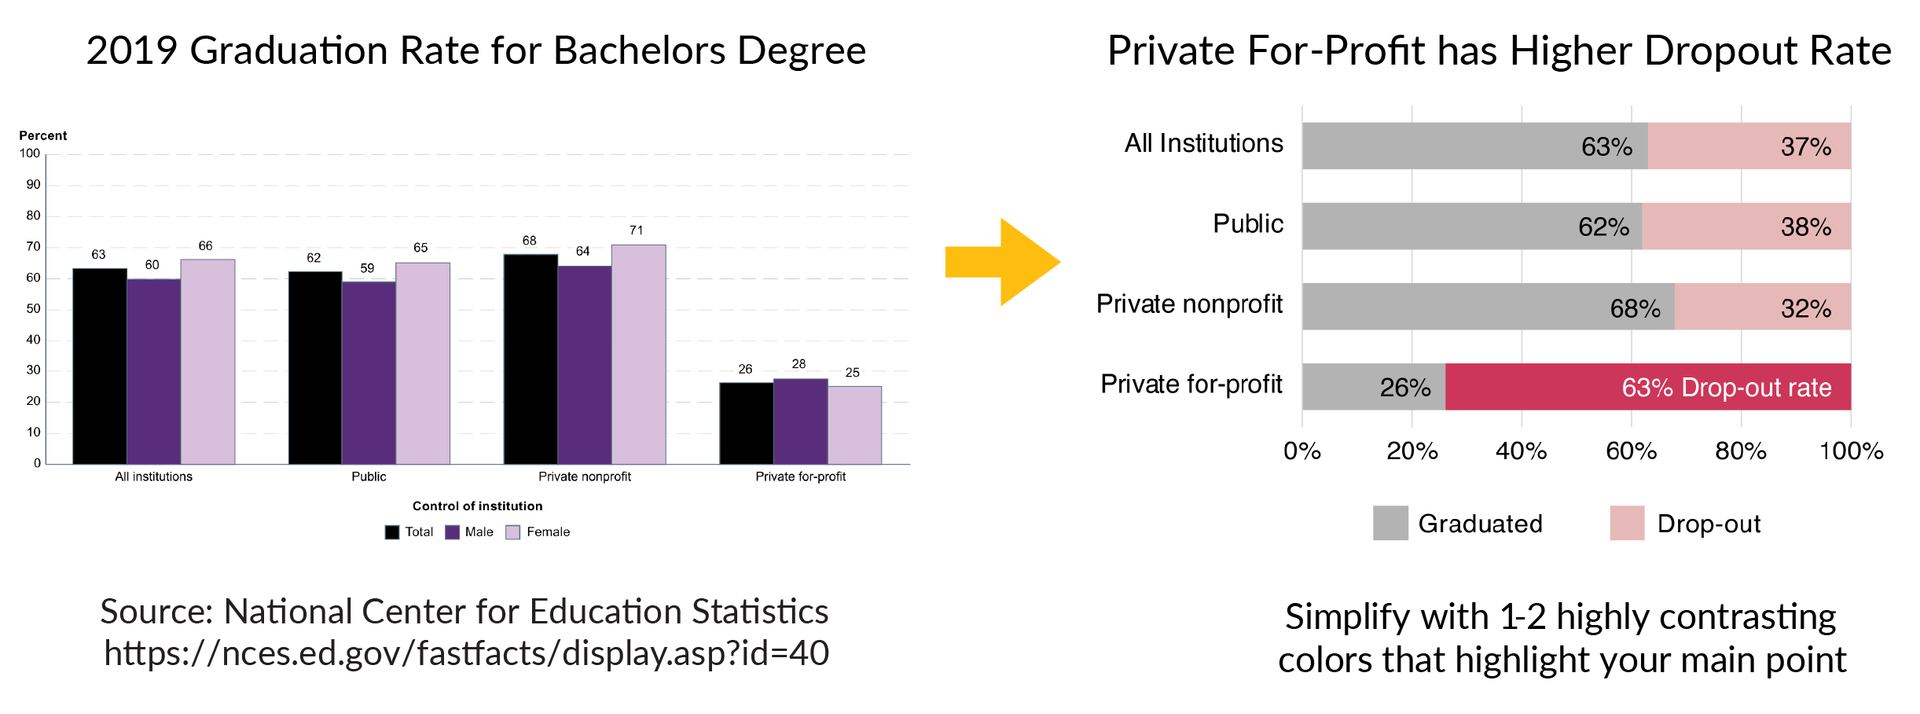
The example below shows a graph on the left that has a lot of information about graduation rates for bachelor’s degrees in 2019. The text is small and the color design makes it difficult to understand the main results of the data. One way to improve this figure is to use colors to highlight the main story of the data, which is that private for-profit institutions have a much higher drop-out rate than all other institutions. The figure on the right improves this design using the bold pink color and clearer text to highlight the main point of the dataset.
Rule 4: Refine and repeat until the story is clear
The goal of good figure design is to have your audience clearly understand the main point of your research. That is why the final rule is to spend time refining the figure using the purpose, composition, and color tools so that the final design is clear.
It is normal to make 2-3 versions of a figure before you settle on the final design that works best. I recommend using the three clarity checkpoints below to improve your refinement process.

Design Clarity Checkpoints:
- Checkpoint 1. Does the figure show the overall story or main point when you hide the text? If not, improve the data visualization designs to more clearly show the main purpose.
- Checkpoint 2. Can you remove or adjust unnecessary elements that attract your attention? Remove repetitive elements, bounding boxes, background colors, extra lines, extra colors, repeated text, shadows/shading, either remove or adjust excess data, and consider moving information to supplementary figures.
- Checkpoint 3. Does the color palette enhance or distract from the story? Limit the use of color and pick a color palette that improves audience understanding of the main purpose of the figure. If the color doesn’t serve an obvious purpose, change to grayscale.
Scientific Figure Design Summary
For every scientific publication, follow the four rules of good scientific figure design to help you create effective graphics that engage and impress your audience:
- Clearly show the main purpose to your audience
- Use composition to simplify the information
- Use colors or grayscale to highlight the main points of the figure
- Refine and repeat the process until the story is clear
Related Content:
- Best Color Palettes for Scientific Figures and Data Visualizations
- Graphical Abstract Examples with Free Templates
- Free Research Poster Templates and Tutorials
- BioRender Alternatives: Scientific Illustration Software Comparisons
Create professional science figures with illustration services or use the online courses and templates to quickly learn how to make your own designs.
Interested in free design templates and training.
Explore scientific illustration templates and courses by creating a Simplified Science Publishing Log In. Whether you are new to data visualization design or have some experience, these resources will improve your ability to use both basic and advanced design tools.
Interested in reading more articles on scientific design? Learn more below:

Scientific Presentation Guide: How to Create an Engaging Research Talk

Data Storytelling Techniques: How to Tell a Great Data Story in 4 Steps

Best Science PowerPoint Templates and Slide Design Examples
Content is protected by Copyright license. Website visitors are welcome to share images and articles, however they must include the Simplified Science Publishing URL source link when shared. Thank you!
Online Courses
Stay up-to-date for new simplified science courses, subscribe to our newsletter.
Thank you for signing up!
You have been added to the emailing list and will only recieve updates when there are new courses or templates added to the website.
We use cookies on this site to enhance your user experience and we do not sell data. By using this website, you are giving your consent for us to set cookies: View Privacy Policy
Simplified Science Publishing, LLC
- Aug 16, 2021
Best free and paid software for scientific illustrations
The best things in life come with a free trial.
Posters. Presentations. Grants. Your papers. It’s becoming more and more essential to be able to make scientific illustrations yourself, but which software could you use to make them?
Are there free options? Should you go straight for the high-end subscriptions?
There are a lot of options out there and to make your life easier we compiled this guide.
To start, align yourself with one of these three personas to help you figure out where you might want to try first!
Student, post-doc or lab head?
Persona 1: You’re a grad student. You’ve gotten used to the writing part of academia (as you’d hope). But when it comes down to making a pretty picture for your proposal or presentation, you might be feeling stumped on how to make your figures look professional. You want to start somewhere, but most good software is really expensive (and not within the budget!)
So, a good free software might be your gateway into developing your skills in graphic design. The paid stuff can wait while you learn!
Persona 2: You’re a post doc. You’ve been invited to write an article for a highly prestigious review journal. You reckon this is finally your chance to spell out your name in FULL beyond the et al. AND to be more than just the mysterious 7th author. But the journal is asking for a handful of scientific illustrations as figures. They need high quality ones that’ll sparkle at 300 dpi when they’re printed hot off the press.
Perhaps you could try a free trial of a high-end industry software? Then convince your supervisor that the software is worth fully funding under the lab equipment budget!
Persona 3: You’re a tenured lab head. It’s grant season and don’t want to be rejected this time . You need to make figures to illustrate your point on a 2 page document, but we all know the word count is horridly small. You realise that a good figure speaks volumes - so you try to make them yourself, or end up asking your students to make them for you just before the deadline. Neither you nor they have got a clue what they could use.
Then maybe it’s worth buying a license to a trusty and reliable software for the whole team!
Figured out what you’re after? If not, no worries!
We’ll walk you through an overview of the best free and paid software for making your very own digital scientific illustrations to use anywhere in your research! It’s up to you to try them out to see which fits you best.
We’ve got 6 recommendations (3 free, 3 paid) lined up to get you started.
Let’s have a look, shall we?
Free design software
Recommended for: Persona 1: The Grad Student, and anyone with fundamental IT skills.

Looking to make a figure, but not from scratch? Canva’s got you covered.
Canva’s motto is “ Design for everyone ”. This means that even non-designers can create amazing graphics - including scientific illustrations!
You’ll first need to make an account on Canva, then you can use Canva directly in your browser.
Then you can start straight away with any of their suggested templates, and there’s a lot to choose from in the free version of Canva.
I personally like to use their Poster template, or set my own canvas up at a size I want. Then, it’s all about dragging and dropping free stock images, or “Elements” as Canva calls them, from their menus. You can use any of their provided Elements to compose your picture, and they have plenty of science-themed ones. Here’s a scientific schematic I put together in just a few minutes!

That was really easy!
But note that if you use these Elements, you can’t publish them anywhere that earns you money, so Canva’s more handy for things like presentations. It’s best to have a read of the Canva Terms of Use to be on the safe side.
If you end up loving Canva, you can optionally choose to upgrade to Canva PRO at $18.00 AUD/month (they also have a free 30 day trial of the PRO version!). This gives you access to a lot more Elements and a tonne of nifty features!
If you’re looking to make your own pictures from scratch, read on!

Recommended for: Persona 1: The Grad Student, and Persona 2: The Post Doc.

Looking to try out vector graphics for the first time, without the long-term commitment?
Vectr is completely browser-based and gives you access to the simple tools for making shapes and writing out text. It’s also equipped with basic features like adding drop shadows or making objects transparent.
It’s a great way to start learning how a Pen tool works, one of the most common tools in vector graphic design. Here’s something you can quickly whip up with the tools available to you in Vectr.

Also if you’re looking to upgrade to another vector graphic design software in the future, you can save your Vectr creations as an .svg file to edit elsewhere.
If you’re keen to upgrade your vector game, we’ve got more to discuss.
Recommended for: Everyone!

Welcome to the nitty-gritty of vector graphics, with your new best friend Inkscape. No fancy upgrades, just a full package that’s 100% free .
Inkscape gives you the ability to work with more complex vector shapes to make more detailed illustrations. You now have access to things like adjusting opacity, making 3D shapes in perspective , and a handy function you’ll see in most vector software called “clipping” , where you can combine shapes together to make new shapes.

Inkscape is downloadable for use on both Windows and MacOS. And by now, being able to save as an .svg file is pretty standard - you can take your Inkscape creations wherever you go!
There’s also a large community of Inkscapers out there being one of the more popular free choices. It’s easy enough to find a guide or tutorial to get you started.
Paid design software
Microsoft powerpoint.
Recommended for: Persona 1: The Grad Student

It needs no introductions - it’s the classic, trusty, Microsoft PowerPoint.
The good news is that you likely already own a paid license for this through your institution. Though just in case you don’t, you can purchase it for $160 AUD to keep forever. There’s also a $10 AUD/month plan for the whole Office suite , if you would much rather test out the waters.
PowerPoint is easy to use, intuitive and you’ve likely used it all throughout your education. But did you know that it has fantastic design capabilities? It’s a popular choice for making scientific posters, and we even have free templates just for this .
You’re likely familiar with the Shapes panel, and we’ve discussed previously how you can make just about anything with the right shapes . And, they’re all vector-based!

But did you know about the Icons and SmartArt tools?

The Icons panel is full of symbols and presets that are neatly categorised - and there’s tonnes of science ones. Just like Canva, you can just drag and drop them onto your workspace.
Combine those icons with the ready-made layouts in SmartArt for diagrams and flowcharts.
It’s super easy!

But wait, there’s more. Did you know that PowerPoint could make animated videos ? Surprise your reviewers with an animation for your next graphical abstract!
Hold up, what if you’re looking to upgrade from PowerPoint?
If you’re looking to go pro, we’ve got TWO industry-standard recommendations below.
Affinity Designer
Recommended for: Persona 2: The Post Doc, and Persona 3: The Lab Head

Think you’ve got the hang of the vector tools from Vectr or Inkscape? It’s time to take them to the next level in Affinity Designer.
Affinity Designer is a high-end vector graphics editing software developed by Serif available for MacOS, Windows as well as for iPads for that added portability.
You can access Affinity Designer with a one-off payment of $80 AUD - no subscriptions or anything. It’s incredible value, and there’s even a free trial to get a feel for it .
It features pretty much everything we’ve mentioned so far - a good selection of shapes and the ability to clip them, a fantastic Pen tool , intuitive text formatting. And, so SO much more! You’d just have to try it out!
Definitely, the one thing I particularly love about Affinity Designer is how fluidly it runs as a program, despite being a very intensive graphics machine. It rarely lags! Nobody wants to see program not responding before you’ve saved your work! With Affinity, there’s no worries!
Also, the unique hallmark of Affinity Designer is its handy Persona system. This allows you to preview your art for export on the fly, and is handy for checking whether your work will change depending on RGB/CMYK colour settings , changes in resolution as a raster image, and so much more.
The fewer unexpected surprises during printing the better!

Should you fall in love with Affinity Designer, it also comes as part of a set with Affinity Photo and Publisher for all your photo editing, painting and typesetting needs.
But, there’s one more piece of software we’ve got to show you, and is a top competitor with Affinity Designer.
Let’s roll out the red carpet.
Adobe Illustrator

You’ve reached the Holy Grail, and our favourite vector software here at Animate Your Science, coming straight from the industry giant Adobe .
Welcome to Adobe Illustrator.
Illustrator is an intensive vector graphics editing software package, that if used well, is capable of taking your vector art to new heights. Fully capable of generating crisp 2D art pieces, through to complete 3D renderings - there’s little that Illustrator can’t do. In fact, there’s a million ways to make the same thing in Illustrator.
Here’s something I prepared in Illustrator during my days as a researcher studying malaria parasites.

Adobe can feel overwhelming when you first open it, but there’s ways around that. With Illustrator’s customisable menus, you can help prevent that “ Whoa, this is too complex!” feeling.
You can hide the tools you don’t need, and keep the ones that you’re using to work. This is a mainstay hallmark in Adobe software called Panels - allowing you to fully control the look of your user interface. One day you might be drawing, another day you might be preparing text - there’s different preset Workspaces for different occasions.

And for those of you who loved Canva for its pre-made assets, Adobe still has you covered! With Adobe Stock Assets you have access to a huge collection of licensed vector illustrations and images. Each image comes with its own descriptive license, but chances are you’ll be able to use it anywhere you want! Check out their FAQ for this handy feature.

You can try out Illustrator today through a free trial , and when you’re ready to commit it’s available for $30 AUD/month. It’s available on MacOS, Windows + with added portability on the iPad.
If you’re loving Adobe (like we are!), you can switch to $80 AUD/month if you want access to the entire suite - which includes popular software programs including Photoshop (photo editing and painting), InDesign (document typesetting), Premiere Pro (video editing) and After Effects (animations). That’s fantastic value for such an expansive set of programs!
There’s a lot to tackle with this beast of a program, so we definitely recommend checking out a course on YouTube or SkillShare to learn the basics. Practice makes perfect!
Not looking to make your own illustrations?
You’ve got us at the ays team..
We get it, academic life is hectic and expecting you to design neat graphics might be too much. That’s why we offer design services for busy people like you.
Here at Animate Your Science, we can discuss your ideas and turn them into professional graphics that will turn heads. We’ve got you covered for all your graphical abstract, scientific infographic and scientific poster needs .
Have a custom request? Contact us to find out what we could do for your research.
To keep up to date with our latest tips for merging the worlds of science and graphic design, subscribe to our newsletter !
Until next time!
Dr Juan Miguel Balbin
Dr Tullio Rossi

Related Posts
How to design an effective graphical abstract: the ultimate guide
How to draw your research with simple scientific illustrations
Best examples of scientific posters

- Plasmids Topic Overview
- Plasmids 101
- Molecular Biology Protocols and Tips
- Plasmid Cloning
- Plasmid Elements
- Plasmid Tags
- New Plasmids at Addgene
- Other Plasmid Tools
- CRISPR Topic Overview
- Base Editing
- Cas Proteins
- CRISPR Biosafety
- CRISPR Expression Systems and Delivery Methods
- CRISPR Pooled Libraries
- CRISPR Visualize
- CRISPR gRNAs
- CRISPR Protocols and Tips
- CRISPR Therapeutic Applications
- Other CRISPR Tools
- Viral Vectors Topic Overview
- Viral Vectors 101
- Addgene’s Viral Service
- Adenoviral Vectors
- Chemogenetics
- Cell Tracing
- Neuroscience Biosensors
- Optogenetics
- Retroviral and Lentiviral Vectors
- Viral Vector Protocols and Tips
- Fluorescent Proteins Topic Overview
- Fluorescent Proteins 101
- Fluorescent Biosensors
- Fluorescent Imaging
- Generating Fusions
- Localization with Fluorescent Proteins
- Luminescence
- Non-protein Fluorophores
- Other Fluorescent Protein Tools
- Science Career Topic Overview
- Applying for Jobs
- Conferences
- Early Career Researcher
- Management for Scientists
- Mentoring for Scientists
- Professional development
- Science Career Options
- Download the Science Career Guide
- Microbiology
- Neuroscience
- Plant Biology
- Model Organisms
- Scientific Sharing
- Scientific Publishing
- Science Communication
- Using Addgene's Website
- Addgene News
Early Career Researcher Toolbox: Free Tools for Making Scientific Graphics
By Beth Kenkel
When I started writing for the Addgene blog, I was focused on writing about new scientific techniques and cool plasmids. Creating graphics were usually the last thing I thought about when writing posts. Since then I’ve realized my figures are just as important, if not more important, than my writing. Initially I didn’t have access to professional-grade design software, like Adobe Illustrator, and I didn’t want to pay for these programs either. But with a little Googling and some trial and error, I found some free design software that let me create graphics that better communicated the science in my blog posts. This post highlights several of these free tools which will hopefully also help you communicate your science, whether it’s in presentations, manuscripts, or social media.
If you want to draw your own figures
Google drawings.
Google Drawings is similar to using PowerPoint to draw figures. It’s part of Google Drive so it has a similar interface as Google Docs or other products in the suite. Since it’s web-based, you could access it from anywhere. Its ease of use is one of the reasons why this was the first program I used to create graphics for the Addgene blog. However, it has a limited number of drawing tools, so it’s harder to draw intricate figures, like a brain or a mouse.
Vectr is like a pared down version of Adobe Illustrator. There’s both a web and a desktop version of this software. Vectr has layers, which let you lock and hide individual vectors (shapes defined by 2D points connected by lines and curves) that you’ve drawn. Layers are useful for drawing figures with lots of elements. It took some playing around to figure out all the settings and tool options, but I found Vectr to be fairly intuitive and I was making figures quickly.

Inkscape is the most similar to Adobe Illustrator out of the three options for drawing your own figure discussed in this post. It’s open source and available for desktop use for Windows, Mac OS X, and Linux. Inkscape is versatile and has a wide selection of tools for drawing and editing shapes and like Vectr, Inkscape uses vector graphics. There’s a steep learning curve for Inkscape, but there are lots of resources for learning the software. The Inkscape website has many tutorials and Lynda has a tutorial as well, which you may have access to through your university or your public library.
If you want to use pre-drawn images in your figures
Biorender is like clip art for scientists. The web-based collection of over 20,000 icons is designed by professional medical illustrators with input from life scientists. It’s easy to search the collection and drag and drop an icon onto the workspace. The color and size of icons are adjustable. New icons can be requested, although there’s no guarantee Biorender will create it. Additionally, you can upload your own images to the Biorender workspace. Free Biorender accounts can store 5 workspaces at a time and workspaces are only downloadable in a small file size with a Biorender watermark, which is usually ok for informal settings like lab meeting presentations. You can download larger images without the watermark, which are better suited for publications, if you sign up for a paid account.
I’m proud to announce that @BioRender (a project my team & I have poured our hearts into for 2 yrs) has 200K+ figures by 95K+ scientists 👨🏽🔬👩🔬! We built this so you could stop struggling to make figures in PPT 🔬 Also, the base version is free, forever 💜 https://t.co/KJpyxgxeQt pic.twitter.com/Ho9SQlyUOP — Biotweeps - Maiko Kitaoka (@biotweeps) May 22, 2019
Smart Servier Medical Art
This site has 3,000 free medical images organized into four main categories: anatomy and the human body, cellular biology, medical specialities, and general items. Individual images as well as collections of images are easy to download in a .png file format. Images are under a Creative Commons 3.0 license , which requires users to give appropriate credit, provide a link to the license, and indicate if changes were made to the images. This requirement means the images are probably better suited for presentations and digital articles where it’s easier to give attribution, than for journal publications.
Google Image Search
Google image search is a great tool for searching the entire internet for scientific graphics. The tools settings let you tailor your search to particular types of images. For example, by selecting “Tools” and then clicking the “Usage rights” dropdown menu, you can search for images “Labeled for reuse with modification.” Occasionally Google Image Search results includes images that can’t be reused without attribution, despite filtering for images labeled for reuse with modification. It’s always a good idea to double-check the image’s license information before using it.
Have a tip for using one of the softwares discussed? Or know of a tool or resource not mentioned? Tell us about it in the comments section!

Additional resources on the Addgene blog
- Read our Early Career Researcher Toolbox blog post on social media for scientists
- Find science career blog posts
- Learn about other lab software
Topics: Science Careers , Early Career Researcher
Leave a Comment
Add Comment
Sharing science just got easier... Subscribe to our blog

Follow Addgene on Social

Addgene is a nonprofit plasmid repository.
We store and distribute high-quality plasmids from your colleagues.
- Cookies & Privacy Policy
- Accessibility
- Terms of Use
How to Create Publication-Quality Figures A step-by-step guide (using free software!) Benjamin Nanes
Introduction, data don't lie, follow the formatting rules, transparency, a computer's view of the journal page, raster data vs. vector data, rasterization and resampling, color spaces, hsl, hsv, and hsb, yuv, ycbcr, and ypbpr, indexed, mapped, and named colors, preparing figure components, graphs and charts, exporting vector graphics from r, exporting vector-format charts from any other program, high-bit-depth images, lookup tables, setting the lut range, comparison to photo editing programs, multi-channel images, generating the 8-bit rgb image, ordinary images, figure layout, importing vector files, importing images, clipping masks, calculating scale bars, exporting final figure files, image compression, creating tiff images, creating eps or pdf files, the bottom line, cmyk figures, preparing raster figure components for cmyk, color conversion, author information.
So, after months (years?) of toil in the lab, you're finally ready to share your ground-breaking discovery with the world. You've collected enough data to impress even the harshest reviewers. You've tied it all together in a story so brilliant, it's sure to be one of the most cited papers of all time.
Congratulations!
But before you can submit your magnum opus to Your Favorite Journal , you have one more hurdle to cross. You have to build the figures. And they have to be "publication-quality." Those PowerPoint slides you've been showing at lab meetings? Not going to cut it.
So, what exactly do you need to do for "publication-quality" figures? The journal probably has a long and incomprehensible set of rules. They may suggest software called Photoshop or Illustrator. You may have heard of them. You may be terrified by their price tags.
But here's the good news: It is entirely possible to build publication-quality figures that will satisfy the requirements of most (if not all) journals using only software that is free and open source. This guide describes how to do it. Not only will you save money on software licenses, you'll also be able to set up a workflow that is transparent, maintains the integrity of your data, and is guaranteed to wring every possible picogram of image quality out of the journal's publication format.
Here are the software packages that will make up the core of the figure-building workflow:
R — Charts, graphs, and statistics. A steep learning curve, but absolutely worth the effort. If you're lazy though, the graph-making program that you already use is probably fine.
ImageJ — Prepare your images. Yes, the user interface is a but rough, but this is a much more appropriate tool than Photoshop. For ImageJ bundled with a large collection of useful analysis tools, try the Fiji distribution .
Inkscape — Arrange, crop, and annotate your images; bring in graphs and charts; draw diagrams; and export the final figure in whatever format the journal wants. Illustrator is the non-free alternative. Trying to do this with Photoshop is begging for trouble.
Embed and Crop Images extension for Inkscape and The PDF Shrinker — Control image compression in your final figure files.
The focus on free software is facultative rather than ideological. All of these programs are available for Windows, Mac, and Linux, which is not always the case for commercial software. Furthermore, the fact that they are non-commercial avoids both monetary and bureaucratic hassles, so you can build your figures with the same computer you use to store and analyze your data, rather than relying on shared workstations (keep backups!) . Most importantly, these tools are often better than their commercial alternatives for building figures.
First of all, this guide is not intended to be a commentary on figure design. It's an introduction to the technical issues involved in turning your experimental data into something that can be displayed on a computer monitor, smart-phone, or dead tree while preserving as much information as possible. You will still be able to produce ugly and uninformative figures, even if they are technically perfect.
So, before we dive into the details of the figure-building workflow, let's take a moment to consider what we want to accomplish. Generally speaking, we have four goals: accurately present the data, conform to the journal's formatting requirements, preserve image quality, and maintain transparency.
And neither should your figures, even unintentionally. So it's important that you understand every step that stands between your raw data and the final figure. One way to think of this is that your data undergoes a series of transformations to get from what you measure to what ends up in the journal. For example, you might start with a set of mouse weight measurements. These numbers get 'transformed' into the figure as the vertical position of points on a chart, arranged in such a way that 500g is twice as far from the chart baseline as 250g. Or, a raw immunofluorescence image (a grid of photon counts) gets transformed by the application of a lookup table into a grayscale image. Either way, exactly what each transformation entails should be clear and reproducible. Nothing in the workflow should be a magic "black box."
Following one set of formatting rules shouldn't be too hard, at least when the journal is clear about what it expects, which isn't always the case. But the trick is developing a workflow that is sufficiently flexible to handle a wide variety of formatting rules — 300dpi or 600dpi, Tiff or PostScript, margins or no margins. The general approach should be to push decisions affecting the final figure format as far back in the workflow as possible so that switching does not require rebuilding the entire figure from scratch.
Unfortunately, making sure your figures look just the way you like is one of the most difficult goals of the figure-building process. Why? Because what you give the journal is not the same thing that will end up on the website or in the PDF. Or in print, but who reads print journals these days? The final figure files you hand over to the editor will be further processed — generally through some of those magic "black boxes." Though you can't control journal-induced figure quality loss, you can make sure the files you give them are as high-quality as possible going in.
If Reviewer #3 — or some guy in a bad mood who reads your paper five years after it gets published — doesn't like what he sees, you are going to have to prove that you prepared the figure appropriately. That means the figure-building workflow must be transparent. Every intermediate step from the raw data to the final figure should be saved, and it must be clear how each step is linked. Another reason to avoid black boxes.
This workflow should accomplish each of these goals. That being said, it's not really a matter of follow-the-checklist and get perfect figures. Rather, it's about understanding exactly what you're doing to get your data from its raw form to the (electronic) journal page.
In order to understand how to get data into a presentable form, we need to consider a few details of how visual information gets represented on a computer.
There are two fundamentally different ways that visual information can be described digitally. The first is by dividing an image into a grid, and representing the color of each cell in the grid — called a pixel — with a numeric value. This is raster data , and you're probably already familiar with it. Nearly all digital pictures, from artsy landscapes captured with high-end cameras to snapshots taken by cell phones, are represented as raster data. Raster data is also called bitmap data.
The second way computers can represent images is with a set of instructions. Kind of like "draw a thin dashed red line from point A to point B, then draw a blue circle with radius r centered at point C," but with more computer-readable syntax. This is called vector data, and it's usually used for images that can be decomposed into simple lines, curves, and shapes. For example, the text you're reading right now is represented as a set of curves .
Storing visual information as raster or vector data has an important impact on how that image gets displayed at different sizes. Raster data is resolution dependent . Because there are a finite number of pixels in the image, displaying the image at a particular size results in an image with a particular resolution, usually described as dots per inch (dpi) or pixels per inch (ppi). If a raster image is displayed at too large a size for the number of pixels it contains, the resolution will be too low, and the individual pixels will be easily visible, giving the image a blocky or "pixelated" appearance.
In contrast, vector data is resolution independent . Vector images can be enlarged to any size without appearing pixelated. This is because the drawing instructions that make up the vector image do not depend on the final image size. Given the vector image instruction to draw a curve between two points, the computer will calculate as many intermediate points as are necessary for the curve to appear smooth. In a raster image a curve must be divided into pixels when the image is created, and it isn't easy to add more pixels if the image is enlarged later.
Often, raster images have a specified resolution stored separately from the pixel values (a.k.a. metadata ). This resolution metadata isn't really an integral part of the raster image, though it can be useful for conveying important information, such as the scale factor of a microscope or the physical size at which an image is intended to be printed. Similarly, vector images may use a physical coordinate system, such as inches or centimeters. However, the coordinates can be scaled by multiplication with a constant, so, as with raster images, the image data is independent of the physical units.
So, if vector data is resolution independent, why use raster data at all? It's often a question of efficiency. Vector data is great for visual data that can be broken down into simple shapes and patterns. For something like a graph or a simple line drawing, a vector-based representation is probably going to be higher quality and smaller (in terms of file size) than a raster image. However, as images get more complex, the vector representation becomes progressively less efficient. Think of it this way: As you add more shapes to an image, the number of drawing instructions needed for the vector representation also increases, while the number of pixels in the corresponding raster image can stay the same. At some point, resolution independence is no longer worth the cost in file size and processing time.
There's a second very important reason why raster data may be preferable to vector data. Many images are so complex that the simplest shapes into which they can be divided are, effectively, pixels. Consider a photograph. One could create a vector image based on outlines or simple shapes in the picture, but this would be a cartoon approximation — shading and textural details would be lost. The only way to create a vector image capturing all the data in the photograph is to create many small shapes to represent the smallest details present — pixels.
Another way to think about this is that some visual data is natively raster. In raster images from digital cameras, each pixel corresponds to the signal captured by a single photosite on the detector. (This is literally true for the camera attached to your microscope, but the full story is a bit more complicated for consumer cameras.) The camera output is pixels, not lines and curves, so it makes sense to represent the image with raster, rather than vector data.
At some point, almost all vector data gets converted into raster data through a process called rasterization . Usually this happens just before the image is sent to a display or printer, because these devices are built to display and print pixels. That's why your monitor has a screen resolution, which specifies the pixel dimensions of the display area. Because vector-format images are resolution independent, they can be rasterized onto pixel grids of any size, but once rasterized, the image is then tied to that particular pixel grid. In other words, the rasterized image contains less information than the original vector image — rasterization causes a loss of image quality.
A similar loss of image information can occur when raster images are redrawn onto a new pixel grid. This process, called resampling , almost always results in an image that is lower quality, even if the pixel dimensions of the resampled image are increased. Why? Consider an image that is originally 100px × 100px, but is resampled to 150px × 150px. The problem is that many of the pixels in the new image do not directly correspond to pixels in the old image — they lie somewhere between the locations of the old pixels. We could assign them values based on the average of the neighboring pixels, but this will tend to blur sharp edges. Alternatively, we could just duplicate some of the old pixels, but this will shift boundaries and change shapes. There are fancier algorithms too, but the point is, there is no way to exactly represent the original raster data on the new pixel grid.
The takeaway from all this is that rasterization and resampling are to be avoided whenever possible . And when, as is often the case, rasterization and resampling are required to produce an image with a particular size and resolution, rasterization and resampling should only be done once — and as the very last steps in the workflow. Once vector information has been rasterized and raster images have been resampled, any further manipulation risks unnecessary quality loss.

Whether an image is represented by raster or vector data, there are a variety of ways to store color information. Every unit of the image — pixels in raster images and shapes/lines/curves in vector images — has an associated color value. There isn't any practical way to represent the more or less infinite light wavelengths (and combinations thereof) perceived as different colors in the real world, so in the digital world, we take shortcuts. These shortcuts mean that only a finite, though generally large, number of colors are available. Different shortcuts make available slightly different sets of colors, called color spaces .
More precisely, color spaces are sets of colors, while the types of numerical color descriptions discussed below are color models . Color models are mapped onto color spaces, ideally based on widely agreed upon standards so that a particular color model value actually appears the same in all situations. Of course things are generally more complicated than that. Rarely do different computer monitors, for example, display colors exactly the same way.
The simplest color representation has no color at all, just black, white, and shades of gray. A grayscale color is just a single number. Usually, lower numbers are closer to black and higher numbers are closer to white. The range of possible numbers (shades) is determined by the bit depth , discussed later. Another name for this color model is single-channel , which comes from raster images, where each pixel stores one number per image channel .
Adding actual color means adding more numbers (a.k.a., more channels). The most common system uses three channels, and is named after the colors each of them represents: red , green , and blue . RGB is an additive color model — the desired color is created by adding together different amounts of red, green, and blue light. Red and green make yellow; red and blue make purple; green and blue make aqua; and all three together make white. Computers use RGB color almost exclusively. It's also the color model journals want to see in your final figures, the better for displaying them on readers' digital devices. This workflow builds figures using RGB color.
Another way to add color to an image is to subtract it. In subtractive color models , each channel represents a pigment absorbing a certain color. CMYK color represents a common color printing process, with cyan , magenta , yellow , and black inks (the K stands for "key"). Once upon a time, journals would ask for CMYK figures to facilitate printing, but now, when there is a print edition, the journal's production department usually handles the conversion from RGB to CMYK. If, for some reason, Your Favorite Journal insists on CMYK figures, you'll need to take a look at the appendix, which discusses some possible solutions (none very good, unfortunately). Note that since CMYK color has four channels, a CMYK raster image will be 1/3 larger than the equivalent RGB raster image. The CMYK color space also contains 1/3 more possible unique colors than the RGB color space, although in practice, RGB models usually represent a broader range of perceived colors than CMYK models.
Several related models specify colors not by adding or subtracting primary colors, but with parameters related to color perception. These generally include hue (sort of like wavelength), saturation (the precise definition varies, but some measure of color intensity), and lightness , value , or brightness (different kinds of dark/light scales). You're most likely to encounter one of these models in a color-picker dialog box, since the maps of these spaces tend to be more intuitive than RGB or CMYK. However, the colors are usually mapped directly to an RGB model.
Similar to the HSL family of color models, these models include separate brightness and hue components. The Y channel is called the luminance value, and it is basically the grayscale version of the color. The other two channels are chrominance values, different systems for specifying hue. These color models are associated with old-fashioned analog video (think pre-2009 television) and various video compression formats where some color information is discarded to reduce the video size (loss of chrominance information is less noticeable than loss of luminance information).
If an image contains relatively few colors, it's sometimes possible to save space by indexing them in a color table . Each color in the table can then be identified with a single index value or label, such as "SaddleBrown" , which your browser probably maps to RGB (139,69,19) . Spot colors are named colors used to refer to specific inks for printing rather than for subsetting the RGB color space.
The range of numbers available in a particular channel is determined by the channel's bit depth , named for the number of bits (0s and 1s) used to store each value. Images with higher bit depth can describe finer shades and colors, though at the cost of increased file size. Pixels of a 1-bit single-channel raster image can hold one of two values, 0 or 1, so the image is only black and white. Pixels of an 8-bit image hold values from 0 to 255, so the image can include black, white, and 254 shades of gray in between. Pixels of a 16-bit image hold values from 0 to 65,535. However, the 8-bit image will be eight-times the file size of the 1-bit image, and the 16-bit image will be twice the file size of the 8-bit image, assuming they all have the same pixel dimensions.
Nearly all computer monitors are built to display 3-channel 8-bit images using the RGB color model. That's (2 8 ) 3 ~ 16.77 million possible colors and shades, if you're counting. 8-bit RGB is so deeply ingrained in computer graphics, that you're relatively unlikely to encounter anything else in ordinary computer use, with the exception of 8-bit grayscale or an 8-bit single-channel color table mapped to 8-bit RGB values. 8-bit RGB is sometimes called 24-bit RGB, because 8-bits per channel × 3 channels = 24-bits total per pixel.
When a larger than 8-bit image does get produced — even the sensors in most cheap digital cameras capture images that are 10-bits per channel — it is often automatically down-sampled to 8-bit. This is fine for ordinary photos, but potentially problematic for microscopy images. That fancy camera attached to your microscope probably captures 12- to 16-bit images. One of the major challenges of building figures with these images is creating the necessary 8-bit representations of them without inadvertently hiding important information. Information will inevitably be lost, but it's important that the transformation to 8-bit is fully under your control.
You'll often see 8-bit RGB values in base-16 or hexadecimal notation for compactness. This is usually a string of 6 digits/letters, often preceded by "#" or "0x", with each character pair representing one channel. The letters "a" through "f" are used to represent "digits" 10 through 15. For example "6c" equals (16×6)+12 = 108 in base-10. " #ff9933 " is RGB (255,153,51) .
Now that we've covered the basics of how computers represent visual information, let's move on to the nuts and bolts of building a figure. We'll consider a three-step workflow: preparing individual figure components from your data, combining multiple components together in a figure, and exporting the final figure file in Your Favorite Journal 's preferred format.
Graphs and charts are obvious candidates for vector data. They're easily decomposed into shapes ( bar -chart, dot -plot), and if you have to resize them, you want all those lines and curves to stay sharp and un-pixelated. Even if you will need to submit your final figures as raster images, it makes sense to keep charts as vector drawings as long as possible to avoid quality loss from resampling.
Lots of software packages can be used to draw charts and export them as vector data, but my personal favorite is R . R is a scripting language focused on statistical computations and graphics. It's free, open-source, and has a large variety of add-on packages, including the Bioconductor packages for bioinformatics. Plus, because R is a scripting language, it's easy to customize charts, keep a complete record of how you made them, and automate otherwise repetitive tasks. I even used several R scripts to help build this website, although that's not one of its more common uses.
The downside of R's power and flexibility is a substantial helping of complexity. If you're on a deadline, you might want to skip down to the part about saving vector-format charts from other programs . Know too that the steepness of the learning curve is inversely proportional to your programming experience. That said, the ultimate payoff is well worth the initial effort. There are lots of books and websites about R — UCLA has a very nice introduction — so here we'll restrict our focus to how to take a chart you've created in R and export it in a format that can be placed into your final figures.
This section assumes a basic familiarity with R. If you want to put off learning R until later, skip down to the next section .
In R, objects called devices mediate the translation of graphical commands. Different devices are used to create on-screen displays, vector image files, and raster image files. In an R console, type ?Devices to see a list of what's available. If you don't explicitly start a device, R will start one automatically when it receives a graphics command. The default device is operating system-dependent, but it is usually an on-screen display.
The easiest device to use for exporting charts in vector format is pdf , which, as you might guess, makes PDF files. Other vector-format devices are also possible, including postscript , cairo_ps , svg , cairo_pdf , and win.metafile . They all have their strengths and weaknesses, but I've found that pdf reliably produces PDFs that are both consistently viewable on many computers and easily imported into Inkscape for layout of the final figure.
All you need to do to get PDF files of your figures is to wrap your plotting code in commands to open and close a pdf device:
And that's it. There are just a few bits to keep in mind:
Setting useDingbats = FALSE on the pdf device makes larger files, but it also prevents issues when importing some charts into Inkscape.
By default, pdf measures fonts in points (1/72 in.), but everything else in 1/96 in.
The default color space is RGB. It's possible to create a CMYK-formatted PDF, but the conversion process is not well documented.
The default page size is 7 in. × 7 in. If you need to change this, set width = X, height = Y when you open the device.
If you want to try out a different device, just replace pdf with your device of choice. Keep in mind that some devices produce raster images instead of vector images.
Don't forget to call dev.off() to close the device, or you won't be able to open your PDF.
Not all chart-making programs give you an explicit option to export charts as vector-format files such as PDF, PostScript, or EPS. If one of those options is available, use it (of the three, PDF is usually the best choice for importing into Inkscape for layout of the final figures). If not, printing the chart and setting a PDF maker as the printer will often do the trick. Don't worry if there's more on the page than just your chart, since it will be possible to pull out the chart by itself when you import it into Inkscape. To check if the resulting PDF really does contain vector data (PDFs can also contain raster images), open the file and zoom in as much as you can. If you don't see any pixels, you're all set. This method works for charts created in Excel or PowerPoint — just save the whole spreadsheet or presentation as a PDF.
Most measurement tools that produce raster data — from cameras used for immunofluorescence microscopy to X-ray detectors — don't produce images that are directly displayable on a computer screen. They produce high-bit-depth images, and including these images in figures often presents a challenge. On the one hand, the images are natively composed of raster data, so the actual pixel values have important meaning which we want to preserve. However, because they are not directly displayable, they must be downsampled before they can be included in a figure. Our goal is to transform high-resolution, high-bit-depth images to 8-bit RGB in a way that is reproducible and does not hide important information from the original data.
The process of preparing a raster image for display in a figure should be kept completely separate from image analysis and quantification, which should always be based on the original, unaltered image data . Figure preparation should also be kept separate from and downstream of processing steps intended to apply to actual measurements, such as deconvolution algorithms. It is important to save original image data along with a record of every transformation applied to derive the image displayed in a figure.
The most useful program for preparing high-bit-depth images for publication is ImageJ . It can open a very large variety of original high-bit-depth image formats which is both convenient and important for maintaining the integrity of your data. It also has useful analysis tools (many contained in the Fiji distribution), is open-source and easy to extend, and gives you complete control of the transformation to an 8-bit RGB image. While many popular photo editing programs, including Photoshop, can be used to open high-bit-depth images and convert them to 8-bit RGB, none offer the transparency and degree of control provided by ImageJ. That flexibility is important, both for preparing the highest quality presentation of your data and for ensuring that important information from your data is not inadvertently hidden.
The key to creating a figure-ready image from high-bit-depth raster data is a lookup table, or LUT for short. The LUT is a function mapping each potential value in the high-bit-depth image to a corresponding 8-bit RGB value. Suppose, for example, you have a 12-bit image, which can contain pixel values from 0 to 4,095. One LUT might map 0 to RGB (0,0,0) , 4,095 to RGB (255,255,255) , and every value in between 0 and 4,095 to the linearly interpolated RGB value between black and white. This LUT would produce a simple grayscale image. However, it's not the only possible LUT. Another LUT might map values from the 0-1,000 range specifically to the red channel – RGB (0,0,0) to RGB (255,0,0) – and values from the 1,001-4,095 range to grayscale values. The advantage of a LUT such as this is that it increases the ability to discriminate between original data values in the final figure. After all, there is no way to map 4,095 shades of gray onto 255 shades of gray without loosing some detail.
It's worth noting that whenever a high-bit-depth image is displayed on a computer monitor, there is an implicit LUT which automatically generates an 8-bit RGB image. This is because both monitors and the software controlling them are built to display 8-bit RGB values — they don't know what to do with raster data using other bit depths or color models. ImageJ is such a useful program because it deals with the LUT explicitly.
To try out different LUTs in ImageJ, open up an image – stick with a single-channel image for now – and click on the LUT button in the toolbar (alternatively, choose Image > Lookup Tables from the menu). This will show a rather large list ranging from grayscale to primary colors to plenty of more fanciful options. Just stay away from the Apply LUT button, which has the totally unhelpful function of downsampling the image to single-channel 8-bit, rather than what we want to eventually get to, 8-bit RGB. For now, just pick a LUT you like.

If for some reason you're not happy with the available choices, it is possible to create a custom LUT ( Image > Color > Edit LUT... ). Note that LUTs in ImageJ are limited to 256 possible values, with everything else determined by interpolation.
Once you've decided on a LUT, the next step is to determine the range of values on which you want it applied. It will often be the case that the interesting information in your high-bit-depth raster data is concentrated in the middle of range — in other words, very few pixels have values that are very close to zero or very close to the maximum value. Remember that it usually isn't possible to assign a unique color for every value, so when this is the case, it makes sense to focus your attention on the range containing most of the pixels.
To set the LUT range in ImageJ, you can use either of two tools: Image > Adjust > Brightness/Contrast... ( Shift-C ) or Image > Adjust > Window/Level... . The Brightness/Contrast tool lets you set the minimum and maximum pixel values which will be mapped to the extremes of the LUT. Pixels between the minimum and maximum values are assigned RGB values based on the LUT. Any pixels below the minimum or above the maximum don't disappear, but they are forced to the LUT extremes, and won't be distinguishable from each other.
The Brightness/Contrast tool also lets you set properties called "brightness" and "contrast," which are just parameters used to set the minimum and maximum pixel values indirectly. Adjusting the brightness shifts the minimum and maximum together, while adjusting contrast brings the minimum and maximum closer together or farther apart. The Window/Level tool does exactly the same thing — window is the equivalent of contrast, and level is the equivalent of brightness.
Both tools conveniently display a histogram of your image, which is a good quick check to make sure you're not hiding too much of your data below the minimum or above the maximum (to see a larger histogram, click on your image and press H ). Also with both tools, if you want to set values by typing them in rather than with sliders, click on the Set button. Avoid the Apply button, which will downsample your image and prevent further changes.
If you're familiar with photo editing programs, all of this might sound a bit familiar. These programs also let you adjust brightness and contrast, and they do accomplish more or less the same thing. The main difference is that in most photo editing programs, these commands actually transform the underlying image data. In ImageJ, they just alter the mapping function for the LUT, and no actual changes are made to the raster data until you create an 8-bit RGB image. That means that in photo editing programs, adjusting the brightness and contrast causes the loss of image information — i.e. a reduction in image quality. This loss of information will occur during the creation of the RGB image in ImageJ too, but in photo editing programs, each adjustment results in the loss of more information. Unless you are extremely disciplined and make only one adjustment, the quality of the final image will suffer. Since changing the LUT in ImageJ does not affect the original raster data, it's much easier to preserve image quality, even if you want to test out lots of different LUT settings.
Some photo editing programs also allow you to make other adjustments affecting images, such as gamma corrections or curves to transform color values. These adjustments basically just define implicit LUTs — if the input value is plotted on one axis and the output value is plotted on the other, the LUT can be visualized as a line or curve defining how the different input values are mapped to outputs. Gamma is just a way to specify a simple curve, but in principle, all sorts of funny shapes are possible. Many journals explicitly prohibit these types of image adjustments because they can sometimes hide important details from the data. The grayscale and single-color LUTs in ImageJ won't violate these prohibitions — they look like straight lines — but that doesn't mean they can't hide data if you're not careful. Remember that it simply isn't possible to show all the data in a high-bit-depth image, so set the LUT with care.

It's quite likely that many of your high-bit-depth images have more than one channel. One particularly common source of multi-channel raster data comes from immunofluorescence microscopy, where signals from multiple fluors are captured and recorded on separate channels. In the final figure, each channel can be presented as a separate RGB image, or multiple channels can be combined together in a single RGB image. Either way, each channel will need its own LUT. Note that if you want to present separate panels of each channel along with a combined "overlay" panel, it's easiest to prepare 8-bit RGB images for each individual channel and a totally separate RGB image for the combined panel, rather than trying to create the combined panel from the individual channel RGB images.
To separate a multi-channel image into several single-channel images in ImageJ, use the Image > Color > Split Channels command. Each resulting single-channel image can then be assigned a LUT and range as described above. To set LUTs and ranges on a multi-channel image, just use the c slider along the bottom of the image to select which channel you want to deal with. Changes from the LUT menu or the Brightness/Contrast tool will apply to that channel. A helpful tool accessible from Images > Color > Channels Tool... or pressing Shift-Z can be used to temporarily hide certain channels — choose Color from the drop-down menu to view only the currently selected channel or Grayscale to view it using a generic grayscale LUT. If you want to combine several single-channel images into a multi-channel image, use the Image > Color > Merge Channels... command.
When setting LUTs for a multi-channel image, keep in mind that the resulting RGB value for any given pixel will be the sum of the RGB values assigned to that pixel by the LUTs for each channel. So, for example, in a two-channel image, if a pixel gets RGB (100,50,0) from one LUT and RGB (50,75,10) from the other LUT, the final value will be RGB (150,125,10) . Remember that the maximum value in 8-bit RGB is 255. If adding values from multiple LUTs exceeds that, the result will still be stuck at 255.
A good way to avoid the possibility of exceeding the maximum 8-bit value of 255 in two- or three- channel images is to make sure that each LUT is orthogonal , or restricted to separate RGB color components. For a three-channel image, this means one LUT assigning shades of red, the second assigning shades of green, and the third assigning shades of blue. For two-channel images there are many possibilities. A good choice is to use shades of green ( RGB (0,255,0) ) and shades of magenta ( RGB (255,0,255) ), since green tends to be perceived as brighter than blue or red individually. It's also helpful for the not-insignificant number of people who are red-green colorblind.
Strictly speaking, LUTs are orthogonal if (1) they can be defined as vectors in the color model coordinate space; and (2) the dot products of each pair of LUTs equal zero. Under this definition, orthogonal LUTs don't necessarily guarantee that final RGB component values larger than 255 can be avoided. Consider three LUTs mapping minimum values to RGB (0,0,0) and maximum values to RGB (0,255,255) , RGB (255,0,255) , and RGB (255,255,0) . These vectors are at right-angles in RGB space, but it's easy to see that sums on any of the RGB coordinates could exceed 255. However, if the LUTs are orthogonal and the sum of their maxima does not exceed 255 on any axis, then any set of LUT coordinates specifies a unique point in RGB space. If these conditions are not met, some RGB colors may result from multiple different combinations of LUT axis coordinates, introducing ambiguity. As you may have guessed, it is not possible to have more than three orthogonal LUTs in an RGB color model.
Once you have assigned LUTs and set their ranges to your satisfaction, generating an 8-bit RGB image is easy. Just choose Image > Type > RGB Color from the menu. This will generate a brand new 8-bit RGB image representation of your original high-bit-depth raster data. If you have a single-channel image and used a grayscale LUT, you can save file space by making a single-channel 8-bit image instead of an RGB image: Image > Type > 8-bit . Be careful with this option though, since it changes the current file rather than creating a new one. Just use Save As instead of Save , and you'll be fine. For both RGB and grayscale images, be sure to avoid quality-degrading image compression when you save the file. Avoid Jpeg at all costs. Both Tiff and PNG are safe choices. Note that there's no need to worry about cropping the image at this stage. It's easier to do that later, when preparing the figure layout.
Be careful not to overwrite your original high-bit-depth image file with the 8-bit RGB image. It's best to think of this as creating a totally new representation of your original data, not applying an adjustment on top of the original image.
If you used a LUT other than grayscale or shades of a simple color, your readers might find it helpful to see a LUT scale bar in the final figure. To make a scale image that can be included in the figure layout, choose File > New > Image... from the menu. Set Type: to 8-bit , Fill With: to Ramp , Width to 256, and height to 1. Clicking Ok will give you a long, thin gradient image. Don't worry that it's only one pixel thick — you'll be able to stretch it later. Select the LUT for which you want to create a scale, set the image type to RGB Color , save the image, and you've got your LUT scale bar.
Some pictures are just pictures — for example, pictures taken with ordinary digital cameras. There's no direct quantitative relationship between the pixel values and your measurements, and the images are 8-bit RGB format to begin with. These images can be included in figures as they are, without the process of setting LUTs. And generally, that's exactly the best thing to do. However, if you decide that the image does need some sort of processing, such as conversion to grayscale to save money on page charges or color correction to compensate for poorly set white-balance, try to do all the adjustment you need in one transformation, since each individual transformation can reduce image quality. Also, keep a copy of the original image file, both because it's the original data, and so if (when) you later decide you don't like the transformed image, you can apply a different transformation to the original image and avoid more quality loss than is absolutely necessary. As with high-bit-depth images, there's no need to worry about cropping ordinary images just yet.
Now that we have the individual components for a figure, it's time to put them all together. The workflow discussed here uses Inkscape , a very flexible (and free) vector graphics editor. The most commonly used non-free alternative to Inkscape is Adobe Illustrator. While it is sometimes possible to create figures using Photoshop, it's generally a bad idea. Why? Because Photoshop is designed to deal primarily with raster data. While it does have limited support for some types of vector data, everything is still tied to a single pixel grid. This means that, unless you are extremely careful, every image component imported into the figure will be resampled, probably multiple times, and most vector components will be rasterized, potentially resulting in significant quality loss. Every manipulation, including scaling, rotating, and even just moving figure components in Photoshop requires resampling. While the changes can be subtle, quality loss from resampling operations is additive — the more operations, the worse the final image will look.
Inkscape, on the other hand, is geared toward vector data and has no document-defined pixel grid. Raster images can be imported into Inkscape as objects that can be positioned, stretched, rotated, and cropped repeatedly, all without resampling. This makes Inkscape a great tool for combining both vector and raster components together in one document — exactly what we need to create a figure layout. There are plenty of general tutorials available on the Inkscape website , so we'll restrict our focus to important tasks related to the figure-building workflow.
Before starting on the figure layout, it's helpful to set a few basic document properties ( File > Document Properties... ). Note that all of these settings can be changed later without affecting your figure:
The Page tab sets page size and default units. Page size is mostly a convenience feature — the page boundaries won't actually show up in the final figure file — but it can be matched to your journal's figure size limits.
Default units sets the units shown on the page rulers as well as the default units choice in most option panels. Inches and centimeters are probably self-explanatory. pt means PostScript points (1/72 in.), and pc means picas (12 points). px isn't really pixels — this isn't a raster document — it means 1/90 in.
The Grid tab can be used to create a grid for aligning objects on the page. Toggle display of the grid by pressing # . Snapping to the grid or other objects can be controlled by the buttons on the snapping toolbar, usually displayed at the right of the window.
The file format used by Inkscape is called SVG, which is short for scalable vector graphics, a perfectly accurate, if generic, description of what the file format contains. SVG is a text-based markup language for representing vector graphics. That means you can open up an SVG file in a text editor and see the individual instructions describing how to draw the image, or even write an SVG file entirely by hand. It also means that developing software to manipulate SVG files is pretty easy. Additionally, SVG is a Web standard , so most modern browsers can be used to view SVG files — many of the figures on this page are SVG. When displayed in the browser, one SVG pixel (1/90 in.) does equal one HTML pixel.
Inkscape is able to import many vector-format file types, but the most reliable is PDF. For some file types, such as PostScript (.ps), EPS, WMF, EMF, and Adobe Illustrator (.ai), Inkscape can correctly recognize most, but not all, features of the file. Inkscape can open SVG files, of course, but SVG files created by other programs sometimes cause problems. PDF import usually goes smoothly, which is all the more useful since many programs can save PDF files. Multi-page PDFs can also be imported, though only one page at a time.
The easiest way to import a vector-format file is just to open it ( File > Open... ). Some imported files can be difficult to work with because their objects are bound together in redundant groups. To undo these, do Edit > Select All followed by a few repetitions of Object > Ungroup . Then just copy the imported vector objects, or a subset of them, and paste them into your figure. Note that the imported objects become part of the figure SVG file. Changing the imported file later won't affect the figure, so if you regenerate a chart PDF, you'll have to delete the old version in the figure SVG and import the chart PDF again.
The upside to having the imported vector data included as objects in the SVG file is that they're completely editable. That means it's possible to change things like fill colors and line widths, which can go a long way to creating a unified look for your figures, even if you're including charts created in several different programs. Editing imported text, however, may not be possible, especially if the imported file used a font which is not available on your computer.
To import an image file into your figure, choose File > Import... from the menu, or just drag in the file from a file manager. This should be either an 8-bit grayscale image or an 8-bit RGB image. Inkscape will let you choose whether to embed the image or to link it. Selecting embed will write the actual image data into the SVG file. On the other hand, selecting link will store only a reference to the location of the image file on your computer. Linking the image is a better option for two reasons. First, it will keep your SVG file nice and small, even if it contains many large images. Second, if the linked image is changed — if, for example, you go back and generate a new 8-bit RGB file using different LUTs — the changes are automatically reflected in the SVG. The downside is that if the location of the image file is changed, the link will need to be updated (which can be done by right-clicking on the image and selecting Image Properties ).
When first imported, the image is likely to be quite large, since Inkscape will size the image to be 90dpi by default. The image can be scaled to a more appropriate size, of course, though take care not to inadvertently scale the width and height separately. Some journals have rules stipulating a minimum resolution for images. To calculate the resolution of an image within the figure, just divide the width or height of the image in pixels (the real pixels in the raster image, not Inkscape "pixels" – opening the image in ImageJ is a good way to get the dimensions) by the width or height of the image in Inkscape. Alternatively, if you've scaled the image by a certain percentage after importing it, divide 9,000 by that percentage to get the resulting resolution.
To crop an image (or any object) in Inkscape, add a clipping mask , which is any other path or shape used to define the displayable boundaries of the image. The clipping mask just hides the parts of the image outside its boundaries — it won't actually remove any data. So if you decide you want to go back and change how you've cropped an image, it's easy to do so.
To create a clipping mask, first draw a shape to define the clipping mask's boundaries. A rectangle is usually most convenient, but any closed path will do. Position the shape on top of the image that should be cropped. Don't worry about the color and line style of the shape — it will be made invisible. Then select both the image and the clip path (hold Shift and click on both), right-click on the path, and choose Set Clip from the menu. The parts of the image outside the path should disappear. To remove a clipping mask from and image, just right-click on it and choose Release Clip from the menu.
Use the widget below to calculate scale bar lengths for a microscopy image. Use the width or height of the entire image before the addition of a clipping path. The scale factor will depend on your microscope, objective, camera, as well as any post-acquisition processing, such as deconvolution. Once you have determined the appropriate size for the scale bar, draw a horizontal line starting at the left edge of the page — enable snapping to the page boundaries, use the Beizer curve tool ( Shift-F6 ), and hold Ctrl to keep the line straight. Then switch to the Edit paths by nodes tool ( F2 ) and select the node away from the page boundary. Move this node to the correct position by entering the appropriate bar size in the X position field in the toolbar at the top of the screen. Be sure that the units drop-down box is set correctly. Now the line will be exactly the right length for a scale bar, and it can be styled (thickness, color, etc.) and positioned however you like.
This method for creating scale bars probably seems convoluted, but it's better than using a scale bar drawn onto the raster image by the microscope capture software. The precision of scale bars drawn onto the raster image is limited by the inability to draw the end of a line in the middle of a pixel. The precision of scale bars drawn in Inkscape is limited only by the precision of the calculations.
Is the layout of your Nobel-prize-worthy figure complete? Then it's time to export a file that can be shared with the world. We'll discuss two ways to export a final figure, at least one of which should satisfy Your Favorite Journal 's production department — creating high-resolution Tiff images and creating EPS or PDF files.
Inkscape's handling of image compression is a bit opaque. This section outlines what you need to do to make sure image compression occurs on your terms. Some of the steps here are non-reversible, so it's a good idea to save your figure as a separate SVG file before you proceed.
By default, Inkscape applies Jpeg compression to linked Tiff images as they are imported. The linked image file itself isn't affected, but the version of the image that Inkscape stores in the computer's memory and uses to render the document is. This means that everything Inkscape does with the image — including on-screen display and export in any format, even if the export format does not use image compression — will contain compression artifacts. You may have noticed that some of your imported images do not look quite the same as they did in ImageJ. The way to avoid compression artifacts is to embed the images as the last step before exporting the final figure file.
To embed all the linked images in their entirety, choose Extensions > Images > Embed Images... from the menu. Note that this command alters the SVG file, so if you save it, be careful not to overwrite your SVG file with linked images! One potential drawback to this approach is that even parts of images that are hidden by clipping masks are embedded in the file. This won't matter at all for creating a final Tiff image, but if you want to export the final figure as an EPS or PDF file, including all of the image data, rather than just the visible image data, can seriously inflate the file size. To help deal with this issue, I've created an Inkscape extension that will crop images before embedding them in the SVG document. You can find instructions for downloading and installing the extension here . Once the extension is installed, you can run it by clicking Extensions > Images > Embed and crop images . Note that as of now, only rectangle-based clipping masks are supported. The extension includes the option to apply jpeg compression, but we want to avoid compression at this stage, so select PNG for the image encoding type. As with the Embed Images... command, this extension is destructive, so take care not to overwrite your original file.
Creating a Tiff image requires rasterization of all the vector data in the figure, but as long as this is the last step of the workflow, quality loss can be kept to a minimum. Unfortunately, Inkscape will not export Tiff images directly, so we'll have to export a PNG image then convert it to Tiff using ImageJ. PNG images don't include compression that will result in image quality loss, so the only trouble this causes is the need for a few more clicks.
To export a PNG image of your figure, select File > Export Bitmap... or press Shift-Ctrl-E . Select either Page or Drawing as the export area, depending on whether or not you want to include any whitespace around the page boundaries (the former will, the latter will not). Use the pixels at box to set the image resolution to at least 600 dpi, or the minimum resolution specified by the journal. Then enter a filename and select Export . To convert the PNG file to a Tiff, just open it in ImageJ and do File > Save As > Tiff... .
Creating EPS or PDF files is even easier. Just do File > Save As... and select either Encapsulated PostScript (*.eps) or Portable Document Format (*.pdf) from the Save as type: list. And that's it!
Unless, that is, the journal does not want full-resolution figure files for the initial submission, but wants a limited size PDF instead. The PDFs exported directly from Inkscape are almost certain to be too large, because the images they contain are uncompressed — exactly what you want to send to the printer, but not too convenient for emailing to reviewers. Note that even if you linked or embedded Jpeg images in the SVG file, the resulting PDF will still contain uncompressed images. The solution is to create a full-resolution PDF, then apply compression to the images within it. The PDF Shrinker makes this easy.
Skipped to the bottom because you didn't want to read the whole thing, or looking for a recap? Here's the four-point summary:
Prepare your charts and graphs in vector format;
Use ImageJ to apply lookup tables to your high-bit-depth images to create 8-bit RGB images you can include in the figure;
Layout the vector and raster components of your figure using Inkscape; and
Export the a final file in the format requested by Your Favorite Journal .
Approaching figure-building using this workflow pushes all the format-specific steps to the very end, so if you change your mind about where you want to submit the paper, you shouldn't have to rebuild the figures from scratch — just re-export files in the new format. Also, this workflow avoids rasterization and resampling whenever possible. In fact, if the final figures are PDF or EPS files, rasterization and resampling can be avoided completely. Even though the journal's production department will likely resample and compress your figures anyway, submitting the highest quality images possible can minimize the damage.
Publication-quality figures? Check . Transparent path from your raw data to the final figure? Check . All done with zero impact on your budget? Check . Go spend the money on another experiment instead.
There are some journals that still insist you give them figures using a CMYK color model. This doesn't make much sense — far more people will see your paper on a screen (native RGB) than on the printed page. Still, rules are rules. If you encounter such a situation, there are four options:
Switch from Inkscape to Adobe Illustrator, which has much better support for CMYK color;
Complete the standard RGB workflow, export a Tiff with RGB color, then convert it to a CMYK Tiff as the last step;
Complete the standard RGB workflow, export a PDF or EPS file with RGB color, then convert it to CMYK; and
Ignore the rule and submit your figures as RGB.
Before deciding which approach to take, it's worth considering what sort of graphical elements are in your figures, and how converting to CMYK is likely to affect them. Also consider whether or not preserving vector-format information in your final figures is important, since converting the color space of a Tiff image (option 2) is likely to be considerably easier than converting the color space of a PDF or EPS file (option 3).
For raster components that already have an 8-bit RGB color model — for example, images from digital cameras and scanners — it's best to leave them as is rather than trying to convert them before completing the figure layout. The rational for this is similar to the rational for avoiding resampling operations. Color space transformations potentially involve loss of information. If they are required, they should only be done once, and as late in the workflow as possible.
For raster data that does not have a natively associated color model, but to which a color model is applied when preparing an image component for the figure — for example, immunofluorescence images — the situation is a bit more complicated. CMYK colors are not additive like RGB, so creating multi-channel overlay images is not so simple. It can be accomplished by importing each channel as a separate layer in Photoshop and coloring each layer separately, but there is no widely accepted way to do it. Further confusing matters, the pixel values in CMYK are backward compared to RGB — 0 is lots of pigment and 255 is no pigment. The safest option is to prepare the figure components as 8-bit RGB, then handle the conversion later. Unfortunately, once the images are converted to CMYK, there will no longer be a straightforward linear relationship between the CMYK pixel values and the original raster data.
Color space conversions are determined by color profiles (ICC profiles) , which specify the relationship between an image file or device color space and a standard color space. If an image file and a device both have an associated color profile, color values in the image can be matched to appropriate color values on the device based on transformations through the two profiles. Color profiles can also be used to specify transformations between different document color models (RGB to CMYK or vice versa ). Standard color profiles often associated with RGB images are "sRGB" and "Adobe RGB (1998)". A standard color profile often associated with CMYK images is "U.S. Web Coated (SWOP) v2." Note that unless your monitor is both calibrated and associated with its own color profile, CMYK colors you see (as implicitly converted back to RGB) might not be the most faithful representation of the CMYK colors that will be printed.
To create a CMYK figure layout in Illustrator, set the document color space to CMYK and, for PDF export, set a destination CMYK color profile. It should also be possible to use Illustrator to convert RGB format EPS or PDF files to CMYK, though it may be necessary to convert each element in the figure separately, rather than simply changing the document format. Refer to the Illustrator documentation for more details. RGB Tiff files (and most other raster image formats) can be converted to CMYK in Adobe Photoshop (do Image > Mode > CMYK Color ). A free software alternative is GIMP with the Separate+ plugin.
Note that the extremes of RGB color space — especially bright greens and blues — don't translate well into CMYK. If you are planning on using CMYK output and have high-bit-depth images, it may be best to avoid LUTs based on shades of green or blue. Alternatively, applying gamma transformations on the cyan and yellow channels after color conversion may improve the appearance of greens and blues in the final CMYK figures. Keep in mind though, each color conversion or transformation you add will degrade the final image quality.
Benjamin Nanes, MD, PhD UT Southwestern Medical Center Dallas, Texas
Web: https://b.nanes.org
Github: bnanes
View the latest institution tables
View the latest country/territory tables
3 ways to make your scientific images accurate, informative and accessible
It’s all in the detail, from colour choice to how methods are documented, and everything in between.

Coloured scanning electron micrograph of cancellous (spongy) bone from a starling's skull. Including key information in a paper about how microscopy images were produced, for example, the make and model of the microscope, is important for reproducibility. Credit: STEVE GSCHMEISSNER/SCIENCE PHOTO LIBRARY/Getty images
It’s all in the detail, from colour choice to how methods are documented, and everything in between.
8 February 2021
STEVE GSCHMEISSNER/SCIENCE PHOTO LIBRARY/Getty images
Coloured scanning electron micrograph of cancellous (spongy) bone from a starling's skull. Including key information in a paper about how microscopy images were produced, for example, the make and model of the microscope, is important for reproducibility.
Skilfully crafted scientific illustrations, figures and graphs can make a paper more accessible to members of the public and the research community.
When supported by the right tools, these visual elements are an important way to present complex information such as statistical modelling and¬ biological systems.
Here, three researchers share their advice on how to create sci¬entific figures that are both accurate and engaging.
1. Use an image-processing workflow
Through her experience teaching visual communication to PhD students and postdoc researchers, Helen Jambor, a biologist at the Dresden Technical University in Germany, says many lack sufficient training in preparing visualizations and charts for publication.
An image-processing workflow is a valuable way to ensure there is consistency across multiple files, that the images are protected through back-ups and safe transfers, and that the most relevant information is drawn out in the images, whether through manipulations such as cropping and filtering.
In 2020, Jambor and her colleague Christopher Schmied, a bioimage analyst at the Leibniz Institute for Molecular Pharmacology in Berlin, published a step-by-step image-processing workflow for researchers:

“I see our workflow as an easy-to-use ‘cheat sheet’ for learning the principles behind creating scientific figures and how to implement them with commonly used, free image-processing software, such as FIJI/ImageJ,” says Jambor.
2. Be mindful of colour choice
When Shyam Saladi was teaching a class for undergraduates, it dawned on him that rainbow colour maps are the default method for visualizing biological structures.
Also used in fields such as geosciences and physics, colour maps take a set of numbers and convert them to corresponding colours to make it easier for the reader take in a lot of information at once.
Researchers such as Saladi, a biophysicist at the California University of Technology (CalTech) in Pasadena, California, are questioning the use of popular rainbow colour maps such as Jet, which uses the full spectrum of colours to represent continuous numerical data or scale.
According to Saladi, rainbow colour maps can lead to misinterpretation because of how people perceive different colours.
For instance, humans are naturally attracted to bright colours , such as yellow and red. Some audiences may perceive areas represented by those colours as being more significant than areas in more muted or darker colours, such as blue and purple. Or, due to stark differences in colour, they may perceive greater variations in the data values represented than actually exist.
Not only is there a risk of misrepresenting the data through the use of rainbow colour maps, but they can pose problems for people with colourblindness, if they have trouble differentiating reds and greens, for example.
The example below, published in a Nature Communications paper led by Fabio Crameri from the Centre for Earth Evolution and Dynamics at the University of Oslo in Norway, compares an image that has data expressed in a rainbow (Jet) colour map and batlow, described as a “scientifically derived” colour map because it has been designed to more intuitively and inclusively represent data.
Crameri and his colleagues favour colour maps like batlow that are perceptually uniform, meaning equal steps in data can be perceived as equal steps in colour changes. In a rainbow spectrum, for instance, humans tend to notice the transition from yellow to green more than they notice a transition through the green part of the spectrum.
In the example below, it’s clear that the rainbow colour map has distorted the images of Marie Curie, the apple, and the globe, because we can directly compare them to the originals. Certain features in red, such as Curie’s forehead and the right side of her face, and the bite in the apple, become dominant, because red is more noticeable than blue, and the transition from yellow to red is striking.

Here’s another example, published on the European Geosciences Journal blog by Crameri, comparing a rainbow colour map with more perceptually uniform colour maps:

To give researchers access to more accurate and inclusive colour palettes such as batlow, Saladi and his colleagues at CalTech created open-source plugins that researchers can download and run on their preferred image-processing software.
3. Document your experimental methods carefully
An important part of ensuring the reproducibility of a paper is documenting the processes used to produce microscopy images. According to Guillermo Marqués, scientific director at the University of Minnesota’s Imaging Centers in Minneapolis, many papers do not contain adequate information regarding microscopy experiments. This hinders reproducibility.
“This can lead to wasted time and resources in figuring out how the experiment was done,” says Marqués.
Marqués and his team have developed a free tool that processes detailed information about how the image was captured from the image file itself. The tool, called MethodsJ, extracts metadata, such as the microscope model, objective lens magnification, and exposure time from a light microscopy image, and generates text that can be used in the ‘materials and methods’ section of an article.
A new version, called MethodsJ2, is under development by a larger international collaboration, and will offer options for researchers to manually add missing imaging information the microscope cannot generate.
Marqués also recommends that researchers take initiative in developing and following publishing standards for all types of scientific images.
Resources such as QUAREP-LiMi , which runs an international working group of light microscopists from academia and industry who aim to establish new microscopy publishing standards, and the BioImaging North America group, a network of optical imaging scientists, students, and innovators who are working to improve image rigour and reproducibility, are good starting points, he says.

How to make multi-panel figures for scientific articles and journals using PowerPoint
For a case report I was writing, I had to figure out how to make multi-panel figures. You know, one large figure divided into grids with parts A, B, C, D and so on, sometimes with arrows and annotations as well?
I thought this was the job of the journal’s editor, but it wasn’t.
To my surprise and frustration, information on how to make these was almost non-existent (and complicated) on the Internet.
Here’s a simple way I figured (no pun intended) using Microsoft PowerPoint. I thought I’d write about some tips I found useful for all of you novice academic writers out there.
Tip #1 – Increase the size of your PowerPoint “slide”
Since we’re making figures for the final print version, it requires more pixels (higher resolution) than if it were to be displayed on screens or webpages.
Increase the size of your “slide” to make sure the final image quality is high enough for print.
- In PowerPoint, go to the Design tab > Customise > Slide Size > Custom Slide Size
- The largest slide size is A3, so I chose that to start with. Adjust the slide size as you see fit.
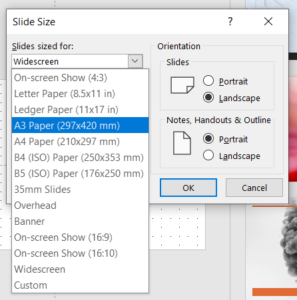
- Add your images and arrange them according to your desired layout.
- You’ll need high resolution source pictures.
Tip #2 – Use Grid and Guides to align your images
- Right click on a blank space, select all of these – Guides , Smart Guides , Gridlines
- Your images and annotations will be aligned neatly and automatically when you move and resize them.
- See all the red lines and arrows when I tried to adjust figure A? PowerPoint automatically detects what else is on your slide and tells you the relationship with other images and borders.
- The same goes for annotations (letters, text) and arrows and lines.
Tip #3 – Image size
- Make sure the images on your “slide” are full size to avoid degraded image quality (remember, it will ultimately be in print)
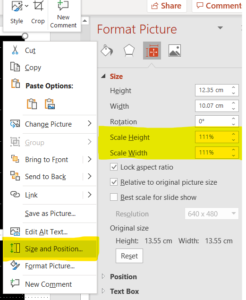
Tip #4 – Export the slide to get your final image
- Use PNG or TIFF
- Please don’t use JPEG. They’re too compressed and will degrade your final image quality
Here you go!
This sums up what I learnt when I was figuring out how to make multi-panel images. Hope this is helpful, and thank you all who took the time to read this post!
Maybe pay a visit to my ResearchGate profile as well?
- https://www.researchgate.net/profile/Ben_Hau
Loading metrics
Open Access
Peer-reviewed
Meta-Research Article
Meta-Research Articles feature data-driven examinations of the methods, reporting, verification, and evaluation of scientific research.
See Journal Information »
Creating clear and informative image-based figures for scientific publications
Roles Conceptualization, Investigation, Methodology, Resources, Visualization, Writing – original draft, Writing – review & editing
¶ ‡ These authors share first authorship on this work.
Affiliation Mildred Scheel Early Career Center, Medical Faculty, Technische Universität Dresden, Dresden, Germany
Roles Data curation, Formal analysis, Investigation, Methodology, Visualization, Writing – review & editing
Affiliations Department of Electronics, Information and Bioengineering, Politecnico di Milano, Italy, Department of Brain and Behavioral Sciences, University of Pavia, Pavia, Italy
Roles Investigation, Methodology, Writing – review & editing
Affiliation Orthogonal Research and Education Laboratory, Champaign, IL, United States of America
Affiliation Evolutionary Genomics Unit, Okinawa Institute of Science and Technology, Okinawa, Japan
Roles Investigation, Methodology, Resources, Writing – review & editing
Affiliation Department of Plant Physiology, Faculty of Biology, Technische Universität Dresden, Dresden, Germany
Affiliations Max Plank Institute of Immunology and Epigenetics, Freiburg, Germany, Hubrecht Institute, Utrecht, the Netherlands
Affiliation Carl R Woese Institute for Genomic Biology, University of Illinois at Urbana-Champaign, Urbana, IL, United States of America
Roles Investigation, Methodology, Resources, Visualization, Writing – review & editing
Affiliation Junior Research Group Evolution of Microbial Interactions, Leibniz Institute for Natural Product Research and Infection Biology—Hans Knöll Institute (HKI), Jena, Germany
Affiliations CIBIO/InBIO, Centro de Investigação em Biodiversidade e Recursos Genéticos, Campus Agrário de Vairão, Universidade do Porto, Vairão, Portugal, Departamento de Biologia, Faculdade de Ciências, Universidade do Porto, Porto, Portugal
Affiliations The Hormel Institute, University of Minnesota, Austin, MN, United States of America, The Masonic Cancer Center, University of Minnesota, Minneapolis, MN, United States of America
Affiliation Aarhus University, Aarhus, Denmark
Affiliations Neuroscience Research Center, Charité—Universitätsmedizin Berlin, Corporate member of Freie Universität Berlin, Humboldt—Universität zu Berlin, Berlin Institute of Health, Berlin, Germany, Einstein Center for Neurosciences Berlin, Berlin, Germany
Affiliation Section of Plant Biology, School of Integrative Plant Science, Cornell University, Ithaca, NY, United States of America
Affiliation Gastroenterology and Hepatology Unit, Internal Medicine Department, Faculty of Medicine, University of Zagazig, Zagazig, Egypt
Affiliation Institute for Computational Medicine and the Department of Biomedical Engineering, Johns Hopkins University, Baltimore, MD, United States of America
Affiliation National Centre for Biological Sciences (NCBS), Tata Institute of Fundamental Research (TIFR), Bangalore, Karnataka, India
Affiliation Department of Molecular Biology and Genetics, Cornell University, Ithaca, NY, United States of America
- [ ... ],
Roles Conceptualization, Data curation, Investigation, Methodology, Project administration, Resources, Supervision, Validation, Visualization, Writing – original draft, Writing – review & editing
* E-mail: [email protected]
Affiliation Berlin Institute of Health at Charité–Universitätsmedizin Berlin, QUEST Center, Berlin, Germany
- [ view all ]
- [ view less ]
- Helena Jambor,
- Alberto Antonietti,
- Bradly Alicea,
- Tracy L. Audisio,
- Susann Auer,
- Vivek Bhardwaj,
- Steven J. Burgess,
- Iuliia Ferling,
- Małgorzata Anna Gazda,
- Published: March 31, 2021
- https://doi.org/10.1371/journal.pbio.3001161
- See the preprint
- Peer Review
- Reader Comments
Scientists routinely use images to display data. Readers often examine figures first; therefore, it is important that figures are accessible to a broad audience. Many resources discuss fraudulent image manipulation and technical specifications for image acquisition; however, data on the legibility and interpretability of images are scarce. We systematically examined these factors in non-blot images published in the top 15 journals in 3 fields; plant sciences, cell biology, and physiology ( n = 580 papers). Common problems included missing scale bars, misplaced or poorly marked insets, images or labels that were not accessible to colorblind readers, and insufficient explanations of colors, labels, annotations, or the species and tissue or object depicted in the image. Papers that met all good practice criteria examined for all image-based figures were uncommon (physiology 16%, cell biology 12%, plant sciences 2%). We present detailed descriptions and visual examples to help scientists avoid common pitfalls when publishing images. Our recommendations address image magnification, scale information, insets, annotation, and color and may encourage discussion about quality standards for bioimage publishing.
Citation: Jambor H, Antonietti A, Alicea B, Audisio TL, Auer S, Bhardwaj V, et al. (2021) Creating clear and informative image-based figures for scientific publications. PLoS Biol 19(3): e3001161. https://doi.org/10.1371/journal.pbio.3001161
Academic Editor: Jason R. Swedlow, University of Dundee, UNITED KINGDOM
Received: October 19, 2020; Accepted: February 26, 2021; Published: March 31, 2021
Copyright: © 2021 Jambor et al. This is an open access article distributed under the terms of the Creative Commons Attribution License , which permits unrestricted use, distribution, and reproduction in any medium, provided the original author and source are credited.
Data Availability: The authors confirm that all data underlying the findings are fully available without restriction. The abstraction protocol, data, code and slides for teaching are available on an OSF repository ( https://doi.org/10.17605/OSF.IO/B5296 ).
Funding: TLW was funded by American Heart Association grant 16GRNT30950002 ( https://www.heart.org/en/professional/institute/grants ) and a Robert W. Fulk Career Development Award (Mayo Clinic Division of Nephrology & Hypertension; https://www.mayoclinic.org/departments-centers/nephrology-hypertension/sections/overview/ovc-20464571 ). LHH was supported by The Hormel Foundation and National Institutes of Health grant CA187035 ( https://www.nih.gov ). The funders had no role in study design, data collection and analysis, decision to publish, or preparation of the manuscript.
Competing interests: The authors have declared that no competing interests exist.
Abbreviations: GFP, green fluorescent protein; LUT, lookup table; OSF, Open Science Framework; RRID, research resource identifier
Introduction
Images are often used to share scientific data, providing the visual evidence needed to turn concepts and hypotheses into observable findings. An analysis of 8 million images from more than 650,000 papers deposited in PubMed Central revealed that 22.7% of figures were “photographs,” a category that included microscope images, diagnostic images, radiology images, and fluorescence images [ 1 ]. Cell biology was one of the most visually intensive fields, with publications containing an average of approximately 0.8 photographs per page [ 1 ]. Plant sciences papers included approximately 0.5 photographs per page [ 1 ].
While there are many resources on fraudulent image manipulation and technical requirements for image acquisition and publishing [ 2 – 4 ], data examining the quality of reporting and ease of interpretation for image-based figures are scarce. Recent evidence suggests that important methodological details about image acquisition are often missing [ 5 ]. Researchers generally receive little or no training in designing figures; yet many scientists and editors report that figures and tables are one of the first elements that they examine when reading a paper [ 6 , 7 ]. When scientists and journals share papers on social media, posts often include figures to attract interest. The PubMed search engine caters to scientists’ desire to see the data by presenting thumbnail images of all figures in the paper just below the abstract [ 8 ]. Readers can click on each image to examine the figure, without ever accessing the paper or seeing the introduction or methods. EMBO’s Source Data tool (RRID:SCR_015018) allows scientists and publishers to share or explore figures, as well as the underlying data, in a findable and machine readable fashion [ 9 ].
Image-based figures in publications are generally intended for a wide audience. This may include scientists in the same or related fields, editors, patients, educators, and grants officers. General recommendations emphasize that authors should design figures for their audience rather than themselves and that figures should be self-explanatory [ 7 ]. Despite this, figures in papers outside one’s immediate area of expertise are often difficult to interpret, marking a missed opportunity to make the research accessible to a wide audience. Stringent quality standards would also make image data more reproducible. A recent study of fMRI image data, for example, revealed that incomplete documentation and presentation of brain images led to nonreproducible results [ 10 , 11 ].
Here, we examined the quality of reporting and accessibility of image-based figures among papers published in top journals in plant sciences, cell biology, and physiology. Factors assessed include the use of scale bars, explanations of symbols and labels, clear and accurate inset markings, and transparent reporting of the object or species and tissue shown in the figure. We also examined whether images and labels were accessible to readers with the most common form of color blindness [ 12 ]. Based on our results, we provide targeted recommendations about how scientists can create informative image-based figures that are accessible to a broad audience. These recommendations may also be used to establish quality standards for images deposited in emerging image data repositories.
Using a science of science approach to investigate current practices
This study was conducted as part of a participant-guided learn-by-doing course, in which eLife Community Ambassadors from around the world worked together to design, complete, and publish a meta-research study [ 13 ]. Participants in the 2018 Ambassadors program designed the study, developed screening and abstraction protocols, and screened papers to identify eligible articles (HJ, BA, SJB, VB, LHH, VI, SS, EMW). Participants in the 2019 Ambassadors program refined the data abstraction protocol, completed data abstraction and analysis, and prepared the figures and manuscript (AA, SA, TLA, IF, MAG, HL, SYM, MO, AV, KW, HJ, TLW).
To investigate current practices in image publishing, we selected 3 diverse fields of biology to increase generalizability. For each field, we examined papers published in April 2018 in the top 15 journals, which publish original research ( S1 – S3 Tables). All full-length original research articles that contained at least one photograph, microscope image, electron microscope image, or clinical image (MRI, ultrasound, X-ray, etc.) were included in the analysis ( S1 Fig ). Blots and computer-generated images were excluded, as some of the criteria assessed do not apply to these types of images. Two independent reviewers assessed each paper, according to the detailed data abstraction protocol (see methods and information deposited on the Open Science Framework (OSF) (RRID:SCR_017419) at https://doi.org/10.17605/OSF.IO/B5296 ) [ 14 ]. The repository also includes data, code, and figures.
Image analysis
First, we confirmed that images are common in the 3 biology subfields analyzed. More than half of the original research articles in the sample contained images (plant science: 68%, cell biology: 72%, physiology: 55%). Among the 580 papers that included images, microscope images were very common in all 3 fields (61% to 88%, Fig 1A ). Photographs were very common in plant sciences (86%), but less widespread in cell biology (38%) and physiology (17%). Electron microscope images were less common in all 3 fields (11% to 19%). Clinical images, such as X-rays, MRI or ultrasound, and other types of images were rare (2% to 9%).
- PPT PowerPoint slide
- PNG larger image
- TIFF original image
(A) Microscope images and photographs were common, whereas other types of images were used less frequently. ( B) Complete scale information was missing in more than half of the papers examined. Partial scale information indicates that scale information was presented in some figures, but not others, or that the authors reported magnification rather than including scale bars on the image. ( C) Problems with labeling and describing insets are common. Totals may not be exactly 100% due to rounding.
https://doi.org/10.1371/journal.pbio.3001161.g001
Scale information is essential to interpret biological images. Approximately half of papers in physiology (49%) and cell biology (55%) and 28% of plant science papers provided scale bars with dimensions (in the figure or legend) for all images in the paper ( Fig 1B , S4 Table ). Approximately one-third of papers in each field contained incomplete scale information, such as reporting magnification or presenting scale information for a subset of images. Twenty-four percent of physiology papers, 10% of cell biology papers, and 29% of plant sciences papers contained no scale information on any image.
Some publications use insets to show the same image at 2 different scales (cell biology papers: 40%, physiology: 17%, plant sciences: 12%). In this case, the authors should indicate the position of the high-magnification inset in the low-magnification image. The majority of papers in all 3 fields clearly and accurately marked the location of all insets (53% to 70%; Fig 1C , left panel); however, one-fifth of papers appeared to have marked the location of at least one inset incorrectly (17% to 22%). Clearly visible inset markings were missing for some or all insets in 13% to 28% of papers ( Fig 1C , left panel). Approximately half of papers (43% to 53%; Fig 1C , right panel) provided legend explanations or markings on the figure to clearly show that an inset was used, whereas this information was missing for some or all insets in the remaining papers.
Many images contain information in color. We sought to determine whether color images were accessible to readers with deuteranopia, the most common form of color blindness, by using the color blindness simulator Color Oracle ( https://colororacle.org/ , RRID: SCR_018400). We evaluated only images in which the authors selected the image colors (e.g., fluorescence microscopy). Papers without any colorblind accessible figures were uncommon (3% to 6%); however, 45% of cell biology papers and 21% to 24% of physiology and plant science papers contained some images that were inaccessible to readers with deuteranopia ( Fig 2A ). Seventeen percent to 34% of papers contained color annotations that were not visible to someone with deuteranopia.
(A) While many authors are using colors and labels that are visible to colorblind readers, the data show that improvement is needed. (B) Most papers explain colors in image-based figures; however, explanations are less common for the species and tissue or object shown, and labels and annotations. Totals may not be exactly 100% due to rounding.
https://doi.org/10.1371/journal.pbio.3001161.g002
Figure legends and, less often, titles typically provide essential information needed to interpret an image. This text provides information on the specimen and details of the image, while also explaining labels and annotations used to highlight structures or colors. Fifty-seven percent of physiology papers, 48% of cell biology papers, and 20% of plant papers described the species and tissue or object shown completely. Five percent to 17% of papers did not provide any such information ( Fig 2B ). Approximately half of the papers (47% to 58%; Fig 1C , right panel) also failed or partially failed to adequately explain that insets were used. Annotations of structures were better explained. Two-thirds of papers across all 3 fields clearly stated the meaning of all image labels, while 18% to 24% of papers provided partial explanations. Most papers (73% to 83%) completely explained the image colors by stating what substance each color represented or naming the dyes or staining technique used.
Finally, we examined the number of papers that used optimal image presentation practices for all criteria assessed in the study. Twenty-eight (16%) physiology papers, 19 (12%) cell biology papers, and 6 (2%) plant sciences papers met all criteria for all image-based figures in the paper. In plant sciences and physiology, the most common problems were with scale bars, insets, and specifying in the legend the species and tissue or object shown. In cell biology, the most common problems were with insets, colorblind accessibility, and specifying in the legend the species and tissue or object shown.
Designing image-based figures: How can we improve?
Our results obtained by examining 580 papers from 3 fields provide us with unique insights into the quality of reporting and the accessibility of image-based figures. Our quantitative description of standard practices in image publication highlights opportunities to improve transparency and accessibility to readers from different backgrounds. We have therefore outlined specific actions that scientists can take when creating images, designing multipanel figures, annotating figures, and preparing figure legends.
Throughout the paper, we provide visual examples to illustrate each stage of the figure preparation process. Other elements are often omitted to focus readers’ attention on the step illustrated in the figure. For example, a figure that highlights best practices for displaying scale bars may not include annotations designed to explain key features of the image. When preparing image-based figures in scientific publications, readers should address all relevant steps in each figure. All steps described below (image cropping and insets, adding scale bars and annotation, choosing color channel appearances, figure panel layout) can be implemented with standard image processing software such as FIJI [ 15 ] (RRID:SCR_002285) and ImageJ2 [ 16 ] (RRID:SCR_003070), which are open source, free programs for bioimage analysis. A quick guide on how to do basic image processing for publications with FIJI is available in a recent cheat sheet publication [ 17 ], and a discussion forum and wiki are available for FIJI and ImageJ ( https://imagej.net/ ).
1. Choose a scale or magnification that fits your research question.
Scientists should select an image scale or magnification that allows readers to clearly see features needed to answer the research question. Fig 3A [ 18 ] shows Drosophila melanogaster at 3 different microscopic scales. The first focuses on the ovary tissue and might be used to illustrate the appearance of the tissue or show stages of development. The second focuses on a group of cells. In this example, the “egg chamber” cells show different nucleic acid distributions. The third example focuses on subcellular details in one cell, for example, to show finer detail of RNA granules or organelle shape.
(A) Magnification and display detail of images should permit readers to see features related to the main message that the image is intended to convey. This may be the organism, tissue, cell, or a subcellular level. Microscope images [ 18 ] show D . melanogaster ovary (A1), ovarian egg chamber cells (A2), and a detail in egg chamber cell nuclei (A3). (B ) Insets or zoomed-in areas are useful when 2 different scales are needed to allow readers to see essential features. It is critical to indicate the origin of the inset in the full-scale image. Poor and clear examples are shown. Example images were created based on problems observed by reviewers. Images show B1, B2, B3, B5: Protostelium aurantium amoeba fed on germlings of Aspergillus fumigatus D141-GFP (green) fungal hyphae, dead fungal material stained with propidium iodide (red), and acidic compartments of amoeba marked with LysoTracker Blue DND-22 dye (blue); B4: Lendrum-stained human lung tissue (Haraszti, Public Health Image Library); B6: fossilized Orobates pabsti [ 19 ].
https://doi.org/10.1371/journal.pbio.3001161.g003
When both low and high magnifications are necessary for one image, insets are used to show a small portion of the image at higher magnification ( Fig 3B , [ 19 ]). The inset location must be accurately marked in the low-magnification image. We observed that the inset position in the low-magnification image was missing, unclear, or incorrectly placed in approximately one-third of papers. Inset positions should be clearly marked by lines or regions of interest in a high-contrast color, usually black or white. Insets may also be explained in the figure legend. Care must be taken when preparing figures outside vector graphics suits, as insert positions may move during file saving or export.
2. Include a clearly labeled scale bar.
Scale information allows audiences to quickly understand the size of features shown in images. This is especially important for microscopic images where we have no intuitive understanding of scale. Scale information for photographs should be considered when capturing images as rulers are often placed into the frame. Our analysis revealed that 10% to 29% of papers screened failed to provide any scale information and that another third only provided incomplete scale information ( Fig 1B ). Scientists should consider the following points when displaying scale bars:
- Every image type needs a scale bar: Authors usually add scale bars to microscope images but often leave them out in photos and clinical images, possibly because these depict familiar objects such a human or plant. Missing scale bars, however, adversely affect reproducibility. A size difference of 20% in between a published study and the reader’s lab animals, for example, could impact study results by leading to an important difference in phenotype. Providing scale bars allows scientists to detect such discrepancies and may affect their interpretation of published work. Scale bars may not be a standard feature of image acquisition and processing software for clinical images. Authors may need to contact device manufacturers to determine the image size and add height and width labels.
- Scale bars and labels should be clearly visible: Short scale bars, thin scale bars, and scale bars in colors that are similar to the image color can easily be overlooked ( Fig 4 ). In multicolor images, it can be difficult to find a color that makes the scale bar stand out. Authors can solve this problem by placing the scale bar outside the image or onto a box with a more suitable background color.
- Annotate scale bar dimensions on the image: Stating the dimensions along with the scale bar allows readers to interpret the image more quickly. Despite this, dimensions were typically stated in the legend instead ( Fig 1B ), possibly a legacy of printing processes that discouraged text in images. Dimensions should be in high resolution and large enough to be legible. In our set, we came across small and/or low-resolution annotations that were illegible in electronic versions of the paper, even after zooming in. Scale bars that are visible on larger figures produced by authors may be difficult to read when the size of the figure is reduced to fit onto a journal page. Authors should carefully check page proofs to ensure that scale bars and dimensions are clearly visible.
Scale bars provide essential information about the size of objects, which orients readers and helps them to bridge the gap between the image and reality. Scales may be indicated by a known size indicator such as a human next to a tree, a coin next to a rock, or a tape measure next to a smaller structure. In microscope images, a bar of known length is included. Example images were created based on problems observed by reviewers. Poor scale bar examples (1 to 6), clear scale bar examples (7 to 12). Images 1, 4, 7: Microscope images of D . melanogaster nurse cell nuclei [ 18 ]; 2: Microscope image of Dictyostelium discoideum expressing Vps32-GFP (Vps32-green fluorescent protein shows broad signal in cells) and stained with dextran (spotted signal) after infection with conidia of Aspergillus fumigatus ; 3, 5, 8, 10: Electron microscope image of mouse pancreatic beta-islet cells (Andreas Müller); 6, 11: Microscope image of Lendrum-stained human lung tissue (Haraszti, Public Health Image Library); 9: Photo of Arabidopsis thaliana ; 12: Photograph of fossilized Orobates pabsti [ 19 ].
https://doi.org/10.1371/journal.pbio.3001161.g004
3. Use color wisely in images.
Colors in images are used to display the natural appearance of an object or to visualize features with dyes and stains. In the scientific context, adapting colors is possible and may enhance readers’ understanding, while poor color schemes may distract or mislead. Images showing the natural appearance of a subject, specimen, or staining technique (e.g., images showing plant size and appearance, or histopathology images of fat tissue from mice on different diets) are generally presented in color ( Fig 5 ). Images showing electron microscope images are captured in black and white (“grayscale”) by default and may be kept in grayscale to leverage the good contrast resulting from a full luminescence spectrum.
Shown are examples of the types of images that one might find in manuscripts in the biological or biomedical sciences: photograph, fluorescent microscope images with 1 to 3 color hues/LUT, electron microscope images. The relative visibility is assessed in a colorblind rendering for deuteranopia, and in grayscale. Grayscale images offer the most contrast (1-color microscope image) but cannot show several structures in parallel (multicolor images, color photographs). Color combinations that are not colorblind accessible were used in rows 3 and 4 to illustrate the importance of colorblind simulation tests. Scale bars are not included in this figure, as they could not be added in a nondistracting way that would not detract from the overall message of the figure. Images show: Row 1: Darth Vader being attacked, Row 2: D . melanogaster salivary glands [ 18 ], Row 3: D . melanogaster egg chambers [ 18 ], Row 4: D . melanogaster nurse cell nuclei [ 18 ], and Row 5: mouse pancreatic beta-islet cells. LUT, lookup table.
https://doi.org/10.1371/journal.pbio.3001161.g005
In some instances, scientists can choose whether to show grayscale or color images. Assigning colors may be optional, even though it is the default setting in imaging programs. When showing only one color channel, scientists may consider presenting this channel in grayscale to optimally display fine details. This may include variations in staining intensity or fine structures. When opting for color, authors should use grayscale visibility tests ( Fig 6 ) to determine whether visibility is compromised. This can occur when dark colors, such as magenta, red, or blue, are shown on a black background.
The best contrast is achieved with grayscale images or dark hues on a light background (first row). Dark color hues, such as red and blue, on a dark background (last row), are least visible. Visibility can be tested with mock grayscale. Images show actin filaments in Dictyostelium discoideum (LifeAct-GFP). All images have the same scale. GFP, green fluorescent protein.
https://doi.org/10.1371/journal.pbio.3001161.g006
4. Choose a colorblind accessible color palette.
Fluorescent images with merged color channels visualize the colocalization of different markers. While many readers find these images to be visually appealing and informative, these images are often inaccessible to colorblind coauthors, reviewers, editors, and readers. Deuteranopia, the most common form of colorblindness, affects up to 8% of men and 0.5% of women of northern European ancestry [ 12 ]. A study of articles published in top peripheral vascular disease journals revealed that 85% of papers with color maps and 58% of papers with heat maps used color palettes that were not colorblind safe [ 20 ]. We show that approximately half of cell biology papers, and one-third of physiology papers and plant science papers, contained images that were inaccessible to readers with deuteranopia. Scientists should consider the following points to ensure that images are accessible to colorblind readers.
- Select colorblind safe colors: Researchers should use colorblind safe color palettes for fluorescence and other images where color may be adjusted. Fig 7 illustrates how 4 different color combinations would look to viewers with different types of color blindness. Green and red are indistinguishable to readers with deuteranopia, whereas green and blue are indistinguishable to readers with tritanopia, a rare form of color blindness. Cyan and magenta are the best options, as these 2 colors look different to viewers with normal color vision, deuteranopia, or tritanopia. Green and magenta are also shown, as scientists often prefer to show colors close to the excitation value of the fluorescent dyes, which are often green and red.
- Display separate channels in addition to the merged image: Selecting a colorblind safe color palette becomes increasingly difficult as more colors are added. When the image includes 3 or more colors, authors are encouraged to show separate images for each channel, followed by the merged image ( Fig 8 ). Individual channels may be shown in grayscale to make it easier for readers to perceive variations in staining intensity.
- Use simulation tools to confirm that essential features are visible to colorblind viewers: Free tools, such as Color Oracle (RRID:SCR_018400), quickly simulate different forms of color blindness by adjusting the colors on the computer screen to simulate what a colorblind person would see. Scientists using FIJI (RRID:SCR002285) can select the “Simulate colorblindness” option in the “Color” menu under “Images.”
The figure illustrates how 4 possible color combinations for multichannel microscope images would appear to someone with normal color vision, the most common form of colorblindness (deuteranopia), and a rare form of color blindness (tritanopia). Some combinations that are accessible to someone with deuteranopia are not accessible to readers with tritanopia, for example, green/blue combinations. Microscope images show Dictyostelium discoideum expressing Vps32-GFP (Vps32-green fluorescent protein shows broad signal in cells) and stained with dextran (spotted signal) after infection with conidia of Aspergillus fumigatus . All images have the same scale. GFP, green fluorescent protein.
https://doi.org/10.1371/journal.pbio.3001161.g007
Images in the first row are not colorblind safe. Readers with the most common form of colorblindness would not be able to identify key features. Possible accessible solutions are shown: changing colors/LUTs to colorblind-friendly combinations, showing each channel in a separate image, showing colors in grayscale and inverting grayscale images to maximize contrast. Solutions 3 and 4 (show each channel in grayscale, or in inverted grayscale) are more informative than solutions 1 and 2. Regions of overlap are sometimes difficult to see in merged images without split channels. When splitting channels, scientists often use colors that have low contrast, as explained in Fig 6 (e.g., red or blue on black). Microscope images show D . melanogaster egg chambers (2 colors) and nurse cell nuclei (3 colors) [ 18 ]. All images of egg chambers and nurse cells respectively have the same scale. LUT, lookup table.
https://doi.org/10.1371/journal.pbio.3001161.g008
5. Design the figure.
Figures often contain more than one panel. Careful planning is needed to convey a clear message, while ensuring that all panels fit together and follow a logical order. A planning table ( Fig 9A ) helps scientists to determine what information is needed to answer the research question. The table outlines the objectives, types of visualizations required, and experimental groups that should appear in each panel. A planning table template is available on OSF [ 14 ]. After completing the planning table, scientists should sketch out the position of panels and the position of images, graphs, and titles within each panel ( Fig 9B ). Audiences read a page either from top to bottom and/or from left to right. Selecting one reading direction and arranging panels in rows or columns helps with figure planning. Using enough white space to separate rows or columns will visually guide the reader through the figure. The authors can then assemble the figure based on the draft sketch.
Planning tables and layout sketches are useful tools to efficiently design figures that address the research question. ( A) Planning tables allow scientists to select and organize elements needed to answer the research question addressed by the figure. ( B) Layout sketches allow scientists to design a logical layout for all panels listed in the planning table and ensure that there is adequate space for all images and graphs.
https://doi.org/10.1371/journal.pbio.3001161.g009
6. Annotate the figure.
Annotations with text, symbols, or lines allow readers from many different backgrounds to rapidly see essential features, interpret images, and gain insight. Unfortunately, scientists often design figures for themselves, rather than their audience [ 7 ]. Examples of annotations are shown in Fig 10 . Table 1 describes important factors to consider for each annotation type.
Text descriptions alone are often insufficient to clearly point to a structure or region in an image. Arrows and arrowheads, lines, letters, and dashed enclosures can help if overlaid on the respective part of the image. Microscope images show D . melanogaster egg chambers [ 18 ], with the different labeling techniques in use. The table provides an overview of their applicability and common pitfalls. All images have the same scale.
https://doi.org/10.1371/journal.pbio.3001161.g010
https://doi.org/10.1371/journal.pbio.3001161.t001
When adding annotations to an image, scientists should consider the following steps.
- Choose the right amount of labeling. Fig 11 shows 3 levels of annotation. The barely annotated image ( Fig 11A ) is only accessible to scientists already familiar with the object and technique, whereas the heavily annotated version ( Fig 11C ) contains numerous annotations that obstruct the image and a legend that is time consuming to interpret. Fig 11B is more readable; annotations of a few key features are shown, and the explanations appear right below the image for easy interpretation. Explanations of labels are often placed in the figure legend. Alternating between examining the figure and legend is time consuming, especially when the legend and figure are on different pages. Fig 11D shows one option for situations where extensive annotations are required to explain a complex image. An annotated image is placed as a legend next to the original image. A semitransparent white layer mutes the image to allow annotations to stand out.
- Use abbreviations cautiously: Abbreviations are commonly used for image and figure annotation to save space but inevitably require more effort from the reader. Abbreviations are often ambiguous, especially across fields. Authors should run a web search for the abbreviation [ 21 ]. If the intended meaning is not a top result, authors should refrain from using the abbreviation or clearly define the abbreviation on the figure itself, even if it is already defined elsewhere in the manuscript. Note that in Fig 11 , abbreviations have been written out below the image to reduce the number of legend entries.
- Explain colors and stains: Explanations of colors and stains were missing in around 20% of papers. Fig 12 illustrates several problematic practices observed in our dataset, as well as solutions for clearly explaining what each color represents. This figure uses fluorescence images as an example; however, we also observed many histology images in which authors did not mention which stain was used. Authors should describe how stains affect the tissue shown or use annotations to show staining patterns of specific structures. This allows readers who are unfamiliar with the stain to interpret the image.
- Ensure that annotations are accessible to colorblind readers: Confirming that labels or annotations are visible to colorblind readers is important for both color and grayscale images ( Fig 13 ). Up to one-third of papers in our dataset contained annotations or labels that would not have been visible to someone with deuteranopia. This occurred because the annotations blended in with the background (e.g., red arrows on green plants) or the authors use the same symbol in colors that are indistinguishable to someone with deuteranopia to mark different features. Fig 13 illustrates how to annotate a grayscale image so that it is accessible to color blind readers. Using text to describe colors is also problematic for colorblind readers. This problem can be alleviated by using colored symbols in the legend or by using distinctly shaped annotations such as open versus closed arrows, thin versus wide lines, or dashed versus solid lines. Color blindness simulators help in determining whether annotations are accessible to all readers.
Annotations help to orient the audience but may also obstruct parts of the image. Authors must find the right balance between too few and too many annotations. (1) Example with no annotations. Readers cannot determine what is shown. (2) Example with a few annotations to orient readers to key structures. (3) Example with many annotations, which obstruct parts of the image. The long legend below the figure is confusing. (4) Example shows a solution for situations where many annotations are needed to explain the image. An annotated version is placed next to an unannotated version of the image for comparison. The legend below the image helps readers to interpret the image, without having to refer to the figure legend. Note the different requirements for space. Electron microscope images show mouse pancreatic beta-islet cells.
https://doi.org/10.1371/journal.pbio.3001161.g011
Cells and their structures are almost all transparent. Every dye, stain, and fluorescent label therefore should be clearly explained to the audience. Labels should be colorblind safe. Large labels that stand out against the background are easy to read. Authors can make figures easier to interpret by placing the color label close to the structure; color labels should only be placed in the figure legend when this is not possible. Example images were created based on problems observed by reviewers. Microscope images show D . melanogaster egg chambers stained with the DNA dye DAPI (4′,6-diamidino-2-phenylindole) and probe for a specific mRNA species [ 18 ]. All images have the same scale.
https://doi.org/10.1371/journal.pbio.3001161.g012
(1) The annotations displayed in the first image are inaccessible to colorblind individuals, as shown with the visibility test below. This example was created based on problems observed by reviewers. (2, 3) Two colorblind safe alternative annotations, in color (2) and in grayscale (3). The bottom row shows a test rendering for deuteranopia colorblindness. Note that double-encoding of different hues and different shapes (e.g., different letters, arrow shapes, or dashed/nondashed lines) allows all audiences to interpret the annotations. Electron microscope images show mouse pancreatic beta-cell islet cells. All images have the same scale.
https://doi.org/10.1371/journal.pbio.3001161.g013
7. Prepare figure legends.
Each figure and legend are meant to be self-explanatory and should allow readers to quickly assess a paper or understand complex studies that combine different methodologies or model systems. To date, there are no guidelines for figure legends for images, as the scope and length of legends varies across journals and disciplines. Some journals require legends to include details on object, size, methodology, or sample size, while other journals require a minimalist approach and mandate that information should not be repeated in subsequent figure legends.
Our data suggest that important information needed to interpret images was regularly missing from the figure or figure legend. This includes the species and tissue type, or object shown in the figure, clear explanations of all labels, annotations and colors, and markings or legend entries denoting insets. Presenting this information on the figure itself is more efficient for the reader; however, any details that are not marked in the figure should be explained in the legend.
While not reporting species and tissue information in every figure legend may be less of an issue for papers that examine a single species and tissue, this is a major problem when a study includes many species and tissues, which may be presented in different panels of the same figure. Additionally, the scientific community is increasingly developing automated data mining tools, such as the Source Data tool, to collect and synthesize information from figures and other parts of scientific papers. Unlike humans, these tools cannot piece together information scattered throughout the paper to determine what might be shown in a particular figure panel. Even for human readers, this process wastes time. Therefore, we recommend that authors present information in a clear and accessible manner, even if some information may be repeated for studies with simple designs.
A flood of images is published every day in scientific journals and the number is continuously increasing. Of these, around 4% likely contain intentionally or accidentally duplicated images [ 3 ]. Our data show that, in addition, most papers show images that are not fully interpretable due to issues with scale markings, annotation, and/or color. This affects scientists’ ability to interpret, critique, and build upon the work of others. Images are also increasingly submitted to image archives to make image data widely accessible and permit future reanalyses. A substantial fraction of images that are neither human nor machine-readable lowers the potential impact of such archives. Based on our data examining common problems with published images, we provide a few simple recommendations, with examples illustrating good practices. We hope that these recommendations will help authors to make their published images legible and interpretable.
Limitations: While most results were consistent across the 3 subfields of biology, findings may not be generalizable to other fields. Our sample included the top 15 journals that publish original research for each field. Almost all journals were indexed in PubMed. Results may not be generalizable to journals that are unindexed, have low impact factors, or are not published in English. Data abstraction was performed manually due to the complexity of the assessments. Error rates were 5% for plant sciences, 4% for physiology, and 3% for cell biology. Our assessments focused on factors that affect readability of image-based figures in scientific publications. Future studies may include assessments of raw images and meta-data to examine factors that affect reproducibility, such as contrast settings, background filtering, and processing history.
Actions journals can take to make image-based figures more transparent and easier to interpret
The role of journals in improving the quality of reporting and accessibility of image-based figures should not be overlooked. There are several actions that journals might consider.
- Screen manuscripts for figures that are not colorblind safe: Open source automated screening tools [ 22 ] may help journals to efficiently identify common color maps that are not colorblind safe.
- Update journal policies: We encourage journal editors to update policies regarding colorblind accessibility, scale bars, and other factors outlined in this manuscript. Importantly, policy changes should be accompanied by clear plans for implementation and enforcement. Meta-research suggests that changing journal policy, without enforcement or implementation plans, has limited effects on author behavior. Amending journal policies to require authors to report research resource identifiers (RRIDs), for example, increases the number of papers reporting RRIDs by 1% [ 23 ]. In a study of life sciences articles published in Nature journals, the percentage of animal studies reporting the Landis 4 criteria (blinding, randomization, sample size calculation, exclusions) increased from 0% to 16.4% after new guidelines were released [ 24 ]. In contrast, a randomized controlled trial of animal studies submitted to PLOS ONE demonstrated that randomizing authors to complete the ARRIVE checklist during submission did not improve reporting [ 25 ]. Some improvements in reporting of confidence intervals, sample size justification, and inclusion and exclusion criteria were noted after Psychological Science introduced new policies [ 26 ], although this may have been partially due to widespread changes in the field. A joint editorial series published in the Journal of Physiology and British Journal of Pharmacology did not improve the quality of data presentation or statistical reporting [ 27 ].
- Reevaluate limits on the number of figures: Limitations on the number of figures originally stemmed from printing costs calculations, which are becoming increasingly irrelevant as scientific publishing moves online. Unintended consequences of these policies include the advent of large, multipanel figures. These figures are often especially difficult to interpret because the legend appears on a different page, or the figure combines images addressing different research questions.
- Reduce or eliminate page charges for color figures: As journals move online, policies designed to offset the increased cost of color printing are no longer needed. The added costs may incentivize authors to use grayscale in cases where color would be beneficial.
- Encourage authors to explain labels or annotations in the figure, rather than in the legend: This is more efficient for readers.
- Encourage authors to share image data in public repositories: Open data benefits authors and the scientific community [ 28 – 30 ].
How can the scientific community improve image-based figures?
The role of scientists in the community is multifaceted. As authors, scientists should familiarize themselves with guidelines and recommendations, such as ours provided above. As reviewers, scientists should ask authors to improve erroneous or uninformative image-based figures. As instructors, scientists should ensure that bioimaging and image data handling is taught during undergraduate or graduate courses, and support existing initiatives such as NEUBIAS (Network of EUropean BioImage AnalystS) [ 31 ] that aim to increase training opportunities in bioimage analysis.
Scientists are also innovators. As such, they should support emerging image data archives, which may expand to automatically source images from published figures. Repositories for other types of data are already widespread; however, the idea of image repositories has only recently gained traction [ 32 ]. Existing image databases, which are mainly used for raw image data and meta-data, include the Allen Brain Atlas, the Image Data Resource [ 33 ], and the emerging BioImage Archives [ 32 ]. Springer Nature encourages authors to submit imaging data to the Image Data Resource [ 33 ]. While scientists have called for common quality standards for archived images and meta-data [ 32 ], such standards have not been defined, implemented, or taught. Examining standard practices for reporting images in scientific publications, as outlined here, is one strategy for establishing common quality standards.
In the future, it is possible that each image published electronically in a journal or submitted to an image data repository will follow good practice guidelines and will be accompanied by expanded “meta-data” or “alt-text/attribute” files. Alt-text is already published in html to provide context if an image cannot be accessed (e.g., by blind readers). Similarly, images in online articles and deposited in archives could contain essential information in a standardized format. The information could include the main objective of the figure, specimen information, ideally with RRID [ 34 ], specimen manipulation (dissection, staining, RRID for dyes and antibodies used), as well as the imaging method including essential items from meta-files of the microscope software, information about image processing and adjustments, information about scale, annotations, insets, and colors shown, and confirmation that the images are truly representative.
Conclusions
Our meta-research study of standard practices for presenting images in 3 fields highlights current shortcomings in publications. Pubmed indexes approximately 800,000 new papers per year, or 2,200 papers per day ( https://www.nlm.nih.gov/bsd/index_stats_comp.html ). Twenty-three percent [ 1 ], or approximately 500 papers per day, contain images. Our survey data suggest that most of these papers will have deficiencies in image presentation, which may affect legibility and interpretability. These observations lead to targeted recommendations for improving the quality of published images. Our recommendations are available as a slide set via the OSF and can be used in teaching best practice to avoid misleading or uninformative image-based figures. Our analysis underscores the need for standardized image publishing guidelines. Adherence to such guidelines will allow the scientific community to unlock the full potential of image collections in the life sciences for current and future generations of researchers.
Systematic review
We examined original research articles that were published in April of 2018 in the top 15 journals that publish original research for each of 3 different categories (physiology, plant science, cell biology). Journals for each category were ranked according to 2016 impact factors listed for the specified categories in Journal Citation Reports. Journals that only publish review articles or that did not publish an April issue were excluded. We followed all relevant aspects of the PRISMA guidelines [ 35 ]. Items that only apply to meta-analyses or are not relevant to literature surveys were not followed. Ethical approval was not required.
Search strategy
Articles were identified through a PubMed search, as all journals were PubMed indexed. Electronic search results were verified by comparison with the list of articles published in April issues on the journal website. The electronic search used the following terms:
Physiology: ("Journal of pineal research"[Journal] AND 3[Issue] AND 64[Volume]) OR ("Acta physiologica (Oxford, England)"[Journal] AND 222[Volume] AND 4[Issue]) OR ("The Journal of physiology"[Journal] AND 596[Volume] AND (7[Issue] OR 8[Issue])) OR (("American journal of physiology. Lung cellular and molecular physiology"[Journal] OR "American journal of physiology. Endocrinology and metabolism"[Journal] OR "American journal of physiology. Renal physiology"[Journal] OR "American journal of physiology. Cell physiology"[Journal] OR "American journal of physiology. Gastrointestinal and liver physiology"[Journal]) AND 314[Volume] AND 4[Issue]) OR (“American journal of physiology. Heart and circulatory physiology”[Journal] AND 314[Volume] AND 4[Issue]) OR ("The Journal of general physiology"[Journal] AND 150[Volume] AND 4[Issue]) OR ("Journal of cellular physiology"[Journal] AND 233[Volume] AND 4[Issue]) OR ("Journal of biological rhythms"[Journal] AND 33[Volume] AND 2[Issue]) OR ("Journal of applied physiology (Bethesda, Md.: 1985)"[Journal] AND 124[Volume] AND 4[Issue]) OR ("Frontiers in physiology"[Journal] AND ("2018/04/01"[Date—Publication]: "2018/04/30"[Date—Publication])) OR ("The international journal of behavioral nutrition and physical activity"[Journal] AND ("2018/04/01"[Date—Publication]: "2018/04/30"[Date—Publication])).
Plant science: ("Nature plants"[Journal] AND 4[Issue] AND 4[Volume]) OR ("Molecular plant"[Journal] AND 4[Issue] AND 11[Volume]) OR ("The Plant cell"[Journal] AND 4[Issue] AND 30[Volume]) OR ("Plant biotechnology journal"[Journal] AND 4[Issue] AND 16[Volume]) OR ("The New phytologist"[Journal] AND (1[Issue] OR 2[Issue]) AND 218[Volume]) OR ("Plant physiology"[Journal] AND 4[Issue] AND 176[Volume]) OR ("Plant, cell & environment"[Journal] AND 4[Issue] AND 41[Volume]) OR ("The Plant journal: for cell and molecular biology"[Journal] AND (1[Issue] OR 2[Issue]) AND 94[Volume]) OR ("Journal of experimental botany"[Journal] AND (8[Issue] OR 9[Issue] OR 10[Issue]) AND 69[Volume]) OR ("Plant & cell physiology"[Journal] AND 4[Issue] AND 59[Volume]) OR ("Molecular plant pathology"[Journal] AND 4[Issue] AND 19[Volume]) OR ("Environmental and experimental botany"[Journal] AND 148[Volume]) OR ("Molecular plant-microbe interactions: MPMI"[Journal] AND 4[Issue] AND 31[Volume]) OR (“Frontiers in plant science”[Journal] AND ("2018/04/01"[Date—Publication]: "2018/04/30"[Date—Publication])) OR (“The Journal of ecology” ("2018/04/01"[Date—Publication]: "2018/04/30"[Date—Publication])).
Cell biology: ("Cell"[Journal] AND (2[Issue] OR 3[Issue]) AND 173[Volume]) OR ("Nature medicine"[Journal] AND 24[Volume] AND 4[Issue]) OR ("Cancer cell"[Journal] AND 33[Volume] AND 4[Issue]) OR ("Cell stem cell"[Journal] AND 22[Volume] AND 4[Issue]) OR ("Nature cell biology"[Journal] AND 20[Volume] AND 4[Issue]) OR ("Cell metabolism"[Journal] AND 27[Volume] AND 4[Issue]) OR ("Science translational medicine"[Journal] AND 10[Volume] AND (435[Issue] OR 436[Issue] OR 437[Issue] OR 438[Issue])) OR ("Cell research"[Journal] AND 28[Volume] AND 4[Issue]) OR ("Molecular cell"[Journal] AND 70[Volume] AND (1[Issue] OR 2[Issue])) OR("Nature structural & molecular biology"[Journal] AND 25[Volume] AND 4[Issue]) OR ("The EMBO journal"[Journal] AND 37[Volume] AND (7[Issue] OR 8[Issue])) OR ("Genes & development"[Journal] AND 32[Volume] AND 7–8[Issue]) OR ("Developmental cell"[Journal] AND 45[Volume] AND (1[Issue] OR 2[Issue])) OR ("Current biology: CB"[Journal] AND 28[Volume] AND (7[Issue] OR 8[Issue])) OR ("Plant cell"[Journal] AND 30[Volume] AND 4[Issue]).
Screening for each article was performed by 2 independent reviewers (Physiology: TLW, SS, EMW, VI, KW, MO; Plant science: TLW, SJB; Cell biology: EW, SS) using Rayyan software (RRID:SCR_017584), and disagreements were resolved by consensus. A list of articles was uploaded into Rayyan. Reviewers independently examined each article and marked whether the article was included or excluded, along with the reason for exclusion. Both reviewers screened all articles published in each journal between April 1 and April 30, 2018, to identify full length, original research articles ( S1 – S3 Tables, S1 Fig ) published in the print issue of the journal. Articles for online journals that do not publish print issues were included if the publication date was between April 1 and April 30, 2018. Articles were excluded if they were not original research articles, or if an accepted version of the paper was posted as an “in press” or “early release” publication; however, the final version did not appear in the print version of the April issue. Articles were included if they contained at least one eligible image, such as a photograph, an image created using a microscope or electron microscope, or an image created using a clinical imaging technology such as ultrasound or MRI. Blot images were excluded, as many of the criteria in our abstraction protocol cannot easily be applied to blots. Computer generated images, graphs, and data figures were also excluded. Papers that did not contain any eligible images were excluded.
Abstraction
All abstractors completed a training set of 25 articles before abstracting data. Data abstraction for each article was performed by 2 independent reviewers (Physiology: AA, AV; Plant science: MO, TLA, SA, KW, MAG, IF; Cell biology: IF, AA, AV, KW, MAG). When disagreements could not be resolved by consensus between the 2 reviewers, ratings were assigned after a group review of the paper. Eligible manuscripts were reviewed in detail to evaluate the following questions according to a predefined protocol (available at: https://doi.org/10.17605/OSF.IO/B5296 ) [ 14 ]. Supplemental files were not examined, as supplemental images may not be held to the same peer review standards as those in the manuscript.
The following items were abstracted:
- Types of images included in the paper (photograph, microscope image, electron microscope image, image created using a clinical imaging technique such as ultrasound or MRI, other types of images)
- Did the paper contain appropriately labeled scale bars for all images?
- Were all insets clearly and accurately marked?
- Were all insets clearly explained in the legend?
- Is the species and tissue, object, or cell line name clearly specified in the figure or legend for all images in the paper?
- Are any annotations, arrows, or labels clearly explained for all images in the paper?
- Among images where authors can control the colors shown (e.g., fluorescence microscopy), are key features of the images visible to someone with the most common form of colorblindness (deuteranopia)?
- If the paper contains colored labels, are these labels visible to someone with the most common form of color blindness (deuteranopia)?
- Are colors in images explained either on the image or within the legend?
Questions 7 and 8 were assessed by using Color Oracle [ 36 ] (RRID:SCR_018400) to simulate the effects of deuteranopia.
Verification
Ten percent of articles in each field were randomly selected for verification abstraction, to ensure that abstractors in different fields were following similar procedures. Data were abstracted by a single abstractor (TLW). The question on species and tissue was excluded from verification abstraction for articles in cell biology and plant sciences, as the verification abstractor lacked the field-specific expertise needed to assess this question. Results from the verification abstractor were compared with consensus results from the 2 independent abstractors for each paper, and discrepancies were resolved through discussion. Error rates were calculated as the percentage of responses for which the abstractors’ response was incorrect. Error rates were 5% for plant sciences, 4% for physiology, and 3% for cell biology.
Data processing and creation of figures
Data are presented as n (%). Summary statistics were calculated using Python (RRID:SCR_008394, version 3.6.9, libraries NumPy 1.18.5 and Matplotlib 3.2.2). Charts were prepared with a Python-based Jupyter Notebook (Jupyter-client, RRID:SCR_018413 [ 37 ], Python version 3.6.9, RRID:SCR_008394, libraries NumPy 1.18.5 [ 38 ], and Matplotlib 3.2.2 [ 39 ]) and assembled into figures with vector graphic software. Example images were previously published or generously donated by the manuscript authors as indicated in the figure legends. Image acquisition was described in references ( D . melanogaster images [ 18 ], mouse pancreatic beta islet cells: A. Müller personal communication, and Orobates pabsti [ 19 ]). Images were cropped, labeled, and color-adjusted with FIJI [ 15 ] (RRID:SCR_002285) and assembled with vector-graphic software. Colorblind and grayscale rendering of images was done using Color Oracle [ 36 ] (RRID:SCR_018400). All poor and clear images presented here are “mock examples” prepared based on practices observed during data abstraction.
Supporting information
S1 fig. flow chart of study screening and selection process..
This flow chart illustrates the number of included and excluded journals or articles, along with reasons for exclusion, at each stage of the study.
https://doi.org/10.1371/journal.pbio.3001161.s001
S1 Table. Number of articles examined by journal in physiology.
Values are n, or n (% of all articles). Screening was performed to exclude articles that were not full-length original research articles (e.g., reviews, editorials, perspectives, commentaries, letters to the editor, short communications, etc.), were not published in April 2018, or did not include eligible images. AJP, American Journal of Physiology.
https://doi.org/10.1371/journal.pbio.3001161.s002
S2 Table. Number of articles examined by journal in plant science.
Values are n, or n (% of all articles). Screening was performed to exclude articles that were not full-length original research articles (e.g., reviews, editorials, perspectives, commentaries, letters to the editor, short communications, etc.), were not published in April 2018, or did not include eligible images. *This journal was also included on the cell biology list (Table S3). **No articles from the Journal of Ecology were screened as the journal did not publish an April 2018 issue.
https://doi.org/10.1371/journal.pbio.3001161.s003
S3 Table. Number of articles examined by journal in cell biology.
Values are n, or n (% of all articles). Screening was performed to exclude articles that were not full-length original research articles (e.g., reviews, editorials, perspectives, commentaries, letters to the editor, short communications, etc.), were not published in April 2018, or did not include eligible images. *This journal was also included on the plant science list (Table S2).
https://doi.org/10.1371/journal.pbio.3001161.s004
S4 Table. Scale information in papers.
Values are percent of papers.
https://doi.org/10.1371/journal.pbio.3001161.s005
Acknowledgments
We thank the eLife Community Ambassadors program for facilitating this work, and Andreas Müller and John A. Nyakatura for generously sharing example images. Falk Hillmann and Thierry Soldati provided the amoeba strains used for imaging. Some of the early career researchers who participated in this research would like to thank their principal investigators and mentors for supporting their efforts to improve science.
- View Article
- Google Scholar
- PubMed/NCBI
- 37. Kluyver T, Ragan-Kelley B, Pérez F and Granger B. Jupyter Notebooks—a publishing format for reproducible computational workflows. In: Scmidt F. L. a. B., ed. Positioning and Power in Academic Publishing : Players, Agents and Agendas Netherlands: IOS Press; 2016.

An official website of the United States government
The .gov means it’s official. Federal government websites often end in .gov or .mil. Before sharing sensitive information, make sure you’re on a federal government site.
The site is secure. The https:// ensures that you are connecting to the official website and that any information you provide is encrypted and transmitted securely.
- Publications
- Account settings
Preview improvements coming to the PMC website in October 2024. Learn More or Try it out now .
- Advanced Search
- Journal List
- v.19(3); 2021 Mar
Creating clear and informative image-based figures for scientific publications
Helena jambor.
1 Mildred Scheel Early Career Center, Medical Faculty, Technische Universität Dresden, Dresden, Germany
Alberto Antonietti
2 Department of Electronics, Information and Bioengineering, Politecnico di Milano, Italy
3 Department of Brain and Behavioral Sciences, University of Pavia, Pavia, Italy
Bradly Alicea
4 Orthogonal Research and Education Laboratory, Champaign, IL, United States of America
Tracy L. Audisio
5 Evolutionary Genomics Unit, Okinawa Institute of Science and Technology, Okinawa, Japan
Susann Auer
6 Department of Plant Physiology, Faculty of Biology, Technische Universität Dresden, Dresden, Germany
Vivek Bhardwaj
7 Max Plank Institute of Immunology and Epigenetics, Freiburg, Germany
8 Hubrecht Institute, Utrecht, the Netherlands
Steven J. Burgess
9 Carl R Woese Institute for Genomic Biology, University of Illinois at Urbana-Champaign, Urbana, IL, United States of America
Iuliia Ferling
10 Junior Research Group Evolution of Microbial Interactions, Leibniz Institute for Natural Product Research and Infection Biology—Hans Knöll Institute (HKI), Jena, Germany
Małgorzata Anna Gazda
11 CIBIO/InBIO, Centro de Investigação em Biodiversidade e Recursos Genéticos, Campus Agrário de Vairão, Universidade do Porto, Vairão, Portugal
12 Departamento de Biologia, Faculdade de Ciências, Universidade do Porto, Porto, Portugal
Luke H. Hoeppner
13 The Hormel Institute, University of Minnesota, Austin, MN, United States of America
14 The Masonic Cancer Center, University of Minnesota, Minneapolis, MN, United States of America
Vinodh Ilangovan
15 Aarhus University, Aarhus, Denmark
16 Neuroscience Research Center, Charité—Universitätsmedizin Berlin, Corporate member of Freie Universität Berlin, Humboldt—Universität zu Berlin, Berlin Institute of Health, Berlin, Germany
17 Einstein Center for Neurosciences Berlin, Berlin, Germany
Mischa Olson
18 Section of Plant Biology, School of Integrative Plant Science, Cornell University, Ithaca, NY, United States of America
Salem Yousef Mohamed
19 Gastroenterology and Hepatology Unit, Internal Medicine Department, Faculty of Medicine, University of Zagazig, Zagazig, Egypt
Sarvenaz Sarabipour
20 Institute for Computational Medicine and the Department of Biomedical Engineering, Johns Hopkins University, Baltimore, MD, United States of America
Aalok Varma
21 National Centre for Biological Sciences (NCBS), Tata Institute of Fundamental Research (TIFR), Bangalore, Karnataka, India
Kaivalya Walavalkar
Erin m. wissink.
22 Department of Molecular Biology and Genetics, Cornell University, Ithaca, NY, United States of America
Tracey L. Weissgerber
23 Berlin Institute of Health at Charité–Universitätsmedizin Berlin, QUEST Center, Berlin, Germany
Associated Data
The authors confirm that all data underlying the findings are fully available without restriction. The abstraction protocol, data, code and slides for teaching are available on an OSF repository ( https://doi.org/10.17605/OSF.IO/B5296 ).
Scientists routinely use images to display data. Readers often examine figures first; therefore, it is important that figures are accessible to a broad audience. Many resources discuss fraudulent image manipulation and technical specifications for image acquisition; however, data on the legibility and interpretability of images are scarce. We systematically examined these factors in non-blot images published in the top 15 journals in 3 fields; plant sciences, cell biology, and physiology ( n = 580 papers). Common problems included missing scale bars, misplaced or poorly marked insets, images or labels that were not accessible to colorblind readers, and insufficient explanations of colors, labels, annotations, or the species and tissue or object depicted in the image. Papers that met all good practice criteria examined for all image-based figures were uncommon (physiology 16%, cell biology 12%, plant sciences 2%). We present detailed descriptions and visual examples to help scientists avoid common pitfalls when publishing images. Our recommendations address image magnification, scale information, insets, annotation, and color and may encourage discussion about quality standards for bioimage publishing.
Introduction
Images are often used to share scientific data, providing the visual evidence needed to turn concepts and hypotheses into observable findings. An analysis of 8 million images from more than 650,000 papers deposited in PubMed Central revealed that 22.7% of figures were “photographs,” a category that included microscope images, diagnostic images, radiology images, and fluorescence images [ 1 ]. Cell biology was one of the most visually intensive fields, with publications containing an average of approximately 0.8 photographs per page [ 1 ]. Plant sciences papers included approximately 0.5 photographs per page [ 1 ].
While there are many resources on fraudulent image manipulation and technical requirements for image acquisition and publishing [ 2 – 4 ], data examining the quality of reporting and ease of interpretation for image-based figures are scarce. Recent evidence suggests that important methodological details about image acquisition are often missing [ 5 ]. Researchers generally receive little or no training in designing figures; yet many scientists and editors report that figures and tables are one of the first elements that they examine when reading a paper [ 6 , 7 ]. When scientists and journals share papers on social media, posts often include figures to attract interest. The PubMed search engine caters to scientists’ desire to see the data by presenting thumbnail images of all figures in the paper just below the abstract [ 8 ]. Readers can click on each image to examine the figure, without ever accessing the paper or seeing the introduction or methods. EMBO’s Source Data tool (RRID:SCR_015018) allows scientists and publishers to share or explore figures, as well as the underlying data, in a findable and machine readable fashion [ 9 ].
Image-based figures in publications are generally intended for a wide audience. This may include scientists in the same or related fields, editors, patients, educators, and grants officers. General recommendations emphasize that authors should design figures for their audience rather than themselves and that figures should be self-explanatory [ 7 ]. Despite this, figures in papers outside one’s immediate area of expertise are often difficult to interpret, marking a missed opportunity to make the research accessible to a wide audience. Stringent quality standards would also make image data more reproducible. A recent study of fMRI image data, for example, revealed that incomplete documentation and presentation of brain images led to nonreproducible results [ 10 , 11 ].
Here, we examined the quality of reporting and accessibility of image-based figures among papers published in top journals in plant sciences, cell biology, and physiology. Factors assessed include the use of scale bars, explanations of symbols and labels, clear and accurate inset markings, and transparent reporting of the object or species and tissue shown in the figure. We also examined whether images and labels were accessible to readers with the most common form of color blindness [ 12 ]. Based on our results, we provide targeted recommendations about how scientists can create informative image-based figures that are accessible to a broad audience. These recommendations may also be used to establish quality standards for images deposited in emerging image data repositories.
Using a science of science approach to investigate current practices
This study was conducted as part of a participant-guided learn-by-doing course, in which eLife Community Ambassadors from around the world worked together to design, complete, and publish a meta-research study [ 13 ]. Participants in the 2018 Ambassadors program designed the study, developed screening and abstraction protocols, and screened papers to identify eligible articles (HJ, BA, SJB, VB, LHH, VI, SS, EMW). Participants in the 2019 Ambassadors program refined the data abstraction protocol, completed data abstraction and analysis, and prepared the figures and manuscript (AA, SA, TLA, IF, MAG, HL, SYM, MO, AV, KW, HJ, TLW).
To investigate current practices in image publishing, we selected 3 diverse fields of biology to increase generalizability. For each field, we examined papers published in April 2018 in the top 15 journals, which publish original research ( S1 – S3 Tables). All full-length original research articles that contained at least one photograph, microscope image, electron microscope image, or clinical image (MRI, ultrasound, X-ray, etc.) were included in the analysis ( S1 Fig ). Blots and computer-generated images were excluded, as some of the criteria assessed do not apply to these types of images. Two independent reviewers assessed each paper, according to the detailed data abstraction protocol (see methods and information deposited on the Open Science Framework (OSF) (RRID:SCR_017419) at https://doi.org/10.17605/OSF.IO/B5296 ) [ 14 ]. The repository also includes data, code, and figures.
Image analysis
First, we confirmed that images are common in the 3 biology subfields analyzed. More than half of the original research articles in the sample contained images (plant science: 68%, cell biology: 72%, physiology: 55%). Among the 580 papers that included images, microscope images were very common in all 3 fields (61% to 88%, Fig 1A ). Photographs were very common in plant sciences (86%), but less widespread in cell biology (38%) and physiology (17%). Electron microscope images were less common in all 3 fields (11% to 19%). Clinical images, such as X-rays, MRI or ultrasound, and other types of images were rare (2% to 9%).

(A) Microscope images and photographs were common, whereas other types of images were used less frequently. ( B) Complete scale information was missing in more than half of the papers examined. Partial scale information indicates that scale information was presented in some figures, but not others, or that the authors reported magnification rather than including scale bars on the image. ( C) Problems with labeling and describing insets are common. Totals may not be exactly 100% due to rounding.
Scale information is essential to interpret biological images. Approximately half of papers in physiology (49%) and cell biology (55%) and 28% of plant science papers provided scale bars with dimensions (in the figure or legend) for all images in the paper ( Fig 1B , S4 Table ). Approximately one-third of papers in each field contained incomplete scale information, such as reporting magnification or presenting scale information for a subset of images. Twenty-four percent of physiology papers, 10% of cell biology papers, and 29% of plant sciences papers contained no scale information on any image.
Some publications use insets to show the same image at 2 different scales (cell biology papers: 40%, physiology: 17%, plant sciences: 12%). In this case, the authors should indicate the position of the high-magnification inset in the low-magnification image. The majority of papers in all 3 fields clearly and accurately marked the location of all insets (53% to 70%; Fig 1C , left panel); however, one-fifth of papers appeared to have marked the location of at least one inset incorrectly (17% to 22%). Clearly visible inset markings were missing for some or all insets in 13% to 28% of papers ( Fig 1C , left panel). Approximately half of papers (43% to 53%; Fig 1C , right panel) provided legend explanations or markings on the figure to clearly show that an inset was used, whereas this information was missing for some or all insets in the remaining papers.
Many images contain information in color. We sought to determine whether color images were accessible to readers with deuteranopia, the most common form of color blindness, by using the color blindness simulator Color Oracle ( https://colororacle.org/ , RRID: SCR_018400). We evaluated only images in which the authors selected the image colors (e.g., fluorescence microscopy). Papers without any colorblind accessible figures were uncommon (3% to 6%); however, 45% of cell biology papers and 21% to 24% of physiology and plant science papers contained some images that were inaccessible to readers with deuteranopia ( Fig 2A ). Seventeen percent to 34% of papers contained color annotations that were not visible to someone with deuteranopia.

(A) While many authors are using colors and labels that are visible to colorblind readers, the data show that improvement is needed. (B) Most papers explain colors in image-based figures; however, explanations are less common for the species and tissue or object shown, and labels and annotations. Totals may not be exactly 100% due to rounding.
Figure legends and, less often, titles typically provide essential information needed to interpret an image. This text provides information on the specimen and details of the image, while also explaining labels and annotations used to highlight structures or colors. Fifty-seven percent of physiology papers, 48% of cell biology papers, and 20% of plant papers described the species and tissue or object shown completely. Five percent to 17% of papers did not provide any such information ( Fig 2B ). Approximately half of the papers (47% to 58%; Fig 1C , right panel) also failed or partially failed to adequately explain that insets were used. Annotations of structures were better explained. Two-thirds of papers across all 3 fields clearly stated the meaning of all image labels, while 18% to 24% of papers provided partial explanations. Most papers (73% to 83%) completely explained the image colors by stating what substance each color represented or naming the dyes or staining technique used.
Finally, we examined the number of papers that used optimal image presentation practices for all criteria assessed in the study. Twenty-eight (16%) physiology papers, 19 (12%) cell biology papers, and 6 (2%) plant sciences papers met all criteria for all image-based figures in the paper. In plant sciences and physiology, the most common problems were with scale bars, insets, and specifying in the legend the species and tissue or object shown. In cell biology, the most common problems were with insets, colorblind accessibility, and specifying in the legend the species and tissue or object shown.
Designing image-based figures: How can we improve?
Our results obtained by examining 580 papers from 3 fields provide us with unique insights into the quality of reporting and the accessibility of image-based figures. Our quantitative description of standard practices in image publication highlights opportunities to improve transparency and accessibility to readers from different backgrounds. We have therefore outlined specific actions that scientists can take when creating images, designing multipanel figures, annotating figures, and preparing figure legends.
Throughout the paper, we provide visual examples to illustrate each stage of the figure preparation process. Other elements are often omitted to focus readers’ attention on the step illustrated in the figure. For example, a figure that highlights best practices for displaying scale bars may not include annotations designed to explain key features of the image. When preparing image-based figures in scientific publications, readers should address all relevant steps in each figure. All steps described below (image cropping and insets, adding scale bars and annotation, choosing color channel appearances, figure panel layout) can be implemented with standard image processing software such as FIJI [ 15 ] (RRID:SCR_002285) and ImageJ2 [ 16 ] (RRID:SCR_003070), which are open source, free programs for bioimage analysis. A quick guide on how to do basic image processing for publications with FIJI is available in a recent cheat sheet publication [ 17 ], and a discussion forum and wiki are available for FIJI and ImageJ ( https://imagej.net/ ).
1. Choose a scale or magnification that fits your research question
Scientists should select an image scale or magnification that allows readers to clearly see features needed to answer the research question. Fig 3A [ 18 ] shows Drosophila melanogaster at 3 different microscopic scales. The first focuses on the ovary tissue and might be used to illustrate the appearance of the tissue or show stages of development. The second focuses on a group of cells. In this example, the “egg chamber” cells show different nucleic acid distributions. The third example focuses on subcellular details in one cell, for example, to show finer detail of RNA granules or organelle shape.

(A) Magnification and display detail of images should permit readers to see features related to the main message that the image is intended to convey. This may be the organism, tissue, cell, or a subcellular level. Microscope images [ 18 ] show D . melanogaster ovary (A1), ovarian egg chamber cells (A2), and a detail in egg chamber cell nuclei (A3). (B ) Insets or zoomed-in areas are useful when 2 different scales are needed to allow readers to see essential features. It is critical to indicate the origin of the inset in the full-scale image. Poor and clear examples are shown. Example images were created based on problems observed by reviewers. Images show B1, B2, B3, B5: Protostelium aurantium amoeba fed on germlings of Aspergillus fumigatus D141-GFP (green) fungal hyphae, dead fungal material stained with propidium iodide (red), and acidic compartments of amoeba marked with LysoTracker Blue DND-22 dye (blue); B4: Lendrum-stained human lung tissue (Haraszti, Public Health Image Library); B6: fossilized Orobates pabsti [ 19 ].
When both low and high magnifications are necessary for one image, insets are used to show a small portion of the image at higher magnification ( Fig 3B , [ 19 ]). The inset location must be accurately marked in the low-magnification image. We observed that the inset position in the low-magnification image was missing, unclear, or incorrectly placed in approximately one-third of papers. Inset positions should be clearly marked by lines or regions of interest in a high-contrast color, usually black or white. Insets may also be explained in the figure legend. Care must be taken when preparing figures outside vector graphics suits, as insert positions may move during file saving or export.
2. Include a clearly labeled scale bar
Scale information allows audiences to quickly understand the size of features shown in images. This is especially important for microscopic images where we have no intuitive understanding of scale. Scale information for photographs should be considered when capturing images as rulers are often placed into the frame. Our analysis revealed that 10% to 29% of papers screened failed to provide any scale information and that another third only provided incomplete scale information ( Fig 1B ). Scientists should consider the following points when displaying scale bars:
- Every image type needs a scale bar: Authors usually add scale bars to microscope images but often leave them out in photos and clinical images, possibly because these depict familiar objects such a human or plant. Missing scale bars, however, adversely affect reproducibility. A size difference of 20% in between a published study and the reader’s lab animals, for example, could impact study results by leading to an important difference in phenotype. Providing scale bars allows scientists to detect such discrepancies and may affect their interpretation of published work. Scale bars may not be a standard feature of image acquisition and processing software for clinical images. Authors may need to contact device manufacturers to determine the image size and add height and width labels.

Scale bars provide essential information about the size of objects, which orients readers and helps them to bridge the gap between the image and reality. Scales may be indicated by a known size indicator such as a human next to a tree, a coin next to a rock, or a tape measure next to a smaller structure. In microscope images, a bar of known length is included. Example images were created based on problems observed by reviewers. Poor scale bar examples (1 to 6), clear scale bar examples (7 to 12). Images 1, 4, 7: Microscope images of D . melanogaster nurse cell nuclei [ 18 ]; 2: Microscope image of Dictyostelium discoideum expressing Vps32-GFP (Vps32-green fluorescent protein shows broad signal in cells) and stained with dextran (spotted signal) after infection with conidia of Aspergillus fumigatus ; 3, 5, 8, 10: Electron microscope image of mouse pancreatic beta-islet cells (Andreas Müller); 6, 11: Microscope image of Lendrum-stained human lung tissue (Haraszti, Public Health Image Library); 9: Photo of Arabidopsis thaliana ; 12: Photograph of fossilized Orobates pabsti [ 19 ].
- Annotate scale bar dimensions on the image: Stating the dimensions along with the scale bar allows readers to interpret the image more quickly. Despite this, dimensions were typically stated in the legend instead ( Fig 1B ), possibly a legacy of printing processes that discouraged text in images. Dimensions should be in high resolution and large enough to be legible. In our set, we came across small and/or low-resolution annotations that were illegible in electronic versions of the paper, even after zooming in. Scale bars that are visible on larger figures produced by authors may be difficult to read when the size of the figure is reduced to fit onto a journal page. Authors should carefully check page proofs to ensure that scale bars and dimensions are clearly visible.
3. Use color wisely in images
Colors in images are used to display the natural appearance of an object or to visualize features with dyes and stains. In the scientific context, adapting colors is possible and may enhance readers’ understanding, while poor color schemes may distract or mislead. Images showing the natural appearance of a subject, specimen, or staining technique (e.g., images showing plant size and appearance, or histopathology images of fat tissue from mice on different diets) are generally presented in color ( Fig 5 ). Images showing electron microscope images are captured in black and white (“grayscale”) by default and may be kept in grayscale to leverage the good contrast resulting from a full luminescence spectrum.

Shown are examples of the types of images that one might find in manuscripts in the biological or biomedical sciences: photograph, fluorescent microscope images with 1 to 3 color hues/LUT, electron microscope images. The relative visibility is assessed in a colorblind rendering for deuteranopia, and in grayscale. Grayscale images offer the most contrast (1-color microscope image) but cannot show several structures in parallel (multicolor images, color photographs). Color combinations that are not colorblind accessible were used in rows 3 and 4 to illustrate the importance of colorblind simulation tests. Scale bars are not included in this figure, as they could not be added in a nondistracting way that would not detract from the overall message of the figure. Images show: Row 1: Darth Vader being attacked, Row 2: D . melanogaster salivary glands [ 18 ], Row 3: D . melanogaster egg chambers [ 18 ], Row 4: D . melanogaster nurse cell nuclei [ 18 ], and Row 5: mouse pancreatic beta-islet cells. LUT, lookup table.
In some instances, scientists can choose whether to show grayscale or color images. Assigning colors may be optional, even though it is the default setting in imaging programs. When showing only one color channel, scientists may consider presenting this channel in grayscale to optimally display fine details. This may include variations in staining intensity or fine structures. When opting for color, authors should use grayscale visibility tests ( Fig 6 ) to determine whether visibility is compromised. This can occur when dark colors, such as magenta, red, or blue, are shown on a black background.

The best contrast is achieved with grayscale images or dark hues on a light background (first row). Dark color hues, such as red and blue, on a dark background (last row), are least visible. Visibility can be tested with mock grayscale. Images show actin filaments in Dictyostelium discoideum (LifeAct-GFP). All images have the same scale. GFP, green fluorescent protein.
4. Choose a colorblind accessible color palette
Fluorescent images with merged color channels visualize the colocalization of different markers. While many readers find these images to be visually appealing and informative, these images are often inaccessible to colorblind coauthors, reviewers, editors, and readers. Deuteranopia, the most common form of colorblindness, affects up to 8% of men and 0.5% of women of northern European ancestry [ 12 ]. A study of articles published in top peripheral vascular disease journals revealed that 85% of papers with color maps and 58% of papers with heat maps used color palettes that were not colorblind safe [ 20 ]. We show that approximately half of cell biology papers, and one-third of physiology papers and plant science papers, contained images that were inaccessible to readers with deuteranopia. Scientists should consider the following points to ensure that images are accessible to colorblind readers.

The figure illustrates how 4 possible color combinations for multichannel microscope images would appear to someone with normal color vision, the most common form of colorblindness (deuteranopia), and a rare form of color blindness (tritanopia). Some combinations that are accessible to someone with deuteranopia are not accessible to readers with tritanopia, for example, green/blue combinations. Microscope images show Dictyostelium discoideum expressing Vps32-GFP (Vps32-green fluorescent protein shows broad signal in cells) and stained with dextran (spotted signal) after infection with conidia of Aspergillus fumigatus . All images have the same scale. GFP, green fluorescent protein.

Images in the first row are not colorblind safe. Readers with the most common form of colorblindness would not be able to identify key features. Possible accessible solutions are shown: changing colors/LUTs to colorblind-friendly combinations, showing each channel in a separate image, showing colors in grayscale and inverting grayscale images to maximize contrast. Solutions 3 and 4 (show each channel in grayscale, or in inverted grayscale) are more informative than solutions 1 and 2. Regions of overlap are sometimes difficult to see in merged images without split channels. When splitting channels, scientists often use colors that have low contrast, as explained in Fig 6 (e.g., red or blue on black). Microscope images show D . melanogaster egg chambers (2 colors) and nurse cell nuclei (3 colors) [ 18 ]. All images of egg chambers and nurse cells respectively have the same scale. LUT, lookup table.
- Use simulation tools to confirm that essential features are visible to colorblind viewers: Free tools, such as Color Oracle (RRID:SCR_018400), quickly simulate different forms of color blindness by adjusting the colors on the computer screen to simulate what a colorblind person would see. Scientists using FIJI (RRID:SCR002285) can select the “Simulate colorblindness” option in the “Color” menu under “Images.”
5. Design the figure
Figures often contain more than one panel. Careful planning is needed to convey a clear message, while ensuring that all panels fit together and follow a logical order. A planning table ( Fig 9A ) helps scientists to determine what information is needed to answer the research question. The table outlines the objectives, types of visualizations required, and experimental groups that should appear in each panel. A planning table template is available on OSF [ 14 ]. After completing the planning table, scientists should sketch out the position of panels and the position of images, graphs, and titles within each panel ( Fig 9B ). Audiences read a page either from top to bottom and/or from left to right. Selecting one reading direction and arranging panels in rows or columns helps with figure planning. Using enough white space to separate rows or columns will visually guide the reader through the figure. The authors can then assemble the figure based on the draft sketch.

Planning tables and layout sketches are useful tools to efficiently design figures that address the research question. ( A) Planning tables allow scientists to select and organize elements needed to answer the research question addressed by the figure. ( B) Layout sketches allow scientists to design a logical layout for all panels listed in the planning table and ensure that there is adequate space for all images and graphs.
6. Annotate the figure
Annotations with text, symbols, or lines allow readers from many different backgrounds to rapidly see essential features, interpret images, and gain insight. Unfortunately, scientists often design figures for themselves, rather than their audience [ 7 ]. Examples of annotations are shown in Fig 10 . Table 1 describes important factors to consider for each annotation type.

Text descriptions alone are often insufficient to clearly point to a structure or region in an image. Arrows and arrowheads, lines, letters, and dashed enclosures can help if overlaid on the respective part of the image. Microscope images show D . melanogaster egg chambers [ 18 ], with the different labeling techniques in use. The table provides an overview of their applicability and common pitfalls. All images have the same scale.
| Feature to be Explained | Annotation |
|---|---|
| Size | Scale bar with dimensions |
| Direction of movement | Arrow with tail |
| Draw attention to: | |
| • Points of interest | Symbol (arrowhead, star, etc.) |
| • Regions of interest: black and white image | Highlight in color if this does not obscure important features within the region OR Outline with boxes or circles |
| • Regions of interest: Color image | Outline with boxes or circles |
| • Layers | Labeled brackets beside the image for layers that are visually identifiable across the entire image OR A line on the image for wavy layers that may be difficult to identify |
| Define features within an image | Labels |
When adding annotations to an image, scientists should consider the following steps.

Annotations help to orient the audience but may also obstruct parts of the image. Authors must find the right balance between too few and too many annotations. (1) Example with no annotations. Readers cannot determine what is shown. (2) Example with a few annotations to orient readers to key structures. (3) Example with many annotations, which obstruct parts of the image. The long legend below the figure is confusing. (4) Example shows a solution for situations where many annotations are needed to explain the image. An annotated version is placed next to an unannotated version of the image for comparison. The legend below the image helps readers to interpret the image, without having to refer to the figure legend. Note the different requirements for space. Electron microscope images show mouse pancreatic beta-islet cells.
- Use abbreviations cautiously: Abbreviations are commonly used for image and figure annotation to save space but inevitably require more effort from the reader. Abbreviations are often ambiguous, especially across fields. Authors should run a web search for the abbreviation [ 21 ]. If the intended meaning is not a top result, authors should refrain from using the abbreviation or clearly define the abbreviation on the figure itself, even if it is already defined elsewhere in the manuscript. Note that in Fig 11 , abbreviations have been written out below the image to reduce the number of legend entries.

Cells and their structures are almost all transparent. Every dye, stain, and fluorescent label therefore should be clearly explained to the audience. Labels should be colorblind safe. Large labels that stand out against the background are easy to read. Authors can make figures easier to interpret by placing the color label close to the structure; color labels should only be placed in the figure legend when this is not possible. Example images were created based on problems observed by reviewers. Microscope images show D . melanogaster egg chambers stained with the DNA dye DAPI (4′,6-diamidino-2-phenylindole) and probe for a specific mRNA species [ 18 ]. All images have the same scale.

(1) The annotations displayed in the first image are inaccessible to colorblind individuals, as shown with the visibility test below. This example was created based on problems observed by reviewers. (2, 3) Two colorblind safe alternative annotations, in color (2) and in grayscale (3). The bottom row shows a test rendering for deuteranopia colorblindness. Note that double-encoding of different hues and different shapes (e.g., different letters, arrow shapes, or dashed/nondashed lines) allows all audiences to interpret the annotations. Electron microscope images show mouse pancreatic beta-cell islet cells. All images have the same scale.
7. Prepare figure legends
Each figure and legend are meant to be self-explanatory and should allow readers to quickly assess a paper or understand complex studies that combine different methodologies or model systems. To date, there are no guidelines for figure legends for images, as the scope and length of legends varies across journals and disciplines. Some journals require legends to include details on object, size, methodology, or sample size, while other journals require a minimalist approach and mandate that information should not be repeated in subsequent figure legends.
Our data suggest that important information needed to interpret images was regularly missing from the figure or figure legend. This includes the species and tissue type, or object shown in the figure, clear explanations of all labels, annotations and colors, and markings or legend entries denoting insets. Presenting this information on the figure itself is more efficient for the reader; however, any details that are not marked in the figure should be explained in the legend.
While not reporting species and tissue information in every figure legend may be less of an issue for papers that examine a single species and tissue, this is a major problem when a study includes many species and tissues, which may be presented in different panels of the same figure. Additionally, the scientific community is increasingly developing automated data mining tools, such as the Source Data tool, to collect and synthesize information from figures and other parts of scientific papers. Unlike humans, these tools cannot piece together information scattered throughout the paper to determine what might be shown in a particular figure panel. Even for human readers, this process wastes time. Therefore, we recommend that authors present information in a clear and accessible manner, even if some information may be repeated for studies with simple designs.
A flood of images is published every day in scientific journals and the number is continuously increasing. Of these, around 4% likely contain intentionally or accidentally duplicated images [ 3 ]. Our data show that, in addition, most papers show images that are not fully interpretable due to issues with scale markings, annotation, and/or color. This affects scientists’ ability to interpret, critique, and build upon the work of others. Images are also increasingly submitted to image archives to make image data widely accessible and permit future reanalyses. A substantial fraction of images that are neither human nor machine-readable lowers the potential impact of such archives. Based on our data examining common problems with published images, we provide a few simple recommendations, with examples illustrating good practices. We hope that these recommendations will help authors to make their published images legible and interpretable.
Limitations: While most results were consistent across the 3 subfields of biology, findings may not be generalizable to other fields. Our sample included the top 15 journals that publish original research for each field. Almost all journals were indexed in PubMed. Results may not be generalizable to journals that are unindexed, have low impact factors, or are not published in English. Data abstraction was performed manually due to the complexity of the assessments. Error rates were 5% for plant sciences, 4% for physiology, and 3% for cell biology. Our assessments focused on factors that affect readability of image-based figures in scientific publications. Future studies may include assessments of raw images and meta-data to examine factors that affect reproducibility, such as contrast settings, background filtering, and processing history.
Actions journals can take to make image-based figures more transparent and easier to interpret
The role of journals in improving the quality of reporting and accessibility of image-based figures should not be overlooked. There are several actions that journals might consider.
- Screen manuscripts for figures that are not colorblind safe: Open source automated screening tools [ 22 ] may help journals to efficiently identify common color maps that are not colorblind safe.
- Update journal policies: We encourage journal editors to update policies regarding colorblind accessibility, scale bars, and other factors outlined in this manuscript. Importantly, policy changes should be accompanied by clear plans for implementation and enforcement. Meta-research suggests that changing journal policy, without enforcement or implementation plans, has limited effects on author behavior. Amending journal policies to require authors to report research resource identifiers (RRIDs), for example, increases the number of papers reporting RRIDs by 1% [ 23 ]. In a study of life sciences articles published in Nature journals, the percentage of animal studies reporting the Landis 4 criteria (blinding, randomization, sample size calculation, exclusions) increased from 0% to 16.4% after new guidelines were released [ 24 ]. In contrast, a randomized controlled trial of animal studies submitted to PLOS ONE demonstrated that randomizing authors to complete the ARRIVE checklist during submission did not improve reporting [ 25 ]. Some improvements in reporting of confidence intervals, sample size justification, and inclusion and exclusion criteria were noted after Psychological Science introduced new policies [ 26 ], although this may have been partially due to widespread changes in the field. A joint editorial series published in the Journal of Physiology and British Journal of Pharmacology did not improve the quality of data presentation or statistical reporting [ 27 ].
- Reevaluate limits on the number of figures: Limitations on the number of figures originally stemmed from printing costs calculations, which are becoming increasingly irrelevant as scientific publishing moves online. Unintended consequences of these policies include the advent of large, multipanel figures. These figures are often especially difficult to interpret because the legend appears on a different page, or the figure combines images addressing different research questions.
- Reduce or eliminate page charges for color figures: As journals move online, policies designed to offset the increased cost of color printing are no longer needed. The added costs may incentivize authors to use grayscale in cases where color would be beneficial.
- Encourage authors to explain labels or annotations in the figure, rather than in the legend: This is more efficient for readers.
- Encourage authors to share image data in public repositories: Open data benefits authors and the scientific community [ 28 – 30 ].
How can the scientific community improve image-based figures?
The role of scientists in the community is multifaceted. As authors, scientists should familiarize themselves with guidelines and recommendations, such as ours provided above. As reviewers, scientists should ask authors to improve erroneous or uninformative image-based figures. As instructors, scientists should ensure that bioimaging and image data handling is taught during undergraduate or graduate courses, and support existing initiatives such as NEUBIAS (Network of EUropean BioImage AnalystS) [ 31 ] that aim to increase training opportunities in bioimage analysis.
Scientists are also innovators. As such, they should support emerging image data archives, which may expand to automatically source images from published figures. Repositories for other types of data are already widespread; however, the idea of image repositories has only recently gained traction [ 32 ]. Existing image databases, which are mainly used for raw image data and meta-data, include the Allen Brain Atlas, the Image Data Resource [ 33 ], and the emerging BioImage Archives [ 32 ]. Springer Nature encourages authors to submit imaging data to the Image Data Resource [ 33 ]. While scientists have called for common quality standards for archived images and meta-data [ 32 ], such standards have not been defined, implemented, or taught. Examining standard practices for reporting images in scientific publications, as outlined here, is one strategy for establishing common quality standards.
In the future, it is possible that each image published electronically in a journal or submitted to an image data repository will follow good practice guidelines and will be accompanied by expanded “meta-data” or “alt-text/attribute” files. Alt-text is already published in html to provide context if an image cannot be accessed (e.g., by blind readers). Similarly, images in online articles and deposited in archives could contain essential information in a standardized format. The information could include the main objective of the figure, specimen information, ideally with RRID [ 34 ], specimen manipulation (dissection, staining, RRID for dyes and antibodies used), as well as the imaging method including essential items from meta-files of the microscope software, information about image processing and adjustments, information about scale, annotations, insets, and colors shown, and confirmation that the images are truly representative.
Conclusions
Our meta-research study of standard practices for presenting images in 3 fields highlights current shortcomings in publications. Pubmed indexes approximately 800,000 new papers per year, or 2,200 papers per day ( https://www.nlm.nih.gov/bsd/index_stats_comp.html ). Twenty-three percent [ 1 ], or approximately 500 papers per day, contain images. Our survey data suggest that most of these papers will have deficiencies in image presentation, which may affect legibility and interpretability. These observations lead to targeted recommendations for improving the quality of published images. Our recommendations are available as a slide set via the OSF and can be used in teaching best practice to avoid misleading or uninformative image-based figures. Our analysis underscores the need for standardized image publishing guidelines. Adherence to such guidelines will allow the scientific community to unlock the full potential of image collections in the life sciences for current and future generations of researchers.
Systematic review
We examined original research articles that were published in April of 2018 in the top 15 journals that publish original research for each of 3 different categories (physiology, plant science, cell biology). Journals for each category were ranked according to 2016 impact factors listed for the specified categories in Journal Citation Reports. Journals that only publish review articles or that did not publish an April issue were excluded. We followed all relevant aspects of the PRISMA guidelines [ 35 ]. Items that only apply to meta-analyses or are not relevant to literature surveys were not followed. Ethical approval was not required.
Search strategy
Articles were identified through a PubMed search, as all journals were PubMed indexed. Electronic search results were verified by comparison with the list of articles published in April issues on the journal website. The electronic search used the following terms:
Physiology: ("Journal of pineal research"[Journal] AND 3[Issue] AND 64[Volume]) OR ("Acta physiologica (Oxford, England)"[Journal] AND 222[Volume] AND 4[Issue]) OR ("The Journal of physiology"[Journal] AND 596[Volume] AND (7[Issue] OR 8[Issue])) OR (("American journal of physiology. Lung cellular and molecular physiology"[Journal] OR "American journal of physiology. Endocrinology and metabolism"[Journal] OR "American journal of physiology. Renal physiology"[Journal] OR "American journal of physiology. Cell physiology"[Journal] OR "American journal of physiology. Gastrointestinal and liver physiology"[Journal]) AND 314[Volume] AND 4[Issue]) OR (“American journal of physiology. Heart and circulatory physiology”[Journal] AND 314[Volume] AND 4[Issue]) OR ("The Journal of general physiology"[Journal] AND 150[Volume] AND 4[Issue]) OR ("Journal of cellular physiology"[Journal] AND 233[Volume] AND 4[Issue]) OR ("Journal of biological rhythms"[Journal] AND 33[Volume] AND 2[Issue]) OR ("Journal of applied physiology (Bethesda, Md.: 1985)"[Journal] AND 124[Volume] AND 4[Issue]) OR ("Frontiers in physiology"[Journal] AND ("2018/04/01"[Date—Publication]: "2018/04/30"[Date—Publication])) OR ("The international journal of behavioral nutrition and physical activity"[Journal] AND ("2018/04/01"[Date—Publication]: "2018/04/30"[Date—Publication])).
Plant science: ("Nature plants"[Journal] AND 4[Issue] AND 4[Volume]) OR ("Molecular plant"[Journal] AND 4[Issue] AND 11[Volume]) OR ("The Plant cell"[Journal] AND 4[Issue] AND 30[Volume]) OR ("Plant biotechnology journal"[Journal] AND 4[Issue] AND 16[Volume]) OR ("The New phytologist"[Journal] AND (1[Issue] OR 2[Issue]) AND 218[Volume]) OR ("Plant physiology"[Journal] AND 4[Issue] AND 176[Volume]) OR ("Plant, cell & environment"[Journal] AND 4[Issue] AND 41[Volume]) OR ("The Plant journal: for cell and molecular biology"[Journal] AND (1[Issue] OR 2[Issue]) AND 94[Volume]) OR ("Journal of experimental botany"[Journal] AND (8[Issue] OR 9[Issue] OR 10[Issue]) AND 69[Volume]) OR ("Plant & cell physiology"[Journal] AND 4[Issue] AND 59[Volume]) OR ("Molecular plant pathology"[Journal] AND 4[Issue] AND 19[Volume]) OR ("Environmental and experimental botany"[Journal] AND 148[Volume]) OR ("Molecular plant-microbe interactions: MPMI"[Journal] AND 4[Issue] AND 31[Volume]) OR (“Frontiers in plant science”[Journal] AND ("2018/04/01"[Date—Publication]: "2018/04/30"[Date—Publication])) OR (“The Journal of ecology” ("2018/04/01"[Date—Publication]: "2018/04/30"[Date—Publication])).
Cell biology: ("Cell"[Journal] AND (2[Issue] OR 3[Issue]) AND 173[Volume]) OR ("Nature medicine"[Journal] AND 24[Volume] AND 4[Issue]) OR ("Cancer cell"[Journal] AND 33[Volume] AND 4[Issue]) OR ("Cell stem cell"[Journal] AND 22[Volume] AND 4[Issue]) OR ("Nature cell biology"[Journal] AND 20[Volume] AND 4[Issue]) OR ("Cell metabolism"[Journal] AND 27[Volume] AND 4[Issue]) OR ("Science translational medicine"[Journal] AND 10[Volume] AND (435[Issue] OR 436[Issue] OR 437[Issue] OR 438[Issue])) OR ("Cell research"[Journal] AND 28[Volume] AND 4[Issue]) OR ("Molecular cell"[Journal] AND 70[Volume] AND (1[Issue] OR 2[Issue])) OR("Nature structural & molecular biology"[Journal] AND 25[Volume] AND 4[Issue]) OR ("The EMBO journal"[Journal] AND 37[Volume] AND (7[Issue] OR 8[Issue])) OR ("Genes & development"[Journal] AND 32[Volume] AND 7–8[Issue]) OR ("Developmental cell"[Journal] AND 45[Volume] AND (1[Issue] OR 2[Issue])) OR ("Current biology: CB"[Journal] AND 28[Volume] AND (7[Issue] OR 8[Issue])) OR ("Plant cell"[Journal] AND 30[Volume] AND 4[Issue]).
Screening for each article was performed by 2 independent reviewers (Physiology: TLW, SS, EMW, VI, KW, MO; Plant science: TLW, SJB; Cell biology: EW, SS) using Rayyan software (RRID:SCR_017584), and disagreements were resolved by consensus. A list of articles was uploaded into Rayyan. Reviewers independently examined each article and marked whether the article was included or excluded, along with the reason for exclusion. Both reviewers screened all articles published in each journal between April 1 and April 30, 2018, to identify full length, original research articles ( S1 – S3 Tables, S1 Fig ) published in the print issue of the journal. Articles for online journals that do not publish print issues were included if the publication date was between April 1 and April 30, 2018. Articles were excluded if they were not original research articles, or if an accepted version of the paper was posted as an “in press” or “early release” publication; however, the final version did not appear in the print version of the April issue. Articles were included if they contained at least one eligible image, such as a photograph, an image created using a microscope or electron microscope, or an image created using a clinical imaging technology such as ultrasound or MRI. Blot images were excluded, as many of the criteria in our abstraction protocol cannot easily be applied to blots. Computer generated images, graphs, and data figures were also excluded. Papers that did not contain any eligible images were excluded.
Abstraction
All abstractors completed a training set of 25 articles before abstracting data. Data abstraction for each article was performed by 2 independent reviewers (Physiology: AA, AV; Plant science: MO, TLA, SA, KW, MAG, IF; Cell biology: IF, AA, AV, KW, MAG). When disagreements could not be resolved by consensus between the 2 reviewers, ratings were assigned after a group review of the paper. Eligible manuscripts were reviewed in detail to evaluate the following questions according to a predefined protocol (available at: https://doi.org/10.17605/OSF.IO/B5296 ) [ 14 ]. Supplemental files were not examined, as supplemental images may not be held to the same peer review standards as those in the manuscript.
The following items were abstracted:
- Types of images included in the paper (photograph, microscope image, electron microscope image, image created using a clinical imaging technique such as ultrasound or MRI, other types of images)
- Did the paper contain appropriately labeled scale bars for all images?
- Were all insets clearly and accurately marked?
- Were all insets clearly explained in the legend?
- Is the species and tissue, object, or cell line name clearly specified in the figure or legend for all images in the paper?
- Are any annotations, arrows, or labels clearly explained for all images in the paper?
- Among images where authors can control the colors shown (e.g., fluorescence microscopy), are key features of the images visible to someone with the most common form of colorblindness (deuteranopia)?
- If the paper contains colored labels, are these labels visible to someone with the most common form of color blindness (deuteranopia)?
- Are colors in images explained either on the image or within the legend?
Questions 7 and 8 were assessed by using Color Oracle [ 36 ] (RRID:SCR_018400) to simulate the effects of deuteranopia.
Verification
Ten percent of articles in each field were randomly selected for verification abstraction, to ensure that abstractors in different fields were following similar procedures. Data were abstracted by a single abstractor (TLW). The question on species and tissue was excluded from verification abstraction for articles in cell biology and plant sciences, as the verification abstractor lacked the field-specific expertise needed to assess this question. Results from the verification abstractor were compared with consensus results from the 2 independent abstractors for each paper, and discrepancies were resolved through discussion. Error rates were calculated as the percentage of responses for which the abstractors’ response was incorrect. Error rates were 5% for plant sciences, 4% for physiology, and 3% for cell biology.
Data processing and creation of figures
Data are presented as n (%). Summary statistics were calculated using Python (RRID:SCR_008394, version 3.6.9, libraries NumPy 1.18.5 and Matplotlib 3.2.2). Charts were prepared with a Python-based Jupyter Notebook (Jupyter-client, RRID:SCR_018413 [ 37 ], Python version 3.6.9, RRID:SCR_008394, libraries NumPy 1.18.5 [ 38 ], and Matplotlib 3.2.2 [ 39 ]) and assembled into figures with vector graphic software. Example images were previously published or generously donated by the manuscript authors as indicated in the figure legends. Image acquisition was described in references ( D . melanogaster images [ 18 ], mouse pancreatic beta islet cells: A. Müller personal communication, and Orobates pabsti [ 19 ]). Images were cropped, labeled, and color-adjusted with FIJI [ 15 ] (RRID:SCR_002285) and assembled with vector-graphic software. Colorblind and grayscale rendering of images was done using Color Oracle [ 36 ] (RRID:SCR_018400). All poor and clear images presented here are “mock examples” prepared based on practices observed during data abstraction.
Supporting information
This flow chart illustrates the number of included and excluded journals or articles, along with reasons for exclusion, at each stage of the study.
Values are n, or n (% of all articles). Screening was performed to exclude articles that were not full-length original research articles (e.g., reviews, editorials, perspectives, commentaries, letters to the editor, short communications, etc.), were not published in April 2018, or did not include eligible images. AJP, American Journal of Physiology.
Values are n, or n (% of all articles). Screening was performed to exclude articles that were not full-length original research articles (e.g., reviews, editorials, perspectives, commentaries, letters to the editor, short communications, etc.), were not published in April 2018, or did not include eligible images. *This journal was also included on the cell biology list (Table S3). **No articles from the Journal of Ecology were screened as the journal did not publish an April 2018 issue.
Values are n, or n (% of all articles). Screening was performed to exclude articles that were not full-length original research articles (e.g., reviews, editorials, perspectives, commentaries, letters to the editor, short communications, etc.), were not published in April 2018, or did not include eligible images. *This journal was also included on the plant science list (Table S2).
Values are percent of papers.
Acknowledgments
We thank the eLife Community Ambassadors program for facilitating this work, and Andreas Müller and John A. Nyakatura for generously sharing example images. Falk Hillmann and Thierry Soldati provided the amoeba strains used for imaging. Some of the early career researchers who participated in this research would like to thank their principal investigators and mentors for supporting their efforts to improve science.
Abbreviations
| GFP | green fluorescent protein |
| LUT | lookup table |
| OSF | Open Science Framework |
| RRID | research resource identifier |
Funding Statement
TLW was funded by American Heart Association grant 16GRNT30950002 ( https://www.heart.org/en/professional/institute/grants ) and a Robert W. Fulk Career Development Award (Mayo Clinic Division of Nephrology & Hypertension; https://www.mayoclinic.org/departments-centers/nephrology-hypertension/sections/overview/ovc-20464571 ). LHH was supported by The Hormel Foundation and National Institutes of Health grant CA187035 ( https://www.nih.gov ). The funders had no role in study design, data collection and analysis, decision to publish, or preparation of the manuscript.
Data Availability
- PLoS Biol. 2021 Mar; 19(3): e3001161.
Decision Letter 0
28 Oct 2020
Dear Dr Weissgerber,
Thank you for submitting your manuscript entitled "Creating Clear and Informative Image-based Figures for Scientific Publications" for consideration as a Meta-Research Article by PLOS Biology.
Your manuscript has now been evaluated by the PLOS Biology editorial staff as well as by an academic editor with relevant expertise and I am writing to let you know that we would like to send your submission out for external peer review.
However, before we can send your manuscript to reviewers, we need you to complete your submission by providing the metadata that is required for full assessment. To this end, please login to Editorial Manager where you will find the paper in the 'Submissions Needing Revisions' folder on your homepage. Please click 'Revise Submission' from the Action Links and complete all additional questions in the submission questionnaire.
Please re-submit your manuscript within two working days, i.e. by Oct 30 2020 11:59PM.
Login to Editorial Manager here: https://www.editorialmanager.com/pbiology
Once your full submission is complete, your paper will undergo a series of checks in preparation for peer review, after which it will be sent out for review.
Given the disruptions resulting from the ongoing COVID-19 pandemic, please expect some delays in the editorial process. We apologise in advance for any inconvenience caused and will do our best to minimize impact as far as possible.
Feel free to email us at gro.solp@ygoloibsolp if you have any queries relating to your submission.
Kind regards,
Roland G Roberts, PhD,
Senior Editor
PLOS Biology
Decision Letter 1
Thank you very much for submitting your manuscript "Creating Clear and Informative Image-based Figures for Scientific Publications" for consideration as a Meta-Research Article at PLOS Biology. Your manuscript has been evaluated by the PLOS Biology editors, an Academic Editor with relevant expertise, and by five independent reviewers. I must apologise for the excessive number of reviewers; we usually aim for three or four, but an administrative oversight led to us recruiting an extra one. I hope that you nevertheless find all the comments useful.
You'll see that the reviewers are broadly positive about your study, but each raises a number of concerns and makes suggestions for improvement. In light of the reviews (below), we are pleased to offer you the opportunity to address the from the reviewers in a revised version that we anticipate should not take you very long. We will then assess your revised manuscript and your response to the reviewers' comments and we may consult the reviewers again.
We expect to receive your revised manuscript within 1 month.
Please email us ( gro.solp@ygoloibsolp ) if you have any questions or concerns, or would like to request an extension. At this stage, your manuscript remains formally under active consideration at our journal; please notify us by email if you do not intend to submit a revision so that we may end consideration of the manuscript at PLOS Biology.
**IMPORTANT - SUBMITTING YOUR REVISION**
Your revisions should address the specific points made by each reviewer. Please submit the following files along with your revised manuscript:
1. A 'Response to Reviewers' file - this should detail your responses to the editorial requests, present a point-by-point response to all of the reviewers' comments, and indicate the changes made to the manuscript.
*NOTE: In your point by point response to the reviewers, please provide the full context of each review. Do not selectively quote paragraphs or sentences to reply to. The entire set of reviewer comments should be present in full and each specific point should be responded to individually.
You should also cite any additional relevant literature that has been published since the original submission and mention any additional citations in your response.
2. In addition to a clean copy of the manuscript, please also upload a 'track-changes' version of your manuscript that specifies the edits made. This should be uploaded as a "Related" file type.
*Resubmission Checklist*
When you are ready to resubmit your revised manuscript, please refer to this resubmission checklist: https://plos.io/Biology_Checklist
To submit a revised version of your manuscript, please go to https://www.editorialmanager.com/pbiology/ and log in as an Author. Click the link labelled 'Submissions Needing Revision' where you will find your submission record.
Please make sure to read the following important policies and guidelines while preparing your revision:
*Published Peer Review*
Please note while forming your response, if your article is accepted, you may have the opportunity to make the peer review history publicly available. The record will include editor decision letters (with reviews) and your responses to reviewer comments. If eligible, we will contact you to opt in or out. Please see here for more details:
https://blogs.plos.org/plos/2019/05/plos-journals-now-open-for-published-peer-review/
*PLOS Data Policy*
Please note that as a condition of publication PLOS' data policy ( http://journals.plos.org/plosbiology/s/data-availability ) requires that you make available all data used to draw the conclusions arrived at in your manuscript. If you have not already done so, you must include any data used in your manuscript either in appropriate repositories, within the body of the manuscript, or as supporting information (N.B. this includes any numerical values that were used to generate graphs, histograms etc.). For an example see here: http://www.plosbiology.org/article/info%3Adoi%2F10.1371%2Fjournal.pbio.1001908#s5
*Blot and Gel Data Policy*
We require the original, uncropped and minimally adjusted images supporting all blot and gel results reported in an article's figures or Supporting Information files. We will require these files before a manuscript can be accepted so please prepare them now, if you have not already uploaded them. Please carefully read our guidelines for how to prepare and upload this data: https://journals.plos.org/plosbiology/s/figures#loc-blot-and-gel-reporting-requirements
*Protocols deposition*
To enhance the reproducibility of your results, we recommend that if applicable you deposit your laboratory protocols in protocols.io, where a protocol can be assigned its own identifier (DOI) such that it can be cited independently in the future. For instructions see: https://journals.plos.org/plosbiology/s/submission-guidelines#loc-materials-and-methods
Thank you again for your submission to our journal. We hope that our editorial process has been constructive thus far, and we welcome your feedback at any time. Please don't hesitate to contact us if you have any questions or comments.
Roli Roberts
Senior Editor,
gro.solp@streborr ,
*****************************************************
REVIEWERS' COMMENTS:
Reviewer #1:
[identifies herself as Elisabeth Bik]
In this paper, the authors screened hundreds of papers from three different scientific fields (physiology, cell biology, and plant sciences) and selected 580 papers that included photographic images. They analyzed the papers containing photographic images for the presence of scale bars, inset annotation, clear labeling, colorblindness-friendly color scheme, adequate description of the specimen etc. The majority of the papers failed one of these criteria. Examples of good and bad image labeling are given throughout the manuscript.
The paper is a welcome addition to the field of meta-science (science about science papers, and provides clear guidelines about what constitutes good labeling and color-use of photographic images in biomedical papers. The search strategy is clearly described and reproducible, and the paper was easy to read and understand. Also, kudos to the authors for including an image featuring Darth Vader.
I have some minor comments.
General comments:
It would be nice if the Abstract should include the total number of papers (580) screened for this study - that number is somewhat hard to find. It is included in Figure S1 (flow chart) and the discussion but it would be good to include it in the abstract and the first paragraph of the Results (see below).
The term "Microphotograph" might benefit from a definition. It appears the authors mean a photo taken from a specimen under a microscope (e.g. of cells or tissues), but I am not sure. Is a "Photograph" then defined as a photo of something visible to the eye such as a plant or a petridish? One could call all the image types mentioned in Figure 1A "photographs", so maybe consider using the term "macrophotograph" for a photo that is not a microphotograph.
Are the examples shown in Figure 4-6 from the papers that were screened for this paper? Or were they taken from public sources (as indicated for some photos) and then manipulated digitally to either remove or add a scale bar (see fig 4)? It would be nice to clearly define that in the Methods (or maybe I missed that).
Specific comments
Page 1, Affiliations of the authors: Typo: "Uterecht"
Introduction. At the end of the Introduction, and the end of "Using a science of science approach...." on Page 4, there are several references to specific figures. I would personally not expect these in the Results, but rather in the Introduction, so maybe consider removing part of that last paragraph of "Using a science...." to the beginning of the Results?
Results. Page 4. It would be more clear to start the Results section by mentioning how many papers (580) were screened.
Results. Page 4. "More than half of the papers in the sample contained images (plant science: 68%, cell biology: 72%, physiology: 55%)." - These numbers do not seem to match the data provided in Supplemental Tables 1-3. Maybe I am misunderstanding something, but Supplemental Tables 1-3 mention 39.9, 51.2, and 38.9% of papers, which are much lower numbers.
Physiology: 431 screened - 172 included (39.9%)
Plant science: 502 screened - 257 included (51.2%)
Cell Biology: 409 screened - 159 included (38.9%)
On page 6, "Approximately half of the papers (47-58%) also failed or partially failed to adequately explain insets. " appears to refer to Figure 1C, right panel, but the figure number/panel is not mentioned. Maybe add that?
Page 11, under 3 "Use Color wisely in images", "Images showing ielectron micrographs" should perhaps read "Images showing electron microphotographs"
Page 13, Maybe write "Deuteranopia, the most common form of colorblindness..." to remind the reader of what the term means (used a lot in the following paragraph)
Discussion. Page 22: "intentionally or accidentally manipulated images" - should be "intentionally or accidentally duplicated images"
Page 22: What is meant by "Error rates" here? The numbers listed here do not appear to match anything else in the paper. Maybe a reference or reminder needs to be included here.
Discussion. Page 22: "Actions journals can take to make image-based figures more transparent and easier to interpret". An important item not listed here, but that I personally think is very important, is to add particular requirements about e.g. the use of colorblind-safe colors and inclusion of scale bars in the journal's guidelines for figure preparation/guidelines for authors. Many of these requirements could be listed to the guidelines that many journals already have online. It is much easier to have these requirements up front instead of trying to fix them during the manuscript reviewing stage.
Page 23. "of which 500 are estimated to contain images" - do the authors mean photographic images? What is this number based on?
Figure 1B and Figure 1C layout could be more similar to each other
Figure 1C - right hand panel not described in Results, and not clear how it differs from what is shown in the left panel
In Figure 4, Square = 1cm, should this be 1cm2?
Figure 4 refers to 1-3 and 4-6 but there are no numbers in the figure itself.
Figure 4 typo: "Micropcope"
Figure 12: In top right, I did not think the color annotation was that clear ; I liked the solution used in the top left, although that is not color blind safe - could something similar be used in the top right? The line to the mRNA appears to land in an area that has both colors, which was not very clear. Maybe moving it a bit to the left so that it would land in a clear green area would help.
Methods. Page 25, under "Screening" what is meant by "using Rayyan software"? I was not familiar with that tool.
Supplemental materials. The Plant Cell articles were included twice in Tables S2 and S3, which was potentially confusing, since now the totals of Tables S1-S3 cannot be summed. I would recommend leaving them out of the Cell Biology table (S3), with a little note under the table, so that there are no duplicate values across the tables.
Table S1-S3: maybe include percentages in the top row, e.g., n=409 n=159 (38.9%)
Page 29, under Table S2, should be "This journal was also included on the cell biology list (Table S3)." instead of "(Table S2)".
Reviewer #2:
In general, I find this paper to be excellent and to be potentially a very valuable resource to the community. I appreciate the large amount of work their initial quantitative findings must have required, and the thoroughness of the recommendations they have put together.
My largest critique (the only one I feel would be NECESSARY to address before publication is that in general), the authors prescribe certain things readers should do when authoring their own papers, but are inconsistent in whether or not they tell readers how to do that (or point them to an educational resource). This is not universal- they do, for example, point the reader to resources for simulating colorblindness in the text around Figures 7 and 8, but not how to do the inversions or greyscale testing in Figure 6, how to generate labels ala Figures 10 and 11, etc. Obviously it would be outside the scope of this paper to teach readers to do every task in every POSSIBLE software it could be done in, but the authors could select one or two commonly used tools (such as FIJI, Photoshop/Illustrator, etc, though for maximum utility my vote would be for something free to use) and provide guidance in those. This could be done along the way, and/or as part of a section at the beginning describing what are some commonly used tools for figure creation (and pointing to resources for each to learn to do common tasks). In that vein it would also be nice for the authors to more fully credit the tools that were used to make their own figures (they describe which python libraries are used in the creation of their bar graphs, but don't cite the relevant publications for those libraries or for the jupyter project itself (which according to the OSF project is how those figures were created), nor do they describe which software tool(s) they used to create the rest of the figures (They mention the QuickFigures tool at one point, though it's not clear that is what's used in this work or not).
An additional few smaller critiques-
1) The degree to which the authors obey their own rules for best practices vary; many of the images in the paper lack scale bars, for example, or have illegible bars (figure 6). I understand in most cases that is not the point being illustrated in that particular figure, and would not see it as a blocker for publication, but it would be nice to see them used more consistently, especially in the "good" images.
2) The text in the table in Figure 10 is VERY small, it might be better to move it below rather than beside the figure so it can more easily be enlarged. The text in other figures (such as 9 and 11 is also borderline tiny)
3) I personally find the broken-up-bar-graph in figure 1B a bit hard to read, especially as the bars for "Some scale bar dimensions" and "All/some magnification in legend" are overlapping; breaking it into multiple bar plots ala 1A lacks the "nice" effect of seeing how things add to 100 but might be more clear.
Reviewer #3:
The manuscript starts with quantification of image usage in publications and is followed by quantification of correct/incorrect image reporting (usage of scale information, insets etc.). The analysis of the published papers served the authors to discover problems and to come-up with suggestions that are presented in the following - core part of the manuscript. Here the authors give clear suggestions to relevant steps of image representation and figure preparation. Each step is visualized comparing wrong and right/improved approaches, such that the readers can compare the differences immediately by themselves. The manuscript ends with a final discussion that includes action points suggested to journal and the scientific community. The manuscript is very clearly written and gives the reader clear recommendations on how to improve image display.
Novelty and significance
While the single steps addressed (scale bar, color scheme, annotations) are not novel, the way of presenting it with the comparison in figures and the focus on the "colorblind safe" images is. The discussion in context of modern publishing (online) and the connection to online image repositories is timely.
The manuscript gives the reader a very clear "workflow" of what to do in different cases (e.g. 2 color image vs. 3 color image, or EM image vs. color photo) in order to avoid pitfalls. With this I expect it to be of great use, especially (but not only) for early career scientists.
Points of criticism:
I would have wished for a discussion around the flexibility of the rules and a potential of "miscounting" in the quantification of fig 1. E.g. also in this manuscript the scale bar is missing in most figures and would have been counted accordingly as "Partial scale information" in figure 1. (The reason why the scale bar is missing is written in the text of the manuscript.)
Also, I would have wished for a discussion whether/whether not it is important to include details in the figure legend, especially about tissue specification. Under section 7 (prepare figure legends) it is written that some journals require details, while others not - which clearly shows different opinions about this topic. Figure 2B "Are species/tissue/object clearly described in the legend?" shows to me rather different opinions on this topic rather than clear errors in image representation.
Minor comments:
- Fig 1: Include to the supplementary examples of images classified as e.g. "insets inaccurately marked, some marked " etc. if this is possible following copyright of already published figures.
- Fig 3A, subcellular scale image is saturated
- Fig 3B. Solution (cell image): inset marking is not fully transparent
- Fig 4: Ruler as scale bar - Square: 1cm; square not visible in this magnification
- Fig. 5: "Darth Vader being attached" - kids playing Star Wars?
- Section 5. Design the figure: "either from top to bottom and/or from right to left" should presumably read as "left to right"
- Fig 6 scale bar not visible in the print as it is for now
- Fig 8 Split the color channel: blue described as "least visible" in Fig. 6, but used anyway
- Same in Fig. 12 (red), described as "least visible" in Fig. 6, but used anyway
Reviewer #4:
[identifies herself as Perrine Paul-Gilloteaux]
This paper proposes a systematic review of figures in literature in biology-related fields, following some of the PRISMA guidelines, to assess the quality of these published figures. The criteria assessed are the accessibility of figures for color-blindness scientist, the presence of some minimal information as defined by the authors in the legend, the clarity of annotations or insets as assessed by the authors, the presence and clarity of the scale bar. The minimal information (in addition to the scale bar) that should be reported in the legend, as defined by the authors, are defined as the species (or cell lines) observed and the explanation of colors shown. Statistics on the binary fulfilment of these criteria are reported on the selected sample of publications.
The main message reported is that a majority of figures manually inspected by the authors did not fulfil all these criteria.
In addition the authors provides some examples of DO and DON'T for these points and provide guidelines to design good quality figures, according to these criteria.
While the study is certainly a considerable amount of work, and may point out that editors and reviewers did not do their job (PLOS Biology was not assessed) (reporting scale bar is at least known and required to be present and all figures by editors), I am questioning the choice of the criteria assessed. In particular, authors stated that these criteria serve the reproducibility, I do not understand how badly presented insets may reduce the reproducibility, as stated by the authors. It may unserve the readability, or send a bad message of the rigour of the study, but even this would need to be supported as statements, since in the study the figures which were not filling these criteria did not need them to be understood by the reader. More important guidelines, such as the one asked by journal publishing guidelines (contrast settings, background filtering, process history) would be more important as they can lead to wrong and false messages. The choice of these particular criteria should have been defended against some data or example about how they prevent reproducibility.
Then, showing with the permission of editors/authors, some example of badly assessed figures would have been useful: in particular I am doubtful about the unvisible annotation due to the blending with background color and how it can escape, the example shown of DON'T would serve better the message if taken from real published papers. Real example from real papers of figures assessed as not filling some of the criteria would serve better the message of the paper. Or even more ambitious, adding some reporting on the subjective loss of information and understanding in these papers by the authors of this meta analysis?
For example, even if it is indeed not deserving the main message of the paper, scale bar is not reported in most of the figures of this paper itself (it would have been expected at least for the example of different scale of images Figure 3 ) and in the same time species is reported for all figures when it brings no element to the main message, which is not biologically-related.
Also in the reporting of the method, I could not get how was defined the error rate mentioned: discrepancy in the binary answer of reviewers on each criteria? Are the scripts to compute the statistics provided? I could not find it on the link provided by the authors.
In addition, one of the main conclusion is also that these recommendations could help in designing the minimal information required when depositing data, but actually the repositories mentioned (IDR, Cell Atlas) store the raw data, not the figures, so the criteria and factors assessed are not applicable. Could the authors comment on this point or clarify this?
In conclusion, while the topic is timely relevant in the time of the reproducibility crisis, the authors are sending some messages that should be in the hand of the editors while editing the final proof of papers, in particular with the limited amount and impact of the criteria assessed. The two parts of the paper: constatation of the state of figure published in April 2018 against the criteria defined by the authors, followed by related guidelines and recommendations, are coherent together but the angle taken is too narrow:, in particular when stating as a main mission the reproducibility of papers. It may be of relevance for teaching courses but I am not sure about its categorization as a research paper as it is. The meta analysis could be of further interest if the support of the message was stronger by proving how this failure in criteria deserves reproducibility and interpretation of the data, as I am not convinced the ones chosen are the more important.
Reviewer #5:
[identifies himself as Simon F. Nørrelykke]
* Summary of the research and my overall impression
** 1. summarise what the ms claims to report
This manuscript details the results from a group of researchers across the globe who got together to document the state of image-based figures in scientific publications. The results obtained show that there is ample room for improvement and the authors proceed by giving figure-creation recommendations that, if followed by authors and journals, should greatly increase the quality of published figures.
Fraudulent image manipulation and how to acquire images is not the focus of this manuscript. Microscopy images, both transmitted, fluorescent, and electron, as well and photographs, are the focus; medical images (MRI, ultrasound, etc) were allowed but rare in the three fields studied.
All papers published during April 2018 in 15 journals (45 journals in total) in the three fields of plant science, cell biology, and physiology were manually examined and scored along several dimensions according to a shared protocol, available online and discussed in the manuscript.
580 papers were examined by "eLife Community Ambassadors from around the world" working together.
Only 2--16% of these papers met all the criteria set for good practices.
Detailed recommendations are given for the preparation of figures with microscopy images. These include discussions of scale bars, insets, colors/colorblindness, label, annotations, legends etc.
Though figures are ideally be designed to reach a wide audience, incl. scientists in other fields, they are typically only interpretable by a very narrow one, if at all.
The advise given on selecting the relevant magnification, how and where to include scale bars, and usage of color, should all be common sense, but apparently is not (behold the results of the investigation reported in this manuscript.) They are thus valuable, even if not novel or thought-provoking, and should be mandatory reading for every student preparing their first manuscript - and perhaps for a majority of PIs, reviewers, and editors alike.
** 2. give overview of the strengths and weaknesses of the ms
- Well written manuscript that reads well (except, perhaps, for the results section)
- The results section is very dry. Six paragraphs lists a large number of percentages. This is data but almost not information. An actuarian may disagree. Figures contain slightly more data and in a more digestible format (graphical).
- Data-acquisition: The number of journals assessed and the approach taken (two reviewers per paper and a clear protocol) is scientific and convincing
- The recommendations are clear and well illustrated
- Though most/all of the points are not new to anyone used to working with images (colorblindness, contrast, scale bars etc), it is useful to see them all collected and commented on in one place - also, every number of years it is useful to remind the community that these things are still (or increasingly? we don't know) an issue.
- Being literal about PLOS criteria:
+ Originality :: this is, as far as I know, the first papers reporting solidly on image-based figure quality
+ Importance to researchers in its field :: Important enough that it should be mandatory reading for any figure-creating scientist
+ Interest to scientists outside the field :: The findings and recommendations cover three fields and easily generalise to other fields
+ Rigorous methodology and substantial evidence for its conclusions :: Yes! Details given elsewhere in report.
** 3. recommended course of action
Publish after revision.
Highlight with editorial mention and Twitter activity.
This paper may do more for science than many a pure research manuscript.
* Specific areas that could be improved
** Major issues
- Major, somewhat, because pointing to conceptual issues
+ p. 6 "We evaluated only images in which the authors could have adjusted the image colors (i.e. fluorescence microscopy)"
+ Unless I misunderstand, it is perfectly possible to adjust the colors in any image, so this limitation to fluorescent microscopy images seems to not be justified by the argument given.
+ Example: In an RGB image, e.g. a photo of a flower, the user can set a different color for each of the three channels. This is easily done in, e.g. Imagej/Fiji using the channel tool
* https://imagej.net/docs/guide/146-28.html#toc-Subsection-28.5
* https://imagej.net/docs/guide/146-28.html#sub:Channels ...[Z]
+ Fix: redo research or reformulate sentence to simply state which images you comment on.
+ Or, did you perhaps mean "e.g." and not "i.e."?
- Major, but fixable, because pointing to conceptual issues
+ p. 12: "Digital microscope setups capture each channel's intensities in greyscale values."
+ Nope: Some do, some don't.
+ Fluorescent microscopes equipped with filter cubes and very light sensitive CCDs (CMOSs) tend to, as do confocals
+ Slides scanners (also microscopes) are usually equipped with RGB cameras.
+ Suggested fix: delete sentence after understanding why it is wrong
- Suggestion for how to lead by example and in the interest of reproducibility
+ Share the data in an interoperable manner (FAIR principles)
+ Share the Python notebooks used for statistical analysis
+ Share the scripts used to create figures (unless assembled by hand)
+ Do this in GitHub, Zenodo, or the journal website
** Minor issues
- p3: EMBO's Source Data tool (RRID:SCR_015018)
+ Is this supposed to be a link or reference?
- p6: "Color Oracle ( https://colororacle.org/ , RRID:SCR_018400)."
+ What is RRID? Not explained until p. 23.
- p. 5, Figure 1
+ Please give n in subpanel B, similar to A and C, or Fig 2 A, B, C.
+ Or state that numbers are the same as in A
- p. 11, Figure 4
+ This figure would be more powerful if the problems were 1-1 mirrored by solutions
+ Only two of the five problem images are solved
+ The ruler shown in the bottom right corner is too small to illustrate the point otherwise made: Zooming in, in the pdf, does not give clearly resolved 1cm squares, perhaps due to jpg effect.
+ Alternatively, rename from "problem" and "solution" to something not evoking expectations of solutions to the problems, e.g. by removing those two words.
- p. 12, Figure 5, top row
+ This is a very unlikely example of a scientific image
+ Resist temptation of including photos of family members ;-)
+ If you cannot find a natural, scientific, example, perhaps this is not an actual problem?
- p. 12, Figure 5, third and fourth row
+ Recommendations: the splitting should be in addition to, not instead of, adjusting for colorblindness in a merged image
+ Yes, you refer to Fig 8, but here is a natural place to mention it
- p. 13, Figure 6
+ This figure ought to be redundant, to the extent that the reader knows that higher contrast has higher contrast
+ If, however, the authors saw many examples of dark colors on dark background during their scans of papers, this could still seem a justified figure
+ "Free tools, such as Color Oracle (RRID:SCR_018400)"
+ Also available, for images, in the very popular open source software Fiji under "Image > Color > Simulate Color Blindness"
- p. 15, Figure 8
+ You show possible solutions but do not say what you recommend.
+ Please, do that and argue for the choice!
+ "QuickFigures (RRID:SCR019082)"
+ Does this software support reproducibility (creates scripts that can generate entire figure)?
+ Please comment in manuscript
- p. 17, Figure 10
+ Text in right half of figure is too small to comfortably read
- p. 21 Figure 13
+ Add title to third column
+ "increase training opportunities in bioimaging"
+ Should, likely, read "increase training opportunities in bioimage analysis"
- p. 35, Figure S1
+ Please create higher quality figure that better supports zooming in
- Suggestion
+ Cite first author's recent paper in F1000R-NEUBIAS on same topic
Author response to Decision Letter 1
30 Jan 2021
Submitted filename: Response_to_reviewers_R1_20200126.docx
Decision Letter 2
26 Feb 2021
Dear Tracey,
I've obtained advice from two of the previous reviewers, and on behalf of my colleagues and the Academic Editor, Jason Swedlow, I'm pleased to say that we can in principle offer to publish your Meta-Research Article "Creating Clear and Informative Image-based Figures for Scientific Publications" in PLOS Biology, provided you address any remaining formatting and reporting issues. These will be detailed in an email that will follow this letter and that you will usually receive within 2-3 business days, during which time no action is required from you. Please note that we will not be able to formally accept your manuscript and schedule it for publication until you have made the required changes.
Please take a minute to log into Editorial Manager at http://www.editorialmanager.com/pbiology/ , click the "Update My Information" link at the top of the page, and update your user information to ensure an efficient production process.
PRESS: We frequently collaborate with press offices. If your institution or institutions have a press office, please notify them about your upcoming paper at this point, to enable them to help maximise its impact. If the press office is planning to promote your findings, we would be grateful if they could coordinate with gro.solp@sserpygoloib . If you have not yet opted out of the early version process, we ask that you notify us immediately of any press plans so that we may do so on your behalf.
We also ask that you take this opportunity to read our Embargo Policy regarding the discussion, promotion and media coverage of work that is yet to be published by PLOS. As your manuscript is not yet published, it is bound by the conditions of our Embargo Policy. Please be aware that this policy is in place both to ensure that any press coverage of your article is fully substantiated and to provide a direct link between such coverage and the published work. For full details of our Embargo Policy, please visit http://www.plos.org/about/media-inquiries/embargo-policy/ .
Thank you again for supporting Open Access publishing. We look forward to publishing your paper in PLOS Biology.
Best wishes,
Roland G Roberts, PhD
Senior Editor
_______________
[identifies herself as Elisabeth M Bik]
I thank the authors for addressing all of the comments raised by the reviewers. I look forward to see this paper published.
[identifies herself as Beth Cimini]
The authors have satisfied my concerns and I can happily recommend this work for publication.
- Resources Home 🏠
- Try SciSpace Copilot
- Search research papers
- Add Copilot Extension
- Try AI Detector
- Try Paraphraser
- Try Citation Generator
- April Papers
- June Papers
- July Papers

How to cite images and graphs in your research paper

Table of Contents

If you are confused about whether you should include pictures, images, charts, and other non-textual elements in your research paper or not, I would suggest you must insert such elements in your research paper. Including non-textual elements like images and charts in the research paper helps extract a higher acceptance of your proposed theories.
An image or chart will make your research paper more attractive, interesting, explanatory, and understandable for the audience. In addition, when you cite an image or chart, it helps you describe your research and its parts with far more precision than simple, long paragraphs.
There are plenty of reasons why you should cite images in your research paper. However, most scholars and academicians avoid it altogether, losing the opportunity to make their research papers more interesting and garner higher readership.
Additionally, it has been observed that there are many misconceptions around the use or citation of images in research papers. For example, it is widely believed and practiced that using pictures or any graphics in the research papers will render it unprofessional or non-academic. However, in reality, no such legit rules or regulations prohibit citing images or any graphic elements in the research papers.
You will find it much easier once you know the appropriate way to cite images or non-textual elements in your research paper. But, it’s important to keep in mind some rules and regulations for using different non-textual elements in your research paper. You can easily upgrade your academic/ research writing skills by leveraging various guides in our repository.
In this guide, you will find clear explanations and guidelines that will teach you how to identify appropriate images and other non-textual elements and cite them in your research paper. So, cut the clutter; let’s start.
Importance of citing images in a research paper
Although it’s not mandatory to cite images in a research paper, however, if you choose to include them, it will help showcase your deep understanding of the research topic. It can even represent the clarity you carry for your research topic and help the audience navigate your paper easily.

There are several reasons why you must cite images in your research paper like:
(i) A better explanation for the various phenomenon
While writing your research paper, certain topics will be comparatively more complex than others. In such a scenario where you find out that words are not providing the necessary explanation, you can always switch to illustrating the process using images. For example, you can write paragraphs describing climate change and its associated factors and/or cite a single illustration to describe the complete process with its embedded factors.
(ii) To simplify examples
To create an impeccable research paper, you need to include evidence and examples supporting your argument for the research topic. Rather than always explaining the supporting evidence and examples through words, it will be better to depict them through images. For example, to demonstrate climate change's effects on a region, you can always showcase and cite the “before and after” images.
(iii) Easy Classification
If your research topic requires segregation into various sub-topics and further, you can easily group and classify them in the form of a classification tree or a chart. Providing such massive information in the format of a classification tree will save you a lot of words and present the information in a more straightforward and understandable form to your audience.
(iv) Acquire greater attention from the audience
Including images in your research paper, theses, and dissertations will help you garner the audience's greater attention. If you add or cite images in the paper, it will provide a better understanding and clarification of the topics covered in your research. Additionally, it will make your research paper visually attractive.
Types of Images that you can use or cite in your research paper
Using and citing images in a research paper as already explained can make your research paper more understanding and structured in appearance. For this, you can use photos, drawings, charts, graphs, infographics, etc. However, there are no mandatory regulations to use or cite images in a research paper, but there are some recommendations as per the journal style.
Before including any images in your research paper, you need to ensure that it fits the research topic and syncs with your writing style. As already mentioned, there are no strict regulations around the usage of images. However, you should make sure that it satisfies certain parameters like:
- Try using HD quality images for better picture clarity in both print and electronic formats
- It should not be copyrighted, and if it is, you must obtain the license to use it. In short cite the image properly by providing necessary credits to its owner
- The image should satisfy the context of the research topic
You can cite images in your research paper either at the end, in between the topics, or in a separate section for all the non-textual elements used in the paper. You can choose to insert images in between texts, but you need to provide the in-text citations for every image that has been used.
Additionally, you need to attach the name, description and image number so that your research paper stays structured. Moreover, you must cite or add the copyright details of the image if you borrow images from other platforms to avoid any copyright infringement.
Graphs and Charts
You can earn an advantage by providing better and simple explanations through graphs and charts rather than wordy descriptions. There are several reasons why you must cite or include graphs and charts in your research paper:
- To draw a comparison between two events, phenomena, or any two random parameters
- Illustration of statistics through charts and graphs are most significant in drawing audience attention towards your research topic
- Classification tree or pie charts goes best to show off the degree of influence of a specific event, or phenomenon in your research paper
With the usage of graphs and charts, you can answer several questions of your readers without them even questioning. With charts and graphs, you can provide an immense amount of information in a brief yet attractive manner to your readers, as these elements keep them interested in your research topic.
Providing these non-textual elements in your research paper increases its readability. Moreover, the graphs and charts will drive the reader’s attention compared to text-heavy paragraphs.
You can easily use the graphs or charts of some previously done research in your chosen domain, provided that you cite them appropriately, or else you can create your graphs through different tools like Canva, Excel, or MS PowerPoint. Additionally, you must provide supporting statements for the graphs and charts so that readers can understand the meaning of these illustrations easily.
Similarly, like pictures or images, you can choose one of the three possible methods of placement in your research paper, i.e., either after the text or on a different page right after the corresponding paragraph or inside the paragraph itself.
How to Cite Images and Graphs in a Research Paper?

Once you have decided the type of images you will be using in your paper, understand the rules of various journals for the fair usage of these elements. Using pictures or graphs as per these rules will help your reader navigate and understand your research paper easily. If you borrow or cite previously used pictures or images, you need to follow the correct procedure for that citation.
Usage or citation of pictures or graphs is not prohibited in any academic writing style, and it just differs from each other due to their respective formats.
Cite an Image/Graphs in APA (American Psychological Association) style
Most of the scientific works, society, and media-based research topics are presented in the APA style. It is usually followed by museums, exhibitions, galleries, libraries, etc. If you create your research paper in APA style and cite already used images or graphics, you need to provide complete information about the source.
In APA style, the list of the information that you must provide while citing an element is as follows:
- Owner of the image (artist, designer, photographer, etc.)
- Complete Date of the Image: Follow the simple DD/MM/YYYY to provide the details about the date of the image. If you have chosen a certain historical image, you can choose to provide the year only, as the exact date or month may be unknown
- Country or City where the Image was first published
- A Name or Title of the Image (Optional: Means If it is not available, you can skip it)
- Publisher Name: Organization, association, or the person to whom the image was first submitted
If you want to cite some images from the internet, try providing its source link rather than the name or webpage.
Format/Example of Image Citation:
Johanson, M. (Photographer). (2017, September, Vienna, Austria. Rescued bird. National gallery.
Cite an Image/Graphs in MLA (Modern Language Association) style
MLA style is again one of the most preferred styles worldwide for research paper publication. You can easily use or cite images in this style provided no rights of the image owner get violated. Additionally, the format or the information required for citation or usage is very brief yet precise.
In the MLA style, the following are the details that a used image or graph must carry:
- Name of the creator of the owner
- Title, Name, or the Description of the Image
- Website Or the Source were first published
- Contributors Name (if any)
- Version or Serial Number (if any)
- Publisher’s Details; at least Name must be provided
- Full Date (DD:MM: YYYY) of the first published Image
- Link to the original image
Auteur, Henry. “Abandoned gardens, Potawatomi, Ontario.” Historical Museum, Reproduction no. QW-YUJ78-1503141, 1989, www.flickr.com/pictures/item/609168336/
Final Words
It is easy to cite images in your research paper, and you should add different forms of non-textual elements in the paper. There are different rules for using or citing images in research papers depending on writing styles to ensure that your paper doesn’t fall for copyright infringement or the owner's rights get violated.
No matter which writing style you choose to write your paper, make sure that you provide all the details in the appropriate format. Once you have all the details and understanding of the format of usage or citation, feel free to use as many images that make your research paper intriguing and interesting enough.
If you still have doubts about how to use or cite images, join our SciSpace (Formerly Typeset) Community and post your questions there. Our experts will address your queries at the earliest. Explore the community to know what's buzzing and be a part of hot discussion topics in the academic domain.
Learn more about SciSpace's dedicated research solutions by heading to our product page. Our suite of products can simplify your research workflows so that you can focus more on what you do best: advance science.
With a best-in-class solution, you can handle everything from literature search and discovery to profile management, research writing, and formatting.
But Before You Go,
You might also like.

Consensus GPT vs. SciSpace GPT: Choose the Best GPT for Research

Literature Review and Theoretical Framework: Understanding the Differences

Types of Essays in Academic Writing - Quick Guide (2024)
Have a language expert improve your writing
Run a free plagiarism check in 10 minutes, generate accurate citations for free.
- Knowledge Base
- Citing sources
How to Cite an Image | Photographs, Figures, Diagrams
Published on March 25, 2021 by Jack Caulfield . Revised on June 28, 2022.
To cite an image, you need an in-text citation and a corresponding reference entry. The reference entry should list:
- The creator of the image
- The year it was published
- The title of the image
- The format of the image (e.g., “photograph”)
- Its location or container (e.g. a website , book , or museum)
The format varies depending on where you accessed the image and which citation style you’re using: APA , MLA , or Chicago .
Instantly correct all language mistakes in your text
Upload your document to correct all your mistakes in minutes

Table of contents
Citing an image in apa style, citing an image in mla style, citing an image in chicago style, frequently asked questions about citations.
In an APA Style reference entry for an image found on a website , write the image title in italics, followed by a description of its format in square brackets. Include the name of the site and the URL. The APA in-text citation just includes the photographer’s name and the year.
| APA format | Author last name, Initials. (Year). [Format]. Site Name. URL |
|---|---|
| Reis, L. (2021). [Photograph]. Flickr. https://flic.kr/p/2kNpoXB | |
| (Reis, 2021) |
The information included after the title and format varies for images from other containers (e.g. books , articles ).
When you include the image itself in your text, you’ll also have to format it as a figure and include appropriate copyright/permissions information .
Images viewed in person
For an artwork viewed at a museum, gallery, or other physical archive, include information about the institution and location. If there’s a page on the institution’s website for the specific work, its URL can also be included.
| APA format | Author last name, Initials. (Year). [Format]. Institution Name, Location. URL |
|---|---|
| Kahlo, F. (1940). [Painting]. Museum of Modern Art, New York City, NY, United States. https://www.moma.org/collection/works/78333 | |
| (Kahlo, 1940) |
Prevent plagiarism. Run a free check.
In an MLA Works Cited entry for an image found online , the title of the image appears in quotation marks, the name of the site in italics. Include the full publication date if available, not just the year.
The MLA in-text citation normally just consists of the author’s last name.
| MLA format | Author last name, First name. “Image Title.” , Day Month Year, URL. |
|---|---|
| Reis, Larry. “Northern Cardinal Female at Lake Meyer Park IA 653A2079.” , 22 Mar. 2021, https://flic.kr/p/2kNpoXB. | |
| (Reis) |
The information included after the title and format differs for images contained within other source types, such as books and articles .
If you include the image itself as a figure, make sure to format it correctly .
A citation for an image viewed in a museum (or other physical archive, e.g. a gallery) includes the name and location of the institution instead of website information.
| MLA format | Author last name, First name. “Image Title.” Year, Institution Name, City. |
|---|---|
| Kahlo, Frida. “Self-Portrait with Cropped Hair.” 1940, Museum of Modern Art, New York. | |
| (Kahlo) |
In Chicago style , images may just be referred to in the text without need for a citation or bibliography entry.
If you have to include a full Chicago style image citation , however, list the title in italics, add relevant information about the image format, and add a URL at the end of the bibliography entry for images consulted online.
| Chicago format | Author last name, First name. . Month Day, Year. Format. Website Name. URL. |
|---|---|
| Reis, Larry. . March 22, 2021. Photograph. Flickr. https://flic.kr/p/2kNpoXB. | |
| 1. Larry Reis, , March 22, 2021, photograph, Flickr, https://flic.kr/p/2kNpoXB. 2. Reis, . |
Chicago also offers an alternative author-date citation style . Examples of image citations in this style can be found here .
For an image viewed in a museum, gallery, or other physical archive, you can again just refer to it in the text without a formal citation. If a citation is required, list the institution and the city it is located in at the end of the bibliography entry.
| Chicago format | Author last name, First name. . Year. Format. Institution Name, City. |
|---|---|
| Kahlo, Frida. . 1940. Oil on canvas, 40 x 27.9 cm. Museum of Modern Art, New York. | |
| 1. Frida Kahlo, , 1940, oil on canvas, 40 x 27.9 cm, Museum of Modern Art, New York. 2. Kahlo, . |
The main elements included in image citations across APA , MLA , and Chicago style are the name of the image’s creator, the image title, the year (or more precise date) of publication, and details of the container in which the image was found (e.g. a museum, book , website ).
In APA and Chicago style, it’s standard to also include a description of the image’s format (e.g. “Photograph” or “Oil on canvas”). This sort of information may be included in MLA too, but is not mandatory.
Untitled sources (e.g. some images ) are usually cited using a short descriptive text in place of the title. In APA Style , this description appears in brackets: [Chair of stained oak]. In MLA and Chicago styles, no brackets are used: Chair of stained oak.
For social media posts, which are usually untitled, quote the initial words of the post in place of the title: the first 160 characters in Chicago , or the first 20 words in APA . E.g. Biden, J. [@JoeBiden]. “The American Rescue Plan means a $7,000 check for a single mom of four. It means more support to safely.”
MLA recommends quoting the full post for something short like a tweet, and just describing the post if it’s longer.
In APA , MLA , and Chicago style citations for sources that don’t list a specific author (e.g. many websites ), you can usually list the organization responsible for the source as the author.
If the organization is the same as the website or publisher, you shouldn’t repeat it twice in your reference:
- In APA and Chicago, omit the website or publisher name later in the reference.
- In MLA, omit the author element at the start of the reference, and cite the source title instead.
If there’s no appropriate organization to list as author, you will usually have to begin the citation and reference entry with the title of the source instead.
Check if your university or course guidelines specify which citation style to use. If the choice is left up to you, consider which style is most commonly used in your field.
- APA Style is the most popular citation style, widely used in the social and behavioral sciences.
- MLA style is the second most popular, used mainly in the humanities.
- Chicago notes and bibliography style is also popular in the humanities, especially history.
- Chicago author-date style tends to be used in the sciences.
Other more specialized styles exist for certain fields, such as Bluebook and OSCOLA for law.
The most important thing is to choose one style and use it consistently throughout your text.
Cite this Scribbr article
If you want to cite this source, you can copy and paste the citation or click the “Cite this Scribbr article” button to automatically add the citation to our free Citation Generator.
Caulfield, J. (2022, June 28). How to Cite an Image | Photographs, Figures, Diagrams. Scribbr. Retrieved June 7, 2024, from https://www.scribbr.com/citing-sources/cite-an-image/
Is this article helpful?

Jack Caulfield
Other students also liked, how to cite a youtube video | mla, apa & chicago, how to cite a website | mla, apa & chicago examples, how to cite a book | apa, mla, & chicago examples, scribbr apa citation checker.
An innovative new tool that checks your APA citations with AI software. Say goodbye to inaccurate citations!

unprecedented photorealism × deep level of language understanding
Unprecedented photorealism, deep level of language understanding.
Google Research, Brain Team
We present Imagen, a text-to-image diffusion model with an unprecedented degree of photorealism and a deep level of language understanding. Imagen builds on the power of large transformer language models in understanding text and hinges on the strength of diffusion models in high-fidelity image generation. Our key discovery is that generic large language models (e.g. T5), pretrained on text-only corpora, are surprisingly effective at encoding text for image synthesis: increasing the size of the language model in Imagen boosts both sample fidelity and image-text alignment much more than increasing the size of the image diffusion model. Imagen achieves a new state-of-the-art FID score of 7.27 on the COCO dataset, without ever training on COCO, and human raters find Imagen samples to be on par with the COCO data itself in image-text alignment. To assess text-to-image models in greater depth, we introduce DrawBench, a comprehensive and challenging benchmark for text-to-image models. With DrawBench, we compare Imagen with recent methods including VQ-GAN+CLIP, Latent Diffusion Models, and DALL-E 2, and find that human raters prefer Imagen over other models in side-by-side comparisons, both in terms of sample quality and image-text alignment.
More from the Imagen family:

Imagen is an AI system that creates photorealistic images from input text

Visualization of Imagen. Imagen uses a large frozen T5-XXL encoder to encode the input text into embeddings. A conditional diffusion model maps the text embedding into a 64×64 image. Imagen further utilizes text-conditional super-resolution diffusion models to upsample the image 64×64→256×256 and 256×256→1024×1024.
Large Pretrained Language Model × Cascaded Diffusion Model
Deep textual understanding → photorealistic generation, imagen research highlights.
- We show that large pretrained frozen text encoders are very effective for the text-to-image task.
- We show that scaling the pretrained text encoder size is more important than scaling the diffusion model size.
- We introduce a new thresholding diffusion sampler, which enables the use of very large classifier-free guidance weights.
- We introduce a new Efficient U-Net architecture, which is more compute efficient, more memory efficient, and converges faster.
- On COCO, we achieve a new state-of-the-art COCO FID of 7.27; and human raters find Imagen samples to be on-par with reference images in terms of image-text alignment.
| Model | COCO FID ↓ |
|---|---|
| Trained on COCO | |
| AttnGAN (Xu et al., 2017) | 35.49 |
| DM-GAN (Zhu et al., 2019) | 32.64 |
| DF-GAN (Tao et al., 2020) | 21.42 |
| DM-GAN + CL (Ye et al., 2021) | 20.79 |
| XMC-GAN (Zhang et al., 2021) | 9.33 |
| LAFITE (Zhou et al., 2021) | 8.12 |
| Make-A-Scene (Gafni et al., 2022) | 7.55 |
| Not trained on COCO | |
| DALL-E (Ramesh et al., 2021) | 17.89 |
| GLIDE (Nichol et al., 2021) | 12.24 |
| DALL-E 2 (Ramesh et al., 2022) | 10.39 |
| Imagen (Our Work) | 7.27 |
DrawBench: new comprehensive challenging benchmark
- Side-by-side human evaluation.
- Systematically test for: compositionality, cardinality, spatial relations, long-form text, rare words, and challenging prompts.
- Human raters strongly prefer Imagen over other methods, in both image-text alignment and image fidelity.
State-of-the-art text-to-image
#1 in coco fid · #1 in drawbench.
Click on a word below and Imagen!
wearing a cowboy hat and wearing a sunglasses and
red shirt black leather jacket
playing a guitar riding a bike skateboarding
in a garden. on a beach. on top of a mountain.
Related Work
Diffusion models have seen wide success in image generation [ 1 , 2 , 3 , 4 ]. Autoregressive models [ 5 ], GANs [ 6 , 7 ] VQ-VAE Transformer based methods [ 8 , 9 ] have all made remarkable progress in text-to-image research. More recently, Diffusion models have been explored for text-to-image generation [ 10 , 11 ], including the concurrent work of DALL-E 2 [ 12 ]. DALL-E 2 uses a diffusion prior on CLIP latents, and cascaded diffusion models to generate high resolution 1024×1024 images. We believe Imagen is much simpler, as Imagen does not need to learn a latent prior, yet achieves better results in both MS-COCO FID and side-by-side human evaluation on DrawBench. GLIDE [ 10 ] also uses cascaded diffusions models for text-to-image, but Imagen uses larger pretrained frozen language models, which we found to be instrumental to both image fidelity and image-text alignment. XMC-GAN [ 7 ] also uses BERT as a text encoder, but we scale to much larger text encoders and demonstrate the effectiveness thereof. The use of cascaded diffusion models is also popular throughout the literature [ 13 , 14 ], and has been used with success in diffusion models to generate high resolution images [ 2 , 3 ]. Finally, Imagen is part of a series of text-to-image work at Google Research, including its sibling model Parti .
Limitations and Societal Impact
There are several ethical challenges facing text-to-image research broadly. We offer a more detailed exploration of these challenges in our paper and offer a summarized version here. First, downstream applications of text-to-image models are varied and may impact society in complex ways. The potential risks of misuse raise concerns regarding responsible open-sourcing of code and demos. At this time we have decided not to release code or a public demo. In future work we will explore a framework for responsible externalization that balances the value of external auditing with the risks of unrestricted open-access. Second, the data requirements of text-to-image models have led researchers to rely heavily on large, mostly uncurated, web-scraped datasets. While this approach has enabled rapid algorithmic advances in recent years, datasets of this nature often reflect social stereotypes, oppressive viewpoints, and derogatory, or otherwise harmful, associations to marginalized identity groups. While a subset of our training data was filtered to removed noise and undesirable content, such as pornographic imagery and toxic language, we also utilized LAION-400M dataset which is known to contain a wide range of inappropriate content including pornographic imagery, racist slurs, and harmful social stereotypes. Imagen relies on text encoders trained on uncurated web-scale data, and thus inherits the social biases and limitations of large language models. As such, there is a risk that Imagen has encoded harmful stereotypes and representations, which guides our decision to not release Imagen for public use without further safeguards in place.
Finally, while there has been extensive work auditing image-to-text and image labeling models for forms of social bias, there has been comparatively less work on social bias evaluation methods for text-to-image models. A conceptual vocabulary around potential harms of text-to-image models and established metrics of evaluation are an essential component of establishing responsible model release practices. While we leave an in-depth empirical analysis of social and cultural biases to future work, our small scale internal assessments reveal several limitations that guide our decision not to release our model at this time. Imagen, may run into danger of dropping modes of the data distribution, which may further compound the social consequence of dataset bias. Imagen exhibits serious limitations when generating images depicting people. Our human evaluations found Imagen obtains significantly higher preference rates when evaluated on images that do not portray people, indicating a degradation in image fidelity. Preliminary assessment also suggests Imagen encodes several social biases and stereotypes, including an overall bias towards generating images of people with lighter skin tones and a tendency for images portraying different professions to align with Western gender stereotypes. Finally, even when we focus generations away from people, our preliminary analysis indicates Imagen encodes a range of social and cultural biases when generating images of activities, events, and objects. We aim to make progress on several of these open challenges and limitations in future work.

imagine · illustrate · inspire
Chitwan Saharia * , William Chan * , Saurabh Saxena † , Lala Li † , Jay Whang † , Emily Denton, Seyed Kamyar Seyed Ghasemipour, Burcu Karagol Ayan, S. Sara Mahdavi, Rapha Gontijo Lopes, Tim Salimans, Jonathan Ho † , David Fleet † , Mohammad Norouzi *
* Equal contribution. † Core contribution.
Special Thanks
We give thanks to Ben Poole for reviewing our manuscript, early discussions, and providing many helpful comments and suggestions throughout the project. Special thanks to Kathy Meier-Hellstern, Austin Tarango, and Sarah Laszlo for helping us incorporate important responsible AI practices around this project. We appreciate valuable feedback and support from Elizabeth Adkison, Zoubin Ghahramani, Jeff Dean, Yonghui Wu, and Eli Collins. We are grateful to Tom Small for designing the Imagen watermark. We thank Jason Baldridge, Han Zhang, and Kevin Murphy for initial discussions and feedback. We acknowledge hard work and support from Fred Alcober, Hibaq Ali, Marian Croak, Aaron Donsbach, Tulsee Doshi, Toju Duke, Douglas Eck, Jason Freidenfelds, Brian Gabriel, Molly FitzMorris, David Ha, Philip Parham, Laura Pearce, Evan Rapoport, Lauren Skelly, Johnny Soraker, Negar Rostamzadeh, Vijay Vasudevan, Tris Warkentin, Jeremy Weinstein, and Hugh Williams for giving us advice along the project and assisting us with the publication process. We thank Victor Gomes and Erica Moreira for their consistent and critical help with TPU resource allocation. We also give thanks to Shekoofeh Azizi, Harris Chan, Chris A. Lee, and Nick Ma for volunteering a considerable amount of their time for testing out DrawBench. We thank Aditya Ramesh, Prafulla Dhariwal, and Alex Nichol for allowing us to use DALL-E 2 samples and providing us with GLIDE samples. We are thankful to Matthew Johnson and Roy Frostig for starting the JAX project and to the whole JAX team for building such a fantastic system for high-performance machine learning research. Special thanks to Durk Kingma, Jascha Sohl-Dickstein, Lucas Theis and the Toronto Brain team for helpful discussions and spending time Imagening!
Purdue Online Writing Lab Purdue OWL® College of Liberal Arts
Welcome to the Purdue Online Writing Lab

Welcome to the Purdue OWL
This page is brought to you by the OWL at Purdue University. When printing this page, you must include the entire legal notice.
Copyright ©1995-2018 by The Writing Lab & The OWL at Purdue and Purdue University. All rights reserved. This material may not be published, reproduced, broadcast, rewritten, or redistributed without permission. Use of this site constitutes acceptance of our terms and conditions of fair use.
The Online Writing Lab at Purdue University houses writing resources and instructional material, and we provide these as a free service of the Writing Lab at Purdue. Students, members of the community, and users worldwide will find information to assist with many writing projects. Teachers and trainers may use this material for in-class and out-of-class instruction.
The Purdue On-Campus Writing Lab and Purdue Online Writing Lab assist clients in their development as writers—no matter what their skill level—with on-campus consultations, online participation, and community engagement. The Purdue Writing Lab serves the Purdue, West Lafayette, campus and coordinates with local literacy initiatives. The Purdue OWL offers global support through online reference materials and services.
A Message From the Assistant Director of Content Development
The Purdue OWL® is committed to supporting students, instructors, and writers by offering a wide range of resources that are developed and revised with them in mind. To do this, the OWL team is always exploring possibilties for a better design, allowing accessibility and user experience to guide our process. As the OWL undergoes some changes, we welcome your feedback and suggestions by email at any time.
Please don't hesitate to contact us via our contact page if you have any questions or comments.
All the best,
Social Media
Facebook twitter.
The state of AI in early 2024: Gen AI adoption spikes and starts to generate value
If 2023 was the year the world discovered generative AI (gen AI) , 2024 is the year organizations truly began using—and deriving business value from—this new technology. In the latest McKinsey Global Survey on AI, 65 percent of respondents report that their organizations are regularly using gen AI, nearly double the percentage from our previous survey just ten months ago. Respondents’ expectations for gen AI’s impact remain as high as they were last year , with three-quarters predicting that gen AI will lead to significant or disruptive change in their industries in the years ahead.
About the authors
This article is a collaborative effort by Alex Singla , Alexander Sukharevsky , Lareina Yee , and Michael Chui , with Bryce Hall , representing views from QuantumBlack, AI by McKinsey, and McKinsey Digital.
Organizations are already seeing material benefits from gen AI use, reporting both cost decreases and revenue jumps in the business units deploying the technology. The survey also provides insights into the kinds of risks presented by gen AI—most notably, inaccuracy—as well as the emerging practices of top performers to mitigate those challenges and capture value.
AI adoption surges
Interest in generative AI has also brightened the spotlight on a broader set of AI capabilities. For the past six years, AI adoption by respondents’ organizations has hovered at about 50 percent. This year, the survey finds that adoption has jumped to 72 percent (Exhibit 1). And the interest is truly global in scope. Our 2023 survey found that AI adoption did not reach 66 percent in any region; however, this year more than two-thirds of respondents in nearly every region say their organizations are using AI. 1 Organizations based in Central and South America are the exception, with 58 percent of respondents working for organizations based in Central and South America reporting AI adoption. Looking by industry, the biggest increase in adoption can be found in professional services. 2 Includes respondents working for organizations focused on human resources, legal services, management consulting, market research, R&D, tax preparation, and training.
Also, responses suggest that companies are now using AI in more parts of the business. Half of respondents say their organizations have adopted AI in two or more business functions, up from less than a third of respondents in 2023 (Exhibit 2).
Gen AI adoption is most common in the functions where it can create the most value
Most respondents now report that their organizations—and they as individuals—are using gen AI. Sixty-five percent of respondents say their organizations are regularly using gen AI in at least one business function, up from one-third last year. The average organization using gen AI is doing so in two functions, most often in marketing and sales and in product and service development—two functions in which previous research determined that gen AI adoption could generate the most value 3 “ The economic potential of generative AI: The next productivity frontier ,” McKinsey, June 14, 2023. —as well as in IT (Exhibit 3). The biggest increase from 2023 is found in marketing and sales, where reported adoption has more than doubled. Yet across functions, only two use cases, both within marketing and sales, are reported by 15 percent or more of respondents.
Gen AI also is weaving its way into respondents’ personal lives. Compared with 2023, respondents are much more likely to be using gen AI at work and even more likely to be using gen AI both at work and in their personal lives (Exhibit 4). The survey finds upticks in gen AI use across all regions, with the largest increases in Asia–Pacific and Greater China. Respondents at the highest seniority levels, meanwhile, show larger jumps in the use of gen Al tools for work and outside of work compared with their midlevel-management peers. Looking at specific industries, respondents working in energy and materials and in professional services report the largest increase in gen AI use.
Investments in gen AI and analytical AI are beginning to create value
The latest survey also shows how different industries are budgeting for gen AI. Responses suggest that, in many industries, organizations are about equally as likely to be investing more than 5 percent of their digital budgets in gen AI as they are in nongenerative, analytical-AI solutions (Exhibit 5). Yet in most industries, larger shares of respondents report that their organizations spend more than 20 percent on analytical AI than on gen AI. Looking ahead, most respondents—67 percent—expect their organizations to invest more in AI over the next three years.
Where are those investments paying off? For the first time, our latest survey explored the value created by gen AI use by business function. The function in which the largest share of respondents report seeing cost decreases is human resources. Respondents most commonly report meaningful revenue increases (of more than 5 percent) in supply chain and inventory management (Exhibit 6). For analytical AI, respondents most often report seeing cost benefits in service operations—in line with what we found last year —as well as meaningful revenue increases from AI use in marketing and sales.
Inaccuracy: The most recognized and experienced risk of gen AI use
As businesses begin to see the benefits of gen AI, they’re also recognizing the diverse risks associated with the technology. These can range from data management risks such as data privacy, bias, or intellectual property (IP) infringement to model management risks, which tend to focus on inaccurate output or lack of explainability. A third big risk category is security and incorrect use.
Respondents to the latest survey are more likely than they were last year to say their organizations consider inaccuracy and IP infringement to be relevant to their use of gen AI, and about half continue to view cybersecurity as a risk (Exhibit 7).
Conversely, respondents are less likely than they were last year to say their organizations consider workforce and labor displacement to be relevant risks and are not increasing efforts to mitigate them.
In fact, inaccuracy— which can affect use cases across the gen AI value chain , ranging from customer journeys and summarization to coding and creative content—is the only risk that respondents are significantly more likely than last year to say their organizations are actively working to mitigate.
Some organizations have already experienced negative consequences from the use of gen AI, with 44 percent of respondents saying their organizations have experienced at least one consequence (Exhibit 8). Respondents most often report inaccuracy as a risk that has affected their organizations, followed by cybersecurity and explainability.
Our previous research has found that there are several elements of governance that can help in scaling gen AI use responsibly, yet few respondents report having these risk-related practices in place. 4 “ Implementing generative AI with speed and safety ,” McKinsey Quarterly , March 13, 2024. For example, just 18 percent say their organizations have an enterprise-wide council or board with the authority to make decisions involving responsible AI governance, and only one-third say gen AI risk awareness and risk mitigation controls are required skill sets for technical talent.
Bringing gen AI capabilities to bear
The latest survey also sought to understand how, and how quickly, organizations are deploying these new gen AI tools. We have found three archetypes for implementing gen AI solutions : takers use off-the-shelf, publicly available solutions; shapers customize those tools with proprietary data and systems; and makers develop their own foundation models from scratch. 5 “ Technology’s generational moment with generative AI: A CIO and CTO guide ,” McKinsey, July 11, 2023. Across most industries, the survey results suggest that organizations are finding off-the-shelf offerings applicable to their business needs—though many are pursuing opportunities to customize models or even develop their own (Exhibit 9). About half of reported gen AI uses within respondents’ business functions are utilizing off-the-shelf, publicly available models or tools, with little or no customization. Respondents in energy and materials, technology, and media and telecommunications are more likely to report significant customization or tuning of publicly available models or developing their own proprietary models to address specific business needs.
Respondents most often report that their organizations required one to four months from the start of a project to put gen AI into production, though the time it takes varies by business function (Exhibit 10). It also depends upon the approach for acquiring those capabilities. Not surprisingly, reported uses of highly customized or proprietary models are 1.5 times more likely than off-the-shelf, publicly available models to take five months or more to implement.
Gen AI high performers are excelling despite facing challenges
Gen AI is a new technology, and organizations are still early in the journey of pursuing its opportunities and scaling it across functions. So it’s little surprise that only a small subset of respondents (46 out of 876) report that a meaningful share of their organizations’ EBIT can be attributed to their deployment of gen AI. Still, these gen AI leaders are worth examining closely. These, after all, are the early movers, who already attribute more than 10 percent of their organizations’ EBIT to their use of gen AI. Forty-two percent of these high performers say more than 20 percent of their EBIT is attributable to their use of nongenerative, analytical AI, and they span industries and regions—though most are at organizations with less than $1 billion in annual revenue. The AI-related practices at these organizations can offer guidance to those looking to create value from gen AI adoption at their own organizations.
To start, gen AI high performers are using gen AI in more business functions—an average of three functions, while others average two. They, like other organizations, are most likely to use gen AI in marketing and sales and product or service development, but they’re much more likely than others to use gen AI solutions in risk, legal, and compliance; in strategy and corporate finance; and in supply chain and inventory management. They’re more than three times as likely as others to be using gen AI in activities ranging from processing of accounting documents and risk assessment to R&D testing and pricing and promotions. While, overall, about half of reported gen AI applications within business functions are utilizing publicly available models or tools, gen AI high performers are less likely to use those off-the-shelf options than to either implement significantly customized versions of those tools or to develop their own proprietary foundation models.
What else are these high performers doing differently? For one thing, they are paying more attention to gen-AI-related risks. Perhaps because they are further along on their journeys, they are more likely than others to say their organizations have experienced every negative consequence from gen AI we asked about, from cybersecurity and personal privacy to explainability and IP infringement. Given that, they are more likely than others to report that their organizations consider those risks, as well as regulatory compliance, environmental impacts, and political stability, to be relevant to their gen AI use, and they say they take steps to mitigate more risks than others do.
Gen AI high performers are also much more likely to say their organizations follow a set of risk-related best practices (Exhibit 11). For example, they are nearly twice as likely as others to involve the legal function and embed risk reviews early on in the development of gen AI solutions—that is, to “ shift left .” They’re also much more likely than others to employ a wide range of other best practices, from strategy-related practices to those related to scaling.
In addition to experiencing the risks of gen AI adoption, high performers have encountered other challenges that can serve as warnings to others (Exhibit 12). Seventy percent say they have experienced difficulties with data, including defining processes for data governance, developing the ability to quickly integrate data into AI models, and an insufficient amount of training data, highlighting the essential role that data play in capturing value. High performers are also more likely than others to report experiencing challenges with their operating models, such as implementing agile ways of working and effective sprint performance management.
About the research
The online survey was in the field from February 22 to March 5, 2024, and garnered responses from 1,363 participants representing the full range of regions, industries, company sizes, functional specialties, and tenures. Of those respondents, 981 said their organizations had adopted AI in at least one business function, and 878 said their organizations were regularly using gen AI in at least one function. To adjust for differences in response rates, the data are weighted by the contribution of each respondent’s nation to global GDP.
Alex Singla and Alexander Sukharevsky are global coleaders of QuantumBlack, AI by McKinsey, and senior partners in McKinsey’s Chicago and London offices, respectively; Lareina Yee is a senior partner in the Bay Area office, where Michael Chui , a McKinsey Global Institute partner, is a partner; and Bryce Hall is an associate partner in the Washington, DC, office.
They wish to thank Kaitlin Noe, Larry Kanter, Mallika Jhamb, and Shinjini Srivastava for their contributions to this work.
This article was edited by Heather Hanselman, a senior editor in McKinsey’s Atlanta office.
Explore a career with us
Related articles.

Moving past gen AI’s honeymoon phase: Seven hard truths for CIOs to get from pilot to scale

A generative AI reset: Rewiring to turn potential into value in 2024

Implementing generative AI with speed and safety
Reference Examples
More than 100 reference examples and their corresponding in-text citations are presented in the seventh edition Publication Manual . Examples of the most common works that writers cite are provided on this page; additional examples are available in the Publication Manual .
To find the reference example you need, first select a category (e.g., periodicals) and then choose the appropriate type of work (e.g., journal article ) and follow the relevant example.
When selecting a category, use the webpages and websites category only when a work does not fit better within another category. For example, a report from a government website would use the reports category, whereas a page on a government website that is not a report or other work would use the webpages and websites category.
Also note that print and electronic references are largely the same. For example, to cite both print books and ebooks, use the books and reference works category and then choose the appropriate type of work (i.e., book ) and follow the relevant example (e.g., whole authored book ).
Examples on these pages illustrate the details of reference formats. We make every attempt to show examples that are in keeping with APA Style’s guiding principles of inclusivity and bias-free language. These examples are presented out of context only to demonstrate formatting issues (e.g., which elements to italicize, where punctuation is needed, placement of parentheses). References, including these examples, are not inherently endorsements for the ideas or content of the works themselves. An author may cite a work to support a statement or an idea, to critique that work, or for many other reasons. For more examples, see our sample papers .
Reference examples are covered in the seventh edition APA Style manuals in the Publication Manual Chapter 10 and the Concise Guide Chapter 10
Related handouts
- Common Reference Examples Guide (PDF, 147KB)
- Reference Quick Guide (PDF, 225KB)
Textual Works
Textual works are covered in Sections 10.1–10.8 of the Publication Manual . The most common categories and examples are presented here. For the reviews of other works category, see Section 10.7.
- Journal Article References
- Magazine Article References
- Newspaper Article References
- Blog Post and Blog Comment References
- UpToDate Article References
- Book/Ebook References
- Diagnostic Manual References
- Children’s Book or Other Illustrated Book References
- Classroom Course Pack Material References
- Religious Work References
- Chapter in an Edited Book/Ebook References
- Dictionary Entry References
- Wikipedia Entry References
- Report by a Government Agency References
- Report with Individual Authors References
- Brochure References
- Ethics Code References
- Fact Sheet References
- ISO Standard References
- Press Release References
- White Paper References
- Conference Presentation References
- Conference Proceeding References
- Published Dissertation or Thesis References
- Unpublished Dissertation or Thesis References
- ERIC Database References
- Preprint Article References
Data and Assessments
Data sets are covered in Section 10.9 of the Publication Manual . For the software and tests categories, see Sections 10.10 and 10.11.
- Data Set References
- Toolbox References
Audiovisual Media
Audiovisual media are covered in Sections 10.12–10.14 of the Publication Manual . The most common examples are presented together here. In the manual, these examples and more are separated into categories for audiovisual, audio, and visual media.
- Artwork References
- Clip Art or Stock Image References
- Film and Television References
- Musical Score References
- Online Course or MOOC References
- Podcast References
- PowerPoint Slide or Lecture Note References
- Radio Broadcast References
- TED Talk References
- Transcript of an Audiovisual Work References
- YouTube Video References
Online Media
Online media are covered in Sections 10.15 and 10.16 of the Publication Manual . Please note that blog posts are part of the periodicals category.
- Facebook References
- Instagram References
- LinkedIn References
- Online Forum (e.g., Reddit) References
- TikTok References
- X References
- Webpage on a Website References
- Clinical Practice References
- Open Educational Resource References
- Whole Website References
B2B Content Marketing Benchmarks, Budgets, and Trends: Outlook for 2024 [Research]

- by Stephanie Stahl
- | Published: October 18, 2023
- | Trends and Research
Creating standards, guidelines, processes, and workflows for content marketing is not the sexiest job.
But setting standards is the only way to know if you can improve anything (with AI or anything else).
Here’s the good news: All that non-sexy work frees time and resources (human and tech) you can apply to bring your brand’s strategies and plans to life.
But in many organizations, content still isn’t treated as a coordinated business function. That’s one of the big takeaways from our latest research, B2B Content Marketing Benchmarks, Budgets, and Trends: Outlook for 2024, conducted with MarketingProfs and sponsored by Brightspot .
A few symptoms of that reality showed up in the research:
- Marketers cite a lack of resources as a top situational challenge, the same as they did the previous year.
- Nearly three-quarters (72%) say they use generative AI, but 61% say their organization lacks guidelines for its use.
- The most frequently cited challenges include creating the right content, creating content consistently, and differentiating content.
I’ll walk you through the findings and share some advice from CMI Chief Strategy Advisor Robert Rose and other industry voices to shed light on what it all means for B2B marketers. There’s a lot to work through, so feel free to use the table of contents to navigate to the sections that most interest you.
Note: These numbers come from a July 2023 survey of marketers around the globe. We received 1,080 responses. This article focuses on answers from the 894 B2B respondents.
Table of contents
- Team structure
- Content marketing challenges
Content types, distribution channels, and paid channels
- Social media
Content management and operations
- Measurement and goals
- Overall success
- Budgets and spending
- Top content-related priorities for 2024
- Content marketing trends for 2024
Action steps
Methodology, ai: 3 out of 4 b2b marketers use generative tools.
Of course, we asked respondents how they use generative AI in content and marketing. As it turns out, most experiment with it: 72% of respondents say they use generative AI tools.
But a lack of standards can get in the way.
“Generative AI is the new, disruptive capability entering the realm of content marketing in 2024,” Robert says. “It’s just another way to make our content process more efficient and effective. But it can’t do either until you establish a standard to define its value. Until then, it’s yet just another technology that may or may not make you better at what you do.”
So, how do content marketers use the tools today? About half (51%) use generative AI to brainstorm new topics. Many use the tools to research headlines and keywords (45%) and write drafts (45%). Fewer say they use AI to outline assignments (23%), proofread (20%), generate graphics (11%), and create audio (5%) and video (5%).

Some marketers say they use AI to do things like generate email headlines and email copy, extract social media posts from long-form content, condense long-form copy into short form, etc.
Only 28% say they don’t use generative AI tools.
Most don’t pay for generative AI tools (yet)
Among those who use generative AI tools, 91% use free tools (e.g., ChatGPT ). Thirty-eight percent use tools embedded in their content creation/management systems, and 27% pay for tools such as Writer and Jasper.
AI in content remains mostly ungoverned
Asked if their organizations have guidelines for using generative AI tools, 31% say yes, 61% say no, and 8% are unsure.

We asked Ann Handley , chief content officer of MarketingProfs, for her perspective. “It feels crazy … 61% have no guidelines? But is it actually shocking and crazy? No. It is not. Most of us are just getting going with generative AI. That means there is a clear and rich opportunity to lead from where you sit,” she says.
“Ignite the conversation internally. Press upon your colleagues and your leadership that this isn’t a technology opportunity. It’s also a people and operational challenge in need of thoughtful and intelligent response. You can be the AI leader your organization needs,” Ann says.
Why some marketers don’t use generative AI tools
While a lack of guidelines may deter some B2B marketers from using generative AI tools, other reasons include accuracy concerns (36%), lack of training (27%), and lack of understanding (27%). Twenty-two percent cite copyright concerns, and 19% have corporate mandates not to use them.

How AI is changing SEO
We also wondered how AI’s integration in search engines shifts content marketers’ SEO strategy. Here’s what we found:
- 31% are sharpening their focus on user intent/answering questions.
- 27% are creating more thought leadership content.
- 22% are creating more conversational content.
Over one-fourth (28%) say they’re not doing any of those things, while 26% say they’re unsure.
AI may heighten the need to rethink your SEO strategy. But it’s not the only reason to do so, as Orbit Media Studios co-founder and chief marketing officer Andy Crestodina points out: “Featured snippets and people-also-ask boxes have chipped away at click-through rates for years,” he says. “AI will make that even worse … but only for information intent queries . Searchers who want quick answers really don’t want to visit websites.
“Focus your SEO efforts on those big questions with big answers – and on the commercial intent queries,” Andy continues. “Those phrases still have ‘visit website intent’ … and will for years to come.”
Will the AI obsession ever end?
Many B2B marketers surveyed predict AI will dominate the discussions of content marketing trends in 2024. As one respondent says: “AI will continue to be the shiny thing through 2024 until marketers realize the dedication required to develop prompts, go through the iterative process, and fact-check output . AI can help you sharpen your skills, but it isn’t a replacement solution for B2B marketing.”
Back to table of contents
Team structure: How does the work get done?
Generative AI isn’t the only issue affecting content marketing these days. We also asked marketers about how they organize their teams .
Among larger companies (100-plus employees), half say content requests go through a centralized content team. Others say each department/brand produces its own content (23%), and the departments/brand/products share responsibility (21%).

Content strategies integrate with marketing, comms, and sales
Seventy percent say their organizations integrate content strategy into the overall marketing sales/communication/strategy, and 2% say it’s integrated into another strategy. Eleven percent say content is a stand-alone strategy for content used for marketing, and 6% say it’s a stand-alone strategy for all content produced by the company. Only 9% say they don’t have a content strategy. The remaining 2% say other or are unsure.
Employee churn means new teammates; content teams experience enlightened leadership
Twenty-eight percent of B2B marketers say team members resigned in the last year, 20% say team members were laid off, and about half (49%) say they had new team members acclimating to their ways of working.
While team members come and go, the understanding of content doesn’t. Over half (54%) strongly agree, and 30% somewhat agree the leader to whom their content team reports understands the work they do. Only 11% disagree. The remaining 5% neither agree nor disagree.
And remote work seems well-tolerated: Only 20% say collaboration was challenging due to remote or hybrid work.
Content marketing challenges: Focus shifts to creating the right content
We asked B2B marketers about both content creation and non-creation challenges.
Content creation
Most marketers (57%) cite creating the right content for their audience as a challenge. This is a change from many years when “creating enough content” was the most frequently cited challenge.
One respondent points out why understanding what audiences want is more important than ever: “As the internet gets noisier and AI makes it incredibly easy to create listicles and content that copy each other, there will be a need for companies to stand out. At the same time, as … millennials and Gen Z [grow in the workforce], we’ll begin to see B2B become more entertaining and less boring. We were never only competing with other B2B content. We’ve always been competing for attention.”
Other content creation challenges include creating it consistently (54%) and differentiating it (54%). Close to half (45%) cite optimizing for search and creating quality content (44%). About a third (34%) cite creating enough content to keep up with internal demand, 30% say creating enough content to keep up with external demand, and 30% say creating content that requires technical skills.

Other hurdles
The most frequently cited non-creation challenge, by far, is a lack of resources (58%), followed by aligning content with the buyer’s journey (48%) and aligning content efforts across sales and marketing (45%). Forty-one percent say they have issues with workflow/content approval, and 39% say they have difficulty accessing subject matter experts. Thirty-four percent say it is difficult to keep up with new technologies/tools (e.g., AI). Only 25% cite a lack of strategy as a challenge, 19% say keeping up with privacy rules, and 15% point to tech integration issues.

We asked content marketers about the types of content they produce, their distribution channels , and paid content promotion. We also asked which formats and channels produce the best results.
Popular content types and formats
As in the previous year, the three most popular content types/formats are short articles/posts (94%, up from 89% last year), videos (84%, up from 75% last year), and case studies/customer stories (78%, up from 67% last year). Almost three-quarters (71%) use long articles, 60% produce visual content, and 59% craft thought leadership e-books or white papers. Less than half of marketers use brochures (49%), product or technical data sheets (45%), research reports (36%), interactive content (33%), audio (29%), and livestreaming (25%).

Effective content types and formats
Which formats are most effective? Fifty-three percent say case studies/customer stories and videos deliver some of their best results. Almost as many (51%) names thought leadership e-books or white papers, 47% short articles, and 43% research reports.

Popular content distribution channels
Regarding the channels used to distribute content, 90% use social media platforms (organic), followed by blogs (79%), email newsletters (73%), email (66%), in-person events (56%), and webinars (56%).
Channels used by the minority of those surveyed include:
- Digital events (44%)
- Podcasts (30%)
- Microsites (29%)
- Digital magazines (21%)
- Branded online communities (19%)
- Hybrid events (18%)
- Print magazines (16%)
- Online learning platforms (15%)
- Mobile apps (8%)
- Separate content brands (5%)

Effective content distribution channels
Which channels perform the best? Most marketers in the survey point to in-person events (56%) and webinars (51%) as producing better results. Email (44%), organic social media platforms (44%), blogs (40%) and email newsletters (39%) round out the list.

Popular paid content channels
When marketers pay to promote content , which channels do they invest in? Eighty-six percent use paid content distribution channels.
Of those, 78% use social media advertising/promoted posts, 65% use sponsorships, 64% use search engine marketing (SEM)/pay-per-click, and 59% use digital display advertising. Far fewer invest in native advertising (35%), partner emails (29%), and print display ads (21%).
Effective paid content channels
SEM/pay-per-click produces good results, according to 62% of those surveyed. Half of those who use paid channels say social media advertising/promoted posts produce good results, followed by sponsorships (49%), partner emails (36%), and digital display advertising (34%).

Social media use: One platform rises way above
When asked which organic social media platforms deliver the best value for their organization, B2B marketers picked LinkedIn by far (84%). Only 29% cite Facebook as a top performer, 22% say YouTube, and 21% say Instagram. Twitter and TikTok see 8% and 3%, respectively.

So it makes sense that 72% say they increased their use of LinkedIn over the last 12 months, while only 32% boosted their YouTube presence, 31% increased Instagram use, 22% grew their Facebook presence, and 10% increased X and TikTok use.
Which platforms are marketers giving up? Did you guess X? You’re right – 32% of marketers say they decreased their X use last year. Twenty percent decreased their use of Facebook, with 10% decreasing on Instagram, 9% pulling back on YouTube, and only 2% decreasing their use of LinkedIn.

Interestingly, we saw a significant rise in B2B marketers who use TikTok: 19% say they use the platform – more than double from last year.
To explore how teams manage content, we asked marketers about their technology use and investments and the challenges they face when scaling their content .
Content management technology
When asked which technologies they use to manage content, marketers point to:
- Analytics tools (81%)
- Social media publishing/analytics (72%)
- Email marketing software (69%)
- Content creation/calendaring/collaboration/workflow (64%)
- Content management system (50%)
- Customer relationship management system (48%)
But having technology doesn’t mean it’s the right technology (or that its capabilities are used). So, we asked if they felt their organization had the right technology to manage content across the organization.
Only 31% say yes. Thirty percent say they have the technology but aren’t using its potential, and 29% say they haven’t acquired the right technology. Ten percent are unsure.

Content tech spending will likely rise
Even so, investment in content management technology seems likely in 2024: 45% say their organization is likely to invest in new technology, whereas 32% say their organization is unlikely to do so. Twenty-three percent say their organization is neither likely nor unlikely to invest.

Scaling content production
We introduced a new question this year to understand what challenges B2B marketers face while scaling content production .
Almost half (48%) say it’s “not enough content repurposing.” Lack of communication across organizational silos is a problem for 40%. Thirty-one percent say they have no structured content production process, and 29% say they lack an editorial calendar with clear deadlines. Ten percent say scaling is not a current focus.
Among the other hurdles – difficulty locating digital content assets (16%), technology issues (15%), translation/localization issues (12%), and no style guide (11%).

For those struggling with content repurposing, content standardization is critical. “Content reuse is the only way to deliver content at scale. There’s just no other way,” says Regina Lynn Preciado , senior director of content strategy solutions at Content Rules Inc.
“Even if you’re not trying to provide the most personalized experience ever or dominate the metaverse with your omnichannel presence, you absolutely must reuse content if you are going to deliver content effectively,” she says.
“How to achieve content reuse ? You’ve probably heard that you need to move to modular, structured content. However, just chunking your content into smaller components doesn’t go far enough. For content to flow together seamlessly wherever you reuse it, you’ve got to standardize your content. That’s the personalization paradox right there. To personalize, you must standardize.
“Once you have your content standards in place and everyone is creating content in alignment with those standards, there is no limit to what you can do with the content,” Regina explains.
Why do content marketers – who are skilled communicators – struggle with cross-silo communication? Standards and alignment come into play.
“I think in the rush to all the things, we run out of time to address scalable processes that will fix those painful silos, including taking time to align on goals, roles and responsibilities, workflows, and measurement,” says Ali Orlando Wert , senior director of content strategy at Appfire. “It takes time, but the payoffs are worth it. You have to learn how to crawl before you can walk – and walk before you can run.”
Measurement and goals: Generating sales and revenue rises
Almost half (46%) of B2B marketers agree their organization measures content performance effectively. Thirty-six percent disagree, and 15% neither agree nor disagree. Only 3% say they don’t measure content performance.
The five most frequently used metrics to assess content performance are conversions (73%), email engagement (71%), website traffic (71%), website engagement (69%), and social media analytics (65%).
About half (52%) mention the quality of leads, 45% say they rely on search rankings, 41% use quantity of leads, 32% track email subscribers, and 29% track the cost to acquire a lead, subscriber, or customer.

The most common challenge B2B marketers have while measuring content performance is integrating/correlating data across multiple platforms (84%), followed by extracting insights from data (77%), tying performance data to goals (76%), organizational goal setting (70%), and lack of training (66%).

Regarding goals, 84% of B2B marketers say content marketing helped create brand awareness in the last 12 months. Seventy-six percent say it helped generate demand/leads; 63% say it helped nurture subscribers/audiences/leads, and 58% say it helped generate sales/revenue (up from 42% the previous year).

Success factors: Know your audience
To separate top performers from the pack, we asked the B2B marketers to assess the success of their content marketing approach.
Twenty-eight percent rate the success of their organization’s content marketing approach as extremely or very successful. Another 57% report moderate success and 15% feel minimally or not at all successful.
The most popular factor for successful marketers is knowing their audience (79%).
This makes sense, considering that “creating the right content for our audience” is the top challenge. The logic? Top-performing content marketers prioritize knowing their audiences to create the right content for those audiences.
Top performers also set goals that align with their organization’s objectives (68%), effectively measure and demonstrate content performance (61%), and show thought leadership (60%). Collaboration with other teams (55%) and a documented strategy (53%) also help top performers reach high levels of content marketing success.

We looked at several other dimensions to identify how top performers differ from their peers. Of note, top performers:
- Are backed by leaders who understand the work they do.
- Are more likely to have the right content management technologies.
- Have better communication across organizational silos.
- Do a better job of measuring content effectiveness.
- Are more likely to use content marketing successfully to generate demand/leads, nurture subscribers/audiences/leads, generate sales/revenue, and grow a subscribed audience.
Little difference exists between top performers and their less successful peers when it comes to the adoption of generative AI tools and related guidelines. It will be interesting to see if and how that changes next year.

Budgets and spending: Holding steady
To explore budget plans for 2024, we asked respondents if they have knowledge of their organization’s budget/budgeting process for content marketing. Then, we asked follow-up questions to the 55% who say they do have budget knowledge.
Content marketing as a percentage of total marketing spend
Here’s what they say about the total marketing budget (excluding salaries):
- About a quarter (24%) say content marketing takes up one-fourth or more of the total marketing budget.
- Nearly one in three (29%) indicate that 10% to 24% of the marketing budget goes to content marketing.
- Just under half (48%) say less than 10% of the marketing budget goes to content marketing.
Content marketing budget outlook for 2024
Next, we asked about their 2024 content marketing budget. Forty-five percent think their content marketing budget will increase compared with 2023, whereas 42% think it will stay the same. Only 6% think it will decrease.

Where will the budget go?
We also asked where respondents plan to increase their spending.
Sixty-nine percent of B2B marketers say they would increase their investment in video, followed by thought leadership content (53%), in-person events (47%), paid advertising (43%), online community building (33%), webinars (33%), audio content (25%), digital events (21%), and hybrid events (11%).

The increased investment in video isn’t surprising. The focus on thought leadership content might surprise, but it shouldn’t, says Stephanie Losee , director of executive and ABM content at Autodesk.
“As measurement becomes more sophisticated, companies are finding they’re better able to quantify the return from upper-funnel activities like thought leadership content ,” she says. “At the same time, companies recognize the impact of shifting their status from vendor to true partner with their customers’ businesses.
“Autodesk recently launched its first global, longitudinal State of Design & Make report (registration required), and we’re finding that its insights are of such value to our customers that it’s enabling conversations we’ve never been able to have before. These conversations are worth gold to both sides, and I would imagine other B2B companies are finding the same thing,” Stephanie says.
Top content-related priorities for 2024: Leading with thought leadership
We asked an open-ended question about marketers’ top three content-related priorities for 2024. The responses indicate marketers place an emphasis on thought leadership and becoming a trusted resource.
Other frequently mentioned priorities include:
- Better understanding of the audience
- Discovering the best ways to use AI
- Increasing brand awareness
- Lead generation
- Using more video
- Better use of analytics
- Conversions
- Repurposing existing content
Content marketing predictions for 2024: AI is top of mind
In another open-ended question, we asked B2B marketers, “What content marketing trends do you predict for 2024?” You probably guessed the most popular trend: AI.
Here are some of the marketers’ comments about how AI will affect content marketing next year:
- “We’ll see generative AI everywhere, all the time.”
- “There will be struggles to determine the best use of generative AI in content marketing.”
- “AI will likely result in a flood of poor-quality, machine-written content. Winners will use AI for automating the processes that support content creation while continuing to create high-quality human-generated content.”
- “AI has made creating content so easy that there are and will be too many long articles on similar subjects; most will never be read or viewed. A sea of too many words. I predict short-form content will have to be the driver for eyeballs.”
Other trends include:
- Greater demand for high-quality content as consumers grow weary of AI-generated content
- Importance of video content
- Increasing use of short video and audio content
- Impact of AI on SEO
Among the related comments:
- “Event marketing (webinars and video thought leadership) will become more necessary as teams rely on AI-generated written content.”
- “AI will be an industry sea change and strongly impact the meaning of SEO. Marketers need to be ready to ride the wave or get left behind.”
- “Excitement around AI-generated content will rise before flattening out when people realize it’s hard to differentiate, validate, verify, attribute, and authenticate. New tools, processes, and roles will emerge to tackle this challenge.”
- “Long-form reports could start to see a decline. If that is the case, we will need a replacement. Logically, that could be a webinar or video series that digs deeper into the takeaways.”
What does this year’s research suggest B2B content marketers do to move forward?
I asked CMI’s Robert Rose for some insights. He says the steps are clear: Develop standards, guidelines, and playbooks for how to operate – just like every other function in business does.
“Imagine if everyone in your organization had a different idea of how to define ‘revenue’ or ‘profit margin,’” Robert says. “Imagine if each salesperson had their own version of your company’s customer agreements and tried to figure out how to write them for every new deal. The legal team would be apoplectic. You’d start to hear from sales how they were frustrated that they couldn’t figure out how to make the ‘right agreement,’ or how to create agreements ‘consistently,’ or that there was a complete ‘lack of resources’ for creating agreements.”
Just remember: Standards can change along with your team, audiences, and business priorities. “Setting standards doesn’t mean casting policies and templates in stone,” Robert says. “Standards only exist so that we can always question the standard and make sure that there’s improvement available to use in setting new standards.”
He offers these five steps to take to solidify your content marketing strategy and execution:
- Direct. Create an initiative that will define the scope of the most important standards for your content marketing. Prioritize the areas that hurt the most. Work with leadership to decide where to start. Maybe it’s persona development. Maybe you need a new standardized content process. Maybe you need a solid taxonomy. Build the list and make it a real initiative.
- Define . Create a common understanding of all the things associated with the standards. Don’t assume that everybody knows. They don’t. What is a white paper? What is an e-book? What is a campaign vs. an initiative? What is a blog post vs. an article? Getting to a common language is one of the most powerful things you can do to coordinate better.
- Develop . You need both policies and playbooks. Policies are the formal documentation of your definitions and standards. Playbooks are how you communicate combinations of policies so that different people can not just understand them but are ready, willing, and able to follow them.
- Distribute . If no one follows the standards, they’re not standards. So, you need to develop a plan for how your new playbooks fit into the larger, cross-functional approach to the content strategy. You need to deepen the integration into each department – even if that is just four other people in your company.
- Distill . Evolve your standards. Make them living documents. Deploy technology to enforce and scale the standards. Test. If a standard isn’t working, change it. Sometimes, more organic processes are OK. Sometimes, it’s OK to acknowledge two definitions for something. The key is acknowledging a change to an existing standard so you know whether it improves things.
For their 14 th annual content marketing survey, CMI and MarketingProfs surveyed 1,080 recipients around the globe – representing a range of industries, functional areas, and company sizes — in July 2023. The online survey was emailed to a sample of marketers using lists from CMI and MarketingProfs.
This article presents the findings from the 894 respondents, mostly from North America, who indicated their organization is primarily B2B and that they are either content marketers or work in marketing, communications, or other roles involving content.

Thanks to the survey participants, who made this research possible, and to everyone who helps disseminate these findings throughout the content marketing industry.
Cover image by Joseph Kalinowski/Content Marketing Institute
About Content Marketing Institute
Content Marketing Institute (CMI) exists to do one thing: advance the practice of content marketing through online education and in-person and digital events. We create and curate content experiences that teach marketers and creators from enterprise brands, small businesses, and agencies how to attract and retain customers through compelling, multichannel storytelling. Global brands turn to CMI for strategic consultation, training, and research. Organizations from around the world send teams to Content Marketing World, the largest content marketing-focused event, the Marketing Analytics & Data Science (MADS) conference, and CMI virtual events, including ContentTECH Summit. Our community of 215,000+ content marketers shares camaraderie and conversation. CMI is organized by Informa Connect. To learn more, visit www.contentmarketinginstitute.com .
About MarketingProfs
Marketingprofs is your quickest path to b2b marketing mastery.
More than 600,000 marketing professionals worldwide rely on MarketingProfs for B2B Marketing training and education backed by data science, psychology, and real-world experience. Access free B2B marketing publications, virtual conferences, podcasts, daily newsletters (and more), and check out the MarketingProfs B2B Forum–the flagship in-person event for B2B Marketing training and education at MarketingProfs.com.
About Brightspot
Brightspot , the content management system to boost your business.
Why Brightspot? Align your technology approach and content strategy with Brightspot, the leading Content Management System for delivering exceptional digital experiences. Brightspot helps global organizations meet the business needs of today and scale to capitalize on the opportunities of tomorrow. Our Enterprise CMS and world-class team solves your unique business challenges at scale. Fast, flexible, and fully customizable, Brightspot perfectly harmonizes your technology approach with your content strategy and grows with you as your business evolves. Our customer-obsessed teams walk with you every step of the way with an unwavering commitment to your long-term success. To learn more, visit www.brightspot.com .

Stephanie Stahl

4 Simple Rules for Better Scientific Pictures and Figures
Scientific figures and images are an integral part of academic publishing . Several journal websites present thumbnails of figures alongside the abstract for all their publications. Consequently, figures and images start making an impression right from the point when readers begin their preliminary search! Several studies and scientific discourses have confirmed that scientific figures and images play a critical role in improving manuscript quality. Rather than going through a tedious verbose account, readers often prefer looking at figures and images.
Table of Contents
Importance of Publishing Excellent Figures
High-quality scientific figures and pictures convey data and information in a cohesive and reader-friendly manner. They help in presenting complex relationships, patterns and trends in a clear and concise manner. Therefore, it is paramount that authors publish figures that readers can interpret clearly and quickly . Images having poor quality, low resolution, and inconsistent in style can reduce the overall impact of a reader’s experience.
Four Simple Rules to Acquire High-quality Scientific Figures
Rule #1: ascertain the message you wish to convey.
If you do not have a clear understanding of the purpose of a figure, it is highly unlikely that your audience will understand its purpose either! Therefore, before you pin down on the figure or image type, it is imperative to have a clear thought about what is the underlying message. Identify the core idea you wish to present using a figure. Also think about how can you best express it! This information can then guide you to choose an appropriate format, design, image or chart type.
Rule #2: Adapt the Figure to Best Suit the Medium
You may have to display the scientific figure on different media. The two most common forms include print articles and electronic media. Image resolution and size are the two attributes one must consider when assessing the suitability of an image for online and print readability. Resolution is the number of pixels in a defined area, usually measured in inches. Authors should carefully check the guidelines for image resolution prior to journal submission . The resolution of an image for viewing on a monitor is designated as “pixels per inch or (ppi)”, whereas the term “dots per inch or (dpi)” represents the resolution of a printed image and refers to dots of ink in printing.
Another important element that defines the image quality is color. Computer monitors, digital cameras, video screens usually use the RGB (red, green, and blue) color mode in various combinations to create all the colors we see in an image. Printed images on the other hand create image colors using the CMYK (cyan, magenta, yellow, and black) color mode. As a best practice, journals suggest to convert digital images to CMYK mode to have a truer preview of how the image will appear in print publications.

Rule #3: Do Your Homework
Plan your scientific figures from the start rather than giving them an afterthought! Master the equipment, instrument and/or software you intend to use for capturing high-quality images. Take formal training if required. While acquiring images make a note of capture adjustments such as brightness or contrast. This will ensure consistency in your image acquisition process. Furthermore, ensure that you save these images or figures at high resolution and in the correct format.
Journals recommend various file formats for figures and images. The most recommended format for saving scientific pictures however is TIFF (Tagged Image File Format) as it is lossless (the number and color of pixels is preserved despite multiple saves or alterations) and do not degrade. JPEG (Joint Photographic Experts Group) can be used for autoradiographs or micrographs as the compression allows submission of much higher resolution images for a given file size. However, one must minimize the number of times an altered version is saved, in order to prevent degradation of quality. PNG (Portable Networks Graphics) can be used for images where quality can be compromised for a smaller file size.
Whichever format you choose to save your final scientific figures , you must always keep the original files as a backup. Furthermore, it is also advisable to save files in the native file format of the image acquisition software, since these files may contain metadata of instrument setting. As a best practice, it is always beneficial to it handy in case you receive any questions from reviewers or editors during peer review.
Rule #4: Avoid Fraudulent Scientific Figure Manipulation
Prior to submission, authors generally use image-editing tools and and software to make adjustment or alterations to their images for creating publication-quality material. A word of caution here! The final scientific figures must be an accurate representation of original data and conform to ethical standards. Inappropriate manipulation of images can lead to manuscript rejection and mistrust on research credibility. For instance, if you are comparing (control vs. several different treatments) a group of images demonstrating cellular fluorescence in a single picture, you must capture them using the same instrument/equipment setting. In addition, any adjustments or must not eliminate or obscure any critical information. Furthermore, if you are making gamma value adjustments or using pseudo-colors to highlight certain aspects, disclose it in the manuscript.
Resizing is an essential step to create an image that fits journal recommendations. Making an image smaller (i.e. decreasing the number of pixels) is acceptable as software can combine multiple pixels into a single pixel. However, when there is an attempt to increase the number of pixels, the computer software needs to create additional pixels. This may result in misinterpretation of data.
Let us know how these tips assisted you in creating scientific figures and pictures in the comments section below!
Rate this article Cancel Reply
Your email address will not be published.

Enago Academy's Most Popular Articles

- Industry News
- Trending Now
ICMJE Updates Guidelines for Medical Journal Publication, Emphasizes on Inclusivity and AI Transparency
The International Committee of Medical Journal Editors (ICMJE) recently updated its recommendations for best practices…

- AI in Academia
- Infographic
- Manuscripts & Grants
- Reporting Research
Can AI Tools Prepare a Research Manuscript From Scratch? — A comprehensive guide
As technology continues to advance, the question of whether artificial intelligence (AI) tools can prepare…

- Manuscript Preparation
- Publishing Research
How to Choose Best Research Methodology for Your Study
Successful research conduction requires proper planning and execution. While there are multiple reasons and aspects…

- Journal Guidelines
How to Use CSE Style While Drafting Scientific Manuscripts
What is CSE Style Guide? CSE stands for Council of Science Editors. Originated in the…

How to Create Publication-ready Manuscripts Using AIP Style Guide
What is AIP Style Guide? The AIP style guide refers to a specific citation format…
What Are the Unique Characteristics of the AMA Style Guide?

Sign-up to read more
Subscribe for free to get unrestricted access to all our resources on research writing and academic publishing including:
- 2000+ blog articles
- 50+ Webinars
- 10+ Expert podcasts
- 50+ Infographics
- 10+ Checklists
- Research Guides
We hate spam too. We promise to protect your privacy and never spam you.
I am looking for Editing/ Proofreading services for my manuscript Tentative date of next journal submission:

As a researcher, what do you consider most when choosing an image manipulation detector?
Indian PM Modi claims victory even as voters deal him a surprise setback
NEW DELHI — Indian Prime Minister Narendra Modi declared victory Tuesday, but it wasn't the landslide he had been predicting as his party lost seats to a stronger-than-expected opposition.
Still, Modi declared that Indian voters had “shown immense faith” both in his party and his National Democratic Alliance coalition after he locked down a rare third term as leader of the world’s most populous country following a divisive decade in power.
“This is a victory for the world’s biggest democracy,” Modi told the crowd at his party’s headquarters.
His Hindu nationalist Bharatiya Janata Party, or BJP, and allied parties appeared to have secured almost 300 of 543 seats in Parliament, early election results showed, which would give them a simple majority.
But for the first time since the BJP swept to power in 2014, it did not secure a majority on its own, The Associated Press reported. It won 240 seats with the opposition performing better than expected after exit polls suggested Modi’s alliance was cruising toward an overwhelming victory.
That leaves Modi, whose dominance over India has steadily grown since he gained power in 2014, dependent on forming a coalition to remain in power.
Even that could be in doubt. Rahul Gandhi, leader of the opposition Indian National Congress has left open the possibility that he may try to form a coalition with two parties allied with the BJP that used to be Congress’ partners.
This is not how the election was supposed to go for Modi, who has a vast base of supporters both at home and among the large Indian diaspora who see him as responsible for India’s rocketing economy and rising confidence on the world stage. According to Morning Consult , Modi is by far the world’s most popular leader, with an approval rating of 74%.
But critics say Modi has also eroded human rights in India and stoked religious tensions, particularly against India’s Muslim minority.
Modi and other BJP candidates were accused of hate speech and other inflammatory rhetoric during the campaign.
India is also struggling to provide enough jobs for its 1.4 billion people, despite being the world’s fastest-growing major economy .

Outside BJP headquarters in New Delhi on Tuesday, dozens of Modi supporters danced to drums and chanted Hindu nationalist slogans. They wore shirts that read “I am Modi’s family” and scarves the color of saffron, the BJP’s official color which is also associated with Hindu nationalism.
Inside, the feeling was less celebratory.
Anxious and disappointed party workers and Modi supporters were glued to the TV screens, awaiting the final results as the supermajority they had hoped for appeared increasingly out of reach. Others were angry.
“Some voters betrayed us,” said Ram Shankar Maharaj, a Hindu priest who had traveled to New Delhi to watch the results from his home in the northern city of Ayodhya, where Modi in January presided over the opening of a grand Hindu temple on a contested holy site . "They betrayed Indian tradition."
The Ayodhya constituency that includes the temple was among those that the BJP conceded on Tuesday.
“We should have gotten 500 [seats],” Maharaj added. “India will suffer from this. Had they cleared 400, the country would flourish.”
India’s benchmark stock indices closed at record highs on Monday after exit polls pointed to a thumping victory for Modi, then fell sharply Tuesday as the results became more muddied.
Speaking across from BJP headquarters Tuesday night, Modi said his alliance was poised to form a government. Rather than focusing on the BJP itself, he mentioned the broader alliance multiple times and praised its leaders.
Congress, the main opposition party, was in a buoyant mood. “This is the people’s victory, and democracy’s victory,” Congress President Mallikarjun Kharge told a news conference.
Regardless of the results, Modi’s ethos of a Hindu-first nation is now deeply entrenched in Indian politics, raising fears among Muslims and other minority groups over how they would fare during five more years of Modi rule.
In Modi’s home seat of Varanasi, which voted Saturday in the last of seven phases of voting , Tasneem Fatma walked out of a polling station wearing a burqa, saying, “We want a united India, not for Hindu, Muslim, Sikh, Isai.”
But Fatma, 20, a business student, was interrupted by an older man who said there was no religious divide. He also dismissed Fatma’s concerns about unemployment, saying, “If you are educated and if you are capable of the job, you can take the job.”
As the discussion grew more heated, police officers asked the man to leave before NBC News could ask for his name.
India’s election is considered the world’s largest , with nearly a billion registered voters and polling that spanned over six weeks. But it was not just the sheer size of the election that posed a challenge for officials.
Voting has taken place amid unusually high temperatures that have exceeded 120 degrees in New Delhi , the capital, and experts say that may have depressed turnout. At least 33 people in three states died of suspected heatstroke just on Friday, Reuters reported, including election officials who were on duty.
Although Indian summers are generally hot, scientists say heat waves in India and elsewhere in South Asia are becoming hotter, longer and more frequent at least partly as a result of climate change . Neither the BJP nor the opposition said much about climate change during the campaign.
The issue foremost in the minds of voters who spoke with NBC News was jobs.
It’s an especially big worry for those ages 15 to 29, who make up 83% of unemployed people in India, according to a report in March .
“Why is nobody talking about rising costs or lack of jobs or poor kids dying or trees being cut?” Fatma asked.
The opposition, led by the Congress party, has tried to use such issues to drive voters away from Modi. Aware of the gargantuan effort it would take to defeat him, the fractured opposition formed an alliance that quickly faltered.
Opposition parties also accused Modi’s government of trying to stifle their campaigns by arresting their leaders and freezing their funds, allegations the BJP denied.
Today’s India is run by “a very strong, dominant BJP, which in 1984 had only got four seats in Parliament,” said Yamini Aiyar, former chief executive of the Center for Policy Research, a highly regarded think tank in New Delhi that has been targeted by a Modi government crackdown on civil society.
In recent years especially, she said, the BJP has become “creepingly authoritarian.”
“Our democracy is at stake,” Aiyar said.
According to Freedom House , a nonprofit pro-democracy organization in Washington, elections in India are generally considered free and fair, but they are being held in an environment in which freedom of expression is shrinking.
It cited the arrests and prosecutions of journalists, information manipulation using artificial intelligence and other technologies, and Indian authorities’ demands that social media companies remove online content critical of the government , among other issues.

Modi’s shaky rights record can make things awkward for Washington, which views India as an important counterweight to China . Though India is not a formal U.S. ally, it is an important defense partner and a member of strategic security groupings such as the Quad, which also includes the U.S., Australia and Japan.
Modi, who rarely takes live questions from journalists, pushed back against criticism at a joint news conference with President Joe Biden during a state visit to Washington last year.
“In India’s democratic values, there’s absolutely no discrimination, neither on basis of caste, creed or age or any kind of geographic location,” he said.
U.S. authorities also say Indian agents may have been involved in the attempted assassination last year of a Sikh activist living in New York. India denies the allegations, saying such a crime would be “contrary to government policy.”
Experts say the U.S. relationship with India will continue to strengthen, regardless of the final election results in either country.
“China remains the elephant in the room or the presence that is shaping the alignments and realignments across the world,” Aiyar said.
Mithil Aggarwal is a Hong Kong-based reporter/producer for NBC News.
Janis Mackey Frayer is a Beijing-based correspondent for NBC News.
COMMENTS
Finally, while a lot of data is helpful to have, be sure to reduce the presence of "chartjunk" - the unnecessary visual elements that distract the reader from what really matters…your data! There are various tools/platforms to help you create high-quality images for research papers including R, ImageJ, ImageMagick, Cytospace, and more.
1. Editable Images. The best kind of science images are editable vector files that allow you to customize the designs to best match the main points of your research. These include image file types such as Scalable Vector Graphics (.svg), Adobe Illustrator (.ai), Affinity Designer (.afdesign), Encapsulated PostScript (.eps), and some files in ...
Create science figures in minutes with BioRender scientific illustration software! ... Because of the large number of pre-drawn icons and color schemes to choose from, I can create beautiful images that accurately depict our scientific findings in no time. I don't know what I would do without BioRender. My 'circles and square figure' days in ...
Rule 4: Refine and repeat until the story is clear. The goal of good figure design is to have your audience clearly understand the main point of your research. That is why the final rule is to spend time refining the figure using the purpose, composition, and color tools so that the final design is clear. It is normal to make 2-3 versions of a ...
Adobe Illustrator is another popular image editing software. It is a vector-based drawing program that allows the user to import images, create drawings, and align multiple images into one figure. The figure that is generated can be exported as a high-resolution image that is ready for publication. Illustrator allows the user to fully customize ...
Recommended for: Persona 1: The Grad Student. It needs no introductions - it's the classic, trusty, Microsoft PowerPoint. The good news is that you likely already own a paid license for this through your institution. Though just in case you don't, you can purchase it for $160 AUD to keep forever.
Scientific illustrations are used to present the information in your article in a way that is easier to understand for your audience. The illustration should clarify the topic of your research. For example, if you are writing about the way a stent opens up blocked arteries in a heart, then you can create an illustration showing the key ...
useful software for editing images and is free to download. Again, when you make changes to an image, remember to save your originals, save the updated image as a tiff, and record all changes. Also, if you are comparing a group of images, such as florescence images of the same cell, and you edit one of the images (contrast, etc.), the edit must ...
Individual images as well as collections of images are easy to download in a .png file format. Images are under a Creative Commons 3.0 license, which requires users to give appropriate credit, provide a link to the license, and indicate if changes were made to the images. This requirement means the images are probably better suited for ...
General guidelines for figure design. • Identifying both the purpose of and audience for the figure allows one to best design an illustration that expresses the intended message • There are many types of scientific visualizations, but below are some common items to consider: • Information density • Information flow • Scientific rigor ...
Often, raster images have a specified resolution stored separately from the pixel values (a.k.a. metadata).This resolution metadata isn't really an integral part of the raster image, though it can be useful for conveying important information, such as the scale factor of a microscope or the physical size at which an image is intended to be printed. . Similarly, vector images may use a physical ...
A behind-the-scenes look at how to create scientific graphics that summarize the latest research. These kinds of images increase comprehension and provide va...
Nowadays the majority of journals put papers online, and many journals are online-only. ... Becuase, I found it comparatively easy to create images than directly in the word. Cite. 2 ...
Here, three researchers share their advice on how to create sci¬entific figures that are both accurate and engaging. 1. Use an image-processing workflow. Through her experience teaching visual ...
Increase the size of your "slide" to make sure the final image quality is high enough for print. In PowerPoint, go to the Design tab > Customise > Slide Size > Custom Slide Size. The largest slide size is A3, so I chose that to start with. Adjust the slide size as you see fit. Add your images and arrange them according to your desired layout.
Twenty-eight (16%) physiology papers, 19 (12%) cell biology papers, and 6 (2%) plant sciences papers met all criteria for all image-based figures in the paper. In plant sciences and physiology, the most common problems were with scale bars, insets, and specifying in the legend the species and tissue or object shown.
Twenty-eight (16%) physiology papers, 19 (12%) cell biology papers, and 6 (2%) plant sciences papers met all criteria for all image-based figures in the paper. In plant sciences and physiology, the most common problems were with scale bars, insets, and specifying in the legend the species and tissue or object shown.
You can cite images in your research paper either at the end, in between the topics, or in a separate section for all the non-textual elements used in the paper. You can choose to insert images in between texts, but you need to provide the in-text citations for every image that has been used. Additionally, you need to attach the name ...
Citing an image in APA Style. In an APA Style reference entry for an image found on a website, write the image title in italics, followed by a description of its format in square brackets. Include the name of the site and the URL. The APA in-text citation just includes the photographer's name and the year. APA format. Author last name, Initials.
Fortunately, we have several tools that can help us effectively prepare or improvise them. Here we give you a summary of the top tools that can be used to create images and figures for scientific research publications. You can also access detailed information on some of these tools here. SmartShorts. 5 stars 4 stars 3 stars 2 stars 1 star.
Google Research, Brain Team. We present Imagen, a text-to-image diffusion model with an unprecedented degree of photorealism and a deep level of language understanding. Imagen builds on the power of large transformer language models in understanding text and hinges on the strength of diffusion models in high-fidelity image generation.
Follow these easy steps to edit a PDF online by adding comments : Choose a PDF to edit by clicking the Select a file button above, or drag and drop a file into the drop zone. Once Acrobat uploads the file, sign in to add your comments. Use the toolbar to add text, sticky notes, highlights, drawings, and more. Download your annotated file or get ...
Mission. The Purdue On-Campus Writing Lab and Purdue Online Writing Lab assist clients in their development as writers—no matter what their skill level—with on-campus consultations, online participation, and community engagement. The Purdue Writing Lab serves the Purdue, West Lafayette, campus and coordinates with local literacy initiatives.
The AI-related practices at these organizations can offer guidance to those looking to create value from gen AI adoption at their own organizations. To start, gen AI high performers are using gen AI in more business functions—an average of three functions, while others average two. They, like other organizations, are most likely to use gen AI ...
More than 100 reference examples and their corresponding in-text citations are presented in the seventh edition Publication Manual.Examples of the most common works that writers cite are provided on this page; additional examples are available in the Publication Manual.. To find the reference example you need, first select a category (e.g., periodicals) and then choose the appropriate type of ...
So, how do content marketers use the tools today? About half (51%) use generative AI to brainstorm new topics. Many use the tools to research headlines and keywords (45%) and write drafts (45%). Fewer say they use AI to outline assignments (23%), proofread (20%), generate graphics (11%), and create audio (5%) and video (5%). Click the image to ...
Resizing is an essential step to create an image that fits journal recommendations. Making an image smaller (i.e. decreasing the number of pixels) is acceptable as software can combine multiple pixels into a single pixel. However, when there is an attempt to increase the number of pixels, the computer software needs to create additional pixels.
Right-click menu - Right-click the image to open the right-click menu. Select Edit . Selecting the edit image or the edit option loads the image in the integrated Adobe express editor. You can edit your image as desired. A. In place tool pallete B. Edit image option in the edit toolbar on the left. A. Edit option in the right-click menu.
Mr. Modi took a more positive view in a statement on X declaring that his coalition had won a third term. "This is a historical feat in India's history," he said. Supporters of the Congress ...
Had they cleared 400, the country would flourish.". India's benchmark stock indices closed at record highs on Monday after exit polls pointed to a thumping victory for Modi, then fell sharply ...