How to Delete the Title in Powerpoint
By default, PowerPoint presentations have at least two placeholder boxes on each slide -- the title and body placeholders. You can delete individual titles from the slides or prevent PowerPoint from using placeholder titles by editing the master slides.

Delete Individual Titles

Open the presentation you want to edit in PowerPoint or create a new presentation and select the slide you want to edit from the left pane. Locate the title at the top of the slide.
Advertisement
Video of the Day

Click the title to switch to editing mode and display the title box -- it has dashed borders. Click one of the dashed borders to select the title box -- the borders change to solid lines when the box is selected.
Press Delete to delete the title.
Delete Placeholder Titles From All Slides
Titles are not deleted automatically from existing slides when you edit the master slide; the new layout is only applied to new slides. You can, however, apply the new layout to existing slides manually.

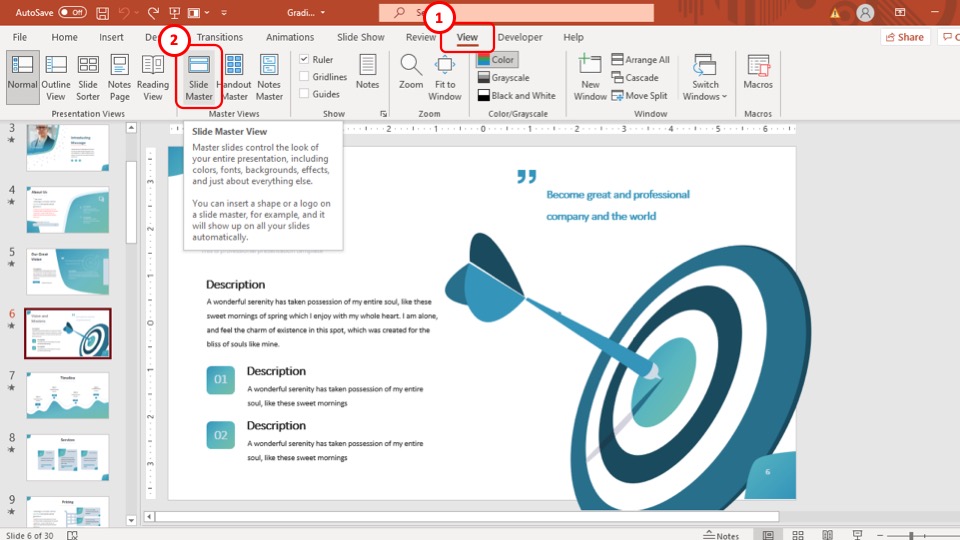
Open the presentation in PowerPoint, switch to the View tab and then click the Slide Master button in the Master Views group to view the master slide.

Select one of the slide layouts from the left pane, select the title box by clicking one of its borders and press Delete to delete it. Unchecking the Title box in the Master Layout group also deletes the title placeholder.
Repeat the process to delete the title placeholders from more slides. Click the Close Master View button in the Close group to save the changes and close the Master Slider view.

Remove the title from existing slides by reapplying the layout. Right-click each slide in the right pane, select Layout from the context menu and then select the new layout from the Office Theme section.
- Microsoft Office: Change or Delete a Placeholder
Report an Issue
Screenshot loading...
Stack Exchange Network
Stack Exchange network consists of 183 Q&A communities including Stack Overflow , the largest, most trusted online community for developers to learn, share their knowledge, and build their careers.
Q&A for work
Connect and share knowledge within a single location that is structured and easy to search.
How do I change the title of a PowerPoint exported to PDF?
I'm uploading a PDF exported from a PowerPoint file to my website. However, it shows "PowerPoint Presentation" as the title:

How do I change this?
- microsoft-powerpoint
- How about posting a link to an example so anyone interested in helping can have a look? – Steve Rindsberg Commented Jul 15, 2017 at 17:21
2 Answers 2
Click on File and on the top right and then Info . You will be able to see the Properties of your document there and also change the title that will be used when saving it as PDF.

I had the same problem. I found the answer for PowerPoint. Open your PowerPoint file, then under the file tab, under Info, on the right side, you'll see Properties. Under Properties, one item is "title" and when you hover of the title an editing box appears. Change it there.
- 2 This appears to be a duplicate of the older answer. – Scott - Слава Україні Commented Jul 14, 2018 at 2:16
You must log in to answer this question.
Not the answer you're looking for browse other questions tagged microsoft-powerpoint ..
- Featured on Meta
- Upcoming sign-up experiments related to tags
Hot Network Questions
- Do rich parents pay less in child support if they didn't provide a rich lifestyle for their family pre-divorce?
- In general, How's a computer science subject taught in Best Universities of the World that are not MIT level?
- Non-standard alignment of multiline equation
- When hiding behind something, can you even make a ranged attack with advantage?
- In "Romeo and Juliet", why is Juliet the "sun"?
- Could alien species with blood based on different elements eat the same food?
- Rank of a matrix with trace and determinant zero.
- Is there a name for books in which the narrator isn't the protagonist but someone who know them well?
- How fast can you win this (very stupid) game?
- How are secret encodings not a violation of amateur radio regulations?
- Usage of それなりの体制で in this sentence?
- QGIS show only one label
- How do we know from the Bible that Adam and Eve have been saved from the lake of fire?
- Is there any piece that can take multiple pieces at once?
- Are many figures in a paper considered bad practice?
- Is there any reason to keep old checks?
- Are there several types of mind-independence?
- Does Ordering of Columns in INCLUDE Statement of Index Matter?
- Am I wasting my time self-studying program pre-requisites?
- Does the recommendation to use password managers also apply to corporate environments?
- What might cause an inner tube to "behave" flat in a tire?
- giving variables a default value in a spec file
- tnih neddih eht kcehc
- In Northern England, what vowel phoneme is used in “can’t”?
- PowerPoint Notes
Hiding Slide Titles in PowerPoint
Slide titles are very important. First of all, they identify a slide. Secondly, they provide structure to your presentation, because anyone who uses PowerPoint’s Outline view will not be happy to see slides without titles, as shown in Figure 1 , below. Look for the highlighted red areas–these are devoid of any titles.
The main reason people don’t type anything within their slide title placeholders is not that they don’t need a title. They don’t type anything because they don’t have space on their slides to add a title! And when space is scarce, you will find that slide titles are the first casualty. Here are some scenarios where slide titles may not be very necessary, and many users will select the slide title placeholder and press the Delete button:
- You have a chart of a picture that takes the entire slide space. So you really cannot add a visible title.
- You have a single chart on the slide that already has a chart title.
- You have four charts on the slide that have individual chart titles. An extra slide title needlessly takes significant slide real estate.
- Your slide has a full-screen video.
- Any number of other reasons.
So we looked at scenarios where some users tend to delete slide titles. Other users who are savvier may tend to choose the Blank slide layout since that’s the only slide layout without a Title placeholder. But those same users will evolve after a few weeks, months, or years and come back to say that they do need slide titles after all, but they don’t need them to be visible. In other words, they need hidden slide titles.
Reasons for Invisible or Hidden Slide Titles
So why would anyone need invisible slide titles? Here are some reasons:
1. For Search
This is important if you have large slide decks, and the only search term in the slide is the title.
2. For Accessibility
This is legally implemented in many companies and organizations now. Screen readers need a title to read aloud.
3. For Linking
When you link to other slides in the same presentation or even another presentation, you can choose to link to a particular slide in the middle of a presentation, and the Insert Hyperlink dialog box shows you all the titles (see Figure 2 ). If you chose not to have a slide title, you’ll have a difficult time in choosing the right slide you want to link to.
Troubleshooting: Did you know that some versions of PowerPoint (not the newest ones) will cause your links to fail if the Slide Title has a comma? In case you see any such behavior, PowerPoint MVP Steve Rindsberg has a VBA-based resolution on his PowerPoint FAQ site: Convert Commas in Slide Titles to a “Safe” Character to Avoid Hyperlink Problems .
4. For Custom Shows
When you create custom shows, the Define Custom Show dialog box shows no slide thumbnails, as shown in Figure 3 . All you see is slide titles. If you chose not to have slide titles, you would have a tough time deciding which slides need to be part of your custom show.
5. For Slide Management
You may use a SharePoint slide library or a third-party slide management service such as SlideSource or Shufflrr . These tools like slide titles.
6. For Export
You may export your deck to HTML5, an LMS, SCORM, or any industry standard that needs each slide to possess a title.
7. For Locating Slides in SlideShow View
What if you want to jump to a particular slide while delivering your presentation? You can quickly bring up the right-click menu, and choose the Go to Slide option, shown in Figure 4 . This option no longer works in PowerPoint 2016, which replaces this option with the See All Slides option, that shows thumbnails rather than Slide Titles.
8. For Zoom
The PowerPoint Zoom feature in Office 365 versions of PowerPoint lets you auto-create and name sections, based on the Slide Titles, as can be seen highlighted in red within Figure 5 , below.
So clearly, you are going to lose so much, if you did not use proper Slide Titles that existed in a Title placeholder. No, none of these options would work if you inserted a Text Box and used that as a Title. See our Text Placeholders vs. Text Boxes page to understand this difference.
Now how can you have a slide that does not have a visible title, but make sure that a title exists in the outline? I can think of two ways:
1. Duplicate Slide Layouts
You can get over this problem by moving the slide titles off the slide area. But this approach will get those titles back in place, in case you press the Reset button. So clearly, there has to be a more involved solution. Follow these steps:
- Access the Slide Master and then duplicate the Slide Layouts you use in the presentation. To do so, you can right-click each individual Slide Layout in the left pane, and choose the Duplicate Layout option, as shown in Figure 6 , below.

- It’s a good idea to duplicate all Slide Layouts, even the ones you don’t use.
- Make sure you rename all duplicated Slide Layouts with descriptive names that make sense (see Figure 7 ).
- Now select the Title placeholder on the duplicated and renamed Slide Layout, and push it over the Slide Area. This is easily done by holding the Up Arrow key until the placeholder is no longer in the Slide Area, as can be seen in Figure 8 , below.
- Make similar changes to all duplicated Slide Layouts. Remember to leave the Slide Master alone because there may still be occasions when you need a visible Slide Title!
- Close the Slide Master view to get back to Normal view , or even Outline view . Now reapply the new Slide Layouts to all slides where you don’t need a visible title.
- Now you can make sure that all Title placeholders have a real title. Type in what you need within the Title placeholder, and while this title is not visible on the slide itself, it still shows up in the Outline pane, providing you with all benefits of a structured presentation (see Figure 9 ).
2. Use the Selection Task Pane
Another way to hide Slide Titles is via the Selection task pane . Follow these steps to learn more:
- Access the slide, for which you want to hide the Slide Title. Also, bring up the Selection task pane .
- Now locate the “Eye” icon for the slide title in the Selection pane, and click once to hide the Slide Title.
- You will notice that hiding the Slide Title this way does not prevent it from showing in the Outline pane, as can be seen in Figure 10 , below.
- Repeat this process for all slides where you need to hide titles.
While the Selection Pane process works best to hide a few slide titles, the Duplicating Slide Layouts method we explored earlier works best for more involved workflows.
I wish to thank Roger Haight from Microsoft for motivating me to write this post. Also, thanks to my fellow MVPs Dave Paradi , Echo Swinford , Ellen Finkelstein , Nolan Haims , and Steve Rindsberg (listed alphabetically) for providing ideas that made this post better.

Geetesh believes that any PowerPoint presentation is a sum of its elements–these elements include abstract elements like story, consistency, and interactivity — and also slide elements like shapes, graphics, charts, text, sound, video, and animation. He explains how these elements work together in his training sessions. He has also authored six books on PowerPoint and Microsoft Office.
Related Posts

Filed Under: Techniques Tagged as: Guidelines , Hide Slide Titles , PowerPoint , Techniques , Tutorials
Microsoft and the Office logo are trademarks or registered trademarks of Microsoft Corporation in the United States and/or other countries.
Home | PowerPoint | Photoshop | PowerPoint Templates | PowerPoint Tutorials | Blog | Notes | Ezine | Media Kit | Feedback | Site Map | About Us | Contact Us Link to Us | Privacy | Testimonials PowerPoint Backgrounds | Christian PowerPoint Backgrounds | Business PowerPoint Presentation Templates
Plagiarism will be detected by Copyscape
© 2000-2024, Geetesh Bajaj - All rights reserved.
Home Blog PowerPoint Tutorials How to Edit Header in PowerPoint
How to Edit Header in PowerPoint

A header and footer in PowerPoint are often used to add company branding, trademark, timestamp, author’s name, and slide numbers. Presenters often need to edit PowerPoint templates or Google Slides templates edited using PowerPoint to replace the default header and footer information. There is more than one way to add or edit a PowerPoint header, with some methods that can help embed more comprehensive branding features across your slides, such as SlideMaster.
How to Edit Automatically Added Header in PowerPoint
If you want to edit the header in PPT or make changes to the footer, go to Insert -> Text -> Header and Footer .

The Slide tab gives the options to add and edit the header and footer for your slides. You can add a fixed or automatically generated date, slide number, and footer text from here. These changes can also be hidden from the title slide by selecting the Don’t Show on the title slide option. Select Apply to apply the change to the current slide, or select Apply to All to apply the changes to all slides.

If you’re wondering how to edit the header in PPT for your handouts, or make changes to the footer, head over to the Notes and Handouts tab to edit the date and time, page number, header, and footer text. If you need additional guidance regarding this method, you might want to see our guide on how to edit footer in PowerPoint . Google Slides users can also see our guide on how to edit header and footer in Google Slides .

How to Edit Manually Added Header in PowerPoint
Sometimes, presentations might contain manually added headers and footers. Presenters add these individually by inserting images (such as a logo) and text boxes.

Similarly, you can add a textbox via Insert -> Text -> Text Box to insert a manual header.

If the information is already added, you can simply edit it by selecting and editing text or adding or removing images. In such a case, the added header and footer can be edited in Normal mode. However, if you cannot edit it, you might need to switch to Slide Master.
How to Edit Header using SlideMaster
A header in PPT that is applied across one or more slides and isn’t editable in Normal mode will need to be edited via SlideMaster. To access SlideMaster go to View -> SlideMaster .

Go to the Master Slide and head over to Insert -> Header and Footer.

The changes made here can be applied to one or more slides in your slide deck by editing the Master Slide.

You can also insert a logo and place slide elements to adjust your header.
The below image shows a header and footer edited using SlideMaster.
We changed all slides to keep your slide deck uniform with a standard header using SlideMaster. This method can help make it easier to incorporate branding and other information necessary for the presentation automatically.

Final Words
To add a simple header with text, timestamp, and other information, you can use the default option via Insert -> Text -> Header & Footer either from Normal view or via SlideMaster to make more sweeping changes to your slide deck. Additionally, you can add a logo or other images and related information in SlideMaster or manually in Normal mode to suit your needs.

Like this article? Please share
PowerPoint Tools Filed under PowerPoint Tutorials
Related Articles

Filed under PowerPoint Tutorials • June 11th, 2024
How to Work with SVG in PowerPoint
Upgrade your graphics quality by mastering SVG graphics in PowerPoint. A detailed guide on how to create and import them.

Filed under PowerPoint Tutorials • June 7th, 2024
How to Change Theme Fonts in PowerPoint
Customize your presentation slides by changing theme fonts in PowerPoint. Instructions for Slide Master, Design tab, and more.

Filed under PowerPoint Tutorials • June 3rd, 2024
How to Align Text Boxes in PowerPoint
Organize your presentation slides layout in seconds by mastering how to align text boxes in PowerPoint. Step-by-step instructions with images here.
Leave a Reply
How to Remove the Footer From PowerPoint Slides
You can always re-enable it later
The footer text at the bottom of your PowerPoint slides has several potential uses. It can be used as a place to number your slides or as a way to place a topic or brand on the slide without distracting from the content.
However, what happens if you want to remove the footer from your PowerPoint slides? You may want to keep the slide clean from any extra content. Thankfully, you can easily remove the footer from your PowerPoint slides using the steps below.
How to Remove the Footer from a PowerPoint Slide
If you want to remove the footer from your PowerPoint slides, you’ll need to access the Header and Footer menu. This is where you can see and edit your slides’ header and footer options. You can also remove or hide other elements such as slide numbers and the date or time from your slides.
To remove the footer from your PowerPoint slides, follow these steps.
- Open your PowerPoint presentation and press the Insert tab on the ribbon bar.

- Next, press the Header and Footer icon in the Text group. This will open a menu box where you’ll be able to edit the header and footer options for your slides.

- To remove the footer, uncheck the Footer box under the Slide tab. You can also uncheck the Slide number and Date and time checkboxes if you don’t want them to appear on your slides.

- Once you uncheck the boxes, you can choose whether to apply the changes to all slides or only to the selected slides. If you want to remove the footer from all slides, press Apply to All .

- If you want to remove it from only some slides, select those slides first, then press Apply instead.

- Your slides will be updated immediately. To undo the changes, press the Undo button in the top-left corner above the ribbon bar before saving your presentation.

How to Remove a Hidden Footer from a PowerPoint Slide Template
Trying to remove a footer from your slide, but it won’t disappear? If that’s the case, you’re probably trying to remove a hidden footer from a slide, without realizing that it’s applied to the slide template.
If you’re using a template that has a hidden text box in the footer, the template will override any settings you make to ensure that it remains visible. To remove this hidden footer, you’ll need to access the Slide Master view to remove it from your template .
To remove a hidden footer from a PowerPoint slide template, follow these steps.
- Open your PowerPoint presentation and press Slide Master from the View tab on the ribbon bar.

- This will show you the template slides that you’re using in your presentation. Look for the slide in your template that has a text box at the bottom with some footer text.

- To remove it, select the text box and press Delete on your keyboard. Alternatively, you can edit or format that text box if you want to keep it but otherwise change its content or appearance.

- When you’re done, press the Close Master View button to return to your standard PowerPoint slide view.

- Press File > Save to save the changes to your presentation.

Editing Your PowerPoint Presentation
If you’ve decided to remove the footer from your Microsoft PowerPoint slides, you can use the steps above to help you. If you disable the footer, it’ll disappear from view, but it won’t be completely removed—you can always re-enable it afterward.
You can also add new headers and footers to your PowerPoint presentation after removing them. If you’re running out of space, you can also resize your PowerPoint slides to increase your space for text and other content.
Don’t go too text-heavy, though. You may want to consider adding other visual elements, like a YouTube video , instead.

Ben Stockton is a freelance technology writer based in the United Kingdom. In a past life, Ben was a college lecturer in the UK, training teens and adults. Since leaving the classroom, Ben has taken his teaching experience and applied it to writing tech how-to guides and tutorials, specialising in Linux, Windows, and Android. He has a degree in History and a postgraduate qualification in Computing. Read Ben's Full Bio
Read More Posts:

Leave a Reply
Your email address will not be published. Required fields are marked *
- PRO Courses Guides New Tech Help Pro Expert Videos About wikiHow Pro Upgrade Sign In
- EXPLORE Tech Help Pro About Us Random Article Quizzes Request a New Article Community Dashboard This Or That Game Popular Categories Arts and Entertainment Artwork Books Movies Computers and Electronics Computers Phone Skills Technology Hacks Health Men's Health Mental Health Women's Health Relationships Dating Love Relationship Issues Hobbies and Crafts Crafts Drawing Games Education & Communication Communication Skills Personal Development Studying Personal Care and Style Fashion Hair Care Personal Hygiene Youth Personal Care School Stuff Dating All Categories Arts and Entertainment Finance and Business Home and Garden Relationship Quizzes Cars & Other Vehicles Food and Entertaining Personal Care and Style Sports and Fitness Computers and Electronics Health Pets and Animals Travel Education & Communication Hobbies and Crafts Philosophy and Religion Work World Family Life Holidays and Traditions Relationships Youth
- Browse Articles
- Learn Something New
- Quizzes Hot
- This Or That Game
- Train Your Brain
- Explore More
- Support wikiHow
- About wikiHow
- Log in / Sign up
- Computers and Electronics
- Presentation Software
- PowerPoint Presentations
How to Edit a PowerPoint Master Slide
Last Updated: May 5, 2021
This article was co-authored by wikiHow staff writer, Travis Boylls . Travis Boylls is a Technology Writer and Editor for wikiHow. Travis has experience writing technology-related articles, providing software customer service, and in graphic design. He specializes in Windows, macOS, Android, iOS, and Linux platforms. He studied graphic design at Pikes Peak Community College. This article has been viewed 45,619 times. Learn more...
This wikiHow teaches you how to edit slide masters in PowerPoint. Slide masters are used to apply the same layout, fonts, styles, images, and placeholders to multiple slides in a PowerPoint presentation. A slide master can have multiple layouts. [1] X Research source
Accessing Slide Master View

- If you have PowerPoint presentations saved on your OneDrive, click OneDrive and then click a PowerPoint presentation you wish to open.

Adding and Deleting Slide Masters and Layouts

- There must be at least one slide master in the list on the left.
- You can also use the right-click menu to rename or duplicate slide masters and layouts.
Editing Backgrounds and Themes

- If you want to create layouts with different themes, color schemes, or fonts, you need to create a new slide master.

- Applying a background style to a slide master affects all the layouts below the slide master. Applying a background style to a layout only affects that layout.

- Solid fill: This applies a single color to the background. Use the "Color" drop-down menu to select a color.
- Gradient: . This applies a fade with two or more colors as a background. To change the gradient colors, click a stop below "Color stops" and then use the "Color" drop-down menu to select a color. Select the gradient type using the "Type" drop-down menu.
- Picture or texture fill: This option allows you to use an image as your background. Click File to select an image file from your computer or use the "Texture" drop-down menu to select one of the texture images.
- Pattern fill: This option allows you to use a pattern as your background. Select a pattern in the menu below "Pattern" and then use the "Foreground" and "Background" drop-down menus to select colors for the pattern.

- If you do not click Apply to all , it will only apply your background settings to a single layout.

Editing Placeholders

- Content: Content placeholders can be filled with any type of content, such as text, images, tables, charts, videos.
- Text: Text placeholders are used to indicate where text will go. You can use a text placeholder to format your text before you even know what the text will say.
- Image: Image placeholders will eventually be filled with an image files, such as a JPEG.
- Chart: Chart placeholders are used to indicate where a chart or graph will be placed.
- Table: Table placeholders are used to indicate where a table, such as those created in Excel will be placed.
- SmartArt: SmartArt is Microsoft's editable graphics. A smartArt placeholder indicates where smartArt will eventually be placed. [3] X Research source
- Media: Media placeholders indicate where media, such as a video file will eventually be placed.
- Online Image: An online image placeholder indicates where you can choose an image from online

- To edit the position of a placeholder, click and hold a blank spot inside the placeholder bounding box. Then drag the placeholder to where you want to go.
- To rotate a placeholder, click the circular arrow icon above the placeholder bounding box and drag left or right to rotate the bounding box.
- To adjust the size of the placeholder, click and drag the small circles in the corners and sides of the placeholder bounding box.
- To Delete a placeholder, click the place holder and press Delete .

- You can also use the options in the menu to add other text effects such as bullets or a numbered list, or text effects such as shadow, glow, or 3D.
Applying a Slide Master or Layout to PowerPoint Slides

- You can also insert a new slide by click Insert in the menu bar at the top and clicking New Slide

- Text: Click the placeholder text to edit it. Highlight the text and press Delete to remove the placeholder text. Then type your own text.
- Image: Click the image icon to open a file browser. Select an image on your computer and click Open .
- Chart: Click the chart icon in the placeholder. Then select a chart type in the menu to the left of the window and click a chart style at the top and click Ok . Use the table to edit the labels and numbers for the chart.
- Table: Click the table icon in the placeholder and then type the number of columns and rows for the table and click Ok . Then click each cell and add your own text to the cell.
- SmartArt: Click the SmartArt icon in the middle of the placeholder. Then select the type or art in the menu on the left. Then select a style in the center and click Ok . Use the pop-up window to add text to the graphic or click the text boxes in the graphic and type your own text.
- Media: Click the media icon in the center of the placeholder and then use the file browser to navigate to an audio or video file on your computer. Click the audio or video file and click Insert .
- Online Image: Click the online image icon in the center of the placeholder. Then use the search bar to search for an image. Click an image you like to select it.
Expert Q&A
Wikihow video: how to edit a powerpoint master slide, you might also like.

- ↑ https://support.office.com/en-us/article/what-is-a-slide-master-b9abb2a0-7aef-4257-a14e-4329c904da54
- ↑ https://support.office.com/en-us/article/customize-a-slide-master-036d317b-3251-4237-8ddc-22f4668e2b56
- ↑ https://support.office.com/en-us/article/video-create-and-change-smartart-393bd987-c33a-4821-aaea-fd9ea71916cd
About This Article

If you want to change the layout or style of all slides in your PowerPoint presentation, you can edit your Slide Master. First, open your PowerPoint presentation and click the "View" tab. Next, click "Slide Master" on the toolbar to open the Slide Master tab. You'll see the Slide Master for your theme at the top of the left panel. The Slide Master contains formatting for elements like headers, footers, and title placeholders. The smaller slides under the Slide Master are Slide Layouts, which inherit the basics of the Slide Master but feature alternative layouts for different types of presentations. You can edit these separately in addition to making changes to your Slide Master. To resize an element, such as the body or title area on a Slide Master or Layout, click it once and then drag its sizing handle. To move an element, click its border and then drag it to the desired location. You can also customize fonts by selecting the text in an element, such as the title, and then making changes using the font options on the Home tab. To add a placeholder for a certain type of object, such as a picture or a chart, click the "Insert Placeholder" button in the toolbar and select your desired option. You can also use the "Background" panel on the toolbar to change the theme's colors and style elements. Just make sure the Slide Master is selected in the left panel and not just one of the Layouts first. Click "Colors" on the toolbar to choose a new color scheme, and then "Background Styles" to choose a new background color from the palette. Click "Fonts" to change the font throughout, and "Effects" to add effects to objects, such as drop-shadows. To add a new layout to a Slide Master, click "Insert Layout" in the toolbar. To delete any part of your Slide Master or Layout, click it once and press the "Delete" key on your keyboard. When you're finished editing your Slide Master, click "Close Master View" in the toolbar to return to regular editing mode—your changes will be applied to all slides in your presentation automatically. Did this summary help you? Yes No
- Send fan mail to authors
Is this article up to date?

Featured Articles

Trending Articles

Watch Articles

- Terms of Use
- Privacy Policy
- Do Not Sell or Share My Info
- Not Selling Info
wikiHow Tech Help Pro:
Level up your tech skills and stay ahead of the curve
How To Remove Click To Add Title In PowerPoint
Are you tired of the default “Click To Add Title” text in your PowerPoint presentations?
We will also explore common mistakes to avoid when removing this text and share tips and tricks for using titles effectively in PowerPoint.
Key Takeaways:
Why is click to add title used in powerpoint.
Using ‘Click to Add Title’ in PowerPoint presentations serves as an effective way to engage your audience visually while delivering a clear message.
By utilizing ‘Click to Add Title’, presenters can create visually appealing slides that capture the audience’s attention from the start. This feature allows for the seamless integration of text and graphics, leading to more engaging and impactful presentations.
The flexibility offered by ‘Click to Add Title’ enables presenters to customize each slide according to the specific content and context of their presentation, facilitating better audience comprehension and retention. It also emphasizes the importance of visual design in conveying information effectively, making the presentation experience more interactive and memorable.
Easy to Use
It is important to practice utilizing this function to become proficient in placeholder customization, ensuring that titles are seamlessly integrated into the overall design of the presentation. With regular use, presenters can develop a keen eye for layout and alignment, enhancing the visual appeal of their slides.
Consistent Formatting
The ‘Click to Add Title’ feature in PowerPoint ensures consistent formatting across slides, allowing presenters to integrate subtitles and text boxes seamlessly for enhanced visual appeal.
Subtitles play a crucial role in breaking down content and guiding the audience through the presentation, providing a clear structure.
Utilizing a cohesive color scheme not only adds aesthetic value but also helps maintain consistency and professionalism throughout the slides.
How to Remove Click To Add Title in PowerPoint
Begin by opening your PowerPoint presentation and navigating to the View tab at the top of the screen.
Click on Slide Master to access the master slide that controls the overall layout and design of your slides.
Select the placeholder text box, right-click on it, and choose ‘Cut’ or simply press the delete key on your keyboard.
Step 1: Select the Slide Master
The first step in removing the ‘Click to Add Title’ placeholder in PowerPoint involves selecting the Slide Master view to access and modify the layout of your slides.
in the sidebar. These options allow you to customize the slide layouts according to your preference. By selecting the Layout Master containing the ‘Click to Add Title’ text box, you can delete or modify it.
Remember to save your changes after removing the placeholder to ensure that it reflects across all your slides. This simple action can greatly enhance the professional appearance of your PowerPoint presentation.
Step 2: Click on the Title Placeholder
Step 3: delete the placeholder.
After selecting the ‘Click to Add Title’ placeholder, proceed to delete it from the Slide Master to eliminate the automatic title insertion and allow for customized subtitles.
By deleting the placeholder in the Slide Master, you ensure that any new slides created with that layout will no longer have the automatic title insertion, giving you more control over the customization of your presentation.
Step 4: Save Changes
What to do if you want to add a title to a slide.
If you need to add a title to a slide in PowerPoint, consider utilizing the Title Layout option, inserting a text box, or using the ‘Insert Title’ feature to emphasize main points.
Use the Title Layout
When using the Title Layout option, you create a cohesive look across your presentation, maintaining a professional and polished appearance. By choosing this format, you not only make your slides aesthetically pleasing but also easy to follow, keeping your audience focused on the main message. The clean and consistent design of titles using this layout promotes better retention of information and helps reinforce the key points you want to convey. This method of organizing titles improves the overall flow of your presentation and ensures that your audience can quickly grasp the essential details.
Insert a Text Box
Use the ‘insert title’ option.
Employing the ‘Insert Title’ feature in PowerPoint provides a quick and effective method for adding titles to slides, ensuring cohesive design elements and engaging content delivery.
Common Mistakes When Removing Click To Add Title in PowerPoint
While removing the ‘Click to Add Title’ feature in PowerPoint, common mistakes include accidentally deleting the entire Slide Master, failing to save changes, and overlooking consistent formatting across slides.
Deleting the Entire Slide Master
Accidentally deleting the Slide Master can lead to a cascade of design issues and layout errors across all slides in your presentation. This blunder can be particularly frustrating for users who have spent significant time customizing their slides for a polished and professional look.
Not Saving Changes
One effective method is to utilize the ‘ Save As ‘ feature in PowerPoint, which allows you to create backup versions of your presentation at different stages of progress. This way, if any changes are lost, you can always revert to a previous version. Double-checking before closing the program or making any major edits can help you avoid losing valuable modifications.
Not Checking for Consistent Formatting
Regularly inspecting slide transitions, animations, and slide layouts for coherence and effectiveness plays a vital role in engaging your audience and conveying your message. Utilizing design principles such as simplicity, contrast, and hierarchy can elevate the visual impact of your slides.
Tips and Tricks for Using Titles in PowerPoint
Use short and clear titles.
Opt for brief and concise titles in PowerPoint to capture the audience’s attention swiftly and communicate your message effectively, enhancing engagement and information delivery.
Use Title Case for Consistency
Implementing a Title Case for your titles can significantly enhance the readability and visual appeal of your PowerPoint slides. By capitalizing the principal words in your titles, you create a more polished and structured appearance, improving overall design aesthetics. Consistent use of Title Case helps guide the audience’s focus to the key points of your presentation, making it easier for them to grasp the information being presented.
Utilize Different Layouts for a Variety
When creating a presentation, it’s essential to consider the visual impact of your title slides. By utilizing multiple layouts, you can create a dynamic experience for your viewers, keeping them engaged and focused. Color scheme variation plays a crucial role in attracting attention and conveying mood, making it easier for your audience to grasp the content. Incorporating transition effects not only adds a polished touch to your titles but also helps in smoothly transitioning between different sections, enhancing the overall flow of your presentation. This blend of design versatility and audience engagement is key to delivering a memorable and impactful presentation.

Frequently Asked Questions
1. how do i remove the “click to add title” placeholder in powerpoint, 2. can i customize the “click to add title” placeholder in powerpoint, 3. why is the “click to add title” placeholder appearing in my powerpoint presentation.
The “Click to Add Title” placeholder appears in PowerPoint to remind you to add a title to each slide. It is a built-in feature to ensure your presentation is organized and professional.
4. How can I remove the “Click to Add Title” placeholder from all my slides at once?
5. is there a way to turn off the “click to add title” placeholder in powerpoint, 6. what should i do if i accidentally delete the “click to add title” placeholder in powerpoint.
If you accidentally delete the “Click to Add Title” placeholder, you can easily add it back by going to the Insert tab, selecting Placeholder, and then choosing Title. This will insert the placeholder back onto your slide.
Similar Posts
How to remove instructions in powerpoint, how to insert watermark in powerpoint, how to present in powerpoint without showing notes, how to insert picture in powerpoint as background, how to add images into your text in powerpoint, how to fade a picture into background in powerpoint.
How to correct unchangeable elements on your slide
Slide Master is the instrument that defines fonts, images (such as logos), and other elements (backgrounds, copyrights, page numbers, etc.) that will be applied to all slides with the same layout.

To edit elements defined in the Slide Master , do the following:
1. On the View tab, in the Master Views group, select Slide Master :

PowerPoint will open the Slide Master tab and will show master slide views. For example:

2. In the Slide Master view, you'll see that the left pane contains two distinctly different elements:

- A larger thumbnail representing the Slide Master – when you edit it, all slides in your presentation that are based on that Slide Master will contain your changes
- Title layout (comprising placeholders to add a Title and Subtitle for a slide)
- Title and Content layout (comprising a slide title and a multi-purpose Content placeholder)
- Title Only layout (comprising a slide Title placeholder with a blank area)
- Blank layout (comprising no placeholders at all)
- And several other layouts

In the Slide Master view, you can:
- Create your own layouts
- Customize existing layouts by adding any background pictures or different shapes, logos, etc.
- Remove predefined layouts
- Rename layouts for more comfortable use.
So, you can use several Slide Masters in one presentation.
3. After making changes in the Slide Master view, on the Slide Master tab, in the Close group, click the Close Master View button:

See also this tip in French: Comment corriger les éléments immuables sur votre diapositive .
Please, disable AdBlock and reload the page to continue
Today, 30% of our visitors use Ad-Block to block ads.We understand your pain with ads, but without ads, we won't be able to provide you with free content soon. If you need our content for work or study, please support our efforts and disable AdBlock for our site. As you will see, we have a lot of helpful information to share.

Header and Footer on slides
How to Add or Remove Watermark in PowerPoint? [EASY Guide!]
By: Author Shrot Katewa
![How to Add or Remove Watermark in PowerPoint? [EASY Guide!]](https://artofpresentations.com/wp-content/uploads/2021/10/Featured-Image-How-to-Add-or-Remove-Watermark-in-PowerPoint.webp "how to remove edit presentation title here in powerpoint")
There are times when you want your PowerPoint presentation to show terms like “Confidential” or “Draft” on top of the slides. This can easily be achieved by adding a watermark in PowerPoint! Although PowerPoint doesn’t provide a watermark feature by default, there is a way to work around this problem.
To add a watermark in PowerPoint, click on “View”. Then, click on “Slide Master”. Select the “Master Slide”, and insert a text box using the “Insert” tab. Add the watermark text in the text box, and click on “Close Master View” to exit the master.
In this article, I will explain the process of adding a watermark in PowerPoint in a step-by-step manner with the help of visual references so you can easily follow along even as a beginner!
Plus, we shall also understand how you can remove a watermark from a PowerPoint file that you have received. That, and much more!
So, let’s get started!
A Quick Note Before We Begin – if you want to make jaw-dropping presentations, I would recommend using one of these Presentation Designs . The best part is – it is only $16.5 a month, but you get to download and use as many presentation designs as you like! I personally use it from time-to-time, and it makes my task of making beautiful presentations really quick and easy!
1. What is a Watermark in PowerPoint and Why Do You Need It?
A watermark in PowerPoint is a semi-transparent text visible on the slides. A watermark is used to indicate that a slide is still a draft, contains confidential information, or simply indicate that it should not be used beyond the intended purpose.
The watermarks can be an image or a text. The most common use for watermarks is to include a message on the background of slides to emphasize it.
You can use a watermark to state its current position, for example, you can add a watermark that says “Confidential” to every slide to emphasize the sensitivity of the message, or you can put a watermark that says “Draft” to indicate that the current status of the presentation is still in development.
You can also add a subtle company logo on each slide to indicate that the presentation was made specifically by the company or for the company.
2. How to Add a Watermark in PowerPoint?
As mentioned previously, there is no direct button that allows you to add a watermark in PowerPoint.
However, you can add a text or an image in the Master Slide of your PowerPoint presentation, and it will be added to all the slides in your presentation as a watermark.
Follow the simple steps given below, to add a watermark in the slides of your PowerPoint presentation.
Step-1: Go to “Slide Master”
The first step is to click on the “ View ” tab which is located in the ribbon of your PowerPoint presentation.
After you have accessed the “ View ” tab, click on the “ Slide Master ” option which is located in the “ Master Views ” section of the “ View ” tab.
Step-2: Click on “Insert”

Once you’ve clicked on the “ Slide Master ” viewing option, your PowerPoint view will change and you will now be able to edit the “ Master Slide ”.
Now, click on the “ Insert ” tab which is located in the ribbon of your PowerPoint presentation.
Step-3: Insert a “Text Box”
Once you’re in the “ Insert ” tab, select the first slide in the “ Slide Master ” view, which is the “ Master Slide ” of your PowerPoint presentation.
After that, click on the “ Text Box ” button located in the “ Text ” section of the “ Insert ” tab and add a text box in the “ Master Slide ”
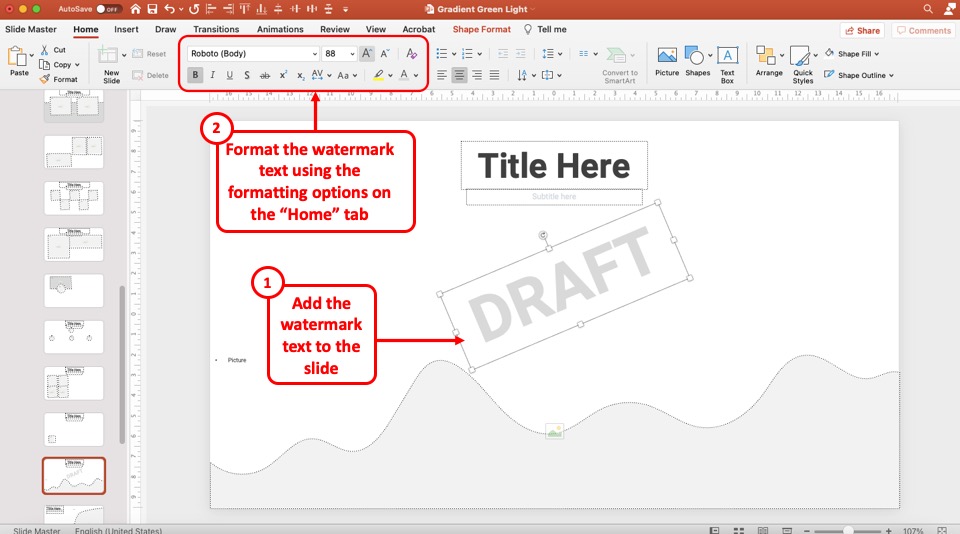
Step-4: Add the text to create a watermark
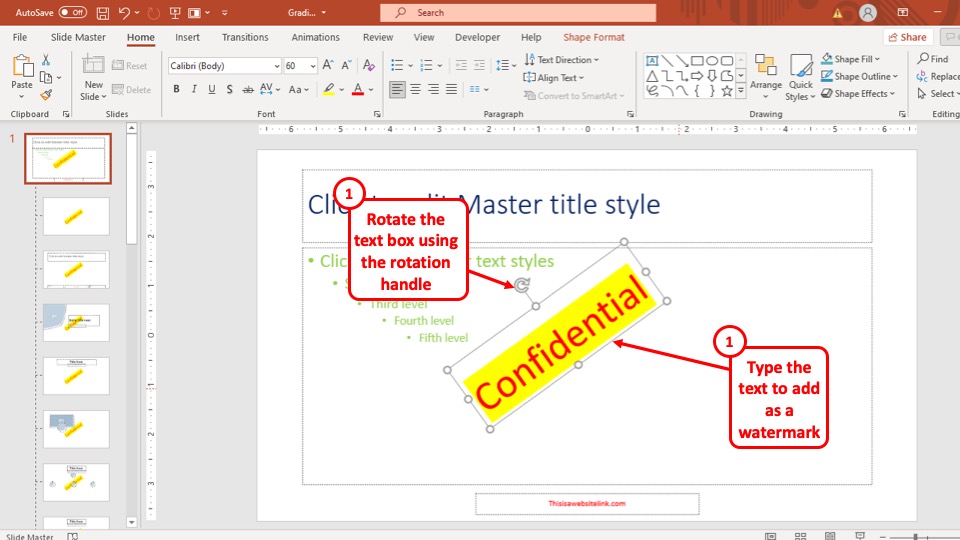
In this step, all you have to do is to type the text in the text box that you want to keep on the background of your presentation as a watermark and format it to fit your preference.
After that simply close the “ Slide Master ” view and the watermark will be added to all the slides in your PowerPoint presentation.
3. How to Add a Watermark to a Single Slide in PowerPoint?
The process mentioned above will add a watermark to every slide in PowerPoint in one go. However, there are times when you want to add a watermark to just one slide in PowerPoint. Here’s how to do that –
To add a watermark to a single slide in PowerPoint, first, select the slide. Then, click on the “View” tab and open the “Slide Master”. Click on the individual slide layout of the selected slide, and add the watermark specifically to the slide. Click on “Close Master” to exit the Slide Master.
Here’s the process explained in a step-by-step manner with pictures for better understanding –
Step-1: Select the Slide and open the Slide Master
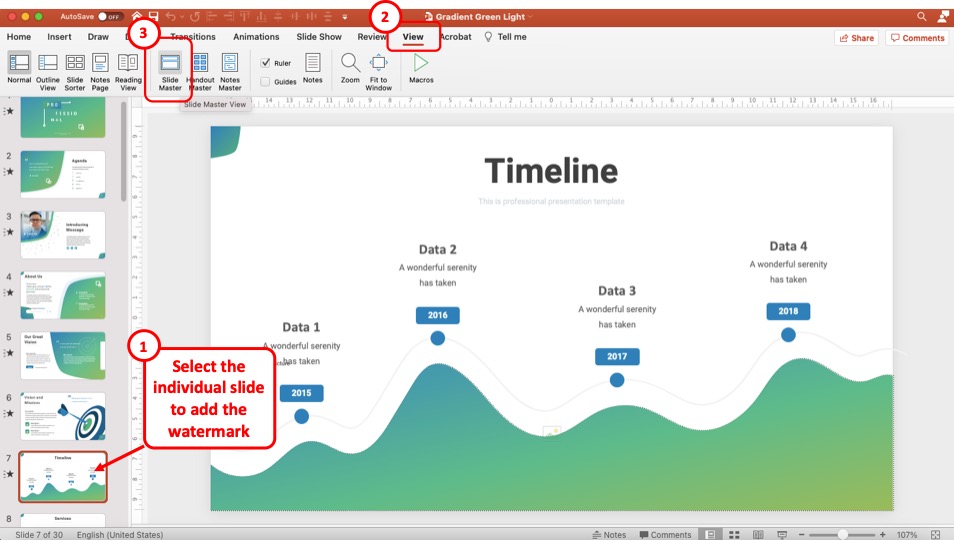
The first step is to select the specific slide on which you would like to add the watermark text.
Then, click on the “ View ” tab. From the ribbon, click on the “ Slide Master ” option. This will open the slide master view in PowerPoint.
Step-2: Add a Text Box
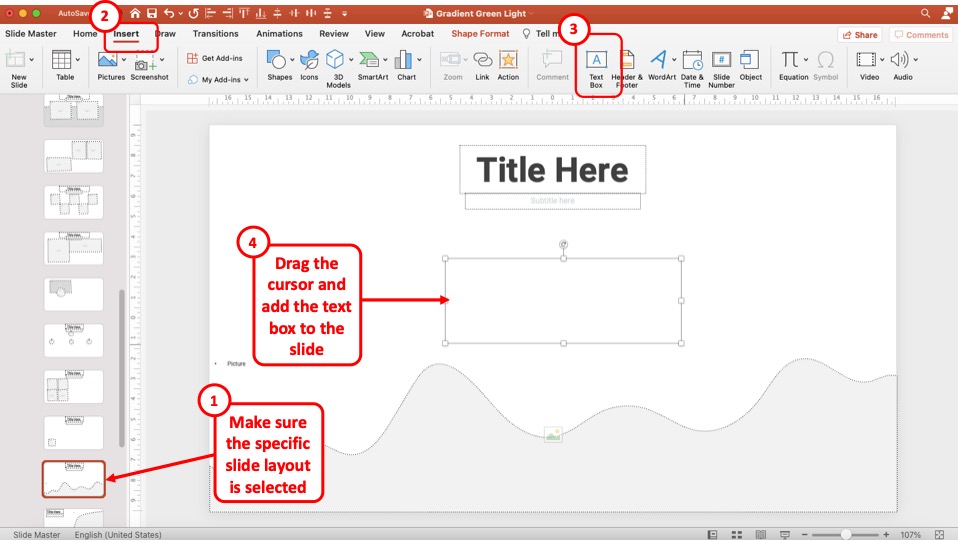
The slide master should open on the specific slide used for the slide that was selected in the normal view in step 1 above. Make sure that the specific slide layout is selected on the left part of the screen first (as shown in the image above).
Then, click on the “ Insert ” tab. Next, click on the “ Text Box ” option to add a text box to the slide. Finally, drag the cursor on the slide to add the text box.
Step-3: Add the Watermark Text
Once you’ve added the text box, simply add the watermark text that you would like to display.
Once you’ve added the text, feel free to format the text by clicking on the “Home” tab and using the text formatting options present on the ribbon.
If you are unsure how to do this, check out my other article on how to format text in PowerPoint that shows everything in a detailed manner.
Alternatively, you can also match the font type, font styles, font size and the font color to the one that I’ve used by checking the values in the image above!
Step-4: Exit the Slide Master View
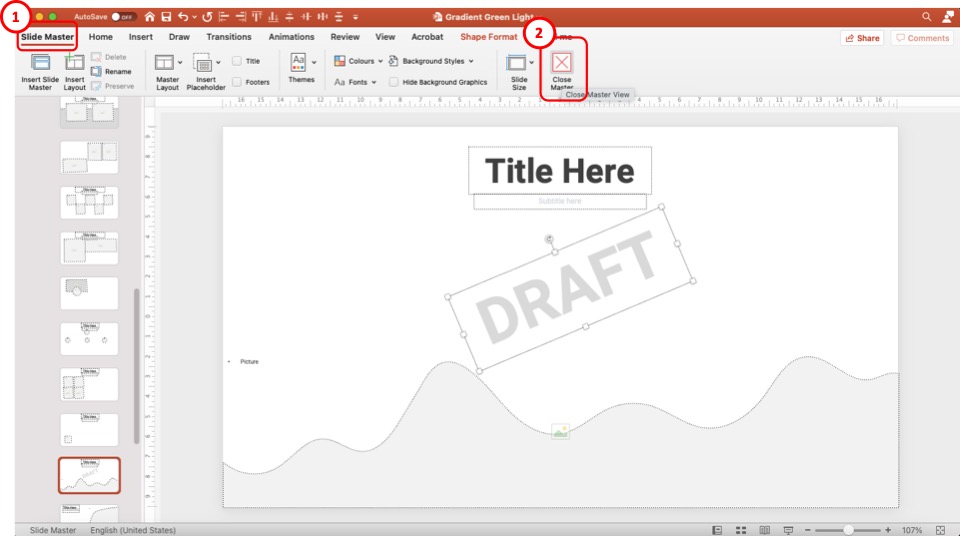
Once you’ve made the changes to the watermark text, it is time to go back to the normal view and exit the slide master.
To do that, first, you will have to click on the “ Slide Master ” tab (as shown in the image above). Then, from the ribbon, click on the “ Close Master ” option.

You should now return back to the normal view. You will also notice that the watermark has been added to the slide (as shown in the image above).
Furthermore, you will also see that the watermark is present only on this slide.
Caveat to this method
There is only one small caveat to this method. Since you have added the watermark to a specific slide layout, the watermark will be visible everytime you use that slide layout.
This means, if you create a new slide but use the same layout, the watermark will now be visible on that slide as well!
The only way to solve this problem is to go back to the slide master view, and create a copy of the said slide layout in use. From the copy of the slide layout, delete the watermark and rename the slide layout.
If you are unsure of how to do this, check out my other article on Slide Layouts in PowerPoint which will help you understand these nuances in further detail.
4. How to Use Picture as a Watermark in PowerPoint?
The process of adding a picture as a watermark in your PowerPoint presentation is very similar to adding text as a watermark.
Follow the simple steps described below –
Step-1: Open the Slide Master View in PowerPoint
As before, the first step is to open the slide master view in PowerPoint.
To do that, click on the “ View ” tab, and click on the “ Slide Master ” option from the ribbon.
Step-2: Insert an Image by Clicking on the “Pictures” button
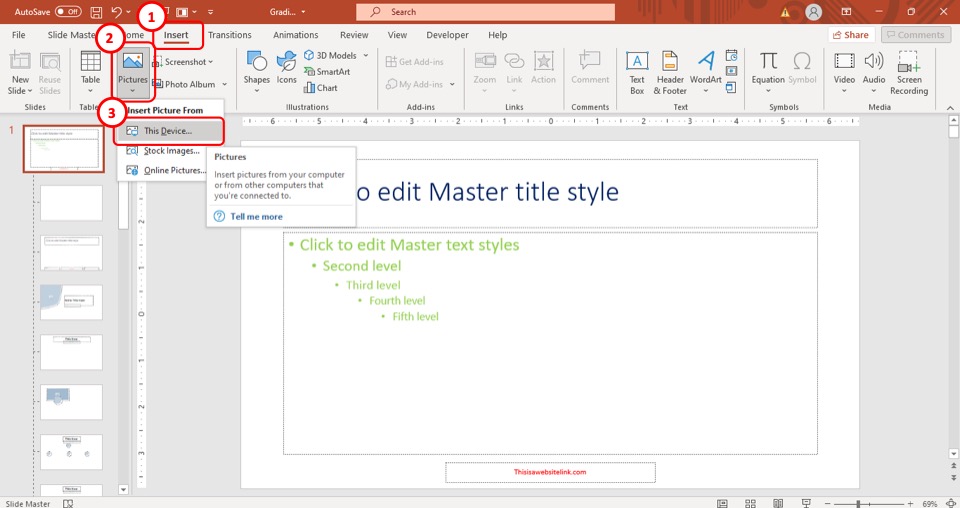
The next step to inserting a picture as a watermark is to select the “ Pictures ” button in the “ Insert ” tab. This will open a drop-down menu.
Step-3: Click on “This Device”
After you have opened the drop-down menu, simply click on the “ This Device ” option, which is the first option in the menu (as shown in the image in step 2).
This will open a pop-up window on your screen.
Step-4: Select your preferred image
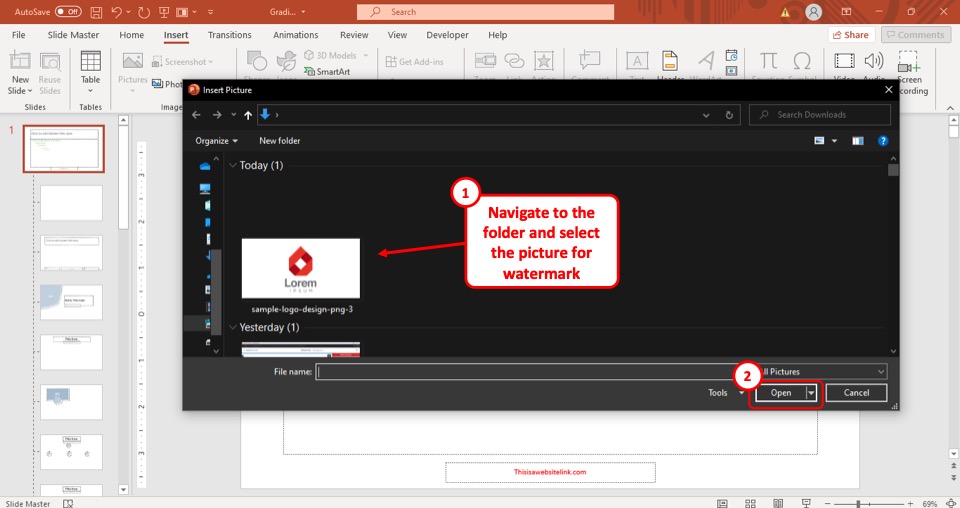
From the pop-up window, click on the image that you want to insert as a watermark and then click on the “ Open ” button.
This will immediately insert the image in your “ Master Slide ”
Step-5: Resize and position the image
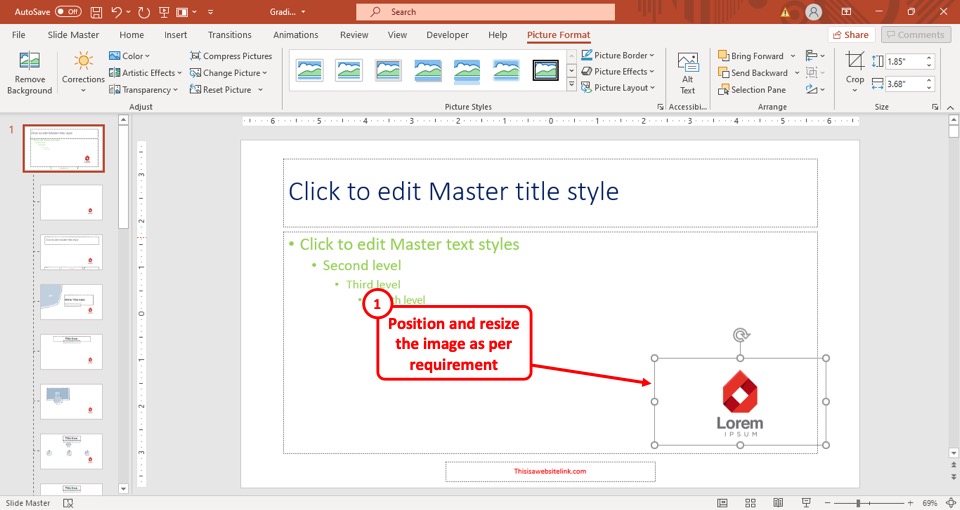
In the last step, all you have to do is to format the image and position it to your preference. After that, the image will be added to all the slides in your PowerPoint presentation as a watermark.
5. How to Edit a Watermark in PowerPoint?
To edit a watermark in your PowerPoint presentation, all you have to do is to go to the “ Master Slide ” by following the steps described earlier in this article.
Then, locate the slide layout in which the watermark is present. Once you’ve identified the watermark, make the desired changes in the text box containing the watermark.
Once you are done, the watermark on all the slides will change accordingly.
6. How to Remove a Watermark in PowerPoint?
Again, to remove a watermark from your PowerPoint presentation, all you have to do is to go to the “ Master Slide ” of your presentation as described earlier in this article.
Then, select the text box of the watermark, and click on the “ Delete ” key on your keyboard.
This will remove the watermark from your “ Master Slide ” and also all the other slides in your PowerPoint presentation.
If, however, the watermark is present only on a single slide then you will have to locate the slide layout containing the watermark and delete the watermark by clicking on it and pressing the “delete” button on the keyboard.
7. How to Add a Watermark That Can’t be Removed
Any watermark can be removed from PowerPoint unless you have implemented one of 7 ways to protect your presentation that I decribed in one of my earlier articles.
But, adding a watermark as a background image to the slide can make it really difficult for someone to remove it!
To add a watermark in your PowerPoint presentation that can’t be removed, you have to insert the watermark as an image in the background of your “ Master Slide ”.
Go to the “ Master Slide ” following the instructions described earlier in this article and follow the steps given below.
Step-1: Click on “Format Background”
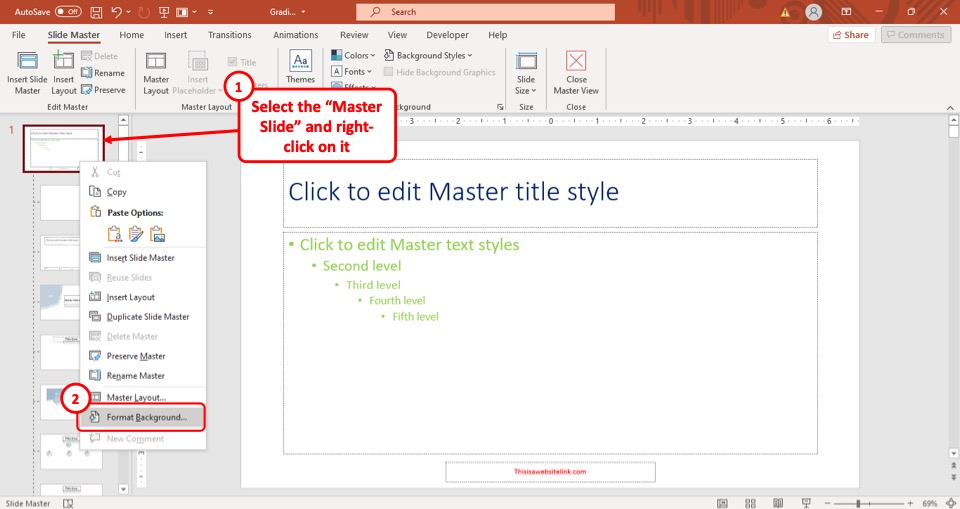
The first step of the process is to “ Right-click ” on the thumbnail of the “ Master Slide ” from the slide navigation pane of the “ Slide Master ” view.
This will open a drop-down menu. From the drop-down menu, click on the “ Format Background ” option. This will open the “ Format Background ” sidebar to the right of your screen.
Step-2: Click on “Picture or Texture Fill”
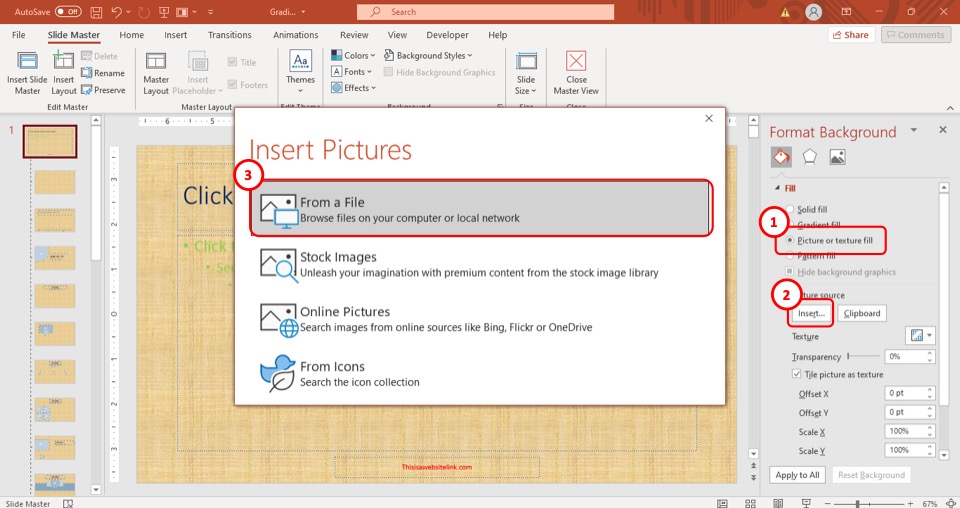
From the “ Format Background ” sidebar, click on the “ Picture or Texture Fill ” option which is the 3 rd option in the sidebar.
Step-3: Click on the “From a File” button
In the “ Picture or Texture Fill ” option, click on the “ Insert ” button. This will open a pop-up window on your screen. From the pop-up window, click on the “ From a file ” button (as shown in the image in step 2).
This will open yet another pop-up window.
Step-4: Insert the Background image
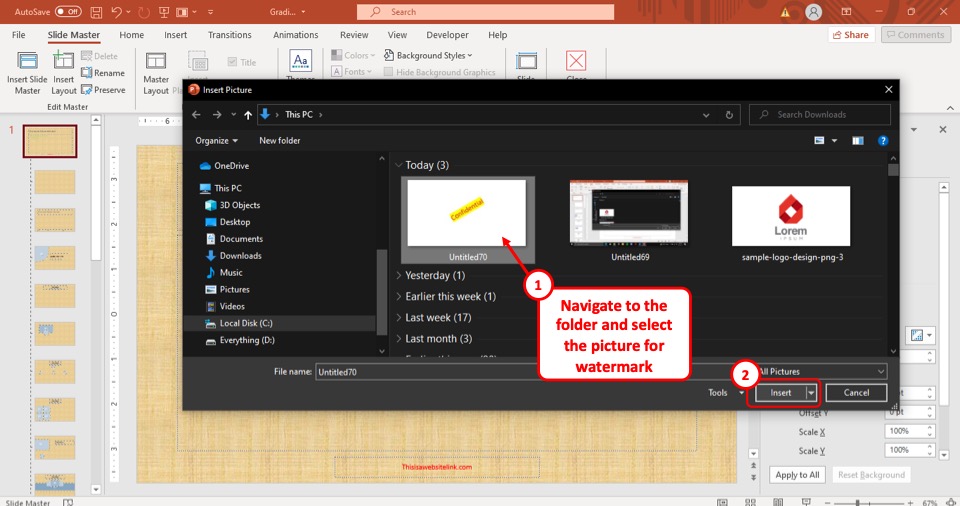
After you open the pop-up window by clicking on the “ From a file ” option, simply select the image that you want to add as a permanent watermark and then hit the “ Insert ” button located at the bottom right corner of the pop-up window.
After that, the image will be added to the background of your “ Master Slide ” and the watermark can not be edited.
8. How to Add a Logo to PowerPoint Footer?
You can also use the logo as an image to add to all your slides in PowerPoint. Sometimes, this can also act as an indication that the specific presentation is for a particular organization.
To add a logo in the footer of your PowerPoint presentation, you have to use the “ Header and Footer ” option which is located in the “ Text ” section of the “ Insert ” tab in your PowerPoint presentation.
I’ve covered this topic in great detail in another article. Make sure you check out how to edit footer in PowerPoint . In the said article, I’ve provided detailed steps on how to add a logo to the footer of a PowerPoint presentation. So, make sure you check it out!
9. How to Add Background Graphics in PowerPoint?
In PowerPoint, you can add pictures, textures, and more from the “ Format Background ” option.
To learn more about how to add background graphics in your PowerPoint presentation and the different ways you can use it to spice up your presentation, check out my dedicated article on how to format background graphics in PowerPoint !
Credit to drobotdean (on Freepik) for the featured image of this article (further edited).

Remove or change the current theme
You change or remove a theme by making a selection from the gallery on the Design tab in PowerPoint.

Select a heading below to open it and see the detailed instructions.
Change the current theme
On the Design tab, in the Themes group, click the More button (illustrated below) to open the entire gallery of themes:

Do one of the following:
To apply a built-in theme, under Office or Built-In , click the theme that you want.
To apply a newly-created theme or an existing theme that you previously modified and saved, under Custom , click the theme that you want.
To apply a custom theme or a themed document stored in a different location, click Browse for Themes , and then locate and select the theme you want.
Remove a colorful theme
To remove a colorful theme, apply the Office Theme for a simple design with a plain white background.
Under Office or Built-in , locate and click the Office Theme , which has a white background.

Edit a theme
See Create your own theme in PowerPoint .
Apply a theme to all slides
Let's say you have a bunch of slides borrowed from different sources and they don't match visually. You can unify the look of the slides in a few clicks:
In the slide thumbnail pane on the left, select a slide.
Point the mouse at the theme you want to apply. Right-click it, and then select Apply to All Slides .

If you change your mind, you can undo immediately by pressing Alt+Backspace, or you can repeat step 3 with a different theme.
Apply a theme only to selected slides
In the slide thumbnail pane on the left, select the slide or slides that you want to apply a theme to.
(To select multiple slides, press and hold the Ctrl key while you click the individual slides.)
Point the mouse at the theme you want to apply. Right-click it, and then select Apply to Selected Slides .
Start a new presentation without a theme
Select File > New .
Select Blank Presentation .
A presentation with a white background opens.
Links to more information about themes
Create your own theme
Understand the difference between PowerPoint templates and themes

Need more help?
Want more options.
Explore subscription benefits, browse training courses, learn how to secure your device, and more.

Microsoft 365 subscription benefits

Microsoft 365 training

Microsoft security

Accessibility center
Communities help you ask and answer questions, give feedback, and hear from experts with rich knowledge.

Ask the Microsoft Community

Microsoft Tech Community

Windows Insiders
Microsoft 365 Insiders
Was this information helpful?
Thank you for your feedback.
Adobe Community
- Global community
- 日本語コミュニティ Dedicated community for Japanese speakers
- 한국 커뮤니티 Dedicated community for Korean speakers
- Acrobat Reader
- Discussions
- How to rename "PowerPoint Presentation" title in P...
How to rename "PowerPoint Presentation" title in PDF?

Copy link to clipboard
1 Correct answer

never-displayed
How-To Geek
7 things i wish i’d known before i made my first powerpoint presentation.

Your changes have been saved
Email Is sent
Please verify your email address.
You’ve reached your account maximum for followed topics.
Quick Links
The slide master saves time and aids consistency, you can remove image backgrounds, cropping images is surprisingly easy, powerpoint has a presenter view, the designer feature instantly professionalizes your slides, the selection pane makes animating much easier, useful keyboard shortcuts.
As with many Microsoft 365 programs, PowerPoint can take some getting used to. Here are seven things I've learned over the years which, had I known about them earlier, would have saved me a lot of time and helped me hit the ground running with slick, professional slides.
In this article, I'll talk about the features available to Microsoft 365 subscribers in the PowerPoint desktop app. Some of these tools are accessible in the web-based version of the program, but—as with all Microsoft 365 programs—the app offers the best flexibility.
One of my main PowerPoint bugbears is seeing slides with different layouts and color schemes, so when I'm creating a slideshow, I like to make sure my viewers don't have the same experience. The best way to ensure your slides are consistent is by using the Slide Master —and doing so will also save you lots of time.
You can use the Slide Master on a blank PowerPoint presentation or a Microsoft template. However, if you have already amended some slides in the Normal view (such as font colors), some changes you make in the Slide Master will not apply to these slides.
In the View tab on the ribbon, click "Slide Master."

You will then see a new Slide Master tab on the ribbon, and your thumbnail pane on the left of your screen will change to a new view.

The top slide thumbnail is the master slide, and all related layouts are displayed underneath. Any formatting changes you make to the top slide—such as font colors, borders, or images—will be duplicated in the remaining slides. In this example, I've added a green border to the slide's text area and changed the title font to blue. I have also moved the slide title area to the right and added a small image to the left, and you can see all these changes applied to the other slide thumbnails below.

You can also make changes to specific slide types. For example, if I wanted the title layout slide to have a yellow background, I would move down to the second thumbnail in the screenshot above and change that slide layout only.
When you have made all the necessary changes, click "Close Master View" in the Slide Master tab, or "Normal" in the View tab.
Then, in the Normal view, to add a new slide, click the "New Slide" drop-down option in the Home tab and choose from the newly designed layouts.

If you have a busy slide with lots of objects, your image backgrounds can take up some valuable space. Instead, you can edit the images to keep the foreground only —as a result, your slide will appear less cluttered to your audience, and you're keeping only the focal point of your photos.
First, upload your image to PowerPoint. To do this, in the Insert tab on the ribbon, click "Pictures," and then choose the appropriate location.

Now, with your image selected, head to the Picture Format tab, and click "Remove Background."

PowerPoint will then attempt to identify which parts of your picture are the foreground and which parts are the background, keeping the former and removing the latter. The part it intends to remove will be highlighted in purple.

If you're happy with which parts of your picture are to be removed, click "Keep Changes" in the Background Removal tab. However, sometimes, PowerPoint's background recognition might not work perfectly well, as in my screenshot above. In this case, I would click "Mark Areas To Remove," and use the freehand pen to tell PowerPoint where the rest of the background is. Each time I click and then unclick, the image will update accordingly.
If you make any mistakes when drawing out your area, simply press Ctrl+Z (undo) to bring back the part you just removed. Luckily, you don't have to be perfectly accurate with where you draw your areas to remove—this process is satisfyingly intuitive.

When you're done, click "Keep Changes."

You will then see the new image with only the foreground retained. Simply select, copy (Ctrl+C), and paste (Ctrl+V) the image if you want to use it somewhere else in your presentation.

Is your image too big? Or do you just want to make the background smaller? PowerPoint lets you do this in just a few clicks.
Select your uploaded image and, in the Picture Format tab, click the "Crop" drop-down arrow. You will then see five options.

- Crop —Clicking this option will place black handles around the edge of your picture, which you can then drag to cut out the necessary parts of your photo (see the screenshot below).
- Crop To Shape —If you click this button, you'll see a choice of shapes that you can select to change your image shape without distorting its ratio. Some shapes will let you adjust their dimensions, but others (such as the oval) will be a set cropping shape.
- Aspect Ratio —If you need your image to be a certain aspect ratio (the image's height versus its width), click "Aspect Ratio," and choose one of the set parameters.
- Fill —This lets you resize the image so that the entire picture area is filled. This is only applicable if you have already changed the image cropping.
- Fit —Finally, this option lets you resize the image so that it displays in full within the picture area. Again, this will only work if you have already cropped the picture.

Whichever cropping option you choose , simply click anywhere away from the image once you're happy, and your amendments will apply to your pic. Press Ctrl+Z to undo this, or click the Crop icon again to revert the image to its original shape or amend the dimensions.
If you're presenting your PowerPoint on a projector or screen, when you press F5, you will automatically see the Presenter View on your primary screen and the slideshow on the other. In this screenshot, the Presenter View is on the left (my laptop screen), and the slideshow is on the right (my second screen).

The Presenter View is great for showing you what the next slide or animation will be, but the best use of this tool is the notes section. When preparing your presentation (before you press F5), click "Notes" under a given slide, and type some comments into the area that appears.

Then, when you press F5, you'll see these notes in the Presenter View.
While you can use Excel's many templates to help you choose your slide layouts, I prefer to use the Designer tool , mainly because it designs your slide based on what you type.
Open a blank PowerPoint presentation and head to your title slide. Then, in the Home tab on the ribbon, click "Designer." You'll then see some nice designs appear in a sidebar on the right, which you might choose to click through to find a suitable layout.

But wait! Don't jump straight into a design. First, try typing a title into your first slide—in our example, we'll type Technology—and see how the design suggestions change to suit your theme.

Add a sub-heading to your title slide, and see the design suggestions update again. Once you see an appropriate design, simply click your choice. When you create new slides, the rest of the presentation will be designed to match your title slide.
If you have lots of objects—such as images and text boxes—on one slide, it can sometimes be confusing which object is which when adding and organizing your animations. In my screenshot below, you can see that the images are labeled with random numbers, so identifying the individual pictures and their animations can be difficult.

Instead, I find that naming the objects individually makes this process a lot clearer. In the Home tab on the ribbon, click the "Select" drop-down arrow, and choose "Selection Pane." You'll then see the Selection Pane appear on the right, listing all the objects on that particular slide.

From here, you can rename the objects by double-clicking the placeholder names and typing your preferred object name.

Now, when you reopen the Animation Pane via the Animation tab on the ribbon, you'll find it much easier to organize your animations.

Do you have only a few hours to create your PowerPoint presentation? There are many keyboard shortcuts you can use in PowerPoint , but speed up the process by learning and using these handy ones:
Action | Windows | MacOS |
|---|---|---|
Add a new slide | Ctrl+M | ⌘+Shift+N |
Format the font | Ctrl+T | ⌘+T |
Copy the selected object's formatting | Ctrl+Shift+C | ⌘+Shift+C |
Paste the copied formatting to the selected object | Ctrl+Shift+V | ⌘+Shift+V |
Duplicate the selected slide | Ctrl+Shift+D | ⌘+Shift+D |
Jump to the next slide | Page Down | Page Down |
Go back to the previous slide | Page Up | Page Up |
Preview your slideshow | F5 | ⌘+Shift+Return |
Whether you're a PowerPoint newbie or a power user, hopefully, some of these tips will make your life a little easier. As well as these hints, there are some other traps you might fall into when creating your presentation, so make sure you avoid making these common PowerPoint mistakes .
- Microsoft PowerPoint
Byte Bite Bit
How to Remove Background in PowerPoint: A Quick Guide for Professionals
Removing backgrounds from images in Microsoft PowerPoint can make your presentations pop. We’ve all been there, trying to polish up that slide and wishing the background of an image would just disappear. PowerPoint’s built-in tools make it surprisingly easy to remove backgrounds and create a more professional look.

When we’re working on a presentation, time is often of the essence. Knowing that PowerPoint allows us to quickly and efficiently remove unwanted backgrounds from graphics can be a real game-changer. Let’s get into the nitty-gritty of how you can achieve this, saving you both time and effort.
Imagine you’ve got a perfect image for your slide, but it’s accompanied by a distracting background. No need to fret! With just a few clicks, you can isolate the important parts of the image and enhance your slide’s visual appeal. This not only keeps your audience focused but also adds a polished touch to your presentation.
- 1.1 Utilizing Images and Graphics
- 1.2 Effective Use of Colors and Backgrounds
- 1.3 Incorporating Vector Graphics
- 2.1 Adjusting Image Properties
- 2.2 Working with Transparency
- 2.3 Picture Formatting Tools
- 3.1 Customizing Slide Appearance
- 3.2 Optimization and Compression Methods
Creating Impactful Presentations
Creating impactful presentations involves effectively using images, graphics, colors, and backgrounds. Incorporating vector graphics can significantly enhance the visual appeal and professional look.
Utilizing Images and Graphics
Using high-quality images and graphics in presentations can captivate and engage the audience. Insert pictures that are clear and relevant. Go to the Insert tab and choose Pictures to add images from your device or various online sources.
Ensure you remove distracting backgrounds from images. Utilize the Remove Background feature in the Format tab. This can help the audience focus on the vital parts of the slide.
Effective Use of Colors and Backgrounds
Colors play a crucial role in making your presentation visually appealing. Use the Design tab to access color themes. Choose colors that contrast well but are easy on the eyes.
- Solid fills work wonderfully for professional presentations.
- Gradients can add depth and texture.
Avoid overly complicated patterns or backgrounds that make text hard to read. Use the Format Background option to make adjustments best suited to your content.
Incorporating Vector Graphics
Vector graphics are excellent for presentations due to their scalability. Unlike raster images, vector graphics do not lose quality when resized. You can create these graphics using tools like Adobe Illustrator or download them in formats such as SVG or EPS.
Insert vector graphics by navigating to Insert > Pictures and selecting your file. These graphics are smooth and professional and can dramatically improve the design of your slides. They also maintain their clarity, ensuring your presentation looks sharp on any screen size.
Enhancing Visual Elements
To make your slides truly stand out, enhancing visual elements is key. We’re going to explore how to adjust image properties, work with transparency, and use picture formatting tools effectively.
Adjusting Image Properties
When it comes to enhancing images in PowerPoint, we frequently start with adjusting their properties. Using the remove background tool helps isolate the main subjects by eliminating unwanted elements.
You can find this option under the Format Picture tab in the Adjust group. By refining the delete mark areas, we ensure only the desired parts of the image stay visible. This step sets the stage for the other enhancements.
Transforming images through brightness, contrast, and color adjustments can also make a huge difference. Simple tweaks result in a polished, professional look that captures attention.
Working with Transparency
Transparency is a powerful tool. Making parts of an image transparent can provide a seamless integration into your slides. We can use the Set Transparent Color tool to remove specific colors from the background, creating a more cohesive visual experience.
For example, let’s say we have a logo with a white background, but we want it to blend with our slide. Set Transparent Color helps us achieve this effortlessly. Sometimes, using transparency in overlays adds depth without cluttering the visual content.
Additionally, by adjusting the transparency levels of our images, we can create subtle overlays or highlight sections without overwhelming the slide. This balance between visibility and subtlety is what makes our presentations look more visually appealing.
Picture Formatting Tools
PowerPoint offers a plethora of Picture Tools under the Picture Format tab. These tools allow us to crop, add borders, and apply styles that enhance the overall look of our images. For instance, adding a soft edge or shadow can make the images pop.
We often use the Background Removal tab to make complex edits. Here, the remove background option stands out because it automatically identifies the subject and separates it from the background. Although sometimes, manual adjustments are necessary to perfect the results.
Lastly, embedding effects like artistic filters or reflections can dramatically transform the appearance of images. PowerPoint’s artistic effects provide a creative touch, making our visuals engaging and memorable without needing external software.
Each of these tools plays an essential role in enhancing the visual elements of our presentations and ensures that our slides are both aesthetically pleasing and professional.
Advanced Editing Features
PowerPoint offers several advanced editing features to enhance your presentations. These tools allow us to customize the appearance of slides and optimize images for performance.
Customizing Slide Appearance
We can make our slides look unique by utilizing the Slide Master . This tool allows us to change fonts, add shadows , and format text once and apply it to all slides. To start, go to the View tab and select Slide Master .
For more control over a single slide, we can insert boxes around text or images. Using the Format tab, we adjust pictures, crop photos, and even remove backgrounds. This ensures our slides stand out and look professional.
Optimization and Compression Methods
Optimizing images is crucial for keeping our file sizes manageable. PowerPoint provides easy ways to compress images. Navigate to the File tab, select Compress Pictures , and pick from options like Web, Print, or Presentation quality.
Additionally, reducing the number of high-resolution images and using simpler backgrounds can help. Use the Background Removal tool to eliminate unnecessary details, enhancing both the visual appeal and performance.
By leveraging these advanced features, we ensure our presentations are both visually appealing and efficient.
Related posts:
- How to Record a PowerPoint Presentation: Step-by-Step Guide for Professionals
- How to Print PowerPoint with Notes: A Step-by-Step Guide
- How to Convert PowerPoint to PDF: A Step-by-Step Guide
- How to Change Slide Size in PowerPoint: A Step-by-Step Guide
- How to Change Font on All Slides in PowerPoint: A Step-by-Step Guide
- How to Save a PowerPoint as a Video: Step-by-Step Guide
- Where is Word Art in PowerPoint: Quick Guide for Users
- How to Rotate Ruler in PowerPoint: Step-by-Step Guide
- How to Add Footer in PowerPoint for Professional Presentations
- How to Add Columns in PowerPoint: A Step-by-Step Guide
- How to Video Record Yourself Presenting a PowerPoint: Essential Tips and Tools
- How to Add 3D Models in PowerPoint: Step-by-Step Guide for Presentations
Leave a Comment Cancel reply
Save my name, email, and website in this browser for the next time I comment.
IMAGES
VIDEO
COMMENTS
Step 2. Select one of the slide layouts from the left pane, select the title box by clicking one of its borders and press Delete to delete it. Unchecking the Title box in the Master Layout group also deletes the title placeholder. Repeat the process to delete the title placeholders from more slides. Click the Close Master View button in the ...
When I add a new slide to my presentation, each slide says, "Click to edit master title style". How do I get rid of that message? It sounds like you're working in Slide Master View... In which case you're actually inserting Slide Masters or Layout Masters rather than Slides. Go to the View tab, then click on the icon for Normal View (or use the ...
To do this, navigate to View > Slide Master to open the Slide Master. Select the top slide, go to the "Text" group under the "Insert" tab, and then click "Text Box." Click and dragging your cursor to draw a header text box in the appropriate location, and then type your text. When you return to View > Normal, your new header box will appear at ...
There are multiple ways to add titles to your slides in PowerPoint. Use the Layout option to create a standalone title slide or to add a title to a slide that contains other text. You can also use the Outline view or the Accessibility ribbon to create and update the titles of your slides. Select a heading below to open it and see the detailed ...
Open the slide master for editing. On the View tab, select Slide Master. In Slide Master view, the slide master is at the very top of the thumbnail pane, with related layouts beneath it. Click to select that master slide, and then select Master Layout on the Slide Master tab. To show or hide the title, text, date, slide numbers, or footer ...
25. Click on File and on the top right and then Info. You will be able to see the Properties of your document there and also change the title that will be used when saving it as PDF. Share. Improve this answer. edited Oct 20, 2022 at 10:32. Trex.
Remove - Click to add title - item from the default new slide. We usually share information (images etc.) via ppt presentations. When I start creating a new slide deck, the default slide always has "Click to add title" and "Click to add subtitle" objects. I prefer an empty slide as default, but I couldn't find the option to change that permanently.
Here are the different options available for reformatting: Colors: Changes all the colors used in your presentation, as well as the color options available in the color picker. Fonts: Changes all the headings and body fonts used in the presentation. Effects: Changes the appearance (shading, border, etc.) of objects in your presentation. Background Styles: Choose the background style for the ...
Slide titles are very important. First of all, they identify a slide. Secondly, they provide structure to your presentation, because anyone who uses PowerPoint's Outline view will not be happy to see slides without titles, as shown in Figure 1, below.Look for the highlighted red areas-these are devoid of any titles.
Add, edit, or remove a placeholder on a slide layout. To rename the layout, in the thumbnail list of layouts, right-click the layout that you customized, and then click Rename Layout. In the Rename Layout dialog box, type a new name that describes the layout you've just created, and then click Rename. On the Slide Master tab, click Close ...
If you want to edit the header in PPT or make changes to the footer, go to Insert -> Text -> Header and Footer. The Slide tab gives the options to add and edit the header and footer for your slides. You can add a fixed or automatically generated date, slide number, and footer text from here. These changes can also be hidden from the title slide ...
Open your PowerPoint presentation and press the Insert tab on the ribbon bar. Next, press the Header and Footer icon in the Text group. This will open a menu box where you'll be able to edit the header and footer options for your slides. To remove the footer, uncheck the Footer box under the Slide tab.
You can then immediately add a title by doing one of the following: Click a slide number and it will display highlighted in the panel on the left side. Click next to the number and add a title. Click the drop-down arrow to the right of the slide and select "Add Slide Title." Select the slide, use the Slide Title drop-down arrow on the ...
Enter an administrator name and password. 4. Click the Add button below the list of users. 5. Click the New Account pop-up menu, then choose a type of user. If the issue still exists, as you said the issue occurs after updating, I want to confirm did you update Office to 16.33 or updating Mac OS.
Open the slide master view mode. To access slide master view mode, click View and then the Slide Master icon. 2. Click Insert Slide Master. It's in the "Edit Master" section in the panel in the upper-left corner. This adds a new Slide Master to the PowerPoint layout. 3.
On the View tab, click Slide Master. In the left thumbnail pane, click the slide layout that you want to add one or more placeholders to. On the Slide Master tab, click Insert Placeholder, and then click the type of placeholder that you want to add. Click a location on the slide layout, and then drag to draw the placeholder.
To remove the "Click to Add Title" placeholder from all slides, click on the placeholder text on the first slide, then hold down the shift key and click on the placeholder text on the last slide. This will select all slides, and you can then press the delete button to remove the placeholder. 5. Is there a way to turn off the "Click to Add ...
To edit elements defined in the Slide Master, do the following: 1. On the View tab, in the Master Views group, select Slide Master : PowerPoint will open the Slide Master tab and will show master slide views. For example: 2. In the Slide Master view, you'll see that the left pane contains two distinctly different elements: In the Slide Master ...
Step-1: Select the Slide and open the Slide Master. The first step is to select the specific slide on which you would like to add the watermark text. Then, click on the " View " tab. From the ribbon, click on the " Slide Master " option. This will open the slide master view in PowerPoint. Step-2: Add a Text Box.
Click to select the master slide, then click Master Layout on the Slide Master tab. 3. Make the updates that you want. 4. To remove any built-in slide layouts that accompany the default slide master, in the slide thumbnail pane, right-click each slide layout that you want to delete, then click Delete Layout. 5.
Create your own theme. Understand the difference between PowerPoint templates and themes. To change the theme for your presentation, click the Design tab. In the Themes group, click the theme you want to apply. You cannot remove a theme, but applying the Office Theme will create the effect of a presention with no theme.
The name of file is one, but when I oppen on Adobe Reader, the title of this is just "PowerPoint Presentation". I usualy open many files at the same time, so the fact that titles are all the same makes my organization be difficulted, as well my work. I know how to change when I have the orinal Power Point file, but in this case I don't have it.
Open a blank PowerPoint presentation and head to your title slide. Then, in the Home tab on the ribbon, click "Designer." You'll then see some nice designs appear in a sidebar on the right, which you might choose to click through to find a suitable layout.
Ensure you remove distracting backgrounds from images. Utilize the Remove Background feature in the Format tab. This can help the audience focus on the vital parts of the slide. Effective Use of Colors and Backgrounds. Colors play a crucial role in making your presentation visually appealing. Use the Design tab to access color themes. Choose ...
Choose Edit from the menu in the upper-left corner. Select Delete from the menu that appears. Delete a Google Slides text box using the mobile app for Android or iOS
I have started using my workplace's version of Office 365 and Powerpoint, and when I create slides they seem to be automatically including a header or footer with the date, but in the US format. My browser and Office 365 are set to use the UK format, but this doesn't seem to make a difference, I cannot edit them at all, there seems to be no way ...