Best Practices: Creating VoiceThread Slides
While importing media into VoiceThread is very simple, there are nuanced methods for doing it best. This page provides best practices related to creating slides and comments in your VoiceThread.
1. Importing PowerPoint or Keynote Slides into VoiceThread 2. Setting Up Your Slides 3. Making Your Comments
Importing PowerPoint or Keynote Slides into a VoiceThread While you can import a PowerPoint file (.ppt) directly into VoiceThread, we recommend that you do not do it that way. Doing the import directly from PowerPoint may cause your slides to scale incorrectly, especially if you have images or illustrations in your slides.
Two Best Ways to Convert
- Save PowerPoint as a .pdf and then import the .pdf into VoiceThread
- Save PowerPoint as a series of jpeg images and then import the jpeg images into Voicethread
1. Save as PDF and then import to VoiceThread Both methods are better than importing a .ppt file directly, however, you will have to experiment a bit in order to determine which is best for you. We recommend trying this path:
- Save your .ppt file as a .pdf and then import it into VoiceThread.
- From one pdf, each slide of your PowerPoint will import as separate slides in your VoiceThread in one easy step.
- Be sure to view each slide to ensure it imported as expected.
2. Save slides as JPEG then import to VoiceThread Occasionally, you may have slides with illustrations or images on them that do not come in particularly well even importing the .pdf version. When this occurs, try the ‘Save As JPEG’ feature in PowerPoint.
- Save your .ppt file slides as JPEG formatted images (using the ‘Save As’ dropdown in PowerPoint).
- Each slide in your PowerPoint will save as a JPEG file. In this case, you would need to import each slide one at a time. This is why we recommend trying .pdf method first; it’s quicker to import the entire presentation.
Using either of these two methods, you will notice that your PowerPoint slides come in much clearer and crisper than the direct .ppt import into VoiceThread.
Back to Top.
Setting Up Your VoiceThread Slides
- Be sure to give your VoiceThread a title. This will help manage your VoiceThreads as you create more of them in the future.
- Give each slide a title . Again, this helps with organization as your VoiceThread content expands.
Making Your Comments
- Make comments one slide at a time.
- Only use multi-slide commenting to compare and contrast slides.
Back to Top.
- Center for Innovative Teaching and Learning

Using VoiceThread to Record Narration Over Slides
This guide summarizes a solution for instructors who need a tool to allow them to record narration over a PowerPoint presentation. This approach is ideal if you were planning to present slides in your face-to-face course.
To use VoiceThread, you need access to Blackboard, and a microphone of some kind (e.g. integrated into your computer or a headset) or a telephone. If you want to capture webcam video as part of your recording, you will of course need a webcam.
Here are the steps to create a recording with VoiceThread
These instructions are slightly different for Blackboard Original courses and Blackboard Ultra courses.
Blackboard Original Courses
- Login to Blackboard and access a specific course
- Click on a content area in your course menu, such as Content
- From the Build Menu , choose Build Content , then VoiceThread
- Provide a Title and Description (as needed) and click Submit
- You should now see the VoiceThread link
- Click the link you just created
- Choose Individual VT from the configuration menu
- Click the grey Create new VoiceThread on the top left of the screen
- From your computer, drag your PowerPoint presentation to the Add Media area (or click the plus sign, then My Computer to browse for your presentation)
- Enter a Title and Description for your VoiceThread video
- Wait while the presentation processes, this could take between 1 and 5 minutes depending on the size of the presentation
- Once the presentation is processed you will see that each slide is displayed separately. Click the Comment button at the top of the window to open the presentation.
- For any slide that you want to add audio, click the comment bubble at the center of the timeline and choose the microphone icon to begin recording (or use the telephone icon to record via your telephone if you do not have a microphone)
- When you finish your audio for that slide, you can either click the next slide arrow and keep recording or click the Stop Recording link
- Once you are finished recording audio, click Stop Recording , then Save
- Click the grey X at the top right to return to the share window
- Click the blue Share with class button then the next Share with class button.
The video will begin processing, and captions will be added automatically when they are ready.
You can click the Return to Course link and close the tab to return to your course Depending on the length of the video, you can return to the course and click the link to preview the video. This is the same view students will experience.
Blackboard Ultra Courses
- Click the plus icon to add content and choose Content Market
- Click the plus icon in the lower right corner of the VoiceThread tile
You can click the Return to Course link and close the tab to return to your course
Depending on the length of the video, you can return to the course and click the link to preview the video. This is the same view students will experience.
Phone: 815-753-0595 Email: [email protected]
VoiceThread: Best Tips and Tricks For Teaching
Use VoiceThread to make presentations more interactive and learning more involving
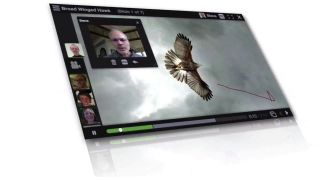
The best VoiceThread tips and tricks for teaching take the already impressively feature rich presentation platform and make it even better for teachers and students.
While VoiceThread does a great job of incorporating rich media both for presenting and for feedback, there are great ways in which other teachers are already using this platform to help engagement in the classroom and for remote learning.
VoiceThread lets teachers create presentations with audio and video notes that students can respond to also using audio, video, doodling, and more. The key is to use these interactions intelligently to maximize the learning.
So read on to make sure you and your students get the most out of this with the best VoiceThread tips and tricks for teaching.
- What is VoiceThread for Education?
- How to setup Google Classroom 2020
- Best Digital Tools for Teachers
Require voice or video with VoiceThread
VoiceThread allows you to comment on slides using voice, video, or text. You will likely find that most students will opt for written responses as they're the best for remaining as hidden as possible. However, it is possible to require video or voice.
By making voice or video a requirement, it helps to better engage students so they feel a part of the subject. It also allows teachers to see the way the students feel about certain areas – ideal if you spot something that excites a lot of the class, which you can then expand on.
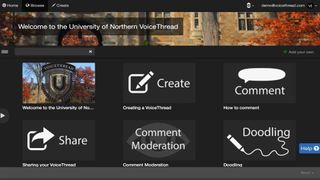
Start using VoiceThread with an icebreaker
While VoiceThread might seem like an easy-to-use and unthreatening platform to you as a teacher, a student may find it intimidating at first. The requirement to give their opinion on video or in voice format, which is recorded potentially for the class to see, could be daunting.
Tech & Learning Newsletter
Tools and ideas to transform education. Sign up below.
Lessen the fear by starting off with a low-risk icebreaker. For example, suggest something that is easy to give an opinion on and that won't have them worried about the responses of others. Perhaps a mutual topic of interest in the school, from the news or even from the local community, could be a good way to start introducing VoiceThread.
Use VoiceThread groups for classes
VoiceThread lets you create groups that act as virtual classrooms. These are really valuable as once each is setup, students can easily join with access to only the VoiceThreads that you've shared in that group. This is secure but also makes for a great way to organize your various classes and even sub-groups within those classes.
Create a Group in settings, which is for paying users only, then paste the "innovation link" inside your virtual class, be it on Google Classroom or wherever, so when your students click they immediately register for VoiceThread and join the group all at once.
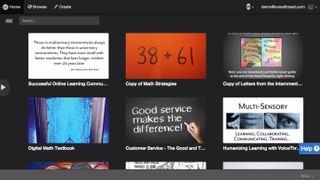
Use VoiceThread Universal if needed
VoiceThread is a very capable and widely accessible platform but it is primarily not built for everyone. Those who are less able to see may want to use full screen readers to navigate the web and VoiceThread won't support that.
VoiceThread Universal is built for this issue as it is able to work with HTML so that students and teachers who need it can use the full screen version.
Take VoiceThread mobile
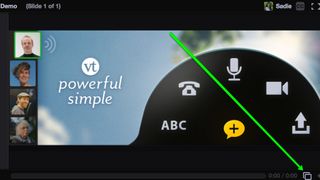
VoiceThread uses a super simple interface with a clear "plus" icon selection to comment and create. Thanks to this, it lends itself well to mobile use. Encourage your students to download the VoiceThread app so they can use it on their smartphones anywhere.
The VoiceThread app frees students to work on their own devices and comment as and when they need. Since it involves video and voice recording, many students may be more comfortable and capable using the device they're used to.
Use VoiceThread for discussion
VoiceThread is useful for commenting directly, and as a discussion tool in the class, it can be used as a jump-off point. Collate students' responses to a question and then have that sectionalized for the lesson. If it were math, for example, you could have right, wrong, and those with more depth; for language, it could be those that have similar opinions and those opposing. However you organize the responses, it can act as a great discussion point in the classroom.
You could even use a dedicated debate platform such as Parlay to make the discussion more structured and digitized.
Use VoiceThread transcripts
If you find yourself using voice notes a lot for comments, this may be fine for some students but not for all. To make sure these are accessible to all it's a good idea to turn on transcription, which will automatically offer the text too.
This will take your voice recording and automatically offer the text along with that so all students have access. It is also ideal for those students who prefer to read along privately, perhaps when in a nonprivate space and without headphones.
Luke Edwards is a freelance writer and editor with more than two decades of experience covering tech, science, and health. He writes for many publications covering health tech, software and apps, digital teaching tools, VPNs, TV, audio, smart home, antivirus, broadband, smartphones, cars and much more.
Figma: How to Use It to Teach
Best Laptop Cases for Teachers
Microsoft Reading Coach: How To Teach With The AI Reading Tutor
Most Popular
EDUCATIONAL DESIGN AND TECHNOLOGY

Contact Us!
For help and support, email us at [email protected] or
Please note: Do not share any personal identifiable information (PII) such as social security numbers or grades in any messages to [email protected] .
Academic Resources
- Academic Calendar
- Academic Catalog
- Academic Success
- BlueM@il (Email)
- Campus Connect
- DePaul Central
- Desire2Learn (D2L)
Campus Resources
- Campus Security
- Campus Maps
University Resources
- Technology Help Desk
Information For
- Alumni & Friends
- Current Students
- Faculty & Staff
- Course Home
- Discussions
- Submissions
- Adding a VoiceThread Link
Creating a VoiceThread
- Sharing a VoiceThread
- Teaching at DePaul
- Support Services
- Teaching Guides
- Technology Tools
Teaching Commons > Teaching Guides > Technology > Desire2Learn > Tools > VoiceThread > Creating a VoiceThread
Once a VoiceThread link has been added to a class, instructors can choose a display option for the link. These options depend on the purpose of the VoiceThread and the way that students will interact with it.

Create a VoiceThread for Discussion
- Create a VoiceThread for Student Presentations
Adjust Playback Settings
See the VoiceThread support page for videos on creating presentations.
If VoiceThread will be used for discussions, the display option to choose is Individual VT. When students select the VoiceThread link, they will see just this one VoiceThread, to which they will be able to add comments.
- After VoiceThread has been added to Content (see Adding VoiceThread ), select Individual VT .
Note: If the VoiceThread already exists, see Sharing a VoiceThread for information on re-populating a previously created VoiceThread.
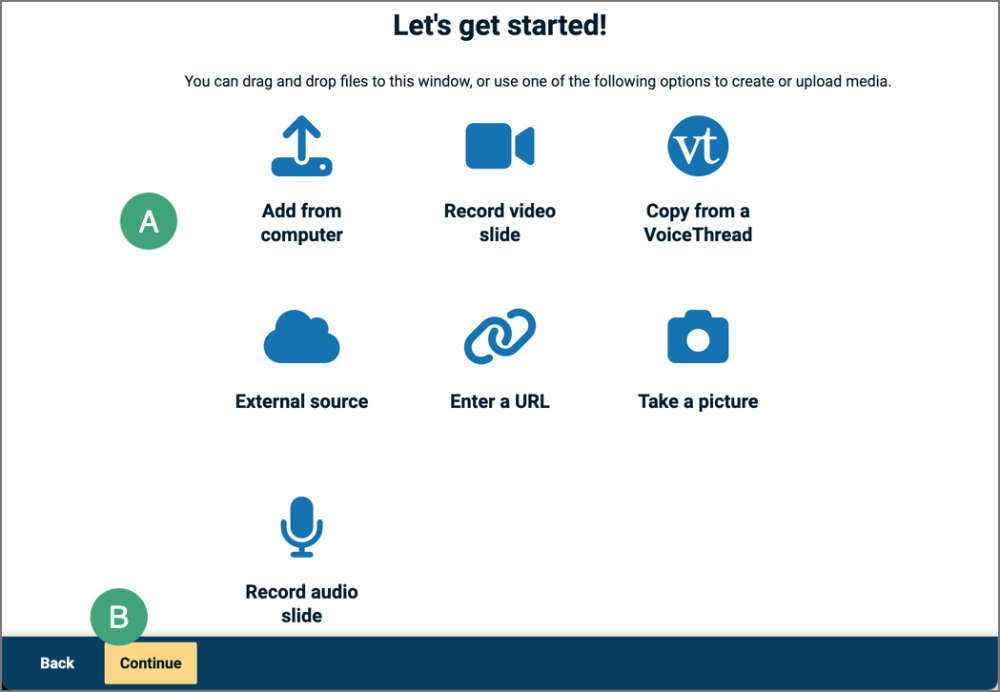
- Select the type of media to use for the start of the VoiceThread [A].
- Upload or record as needed based on the selection.
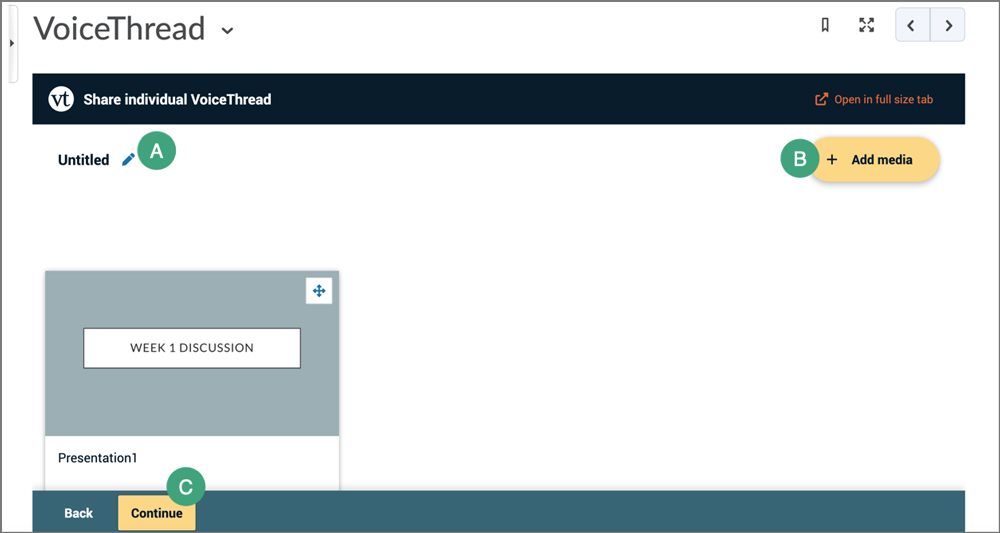
- Enter a title for the VoiceThread [A].
- (Optional) Add more media [B].
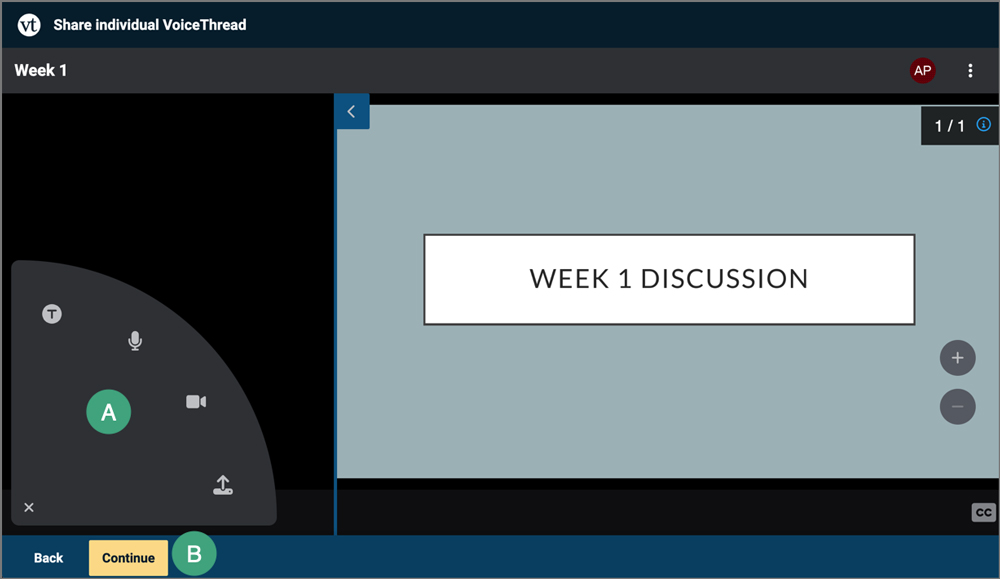
- Select the type of comment to add [A].
- Provide students with instructions for Adding Comments to a VoiceThread Discussion .
Use VoiceThread for Student Presentations
If VoiceThread will be used for class presentations, the display option to choose is Course View. This will show the collection of VoiceThreads that have been shared with the course. Anything that has not yet been explicitly shared with the course will not appear. (See Sharing a VoiceThread for more information.) Students will be able to add comments to individual presentations when selected.
- After VoiceThread has been added to Content (see Adding VoiceThread ), select Course View .
- When students use the VoiceThread link, they will be shown all of the VoiceThreads that have been added to the class or shared with the class.
- Provide students with the instructions for Creating a VoiceThread Presentation .
- From an individual VoiceThread, select the three dots menu [A].
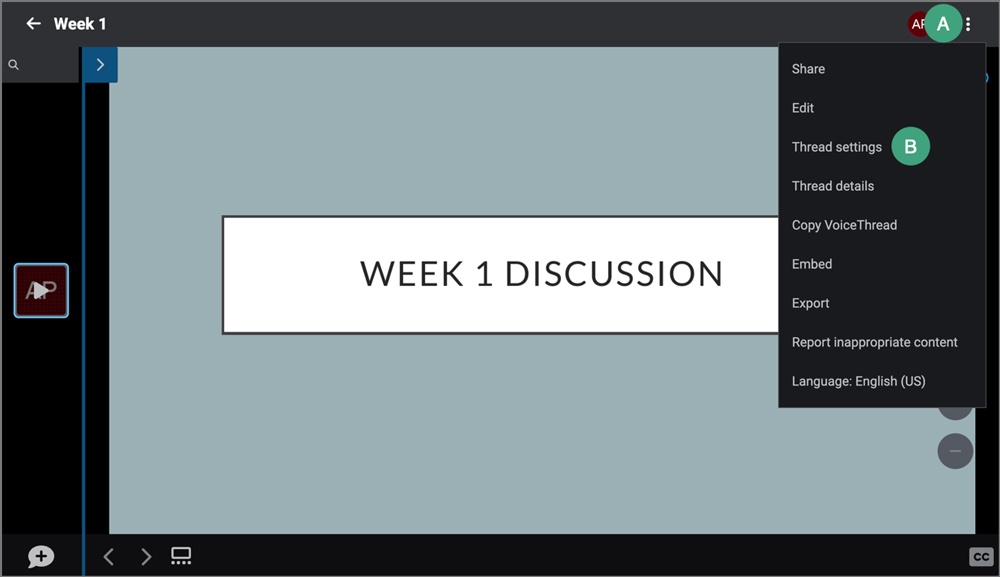
- Change playback settings for a VoiceThread depending on its purpose:
- If the VoiceThread is being used for a discussion , leave the " Enable Threaded Commenting" box selected.
- If the VoiceThread is being used as a presentation , select the " Automatically advance to the next slide after __ seconds box" and enter a number in the text box. (This is the number of seconds between when the comment ends and the presentation advances to the next slide. For fast-moving presentations, it is recommended to enter 0.)
- If students should not be able to download the original presentation slides , de-select the " Allow others to download original media" . This option allows students to download the PowerPoint file only, not any narrations.
- Select Save when done.
Note: Detailed information on each playback setting option is available on VoiceThread's website .
If a VoiceThread is created within a D2L class, it will automatically be shared with that class. For information on how to share a previously-created VoiceThread with a class, see Sharing a VoiceThread.

Canvas at JHU
VoiceThread
- VoiceThread is web-based presentation software that allows users to create and share interactive multimedia slideshows.
- It transforms media into collaborative spaces within courses with video, voice, and text commenting.
- VoiceThread presentations are used to showcase audio, video, images, and documents while allowing users to comment on them in a variety of different ways.
- The result is a digital conversation that can be easily shared with individuals, groups, and/or embedded into different websites, including Canvas.
Quick Links
- How does Canvas differ from Blackboard?
What Canvas Roles Work With This Tool?
- Best Practices and Accessibility
- Additional Resources
- Add the actual VoiceThread assignment to the SIS term shell with the instructions below.
- Build your VoiceThread Assignment using Canvas and the steps below to ensure that when you grade the VoiceThread assignment, the grade is then passed automatically to your Gradebook.
- If you’re having trouble getting your account set up or for other technical support, you can review solutions on the JHU VoiceThread Support Page or contact your faculty support at your division .
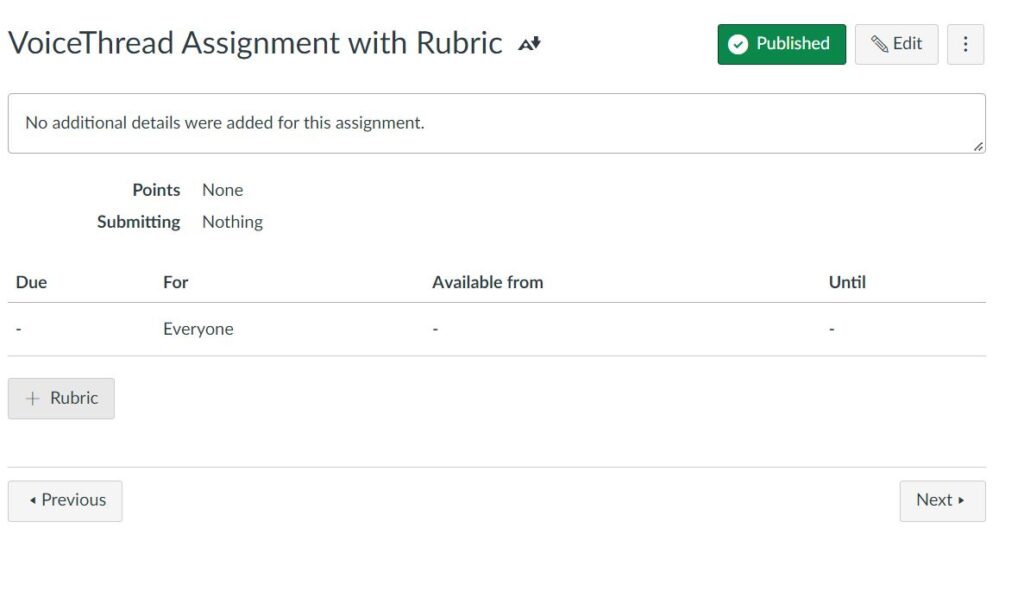
- If you want to add a Rubric to a VoiceThread Assignment, you need to add it first and then edit it to add the Rubric itself. Follow the instructions under Using Rubrics in VoiceThread .
- There is a known issue that causes VoiceThread assignments to appear as if they have been turned in late regardless of when they were submitted by the student. This can happen when you have an VoiceThread Assignment in your course with a Due Date. If you grade that assignment after the due date, the student submission will be marked late . This is a known issue in Canvas with VoiceThread.
How does Canvas differ from Blackboard?
Generally, third-party tools are not unique to Canvas or Blackboard. VoiceThread functions the same in all LMSs; however, adding the tool in the course requires a different set of steps. VoiceThread is a deep embed LTI in Canvas so there are minor differences in associating it with assignments and content.
| Possible Course Roles | Access Level |
|---|---|
| Teacher | View content, create content and assignments, and submit assignments in student view |
| Student | View content, participate in published content |
| Waitlisted Student | View content, participate in published content |
| TA | View content, create content and assignments, and submit assignments in student view |
| Grader | View content, create content and assignments, and submit assignments in student view |
| Designer | View content, create content and assignments, and submit assignments in student view |
| Observer | View content only |
| Guest Facilitator | View content only |
| Leaders (Community Sites Only) | View content, create content and assignments, and submit assignments in student view |
Steps to Create a VoiceThread Assignment in Your Canvas Course
- On the Modules page click on the plus (+) sign to add assignment.
- Select Add Assignment.
- Click on Create Assignment.
- Add Assignment Name.
- Click Add item.
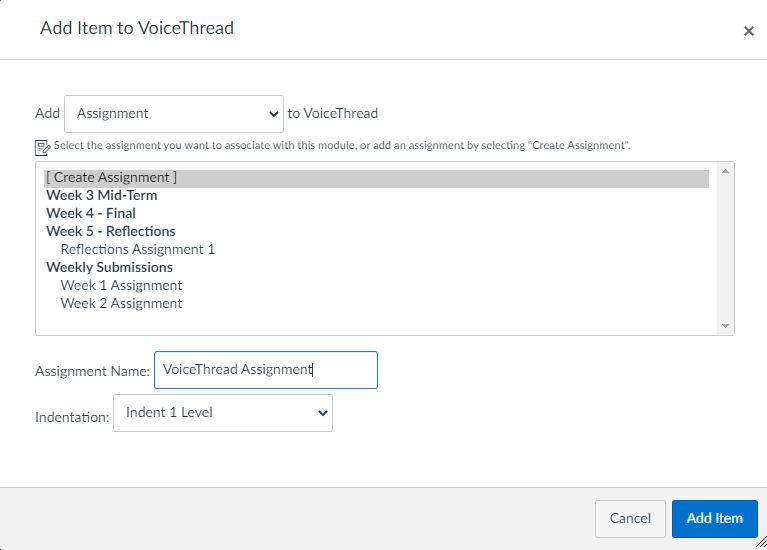
- The Assignment will be placed at the bottom of the current Module.
- Click on the Assignment link to launch the Assignment Page.
- Click on Edit.
- This link provides an introduction to VoiceThread .
- This explains how VoiceThread works to build out and share content on the VT side at JHU .
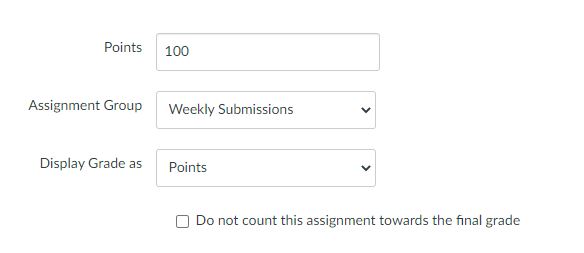
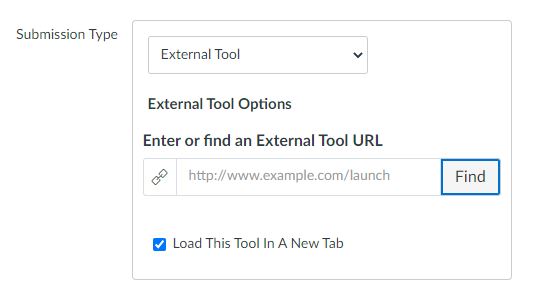
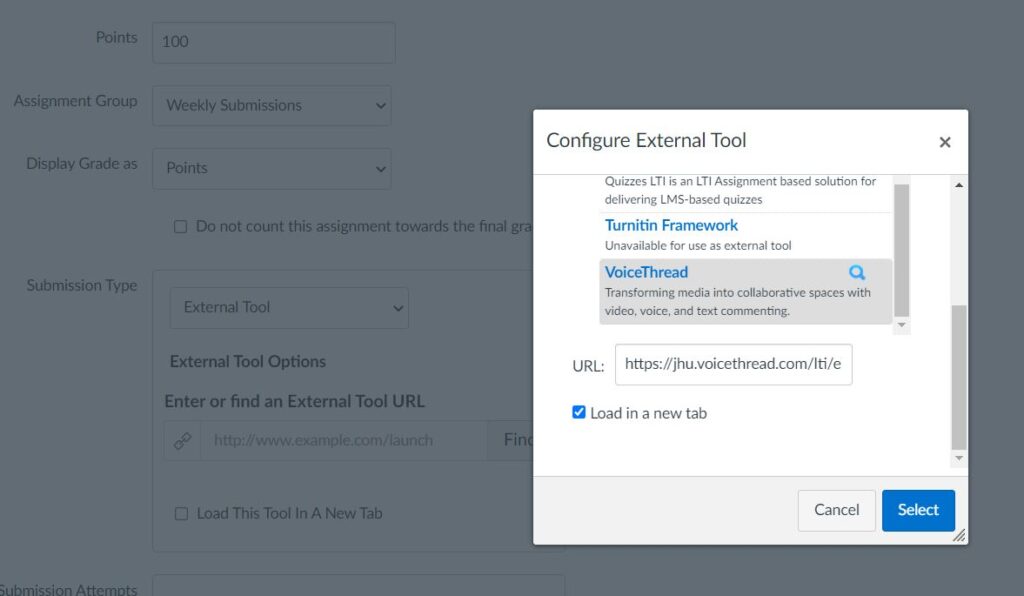
- Move down to Submission Type and change selection to External Tool.
- Put a checkmark in Load this Tool in a New Tab, and then click on Find.
- A Configure External Tool window will open. Move down and click on VoiceThread.
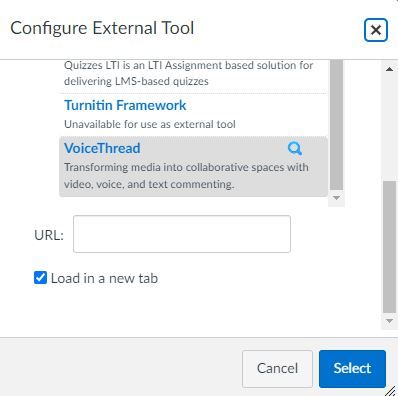
- The VoiceThread window will open. Select Assignment Builder.
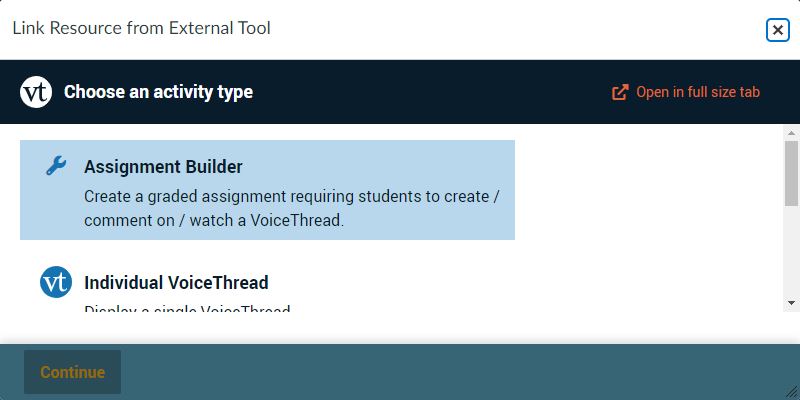
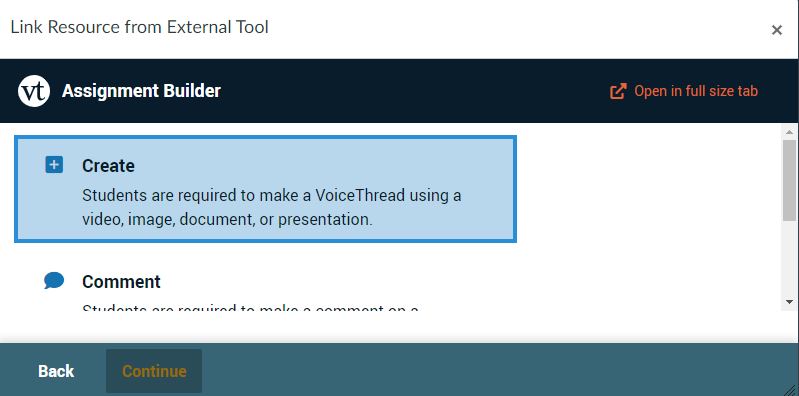
- The Assignment Builder Window will open.
- Click on Create and add all the elements for the assignment.
- See next step for the Assessment Settings to apply before publishing.
- Before Publishing the assignment, Change the Assessment options to Points.
- Enter the total number of points possible (the points should match Assignment on Canvas side).
- This step allows the VoiceThread grade to pass back to the Gradebook. Instructors will need to grade in VoiceThread.
- They will not have to manually add the Grade to Canvas. As a note, VoiceThread submissions will not show in SpeedGrader.
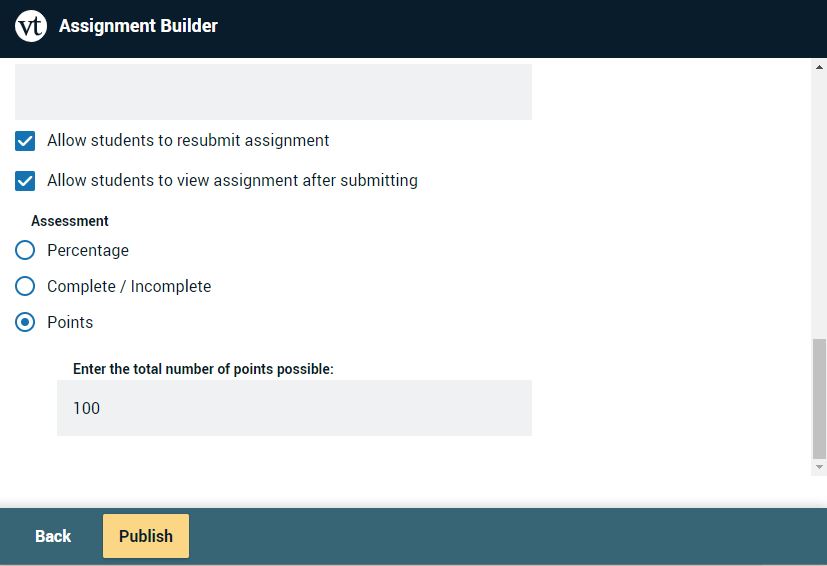
- Click on Publish . The window will close and return to the Configure External Tool Window.
- If you see a URL in the window, your assignment has been created (including any instructions you might want to add).
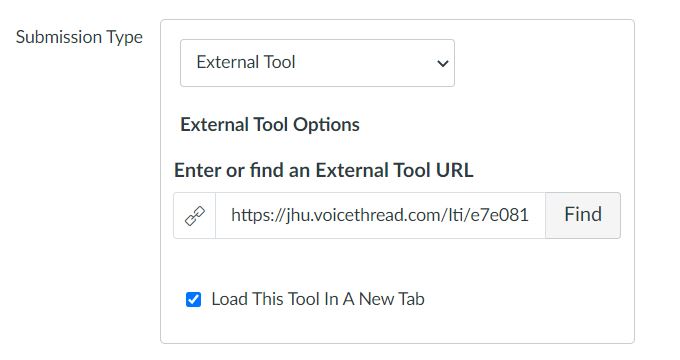
- Click on Select to add the VoiceThread Assignment to the Assignment Page (you will not be able to see the VoiceThread Assignment yet).
- Finish updating the Assign Box and then Save the VoiceThread Assignment.

- The final view will have a button to launch the assignment in a new tab.
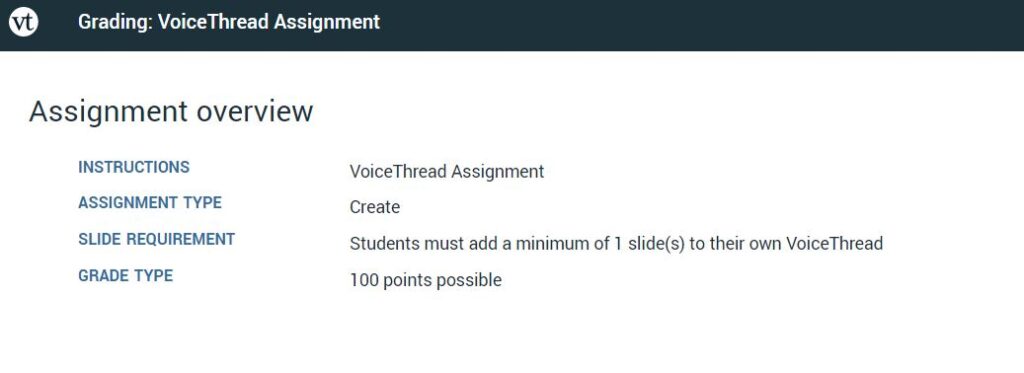
Using Rubrics in VoiceThread
The using Rubrics with an External Tool like VoiceThread requires the following.
- Create the assignment as a regular online submission type, save it.
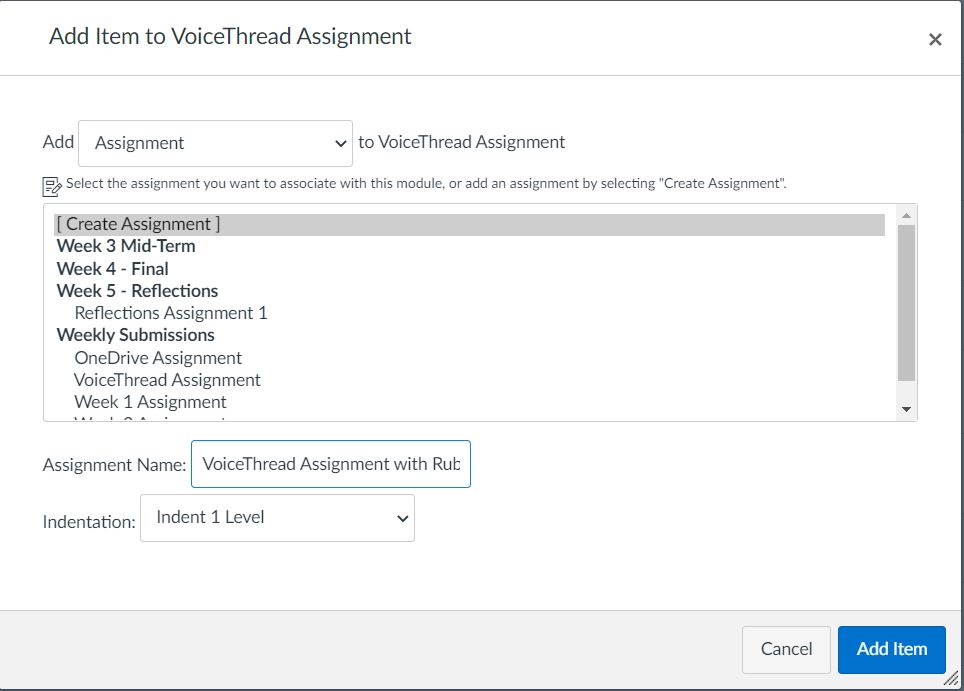
- Edit the assignment and select/add the rubric, and save.
- Go back and edit the Assignment changing the submission type to External Tool.
Best Practices and Accessibility
Best practices.
Instructors, for face-to-face, online, or hybrid courses may want to consider using voice thread to:
- Share lecture slides or visual materials, with or without audio commentary.
- Ask students to comment on or respond to questions about those materials.
- Ask students to create, share, and peer review presentations.
Accessibility
- The university has vetted the current tools for compliance with accessibility and privacy standards.
- VoiceThread has a Guide on Accessibility.
Additional Resources
- VoiceThread Non-Graded Content/Options
- JHU VoiceThread Support Page

- Brandeis Library
- Research Guides
Moodle 4.0 Resources for Faculty
- VoiceThread
- LATTE to Moodle 4.0 - What has Changed
- What's New in Moodle 4.0
- Faculty Quick Start Guide
- Managing Your Course
- Implementing a Course Template
- Accessing Past Course Content
- LATTE Backups Migrated Via Box
- Configure the My Courses Page
- Add Learning Materials
- Assignments
- Discussion Forums
- Questionnaire
- Gradebook: Quick Start Guide
- Creating and Managing Groups
- Group Choice
- Google Groups
- Forums (Q&A, Add to gradebook)
- Communication
Media Types
External resources, what is voice thread.
Voice Thread is a collaborative online tool that integrates visual media, text, video, and voice into a presentation. You can pre-record your narration of images, documents, videos, and power point slides into one thread for students. You can enable video, audio, or text comments for asynchronous discussion with your class.
There are three types of VoiceThread assignments :
Create: Require students to create a full VoiceThread with slides and recorded comments. Creating assignments are best for:
Student presentations
Submitting work to receive asynchronous verbal feedback from peers or the instructor
Comment: Require students to post comments on a VoiceThread created by the instructor. Commenting assignments are great for:
Discussions about a topic
Quizzes or comprehension checks
Speaking practice
Watch: Require students to watch a VoiceThread created by the instructor. Watching assignments are helpful for:
Recorded lectures
Reviewing the syllabus
Step-by-step instruction and training
To get started with VoiceThread please visit our guides:
For a general VoiceThread guide for faculty: VoiceThread Faculty Guide For a detailed guide on how to set up an assignment in VoiceThread: VoiceThread Assignment Guide For a general guide for students: VoiceThread Student Guide
If you have questions about how to set up VoiceThread in your course or would like to speak with someone on our team please reach out to [email protected].
VoiceThread allows for multiple types of media to be uploaded as slides. There is a 3GB size limit for each file. You can include:
- Presentations (PPT, PPTX, OPD, and PDF)
- Documents (DOC, DOCX, PDF, ODT, XLS, XLSX, and ODS formats)
- Images (JPEG, GIF, PNG, HEIC, and BMP formats)
- Websites (via link)
- Videos (most formats)
- Audio files (MP3 or WAV formats)
VoiceThread also allows importing media from other services. You can share from the following sources:
- Other VoiceThreads
- Flickr
- Google Drive
- New York Public Library
- VoiceThread Assignments Instructions on how to create and assign a VoiceThread assignment to your class. This covers the three types of assignments: create, comment, and watch.
- VoiceThread in Moodle Workshop Recording
- Creating Groups in VoiceThread
- Using VoiceThread in a Learning Management System Documentation from VoiceThread
- << Previous: Echo360
- Next: Zoom >>
- Last Updated: Jun 28, 2024 3:34 PM
- URL: https://guides.library.brandeis.edu/moodle4
Setting up a create-a-VoiceThread assignment
Require students to create a full VoiceThread. They will upload the slides and record comments, then submit that to you for a grade. You can even allow students to see their classmates’ submissions later so they can engage in peer review and conversation. Great for:
- Student presentations
- Demonstration of a skill (bedside manner, playing an instrument, painting/drawing technique, pitching a business)
- Submitting a paper, wireframe, website, etc. to receive feedback
Note: If you haven’t built a VoiceThread link in your course yet, please visit the link building support page to get started.
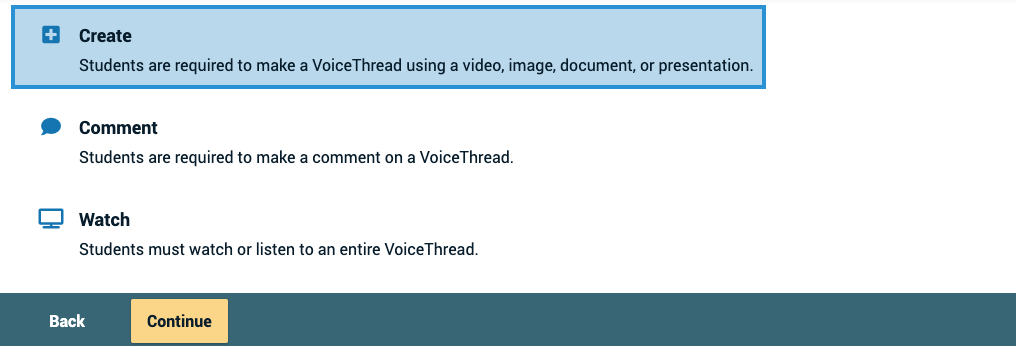
Step1: Choose Activity
Click on the Create button, then click “Continue” at the bottom of the screen.
Step 2: Choose options
Select the playback settings you want each student’s VoiceThread to have. Students will not be able to override these settings.
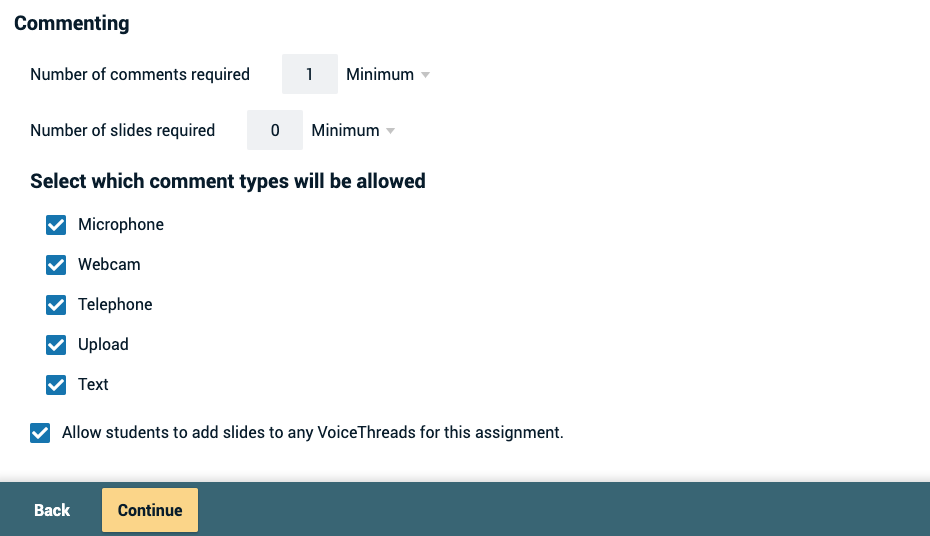
Number of comments required Students will be required to post comments on the VoiceThread they create. You can require a minimum number or an exact number. They will not be permitted to submit until this requirement is met. Important: This is the number of comments students record on their own VoiceThread, not on a classmate’s submission.
Number of slides required Students will be required to add this number of slides to their VoiceThread. Minimum number of slides required is always 1 by default, but you can require more if desired.
Commenting types Select which types of comments you want to allow students to post.
Allow students to add slides to any VoiceThreads for this assignment Allow students to add slides to any VoiceThreads submitted by their classmates to this assignment.
Enable threaded commenting Turns on the ability for your participants to start threaded conversations .
Enable comment moderation Allows you and the student to preview all comments on this VoiceThread before revealing them to others. You can also choose never to reveal them. Learn more about Comment Moderation.
Don’t allow commenters to delete their own comments Anyone who records a comment on a VoiceThread will be unable to delete it once it is saved. This is a powerful tool for assessment because your commenters will not be able to “retry” after they’ve recorded.
Limit length of each comment By default, all audio and video comments recorded in VoiceThread can be 60 minutes long. If you’d like to set shorter time limits for your commenters, enter your desired maximum comment length here.
When recording, automatically advance to the next slide after Set slides to advance automatically at pre-set intervals as users are recording. In addition, you can check the box for Pecha Kucha or Ignite beneath this option to automatically set the correct restrictions for those presentation types. Learn more about timed presentations here.
Start playing when opened The comments on your VoiceThread will begin playing automatically when people first open it.
When final comment on a slide has played, automatically advance to the next slide after __ seconds When the VoiceThread is in play mode, it will play through all of the comments on a slide and then move to the next slide automatically. The number of seconds is the “pause” time before the slide advances.
Allow download Allow students to download the central media from the VoiceThreads their classmates create.
Allow export Allow students to export one another’s VoiceThreads.
Allow students to make a copy Allow students to make a copy of one another’s VoiceThreads.
Student Gallery If you want students to view one another’s VoiceThreads after they are submitted, check this box. This will give them a “Student Gallery” button in their interface to see the VoiceThreads their classmates have submitted for this assignment.

Click “Continue” at the bottom of the screen when you’re done.
Step 3: Finalize
Set the final details for your assignment.
Assignment name This will appear at the top of the assignment in the student’s view.
Assignment instructions These instructions will appear on the right-hand side of the student’s view. Tell them more about what you expect from them here.
Example URL If you have created an example you want students to follow or more information about the assignment, enter the link to that page here. It will appear on the right side of the student’s view.
Message shown to student after they submit Customize the message students see after they’ve submitted their VoiceThread. A little personalization goes a long way!
Prerequisite Students will not be able to start this assignment unless they have already submitted a previous VoiceThread assignment in this course. Check this box and then browse for the assignment(s) you want to require them to complete before beginning this one.
Start date Students will not be able to view the assignment until the start date/time. If you want it to be open immediately, leave this blank.
Due date This is the date the assignment is due. Students can still submit after the due date, but they will be marked late.
Close date Students will not be able to access the assignment at all after this date. If you want the assignment to be open indefinitely, leave this blank.
Allow students to resubmit assignment Give students the opportunity to try again if they submit the wrong thing or need to make corrections after you give them feedback.
Allow students to view assignment after submitting If you don’t want students to be able to see the work they’ve submitted, un-check this box. If you want them to see their work so you can record feedback on it, leave it checked. They will not be able to make any changes to their work even if they can see it.
Assessment Choose how you would like to grade this assignment.
- Complete/Incomplete
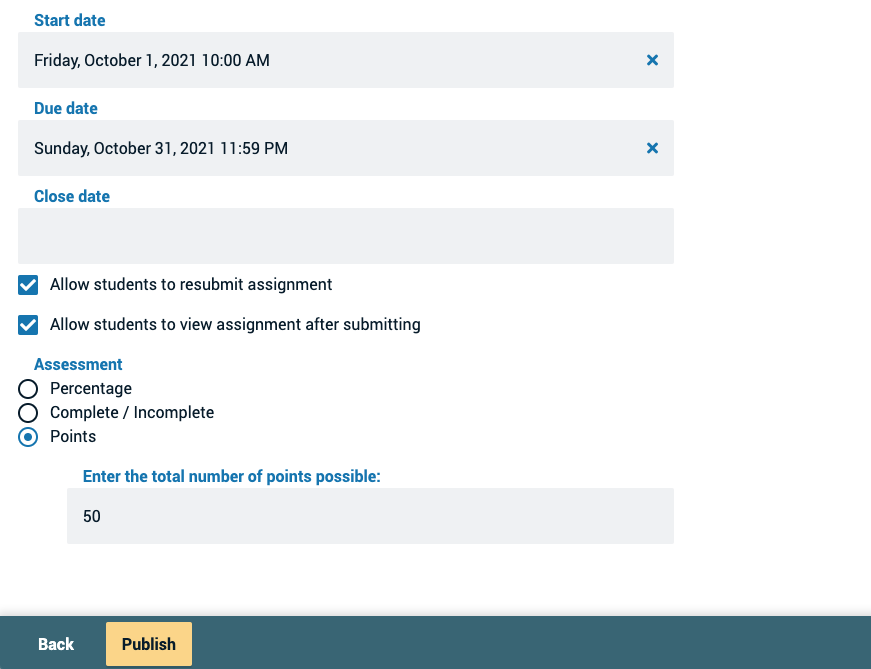
Click “Publish” at the bottom of the screen when you’re done. This will return you to your course page.
- Undergraduate Admission
- Graduate Admission
- Tuition & Financial Aid
- Communications
- Health Sciences and Human Performance
- Humanities and Sciences
- Music, Theatre, and Dance
- IC Resources
- Office of the President
- Ithaca College at a Glance
- Awards and Accolades
- Five-Year Strategic Plan
- Fall Orientation
- Directories
- Course Catalog
- Undergraduate
New VoiceThread Update Coming July 1st!
New voicethread updates and info.
Dear Faculty,
We are pleased to announce that as of July 1st, 2024,the new VoiceThread will be available. It will bring many enhancements and changes. All your prior content will be available in the new VoiceThread update.
What is VoiceThread?
VoiceThread allows teachers and students to have dynamic conversations anchored in media, such as images, videos, and slideshows. It is used by instructors at Ithaca College for a wide variety of activities, including:
- Shared class notetaking
- Detailed image, video, or slide annotation
- Performance/project presentation and peer review
What is Changing?
VoiceThread’s update features a more accessible and intuitive user interface, as well as some new features like:
- Zoom & Pan: Commenting on an image? You can zoom in, move around, and have these actions play back for your audience.
- Jump Navigation: Navigate through slides with ease – jump from slide 1 to slide 40 in a single click.
- Bulk Comment Management & Additional Options: Manage comments in bulk, add audio descriptions to slides, support multiple closed caption tracks/languages for a single recording, and more.
- Enhanced Navigation & Sorting: Easily sort VoiceThreads by the most recently active, view a compact list of all VoiceThreads in the home page sidebar, and more.
Documentation and Support
For more information visit the following article in the IC Knowledge Base: Quick Guide: Using New Voicethread
For a full list of enhancements see New VoiceThread: simpler, more accessible, and more powerful l If you have any questions or need support with the transition, please feel free to reach out to the Center for Instructional Design and Educational Technology for a consultation .
Thank you for your time - we hope you enjoy the new and improved VoiceThread experience!

IMAGES
VIDEO
COMMENTS
Learn to create an online lecture quickly and easily using Voicethread. This is a beginner's guide. Learn how to add your presentation slides, reorder them...
While importing media into VoiceThread is very simple, there are nuanced methods for doing it best. This page provides best practices related to creating slides and comments in your VoiceThread. 1. Importing PowerPoint or Keynote Slides into VoiceThread. 2. Setting Up Your Slides. 3. Making Your Comments. While you can import a PowerPoint file ...
VoiceThread is a great option because you can start with a PowerPoint presentation or ... There are many, many tools that you could use to record presentations.
New VT. To create a new VoiceThread, click on the + icon (label: "Create a new VoiceThread") at the top of the page. Once you've clicked on the + button, you can start adding slides. Details about the various ways to add slides can be found in the "Create" category of this page. Video walkthrough of how to create a VoiceThread:
Creating a VoiceThread is always a simple two step process: 1. Add your media. 2. Comment. For flipped content, this process may involve uploading a PowerPoint presentation that you already use, then narrating your mini-lecture over each slide. If you don't use PowerPoint, you can always upload images, movie files, import Khan Academy videos ...
Create the VoiceThread presentation: Click the link you just created; Choose Individual VT from the configuration menu; Click the grey Create new VoiceThread on the top left of the screen; From your computer, drag your PowerPoint presentation to the Add Media area (or click the plus sign, then My Computer to browse for your presentation)
Voice Thread is a free web-based app that allows you to add video or audio over the top of images, photos, etc.
Go to Voicethread (bookmark the site). MyVoice -- VoiceThreads you have created, tutorials and an intro to Voicethread; Browse -- explore some Voicethread to see what kinds of things you can do; Create -- practice creating a Voicethread (but only one -- you have limited space and number of Voicethreads with your free account); Voicethread is extremely easy to use.
VoiceThread allows you to comment on slides using voice, video, or text. You will likely find that most students will opt for written responses as they're the best for remaining as hidden as possible. However, it is possible to require video or voice. By making voice or video a requirement, it helps to better engage students so they feel a part ...
Creating a VoiceThread Presentation 1. To create a new VoiceThread, click on the Create icon on the top left of the page. You will need to add media at this point that you want to share with. You may add a pdf, an existing PowerPoint (though it is better to convert PowerPoint slide to pdf format for
Click on Create new VoiceThread at the top-left corner. Click on Add Media. Click on My Computer. Locate your PowerPoint or PDF slides and click Open. VoiceThread will not accept Keynote presentations. Enter a title and click on Save. Click on the comment tab. Click on the comment icon located in the middle-bottom area.
From an open VoiceThread. Click on the slide gallery button at the bottom of the page. Click on the "Record video slide" button. Click "Allow" on your web browser's permission pop-up if you see one. If you have given VoiceThread permission to access your microphone previously, you won't see this step. When you are ready to record ...
VoiceThread is web-based presentation software that allows users to create and share interactive multimedia slideshows. VoiceThread presentations are used to showcase audio, video, images, and documents while allowing users to comment on them in a variety of different ways. There are THREE steps (1) Create (2) Share (3) Comment 1 Create a ...
Reordering VoiceThread Slides 1. Click on the VoiceThread you wish to edit from the My Voice tab to open it. 2. From the Menu gear at the top left select Edit. 3. Click and drag slides to a new position to reorder them. Deleting VoiceThread Comments 1. To delete a comment, open the VoiceThread presentation from the My Voice tab. 2.
A great alternative to in-person student presentations, particularly in an online class environment. Collaborative class creation: Each student can add 1 (or more) slides to a shared class VoiceThread, creating a 'patchwork quilt' effect where everyone adds their own contribution to the final presentation. This approach can also work well ...
Additional Resources. Creating a new VoiceThread; Creating using different medias; Creating a Presentation assignment that requires students to present course-related topics with audio or video/webcam.; Creating a Comment assignment that requires students to answer your questions at any point in your lectures, or comment on your VT presentations in text, audio, or video format.
This video explains how to use VoiceThread.
Creating a new VoiceThread. Uploading files from your computer. Importing media from other VoiceThreads. Importing media from another website. Importing media from other services. Using your webcam to create a slide. Using your microphone to create an audio slide. Number of slides a VoiceThread can contain. Adding a title, description, and tags.
See the VoiceThread support page for videos on creating presentations. Create a VoiceThread for Discussion. If VoiceThread will be used for discussions, the display option to choose is Individual VT. When students select the VoiceThread link, they will see just this one VoiceThread, to which they will be able to add comments. ...
VoiceThread presentations are used to showcase audio, video, images, and documents while allowing users to comment on them in a variety of different ways. ... Steps to Create a VoiceThread Assignment in Your Canvas Course. On the Modules page click on the plus (+) sign to add assignment. Select Add Assignment.
Quick tutorials for students on how to use the VoiceThread - Blackboard integration feature to submit presentations
Create: Require students to create a full VoiceThread with slides and recorded comments. Creating assignments are best for: Student presentations . Group work. Submitting work to receive asynchronous verbal feedback from peers or the instructor . Comment: Require students to post comments on a VoiceThread created by the instructor. Commenting ...
Step 2: Choose options. Select the playback settings you want each student's VoiceThread to have. Students will not be able to override these settings. Number of comments required. Students will be required to post comments on the VoiceThread they create. You can require a minimum number or an exact number.
Watch this video for more detailed explanation on how to Create a Voicethread Presentation. STEP 6 After uploading your media you can now edit your lessons by adding "Title, comments, links,etc." Step 5 Add Media: By clicking "Add Media" it opens up a slidebar consists of 5 ways. Get started for FREE Continue.
New VoiceThread Updates and Info Dear Faculty,We are pleased to announce that as of July 1st, 2024,the new VoiceThread will be available. It will bring many enhancements and changes. All your prior content will be available in the new VoiceThread update.What is VoiceThread?VoiceThread allows teachers and students to have dynamic conversations anchored in media, such as images, videos, and ...