The Tech Edvocate
- Advertisement
- Home Page Five (No Sidebar)
- Home Page Four
- Home Page Three
- Home Page Two
- Icons [No Sidebar]
- Left Sidbear Page
- Lynch Educational Consulting
- My Speaking Page
- Newsletter Sign Up Confirmation
- Newsletter Unsubscription
- Page Example
- Privacy Policy
- Protected Content
- Request a Product Review
- Shortcodes Examples
- Terms and Conditions
- The Edvocate
- The Tech Edvocate Product Guide
- Write For Us
- Dr. Lynch’s Personal Website
- The Edvocate Podcast
- Assistive Technology
- Child Development Tech
- Early Childhood & K-12 EdTech
- EdTech Futures
- EdTech News
- EdTech Policy & Reform
- EdTech Startups & Businesses
- Higher Education EdTech
- Online Learning & eLearning
- Parent & Family Tech
- Personalized Learning
- Product Reviews
- Tech Edvocate Awards
- School Ratings

Challenging Behavior: Everything You Need to Know
Emotional vocabulary: everything you need to know, the goodness of fit: everything you need to know, spain, ireland and norway say they will recognize a palestinian state. why does that matter, world reacts to the death of iran’s president ebrahimraisi, best cities to live in the u.s., according to u.s. news & world report, netanyahu denounces bid to arrest him over gaza war, how does this end with hamas holding firm and fighting back in gaza, israel faces only bad options, trump hush money trial to shape prosecutor alvin bragg’s legacy, judge dismisses felony convictions of 5 retired military officers in u.s. navy bribery case, how to run a powerpoint presentation on chromebook.

As Chromebooks become increasingly popular, users may find themselves wondering if it’s possible to run a PowerPoint presentation on their device. The good news is, it is indeed possible. In this article, we’ll go over how to run a PowerPoint presentation on a Chromebook.
Option 1: Use PowerPoint Online
One way to run a PowerPoint presentation on a Chromebook is by using PowerPoint Online, which is available for free through OneDrive or Microsoft’s Office website. Here’s how:
1. Open your web browser and navigate to OneDrive or office.com.
2. Sign in with your Microsoft account.
3. Click “PowerPoint” to create a new presentation or open an existing one.
4. Create or edit your presentation as you would in the desktop version of PowerPoint.
5. When you’re ready to present, click “Slide Show” in the top menu, then select “From Beginning” or “From Current Slide” to start your presentation.
6. Use the arrow keys on your keyboard to navigate through the slides.
Option 2: Use Google Slides
Another option for running a PowerPoint presentation on a Chromebook is to use Google Slides, which is a free web-based alternative to PowerPoint. Here’s how:
1. Open your web browser and navigate to Google Slides.
2. Sign in with your Google account.
3. Click “Blank” or “From Template” to create a new presentation or open an existing one.
4. Create or edit your presentation as you would in PowerPoint.
5. When you’re ready to present, click “Present” in the top right corner of the screen.
Option 3: Use a Third-Party App
If neither PowerPoint Online nor Google Slides meets your needs, there are third-party apps available that allow you to run PowerPoint presentations on a Chromebook. Here are a few options:
1. SlideDog: This app allows you to combine PowerPoint presentations with other media, such as PDFs and videos.
2. Prezi: Prezi uses a different type of presentation format that is more fluid and interactive than traditional slideshows.
3. Zoho Show: Zoho Show is a web-based presentation tool that includes features for collaborating with others in real-time.
How to Change Your PlayStation Username on ...
How to return merchandise without a receipt.

Matthew Lynch
Related articles more from author.

How to Use the Off Facebook Activity Tool to Protect Your Privacy

How to Use Bumble

How to Create Custom Alerts in React Using React-Toastify

How to Find Alternate Routes on Google Maps
How to Create a Gmail Alias

How to Install and Set Up a Home Theater Receiver
- Add and delete slides Video
- Apply or change a slide layout Video
- Apply Themes to presentations Video
- Get design ideas for slides Video
- Change slide masters Video
- Change the page orientation Video
- Add a watermark to your slides Video
- Organize slides into sections Video
- Add a logo to your slides Video

Add and delete slides

Add and delete slides to organize your presentation how you want.
Select the slide you want your new one to follow.
Select Home > New Slide .
Select a layout.
Select the text box and type.
Delete slides
Select your slide.
You can delete one or more slides at once:
Single slide - Right-click and select Delete Slide .
Multiple slides - Hold Ctrl and select the slides you want then right-click and select Delete Slide .
Sequence of slides - Hold Shift and select a sequence of slides then right-click and select Delete Slide .
Add, rearrange, duplicate, and delete slides in PowerPoint

Need more help?
Want more options.
Explore subscription benefits, browse training courses, learn how to secure your device, and more.

Microsoft 365 subscription benefits

Microsoft 365 training

Microsoft security

Accessibility center
Communities help you ask and answer questions, give feedback, and hear from experts with rich knowledge.

Ask the Microsoft Community

Microsoft Tech Community

Windows Insiders
Microsoft 365 Insiders
Was this information helpful?
Thank you for your feedback.
- Help Center
- Google Docs Editors
- Privacy Policy
- Terms of Service
- Submit feedback
- Create, edit, and customize slides
Add, delete & organize slides
Want advanced Google Workspace features for your business?
Try Google Workspace today!
You can add, delete, and reorder slides in a presentation to organize them the way you want. You can also add numbers to your slides.
Add, duplicate, & delete a slide
Insert a slide.
To add a slide with the same layout as the current slide:
- On your computer, open a presentation in Google Slides .
To add a slide with a different layout:
- Choose a slide.
Learn how to change the theme or layout of your slides .
- If you want to duplicate multiple slides, hold the Shift key and click them now.
- Right-click and select Duplicate slide .
- If you want to delete multiple slides, hold the Shift key and click them now.
- Press Delete or Backspace on your keyboard.
Organize your slides
Skip a slide.
You can skip a slide when you present a presentation. The slide won’t be deleted, and if you share your presentation with others, people will be able to see the skipped slides.
- At the left, right-click the slide or slides you want to skip.
- Click Skip Slide .
- Optional: To show a skipped slide, click Skip Slide again.
You can change the order of slides in a presentation:
- If you want to reorder multiple slides, hold the Shift key and click them now.
- Drag the slide or slides where you want them.
You can number your slides in a presentation:
- Click Apply .
Note: If you don’t want your title slide to be numbered, check the box next to "Skip title slides" when adding slide numbers.
To number only certain slides:
- Select the slide or slides that you want numbered.
- Click Apply to selected .
You can view your slides in filmstrip view or grid view:
- On your computer, open a presentation in Google Slides.
- In the menu, you can go to View to check or uncheck Show filmstrip .
Need more help?
Try these next steps:.
Using Google products, like Google Docs, at work or school? Try powerful tips, tutorials, and templates. Learn to work on Office files without installing Office, create dynamic project plans and team calendars, auto-organize your inbox, and more.
- INSIDER REVIEWS
- TECH BUYING GUIDES
How to delete a slide in your PowerPoint presentation or delete an entire section of slides at once
Melanie weir .

- You can delete a slide in PowerPoint simply by right-clicking on it.
- Every version of PowerPoint lets you individual slides or multiple slides at once.
It's pretty common to have to delete a slide in PowerPoint . Maybe your presentation is going on a bit too long and you need to cut content. Or maybe you were keeping a slide for notes that you don't want to appear in your presentation.
Regardless of the reason, there's good news: PowerPoint makes it very easy to delete slides, no matter what version of it you have.
In fact, the solution is so intuitive, you may have missed it altogether while looking for a delete button or a trash bin somewhere in the application.
If you need to delete a PowerPoint slide, here's how you do it, using any version of PowerPoint on your Mac or PC.
Check out the products mentioned in this article:
Apple macbook pro (from $1,299.00 at apple), acer chromebook 15 (from $179.99 at walmart), how to delete a slide in powerpoint.
1. Open your PowerPoint presentation and right-click (or hold Control as you click) any slide you want to delete in the left sidebar.
2. From the drop-down list that appears, select "Delete" or "Delete Slide."
Even better, PowerPoint will actually allow you to delete multiple slides at once — in case you need to delete a whole section or trim a few extras here and there.
To delete a section of slides that are right next to each other, just hold shift and select the first and last slides in the section. This will select those slides, as well as every slide between them. Once they're selected, just delete them the same way you did above.
To delete multiple slides that aren't next to each other, hold down the Ctrl or Command key and click on each slide you want to delete. Once selected, right-click any of them and select the "Delete" option.
Related coverage from Tech Reference :
How to add a border to slides in powerpoint, and give your slideshow a sleek design, how to embed a youtube video into your microsoft powerpoint presentations using a mac or pc, how to change your language settings in microsoft powerpoint in 3 different ways, how to change and format the background of your powerpoint slides to custom designs, how to copy or duplicate a powerpoint slide and put it anywhere in your slideshow, read more articles on.
- Tech Insider
- Tech Reference
- Software Apps Reference
- Tech How To
- Presentations
- Laptops Tablets Reference
- Microsoft Powerpoint
Advertisement
How to Delete Slides in PowerPoint? A Beginner’s Guide!
By: Author Shrot Katewa

When you start using Microsoft PowerPoint, most of your effort will be spent trying to learn the various features and in creating slides for your presentation. But, what happens when you don’t like a slide design and you want to delete it? How do you delete slides in PowerPoint?
To delete a slide in PowerPoint, simply select the slide from slide preview on the left part of your screen. Then, from the options, click “Delete Slide”. You can also press the “Delete” key on your keyboard after selecting the slide from the slide navigation pane.
In this article, I will share with you not just how to delete your slides, but also how to recover slides that you may have accidentally deleted! Plus, you’ll also get to understand everything in a step-by-step manner so that you can implement this in your presentation.
So, let’s get started!
[ Please note – in this article, I will be using one of the presentation templates from Envato Elements . With Envato Elements, you get access to thousands of presentation designs with unlimited downloads so you never run out of options again. Plus, you get free previews so you know exactly what you’re getting before buying! Check out their pricing here ]
1. How to Delete a Slide in PowerPoint?
Let’s understand how to delete a in your PowerPoint presentation. This can be achieved in the following 2 easy steps mentioned below –
Step-1: “Right-click” and Select the Slide
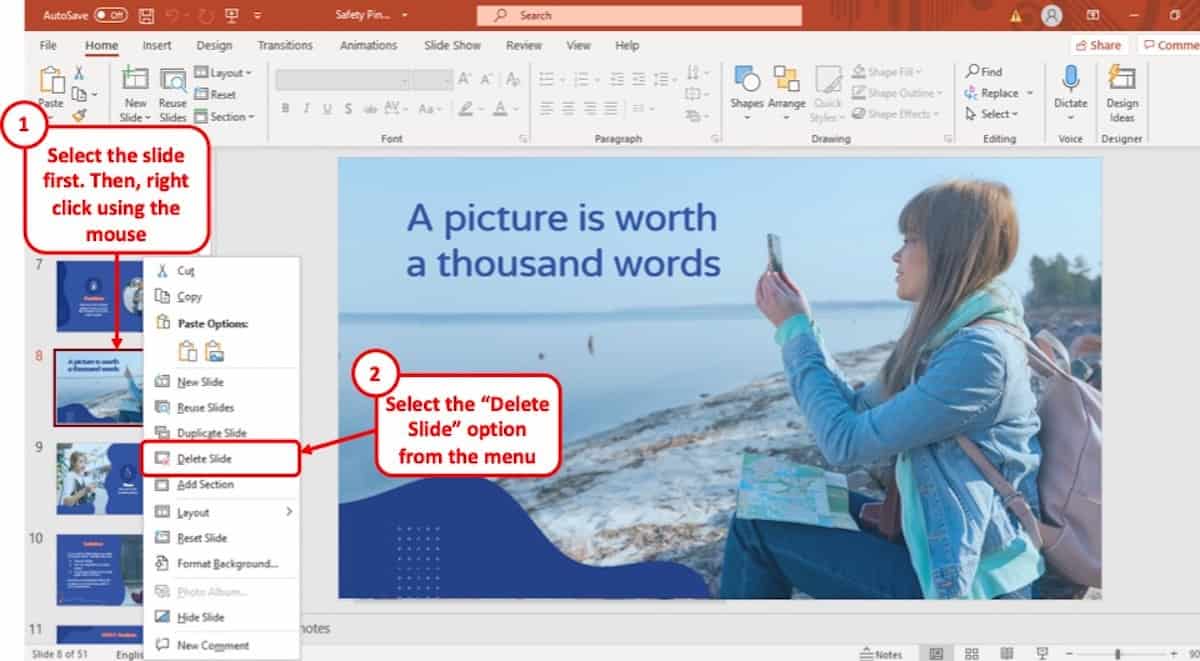
The first step to deleting a slide on your PowerPoint presentation is to move your cursor on the slide which you want to remove and “ Right-click ” on it using the mouse of your computer.
Step-2: Click the “Delete Slide” Option
After “ Right clicking ” on the slide, click on the “ Delete Slide ” option from the drop-down menu. It is located in the middle of the menu with an icon of a square with a red ‘x’ mark on it.
1a. How to Delete Slides in PowerPoint on Mac?
Deleting a slide from a PowerPoint presentation is the same on Mac as it is on Windows. Simply follow the two steps described above from your Mac device and you will be able to delete any slide in your PowerPoint presentation.
1b. How to Delete a Slide in PowerPoint without Right-click?
Sometimes, when you have too many slides to delete from time to time, you don’t want to end up using the right-click option as this does take a bit of time. So, to delete a slide in PowerPoint without “ Right-clicking ” the mouse on your computer, you have to use the keyboard instead.
Below is a step-by-step guide of the whole process.
Step-1: Select the slide you want to delete
At first, you have to select the slide you want to delete from the “ Slide Navigation ” bar at the left of your screen. (just the way it is shown in the previous section above)
Step-2: Press the “Delete” button on your keyboard.
Keeping the slide selected in the “ Slide Navigation ” bar, hit the “ Delete ” button on the keyboard of your computer. It is located at the upper right corner of the keyboard right above the “ Backspace ” key.
Alternatively, you can press the “ Backspace ” key on your keyboard which will also delete the slide from your presentation. Furthermore, for Mac users, simply press the “Delete” key since there is no backspace key on Mac.
2. How to Delete Multiple Slides in PowerPoint?
To delete multiple slides in your PowerPoint presentation, you have to use the ‘ Ctrl ” key on your keyboard to select multiple slides at the same time.
Here’s the detailed process to delete multiple slides in PowerPoint –
Step-1: Hold the “Ctrl” key and select all the slides you want to delete.
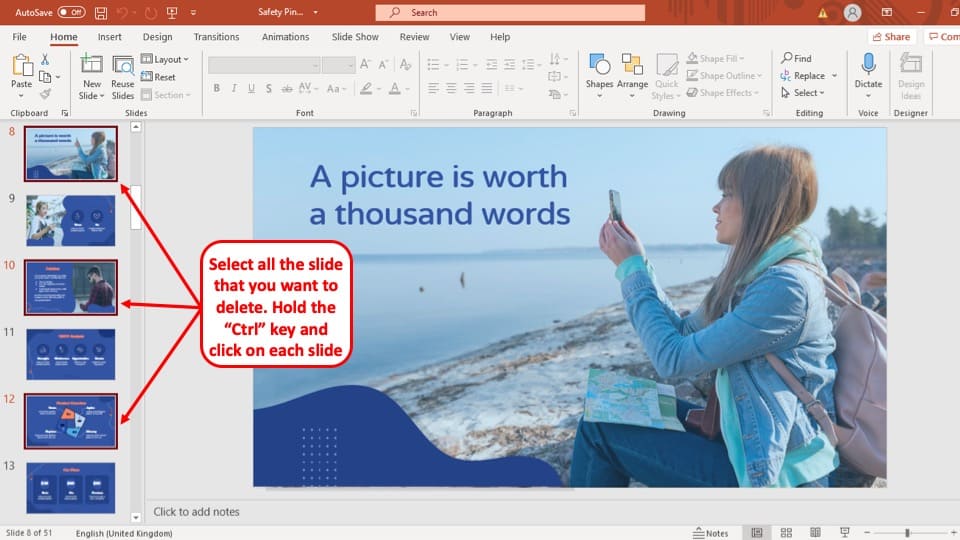
To delete multiple slides on your PowerPoint presentation, first, hold the “ Ctrl ” key on your keyboard and simply “ Left-click ” on the slides you want to delete to select them together.
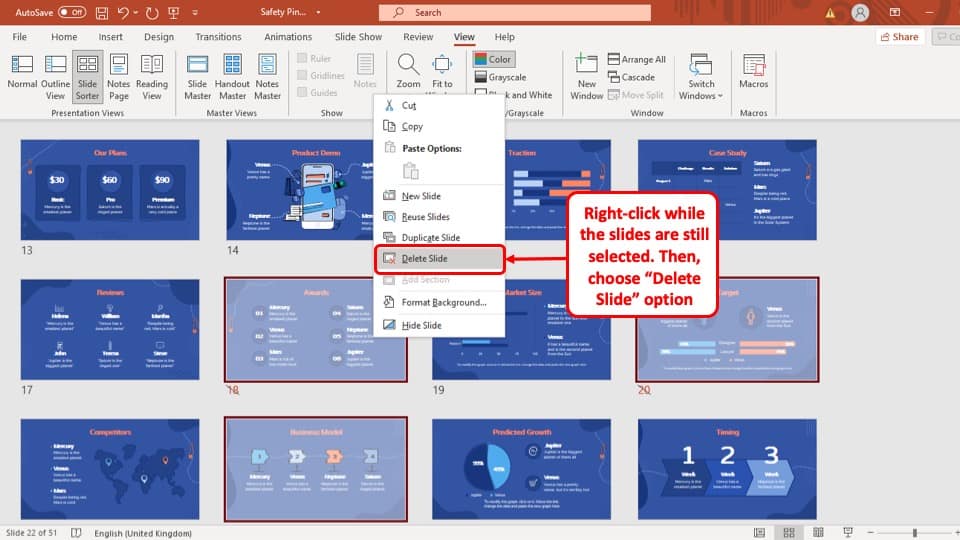
Step-2: “Right-click” on one of the slides and press the “Delete Slides” option.
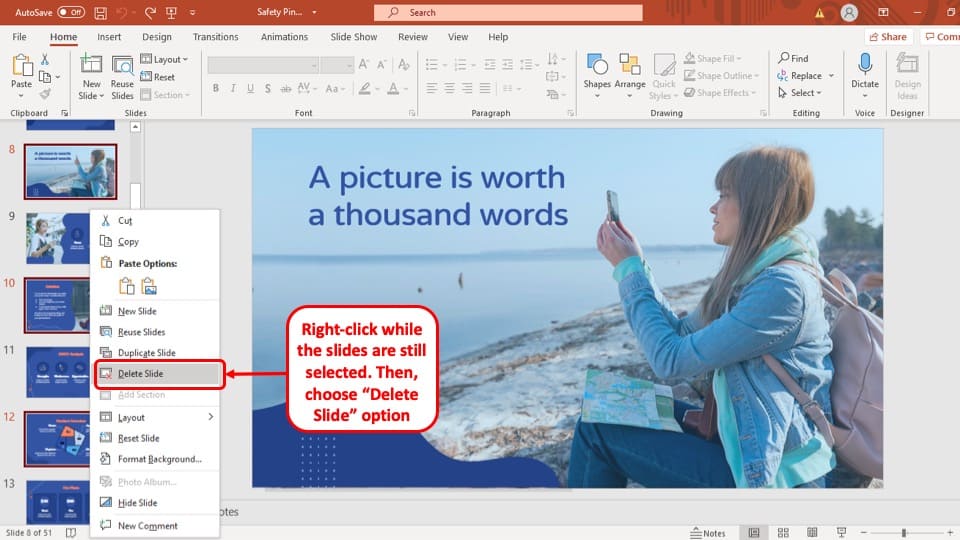
Once you have selected the slides that you want to remove from your PowerPoint presentation, “ Right-click ” on it using the mouse of your computer to open the drop-down menu and click on the “ Delete Slides ” option. However, make sure that the slides remain selected when you right-click (you will see a red border around the selected slides in the slide navigation pane)
Alternatively, you can also press the “Delete” button on your keyboard while. All the selected slides will be deleted instantly.
3. How to Delete Hidden Slides in PowerPoint?
The easiest way delete hidden slides in your PowerPoint presentation is to use the “ Slide Sorter ”. A step-by-step description of the process is given below.
Step-1: Go to the “View” tab on the ribbon.
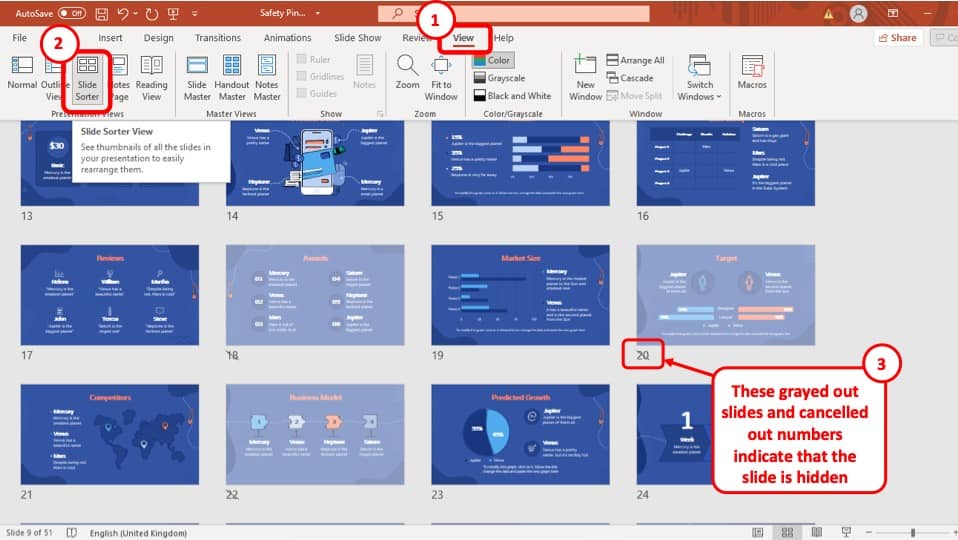
To access the “ Slide Sorter ” you have to first go to the “ View ” tab on the ribbon of your PowerPoint window. It is the second to last tab on the ribbon.
Step-2: Click on the “Slide Sorter” button
The next step to deleting hidden slides is to click on the “ Slide Sorter ” button which is the third button from the left at the “ Presentation View ” section.
Step-3: Select the hidden slides using the control key
After opening the “ Slide Sorter ” view, select the slide or multiple hidden slides that you want to delete and
Step-4: Right-click and Press the “Delete Slide” option
After you have selected all the hidden slides, simply “ Right-click ” on one of them using the mouse. Then, from the drop-down menu, simply press the “ Delete Slides ” option and all the hidden slides will be deleted from your PowerPoint presentation.
4. How to Delete Unused Master Slides in PowerPoint?
Deleting an unused master slide is quite helpful to reduce the size of you PowerPoint file if it becomes too large. Below is a step-by-step guide on how to delete unused master slides in your PowerPoint presentation:
Step-1: Go to the “View” tab in the ribbon
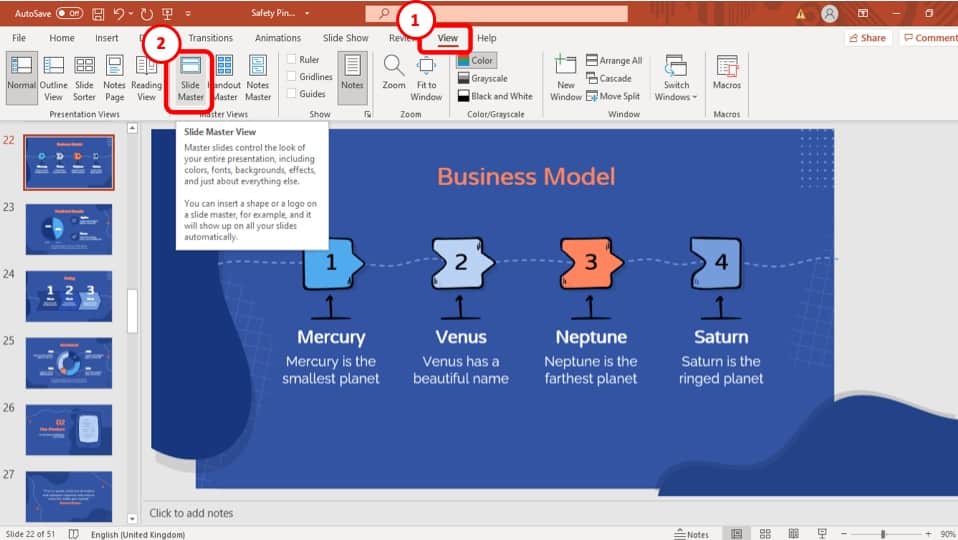
To access the “ Slide Master Navigation ” bar, at first you have to click on the “ Slide Master ” option located at the “ Master Views ” section in the “ View ” tab of the ribbon.
Step-2: Hover over the slides to see which ones are unused
To see which master slides are unused, hover your cursor over the slides to see which ones have not been used.
Step-3: Select the slide and delete it
Once you have found the master slides that you want to delete, simply “ Right-click ” on one of them and press the “ Delete ” button.
5. How to Recover Deleted Slides in PowerPoint?
To recover deleted slides in PowerPoint, you have to use the “ Undo ” button. Once you have mistakenly deleted a slide in your presentation., click on the icon that looks like a curved arrow directing to the left, which is the “ Undo ” button.
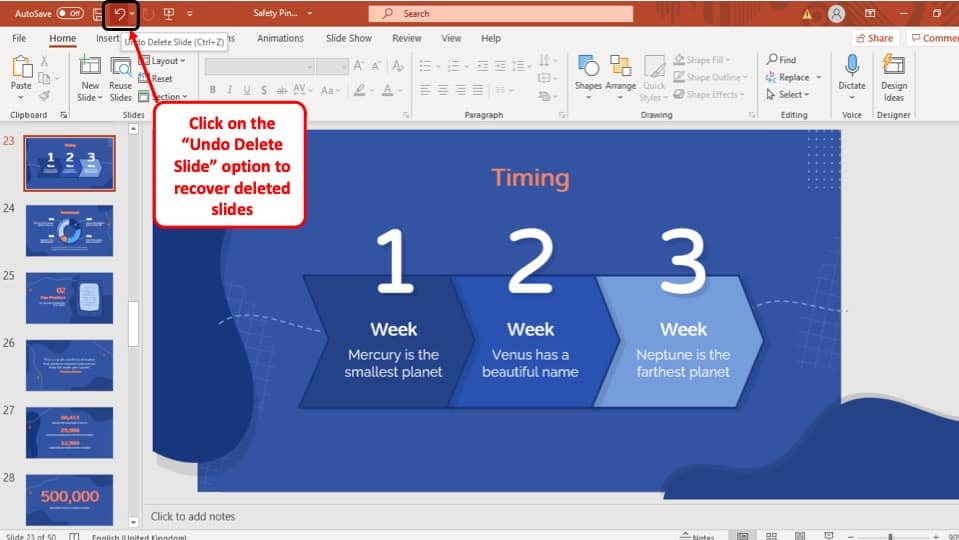
It is located at the top left corner of your PowerPoint software window. By clicking on it, your deleted PowerPoint slide will be recovered. Alternatively, you can press “ Ctrl + Z ” on your keyboard.
Another way of recovering deleted slides is to close the Microsoft PowerPoint application without saving the changes. You can do that by clicking on the ‘ x ’ icon at the top right corner of your screen and selecting the ‘Don’t Save’ option.
Now when you open your PowerPoint file again, you will find that the deleted slide is back to its place!
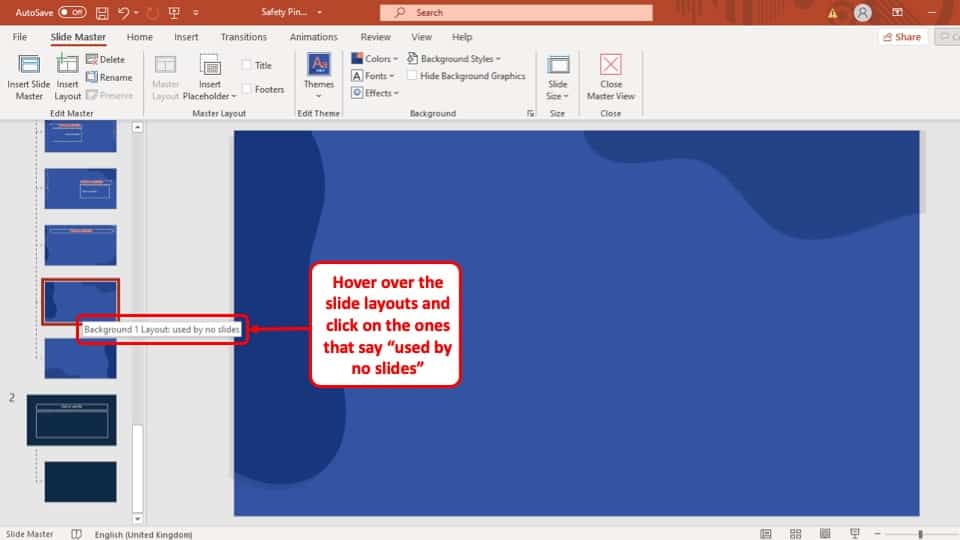
6. How to Delete a Slide Layout in PowerPoint?
Deleting a slide layout in PowerPoint is just the same as deleting unused master slides. So, you can follow the exact steps mentioned in the section 4 of this article.
However, one thing that you do need to remember is that a slide layout that is being used in one of your PowerPoint presentation slides cannot be deleted.
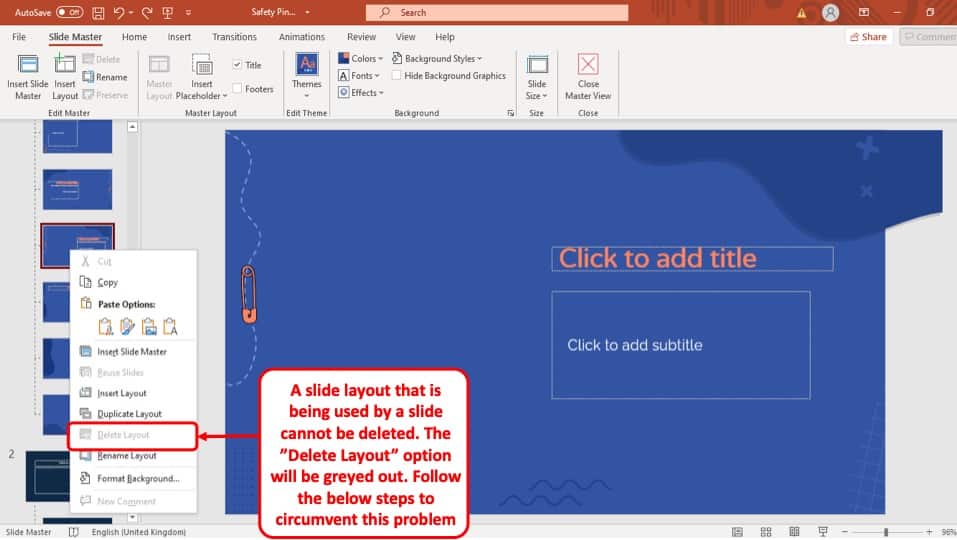
If you try to delete a layout that is being used the “ Delete Layout ” option will be greyed out indicating that it cannot be deleted (as shown in the image above).
To get around this issue, follow the 5 easy steps given below.
Step-1: Identify the slide using the layout
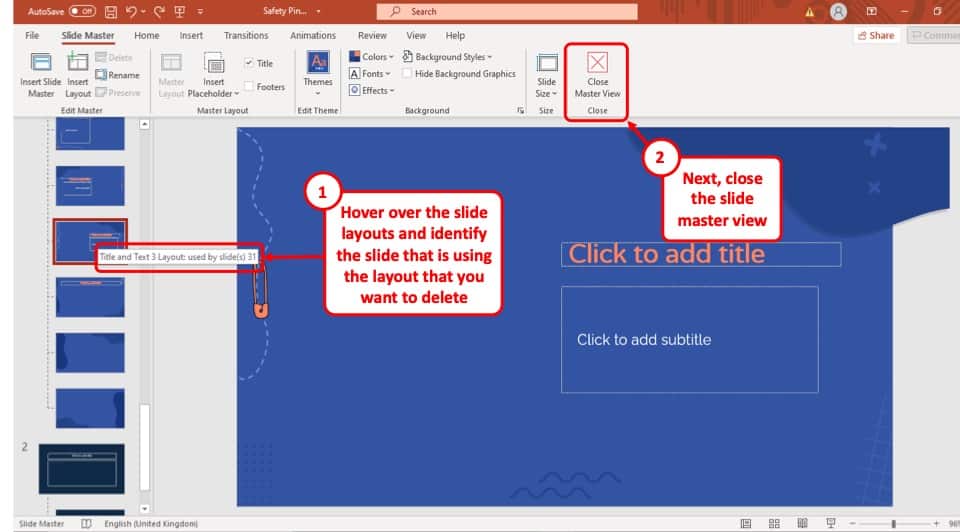
At first go to the “ Slide Master ” and hover your cursor over the layout that you want to delete. This will show you which of the slides in your PowerPoint presentation are using that layout.
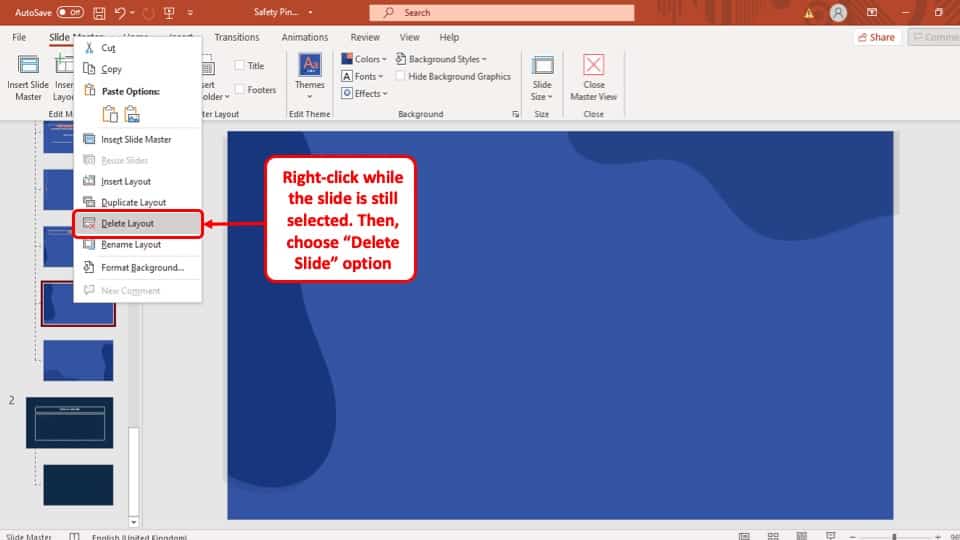
Step-2: Exit Slide Master and go to the specific slide
After finding out which slide is using the layout you want to delete, you have to go back to the “ Slide Navigation ” bar and “ Right-click ” on the slide to open the drop-down menu.
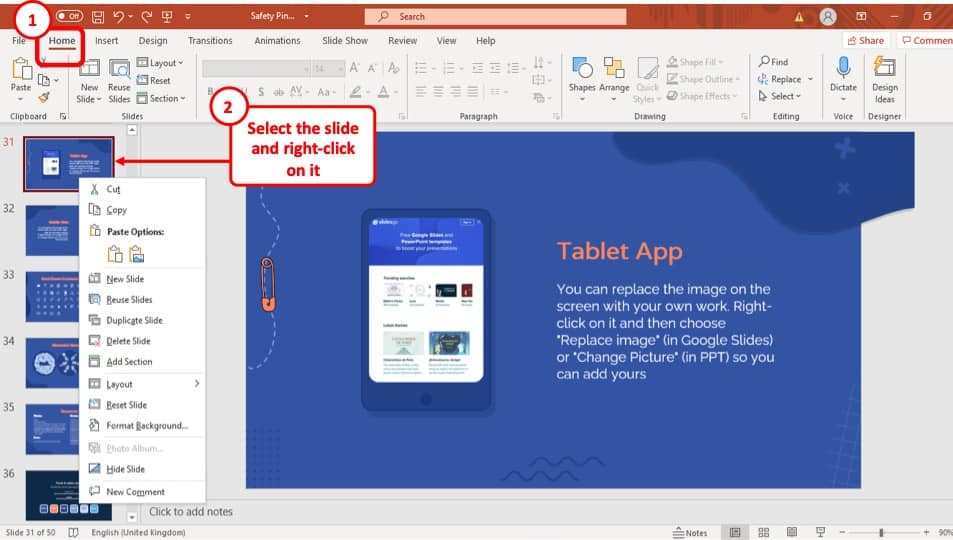
Step-3: Change the layout of the slide
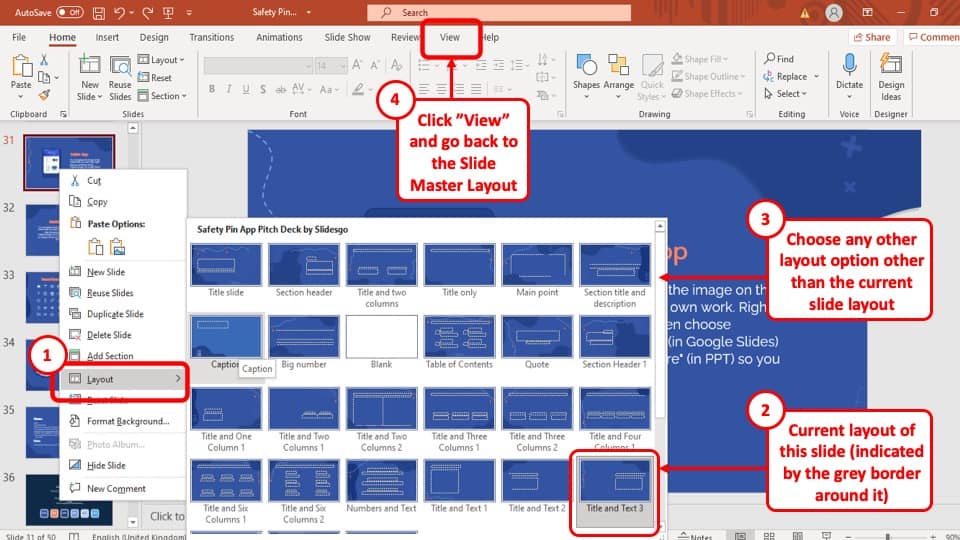
Once you have opened the drop-down menu, go to the “ Layout ” option, and change the layout of the slide to a different style. This will allow you to delete the layout that this slide was previously using.
Step-4: Go back to “Slide Master”
Once you have changed the layout of the slide that was using the layout you want to delete, go back to the “ Slide Master ” option, and “ Right-click ” on the layout. Now you will see that the “ Delete Layout ” button is no longer greyed out.
Step-5: Delete the layout
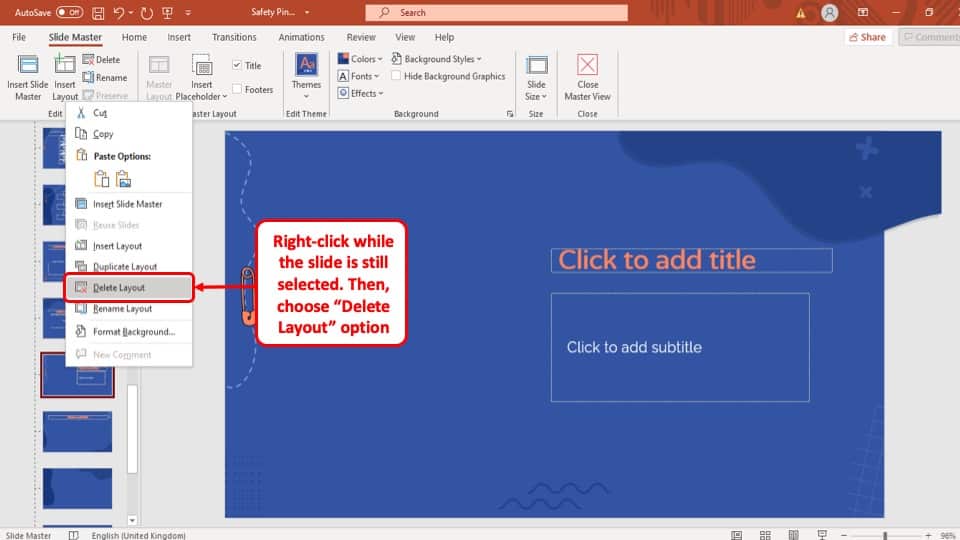
Finally, select the “ Delete Layout ” option and the layout will be removed from your PowerPoint Presentation.
7. Why Can’t I Delete Slides in PowerPoint?
On some occasions, you may not be able to delete slides. This is an extremely rare occurrence, but it can happen!
The main reason why you may not be able to delete a slide in PowerPoint is that your PowerPoint may have faulty macros in it. Perhaps you may have added a macro command that has bugs. This may create such an issue or prevent you from deleting slides even when the slide is blank with no data in it.
If you have indeed added a macro in your PowerPoint Presentation, it will be saved with a “.pptm” extension instead of a “.pptx” extension.
To solve this issue, all you have to do is save the presentation back as a ‘.pptx’ file, which will essentially kill all the macro commands. Once it is saved as a ‘ .pptx’ , opening it will allow you to delete any slide you want!
Another culprit could perhaps be an add-on that you may have recently added to your PowerPoint application. If so, try disabling or deleting the add-on, restart PowerPoint and try once again to see if you are able to delete the slide.
More PowerPoint Related Topics
- How to Crop a Picture in PowerPoint? [Complete Step-by-Step Tutorial!]
- How to Give a Presentation on Zoom? A Helpful Resource!
- How to Convert a PowerPoint to PDF? [A Simple Guide!]
- PowerPoint vs Google Slides: Which is Better? [ULTIMATE Test!]
- How to Change Bullet Style in PowerPoint? A Complete Guide
Credit to Lookstudio for the featured image (designed by Freepik) of this article
How To Delete Microsoft PowerPoint (An Easy Step-By-Step Guide)
Are you looking for an easy and straightforward way to delete a Microsoft PowerPoint presentation? If so, youve come to the right place.
In this article, youll learn how to delete a PowerPoint presentation, no matter what version of Microsoft PowerPoint you have.
Well cover what Microsoft PowerPoint is, why you might want to delete a presentation, and then the step-by-step instructions for deleting a PowerPoint presentation.
With this guide, youll be able to delete your presentation quickly and easily.
Lets get started!
Table of Contents
Short Answer
To delete Microsoft PowerPoint, open the Start menu and type in Add or Remove Programs.
Select Add or Remove Programs from the list of options that appear.
Scroll through the list of programs and select Microsoft PowerPoint.
Click the Remove button and follow the instructions given.
When the process is complete, Microsoft PowerPoint will be deleted from your computer.
What is Microsoft PowerPoint?
Microsoft PowerPoint is a powerful presentation software used by millions of people around the world.
It is a versatile and easy to use program that allows users to easily create professional-looking presentations.
Microsoft PowerPoint can be used to create a variety of presentation types, from simple slideshows to complex multimedia presentations.
It offers users a variety of features, including the ability to create text, images, charts, animations, and videos.
PowerPoint is commonly used in business and educational settings to help people communicate ideas effectively and efficiently.
Additionally, PowerPoint allows users to share their presentations with others over the Internet or via email.
Why Delete a PowerPoint Presentation?
When it comes to presentations, Microsoft PowerPoint is a powerful and versatile software used by millions of people across the world.
It can be used to create stunning slideshows, powerful visual aids, and detailed diagrams.
However, sometimes, a presentation may need to be deleted for a variety of reasons.
Perhaps you created a presentation for a project that has since been cancelled.
Maybe youve used a presentation to practice for an upcoming event, and now no longer need it.
Or, maybe youve created a presentation that you dont feel confident enough to present, and have decided to delete it.
Whatever the reason, deleting a PowerPoint presentation is a simple and straightforward process.
In this blog post, well look at how to delete a PowerPoint presentation in a few easy steps.
Well explore why its important to delete presentations you no longer need and review some of the benefits of deleting presentations.
Finally, well look at some best practices for deleting PowerPoint presentations.
Opening the PowerPoint Presentation
Opening a PowerPoint presentation is an important first step in deleting it.
To begin, open the presentation that you wish to delete by double-clicking on the file’s icon in your computer’s file explorer or clicking on the file from the list of recently opened presentations in the PowerPoint menu.
Depending on the version of PowerPoint you have, you may also be able to open a presentation from the File menu, or by dragging and dropping the file into the PowerPoint window.
Once the presentation is open, you can begin the process of deleting it.
Accessing the File Menu
To delete a Microsoft PowerPoint presentation, the first step is to open the presentation you wish to delete.
Once the presentation has been opened, the next step is to access the File menu.
To access the File menu, you must click the File tab at the top of the window.
This will open the File menu, where you can then select the Info option.
The Info section of the File menu gives you the option to delete the presentation.
To delete the presentation, click the Delete Presentation button.
This will open a confirmation window, which will ask you to confirm that you want to delete the presentation.
Clicking Yes will delete the presentation.
It is important to note that this process is irreversible, so be sure that you are sure you want to delete the presentation before moving forward.
Selecting Info
Deleting a PowerPoint presentation is easy, and can be done quickly and efficiently.
To delete a PowerPoint presentation, start by opening the presentation you wish to delete.
Then, click the File tab at the top of the window.
From the File menu, select Info.
When you select the Info option, you will be taken to a page that contains several options related to the PowerPoint presentation you have open.
Here, you will find options to share your presentation with others, print your presentation, and check for issues or compatibility with other versions of PowerPoint.
At the bottom of the Info page, you will see the Delete Presentation button.
Clicking the Delete Presentation button will open a confirmation box, asking if you are sure you want to delete the presentation.
If you are sure, click Yes to confirm the deletion.
Once you have confirmed the deletion, the PowerPoint presentation will be permanently deleted.
It is important to note that, once you have deleted a PowerPoint presentation, it cannot be recovered.
Therefore, it is wise to make sure you have a backup of the presentation before deleting it.
Additionally, if you delete a presentation that has been shared with others, it will be removed from their shared folder as well.
Clicking the Delete Presentation Button
When you have opened the presentation that you wish to delete, the next step is to click the File tab at the top of the window.
This will open the File menu, where you will find the Info option.
Upon selecting Info, the Delete Presentation button will appear.
This button is typically located in the upper-right corner of the window.
Clicking the Delete Presentation button will bring up a confirmation window, which will prompt you to confirm the deletion of the PowerPoint presentation.
Clicking the Yes button will delete the presentation, while clicking No will cancel the deletion process.
It is important to note that deleting a PowerPoint presentation is permanent.
Once the presentation is deleted, it cannot be recovered, so it is best to make sure that you really do wish to delete the presentation before you click the Delete Presentation button.
If you are ever in doubt, you can always save a copy of the presentation before deleting it.
Confirming the Deletion
Confirming the deletion of a PowerPoint presentation is an essential step to ensure that all of the information contained within the presentation is not only removed from your device, but also removed from the Microsoft Office cloud storage.
To confirm your deletion, you must click the Yes button that appears after you have selected the Delete Presentation button from the File menu.
Once the Yes button is clicked, the PowerPoint presentation will be deleted from the device and removed from the Microsoft Office cloud storage.
This will ensure that the presentation can no longer be accessed from any other device or shared with other users.
Additionally, once deleted, the presentation cannot be recovered, so it is important to make sure that you do not delete a presentation that you wish to keep.
It is also important to note that when deleting a presentation, any changes that you made to the presentation will not be saved.
This means that if you made any edits or added any new content to the presentation, those changes will be lost when the presentation is deleted.
Therefore, it is important to save any content that you wish to keep before deleting the presentation.
By following these steps, you can easily and efficiently delete a PowerPoint presentation.
This will ensure that the presentation is no longer accessible to any other users and that any changes that you made to the presentation are not lost.
Final Thoughts
Now that you know how to delete a Microsoft PowerPoint presentation, you’re one step closer to managing your presentation files with ease.
Why wait any longer? Follow this easy step-by-step guide and delete your PowerPoint presentation today!
James Wilson
James Wilson has extensive knowledge in the information technology industry.His second love, besides dealing with computers, is smart home technology. He is continually updating information to better comprehend this problem and has a deep understanding of the apartment’s support system.
Recent Posts
Is Airtable a Public Company? Unveiling the Truth
No, Airtable is not a public company. As of now, Airtable is a private company that has raised funds from various investors but has not gone through an initial public offering (IPO) to be listed on...
How to Make Money with Airtable: Top Strategies and Success Stories
To make money with Airtable, you can offer consulting services to businesses looking to optimize their workflows through the platform. You can also create and sell templates or automation scripts...
How to delete a slide on Google Slides
- You can delete a single slide or a selection of slides in Google Slides on a desktop or in the mobile app on your phone.
- In the desktop version, select the slide thumbnail you want to delete and then press the Delete key.
- To delete a slide on your phone, select it and then tap Delete in the main menu on Android or tap the Scissors icon on iOS.
Google Slides is a fast, easy, and free tool for making slideshows and presentations. And while it's straightforward to add and modify slides, it's not always obvious how to delete one or more slides you no longer need from your deck. Once you learn how, though, you can delete slides with just a couple of clicks or taps using a desktop browser or the mobile app on your phone.
How to delete a slide on Google Slides on the desktop
With Google Slides in a web browser and your deck open, find the slide you want to delete. Click the slide thumbnail in the pane on the left and then press the Delete key on your keyboard. Alternatively, you can right-click the slide and then choose Delete from the pop-up menu. If you want to delete multiple slides at once, hold the Shift key when you select the first and last slide, then delete it using the right-click menu or Delete key.
How to delete a slide on Google Slides on Android
Open the deck you want to edit in the Google Slides app on your phone. If the slides are in a scrolling list view, double-tap so you can see the slide thumbnails along the bottom of the screen. Tap and hold the slide you want to delete until it's selected, then tap the three-dot menu at the top of the screen. In the pop-up menu, tap Delete .
If you want to delete multiple slides at once, tap and hold the first slide, tap all the additional slides you want to delete, and then tap the three-dot menu and choose Delete .
How to delete a slide on Google Slides on iPhone or iPad
Open a deck in the Google Slides app on your iPhone or iPad. If the slides are in a scrolling list view, double-tap so you can see the slide thumbnails along the bottom of the screen. Tap and hold the slide you want to delete until it's selected, then tap the Scissors icon in the toolbar at the top of the screen.
If you want to delete multiple slides at once, tap and hold the first slide, then tap all the additional slides you want to delete. Then tap the Scissors icon in the toolbar.
On February 28, Axel Springer, Business Insider's parent company, joined 31 other media groups and filed a $2.3 billion suit against Google in Dutch court, alleging losses suffered due to the company's advertising practices.
- Main content
- PRO Courses Guides New Tech Help Pro Expert Videos About wikiHow Pro Upgrade Sign In
- EDIT Edit this Article
- EXPLORE Tech Help Pro About Us Random Article Quizzes Request a New Article Community Dashboard This Or That Game Popular Categories Arts and Entertainment Artwork Books Movies Computers and Electronics Computers Phone Skills Technology Hacks Health Men's Health Mental Health Women's Health Relationships Dating Love Relationship Issues Hobbies and Crafts Crafts Drawing Games Education & Communication Communication Skills Personal Development Studying Personal Care and Style Fashion Hair Care Personal Hygiene Youth Personal Care School Stuff Dating All Categories Arts and Entertainment Finance and Business Home and Garden Relationship Quizzes Cars & Other Vehicles Food and Entertaining Personal Care and Style Sports and Fitness Computers and Electronics Health Pets and Animals Travel Education & Communication Hobbies and Crafts Philosophy and Religion Work World Family Life Holidays and Traditions Relationships Youth
- Browse Articles
- Learn Something New
- Quizzes Hot
- This Or That Game
- Train Your Brain
- Explore More
- Support wikiHow
- About wikiHow
- Log in / Sign up
- Computers and Electronics
- Website Application Instructions
- Google Applications
How to Delete a Slide on Google Slides Using a Computer or Mobile
Last Updated: June 18, 2022 Fact Checked
This article was co-authored by wikiHow staff writer, Darlene Antonelli, MA . Darlene Antonelli is a Technology Writer and Editor for wikiHow. Darlene has experience teaching college courses, writing technology-related articles, and working hands-on in the technology field. She earned an MA in Writing from Rowan University in 2012 and wrote her thesis on online communities and the personalities curated in such communities. This article has been fact-checked, ensuring the accuracy of any cited facts and confirming the authority of its sources. This article has been viewed 13,791 times. Learn more...
Are there unnecessary slides in your Google Slides presentation that you want to delete? There are a few ways you can remove them so they don't show up in your presentation. This wikiHow article teaches you how to delete a slide on Google Slides using the website or the mobile app.
Deleting Slides Using the Website

- If you don't have a slideshow created, you can create a new one by clicking the multicolored + in the lower right corner of your screen.

- To select multiple slides, press and hold Shift as you click to select slides.
- The selected slides will highlight in orange to indicate that you have them selected.

- Alternatively, right-click on a selected slide and click Delete . You can also delete your selection by going to Edit > Delete . [1] X Research source
- If you don't want to delete the slide, you can instead skip it and hide it in the presentation. To do this, right-click the slide and select Skip slide before you start the presentation. You'll see an eye icon that's crossed out appear on the hidden slide thumbnail so you know that slide will not appear in the presentation.
Deleting Slides Using the Mobile App

- In Edit Mode, you'll see the slides of your presentation at the bottom of the screen.

- To delete multiple slides, tap them to make sure they are highlighted and selected as well.

- You'll see the three-dot menu icon in the top right corner of your screen.

- The highlighted slides will be deleted immediately.
- Similar to the computer method, you can also tap Skip slide to hide it from your Slide Show. [2] X Research source Tap that option again to unhide it.
Expert Q&A
- If you are using PowerPoint instead, the instructions are very similar to those using Google Slides. Thanks Helpful 0 Not Helpful 0

You Might Also Like

- ↑ https://support.google.com/docs/answer/1694830?hl=en&co=GENIE.Platform%3DDesktop
- ↑ https://support.google.com/docs/answer/1694830?hl=en&co=GENIE.Platform%3DiOS#zippy=%2Cskip-a-slide
About This Article

1. Open your document in Google Slides. 2. Select the slide you want to delete from the panel on the left. 3. Press Backspace or Delete . Did this summary help you? Yes No
- Send fan mail to authors
Is this article up to date?

Featured Articles

Trending Articles

Watch Articles

- Terms of Use
- Privacy Policy
- Do Not Sell or Share My Info
- Not Selling Info
wikiHow Tech Help:
Tech troubles got you down? We've got the tips you need
Microsoft Learn Q&A needs your feedback! Learn More
May 20, 2024
Microsoft Learn Q&A needs your feedback!
Want to earn $25 for telling us how you feel about the current Microsoft Learn Q&A thread experience? Help our research team understand how to make Q&A great for you.
Find out more!
Contribute to the Microsoft 365 and Office forum! Click here to learn more 💡
April 9, 2024
Contribute to the Microsoft 365 and Office forum!
Click here to learn more 💡
PowerPoint Forum Top Contributors: Steve Rindsberg - John Korchok - Bob Jones AKA: CyberTaz ✅
May 10, 2024
PowerPoint Forum Top Contributors:
Steve Rindsberg - John Korchok - Bob Jones AKA: CyberTaz ✅
- Search the community and support articles
- Microsoft 365 and Office
- Search Community member
Ask a new question
Office 365, Powerpoint presenter view on chromebook
Hope you are well
Is it possible to get presenter view on a Chromebook when using a powerpoint?
Report abuse
Reported content has been submitted
- Microsoft Agent |
Hi AhamadSabir,
Thank you for posting your question in this community.
I am not a Chromebook user, but I did a test with my PowerPoint application on my Android pad (The PowerPoint for Android application was the latest version downloaded from Google play store).
You can enter the presenter view in PowerPoint for Android application by clicking the Presenter View button in the menu above to enter the presenter view.

Then you can get you notes and Slide to display like the screenshot below.

Best regards,
1 person found this reply helpful
Was this reply helpful? Yes No
Sorry this didn't help.
Great! Thanks for your feedback.
How satisfied are you with this reply?
Thanks for your feedback, it helps us improve the site.
Thanks for your feedback.
Replies (1)
Question info.
- Norsk Bokmål
- Ελληνικά
- Русский
- עברית
- العربية
- ไทย
- 한국어
- 中文(简体)
- 中文(繁體)
- 日本語
How To Delete a Slide on Google Slides [3 Methods]
- Last updated December 6, 2023
Do you want to learn how to delete a slide on Google Slides? Do you need to streamline your presentation and get rid of unnecessary slides? In this guide, I’ll show you how to delete a slide on Google Slides quickly and easily.
In short, here is how to delete a slide on Google Slides: Right-click on the slide you want to remove and select “Delete slide” from the drop-down menu.
Alternatively, you can click on the slide and press the “Delete” button on your keyboard. This will remove the slide from your presentation and shift the remaining slides up or down accordingly.
Read on to learn the other methods on how to delete a slide on Google Slides and also how to delete multiple slides in Google Slides.
Table of Contents
How To Delete a Slide On Google Slides
One of the essential skills you should know when working with Google Slides is how to delete a slide on Google Slides. Whether you accidentally added an extra slide or don’t need it anymore, deleting a slide is a simple task that can make your presentation more organized and concise.
There are several methods to do it. Let’s take a look at them one by one in more detail:
Method 1: Right-click on the Slide
Here’s a quick method on how to delete a slide on Google Slides:
- Open the presentation in Google Slides
- Right-click the thumbnail of the slide you want to delete to select it. A menu will appear.
- Select “Delete” from the drop-down menu, and that’s it! The selected slide will now be deleted from the presentation.

Method 2: Press the Delete Key
Here is another easy way to delete a slide in Google Sheets using your keyboard:
- Open the presentation in Google Slides and click the slide you want to delete
- Once the slide is selected, press the “Delete” key on your keyboard (this is the same on macOS too.

Photo by Stefen Tan on Unsplash
Method 3: Use the “Delete” Option in the Toolbar
- Open the presentation in Google Slides and click on the slide you want to delete
- In the toolbar at the top of the screen, click on the “Slide” menu
- From the drop-down menu, select “Delete slide.”

This method is effective if you don’t have a mouse or don’t want to use a keyboard shortcut.
If you want to make your slides more entertaining, here’s a guide on how to add GIFs to Google Slides .
Want to learn how to delete a slide on Google Slides in 2 minutes? Watch this video learn how to delete and skip a slide on Google Slides!
How To Delete a Slide on Google Slides App
Now that we’ve discussed the different methods to delete a slide on Google Slides using a desktop, let’s take a look at how to delete Google Slides using the Google Slides app. The process is slightly different, but it’s just as easy. Follow the steps below:
- Open the Google Slides app on your mobile device and open the presentation you want to edit
- Navigate to the slide you want to delete by swiping up or down
- Once you’ve found the slide you want to delete, tap on it to select it

- Tap “Edit slide”

- Double-tap on the slide on the menu below
- Tap the “ More options ” button (three-dot icon)

- Tap “Delete,” and the selected slide will now be deleted from your presentation.

How To Delete Multiple Slides in Google Slides
You can combine the methods we’ve discussed above to delete multiple slides in Google Slides. However, the easiest and most efficient way to delete multiple slides is by deleting multiple slides in one go.
Follow the steps below to delete multiple slides on Google Slides:
- When you click on the slides, they should be highlighted.
- Once you have chosen all the slides you want to delete, right-click on one of the selected slides and click “Delete.”

In the example above, I used the Ctrl key because it lets you select individual slides. When choosing consecutive slides, I use the Shift key ⇧ , which lets me select from the first to the last slide that I want to delete, which is considerably faster than selecting slides individually.
And that’s all you need to know for mass deleting Google Slides slides!
How To Hide a Slide in Google Slides
Hiding a slide in Google Slides is a practical function for streaming the layout of your presentation. This helps to make your slides look good. There are two different ways to do this:
- By right-clicking on the slide
- By using the “Slide” menu
Using the Right-Click Method
To hide a slide in Google Slides using the right-click method , simply follow the steps below:
- Open the Google Slides with the presentation you want to edit
- In the left sidebar, click on the slide you want to hide
- Right-click on the slide to open a context menu
- Select “Skip Slide”

NOTE: If you don’t see the filmstrip in the sidebar, you can enable it by clicking the “View” menu and then “Show filmstrip.”

Using the “Slide” Menu
Here’s how to hide slides in Google Slides with the “Slide” menu:
- Open your Google Slides presentation
- Select the slide that you want to hide

- Click on the “Slide” menu in the top menu bar
- Select “Skip slide” to hide the selected slide

Both methods will hide the selected slide during the presentation, but they’ll still be part of it (and can be unhidden later if needed).
Tip: To unhide a Google Slide, follow the same steps but choose “Unskip slide” instead.
How To Hide Multiple Slides in Google Slides
Instead of hiding a slide individually, Google Slides allows its users to hide multiple slides simultaneously. Simply follow these steps:
- Hold Ctrl (Windows, Chromebook, and Linux) or Command ⌘ (for Mac) to select the slides.

- Click the “Slide” menu, then “Skip Slides.”

- Alternatively, you can right-click on one of your selected slides and select “Skip slides” within the context menu.

It is worth mentioning that while the process is simple, you’ll need to be careful when clicking which slides you want to hide. So, pay attention, or you might select a significant slide and accidentally ruin your presentation!
Advantages of Using Google Sides for Collaborative Work
In the modern remote work environment, Google Slides is an excellent tool for collaborative work because it can be shared with multiple users with minimal hassle.
Let’s take a closer look at some other benefits of using Google Slides as a group collaboration tool:
- Real-time collaboration: Google Slides allows multiple people to simultaneously work on the same presentation. All changes one collaborator makes are immediately visible to the others, making it easier to work together while avoiding version control issues.
- Easy to share: Sharing a Google Slides presentation is easy. The “ Share ” button is located in the screen’s top-right corner, making it simple to share with others. From there, you can enter the email addresses of the people with whom you wish to share the presentation, and they will receive an email invitation to view or edit the presentation.
- Convenient revisions management: Keeping track of changes and revisions is essential when working on a project with multiple team members. Google Slides has a version history feature that lets you see who made the presentation changes and when. You can also revert to a previous version if necessary.
- Seamless integration with Google tools: Google Slides integrates seamlessly with other Google tools , such as Google Drive, Google Docs, and Google Sheets. This integration makes incorporating other documents and data into your presentation quickly and efficiently.
- Accessible on multiple devices: Google Slides is a cloud-based tool, meaning you and your colleagues can access your presentations from any device with an internet connection. This feature is perfect for remote teams collaborating from different locations and time zones.
Frequently Asked Questions
Can i recover a deleted slide in google slides.
There are multiple ways to recover a deleted slide slide in Google Slides. For example, if you recently deleted the slide, you can use Ctrl + Z or Cmd + Z for MacOS devices.
Another way is using the version history feature:
- Click on the clock icon at the right of the menu
- Go to the version that had the deleted slide
- Copy the deleted slide
- Return to your current version
- Paste the contents of the deleted slide.
If you can’t find the slide in the version history, you can go to your drive and find the file in the trash folder.
What Is the Shortcut to Delete a Slide in Google Slides?
You can use a handy keyboard shortcut to delete slides in Google Slides. Here’s how to do it:
- Select the slide you want to delete by clicking its thumbnail in the left-hand panel
- Press the “ Delete ” or “ Backspace ” key on your keyboard
The slide will be deleted instantly without a confirmation dialog box. The Google Slides shortcut also works on Mac computers.
Why Can’t I Delete a Slide in Google Slides?
If you cannot delete a slide in Google Slides, there may be several reasons why this is happening. The most common reasons include:
- You are not the presentation owner, or you do not have the necessary editing permissions. If you don’t have the proper access, you won’t be able to delete any of the slides.
- There is only one slide in the presentation. Google Slides requires a minimum of one slide in a presentation, so if you try to delete the only slide, the program will not allow it. In this case, you can duplicate the slide and then delete the original to create a new presentation.
- The slide contains a layout or a master element used by another slide in the presentation. In this case, you must remove the element or the layout from the other slide. Or learn how to remove a slide from Google Slides and remove the element from the duplicate.
- Your internet connection is slow or unstable. If your internet connection is unstable, you will experience difficulty deleting slides or performing other functions in Google Slides . Try refreshing the page or waiting for your connection to stabilize before attempting to delete the slide again.
And that’s how to delete a slide on Google Slides! Deleting a slide is necessary when creating or editing a presentation, but ensure you have selected the correct slide to avoid accidentally deleting the wrong one.
Watch these G Suite courses for more tips and tricks when using other Google tools. Many courses are simplified, so you can learn something new even if you aren’t well-versed in the Google Suite platform.
- Insert Google Sheets Into Google Slides
- How To Add a Video to Google Slides [Complete Guide]
- How To Download Google Slides
- How To Change Slide Size in Google Slides [Easy Guide]
- How To Fix Google Slides Words Overlapping Issue
- How To Group in Google Slides [Step-by-Step Guide]
Most Popular Posts

How To Highlight Duplicates in Google Sheets

How to Make Multiple Selection in Drop-down Lists in Google Sheets

Google Sheets Currency Conversion: The Easy Method
A 2024 guide to google sheets date picker, related posts.
- Sumit Bansal
- May 16, 2024
- May 2, 2024
How to Insert a Google Sheets Hyperlink in 5 Seconds
- Chris Daniel
- April 15, 2024
How to Import Stock Prices into Google Sheets
- April 2, 2024
Thanks for visiting! We’re happy to answer your spreadsheet questions. We specialize in formulas for Google Sheets, our own spreadsheet templates, and time-saving Excel tips.
Note that we’re supported by our audience. When you purchase through links on our site, we may earn commission at no extra cost to you.
Like what we do? Share this article!
How to Delete Apps on a Chromebook
Find out how to clean up space on your Chromebook—or get an app back once you’ve removed it.
Key Takeaways
- Easily remove apps from your Chromebook by right-clicking on the app icon and selecting "Uninstall."
- Find apps you want to reinstall in the Google Play Store or Debian repositories.
Chromebooks are best known for supporting web apps, but you can also install websites, Android apps, and even Linux programs on the most recent models. Sometimes, you’ll need to remove an app. Fortunately, it's easy to uninstall Chromebook apps—and restore them too.
Finding Apps to Delete on Your Chromebook
Since your Chromebook has limited storage space, you’ll probably want to free it up at some point. One method is to delete files you don't need . You can also remove apps you don't use.
It's easy to find the app you want to get rid of on your Chromebook; just open the Launcher in the bottom left-hand corner of the screen. You can also press the Search key (the one that looks like a magnifying glass) to bring up the Launcher.
If you have Linux apps, they'll all be organized in their own section. You can scroll through your apps to find the one you want to delete.
Removing Chromebook Apps
Once you do, you can right-click (or use both fingers on a trackpad) to bring up the context menu. Click "Uninstall" to remove it. To further the point home, there's an icon of a trash can next to it.
This method will also work on Android and Linux apps, if you've installed the Linux development environment. You can also remove them with their methods: the Google Play store and the Debian APT utility.
Getting Your Chromebook App Back
If you decide you want to keep the app you just deleted, you're going to have to reinstall it. For web apps, you can navigate to the website and click the "install" icon in the right-hand part of the URL bar. You can find Android apps in the Google Play store.
For Linux apps, you'll have to search Debian's package repositories. You can use the APT's search function on the command line:
You can also use Debian's searchable packages website. It's useful for browsing since it's organized by the type of app.
How-To Geek
Why i prefer google slides to microsoft powerpoint.
Your presentations (and your sanity) will thank you.
Quick Links
- Ease of Collaboration
- Offline Access
- Integration With Other Google Tools
- More Storage Space
- Compatibility With PowerPoint
- AI Features
- Provide Detailed Version History
- Customization Features and Template Options
PowerPoint and Google Slides are two popular options for presentations, but which one is best? As someone who has used both programs for a long time, I've found that Google Slides offers many advantages that make it my go-to choice.
Let's be clear: I'm comparing the web-based PowerPoint and Google Slides versions. It's unfair to compare Google Slides to the desktop version of PowerPoint, isn't it? Here are some reasons why Google Slides is my favorite presentation tool.
1. Ease of Collaboration
Ease of collaboration was the central reason I switched to Google Slides for my presentation needs. As a content creator, I always aim for a seamless collaboration experience while dealing with my clients and team members. Google Slides offered exactly that, and I was in love with it.
So, is Google Slides better than PowerPoint for collaboration? It certainly has advantages that make it an ideal choice for a lot of users.
With Google Slides, you can efficiently work with others and share your work , no matter what kind of computer or phone you use. If you have a Google account and the link to the presentation, you can join in and make changes simultaneously with other members.
In contrast, to collaborate in PowerPoint, you have to consider various external factors, such as the user's working device and storage locations. For example, you might not be able to easily collaborate with someone who has an older version of PowerPoint, or with someone using a PowerPoint mobile due to feature limitations. Some things that are restricted in the free web and mobile version compared to PowerPoint on desktop include limited commenting tags, editing options, and more.
Additionally, Google Slides also has built-in chat and commenting features. This feature allows all your team members to stay on the same page and communicate with each other to streamline editing. In PowerPoint, you're limited to comments only.
2. Offline Access
Another important reason for my switch to Google Slides is the offline access feature. With this feature, you can create, edit, and present presentations to others even without an internet connection. Any changes you apply offline are synced automatically once you're back online, so you can keep working even without an internet connection.
You can activate offline access by checking the offline mode option in your Google Drive settings.
Also, with Google Slides, you don't need software installed on your computer to access your presentations offline. However, Microsoft PowerPoint requires an internet connection to save changes to OneDrive storage. No internet, no autosave!
3. Integration With Other Google Tools
Switching to Google Slides is easy if you already use Google apps like Docs, Sheet, Meet, and Gmail. They all work well together. You can import charts and tables from Google Sheets into your presentations with just a few clicks. Any modifications to the original data in Google Sheets will automatically be reflected in your Google Slides presentation.
For example, on Google Slides, open the "Insert" tab and navigate to the "Chart" option. From there, click on the "From Sheets" option and import a chart from Google Sheets.
Furthermore, you can add Google Keep notes to your Slides and share your content in Google Meet with Smart Canvas without switching between tabs.
On the other hand, Microsoft PowerPoint integrates with other Microsoft tools, but it's not as seamless as Google Slides and has limited integration capabilities. For example, unlike Google Sheets, which updates data automatically in Slides, PowerPoint requires you to manual refresh to update Excel charts. This means you need to copy and paste the updated chart from Excel to PowerPoint.
4. More Storage Space
Google Slides offers more storage space through Google Drive. With a Google account, you get 15GB of storage shared across Google Photos, Drive, and Gmail. This is significantly more than what Microsoft offers with its free PowerPoint Web version, which only provides 5GB of OneDrive storage. If you create large presentations with many images or videos, Google's extra storage space can be a significant advantage.
Additionally, Google offers affordable plans to upgrade your storage if needed. For example, you can get 100GB of storage for a $20 annual fee, which is perfect for those who create and store a lot of presentations. However, it's important to note that pricing for additional storage might be different depending on your region.
For detailed information, it's best to check your plans manually by clicking the "Get More Storage" option in Drive.
5. Compatibility With PowerPoint
I know what you're thinking—what if I need to work with someone who only uses Microsoft PowerPoint? Fear not; Google Slides has got you covered. You can import and export PowerPoint presentations into Google Slides, making switching between the two platforms easy.
This feature has been a lifesaver for me when I work with my clients or colleagues who use PowerPoint. I can easily collaborate with them and edit their files without any hassle. After making changes, I can save the Google Slides file again as a PowerPoint file.
You can add your PowerPoint file to Google Slides by either uploading it on Drive or directly opening it from the File > Open option.
6. AI Features
You can also use Google AI tools like Gemini to improve your presentations. For example, the Gemini AI feature in Google Slides allows users to generate images and slides based on their prompts. You can access Gemini from the Slides side panel and input your prompts, such as "Create a slide about," and it will generate slides accordingly.
This feature lets you quickly add relevant and visually appealing presentation content without leaving the Google Slides platform. Using Gemini AI, you can also generate background images in various styles, such as Vector art, Photography, Watercolor, and others.
In contrast, Microsoft AI feature tools like Copilot are not available on the PowerPoint web version. To use Copilot and other AI features in PowerPoint requires a paid subscription to either Microsoft 365 or Copilot Pro.
7. Provide Detailed Version History
Both Google Slides and Microsoft PowerPoint allow you to view and restore previously edited versions of your presentation. However, Google Slides stands out with its detailed version history feature. This feature groups certain versions of your presentation together if you make multiple changes over a short period. This makes it easy to find and select the version you need. These group versions are displayed under the Version History panel.
Another notable feature of Google Slides is the ability to name the modified versions. This is quite useful when working on large documents with multiple collaborators, as it can take time to find the version you want, among many others. To rename a version, open the "Version History" panel, click the three-dot icon, and then select "Name This Version" from the dropdown menu.
Once you've named important versions of your presentation, you can filter them by selecting the "Named Versions" option from the drop menu. This will highlight only the renamed versions, along with the current version of the document, making it easy to locate the version you need.
8. Customization Features and Template Options
The web version of Microsoft PowerPoint has limited features compared to the PowerPoint desktop app, which can sometimes be helpful while designing presentations. For example, you can't insert charts or equations in the web version. Additionally, you can't add hyperlinks to pictures or shapes. On the other hand, you can add equations, charts, and hyperlinks to images in Google Slides.
While both platforms offer a good selection of templates, I prefer Google Slides because its templates are user-friendly and easy to customize. It also provides more flexibility when working with themes compared to the web version of PowerPoint.
Google Slides isn't a flawless tool, but for me and many other presentation creators, it not only gets the job done but also has some advantages over PowerPoint. Whether you're a student, team, or regular user, you can use it to make clear and effective presentations.
COMMENTS
Enter your details, and you are ready to go. To run an existing PowerPoint presentation, simply click on Upload and open and locate the file that you want to run. When the time comes, you can run it in full-screen mode by going to Slide Show > From Beginning or From Current Slide from the top bar.
Yes, you can get Microsoft PowerPoint on a Chromebook. This is possible through the Google Play Store, which allows Chromebook users to access a variety of apps, including Microsoft Office apps such as PowerPoint. With the Google Play Store, you can easily download the PowerPoint app and start creating presentations right away.
After Microsoft 365 is set up on your Chromebook, you can open and edit files found in your Files app. In the corner of your screen, select Launcher . Find and select Files . Open any Powerpoint, Excel, or Word file. You're prompted to move the file to Microsoft OneDrive if it's not there already.
3. Right-click the slide (s) and click Delete Slide. This is in the pop-up menu, underneath Duplicate Slide. On Mac, use a control-click . The selected slide (s) will be deleted. You can also press Del or Backspace on your keyboard to delete slides. To undo this action, press Ctrl + Z (Windows) or Cmd + Z (Mac).
2. Sign in with your Google account. 3. Click "Blank" or "From Template" to create a new presentation or open an existing one. 4. Create or edit your presentation as you would in PowerPoint. 5. When you're ready to present, click "Present" in the top right corner of the screen. 6.
Right-click and select "New Slide.". The slide template will be the same as the slide directly above where you're inserting the new one. Deleting a slide is just as easy. In the Slide Preview pane, right-click the slide you want to delete and then click "Delete Slide.". Alternatively, you could select the desired slide to be deleted and ...
To learn how to open and edit a presentation with Google Slides, visit http://goo.gl/oVd9wc.
Select your slide. You can delete one or more slides at once: Single slide - Right-click and select Delete Slide. Multiple slides - Hold Ctrl and select the slides you want then right-click and select Delete Slide. Sequence of slides - Hold Shift and select a sequence of slides then right-click and select Delete Slide.
1. Open your PowerPoint presentation and right-click (or hold Control as you click) any slide you want to delete in the left sidebar. 2. From the drop-down list that appears, select "Delete" or ...
Right-click and select Duplicate slide. Delete a slide. On your computer, open a presentation in Google Slides. At the left, click the slide you want to delete. If you want to delete multiple slides, hold the Shift key and click them now. Press Delete or Backspace on your keyboard.
1. Open your PowerPoint presentation and right-click (or hold Control as you click) any slide you want to delete in the left sidebar. 2. From the drop-down list that appears, select "Delete" or ...
This can be achieved in the following 2 easy steps mentioned below -. Step-1: "Right-click" and Select the Slide. The first step to deleting a slide on your PowerPoint presentation is to move your cursor on the slide which you want to remove and " Right-click " on it using the mouse of your computer. Step-2: Click the "Delete Slide ...
Alternatively, use the Ctrl+Alt+1 keyboard shortcut . Once in Grid view, select the slide or slides you want to delete by clicking them (hold the Shift key to select multiple slides). Next, simply press the Delete key or right-click any selected slide and then click "Delete" from the context menu. The selected slide or slides will be removed.
Short Answer. To delete Microsoft PowerPoint, open the Start menu and type in Add or Remove Programs. Select Add or Remove Programs from the list of options that appear. Scroll through the list of programs and select Microsoft PowerPoint. Click the Remove button and follow the instructions given.
Below is information on how to use Microsoft PowerPoint on a Chromebook. Open Chrome browser and search for Microsoft 365. Sign into a Microsoft 365 account using your Microsoft Account and select PowerPoint. By logging in to Microsoft 365 using your Microsoft free account, you will only be able to do basic editing on PowerPoint.
With Google Slides in a web browser and your deck open, find the slide you want to delete. Click the slide thumbnail in the pane on the left and then press the Delete key on your keyboard ...
Record Audio feature is available in Windows OS, as a workaround, we request you record the audio in your Chromebook using the Recorder or some other app and insert the recorded audio file into the presentation. In addition, we sincerely suggest you add your feedback in the PowerPoint for Android UserVoice as the related team can take into ...
Create a presentation that plays itself, including transitions and narration.This video shows a brief overview of making a presentation in Google Slides. It ...
Press ← Backspace or Delete. Press this key on your keyboard to delete the selected slide (s). Alternatively, right-click on a selected slide and click Delete. You can also delete your selection by going to Edit > Delete. [1] If you don't want to delete the slide, you can instead skip it and hide it in the presentation.
In this video, Timmy's going to show you how to open a PowerPoint Presentation On A Chromebook.There are several different ways to open a PowerPoint Presenta...
You can enter the presenter view in PowerPoint for Android application by clicking the Presenter View button in the menu above to enter the presenter view. Then you can get you notes and Slide to display like the screenshot below. Best regards, Dihao. -----------------------* Beware of scammers posting fake support numbers here.*.
Method 1: Right-click on the Slide. Method 2: Press the Delete Key. Method 3: Use the "Delete" Option in the Toolbar. How To Delete a Slide on Google Slides App. How To Delete Multiple Slides in Google Slides. How To Hide a Slide in Google Slides. Using the Right-Click Method. Using the "Slide" Menu.
Removing Chromebook Apps. Once you do, you can right-click (or use both fingers on a trackpad) to bring up the context menu. Click "Uninstall" to remove it. To further the point home, there's an icon of a trash can next to it. This method will also work on Android and Linux apps, if you've installed the Linux development environment.
As a reminder, you can delete individual speaker notes easily. Open the presentation notes using the Notes button in the PowerPoint status bar or by clicking "Notes" in the ribbon on the View tab. Go to the slide with the notes that you want to delete, click in the Notes area, and remove the text. You can do this quickly by selecting all of the ...
Here are some reasons why Google Slides is my favorite presentation tool. 1. Ease of Collaboration. Ease of collaboration was the central reason I switched to Google Slides for my presentation needs. As a content creator, I always aim for a seamless collaboration experience while dealing with my clients and team members.