- PRO Courses Guides New Tech Help Pro Expert Videos About wikiHow Pro Upgrade Sign In
- EDIT Edit this Article
- EXPLORE Tech Help Pro About Us Random Article Quizzes Request a New Article Community Dashboard This Or That Game Popular Categories Arts and Entertainment Artwork Books Movies Computers and Electronics Computers Phone Skills Technology Hacks Health Men's Health Mental Health Women's Health Relationships Dating Love Relationship Issues Hobbies and Crafts Crafts Drawing Games Education & Communication Communication Skills Personal Development Studying Personal Care and Style Fashion Hair Care Personal Hygiene Youth Personal Care School Stuff Dating All Categories Arts and Entertainment Finance and Business Home and Garden Relationship Quizzes Cars & Other Vehicles Food and Entertaining Personal Care and Style Sports and Fitness Computers and Electronics Health Pets and Animals Travel Education & Communication Hobbies and Crafts Philosophy and Religion Work World Family Life Holidays and Traditions Relationships Youth
- Browse Articles
- Learn Something New
- Quizzes Hot
- This Or That Game
- Train Your Brain
- Explore More
- Support wikiHow
- About wikiHow
- Log in / Sign up
- Computers and Electronics
- Presentation Software
- PowerPoint Insertions

5 Ways to Embed a Video File in Microsoft PowerPoint
Last Updated: March 27, 2024 Fact Checked
Embedding a Web Video
Embedding a video file, embedding a stock video, using android, linking movie files (powerpoint 2007).
This article was co-authored by Mitch Harris and by wikiHow staff writer, Rain Kengly . Mitch Harris is a Consumer Technology Expert based in the San Francisco Bay Area. Mitch runs his own IT Consulting company called Mitch the Geek, helping individuals and businesses with home office technology, data security, remote support, and cybersecurity compliance. Mitch earned a BS in Psychology, English, and Physics and graduated Cum Laude from Northern Arizona University. This article has been fact-checked, ensuring the accuracy of any cited facts and confirming the authority of its sources. This article has been viewed 1,132,373 times.
If you want to spruce up your PowerPoint presentations, you can add a video to your slides. If you have a video file on your computer, you can easily embed it into your presentation. You can also embed YouTube videos, use looping stock videos, or, on older versions of PowerPoint, link to the videos. This wikiHow will show you how to add a video to Microsoft PowerPoint using your Windows, Mac, or Android device.
Things You Should Know
- Copy a YouTube URL. In PowerPoint, click "Insert' → "Video" → "Online Videos/Movie". Paste the URL and click "Insert".
- To embed a video file, click "Insert" → "Video" → "This Device" → select a file → "Insert".
- To use a stock video, click "Insert" → "Video" → "Stock Videos" → select a video → "Insert".

- You must have a subscription to use Office 365 . [1] X Trustworthy Source Microsoft Support Technical support and product information from Microsoft. Go to source
- Adding a video to your PowerPoint can help you make a great presentation .

- You can insert a video from supported websites such as: YouTube, SlideShare, Vimeo, Microsoft Stream, and Flip.

- On Mac, this will look like Online Movie .

- You'll see a preview of the video.

- To adjust when the video plays, click the drop-down menu next to Start: . Select In Click Sequence , Automatically , or When Clicked On .
- Check the boxes to apply any of the following: Play Full Screen , Hide While Not Playing , Loop until Stopped , and/or Rewind after Playing .
- Click Volume to adjust the video's volume. Select Low , Medium , High , or Mute .

- Select the web video and click the Video Format tab.
- Click Poster Frame on the left of the toolbar.
- Click Image from File… .
- Select From a File , Stock Images , Online Pictures , or From Icons .
- Select the image source from the chosen method, and then click Insert .

- Stock videos work best as a background graphic to your PowerPoint text, since these videos loop seamlessly

- The stock video will be added to your slide. By default, it will cover the entire slide.

- PowerPoint is available for Android in the Google Play Store .

- The menu will open.

- If you want to take a video using your camera, tap Open Camera instead.
- The video file will be added to your PowerPoint.

- Videos can only be "embedded" (included in the presentation file itself) in PowerPoint 2010 or newer.

- Click the Office button and select "Publish."
- Select "Package for CD" and then select your presentation.
- Ensure that "Linked files" is selected in the "Options" menu.
Community Q&A
You Might Also Like

- ↑ https://support.microsoft.com/en-us/office/insert-a-video-from-youtube-or-another-site-8340ec69-4cee-4fe1-ab96-4849154bc6db#OfficeVersion=Windows
- ↑ https://support.microsoft.com/en-us/office/insert-audio-or-video-in-powerpoint-for-android-95e0a2af-35fb-405a-8536-cdcd934f659a
- ↑ https://support.office.com/en-us/article/My-movie-doesn-t-play-190cf574-183d-4b7f-b627-3783a14b7b07?ui=en-US&rs=en-US&ad=US
- ↑ https://support.office.com/en-us/article/Add-and-play-a-movie-in-a-presentation-f3fcbd3e-5f86-4320-8aea-31bff480ed02
About This Article

1. Open the slide. 2. Click Insert . 3. Click Movie . 4. Click Movie from File or Video on my PC . 5. Select the video and click OK . 6. Click Playback . 7. Choose how to play the video. 8. Save your presentation. Did this summary help you? Yes No
- Send fan mail to authors
Reader Success Stories
Rjan Berglund
May 26, 2017
Is this article up to date?

Jun 20, 2017
Nov 7, 2016
Jul 27, 2016

Featured Articles

Trending Articles

Watch Articles

- Terms of Use
- Privacy Policy
- Do Not Sell or Share My Info
- Not Selling Info
wikiHow Tech Help Pro:
Level up your tech skills and stay ahead of the curve

How to Insert a Video in PowerPoint (from a File on Your PC or Shared Drive)

Insert or Embed a Video in a PowerPoint Presentation from a File and Set Playback Options
by Avantix Learning Team | Updated October 9, 2021
Applies to: Microsoft ® PowerPoint ® 2010, 2013, 2016, 2019 and 365 (Windows)
You can insert a video into a PowerPoint presentation from a file on your PC or from a shared drive. Video can help to engage your audience and focus attention. In 2010 and later versions, video files are embedded or copied into PowerPoint by default so video files can increase file size significantly.
Recommended article : How to Compress Video and Audio Media in PowerPoint to Reduce File Size
Do you want to learn more about PowerPoint? Check out our virtual classroom or live classroom PowerPoint courses >
When inserting video in PowerPoint, consider the following:
- PowerPoint 2010 and later versions support common video formats such as WMV (Windows Media Video file), ASF (Windows Media file), MP3 and MP4 (Movie files) and AVI (Windows Video File).
- The default format for PowerPoint 2013 and later versions is MP4.
- In 2010 and later versions, video is embedded by default not linked as in previous versions.
- If you choose to link to a video, it's good practice to copy the video file to the same folder as your presentation before you link. You will not be able to apply certain types of formatting to linked videos.
Note: Buttons and Ribbon tabs may display in a different way (with or without text) depending on your version of PowerPoint, the size of your screen and your Control Panel settings. For PowerPoint 365 users, Ribbon tabs may appear with different names. For example, the Video Tools Playback tab may appear as Video Playback.
Although you can insert a video in Slide Master View, we'll assume here that most of your videos will be inserted on slides in Normal View.
Inserting a video from a file
To insert a video from a file and embed it on a slide:
- In Normal View, navigate to the slide where you want to insert a video.
- Click the Insert tab in the Ribbon.
- Click Video. A drop-down menu appears.
- Depending on your PowerPoint version, choose Video on My Computer, Video on My PC or This Device. A dialog box appears.
- Navigate to the folder where your video is saved and click the video to select it.
- On the bottom right of the dialog box, click Insert to embed the video. You can also double-click it. If you click the drop-down menu beside Insert, you can choose Link to File. If you decide to link rather than embed, you may want to copy your video or movie clip to the same folder as your presentation before you insert it on your slide. PowerPoint will place the video in the center of the slide.
- In Normal View, click the video and then Play on the media controls to play the video.
After you insert a video, two tabs will appear in the Ribbon when you click the video (Video Tools Playback and Format or Video Playback and Format) in Normal View.
Below is the Video Tools Playback tab in the Ribbon with a video selected (this may appear as Video Playback):

Below is the Video Tools Format tab in the Ribbon with a video selected (this may appear as Video Format):

Playing a video automatically or when clicked
You can change the way a video plays when you run a slide show.
To control the way a video plays during a slide show:
- In Normal View, click the video on the slide.
- Click the Video Tools Playback or Video Playback tab in the Ribbon.
- In the Video Options group, beside Start, choose In Click Sequence, When Clicked On or Automatically from the drop-down menu.
If you select When Clicked On, you must click directly on the video when running a slide show.
Playing a video full screen
You can play a video so that it fills the entire screen when you run a slide show. However, depending on the resolution of the original video file, it might appear distorted if the video is lower quality.
Be sure to preview your video so that if the video appears distorted or blurry, you can turn off the full screen option. If you set a video to be displayed full screen and it is also set to start automatically, you can drag the video frame off the slide into the gray work area so that it will not be visible on the slide or flash briefly before the video goes to full screen.
To set a video to play full screen during a slide show:
- In the Video Options group, select the Play Full Screen check box.
Controlling video volume
To control video volume:
- In the Video Options group, click Volume and then choose Low, Medium, High or Mute.
- You can also set the volume of a video by using the volume slider on media controls that appear below the video.
Be sure that volume is turned on through your Control Panel settings on your computer.
Hiding a video when not playing
During a presentation, you can hide a video until you are ready to play it. However, you should create an automatic or triggered animation to start the video or you won't see it play during the slide show.
To hide a video when not playing:
- In the Video Options group, select the Hide While Not Playing check box.
Looping a video
To play a video continuously during a presentation, you can loop the video:
- In the Video Options group, select the Loop until Stopped check box.
Rewinding a video after playing
To rewind a video after playing during your presentation:
- In the Video Options group, select the Rewind after Playing check box.
Showing media controls during a slide show
To show the media controls during your presentation when running a slide show:
- In Normal View, click the Slide Show tab in the Ribbon.
- In the Set up group, select the Show Media Controls check box.
Fading a video in or out
You can start or end your video with a fade effect for a certain number of seconds.
To start or end a video with a fade effect:
- In the Editing group, under Fade Duration, choose or enter a duration for Fade In or Fade Out. To add a timed fade to the beginning of your video, in the Fade In box, click the up and down arrows to increase or decrease the fade in time. To add a timed fade to the end of your video, in the Fade Out box, click the up or down arrows to increase or decrease the fade out time.
Cropping a video
You can also crop a video in PowerPoint to remove specific areas in the video.
To crop a video:
- Click the Video Tools Format or Video Format tab in the Ribbon.
- Click Crop in the Size group.
- Position the pointer over a black cropping handle and drag the handle.
- Click Crop again to finish cropping.
Trimming a video
You can trim video at the beginning and end of each clip so you can start at any point and end the clip earlier. Trimming is different from cropping.
To trim a video clip:
- In the Editing group, click Trim Video. A dialog box appears.
- To trim the beginning of the clip, click the start point (a green marker on the far left). When the pointer becomes a two-headed arrow, drag the arrow to the desired starting position.
- To trim the end of the clip, click the end point (a red marker on the right). When the pointer becomes a two-headed arrow, drag the arrow to the desired ending position.
In this article, we've reviewed inserting video files in PowerPoint presentations from a PC or shared drive, controlling playback during a slide show as well as cropping and trimming. In future articles, we'll look at video formatting techniques and how to export a PowerPoint presentation as a video.
Subscribe to get more articles like this one
Did you find this article helpful? If you would like to receive new articles, join our email list.
More resources
How to Embed a YouTube Video in PowerPoint
How to Highlight Text in PowerPoint (5 Ways)
How to Add Audio in PowerPoint Presentations
A Beginner's Guide to Video Formats in PowerPoint
PowerPoint Keyboard Shortcuts to Play and Control Video During a Slide Show
Related courses
Microsoft PowerPoint: Intermediate / Advanced
Microsoft PowerPoint: Design for Non-Designers
Microsoft PowerPoint: Accessible PowerPoint Presentations
Microsoft PowerPoint: Animations Bootcamp
Microsoft Excel: Intermediate / Advanced
VIEW MORE COURSES >
Our instructor-led courses are delivered in virtual classroom format or at our downtown Toronto location at 18 King Street East, Suite 1400, Toronto, Ontario, Canada (some in-person classroom courses may also be delivered at an alternate downtown Toronto location). Contact us at [email protected] if you'd like to arrange custom instructor-led virtual classroom or onsite training on a date that's convenient for you.
Copyright 2024 Avantix ® Learning
You may also like

How to Insert or Type E with an Accent Mark in PowerPoint (È, É, Ê, Ë, è, é, ê, or ë)
You can insert or type e with an accent mark in PowerPoint using built-in tools or keyboard shortcuts (including Alt code shortcuts). The letter e can be inserted with an accent in both upper or lower case in text boxes or placeholders on slides, the slide master or layouts. The following are common accents in upper or lower case – È, É, Ê, Ë, è, é, ê, or ë.

How to Fade a Picture or Part of a Picture in PowerPoint (Using a Gradient)
You can fade a picture in PowerPoint by drawing a rectangle shape on top of the picture and then filling the rectangle with a gradient from opaque to transparent. This technique is often used to fade an image into the background of a slide. Since the rectangle is placed on top of the image and then text may be placed on top of the rectangle, you may need to reorder the objects.

How to Lock an Image, Shape or Other Object in PowerPoint
You can now lock an image, shape or other object in PowerPoint. Objects can be locked in Normal View or Slide Master View. Only PowerPoint 365 users can lock objects to prevent moving and resizing. This is helpful if you want to select and move other objects on the slide or prevent others from moving or resizing an object. You can lock items using the context menu or the Selection Pane.
Microsoft, the Microsoft logo, Microsoft Office and related Microsoft applications and logos are registered trademarks of Microsoft Corporation in Canada, US and other countries. All other trademarks are the property of the registered owners.
Avantix Learning |18 King Street East, Suite 1400, Toronto, Ontario, Canada M5C 1C4 | Contact us at [email protected]
Our Courses
Avantix Learning courses are offered online in virtual classroom format or as in-person classroom training. Our hands-on, instructor-led courses are available both as public scheduled courses or on demand as a custom training solution.
All Avantix Learning courses include a comprehensive course manual including tips, tricks and shortcuts as well as sample and exercise files.
VIEW COURSES >
Contact us at [email protected] for more information about any of our courses or to arrange custom training.
Privacy Overview
Pin it on pinterest.
- Print Friendly
How to Embed a Video In PowerPoint [2022 User Guide]
- Share on Facebook
- Share on Twitter
By Nikolay Kaloyanov
in How-To Tutorials
2 years ago
Viewed 693 times
Spread the word about this article:

Videos have become a pivotal part of presentations. And not only. All types of content rely on videos – regardless if they are informational, educational, or sales content. According to Invideo ,
The average person is about to watch around 100 minutes of video content PER DAY in 2022.
This piece of stats only adds to the fact that people around the world embrace video content more and more, and will prefer it over text. In this article, we will show you how to embed a video in PowerPoint, so you can grab your audience’s attention and make them rate your presentation.
Article overview: 1. Why insert a video in PowerPoint? 2. How to embed a video in PowerPoint? 3. How to edit a video in PowerPoint?
1. Why insert a video in PowerPoint?
Before we show you how to embed videos in PowerPoint, we need to start with the reasons why you should add videos to your PowerPoint presentation.
✔️Reason #1 – People hate boring presentations
79% of people say they find most presentations boring. If you insert video content in your PowerPoint presentations, there’s no guarantee your presentation will be more likable. But you’ll certainly increase your chances to stand out.
✔️Reason #2 – Short attention span
Distractions are one major problem for presenters. Over the years, the average attention span has shrunk to just 8 seconds. Apart from the best practices to start and end a presentation , you can also keep your audience hooked when you embed videos in PowerPoint.
✔️Reason #3 – People absorb video content better
Your end goal is to convey your message no matter what your presentation is about. According to stats, audiences only retain 10% of the information they’ve seen in a text, compared to 95% in videos . If Google’s CEO Sundar Pichai can give up on bulk texts and bullet points, what stops you from following his presenting style?
2. How to embed a video in PowerPoint?
In 2022, a PowerPoint presentation can be a powerful tool that can impress audiences and sell great ideas. That’s why Microsoft has ensured they are in line with the recent digital marketing trends .
There are not one but three ways to insert videos in PowerPoint ! We will cover all of them in our tutorial.
2.1. How to insert a video into PowerPoint from my computer?
When to use : If you have your own videos to share in the presentation.
The best thing about adding videos in PowerPoint is that there is a dedicated menu. And in case some steps seem familiar, don’t get surprised.
Our first option is computer imports. Let’s see how to add a video from a PC or Mac.

Step 2 : Pick Video , and then go to This computer – the first option.

Step 3 : Select a file of your choice and then click Insert .

2.2. How to embed a stock video in PowerPoint?
Stock videos are great options for corporate presentations. Paired with some great PowerPoint templates for download , you can capture the attention of your audience. You have over 20 categories to choose from and if you prefer, you can use the search bar to find what you need. While there isn’t much of a choice compared to YouTube and Vimeo (which we will discuss later), picking stock videos ensures you won’t have copyright issues with your presentations.
Let’s see how to insert a stock video in PowerPoint.
Step 1 : Select Insert from the menu ribbon (this step is the same).
Step 2 : Pick Video , and then go to Stock Videos – the second option.

Step 3 : Choose which video you want to select and then press Insert .

2.3. How to embed a third-party video in PowerPoint?
Without a doubt, most people ask how to embed a YouTube video in PowerPoint, as this is the best place to find video resources. But you can not only embed a video from YouTube in PowerPoint, you can also insert one from other platforms like Vimeo, Slideshare, Stream, and Flipgrid. All you need to do is just copy the address of the video URL and paste it into the search bar. Let’s see how to do so.
Step 2 : Pick Video , and then go to Online Videos – the third option.

Step 3 : Copy the video URL and paste it into the search bar.

Step 4 : When the video preview appears, click Insert .

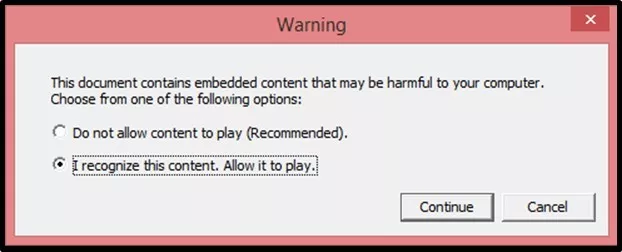
N.B. Embedding a video from an online source – WARNING⚠️
We need to warn you that adding videos to PowerPoint from online sources may affect the Video Format and Playback options. Also, embedding through the Web will cause a delay in loading time. I’ve personally found out that on average, a YouTube video embedded in PowerPoint starts playing in 5-6 seconds at least.
I ran an experiment where I added one Graphic Mama’s video from my computer, and it loaded instantly. It also didn’t have any formatting and playback issues. In conclusion, it may be best if you find a way to download your desired videos and upload them directly from your PC/Mac.

3. How to edit a video in PowerPoint?
If you learned how to upload a video in PowerPoint using these three methods mentioned above, that’s great. You have already made a lot of progress to satisfy your audience and meet your presentation goals. But your task doesn’t end here (unfortunately). You need to plan how your video will look and sound. Positioning your video, trimming unnecessary parts of it, etc., are all important things to consider.
Let’s see how to modify your PowerPoint videos so that they look great and add that “extra touch of finesse” to your slides.
3.1. How to format a video in PowerPoint?
Without a doubt, you need to check all the boxes when you upload your videos into PowerPoint. And the first thing to do is check your video format. Microsoft has added a lot of functions so that you can further customize the video experience for your audience.
Video Format Menu

As you can see, you can adjust the video, apply some video style, test it for accessibility, arrange it in the slide, and select its size. Let’s start.
3.1.1. How to apply visual color corrections?
Visual Corrections Presets

If you want to modify your contrast and exposure, you can use 25 pre-made color combinations between +40% and -40% brightness and contrast.
Visual Corrections Extended Menu

In case none of the presets delights you, you can manually adjust the brightness and contrast with 1% stops and values beyond +/- 40%.
3.1.2. Video Recolor
Sometimes, the video isn’t in your brand colors or you wish to make it more playful. The video recolor tool gives you just that – it applies a dramatic change to your video colors, in order to fit the Powerpoint templates colors or simply add some color punch. You’re left with three options: to pick something from the default options (21), choose a custom recolor variation, or check the video color options which are also found in Format Video Menu on the right (check Visual Corrections Extended Menu image).

3.1.3. Choosing Video Styles
Of course, choosing the right video style is important. It will be a decisive factor in measuring how well your audience will respond to the video. Picking one of the templates is okay but if you put some effort into choosing a video shape , video border , and video effects , you will notice a big difference.

Video Shape
Video Shapes can make your videos a ton better. The standard square format can be tweaked and if you add some imagination, you can end up with superb interactive elements – like arrows, comment boxes, etc.

Video Border
Video borders are very useful. They can outline the video, putting the focus on it, and the most important thing – separate the video from the background, especially if they are in similar colors.

Video Effects
Video effects are your playground. But seriously – these effects can make your embedded video stand out by adding some shadows, soft edges, glow effect, or simply giving it a smooth 3D look that will grab the audience.

3.1.4. Video Accessibility, Arrangement, and Dimensions
We decided to combine all these three under one section, as these are some of the standard options that don’t need much explanation. Alt text is for people with visual impairment or if the resource doesn’t load due to a slow Internet connection. Typically, you need between 1-2 sentences to explain what is in the video. When you click on Alt text, a dialog box with instructions will appear on the right.

The Arrange and Size options are related to where the video is positioned and how much space it will occupy from the slide. With Arrange , you can place the video anywhere on the slide, as well as rotate it, bring it back and forwards, and align it.
The Size tools allow you to scale the video up and down, crop it, and by default – lock the aspect ratio. To manage the alignment and size at the same time (as these two settings go well together), there is a special dedicated menu that you can access by clicking on the small arrow (check the cursor).

3.2. How to manage Video Playback in PowerPoint?
Learning how to embed a video in PowerPoint is important but just as crucial is the way you play the video – which parts are you going to show, which effects you will add, and decide if you will add or skip adding captions. All these things can make a difference.
3.2.1. How to add bookmarks to your video in PowerPoint?
You have probably seen plenty of YouTube videos where you can find bookmarks when new important parts of the videos start. The same applies here. You can add and remove bookmarks, so as to separate the different parts of your video.
3.2.2. Editing options
In the Editing section of the Playback menu, you can choose if you want to trim your video or add Fade In/Fade Out effects, and the duration of the latter. Below, you can see how to trim a video in PowerPoint – you can select the start and the end of it, so your audience will see the most important details only.

3.2.3. Video Options
In the Video Options , you will find several tools that you can work with.
- Volume – starting with video volume, it’s pretty straightforward what this means. You have 3 modes /low, medium, high/ + mute.
- Start – you have three options: Automatically /by default/, In Click Sequence , and When Clicked On .
- Play Fullscreen – when the video is on, it will be displayed throughout the whole slide.
- Hide While Not Playing – if the video is not playing, it will not be accessible.
- Loop until Stopped – after the video ends, it will automatically start from the beginning if you don’t stop it manually.
- Rewind after Playing – once the video is played through the end, it will display the first frame and stop.

3.2.4 Insert Captions
If your video has a voiceover, you may need to add captions to make it more understandable for an audience with hearing impairment or people sitting too far from you. The captions have to be uploaded from your computer.
Learning how to embed videos in PowerPoint is crucial for your presentation success. You will get access to a whole new world. But don’t forget about formatting. Some basic video editing can make your videos even more engaging.
If you found this article helpful, why don’t you check some of our other PowerPoint-related tutorials:
- Adding Audio to PowerPoint: The Quick Step-by-Step Guide
- How to Insert GIFs into PowerPoint: The Quick Step-by-Step Guide
- How to Get Started with PowerPoint in 2022

Add some character to your visuals
Cartoon Characters, Design Bundles, Illustrations, Backgrounds and more...
Like us on Facebook
Subscribe to our newsletter
Be the first to know what’s new in the world of graphic design and illustrations.
- [email protected]
Browse High Quality Vector Graphics
E.g.: businessman, lion, girl…
Related Articles
How to do a hanging indent in google slides in a few steps, how to create table of contents in powerpoint: ultimate guide, how to add fonts to google slides [quick guide], streaming on twitch with adobe character animator, how to make cartoon animation like ted-ed, enjoyed this article.
Don’t forget to share!
- Comments (0)
Nikolay Kaloyanov
Nikolay is a copywriter with vast experience in Technology, Marketing, and Design. When he isn't playing with words and crafting texts, he watches sports and asks questions. He is a funny person...until you put him on a diet.

Thousands of vector graphics for your projects.
Hey! You made it all the way to the bottom!
Here are some other articles we think you may like:

How-To Tutorials
22 common design mistakes and how to avoid them.
by Bilyana Nikolaeva

20 Sketch Tutorials To Master the UX Design Software
by Nikolay Kaloyanov

Top 16 Tutorials to Learn Adobe Character Animator [2022]
by Lyudmil Enchev
Looking for Design Bundles or Cartoon Characters?
A source of high-quality vector graphics offering a huge variety of premade character designs, graphic design bundles, Adobe Character Animator puppets, and more.
How-To Geek
How to embed a youtube video in powerpoint.
During a presentation, a mix of media always performs best.
Quick Links
Finding a youtube video’s embed code, embedding a youtube video in powerpoint, searching the youtube video in powerpoint.
During a presentation, a mix of media always performs best. Using images, graphs, charts, and videos not only makes your presentation more informative but also more engaging for the audience. If you have a YouTube video you’d like to use during your presentation, it’s as simple as embedding it in a slide. Here’s how.
Rather than linking to a YouTube video in your presentation, embedding it in the slide is usually the better option. It gives your presentation a more professional look because you won't be leaving your slide to pop open the YouTube website. Keep in mind, though, that even with the video embedded in your presentation, you’ll still need to be connected to the internet to play the video.
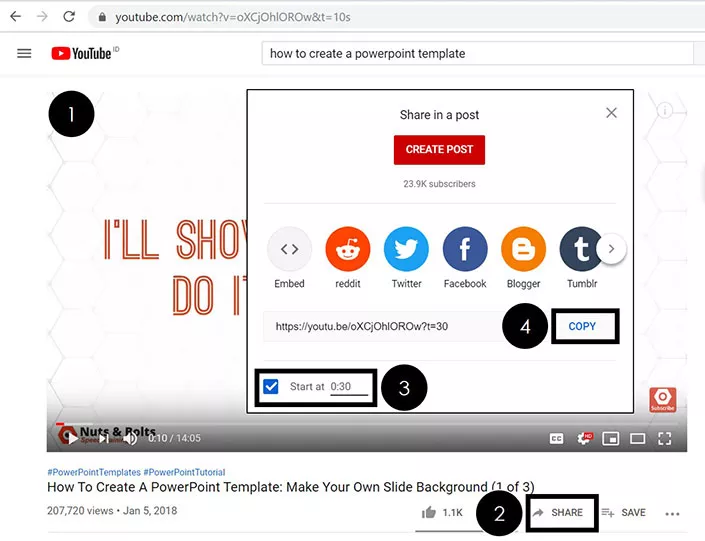
First, head over to YouTube and find the video you want to embed. Once you’re there, select the “Share” option, which you'll find in the video description.
A window will appear, giving you a few different vehicles for sharing the video. Go ahead and click the “Embed” option in the “Share a link” section.
Another window will appear, providing the embed code along with a few other options. If you wanting to start the video at a particular time, select the “Start at” box and enter the time when you’d like the video to start. Additionally, you can select whether you’d like to player controls to appear and if you want to enable privacy-enhanced mode.
Note: Privacy-enhanced mode keeps YouTube from storing information about visitors that visit your website that the video is embedded on unless they play the video. Since we will be using the embed code in a PowerPoint presentation, this option is not necessary.
Select “Copy” at the bottom right of the window to copy the embed code to your clipboard. Alternatively, select the code and use the Ctrl+C shortcut.
We’re finished with YouTube, for now, so head on over to PowerPoint and open your presentation.
Select the slide where you want to embed the YouTube video. On the “Insert” tab, click the “Video” button.
On the drop-down menu, select the “Online Video” option.
The Insert Video window that appears lets you search YouTube for a video or paste in that embed code you copied from the YouTube website. Paste the embed code and click the arrow to complete the action.
Your video will now appear in the presentation. To resize the video, click and drag the corners.
Note that at first, the video will appear as a black rectangle. Don’t worry---this is normal. Simply right-click the video and then select “Preview.”
This will give you a quick preview of how the video will look during your presentation.
You can also search for a YouTube video from that Insert Video window in PowerPoint. Type in your search terms and then click the search icon.
Several options will appear---888,341 in the case of the Rick Astley’s Never Gonna Give You Up video for which we searched. Select the one you want to use.
Then select “Insert” at the bottom-right of the window.
That’s all there is to it. Generally, we recommend searching the actual YouTube website and using the embed code the way we described earlier---mostly because the site is much easier to search and you can watch the videos before selecting the one you want. Still, if you know exactly what you're after, this method might work fine for you.

- Explainer Videos
- How To Videos
- Whiteboard Animation
- Educational Videos
- Commercial Videos
- Social Media Videos
- Animated Video Series
- Internal Videos
- Product Videos
- Music Videos
- Interactive Video Production
- Animated Videos for Education
- Finance Explainer Videos
- Healthcare Explainer Videos
- Manufacturing and Logistics
- Music Industry
- Products and Retail Videos
- Professional Services Videos
- Tech Industry Explainer Videos
- Real Estate Explainer Videos
- How We Work
- Explainer Video Types
- Top 10 Explainer Video Companies
- Top 10 Best Whiteboard Animation Companies
- Top 10 Best Explainer Videos 2024
- Top 10 Company Explainer Videos
- Top 10 Best Product Explainer Video Examples
- Top 10 Best Real Estate Explainer Videos
- Top 10 Animated Music Videos 2022
- Top 10 Free Sound Effects Websites
- The Revisions Process
- Terms and Conditions
Embed Videos in PowerPoint: Easy Step-by-Step Guide

Table of Contents
Are you looking for a way to make your business presentations stand out? Adding videos or short clips isn’t just an eye-catching trick – it can also help get your message across in ways that speaking alone can’t.
Luckily, there are several easy methods to embed video into Microsoft Powerpoint . In this blog post, we will discuss how anyone with basic tech literacy knowledge can embed video into their business presentation slides with minimal effort and cost.
K eep reading if you want to learn how to quickly, easily, and effectively add a bit of flair and pizzazz while giving your professional presentations the added punch they need!
Embedding Video in Microsoft Powerpoint Essential Steps
Embedding a video in Microsoft Powerpoint is a great way to make your presentation more engaging and interactive. Whether you want to demonstrate a concept with an explainer video or show off a marketing video , or just add some visual interest to your slides, embedding videos into Powerpoint can help you get your point across. Here’s how to do it:
1. Find the Video You Want to Use
There are several sources for videos that you can use in Powerpoint presentations. YouTube, TikTok, Instagram are but a few are two of the most popular options; both offer free content that you can easily access and copy for use in your presentation. If you’re looking for other types of video material—such as stock footage or commercial clips—you’ll need to purchase them from a licensed provider.
2. Copy the Video’s Embed Code
Once you’ve found your video, copy the embed code that is provided. On YouTube ( see below on youtube video) and Vimeo, this will usually be located in the share or embed section of the page. The code should start with “ <iframe> ” and end with “ </iframe> ,” and will include all of the information needed to embed the video into your presentation.
3. Open Your Powerpoint Presentation
Open Microsoft Powerpoint and open up the presentation where you would like to add the video clip. Select one of your slides; this will be where we’ll paste the embed code later on.
4. Insert an Object Into Your Presentation
Go to the Insert tab at the top of your screen, and select Object . This will bring up a window that lets you insert objects into your presentation; find the “ Create from File ” option, and paste in the embed code you copied earlier.
5. Make Adjustments To Your Video
Once you’ve inserted your video into Powerpoint, you can make changes as necessary to fit it within the parameters of your presentation. You can resize or move the video around on your slide, or adjust its playback options to control when it starts and stops playing during your presentation.
And that’s all there is to it! Embedding a video in Microsoft Powerpoint is a great way to add visual interest and engage your audience. Just remember to keep an eye on any copyright restrictions that may apply to the video content you use, and make sure you always have permission before using it in your presentation!
How to Embed a Youtube Video in Powerpoint Step by Step

Embedding a YouTube video in PowerPoint can add an extra level of impact to your presentation. Not only is it easy to do, but having the video right inside the presentation gives you control over how and when the audience sees it. Here are some simple step-by-step instructions on how to embed a YouTube video into PowerPoint.
1. Log in to your YouTube account and go to the page with the video you want to use in your presentation.
2. Click “Share” underneath the video , then click “Embed” from the options below that appear.
3. Copy the code for embedding by clicking inside of it and pressing Control + C (or Command + C on a Mac).
4. Open the PowerPoint presentation that you wish to embed the video in and switch to “Slide Show” mode by clicking on the button in the bottom right corner of your screen.
5. Select the slide where you want the video to appear, then click “Insert” at the top of your toolbar.
6. Click “Video”, then select “Online Video ” from the options that will appear below it.
7. Paste (Control + V or Command + V) your embed code into the box provided and click OK when it is done processing.
8. Your YouTube video should now be embedded into your presentation. Test it by clicking on the video thumbnail that should now appear in the middle of your slide and see if it plays correctly.
And there you have it! You’ve successfully embedded a YouTube video into PowerPoint. Keep these steps handy for any future presentations you may give and you’ll be able to easily add engaging visuals with ease every time. Happy presenting!
With these simple steps, you’re well on your way to mastering the art of embedding YouTube videos into Powerpoint presentations . Just follow the instructions outlined above and you’ll have a professional-looking presentation in no time.

How to Embed a TIKTOK Video in Powerpoint Step by Step

Embedding a TikTok video in Powerpoint is an easy way to add fun and interest to your presentations. Whether for personal or professional use, you can use the video-sharing platform’s vast library of content to make your presentation stand out. Here’s how to do it.
Step 1: Open Microsoft Powerpoint
Open Microsoft Powerpoint and create a new slide, selecting either “Blank Slide” or one of the many pre-made style templates that come with it. If you already have an existing slide deck, simply add a new blank slide to it.
Step 2: Insert Video from Online Source
From the top menu bar, select “ Insert ” and then “ Video ”. A drop-down menu will appear with the option for “ Online Video ”. Select it, and a new window will open prompting you to search for an online video source.
Step 3: Find Your TikTok Video
Type in your keyword or phrase into the search bar of the new window that opened in Step 2, and click on the magnifying glass icon to initiate your search. Find the video you want to embed from among the results, and select it by clicking on its thumbnail image.
Step 4: Embed Your TikTok Video
Once you have found your desired video, click “ Insert ” at the bottom right corner of the window. This will embed the video into your slide, and you can reposition or resize it to fit your presentation’s design.
You can also add additional features such as audio or captions if desired , by selecting the “ Playback ” tab from the top menu bar and customizing them for your needs.
And there you have it! By following these steps, you now know how to embed a TikTok video into Microsoft Powerpoint . With this new skill, you can make your presentations more engaging and visually stimulating than ever before!
How to Embed an Instagram Video in Powerpoint Step by Step

Embedding an Instagram video in Powerpoint can be a great way to add visual interest to your presentation . Whether you’re creating a slideshow for school, business, or personal use, embedding social media videos into your slides will make them more engaging and interactive for your audience. In this article, we’ll show you how to quickly and easily embed an Instagram video into PowerPoint step by step.
1. Visit the Video You Want to Embed
You’ll need the URL of the Instagram post to begin the process of embedding it in PowerPoint. Go to the post you want to embed and copy its URL from the address bar at the top of your browser window. Make sure it is a video post and not an image.
2. Open PowerPoint and Select the Slide You Want to Embed Into
Open your presentation in PowerPoint, select the slide you want to add the Instagram video to, and click “ Insert ” on the menu bar.
3. Select “Object” from Insert Menu Options
In the drop-down menu that appears, choose “ Object ”. This will bring up another window with a variety of options for inserting objects into your slides.
4. Choose “Create from File” Option
Scroll down until you see the option for “ Create from File ” and then click it to open a file browser window where you can find the Instagram video you want to embed. Paste the URL of the video into the search box at the top of the window and click “ Browse ”.
5. Select Video from Search Results
The video should appear in the search results below. Click it to select it and then press “ OK ” to insert it into your slide in PowerPoint. You will now be able to play, pause, and even edit your embedded Instagram video within your presentation!
By following these simple steps, you’ll be able to quickly and easily embed any Instagram video into your PowerPoint presentation for a more interactive experience that is sure to engage your audience.
Whether you’re creating slideshows for school or work , embedding social media videos is an easy and effective way to make your presentation more compelling.

That’s all there is to embedding a video in Powerpoint! It’s actually a very easy process, but it can make your presentations look much more professional and engaging . If you have any questions or run into any problems while trying this out yourself, don’t hesitate to contact us for help.
We would be happy to walk you through the steps or even do it for you! Thanks for reading, and we hope you find this information useful.
Q1: Why should I embed videos in my PowerPoint presentations?
A1: Embedding videos adds dynamic content, enhancing engagement and clarity. It’s an effective way to convey information and make your presentations more captivating.
Q2: What types of videos can be embedded in PowerPoint?
A2: PowerPoint supports a variety of video formats, including MP4, WMV, and AVI. Ensure your video is in a compatible format for seamless embedding.
Q3: Is it possible to embed videos from online platforms like YouTube or Vimeo?
A3: Yes! You can embed online videos by using the ‘Online Video’ feature in PowerPoint. This allows you to seamlessly integrate videos from popular platforms into your presentation.
Q4: Are there size limitations for embedded videos in PowerPoint?
A4: While PowerPoint doesn’t have strict size limitations, it’s advisable to optimize videos for smoother playback. Large files may affect presentation performance.
Q5: Can I customize the playback settings for embedded videos?
A5: Absolutely! PowerPoint offers playback customization options. You can set the video to play automatically, loop, or trigger on click, giving you control over the viewer experience.
Q6: How can I ensure the embedded video plays smoothly during a presentation?
A6: To ensure smooth playback, save your PowerPoint file and the video in the same folder. This avoids broken links and ensures the video plays seamlessly, even if you move the presentation.
Q7: Will the embedded video play on any computer?
A7: As long as the computer has PowerPoint installed and supports the video format, it should play. Consider using widely compatible formats for broader accessibility.
Q8: Can I edit the embedded video directly within PowerPoint?
A8: PowerPoint provides basic video editing tools, such as trimming and fading. For extensive edits, it’s recommended to use video editing software before embedding.
Q9: How can I share a PowerPoint presentation with embedded videos?
A9: When sharing the presentation, ensure the video file is included or share it in a format that retains the embedded video, such as a PowerPoint file or a video-supported format.
Q10: What should I do if the embedded video is not playing during the presentation?
A10: Check the video format, file path, and ensure the computer has the necessary codecs. If issues persist, consider converting the video to a more compatible format.
Article by Nicole Delgado 2022 | Marketing Manager | Explainer Video Company | Animated Explainer Video Production
Privacy Preference Center
Privacy preferences.
Critical PowerPoint Shortcuts – Claim Your FREE Training Module and Get Your Time Back!
How to Embed a YouTube Video in PowerPoint (Step-by-Step)
- PowerPoint Tutorials
- Pictures, Icons, Videos, Etc.
- February 25, 2015
This is your SUPER GUIDE for how to embed a YouTube video in PowerPoint, covering all versions of PowerPoint (find your version below).
Adding videos to your presentations is a great way to create more engaging content and backup your main points with PROOF.
Before you get started embedding your video though, there are 3 considerations to take into account
Note: You are limited to what you can do with online videos in PowerPoint, compared to videos you embed from your computer. To learn all about these differences, read our guide
YouTube Video Considerations
1. which version of powerpoint you are using.
There are various techniques for the different versions of PowerPoint and add-ins you can install to make this process (and your life) easier.
The guide below covers PowerPoint versions 2007, 2010, 2013 and the latest Office 365 version of PowerPoint.
2. Do you want the YouTube video’s entire playlist on your slide?
If so, you need to navigate to your video through the YouTube channel’s playlist, which drove me crazy when I was trying to figure this out.
Also, inserting a playlist isn’t available in PowerPoint 2007.
3. Do you need to trim your YouTube video?
If you want to take advantage of all the PowerPoint video editing features, you will need to find a way to download your YouTube video and embed it in PowerPoint.
That’s because the FULL range of PowerPoint video editing tools is only available for videos you directly embed into PowerPoint from your computer.
To see everything you can do with videos embedded directly from your computer (instead of from an online source like YouTube), read our guide here .
PowerPoint 2019 (Office 365) Embed a YouTube Video
1. find your youtube video’s proper url.

To find the right URL for your YouTube video to embed into PowerPoint, follow these steps:
- Navigate to YouTube.com
- Use the Search Bar to find your video
- Select your video to open the YouTube Player
- Click Share at the bottom of the video player
- Click Copy
The same is true if you are using an online video from another source.
You want to make sure you use the Share button (or similar feature) to get the proper URL for your video before you embed it into PowerPoint.
Otherwise it might not play properly, as discussed below.
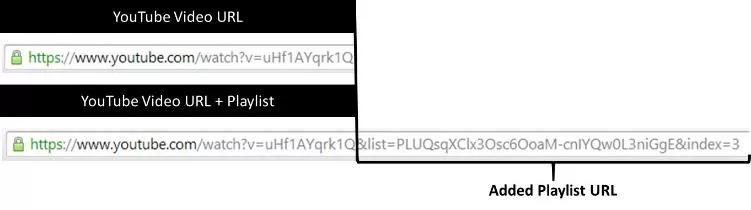
WARNING: Get the right YouTube URL
You want to make sure you copy your video’s URL using the share button. DO NOT use the URL from your web browser.
That’s because the URL in your web browser tends to start where you last left off in the video and not at the beginning of the video.

In the picture above this is reflected in the URL with T=60s. This means the video will start 60 seconds into the video, and not from the beginning.
This can lead to an embarrassing presentation, where you play the video at the punchline that you want to make instead of the full video that leads up to the punch line.
2. Embed your YouTube video into PowerPoint

To embed a YouTube video in PowerPoint, simply:
- Navigate to the Insert tab
- Select the Video drop down (within the Media group)
- Choose Online Video
- Where it says Enter the URL for the Online Video , Paste in (Ctrl + V) your URL
- Click Insert
Clicking Insert , a message at the bottom of your screen will tell you the video is processing. Once it’s done, the video appears on your slide as you can see below

How to trim a YouTube video
Keeping in mind that you are limited in what you can do with online videos in PowerPoint (like YouTube videos), you can adjust the start time of your YouTube video.
This allows you to start your YouTube video at a certain time within the video, so you can just show the most relevant part of the video that backs up your presentation.
The trick to doing this is to adjust it BEFORE you copy the YouTube video’s URL.
If you want to trim both the start and end times of your video, you’ll need to download the YouTube video, embed the video from your PC and then use the Trim command.
To learn how to embed a video in PowerPoint (including trimming the video’s length), read our guide here .
To trim a YouTube video to a certain start time, simply:
- Open your YouTube video’s watch page
- Click the Share button
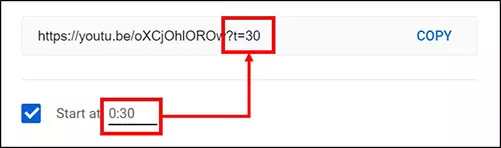
- Adjust the video’s Start at time
Adjusting the YouTube video’s start time, you’ll see the new start time reflected in the URL, as pictured below.
PowerPoint 2013: Embed a YouTube video in PowerPoint
There are two ways to embed YouTube videos in PowerPoint 2013: the new dedicated YouTube option in PowerPoint, and the old embed code method.
Warning: New YouTube Option
Although the new YouTube option in PowerPoint simplifies the embedding process…you DO lose the capability to format your YouTube videos and/or embed an entire YouTube playlist.
To format the appearance of the YouTube video in PowerPoint 2013 or to grab a playlist, you still need to use the old embed code method (the second method).
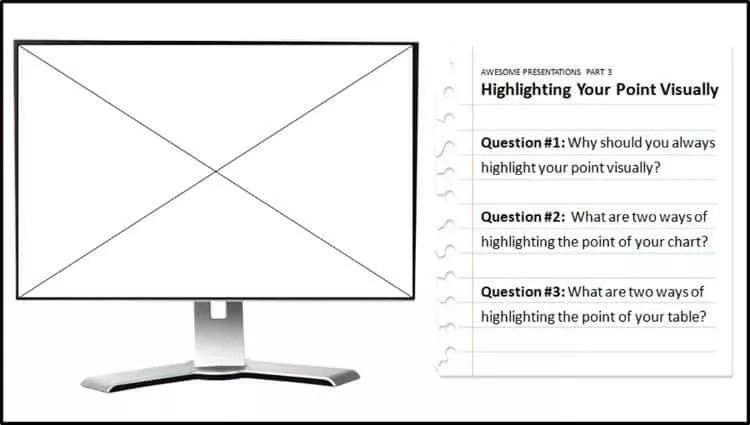
I’ve covered both methods in the tutorials below. You’ll notice I used an image of a computer screen to frame the video and create a cool effect…just another tip for making your videos come to life!
There are two methods for adding YouTube videos in PowerPoint:
Method #1 – The dedicated YouTube option (simplest but least flexible)
Method #2 – Using the embed code (most flexible)
Although the words ‘embed code’ wig most people out, rest assured that you don’t need to know ANYTHING about coding to pull the second method off…YouTube does all of the hard work for you
Method #1: Dedicated YouTube option
1. search the youtube dialog box.

Within the online video dialog box, go to the YouTube search box and type the name of the video you are searching for (in this case I’ve typed ‘breaking up your bullet points’), and then hit Enter.
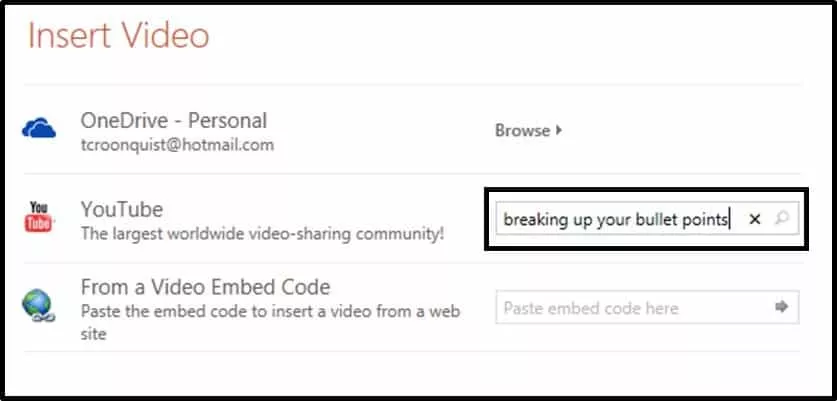
The dialog box searches YouTube and displays the video results. In this case the video we want is on the far left so I will select it and hit Insert.

2. Resize the YouTube video to fit your screen
Note: If you are using an image like I am, you want to extend the YouTube video until its controls cover up the bottom of the picture…which will make it look more realistic.
With the video setup, double-click the embedded YouTube video to load the video and see what it looks like.

What about the playlist and other formatting options?
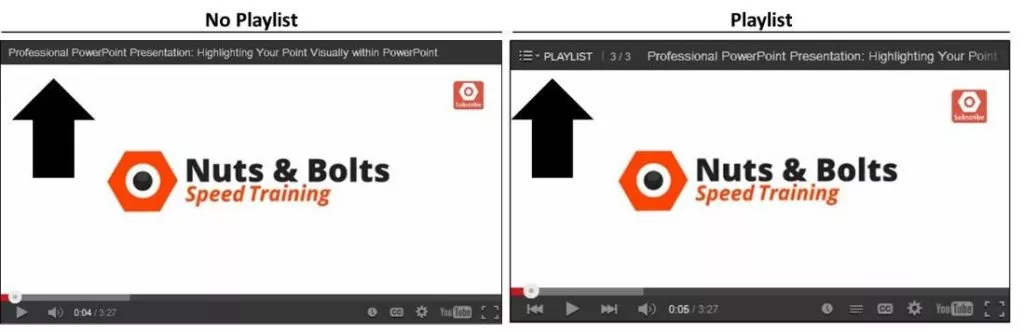
Although this new YouTube embedding method is EXTREMELY fast and easy, notice that you are not given any options to remove the YouTube controls (on the bottom or the top of the video) and there was no option to include the entire YouTube playlist (assuming there is one associated with that video).
You can see the difference in this picture:
For more control over these additional features, you need to know how to embed a YouTube video using the embed code method, which is SUPER straightforward and easy…continue reading on to see how.
Method #2: Using the embed code
This technique not only works for embedding a YouTube playlist into your presentation, but will also work for embedding other online videos into your presentation.
1. Navigate to your YouTube video through the channel playlist
Assuming that you want a video’s entire playlist, you need to navigate to the channel where the playlist exists, and open the video through the playlist. If you don’t care about the playlist, simply search YouTube as you normally would.
This might seem SUPER weird, but as you will see in a minute, it works.
To get the playlist for this video, you can see that I’ve navigated to the Nuts & Bolts channel page (fancy that!), selected the playlists option, found my playlist and then found the video that I want within the playlist.
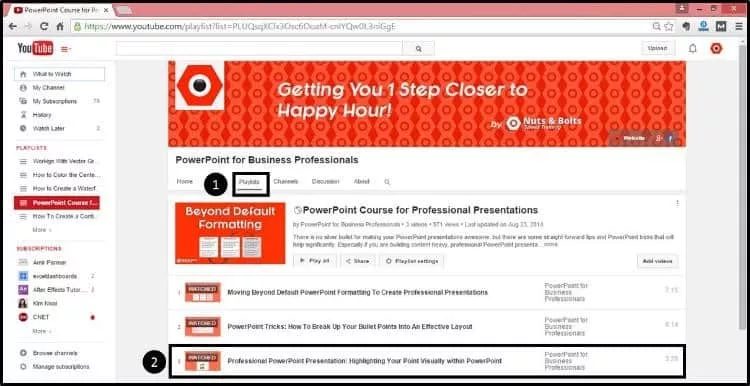
Select the video (through the playlist) to open the video in YouTube as you normally would. Notice in the picture below, to the right of the video, you can see the entire playlist.

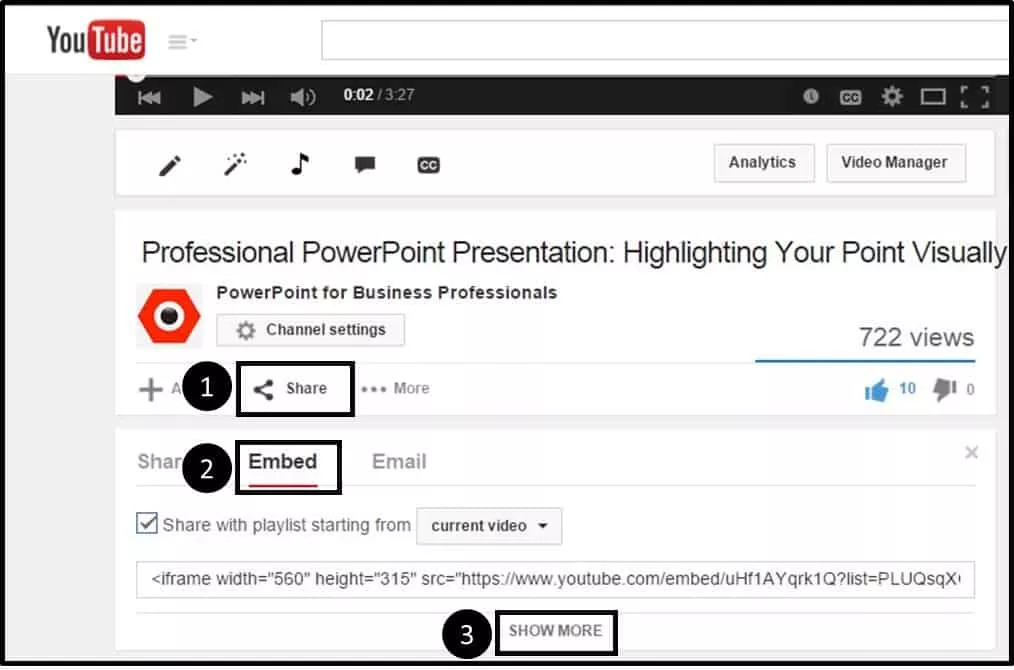
2. Navigate to the embed code
3. Choose how you want your video to play
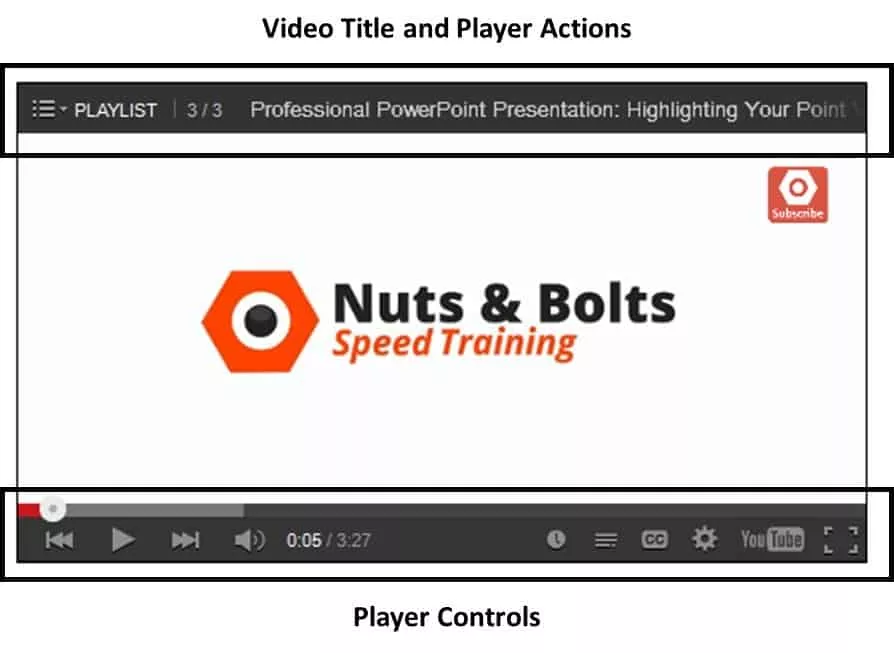
When embedding a YouTube video in PowerPoint 2013, there are few options you want to pay attention to, primarily:

Option #1: Show Player Controls – This includes the pause, play and other navigational features at the bottom of the YouTube video.
Option #2: Show Video Title and Player Actions – This includes the tile of the video, share buttons on the far right and a playlist dropdown…assuming the video is part of a playlist and you navigated to it through the playlist itself.
Leaving these selected, the YouTube video will play in PowerPoint as demonstrated below.
If you uncheck both of these options, your YouTube video will play in your PowerPoint presentation as pictured below (you can obviously do a hybrid of these controls as well).

Other video options include:
Video size – Not terribly important as you can manually resize your video within PowerPoint anyway.
Show suggested videos when the video finishes – This is optional and depends on whether you want people to continue watching other videos once the video finishes. This option is not available if you navigate to the video through the playlist as I described above.
Enable privacy – Enhanced mode – This last option is only relevant if you are embedding the YouTube video on a website…choosing this option will not work in PowerPoint.
4. Copy and Paste the Embed Code

Alternatively, you can simply right-click the video, select ‘Get embed code’ and then hit CTRL + C to copy.

With the embed code copied, back in PowerPoint 2013, navigate to the Insert tab, open the Insert Video dropdown and select Online Video.

In the dialog box that pops open, in the ‘From a Video Embed Code’ option, hit CTRL + V on your keyboard to paste the embed code into the dialog box and then hit Enter.
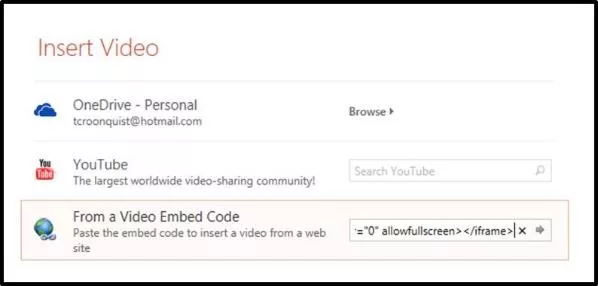
A black box is inserted into your layout that you now want to resize and position.
If you are using a blank TV or computer monitor image (as I am in this example) you want to stretch the video down to cover the bottom of the monitor so that the YouTube controls cover the controls on the static image…it will look more realistic this way.

Note: Going this route has given us more control over the look and feel of our YouTube video and we were able to get the playlist feature in the upper left-hand corner.
PowerPoint 2010: Embed a YouTube video in PowerPoint
Believe it or not, there are three ways to embed YouTube videos in PowerPoint 2010:
- The free add-in (see Method #1 on the PowerPoint 2007 tab)
- Using the Shock Wave ActiveX Control (see Method #2 on the PowerPoint 2007 tab)
- Using the dedicated YouTube embed option
In this tutorial, I will focus on the third and newest method, which is a HUGE improvement over the previous methods: using the dedicated YouTube embed code option.
This method gives you the most flexibility in formatting your YouTube video in PowerPoint AND it allows you to embed an entire playlist…something that was not possible in PowerPoint 2007.
For the tutorial, I used an image of a computer screen to frame the video and create a cool effect…just another tip for making your videos come to life!
1. Find your YouTube video

When embedding a YouTube video in PowerPoint 2010, there are few options you want to pay attention to, primarily:
Option #2: Show Video Title and Player Actions – This includes the tile of the video, share buttons on the far right and a playlist dropdown (see ‘getting the playlist’ below) on the left…assuming the video is part of a playlist.
Leaving these selected, your YouTube video will play in PowerPoint as demonstrated below.
If you uncheck both of these options, your YouTube video will play in your PowerPoint presentation as displayed here:
Video size – This is not terribly important as you can manually resize your video within PowerPoint anyway.
Show suggested videos when the video finishes – This is optional and depends on if you want people to continue watching other videos once the video finishes.
Enable privacy – Enhanced Mode – This is only relevant if you are embedding the video on your website…choosing this option will not work in PowerPoint.
As YouTube states “Enabling this option means that YouTube won’t store information about visitors on your web page unless they play the video.”
4. Copy and paste the embed code
With the YouTube embed code copied, back in PowerPoint, navigate to the Insert tab, select Video and then select the ‘Video from Web Site’ option.

In the dialog box that pops open, hit CTRL + V on your keyboard to paste the YouTube embed code into the dialog box, and then click on Insert.
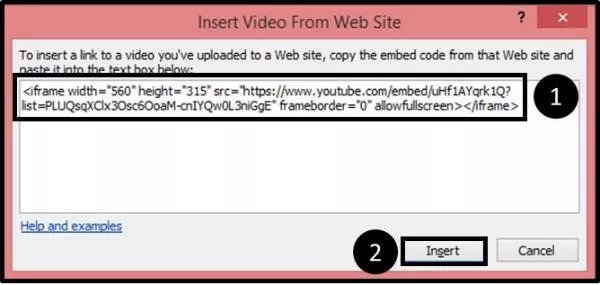
A black box is inserted onto your slide that you then want to resize and position.
Note: If you have the option to show the player controls at the bottom of your video, you will want to stretch the video out to cover the image you are using (in this case a blank computer screen) so that the YouTube video controls show on top of the controls on your image.
That way, when you play the video, it will look more realistic.
To see how the video lines up within your frame (which can be tough when you have a black box on top of a black frame), simply double click the video in the Normal View, and the YouTube video will load.
Notice in the picture below how the YouTube controls replace the controls on the bottom of the static picture I’m using, creating a more realistic effect in PowerPoint.
PowerPoint 2007: Embed a YouTube in PowerPoint
There are two methods for inserting YouTube videos in PowerPoint 2007, and a number of trouble shooting issues you need to be aware of.
Method #1: The Easy Way – Using add-ins like the free one built by Microsoft MVP Shyam, which does all of the hard work for you.
Method #2: The Harder Way – Adding the Developer tab to your Ribbon, adding a Shockwave ActiveX Object, and then manually manipulating the URL of your YouTube video.
Which one is best depends on how many YouTube videos you need to add to your PowerPoint presentations and how often you plan to do so.
If you frequently need to install YouTube videos in PowerPoint, you should definitely get the free add-in for PowerPoint 2007 and/or consider upgrading to a more recent version of PowerPoint which gives you additional YouTube options like adding playlists.
Warning: Compatibility Issues
If you are sharing your files with people using other versions of PowerPoint, you also need to be aware of the compatibility issues.
YouTube videos inserted in more recent versions of PowerPoint (2010 and 2013) will not necessarily play when opened in PowerPoint 2007…they might, it just depends on how they were added.
That said, any YouTube video successfully inserted in an earlier version of PowerPoint, will always play in a later version.
Method #1: The Easy Way
Embedding YouTube videos in PowerPoint 2007 normally requires getting and manipulating the video’s URL. This easy method of using an add-in is awesome because it does all of the hard work for you!
It takes a minute in the beginning to download and install the add-in, but once it’s all set up, with just a few clicks (as you’ll see below), you can quickly grab your YouTube videos and play them directly in PowerPoint.
A big thanks to Microsoft MVP Shyam Pillai for developing this great free add-in!
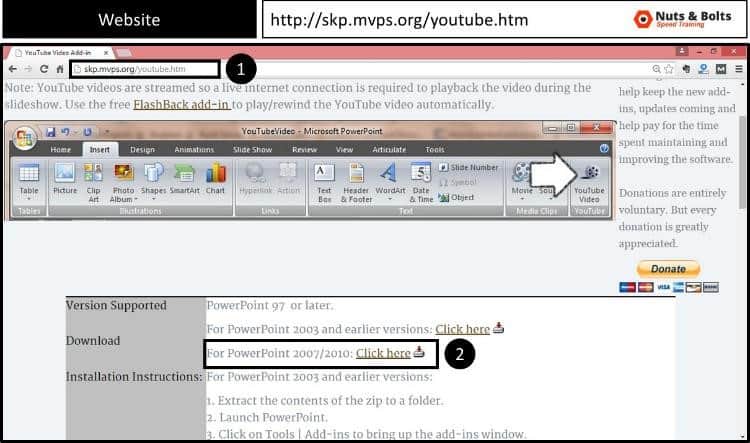
1. Download the free add-in
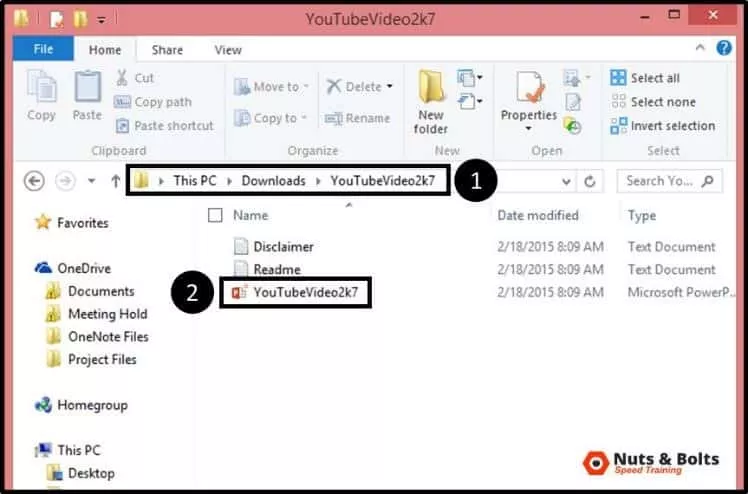
2. Extract the zipped file

3. Copy the PowerPoint add-in
4. Add the PowerPoint add-in
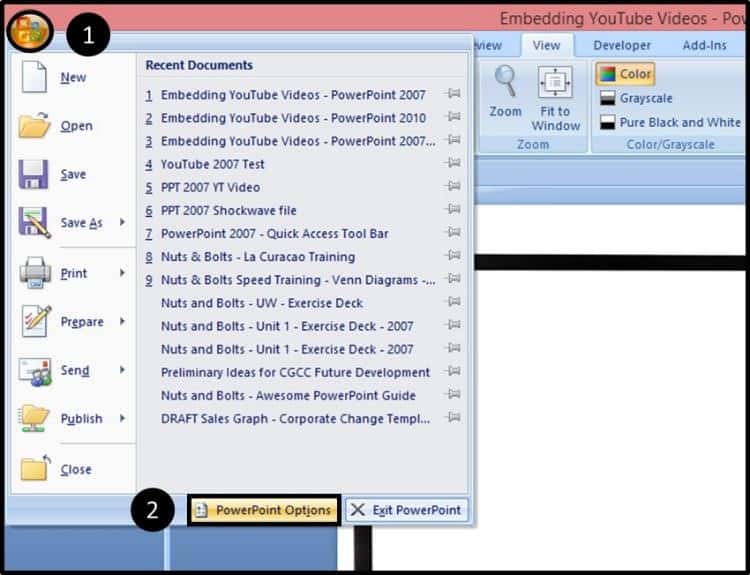
Back in PowerPoint 2007, open the Windows button in the upper left-hand corner and select PowerPoint Options.
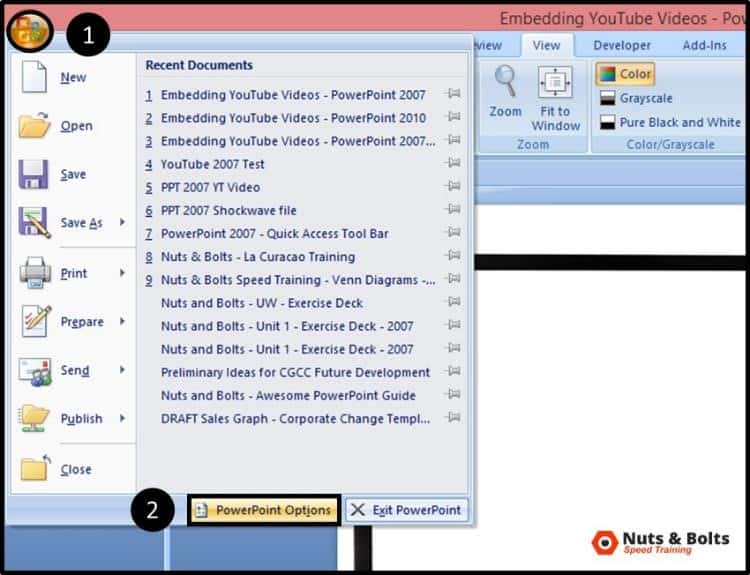
Select Add-ins on the left, use the drop-down at the bottom of the screen to filter to PowerPoint Add-ins and the select Go.
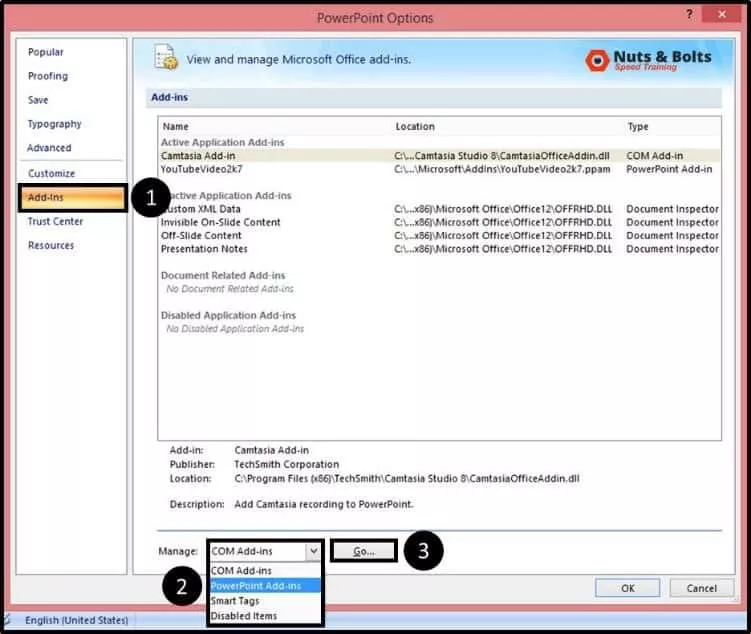
In the Add-Ins dialog box that opens, select Add New.

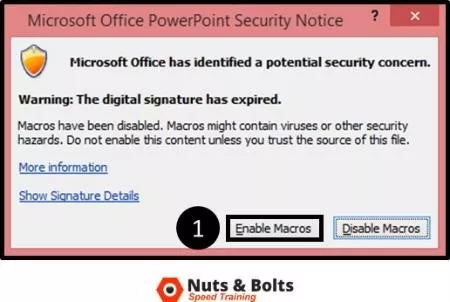
Clicking OK, a macro dialog box might open. If it does, select Enable Macros.
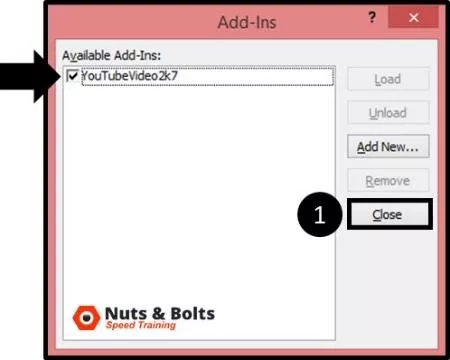
You should now see the YouTubeVideo2k7 add-in in the window with a check mark next to it. Click Close.
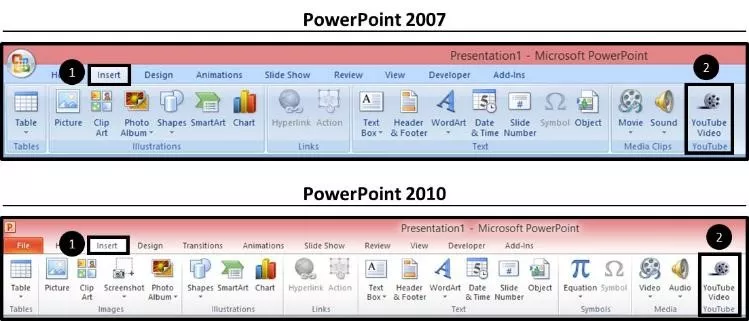
With the add-in installed, if you now open up the Insert tab in PowerPoint 2007 or 2010, you will have an added command at the end of the Insert Tab for quickly embedding YouTube videos.
Now that you have the PowerPoint 2007 Add-In installed, let’s take a look at how to use it.
5. Navigate to YouTube and copy your video’s URL
Warning: Get the right URL
Be VERY careful here!
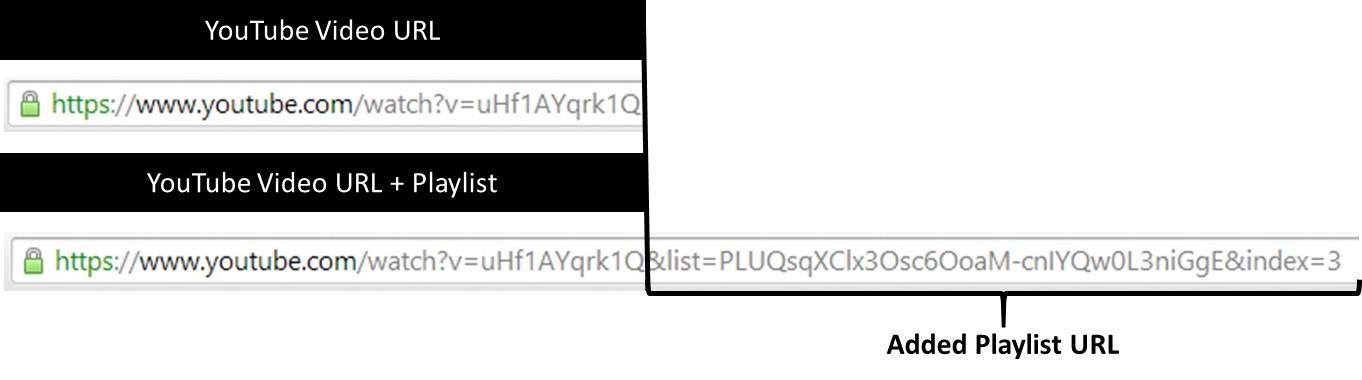
PowerPoint 2007 cannot play YouTube playlists, which you can tell by the length of the URL. Notice in the picture below the difference in length between the video and the video plus its playlist.
If you accidentally embed the longer URL into PowerPoint 2007, the YouTube video will not play, regardless of how you try to troubleshoot. If you want to embed a playlist in PowerPoint, you need to upgrade to PowerPoint 2010 or PowerPoint 2013.
You need to grab the shorter URL which is everything up until the ‘&list’ or ‘&index” separator. With the shorter URL selected, hit CTRL + C on your keyboard to copy it.
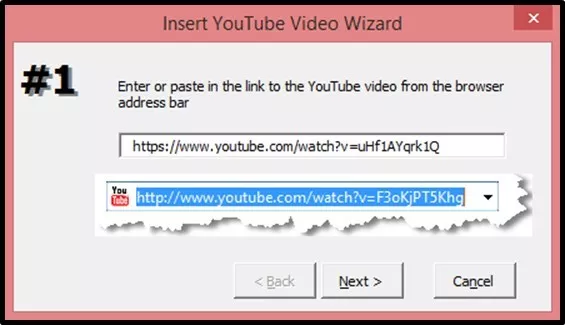
6. Insert the YouTube video using the add-in

Hit CTRL + V to paste in your YouTube URL, then hit Next.
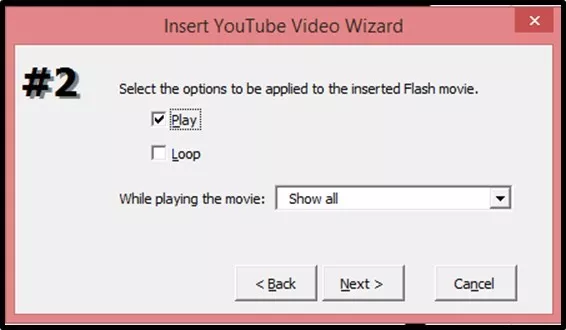
You can select options for your video like Play and Loop. I will simply hit Next.
You can then choose to resize the video here if you like. But as we can do this on our own in a second, I will again simply hit Next.

On the last screen, hit Finish
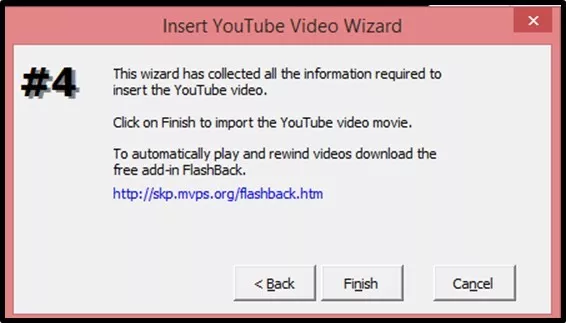
The YouTube video is now inserted into your slide as a white box with an X through it.
7. Resize the YouTube video
As you resize the video, the entire box might turn white, but no worries, you are still fine.
8. Launch the YouTube video
Assuming you are connected to the internet, the video will load and you will be able to play the video directly from within your PowerPoint 2007 presentation.

Method #2: The Hard Way
If that sounds scary to you, I highly recommend the easier method described above, using the free add-in.
1. Add the Developer Tab to your ribbon
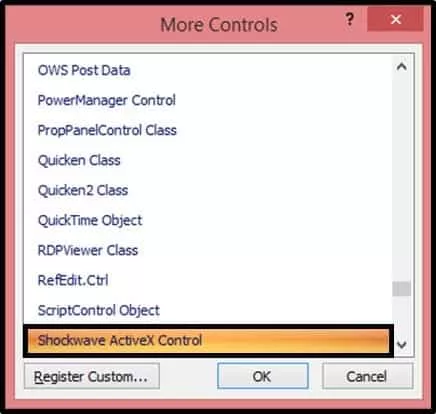
2. Insert a Shockwave file
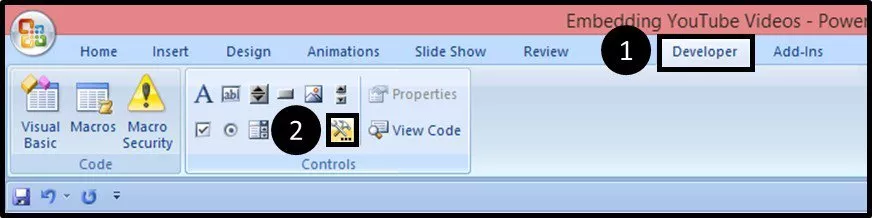
Within the dialog box, navigate down to Shockwave ActiveX Control, click OK.
And then draw a rectangle on your slide (where your YouTube video will go).
Note that you cannot draw the Shockwave ActiveX Control on top of another object, so you will have to draw it on a blank part of your slide (assuming you have something on your slide).

The Shockwave ActiveX object will look like a white box with an X through it. Resize and position the object on your slide, in this case I’m stretching it out to fit on top of my blank computer screen image.
Now we are ready to get our YouTube video
3. find your youtube video’s url.
Navigate to YouTube and find your Video’s URL…but be VERY careful here! PowerPoint 2007 cannot play YouTube playlists, it can only play individual videos, so you need to be careful you don’t accidentally grab a video + its playlist.
If you want to embed a playlist in PowerPoint, you need to upgrade to PowerPoint 2010 or PowerPoint 2013 and use the embed code method. See the PowerPoint 2013 tutorial below.
With the shorter URL selected, hit CTRL + C on your keyboard to copy.
4. Open up the properties of your Shockwave ActiveX object

In the Properties dialog box, scroll down to the Movie section and paste in your URL.
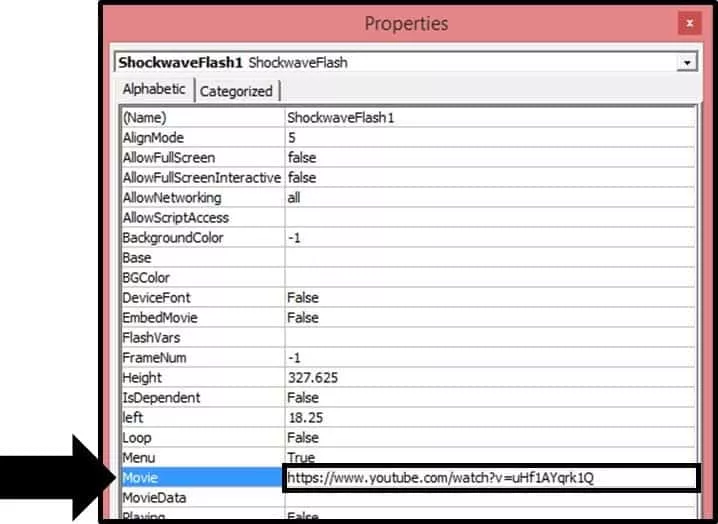
5. Adjust the YouTube URL within the dialog box
To get the YouTube video to play correctly in PowerPoint 2007, you need to make two adjustments:
#1: Delete the ‘watch?’ from the URL #2: Replace the ‘=’ with ‘/’
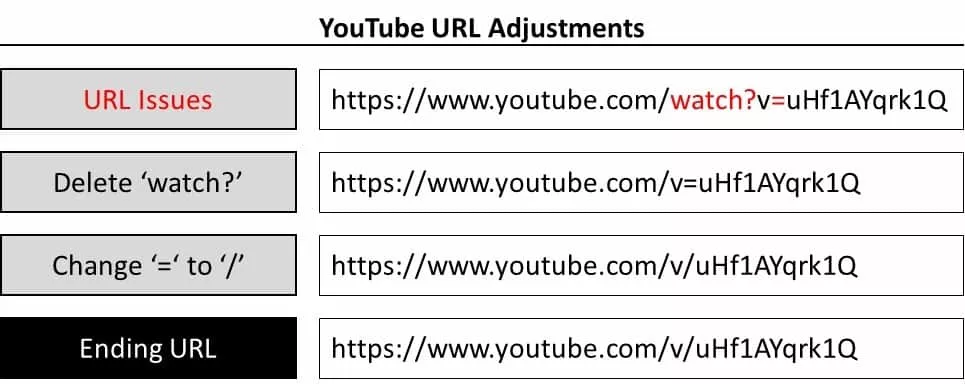
With the URL adjusted, hit OK to close the dialog box.
6. Run your presentation

So that’s how to embed a YouTube in PowerPoint, regardless of which version of PowerPoint you have.
This allows you to quickly and easily add interactive media features to your presentation.
The other advantage of embedding a YouTube video, is it does not increase the size of your presentation. That means that you don’t need to worry about compressing your presentation.
If you enjoyed the depth of this post and want to boost your PowerPoint skills for the professional world, visit us here .
What’s next?
Related articles.
- What is a broken link chart in PowerPoint (and how to fix it)?
- Bar chart trick: Right aligning categories (PPT, Word, and Excel)
- PowerPoint settings: program level vs. presentation level
- What is a linked Excel chart in PowerPoint?
- Set Up Slide Show: Customize how your PPT presentations run
About The Author

This Post Has 5 Comments

You may use Allavsoft to download YouTube video to AVI, WMV to put a youtube video in PowerPoint

Thanks for the tip!

This article certainly is thorough. Just an FYI, we’ve built a PowerPoint add-in at https://www.liveslides.com/websites/youtube/ that makes it significantly easier to embed and play YouTube videos (any web content really) directly in PowerPoint. Seriously, just a couple steps and you’re ready to roll.
Thanks for sharing, Jason. I’ve never used your software but we usually like anything that helps us save time. Cheers
Hey John, and thanks for sharing the software! Sounds like a handy program that can save you time – we like that! Just make sure you don’t abuse any copyright issues when downloading videos from the web 😉
Comments are closed.
Popular Tutorials
- How to Strikethrough Text (l̶i̶k̶e̶ ̶t̶h̶i̶s̶) in Word, Excel & PowerPoint
- How to Make Animated Fireworks in PowerPoint (Step-by-Step)
- Strikethrough Shortcut (l̶i̶k̶e̶ ̶t̶h̶i̶s̶) for Word, Excel & PowerPoint
- How to Create a Flash Card Memory Game in PowerPoint (Like Jeopardy)
- Keyboard Shortcuts Not Working: Solved
PowerPoint Tutorial Categories
- Strategies & Opinions
- Shortcuts & Hacks
- Presentation Design
- New Features
- Miscellaneous
- Charts & Data Viz
We help busy professionals save hours and gain peace of mind, with corporate workshops, self-paced courses and tutorials for PowerPoint and Word.
Work With Us
- Corporate Training
- Presentation & Template Design
- Courses & Downloads
- PowerPoint Articles
- Word Articles
- Productivity Resources
Find a Tutorial
- Free Training
- For Businesses
We help busy office workers save hours and gain peace of mind, with tips, training and tutorials for Microsoft PowerPoint and Word.
Master Critical PowerPoint Shortcuts – Secure Your FREE Training Module and Save Valuable Time!
⌛ Master time-saving expert techniques.
🔥 Create powerful presentations.
🚀 Propel your career to new heights.
We value your privacy – we keep your info safe.
Discover PowerPoint Hacks Loved by Industry Giants - KKR, AmEx, HSBC!
Over 114,880 professionals in finance, marketing and sales have revolutionized their PPT skills with our proven methods.
Gain FREE access to a full module of our premium PowerPoint training program – Get started today!
We hate spam too and promise to keep your information safe.
You are currently viewing a placeholder content from Facebook . To access the actual content, click the button below. Please note that doing so will share data with third-party providers.
Make attention-worthy videos faster and better | Join us for a live VEED demo
How to apply code, 🇺🇦 ukrainians can now use all subtitle and translation features for free. use code 'ukraine', how to embed a video in powerpoint (step-by-step).
Want to make PowerPoint presentations with video that people love to watch? Here's hpw.
Today, I’m going to show you how to embed a video in PowerPoint to make your presentations come to life. I'm also going to cover some of the best practices for creating a PowerPoint presentation, as well as the frequently asked questions about inserting video in PowerPoint.
So, shall we get started?
How to upload a video to PowerPoint from your desktop or laptop
Embedding video in PowerPoint makes your file size larger. But it allows you to share a video with your audience without frantically looking for it on your computer while presenting. This tutorial is for PowerPoint 365. If you’re using an older version there might be some differences but you should still be able to follow along just fine. Just follow these five easy steps:
1. Start by opening your PowerPoint presentation and navigating to the slide where you want to insert your video.

2. Then, click the “Insert” tab.

3. Now, in the top right corner, click the arrow under the "Video" button, or in PowerPoint 365, click the arrow beside the "Video" button.

4. Next, click "Video on My PC/Movie from File" and select the video you want to insert. Then, click the “Insert” button.

5. The video will now appear on your slide. You can resize it or move it around on the slide as you see fit.

And that’s it. You’re good to go! Don’t forget to preview your entire presentation to ensure your video plays exactly as you want it to.
How to link a video in PowerPoint
Another method for inserting video in PowerPoint is to link the media on your slide to an external source or file. It will keep your presentation file size small as it will launch the video from its location on your PC. However, the link may be broken if you move the source video to a different location on your computer.
Here’s how to do it:
1. In the top left corner, click the “Insert” tab.
2. then, click the arrow under the “video” button, 3. on the drop-down menu, click “video on my pc/movie from file.”, 4. now, click the drop-down arrow beside or under “insert” and select “link to file.” if you’re using powerpoint 365, click the “option” button, then select “link to file.”.

4. Choose your video, then click “Insert.”

And voila! You’re all set! We suggest keeping your linked video and your PowerPoint presentation in the same folder so as not to lose either of them.
How to put a YouTube video in a PowerPoint
You can also add an online video to your PowerPoint presentation . This is a much better approach because you won’t have to download a video and it won’t add anything to your PowerPoint’s file size. However, to play the video during your presentation, you must have an internet connection.
Embedding a video from YouTube depends on the version of your PowerPoint. I’ll walk you through the process for PowerPoint 365, but it’s not that different from the earlier PowerPoint versions.
1. Copy the video’s URL from the address bar of your computer's web browser.

2. Choose the PowerPoint slide onto which you want to insert the video and click the "Insert" tab

3. Now, click “Video,” then choose “Online Video/Movie…

4. Once the online dialog box appears, paste the YouTube video URL and click “Insert.”

5. Now, click Play Video to ensure the video was successfully added.

Best Practices for Video PowerPoint Presentations from Ben, VEED’s Head of Enterprise
Download your videos to avoid issues from a bad internet connection when making and presenting your video powerpoint.
While inserting online videos in PowerPoint is a convenient way to avoid increasing the file size, you'll need an internet connection to play them while presenting. And what if your internet connection goes down during your presentation? Will you find your way out of this mess? Most likely, but it’s better to prepare for this situation.
Download video files from websites such as YouTube , Vimeo , or VEED, so you don't have to worry about retrieving them if your internet goes down. It's also a good idea to save your completed PowerPoint so you can present it if there are any connectivity issues during an in-person presentation.
Know when to upload a video vs. link to a video inside a PowerPoint
If you have lots of videos in your PowerPoint presentation, expect the file size to be huge. What you can do is to choose videos you can do without or whose content you can explain on your own, and then link to that video and let it stream over the internet. This is a great tip in case an internet connection issue arises. But, it’s always best to download the video as a backup just in case something happens.
Why should you embed a VEED video instead of a YouTube video for professional PowerPoint presentations?
Youtube videos play distracting off-topic advertisements, which we don’t want to see during a presentation. You’ll never have that problem with videos you create, edit, save, and share with VEED .
You can also use VEED to clean your audio, add subtitles to your video , and even translate it . This is useful when presenting to a global audience.
VEED can also help you take your presentation to the next level. Use our teleprompter to avoid forgetting your lines. You can also use our screen recorder tool to record yourself talking through your PowerPoint slides. Turn on your camera to keep your video personalized.
How to link to a VEED video inside of PowerPoint
- Upload your video to VEED. You can even import a YouTube video from the video’s URL.
- (Optional) Edit the video if needed
- Click on export
- Click on ‘share’ to copy and paste the video share link to the text (or image) on your presentation that’ll be hyperlinked.
Keep videos between 30 to 90 seconds long
Use videos to enhance your presentation, not to replace it. People don't have long attention spans , so keep it short but sweet. You only have the first 2.7 seconds of your video to capture your audience’s attention before they tune out.
In general, 60 to 90 seconds is the video duration sweet spot for engagement.
According to Forbes , the ideal video length for a presentation is only 30-60 seconds long because studies have shown that 75% of people will likely stick with a video if it’s only 60 seconds long.
Cover only one idea per video so the content is easy to digest.
Look into your camera’s lens and pace yourself
When recording, look directly into the camera lens. This is like looking your audience in the eyes.. They’ll feel as if you are speaking directly to them.
You can edit or re-record your lines using VEED's screen recording and teleprompter tool. You can also cut out the pauses before returning your gaze to the camera.
Frequently Asked Questions
How do you link to a video in powerpoint .
1. Take a screenshot of the video. For Mac users, simply press command + shift + 3; for PC users, press the PrtScn (Printscreen) key on your keyboard.
2. Click the slide where you want to insert the image.
3. Insert the screen-grabbed image onto the slide by clicking “Insert'' then clicking “Picture from file.”
4. Resize your image
5. Click the image, then go to “Insert,” then toggle down to “Hyperlink.”
6. Copy and paste the video link into the hyperlink dialogue box, then click OK. Use a YouTube video link if you don’t mind ads running. Use a video share link from VEED for an ad-free PowerPoint presentation.
How do I embed a video in a PowerPoint without a link?
The best option is to download it to your computer, then follow the steps for uploading video to PowerPoint from your desktop or laptop. You can also use VEED to download videos. Just paste the video’s URL into the upload screen. Export the video, then click “Download MP4”.
Why can I not embed a video in PowerPoint?
If you cannot insert video in PowerPoint, it’s possible the video you’re trying to embed isn’t compatible with Microsoft Office PowerPoint, the file is missing, the file moved, or the file is corrupted. It could also be because the actual PowerPoint file is missing plugins needed to insert the video.
How do you embed Vimeo videos in PowerPoint
1. Go to your Vimeo video library and find the video you want to embed.
2. Click on the “Link” icon.
3. Then select “Copy Video Link” or “Copy Embed Video.” It doesn’t matter which one you choose, as you’ll need the internet to play the video anyway.
4. Paste the URL or embed code into the PowerPoint, then proceed as if you were embedding a YouTube video.
How do you make a video on Powerpoint?1. Create slides- Structure your video with a title, body, and concluding slides by adding images, texts, and layer elements.
2. Add animations - Go to the animation ribbon and animate the key elements on your slide.
3. Insert video into PowerPoint - Navigate to the "Slideshow" tab and click "Record Slideshow" to insert an existing video or create screen recordings.Then hit the “Record” button.
4. Insert Audio- Go to the "Insert" tab and then click on the Audio in the top right corner of the PowerPoint. Then, from the drop-down menu, choose "Audio on My PC" or "Audio from file."
5. Export- Once you’re done adding animations, videos, and sound to your PowerPoint slides, it’s time to export the presentation as a video by clicking “File” and then “Export.” Then click on “Create a Video,” or for those using MS PowerPoint 365, choose where to save the video and change the file format to MP4.
How do you put a YouTube video in PowerPoint without ads?
1. Copy the YouTube video's URL that you want to embed.
2. Go to VEED.IO and paste the URL in the upload screen.
3. Export the video.
4. Click and copy the share link to put the ad-free YouTube video in the PowerPoint.
Make video presentations people love to watch quickly and easily
Now that you know how to embed a video in PowerPoint it's time to go give it a shot!
Make your presentation stand out by inserting videos in PowerPoint. Need to make a sales presentation at work? Make a screencast and use VEED’s screen recording and teleprompter tools. Harness the power of videos and make your PowerPoint more interesting.
Whether you’re an editing pro or a beginner, VEED can help you make and share videos people will love quickly and easily. No need to download any software! It’s an online video editor readily available to you! Try using it for your first or next PowerPoint presentation.
Vella Gonzaga

One-click video editing, online.
More from veed.

How to check TikTok Analytics?

How to Record Your Screen (for Windows, Mac, and More)

70+ Father Quotes for the Dads in Your Life
Related tools, free online video editor.
/Video%20Editor.png "how to insert video on powerpoint presentation")

- Get started with computers
- Learn Microsoft Office
- Apply for a job
- Improve my work skills
- Design nice-looking docs
- Getting Started
- Smartphones & Tablets
- Typing Tutorial
- Online Learning
- Basic Internet Skills
- Online Safety
- Social Media
- Zoom Basics
- Google Docs
- Google Sheets
- Career Planning
- Resume Writing
- Cover Letters
- Job Search and Networking
- Business Communication
- Entrepreneurship 101
- Careers without College
- Job Hunt for Today
- 3D Printing
- Freelancing 101
- Personal Finance
- Sharing Economy
- Decision-Making
- Graphic Design
- Photography
- Image Editing
- Learning WordPress
- Language Learning
- Critical Thinking
- For Educators
- Translations
- Staff Picks
- English expand_more expand_less
PowerPoint - Inserting Videos
Powerpoint -, inserting videos, powerpoint inserting videos.

PowerPoint: Inserting Videos
Lesson 20: inserting videos.
/en/powerpoint/animating-text-and-objects/content/
Introduction
PowerPoint allows you to insert a video onto a slide and play it during your presentation. This is a great way to make your presentation more engaging for your audience.
You can even edit the video within PowerPoint and customize its appearance. For example, you can trim the video's length or add a fade in .
Optional: Download our practice presentation .
Watch the video below to learn more about inserting videos in PowerPoint.
To insert a video from a file:
In our example, we'll insert a video from a file saved locally on our computer. If you'd like to work along with our example, right-click this link to our example video and save it to your computer.

With the Screen Recording feature on the Insert tab, you can create a video of anything you are doing on your computer and insert it into a slide.

To insert an online video:
Some websites—like YouTube—allow you to embed videos into your slides. An embedded video will still be hosted on its original website, meaning the video itself won't be added to your file. Embedding can be a convenient way to reduce the file size of your presentation, but you'll also need to be connected to the Internet for the video to play.

Working with videos
To preview a video:.
- Click a video to select it.

To resize a video:

The corner sizing handles will resize a video while preserving its original aspect ratio . If you use the side sizing handles, the video will become distorted .
To move a video:

To delete a video:
- Select the video you want to delete, then press the Backspace or Delete key on your keyboard.
Editing and formatting videos
The Playback tab has several options you can use to edit your video. For example, you can trim your video to play an excerpt from the original, add a fade in and fade out , and add bookmarks that allow you to jump to specific points in the video.
Most of the features on the Playback tab can only be used with videos that are inserted from a file . They will not work with embedded videos.
To trim a video:
- Select the video, then click the Playback tab on the Ribbon.

- When you're done trimming the video, click OK .
To add a fade in and fade out:
- On the Playback tab, locate the Fade In: and Fade Out: fields.

To add a bookmark:

Video options
There are other options you can set to control how your video will play. These are found in the Video Options group on the Playback tab.

- Volume : This changes the audio volume for the video.
- Start : This controls whether the video starts automatically or when the mouse is clicked .
- Play Full Screen : This lets the video fill the entire screen while playing.
- Hide While Not Playing : This hides the video when it's not playing.
- Loop until Stopped : This peplays the video until it is stopped.
- Rewind after Playing : This returns the video to the beginning when it is finished playing.
Formatting the appearance of a video
Like pictures , PowerPoint allows you to format the appearance of a video by applying a video style , adding a border , changing the shape , and applying various effects .
To create a poster frame:
You can add a poster frame to a video, which is the placeholder image your audience will see before the video starts playing. The poster frame is usually just a frame taken from the video itself.
- Click the timeline to locate the desired part of the video.

If you want to use a picture from your computer, select Image from file .
To apply a video style:
- Select the video, then click the Format tab on the Ribbon.

To learn more about corrections , color adjustments , borders , shapes , and effects , review our Formatting Pictures lesson.
- Open our practice presentation . Also, right-click this link to our example video and save it to your computer. If you have already downloaded our practice presentation to follow along with the lesson, be sure to download a fresh copy.
- On slide 2, Insert our example video file.
- Resize the video so it fits next to the text box.
- Apply a video style of your choice.
- Trim the video so the start time is around 00:17.5 and the end time is around 00:25.
- Add a bookmark somewhere in the middle of your video.
/en/powerpoint/inserting-audio/content/

How to Embed a Video in Powerpoint (From Drive & YouTube)
Written by sam parker.
Last updated on 21st February 2022
Imagine this: you’re giving a presentation to your boss, a potential new client, or an important customer. You’re in a groove, and things are going well. Best of all, you’ve got a killer video coming up in your presentation that’s sure to get them excited. But suddenly, you get to your video in your PowerPoint and it wont play.
You lose focus, stumble around to find the video elsewhere (or forego playing it at all), and lose the attention of your once captive audience.
We’ve all been there, and unfortunately, technical difficulties with video can be a huge buzz kill for presenters and audiences alike.
But, when it’s done right, video has the ability to amp up a presentation, get a crowd excited, and share a powerful message with your viewers.
So how do you prevent this all-too-common mishap from ruining your next presentation? Here’s a step-by-step guide to how to embed a video in PowerPoint three different ways.
How to embed a video from your hard drive
Embedding a video into your PowerPoint directly from your hard drive is a great way to ensure your video plays seamlessly, even without an internet connection. When you store a video on your hard drive, it’s accessible to PowerPoint even if you can’t connect to wi-fi, which is an important consideration for people presenting to groups in new environments.
But watch out for a few common stumbling blocks. If you move the video from one folder to another on your hard drive, your PowerPoint presentation may have trouble locating it, leaving you with a blank screen. Also, if you share your PowerPoint with someone via email or USB, and you don’t also share the video with them and re-embed it into the presentation, you’ll be stuck stumbling in front of a confused audience with no playable video content in your PowerPoint.
If you decide to embed a video file from your hard drive into a PowerPoint presentation, here are six simple steps you can take to ensure success.
1. Navigate to the right slide
First, open your PowerPoint file and navigate to the slide that you want to put the video on.
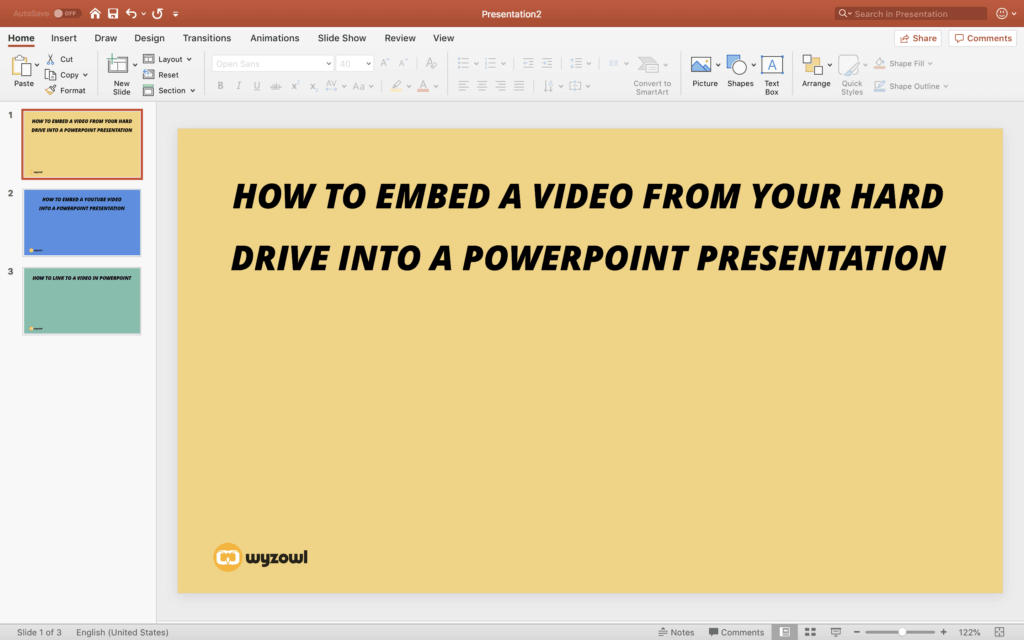
2. Select Insert > Video > From File
Next, navigate to the top PowerPoint menu and select Insert. Then toggle down to Video, and select Movie from File. Be sure you know where your video is saved to make this step quick and easy.
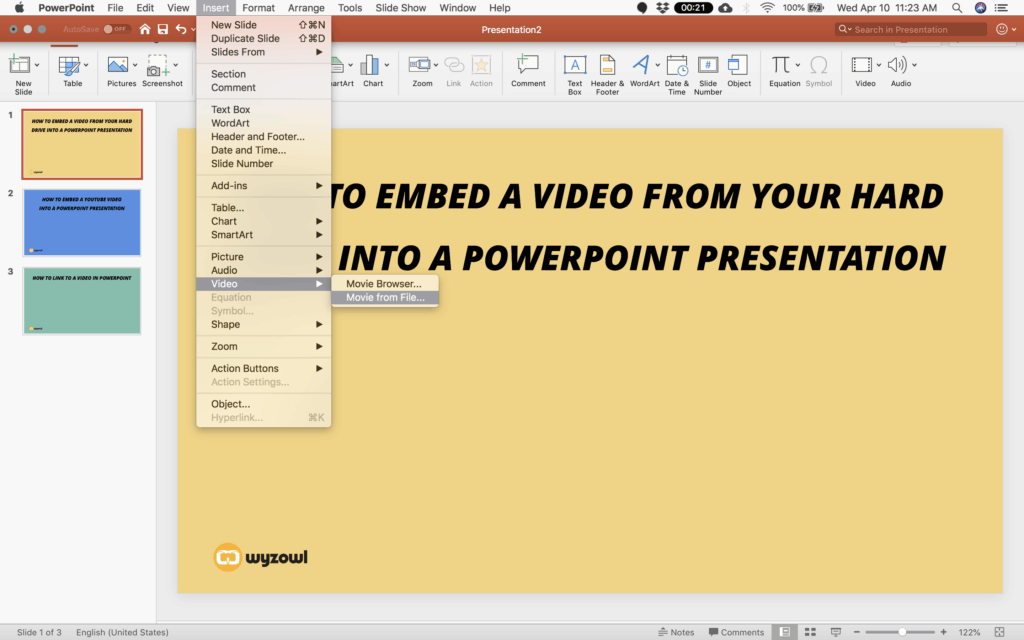
3. Find the video file on your hard drive
From here, find the video on your hard drive. If you have your hard drive synced to a cloud storage system like Dropbox or Google Drive, you could also use a video stored in one of those locations.
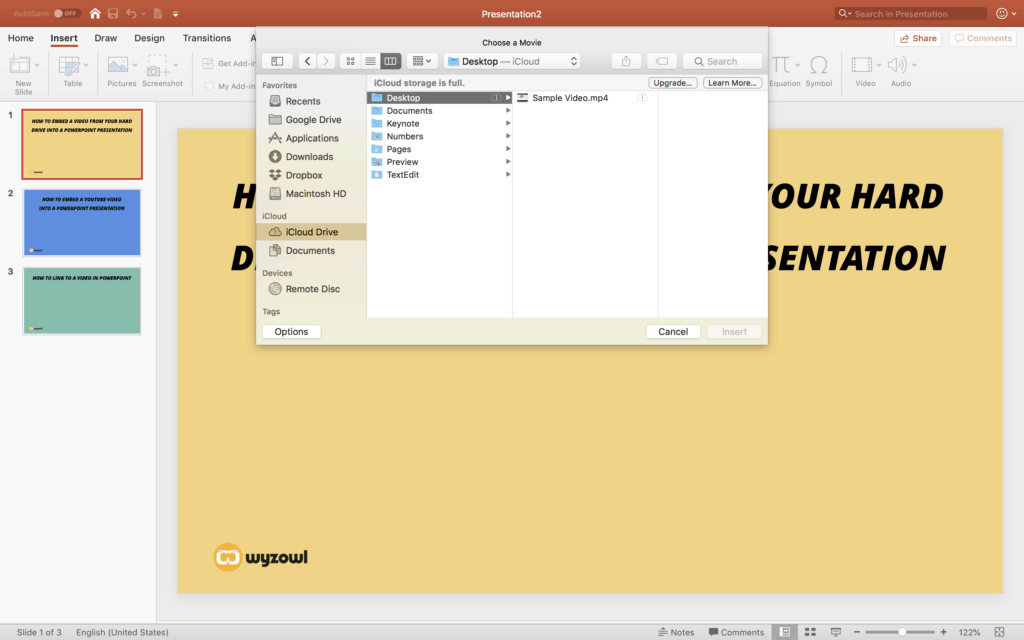
4. Resize the video
Once the video is inserted onto your slide, you’ll want to resize it to fit the slide. PowerPoint may insert the video as a full-screen video – which could be exactly how you want to display it. But if you’re looking to feature a headline or other graphics on your slide, simply resize the video and position it on the slide the same way you would an image or other element.
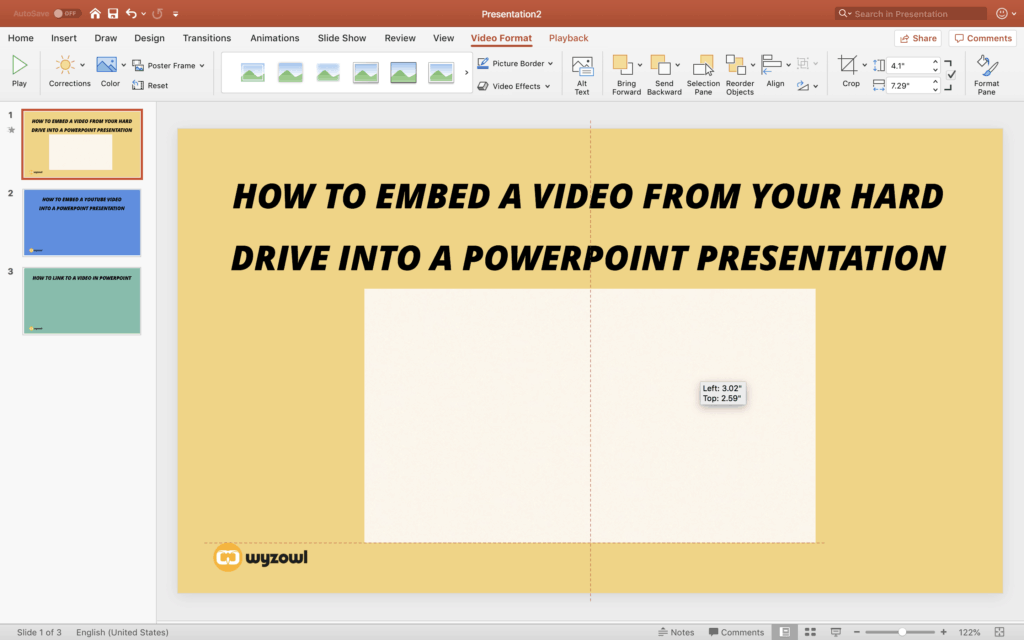
5. Play the video
Testing is critical to ensuring your video embed was successful. The first test you’ll perform is at this step, right after you’ve resized the video. Play the video in the PowerPoint to be sure it fully embedded and that you selected the right file. Be sure you watch from start to finish to ensure the full video embedded successfully.
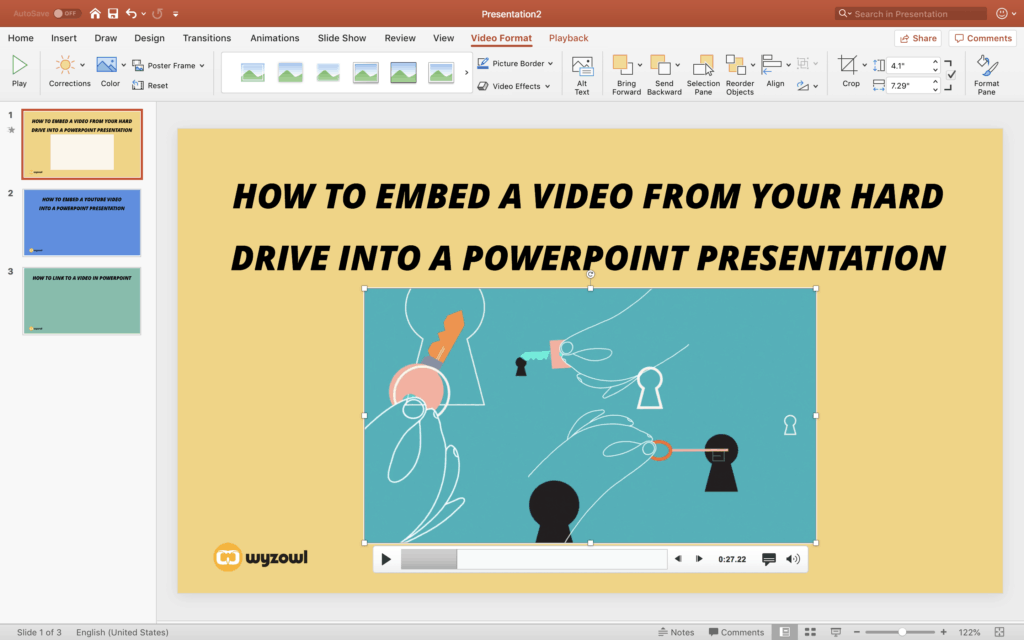
6. Test in Play mode
As the final step in the process and your second test, play the PowerPoint like you will be during your presentation. You should see the video move at normal speed and hear any audio you have in your video as well. Again, be sure to watch the entire video to identify any potential embedding issues.
While you will have tested your video twice at this point, it’s also a good idea to give it a final test on the day of your presentation. This will not only ensure you’re set up for success, but give you confidence knowing your video will play seamlessly.
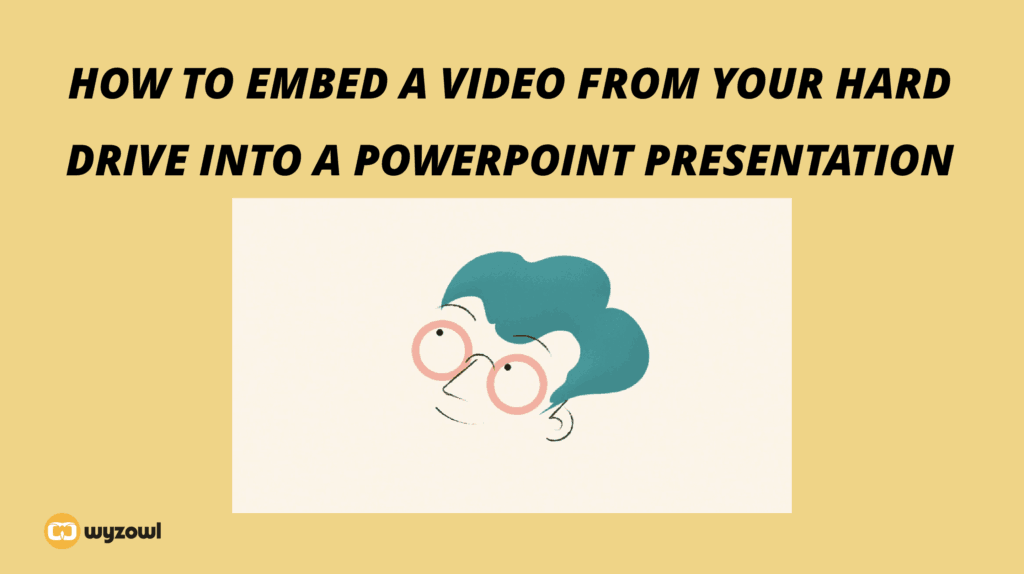
How to embed a YouTube video in PowerPoint
PowerPoint has come a long way with regards to displaying video into presentations, and this method is proof of that. PowerPoint offers the option to embed a YouTube (or other video platform) video directly from the website in just a few clicks.
This option is the fastest solution and doesn’t involve downloading or storing any video files on your computer, but it does come with a few limitations. First, with this option, YouTube automatically selects the image that appears on the slide, giving you a less customisable look. If image customisation is important to you, check out the next section on how to link to a video from PowerPoint. Second, if you’re not connected to the internet, your video won’t play – an important consideration for people presenting in environments where they don’t have reliable internet access.
While this method comes with a few technical limitations, it’s super easy to implement. If you decide to use this method, here’s how to embed a YouTube video in PowerPoint in just five steps.
First, open your PowerPoint file and find the slide you want to embed your YouTube video onto.
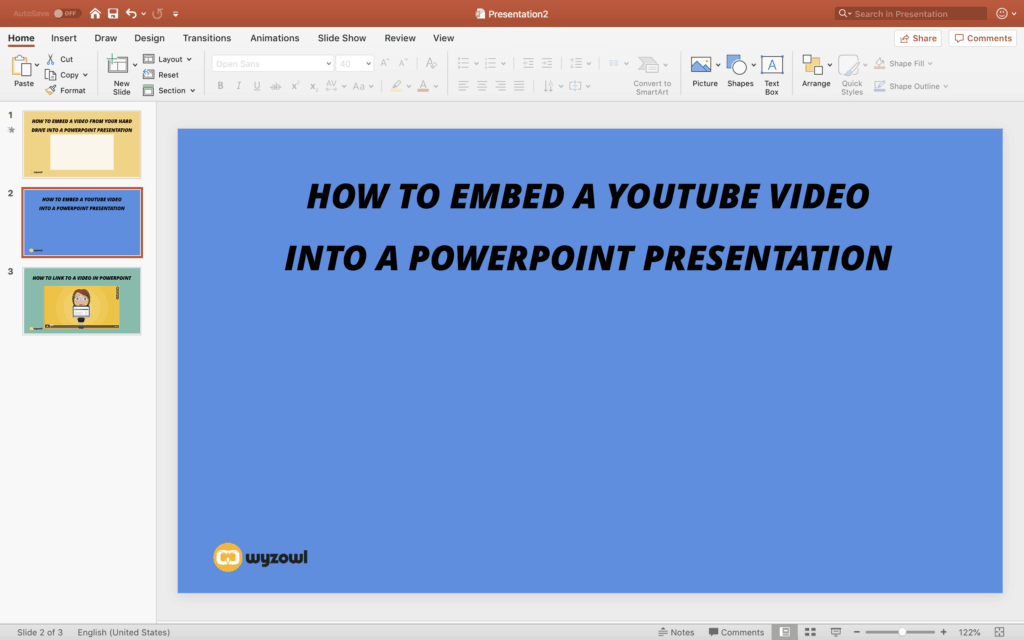
2. Insert an Online Movie
Next, navigate to the Insert tab within PowerPoint’s main menu, and select Video. Then from the dropdown, opt to insert an Online Video.
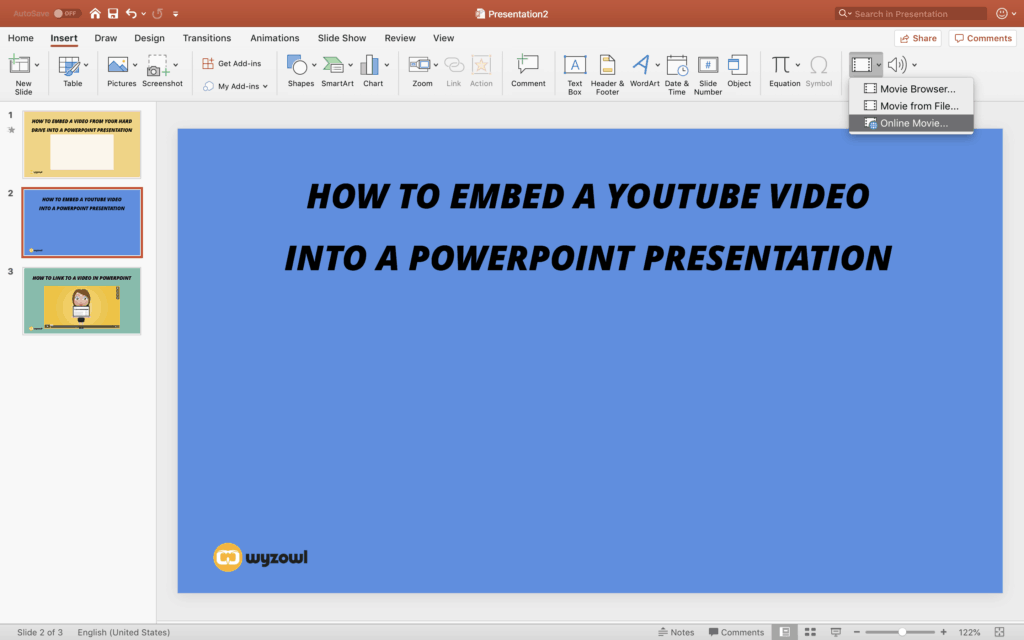
3. Paste your video URL
Selecting insert an Online Video will activate a pop-up to insert a URL. Paste your YouTube link directly into this form field, and select Insert.
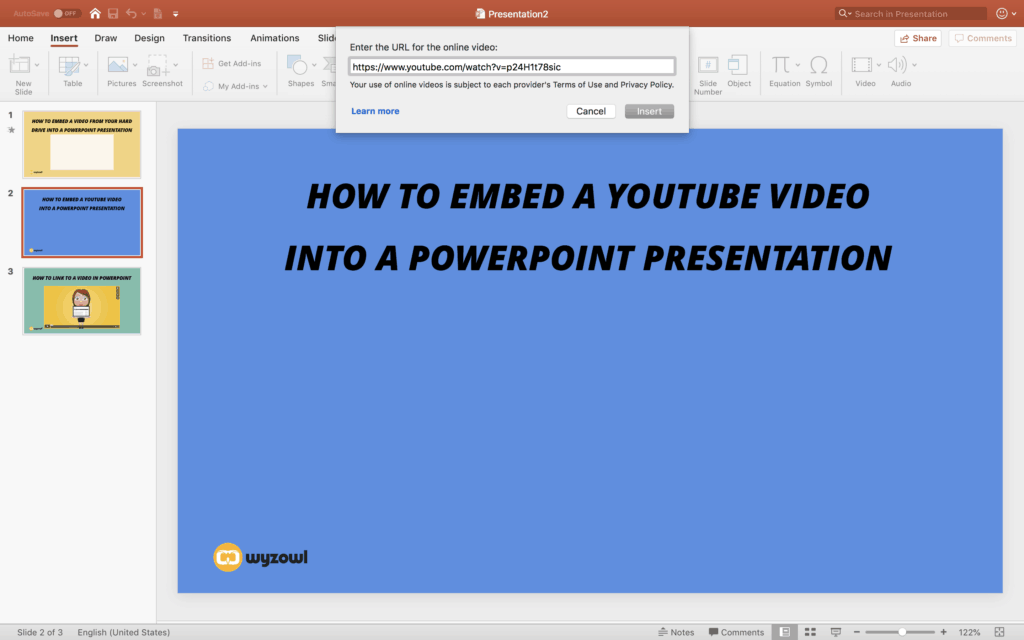
4. Resize and position your video
With this method, PowerPoint does all the work. The playable video will appear right on the slide, complete with an image from your video (note that this is the non-customisable part we mentioned). Now all you need to do is resize the video and position it on the slide where you’d like it.
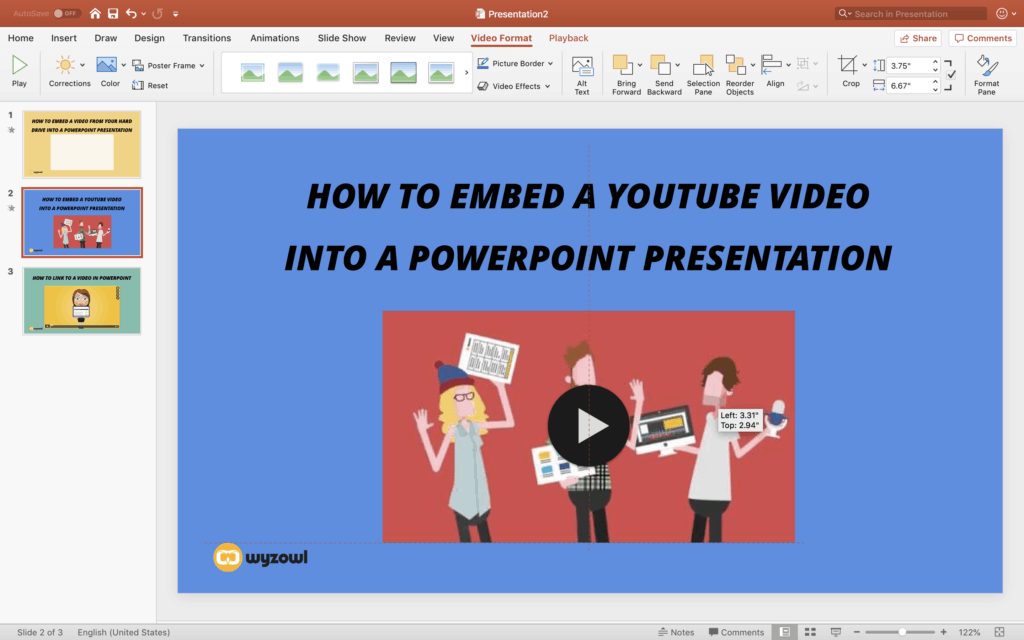
5. Test your video in Play mode
As a final step, hop into Play mode and test the video playback. You’ll even see the YouTube window, along with play and pause buttons, giving your slide an official, buttoned-up feel reminiscent of a website more than a PowerPoint.
How to link to a video from PowerPoint
Linking to a video within your PowerPoint is a great option that’s very customisable. You can link any image or text to a YouTube, Wistia , Vimeo or website link in just a few minutes. But, readers beware: while you don’t have to worry about hosting large files on your computer with this option, web connectivity is critical. You need to have a reliable internet connection for this option to work.
If you’re unsure about your connectivity, we recommend opting to embed a video into your presentation from your hard drive. But if you’re cruising through the digital age at warp internet speed, check out how to link to a video from a PowerPoint in just six steps.
1. Screengrab an image of the video
To link to a video, you’re going to turn an image in your presentation into a hyperlink. The first step in the process is to find the right image – which in this case is a screenshot of your video. Note that you could use any image as your link, but we’re going to focus on the screenshot approach.
To capture a screenshot on a Mac, simply select command + shift + 3. You can also control the parameters of your screen grab by using command + shift + 4 (as seen in the image below). We suggest you play around with both options to determine which works best for you. This action will automatically save the image to your desktop.
To capture a screenshot on a PC, you’ll want to locate the key labeled PrtScn, also known as the print screen key. When you press this key along with the Windows icon key, your computer will take a screenshot of the screen and save it to your Pictures folder. Since this function captures an image of the entire screen, you’ll want to use a photo editor, like Windows Photo Gallery, to crop the image to include only the video thumbnail.
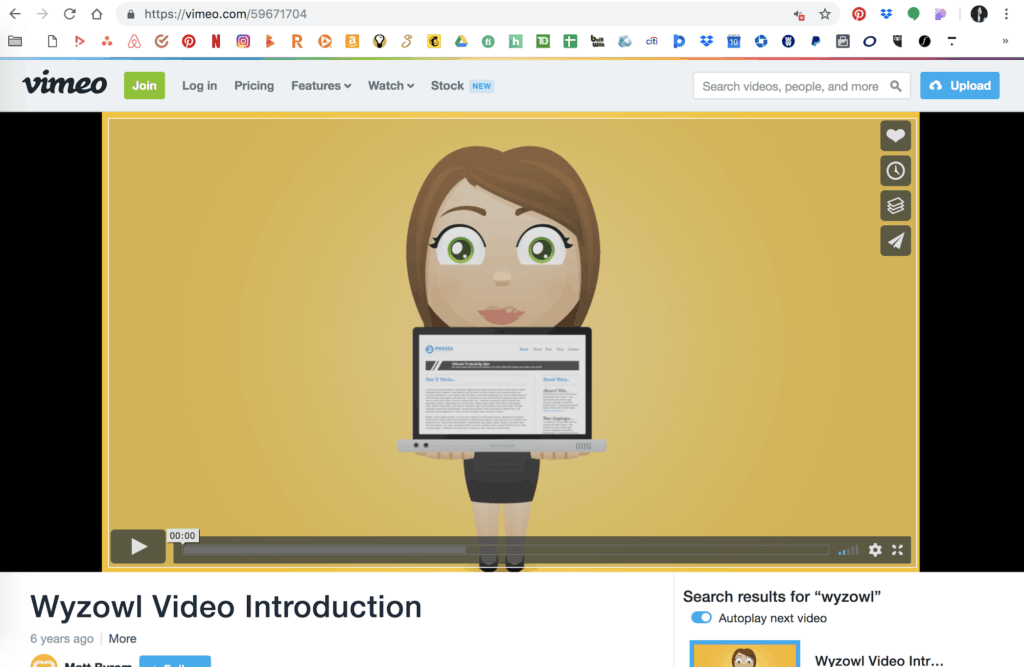
2. Find your PowerPoint slide
After you’ve captured a screenshot of your video, navigate to the slide in the PowerPoint that you want to use to link to your video.
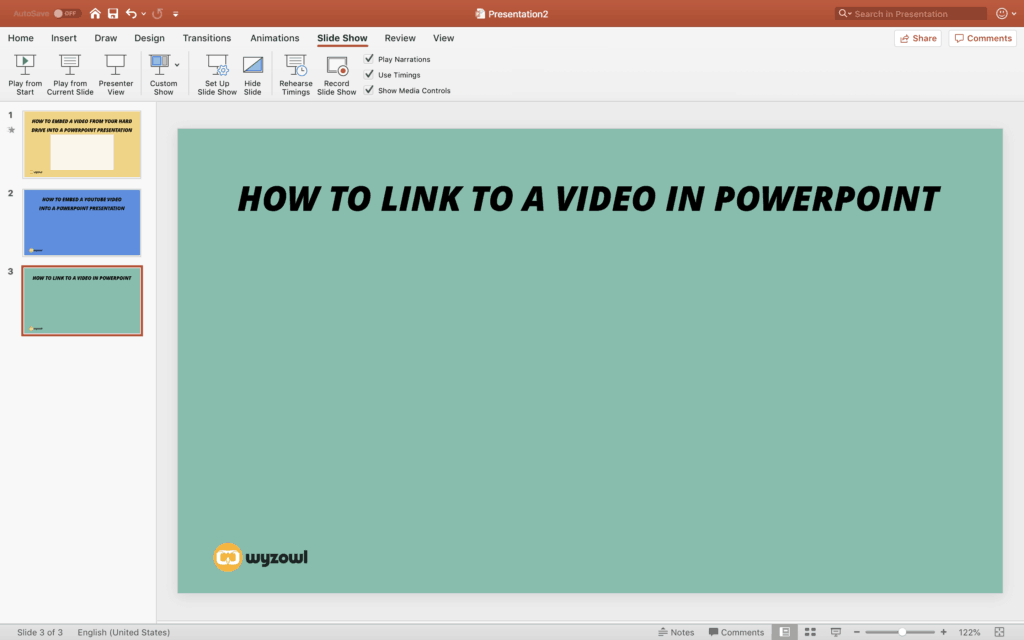
3. Insert your image onto the slide
Next, put the image onto your slide. Select Insert, and toggle down to Picture and select Picture from File.
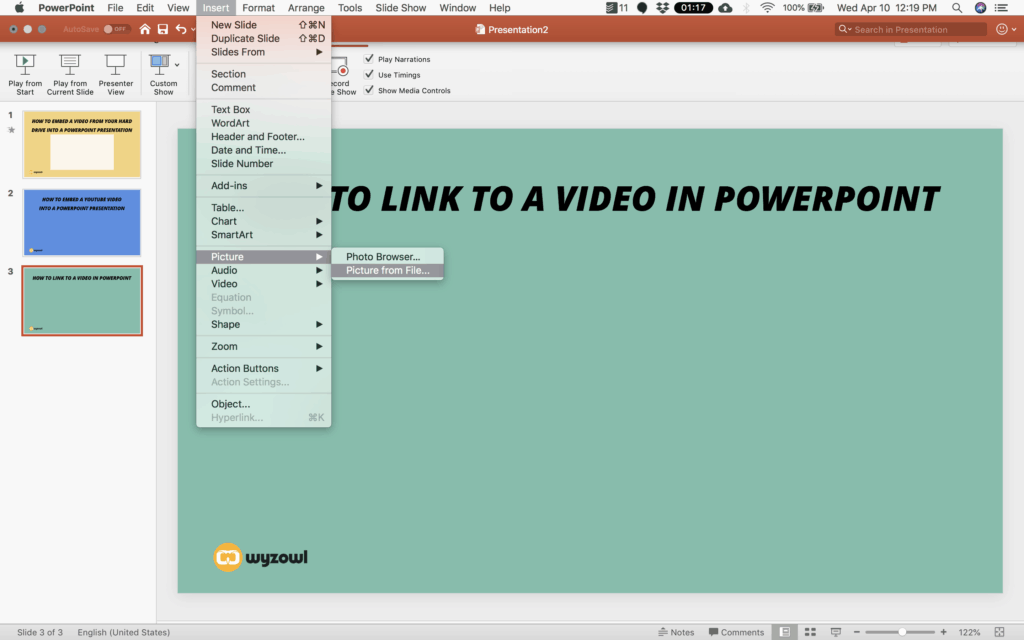
Then find the image you’d like to use to preview your video, and select Insert.

4. Resize your image
Once your image appears on your slide, resize it and position it just like you would any other image.
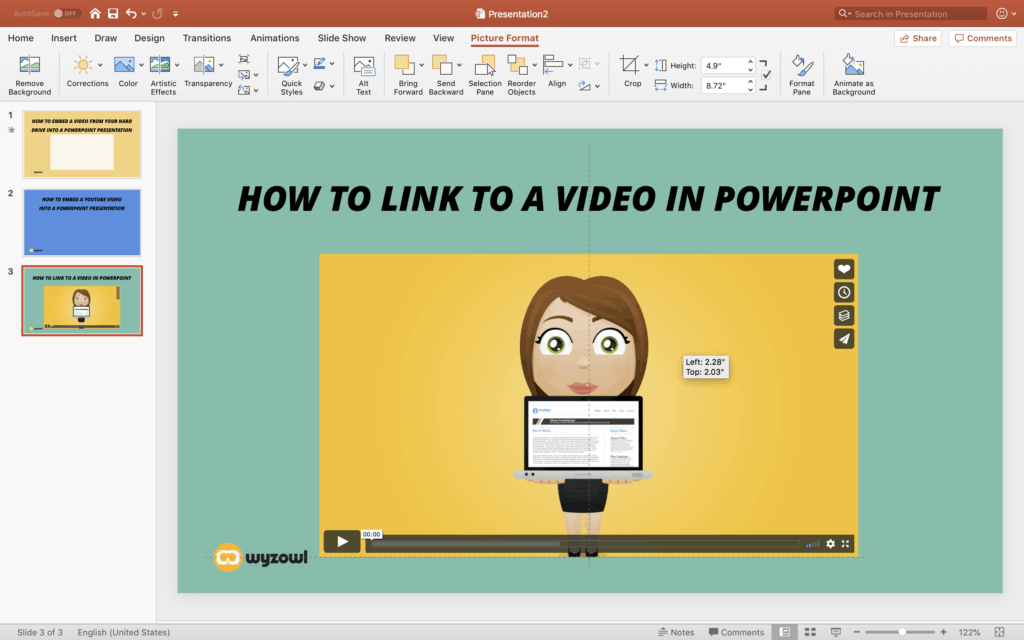
5. Add a hyperlink to the image
The same way you inserted your video file, you’re going to insert a hyperlink. Navigate to Insert, and toggle down to Hyperlink. Be sure you have the image selected while you’re doing this so the hyperlink connects to the image itself, not the entire slide or another element on the slide.
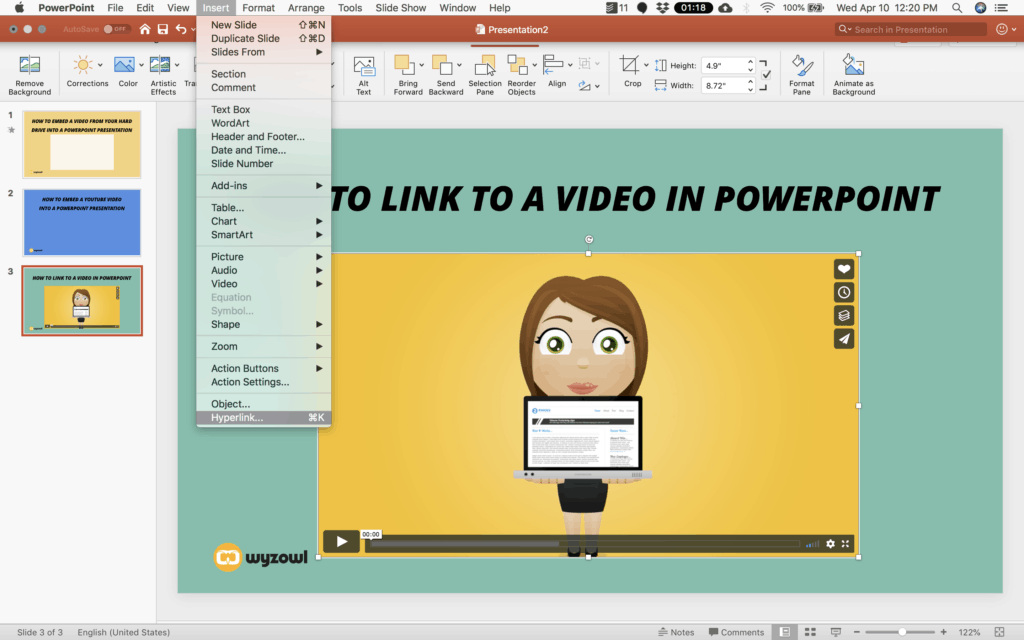
Then copy-and-paste the link to your web video into the hyperlink form field, and select OK.
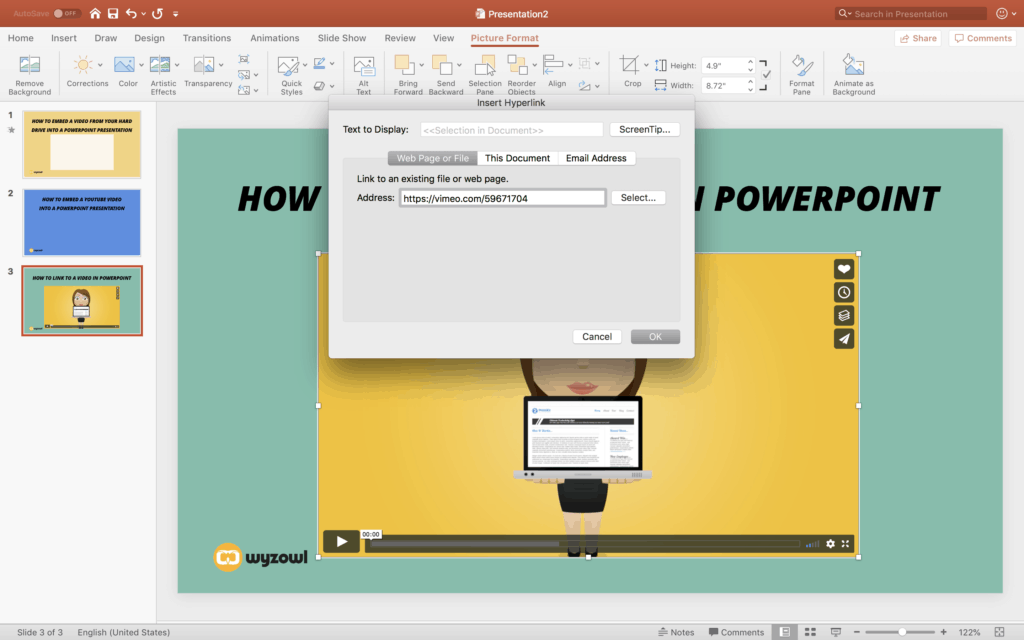
6. Test the video in Play mode
You guessed it. The final step in the process is to test your video in Play mode to be sure you linked to the right video. You should be able to click on the image in your PowerPoint when you’re in Play mode. And when you click it…
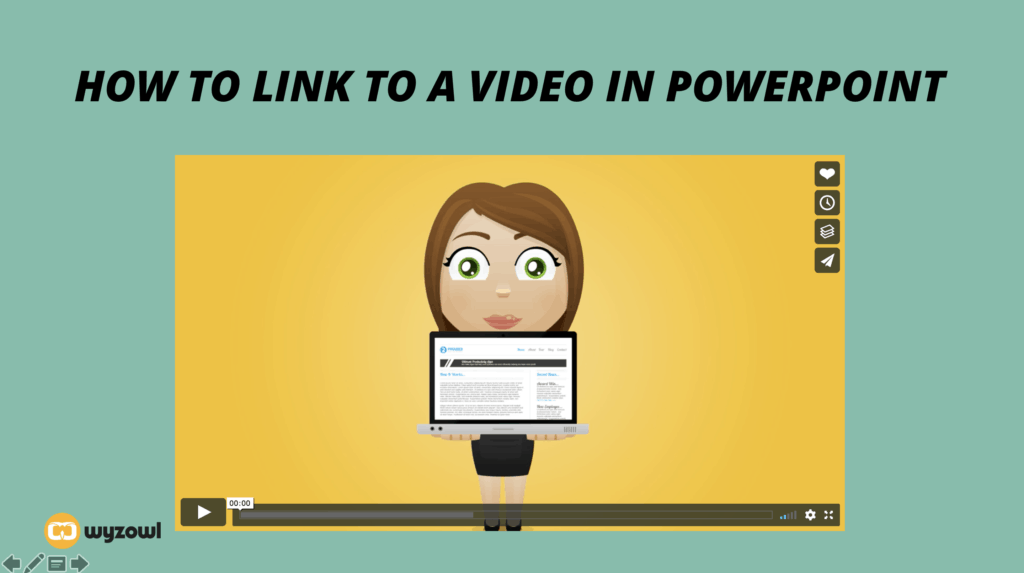
…you should be taken to a web browser where your video appears, ready for you to play!
Now that you know how to embed a video in PowerPoint, it’s time to take the final steps to preparing for a phenomenal presentation.
- Test your audio and visuals before you present. If you’re giving a presentation in a new location, you should anticipate issues with their A/V set-up and assume you’ll have wi-fi connectivity issues. Be sure to run through the presentation once before you formally present to ensure the video appears and your audio is both working and loud enough. Also consider taking a wi-fi hot spot in case you encounter internet issues.
- Keep it short. When presenting in front of an audience, sometimes less is more. No one wants to watch a 10-minute long video in the middle of a presentation. The best PowerPoint videos get an audience excited but don’t drag on to the point of boredom.
- Get creative. PowerPoints can be boring – but when you add video, you add a whole new dynamic element and energy to your presentation. Let your mind run wild with ideas as you think of ways to spice up your PowerPoint.
For more awesome tips on how to create the most awe-inspiring, jaw-dropping videos your audience has ever seen, head over to the Wyzowl blog . Peruse posts on the best motion graphics videos around, how to convert a video to a GIF , and everything in between.

Related Posts

Need to know how to embed a video in Wordpress? Use this super quick and easy guide to do it for yourself!

Want to know how to embed video in email? In this article we show you several ways to embed videos in emails with little fuss.

In this simple guide we show you how to compress a video, and we also identify the best free video compressor out there.
🎥 One great video example
🗓 Once per week
🤩 Analysed & reviewed
✉️ Direct to your inbox

How to explain anything with video
- Name * First Last
- Hidden cloudamp__data__c *
- Hidden gclid
- Phone This field is for validation purposes and should be left unchanged.
Get info & pricing
Fill out the form below and we’ll send a FREE info pack with everything you need to know about our service. Then we’ll be in touch to discuss how we can help you with your next video 🚀

We make videos! In fact, we’ve made over 3,000 videos for 1,500 companies around the world. We create everything from simple social media videos to explainer videos, customer testimonials and everything in-between.
Complete your details below and we’ll send you a FREE info pack with everything you need to know about our service, straight to your inbox.
How to Easily Insert a YouTube Video into PowerPoint
- Recent Posts
- How to Add Bullet Points in PowerPoint: A Step-by-Step Guide - May 25, 2024
- Where is Slide Master in PowerPoint: A Comprehensive Guide for Beginners - May 25, 2024
- How to Use Copilot in PowerPoint: A Step-by-Step Guide - May 25, 2024
Are you struggling to add a YouTube video to your PowerPoint presentation? Look no further! I’ve got you covered. As someone who has created countless presentations, I understand the importance of incorporating dynamic visuals to keep your audience engaged. In this article, I’ll walk you through the steps to input a YouTube video into your PowerPoint presentation, making your presentation stand out from the rest.

First and foremost, it’s essential to note that there are different ways to add a YouTube video to your PowerPoint presentation, depending on the version of PowerPoint you’re using. However, the most common method is to use the “Insert Online Video” feature, which allows you to search for and embed a YouTube video directly into your presentation. This feature is available in PowerPoint 2013 and later versions.
To get started, open your PowerPoint presentation and navigate to the slide where you want to insert the YouTube video. Click on the “Insert” tab in the ribbon, and then click on the “Online Video” button. A dialog box will appear, prompting you to enter the URL of the YouTube video you want to embed. Simply copy and paste the video’s URL in the dialog box, and click “Insert.” That’s it! Your YouTube video is now embedded in your PowerPoint presentation.
Overall, adding a YouTube video to your PowerPoint presentation is a simple yet effective way to enhance your presentation and keep your audience engaged. By following the steps outlined above, you’ll be able to seamlessly integrate YouTube videos into your presentations, making your presentations more dynamic and memorable.
JUMP TO TOPIC
Understanding Embed Codes
How to embed a youtube video in powerpoint, ensuring video compatibility and performance, using player controls and playback features, incorporating multimedia and interactive elements, leveraging add-ins and external tools, embedding online videos in presentations.

As a presenter, adding videos to your PowerPoint presentation can help you to capture your audience’s attention and make your presentation more engaging. One way to do this is by embedding a YouTube video in your PowerPoint presentation. Here, I will explain the steps to embed a YouTube video in PowerPoint.
Before we begin, it’s important to understand what an embed code is. An embed code is a piece of HTML code that allows you to display content from another website on your own website or in this case, presentation. YouTube provides an embed code for every video uploaded to its platform, which you can use to embed the video in your PowerPoint presentation.
Now that you understand what an embed code is, let’s dive into the steps to embed a YouTube video in PowerPoint.
First, open your PowerPoint presentation and select the slide where you want to insert the video.
Next, go to the YouTube video you want to embed and copy the video’s URL.
Then, go back to your PowerPoint presentation and navigate to the Insert tab on the ribbon.
Select the Online Video option in the Media group, and then select the option From a Video Embed Code.
Paste the YouTube video’s URL into the text box and click the arrow button next to it.
The video should now appear in your PowerPoint presentation. You can resize the video by dragging its corners.
It’s important to note that you must have an internet connection to play the video during your presentation. Also, if you plan to present on a different computer, make sure to copy the video file along with your PowerPoint presentation to ensure it plays correctly.
In conclusion, embedding a YouTube video in your PowerPoint presentation can help you to make your presentation more engaging and memorable. By following the above steps, you can easily embed a YouTube video in your PowerPoint presentation and impress your audience with your multimedia skills.
Optimizing Video Playback for Audience Engagement
As a presenter, it is essential to ensure that your audience is fully engaged throughout the presentation. One way to achieve this is by incorporating videos into your PowerPoint presentation. However, it is not enough to insert a video and let it play. You need to optimize the video playback to enhance audience engagement.
Before inserting a video into your PowerPoint presentation, ensure that the video file is compatible with PowerPoint. PowerPoint supports various video file formats, including MP4, WMV, and AVI. It is best to use MP4 format because it is widely supported and provides high-quality playback.
Also, ensure that the video file size is not too large. Large video files can slow down your presentation and affect the overall performance. You can compress the video file using PowerPoint’s built-in compression tool or an online video compressor.
PowerPoint provides various playback features that you can use to enhance audience engagement. For instance, you can set the video to play automatically when you reach a specific slide or play it on click. You can also set the start and end time of the video to play only a specific segment.
Additionally, you can use player controls such as play, pause, and volume to enhance audience engagement. You can also add captions or subtitles to the video to make it more accessible to your audience.
To access these features, navigate to the Playback tab in PowerPoint 2019 or 2013. Here, you can adjust the video settings to suit your preferences.
In conclusion, optimizing video playback in your PowerPoint presentation is crucial for enhancing audience engagement. By ensuring video compatibility, compressing the video file size, and using player controls and playback features, you can create a professional look and keep your audience engaged throughout the presentation.
Advanced Techniques for Professional Presentations
As a professional, I understand that creating an informative and engaging presentation is crucial. Incorporating multimedia and interactive elements can make a presentation more effective and memorable. In this section, I will share some advanced techniques for creating professional presentations that will captivate your audience.
Multimedia elements such as videos, charts, and music can add a dynamic touch to your presentation. One effective way to incorporate multimedia elements is by embedding YouTube videos in PowerPoint. This can be done by copying the video’s embed code from YouTube and pasting it into the “Insert Video” option in PowerPoint.
Another way to add interactivity to your presentation is by including quizzes. PowerPoint add-ins such as “Quiz Tabs” and “Quizmaker” allow you to create interactive quizzes and surveys that can engage your audience and provide valuable feedback.
PowerPoint add-ins and external tools can help you create more professional and visually appealing presentations. For example, the “Office Timeline” add-in allows you to create visually stunning timelines and Gantt charts. The “Mentimeter” external tool provides interactive features such as live polls and word clouds that can help you engage your audience.
In conclusion, incorporating multimedia and interactive elements, as well as leveraging add-ins and external tools, can help you create a more professional and engaging presentation. By following these advanced techniques, you can captivate your audience and deliver a memorable presentation that will leave a lasting impression.
Related posts:
- Free Online Solution to Repair Damaged PowerPoint Files
- Maximum Number of Slides in PowerPoint: What You Need to Know
- Access Excel, PowerPoint, Word and More for Less Than 1 Euro: A Tech-Savvy Guide
- How to Connect Shapes in PowerPoint: A Step-by-Step Guide
- PowerPoint This Picture Can’t Be Displayed: Troubleshooting Tips for Techies
- How to Collaborate on PowerPoint Presentations: Tips and Tricks
- Repair Damaged PowerPoint File Online for Free: A Tech Guide
- Mac Version of PowerPoint: Everything You Need to Know
- PowerPoint Chart Creation: The First Step
- Create Your First PowerPoint 2013 Presentation: A Step-by-Step Guide
Leave a Comment Cancel reply
Save my name, email, and website in this browser for the next time I comment.
How to video record yourself presenting a PowerPoint

What type of content do you primarily create?
Recording yourself presenting a PowerPoint can be challenging, especially getting the technical aspects right. You need to capture your screen, webcam, and audio seamlessly while delivering your content naturally and avoiding awkward transitions between slides.
Finding a tool that integrates all these components can seem daunting. However, recording yourself presenting a PowerPoint doesn't have to be reserved for the tech-savvy or professional speakers.
Whether you're a teacher creating online lessons, a marketer producing a product demo, or someone looking to improve their presentation skills, this guide will walk you through user-friendly tools and strategies that will teach you how to video record yourself presenting a PowerPoint.
- Recording yourself presenting a PowerPoint can be challenging, but it doesn't have to be reserved for experts.
- Video recording offers unlimited reach, repurposing opportunities, and a more engaging experience.
- Use PowerPoint's built-in recording feature or tools like Descript for a polished presentation.
- Other tools like Zoom, Loom, OBS Studio, Clipchamp, and Quick Time Player can also be used for recording.
- Tips include practicing your script, using slide notes, ensuring high-quality audio and lighting, and incorporating storytelling techniques.
Why video record yourself presenting a PowerPoint?
Video recording your PowerPoint presentations offers several advantages:
- Unlimited reach : Unlike in-person presentations confined to a specific time and location, recorded videos allow your message to reach audiences globally at their convenience.
- Repurposing opportunities: Recorded presentations can be repurposed as evergreen content across multiple platforms, such as social media, online courses, webinars, and internal training materials, maximizing their value.
- Personal and engaging : Recording yourself narrating a presentation adds a personal touch and dynamic element that static slides alone cannot replicate. Your viewers can see and hear you deliver the content, creating a more immersive and engaging experience.
How to record your presentation with the PowerPoint app
Built-in recording feature in powerpoint.
1. Open the PowerPoint slide you want to record.
2. Click on the Record tab of the top toolbar.
3. Click on the Record button and choose from any of the following options:
- From Current Slide
- From Beginning
4. You'll see the PowerPoint screen recording window.
5. Select the microphone and camera from the icon on the top-right.
6. Click the Stop and Replay buttons to end or replay your recording.
7. To export your presentation's recording, click Export to Video within the Recording tab.
Benefits : Easy to use, no external tools needed
Limitations : Limited editing capabilities.
How to make a more polished recording of your presentation with Descript
While PowerPoint's built-in recording features are helpful, they may not produce the refined result you want for your presentation. That's where Descript comes in handy.
It’s a whole production studio at your fingertips, with video recording, transcription, and editing capabilities, ready to transform dull PowerPoint slides into an engaging experience for your audience. Descript also has a built-in screen recorder.
You can use Descript on Windows, Mac, or even straight from your web browser.
Here's step-by-step guide to recording your PowerPoint presentation with Descript.
Set up your screen recording
1. Install and open Descript. At the top of the editor, click and open the Record panel.
2. Select Screen.
3. Set Recorder settings:
Adjust the default recording settings to your liking, including the transcription language, the maximum recording resolution, and more.
4. Set recording options. Choose which audio and video sources to record (e.g., microphone, computer audio, camera). Remember to turn the camera on to capture your talking head video alongside your PowerPoint presentation.
5. Click the Additional Settings icon for
- Studio Sound (Optional): Enhance audio quality with noise reduction and background removal
- Transcription (Optional): Enable automatic transcription for easier editing
- Recording separate audio tracks
6. Add (optional) Speaker labels for each audio track (e.g., "Narrator," "Expert") by typing them in the text box next to your audio inputs.
Capture your screen recording
1. Select the right recording option:
- Recording into script : Choose this if you haven’t recorded anything yet.
- Replace selection : Choose this if you already have a script and want to replace a specific section with a new recording.
- Record new layer : Pick this for recording your video as a new layer on top of an existing recording.
2. Click Record at the bottom of the Record panel.
3. Drag over the area of your screen you wish to record. Click Start Recording. Press Space to start recording the full screen.
4. Click Stop to finish recording
Bonus: Descript creates separate tracks for camera, microphone, and computer audio. You can edit each track individually for more precise control.
- Do a short test recording to ensure everything is set up correctly.
- Set your recording to transibe for easier editing.
Editing and polishing your PowerPoint recording in Descript
Descript's AI video editing tool makes it a breeze to trim, cut, and splice your video footage, ensuring a seamless flow from start to finish. You can add smooth transitions and other visual effects to make your presentation pop.
Here’s a glimpse of how to edit and polish your PowerPoint recording in Descript:
Edit your recording like a doc
Did you make a mistake during a slide transition? No problem. Just delete those sections in the text transcript (created automatically by Descript) and the video will adjust to match.
Remove filler words
Sound smoother and more confident by easily removing filler words like "um" and "uh" from the transcript.
Fix voiceover mistakes by typing
Didn't nail your delivery on a specific slide? No need to start from scratch! Descript's Overdub feature lets you simply type in the correct narration and replace the audio on that slide with AI voice cloning.
Boost video quality and engagement :
- Crisp up audio quality by reducing background noise and room reverb with the AI-powered Studio Sound feature.
- Replace your background completely with the Green Screen Video Editor —look like you're presenting in a sleek studio or broadcasting from a beach.
- Enable Eye Contact simulation with AI, so it appears you're making direct eye contact with viewers, even if you’re looking or reading something off-camera.
Other ways to video record yourself presenting a PowerPoint
Use Zoom’s meeting recording feature to record yourself giving a PowerPoint presentation. Start a Zoom meeting with yourself, share your PowerPoint window, and enable recording
Loom is a handy screen recording tool that also offers a webcam overlay. Launch the Loom app or Chrome extension and set it to record your screen and webcam. Expect high-quality recordings but no advanced editing features. The free plan offers only five minutes of recording at a stretch.
3. OBS Studio
OBS Studio is a free, open-source screen recorder/streaming software with a steeper learning curve. It’s popular among advanced or tech-savvy users who need granular customization and control.
To record your presentation, add a "Screen Capture" source to capture your PowerPoint window and a "Video Capture Device" source for your webcam.
4. Clipchamp: Recording natively in Windows
You can use Microsoft’s Clipchamp , the built-in screen recorder and video editor for Windows, to simultaneously capture your computer screen, webcam, and audio for recording your PowerPoint presentation. It’s also available as a browser-based app. You can record up to 30 minutes on screen and webcam recordings.
Users can also adjust the screen and webcam recordings in the editing timeline separately.
5. Quick Time Player Recording natively in Mac
Use Mac’s Quick Time Player to record your PowerPoint presentation. It’s not as straightforward as the other options on this list, so here’s a quick guide to help you out:
- Launch Quick Time Player.
- Select File and go to New Movie Recording.
- You'll be recording your entire screen in addition to recording your face, so adjust the size and location of the recording window so that it's in a nonintrusive corner of your PowerPoint.
- Go to View and select Float on Top .
- Next, go to File and select New Screen Recording.
- On the menu that appears, select Record Selected Portion and drag a border around your PowerPoint and the webcam recording window.
- Press Record and start presenting.
- You can adjust the video quality and the audio source in the webcam recording window.
How to turn your PowerPoint presentation slides into a video
Did you know PowerPoint lets you save your presentation as a video, too?
Here's a breakdown of the two ways you can do so—keeping all the presentation elements (narration, animation, pointer movements, timings, and so on) intact in the presentation itself.
Save your PowerPoint presentation as a video
This creates a separate video file (MP4 or WMV) that anyone can play, even without PowerPoint.
Follow these steps:
- Save your presentation
- Go to File > Export > Create a Video
- Ultra HD (4K): Best for large screens (if you have Windows 10+)
- Full HD (1080p): Great for computers and TVs
- HD (720p): Good for streaming online or on DVDs
- Standard (480p): Smallest size, good for phones
4. Decide on narration
- If you haven't recorded yourself talking, choose "Don't Use Recorded Timings and Narrations" from the dropdown menu
- If you have a recording, choose "Use Recorded Timings and Narrations." You can also set how long each slide shows for (default is 5 seconds)
5. Click Create Video
6. Name your video, pick a folder to save it in, and choose a file type (MPEG-4 or Windows Media Video)
Creating the video might take a while, especially for longer presentations. You can even leave it running overnight. Once done, find your video in the chosen folder and double-click to play it.
Save your PowerPoint presentation as a slideshow
This saves your presentation as a special file (PPSX) that starts playing automatically on full screen when opened. It only works with PowerPoint.
Here’s how it works:
- Make sure your presentation is saved (regular PowerPoint file)
- Go to File > Save As .
- Pick a folder to save the slideshow in.
- Under Save as type, choose PowerPoint Show (*.ppsx) .
- Click Save .
Now when someone opens the file, it will automatically play the slideshow.
Pro tips for making better video PowerPoint presentations
Practice your script.
Recording a flawless PowerPoint video rarely happens in one take. The key is practice.
Record practice run-throughs and watch them back. Make notes on areas that need improvement or parts lacking clarity. The more you drill your script, the more confident and natural you'll sound in the final recording.
Take advantage of PowerPoint's built-in Speaker Coach . The feature shows you whether your pace is too fast or slow, your use of filler words like "um," and suggestions to improve your voice modulation.
Use slide notes for coherent delivery
Wouldn’t a personal teleprompter make presentations so much easier? That’s what slide notes are for.
Having your thoughts and talking points organized within your PowerPoint file lets you have all crucial information and prompts readily available when recording.
Go ahead and add detailed notes or even a full script for each slide. This will help you stay on track and provide a handy transcript reference if you need to do any editing or voiceover work in post-production.
Use high-quality audio equipment or turn on Studio Sound
Poor audio recording quality is a surefire way to make even the most visually polished video feel amateurish. Do your presentation justice by investing in a decent external or Bluetooth microphone and audio interface to capture clear voiceover audio.
If you must use a built-in mic, record in a quiet environment to minimize background noise pickup. Or better yet, pair up with an AI-powered audio enhancement tool like Descript's Studio Sound , which reduces background noise , reverb, and other artifacts.
Ensure a clean background and even lighting
Ditch cluttered backgrounds. You want people to focus on the content of your PowerPoint and not be distracted by the funny shapes and colors in your video.
Your video lighting and framing matters, too. Position yourself facing a natural light source or bring supplemental video lighting to eliminate weird shadows and squinting-level glare.
Look directly into the camera or turn on Eye Contact
Looking directly into the camera is essential to create a sense of connection with the audience. Position your webcam or camera at eye level and imagine you're talking to a friend. If you're using Descript, enable the Eye Contact feature to auto-adjust your gaze towards the camera.
- Dress professionally and maintain a good posture to project confidence and authority.
- Use visuals, animations, and multimedia elements to enhance your presentation and keep your audience engaged.
- Consider adding closed captions or subtitles to your video for better accessibility and engagement, especially for those watching without sound.
- Speak clearly and at a moderate pace, using vocal variety to emphasize key points and maintain interest.
- Incorporate storytelling techniques, real-life examples, or personal anecdotes to make your video presentation more relatable and memorable .
Take your PowerPoint presentations from amateur to amazing
Recording yourself virtually presenting a PowerPoint allows you to distribute your message using the most engaging type of content: video. And there are many screen recording tools out there that can capture your screen and web camera footage with just a few clicks.
But how do you stand out?
By focusing on the presentation's depth, your delivery, and the video's quality. The first two are the bare minimum to communicate your message effectively.
But the right screen capture software and all-in-one video creation tool like Descript can help you with third. Use the tool to improve the quality of your recorded PPT presentations.
With Descript, it's easier than ever to record your screen, polish up the audio, and create stunning visuals all in one place. So why wait?
Sign up for Descript today and simplify your workflow while creating a PowerPoint presentation video that sticks with your audience in the long term.
How do you make a presentation video with your face?
To create a presentation video with your face, follow these steps:
- Open your presentation in PowerPoint.
- Go to the Slide Show tab.
- Click on Record and choose From Current Slide or From Beginning .
- Choose your microphone and camera by clicking on a sound icon on the top-right.
- Start recording by clicking on the record button.
- Speak into your microphone to narrate the presentation.
- Your webcam will capture your face during the recording.
- Click Stop when you finish recording.
- Export your recorded presentation by clicking on File> Export>Create a video.
How do you present yourself in PowerPoint?
To present yourself effectively in PowerPoint, follow these steps:
- Determine the key information to include in your presentation.
- Design and prepare your PowerPoint slides with a cohesive theme.
- Craft a compelling introduction to engage your audience.
- Tailor your presentation to different time constraints for flexibility.
- Capture the audience's attention before you begin speaking.
Related articles

Featured articles:
10 excellent Loom alternatives to record your screen
Looking for the best ways to record your screen without Loom? Find out 10 Loom alternatives, their features, and pricing.

How to record a YouTube video: A guide for all devices
If you want to record a YouTube video for personal use or fair-use repurposing, here are the steps to get started.

For Business
Social media video marketing: Everything you need to know
Learn how to win over potential customers (and the algorithms) with the right social media video marketing tools, strategy, and optimizations.

How to record a podcast on Zoom: A beginner’s guide
Follow this step-by-step guide on how to record a podcast on Zoom, then learn about why it may not be your best recording option.

How to record a Microsoft Teams meeting: 5 easy ways
Learn how to record a Microsoft Teams meeting on any device and get answers to common problems.

10 effective how-to videos to engage your audience
How-to videos are a great way to educate your audience. Whether you’re recording a software demo or training instructions, here’s how to create a how-to video.

Articles you might find interesting
10 proven ways to make money on TikTok in 2024
From built-in funds offered by the platform to other creative techniques, learn more about how to monetize TikTok and grow your following.

The 15 most popular podcasts right now
Explore the most popular podcasts of the moment. Discover trending topics and captivating hosts to find your next favorite podcast.

Product Updates
Descript now supports remote recording in 4K
Your podcast and video recordings are about to get stunningly, beautifully clear: SquadCast by Descript now supports 4K video recording. Paid Descript subscribers can now record in crystal-clear 4K quality.

Social media content creation: A 2024 guide
Want to build up your brand’s social media presence? Learn how to create a social media content creation strategy that will engage and entertain your audience.
New in Descript: Um detection, search, and more
Descript 3.1 is now available. Here’s what’s new:

42 million minutes: what millions of Descript creators did in 2023
What more than millions of Descript creators did in 2023.
Join millions of creators who already have a head start.
Get free recording and editing tips, and resources delivered to your inbox.
Related articles:
Share this article
- Sign In Sign Up
Home / AI Design / How To Put A Video In Google Slides

How To Remove Audio From Video
How to compress a video, how does an ai powerpoint generator work.

How To Make A Reel With Photos?
How to put a video in google slides.

The Google Slide AI is an innovative tool designed to streamline the process of creating engaging and professional presentations. This AI platform offers users the ability to design slides, incorporating various multimedia elements, including videos, to lift the visual and informational appeal of their presentations. By using the capabilities of AI, users can quickly generate templates and customize them to suit their specific needs, ensuring a cohesive final product.
Adding a video to your Google Slides can significantly uplift the viewer’s experience by providing dynamic content that supports your message. Below, we outline the steps to integrate a video into your slide using the AI Design app.
Steps to Add a Video to Google Slides
1. Access the AI Design App:
Start by navigating to the AI Design app from your dashboard to c reate Your Presentation

2. Create presentation with Template or AI:
You will get two options to create presentation
From Template: Choose this option to select a pre-designed template.
Click on Browse Templates
Search for presentation
Select a Template and Preview It

From AI: Choose this option to let the AI generate a custom presentation for you.
Click on “Generate with AI”
Select “AI Presentation”
Describe Your Topic

Bonus: How Does An AI PowerPoint Generator Work?
3. Upload Your Video:
Choose a source to upload Video:
Upload video from your device: One of the sources available is to upload photos directly from your device. Click on the “Browse” button and select the image file you want to upload from your device’s storage.
Click on “My Assets” and drag your uploaded element: If you have already uploaded videos or elements, you can access them by clicking on “My Assets.” Simply drag and drop the desired photo or element.
Upload from your mobile: Another option to upload images to reel is through your mobile device. Click on the “Mobile” option. You can either scan the QR code displayed on your screen using your mobile device or copy and paste the code provided. This will allow you to upload videos directly from your mobile device.
Google Drive link: If your photos are stored on Google Drive, you can easily import them into Presentation. Simply copy the link of the images from Google Drive and paste it into the designated area.

4. Select Your Video:
Browse your uploaded files in My Assets and select the video you want to add to your slide. Click on the Add button to insert the video into your slide.

5. Adjust Video Size:
Once the video is on the slide, you can adjust its size by dragging the corners of the video box.

6. Advanced Adjustments:
For more detailed adjustments, click on the three dots on the video.
Here, you can select options such as Flip or Align to further customize the size and placement of the video.

7. Control Playback and Volume:
Click on the Play button to preview the video on your slide. Adjust the volume settings as needed.

8. Additional Editing Options:
You can further enhance your video by using editing options like Trim or Flip.
Ensure the video fits seamlessly with the rest of your content.

9. Continue with Your Text:
After placing and editing your video, continue adding and formatting the text on your slide to complement the video content.
If satisfied, click on “Export” and then “Download” to save your masterpiece.

For more resources and tutorials, users can visit our Simplified Academy or explore our Help Center .
Don’t forget to check out our YouTube channel for more tips and tutorials on using the AI Design app and other features.
You may also like

How to Make a Business Presentation?
How to edit ai generated images, how to make professional thumbnails using simplified ai thumbnail maker tool, how to use the ai design to create full social media posts with ai, how to create ads with simplified.

How to preview your AI presentation in full screen

How to generate a color palette from images?

How to create a presentation with AI in Simplified
Comments are closed.
More in: AI Design

Where to find your generated AI presentations

How to delete elements or slides from presentations created using the ‘AI Presentation’ tool

Generating An AI Image From a Reference Image

Publishing AI-Generated Images To Social Media: The Ultimate Guide

AI Art: Edit images, download as PNG, generate more and variations
- Graphic Design
- Video & Animations
- Social Media Planner
- Background Remover
- Magic Resizer
- Animation Maker
- Content Rewriter
- Long Form Writer
- Instagram Reels
- Customer Testimonial
- Convert mov to mp4
- Convert jpg to png
- Instagram Stories
- Facebook Posts
- Linkedin Posts
- Pinterest Pins
- Half Page Ads
- Instagram Ads
- Facebook Feed Ads
- Billboard Ads
- Newsletter Popup
- Shopify Mobile Banner
- Shopify Home Page
- Business Cards
- Explore Static Templates
- YouTube Shorts
- Pinterest Video Pins
- TikTok Videos
- Explore Videos
- Hashtag Generator
- Youtube Video Titles
- Photo Captions
- Amazon Product Features
- Review Responder
- Blog Ideas + Title
- Sentence Expander
- Before After Bridge
- Social Media Quotes
- Meme Generator
- Explore AI Templates
- Google My Business
- Social Media Planning
- Social Media Analytics
- Video Academy
- What’s New
- Help center
- Affiliate Program
Latest Posts
- Insert a video from your PC Video
- Edit and format a video Video
- Insert a YouTube video Video

Insert a video from your PC

Watch this video to see how to insert or link to a video that is saved to your computer's local drive.
You have a video file on your computer that you want to play in your presentation.
Here is how to insert it and select play settings.
There are a couple of ways to insert a video file depending on the slide layout.
First, we will insert a video in a content layout within a placeholder.
In the placeholder I'll click the insert video icon, then I will click Browse , select my video and click Insert .
The video is inserted within the placeholder.
It has a play bar attached and I can control the action by clicking Play and Pause .
Now let's go to slide three and compare a blank layout.
To insert a video here I click the INSERT tab, Video , Video on My PC .
I select the video and click Insert .
In a blank layout the video is inserted either in the middle of the slide or at full slide size.
Depending on the videos original format.
If you want to resize the video and keep it centered press and hold control point to a corner and drag the two-pointed cursor.
PowerPoint maintains the height to width proportions as you resize.
Now let's click Slide Show to play the video in slide show view.
In a slide show when I move the cursor the play bar appears.
I click Play to start the video and pause to pause it.
I can drag on the play bar to go forward in the action or back.
And, there is a volume control.
Note that I can also play the video by clicking it a hand cursor appears when I point.
And I can click to pause it too.
Back in normal view let's try another approach.
On this slide I've inserted the video, resized it and pulled it into a corner.
I want the video to start automatically and to appear full-screen only while it's playing.
I also want this text box to appear when the video stops.
To choose the settings I want I select the video and click the Video Tools PLAYBACK tab.
Then for the start setting I'll change On click to Automatically .
I'll also check Play Full Screen and Hide While Not Playing .
Now let's click the preceding slide and click slide show to see the sequence.
I click the slide before the video then the video plays automatically full screen.
When it's done it disappears and wee see only the text box that's on the video slide.
Finally, here is an important point about videos and file size.
When you click Insert to insert a video the video file is embedded in the presentation and that results in a large file size for the presentation.
To reduce file size, save the presentation and click the FILE tab on the Info tab under properties you will see the file size.
This file is over eight megabytes.
To make the file size smaller and more manageable for sharing click Compress Media and choose a type of compression in terms of quality.
Let's try Internet Quality .
The file gets compressed and the compressed media window shows the amount of space saved.
We will close this window.
When I save the file and then click File again I see under properties that the file size is smaller.
If I don't like the result of the compression I can click Compress Media Undo .
To avoid the issue of a large file size another option is to link to the video file.
To do that when you first insert the video click the arrow next to insert and click Link to File .
When you present you need to have access to the linked video file from the presenting computer.
For more information about this and for additional tips such as creating a trigger to play a video, see the course summary at the end of this course.
Up next, edit and format a video.

Need more help?
Want more options.
Explore subscription benefits, browse training courses, learn how to secure your device, and more.

Microsoft 365 subscription benefits

Microsoft 365 training

Microsoft security

Accessibility center
Communities help you ask and answer questions, give feedback, and hear from experts with rich knowledge.

Ask the Microsoft Community

Microsoft Tech Community

Windows Insiders
Microsoft 365 Insiders
Was this information helpful?
Thank you for your feedback.
IMAGES
VIDEO
COMMENTS
Adjust the playback settings. Select the video and click the Playback tab. You'll be able to edit how your video plays on the slide. To adjust when the video plays, click the drop-down menu next to Start:.Select In Click Sequence, Automatically, or When Clicked On.; Check the boxes to apply any of the following: Play Full Screen, Hide While Not Playing, Loop until Stopped, and/or Rewind after ...
On the PowerPoint window, in the left sidebar, click the slide in which you want to add a video. At the top of the PowerPoint window, click the "Insert" tab. In the "Insert" tab, under the "Media" section (which is to the extreme right side of the interface), click "Video." You'll now see an "Insert Video From" menu.
Copy the address of the web page from the Address bar of your browser. Switch to PowerPoint for the web and select the slide where you want to place the video. On the Insert tab of the ribbon, in the Media group, select Online Video. In the Online Video dialog box, paste the address you copied in step 2. Select Insert.
On the Insert tab, click the arrow under Video, and then select This Device (or Video on My PC ). In the Insert Video box, click the file that you want to link to, click the down arrow next to the Insert button, and then click Link to File. Newer versions of PowerPoint support the playback of video with multiple audio tracks.
Step 3: Click Insert. In the Choose a Video dialog box, select the video file you want to insert, then click the Insert button to embed the video on the slide. If you want to put a link to the video on the slide, click Show Options in the lower left corner of the dialog box.
Select Format to put frames and effects on your video. Select Video Effects, Video Border, or Video Shape to add effects, borders, or crop your video to a shape. Select Corrections or Color to adjust the video's color tone. Select Poster Frame to choose the video's opening frame, and then click and drag with your mouse to select your ...
To insert a video from a file and embed it on a slide: In Normal View, navigate to the slide where you want to insert a video. Click the Insert tab in the Ribbon. Click Video. A drop-down menu appears. Depending on your PowerPoint version, choose Video on My Computer, Video on My PC or This Device. A dialog box appears.
In this video, you'll learn the basics of inserting videos in PowerPoint 2019, PowerPoint 2016, and Office 365. Visit https://edu.gcfglobal.org/en/powerpoint...
Let's see how to do so. Step 1: Select Insert from the menu ribbon (this step is the same). Step 2: Pick Video, and then go to Online Videos - the third option. Step 3: Copy the video URL and paste it into the search bar. Step 4: When the video preview appears, click Insert.
Haily is here to run you through the ins-and-outs of adding a video to your PowerPoint presentation — whether that's by inserting a video, uploading a linked...
Click or tap the Video button in the Media section and a small menu opens. Press the " Video on My PC" option to embed a video from your PC. PowerPoint, Embed, video. File Explorer will open. Search for the folder containing the video that you want to insert into your presentation.
Select the Video. Click Insert. Clicking Insert, the video is added to your PowerPoint slide as an editable PowerPoint object, as you can see below. With the video now inserted on your slide, you can use the features found in the Video Playback and Formatting tabs.
Video is a great way to engage your audience with something that can be more engaging, dynamic, or emotive than you can achieve with standard PowerPoint func...
Select the slide where you want to embed the YouTube video. On the "Insert" tab, click the "Video" button. On the drop-down menu, select the "Online Video" option. The Insert Video window that appears lets you search YouTube for a video or paste in that embed code you copied from the YouTube website. Paste the embed code and click ...
To insert a video file into PowerPoint, open your presentation and select a slide. From the ribbon bar, click Insert > Video > Video on my PC. Locate the video file on your PC in the Insert Video ...
Step 1: Open Microsoft Powerpoint. Step 2: Insert Video from Online Source. Step 3: Find Your TikTok Video. Step 4: Embed Your TikTok Video. How to Embed an Instagram Video in Powerpoint Step by Step. 1. Visit the Video You Want to Embed. 2. Open PowerPoint and Select the Slide You Want to Embed Into.
Within PowerPoint, navigate to the Insert tab in the Ribbon, open the Video dropdown and select Online Video. Within the online video dialog box, go to the YouTube search box and type the name of the video you are searching for (in this case I've typed 'breaking up your bullet points'), and then hit Enter.
Insert a video file. Open the slide where you want to add the video. Click Recording tab > Video > and then browse to the location on your computer or network where the video file is stored. Select the file and click Insert. The video will "auto-play" That means that when viewers look at the presentation in Slide Show, and they arrive at the ...
Just follow these five easy steps: 1. Start by opening your PowerPoint presentation and navigating to the slide where you want to insert your video. 2. Then, click the "Insert" tab. 3. Now, in the top right corner, click the arrow under the "Video" button, or in PowerPoint 365, click the arrow beside the "Video" button. 4.
From the Insert tab, click the Video drop-down arrow, then select Video on My PC ... Locate and select the desired video file, then click Insert. The video will be added to the slide. With the Screen Recording feature on the Insert tab, you can create a video of anything you are doing on your computer and insert it into a slide.
1. Navigate to the right slide. First, open your PowerPoint file and navigate to the slide that you want to put the video on. 2. Select Insert > Video > From File. Next, navigate to the top PowerPoint menu and select Insert. Then toggle down to Video, and select Movie from File.
To get started, open your PowerPoint presentation and navigate to the slide where you want to insert the YouTube video. Click on the "Insert" tab in the ribbon, and then click on the "Online Video" button. A dialog box will appear, prompting you to enter the URL of the YouTube video you want to embed. Simply copy and paste the video's ...
In this step-by-step tutorial video, learn how to insert a video on YouTube into a Microsoft PowerPoint presentation. Along with embedding the video, I also ...
Record new layer: Pick this for recording your video as a new layer on top of an existing recording. 2. Click Record at the bottom of the Record panel. 3. Drag over the area of your screen you wish to record. Click Start Recording. Press Space to start recording the full screen. 4. Click Stop to finish recording.
Select Your Video: Browse your uploaded files in My Assets and select the video you want to add to your slide. Click on the Add button to insert the video into your slide. 5. Adjust Video Size: Once the video is on the slide, you can adjust its size by dragging the corners of the video box. 6. Advanced Adjustments:
To insert a video here I click the INSERT tab, Video, Video on My PC. I select the video and click Insert. In a blank layout the video is inserted either in the middle of the slide or at full slide size. Depending on the videos original format. If you want to resize the video and keep it centered press and hold control point to a corner and ...
Want to add dynamic multimedia content to your PowerPoint presentations? Follow this comprehensive guide to learn how to embed a YouTube video in PowerPoint....
There are many ways to start a presentation: make a provocative statement, incite curiosity; shock the audience; tell a story, be authentic; quote a famous or influential person. Here are other presentation opening strategies: Begin with a captivating visual; ask a question; use silence; start with a prop; tell a relevant joke; use the word ...
Hi everyone. My add-in embeds an iframe to display a website in the slide. I can view and interact with the iframe normally in both edit mode and presentation mode. However, when I print the slide, the iframes do not display. Does anyone know why this is happening?