
Feb 23, 2021

Export Word documents into PowerPoint presentations
Mohit Anand
- Add our blog to your RSS feed reader" href="/rss/blog.xml" data-bi-name="RSS Subscription" data-bi-id="rss_feed" data-bi-bhvr="120" data-bi-socchn="RSSSubscription" title="Microsoft 365 Insider Blog RSS" target="blank" class="d-inline-block">
Hi, Office Insiders, my name is Mohit Anand, and I’m a Program Manager on the PowerPoint team. I’m glad to share that a new scenario is now available in Word for the web . You can now export Word document s in to PowerPoint presentation s .
Word document s to PowerPoint presentation s
Have you ever wished you could easily export an existing Word document into a great PowerPoint presentation? If so, the wait is over!
When you use the Export command, it creates a presentation based on all the summarized sections of the document. It also adds imagery, icons, videos, themes, and fonts using AI.
How it works
To turn your Word document into a PowerPoint presentation:
- Open any document you want to convert into a presentation in Word for the web.
- Click File > Export > Export to PowerPoint presentation .
- When prompted , choose a design theme for your presentation.
- Click Open presentation to re view the results in PowerPoint for the w eb.
- The presentation w ill be created in the OneDrive root folder of the user who used this option.

Scenarios to try
- Open a Word document and explore the available PowerPoint themes.
- Open a Word document that is mostly text and see which AI-backed assets are added by clicking on Export .
Known Issues
- This feature is currently only available in English.
- It is not available in the Internet Explorer and Safari browser.
- We only support text content for the transformation to presentation, other media content support is not currently available. You can add your own media to the presentation after you have exported your Word document.
Availability
Export your document to PowerPoint presentation is rolling out to all Word for the web users shortly .
Features are released over some time to ensure that things are working smoothly. Therefore, we highlight features that you may not have because they’re slowly releasing to larger numbers of Insiders. Additionally, sometimes we remove elements to further improve them based on your feedback. Though this is rare, we also reserve the option to pull a feature entirely out of the product, even if you, as Insiders, have had the opportunity to try them.
Feedback
If you have any feedback or suggestions, you can submit them by clicking Help > Feedback.
Learn more about what other information you should include in your feedback to ensure it’s actionable and reaches the right people.
We’re excited to hear from you! Sign up for the Office Insider newsletter , and you’ll get the latest information about Insider features in your inbox once a month.
Sorry, JavaScript must be enabled to use this app.
How-To Geek
How to convert a docx document to a pptx file.

Your changes have been saved
Email Is sent
Please verify your email address.
You’ve reached your account maximum for followed topics.
Samsung's New Foldables Are Coming July 10th
20+ surprisingly good-looking games you can play on a potato gaming pc, this is how i fixed the windows update error 0x80070643, quick links, the easy way: do it on the web, convert a word document to powerpoint on desktop.
Not all presentations have to be made in PowerPoint. If your presentation's content is in a Word document (DOCX file), there are a couple of ways to turn your document into a PowerPoint presentation (PPTX file).
Related: How to Convert a Word Document to a PowerPoint Presentation
You can easily convert a Word document to a PowerPoint file on the web . It's an easy process, but you do have to upload your document to Microsoft's web app. If you'd rather work with your file locally, there's a way to do that on your PC.
Microsoft Word's desktop app doesn't offer the above feature to automatically convert Word files to PowerPoint. Instead, it uses a manual workaround to convert your files.
This workaround involves formatting your Word document in a way that PowerPoint accepts and then importing the document into the PowerPoint app.
First, Format the Word Document
The first step is to make your Word document PowerPoint compatible. To do this, apply the H1 header style to all headers and the H2 header style to all paragraphs in your document.
Start by opening your document with Microsoft Word. In the Word window, select a header in your document.

While the header is selected, in the "Styles" section at the top of the Word window, click the "Heading 1" style. Do this for all the headers in your document.

Next, select the paragraph beneath your header. Then, in the "Styles" section at the top, click "More," and then select "Heading 2." Format all of your document paragraphs this way.

Finally, click File > Save in Word's menu bar to save the document. (Alternatively, press Ctrl+s on Windows or Command+s on Mac.)

Close the document in Word.
Next, Import the Word Document into PowerPoint
Your Word document is now ready to be imported into PowerPoint and converted into a presentation.
Start the import process by opening PowerPoint on your computer. On the first screen in PowerPoint, click "Blank Presentation" to make a new presentation.

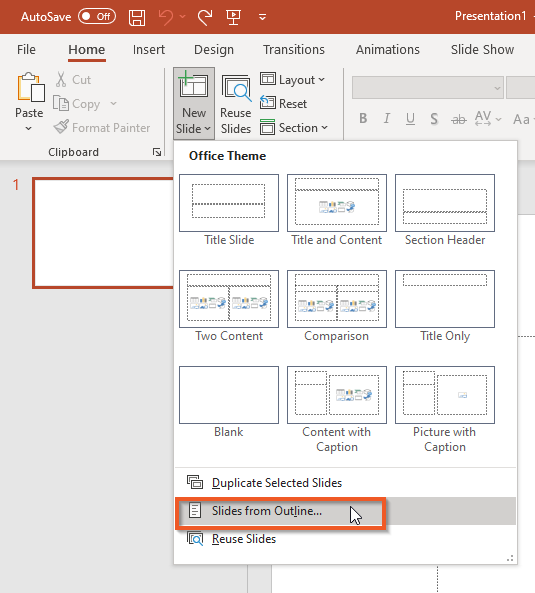
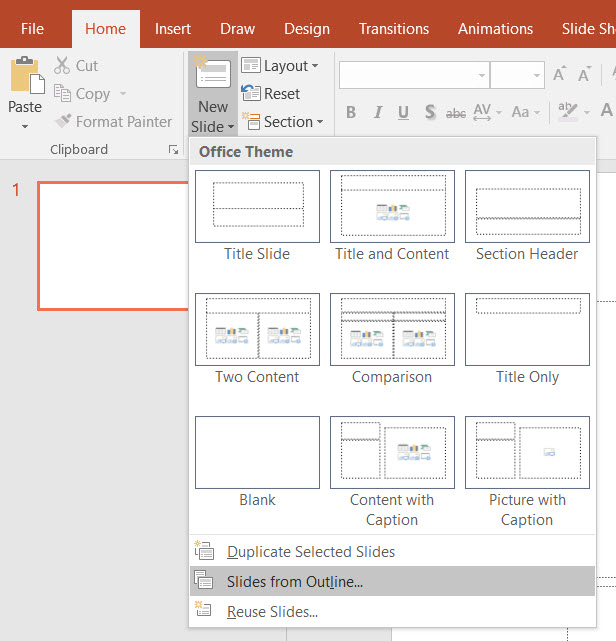
In the PowerPoint editing window that opens, click the "Home" tab at the top. Then, in the "Slides" section at the top, click the arrow icon beside "New Slide."

Select "Slides from Outline" in the menu that appears.

PowerPoint will ask you to select the file to import into your presentation. Here, select the Word document that you formatted earlier.

Your Word document will now be converted into a PowerPoint presentation. Each "Header 1" in your Word document will now have a dedicated slide in the presentation. Review this presentation and make changes to it if you want.

Lastly, save the presentation by clicking File > Save in PowerPoint's menu bar.

And that's all. Your Word document is now ready to be presented to your audience!
Now that you're done, if you have a PowerPoint presentation that you'd like to convert to Word , there's a way to do that, too.
Related: How to Convert a PowerPoint to Word and Make It Editable
- Microsoft Office
- Microsoft Word
- PRO Courses Guides New Tech Help Pro Expert Videos About wikiHow Pro Upgrade Sign In
- EDIT Edit this Article
- EXPLORE Tech Help Pro About Us Random Article Quizzes Request a New Article Community Dashboard This Or That Game Popular Categories Arts and Entertainment Artwork Books Movies Computers and Electronics Computers Phone Skills Technology Hacks Health Men's Health Mental Health Women's Health Relationships Dating Love Relationship Issues Hobbies and Crafts Crafts Drawing Games Education & Communication Communication Skills Personal Development Studying Personal Care and Style Fashion Hair Care Personal Hygiene Youth Personal Care School Stuff Dating All Categories Arts and Entertainment Finance and Business Home and Garden Relationship Quizzes Cars & Other Vehicles Food and Entertaining Personal Care and Style Sports and Fitness Computers and Electronics Health Pets and Animals Travel Education & Communication Hobbies and Crafts Philosophy and Religion Work World Family Life Holidays and Traditions Relationships Youth
- Browse Articles
- Learn Something New
- Quizzes Hot
- This Or That Game
- Train Your Brain
- Explore More
- Support wikiHow
- About wikiHow
- Log in / Sign up
- Computers and Electronics
- Microsoft Office
Step-By-Step Guide to Convert PowerPoint to Word: Windows + Mac
Last Updated: December 18, 2023 Fact Checked
This article was co-authored by wikiHow staff writer, Darlene Antonelli, MA . Darlene Antonelli is a Technology Writer and Editor for wikiHow. Darlene has experience teaching college courses, writing technology-related articles, and working hands-on in the technology field. She earned an MA in Writing from Rowan University in 2012 and wrote her thesis on online communities and the personalities curated in such communities. This article has been fact-checked, ensuring the accuracy of any cited facts and confirming the authority of its sources. This article has been viewed 734,106 times. Learn more...
This wikiHow article teaches you how to convert a Microsoft PowerPoint presentation into a Microsoft Word document by using the "Create Handouts" feature on PowerPoint for Windows, or by exporting an RTF (Rich Text Format) file using PowerPoint for Mac. The current version of PowerPoint for Mac does not have the "Create Handouts" feature. RTF files are not able to accurately convert the formatting of some PowerPoint features, so many images and backgrounds may not be supported.
Things You Should Know
- To convert a PowerPoint file to Word, first open the PowerPoint presentation.
- On Windows, go to File > Export > Create Handouts and click "OK."
- On Mac, go to File > Export > File Format > .rtf > Export. Open the RTF in Word, then go to File > Save As > Format > .docx and click "Save."

- If you want the Word document to update whenever the original PowerPoint presentation is changed, click on Paste link .
- If you want the Word document to remain unchanged whenever the original PowerPoint presentation is updated, click on Paste .

- The PowerPoint will open in Word so you can save it and view it later as a .docx document. [1] X Trustworthy Source Microsoft Support Technical support and product information from Microsoft. Go to source

- In most instances, the formatting and pagination will not match the original PowerPoint presentation, and the RTF format may not support many pictures or backgrounds. Be sure to go through the Word document and adjust it to your liking.
- Alternatively, you can easily convert a Word document to PowerPoint .
Expert Q&A
- Use online converters, like Zamzar, to convert PPT to Word docs without Microsoft software. Thanks Helpful 0 Not Helpful 0
- If you get the error "PowerPoint couldn't write to Microsoft Word," restart your computer and try the conversion again. Converting PowerPoint to Word takes a lot of memory, so if you have a lot of programs open or have a few browser tabs open, you can keep getting an error. Thanks Helpful 0 Not Helpful 0
- You can also use the Create Adobe PDF to see the PowerPoint easily. Thanks Helpful 0 Not Helpful 0

You Might Also Like

- ↑ https://support.microsoft.com/en-us/office/edit-or-print-powerpoint-handouts-in-word-09256fc0-3b3e-4a43-9c83-3cfde594fed4?ui=en-us&rs=en-us&ad=us
About This Article

- Send fan mail to authors
Is this article up to date?

Featured Articles

Trending Articles

Watch Articles

- Terms of Use
- Privacy Policy
- Do Not Sell or Share My Info
- Not Selling Info
wikiHow Tech Help Pro:
Level up your tech skills and stay ahead of the curve
- Qualifications
- Cyber Security Roundtable Series
- vCIO Services
- Cyber Security
- Managed Services
- Mobility Solutions
- Virtualization
- Unified Communications
- Structured Cabling
- Long-Term Support
- Client Portal
- ADKonnect Remote Support
- Free Assessment
How to Quickly Create a PowerPoint from Word
- How to Quickly Create a…
It’s 4PM on a Tuesday afternoon and your boss tells you she needs a 50-page training document turned into a presentation by the end of the day. Don’t panic! With Microsoft Word and PowerPoint, creating a presentation from a pre-existing Word document is as easy as 1-2-3.
1. Create a Word outline
If you already use headings (levels H1, H2, etc.) in Microsoft Word, then this step is already started for you! Follow these simple steps to create an outline within your documents:
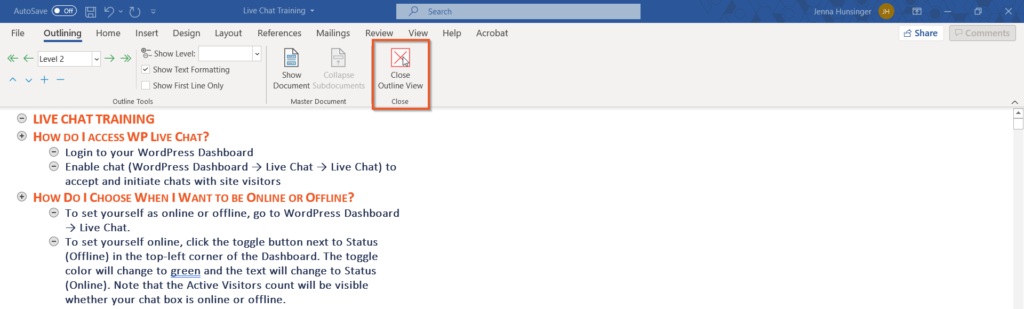
In the Ribbon at the top, click on the View tab then select Outline to automatically create a document outline.

If you don’t already have headings in your document, you’ll see a bulleted list with a separate bullet for each paragraph.

To add structure to your document, select the appropriate headings for each section in the Outlining tab. For example, use Level 1 for slide titles and Level 2 for bullet points on each slide.

Continue until all of your content is organized and assigned a heading. Then click Close Outline View.
2. Save your Word document
This is the easiest step of all! Simply save your document by hitting CTRL + S on your keyboard, clicking the Save icon at the top of your document, or going to File > Save. Then hit Close. Your document must be closed in order to import your outline into PowerPoint.
3. Import your Word document into PowerPoint
Open PowerPoint. In the Ribbon at the top, click New Slide then select Slides From Outline. Choose your desired Word file then click Insert.
Voilà! Most of your work is automatically done for you. Now all you have to do is add a cover slide and adjust the design settings to match your brand (the Design Ideas section is a great tool). Happy presenting!
Related posts

- Shop Early Amazon Prime Day Deals
- I Tried Both: Ring vs Nest Doorbell
How to Add PowerPoint Slides Into a Word Document
Insert PowerPoint slides as individual images
- Brock University
What to Know
- In Word, go to Insert > Add from Files and select the PowerPoint file. Choose Insert Slide for each slide you want to add.
Use the Picture Format menu to adjust each inserted slide.
When you want to use PowerPoint slides in a Microsoft Word document, use the Add from Files tool to import one or more slides from a PowerPoint presentation as images to the Word file. We show you how to do it using Microsoft Word for Microsoft 365, Word 2019, Word 2016, and Word for Mac.
How to Insert PowerPoint Slides Into a Word Document
Slides from an existing PowerPoint presentation can be inserted as an image into a blank document or an existing document.
Open an existing or blank Word document, then position the cursor where you want to insert the PowerPoint slide.
Go to the Insert tab and select Add from Files .
Select the PowerPoint file that contains the slides you want to add to the Word document.
If the file isn't listed, select Show More Files to browse the filesystem and choose a file.
In the Insert From File panel, find the slide you want to insert as an image and select Insert Slide to insert it into the document.
The slide appears as an image. It can only be edited with photo tools.
Considerations
In old versions of Microsoft Office , it sometimes made sense to export PowerPoint content into Word to mark it up with the speaker's notes and other information. However, PowerPoint has advanced such that these workarounds no longer prove as helpful.
PowerPoint presentations can be exported in different formats including PDF, several image formats, several movie formats, and a rich-text outliner format. Use these export formats as an alternative to a multi-step Word process.
Get the Latest Tech News Delivered Every Day
- How to Make an Image Background Transparent in PowerPoint
- How to Add Page Numbers in PowerPoint
- Converting PowerPoint Presentations to Word Documents
- How to Merge PowerPoints
- Converting PowerPoint Slides to Word Documents
- How to Add a Background Picture to PowerPoint Slides
- Create Pictures From PowerPoint Slides
- A Beginner's Guide to Text Wrap in PowerPoint
- How to Make a PowerPoint Presentation
- Use PowerPoint Slide Finder
- How to Print PowerPoint Slides With Notes
- How to Link or Insert Excel Files to Word Documents
- Copy Slides to Another PowerPoint Presentation
- How to Insert PDF Files Into PowerPoint Presentations
- How to Place a Picture Inside a PowerPoint Shape
- How to Add Pages to a PDF
How to create a PowerPoint Presentation from a word document
Revamp your Word documents into stunning presentations with Google Slides and MagicSlides. Here's your guide!
Step 1: Visit Google Slides

Step 2: Download MagicSlides Extension

Step 3: Locate Your Word Document

Step 4: Upload the Word Document

Step 5: Click "Generate Presentation"

Step 6: Your Word Document is Now a PowerPoint Presentation

Conclusion:
Frequently asked questions:.
Sanskar Tiwari
Founder at MagicSlides
How to group shapes in PowerPoint
30 April 2024
What do text boxes allow you to do in a PowerPoint Presentation?
How to use copilot in PowerPoint
29 April 2024
How to change master slide in PowerPoint
5 AI PowerPoint Generators Who Are Transforming Presentation Creation
How to flip a shape in PowerPoint?
26 April 2024
How to create flow chart in PowerPoint
How to remove all animations from PowerPoint
24 April 2024
How to change border color in PowerPoint
Stunning presentations in seconds with AI
Install MagicSlides app now and start creating beautiful presentations. It's free!

Free AI PPT Tools

Try Process AI free
How to make a powerpoint presentation using microsoft word 2010.
Microsoft Word 2010 isn’t normally used to make PowerPoint presentations. It’s a word processing program. But, if you only have Microsoft Word 2010 and need to make a PowerPoint presentation, there are ways around it.
One way is to make slides using Word’s page layout features, and then save them as images. JPEG or PNG is a good file format for this.
Next, open PowerPoint and make a blank presentation. Put the saved images from Word into it as slides. You can adjust the layout and design of the slides in PowerPoint.
Alternatively, you can use Word’s Outline View feature to create your PowerPoint presentation. In Outline View, structure your content into bullet points which will become slides when imported into PowerPoint.
To get into Outline View in Word 2010, go to the “View” tab and select “Outline” in the “Document Views” section. Then, organize your text using bullet points and headings.
Save your outline as a .rtf file. Open PowerPoint and choose “Open” from the File menu. Select your .rtf file and follow the prompts to import the outline as slides.
Pro Tip: Although Microsoft Word 2010 wasn’t made to do this, these workarounds can help you when PowerPoint isn’t available. Remember to adjust the formatting and design within PowerPoint for a professional presentation.
Overview of Microsoft Word 2010 features
Microsoft Word 2010 is a powerhouse of amazing features that make it ideal for crafting presentations. Here’s a glimpse of its top functions.
- Limitless customization: Word 2010 allows users to customize their slides with a wide range of formatting choices. From font type and color to bullet points and alignment, you can create slides that grab attention.
- SmartArt graphics: It offers an excellent SmartArt graphics option. This lets you insert professional diagrams, charts, and images into your presentation easily, so you can present complex info in a visually-pleasing way.
- Enhanced collaboration: It has co-authoring capability, so multiple people can work on a presentation at the same time. This makes team projects much simpler and efficient.
- Seamless integration with other Office apps: You can import/export content from programs like Excel or Access. This simplifies incorporating data into slide decks.
Also, you can add audio/video elements, apply transition effects between slides, and even save your presentation as a video. Unlock the potential of Microsoft Word 2010 – explore its features and create presentations that leave a mark.
Opening Microsoft Word 2010 and starting a new document
- Launch Microsoft Word 2010 by clicking its icon.
- Once open, find the “File” tab in the top-left corner.
- Select “New” from the drop-down menu to create a new document.
- A gallery will appear with templates and document types.
- Scroll through or use the search bar to find one for your PowerPoint .
- Or, select “Blank Document” from the gallery.
- Click “Create” to start working on your PowerPoint.
It’s worth mentioning that templates offer pre-designed layouts and themes for presentations. This can save time and effort. Align the template to the theme or purpose of your presentation to maintain consistency. For example, if giving a sales pitch, choose a template that looks professional and has eye-catching graphics.
By utilizing templates, you’ll get a visually appealing presentation while streamlining your workflow. Customize them to make them unique and engaging for your audience.
Choosing a design template for the PowerPoint presentation
When making a PowerPoint using Word 2010, it’s essential to pick a design template that will showcase your content well. Here are some key points for choosing one:
- Visual Appeal: Pick a template with colors, fonts and layouts that fit your content.
- Content Organization: Make sure the template has sections for titles, bullet points, images and charts.
- Customization Options: Check the template can be modified – colors, fonts, backgrounds etc – to create a unique presentation.
- Consistency: Get a template that keeps the same font styles, sizes and colors for headings and text, for readability.
Take a look at various design templates before settling on one. This’ll give you an idea of how each looks with your content. Selecting a great design template will give you an engaging PowerPoint.
Choose a template that boosts visual appeal whilst keeping consistency across slides. This will create an awesome presentation experience for your viewers. Start exploring design templates now to make your PowerPoint stand out!
Adding and formatting text in slides
- To add a text box to your slide, click “Insert” in the ribbon.
- Select “Text Box” from the drop-down menu.
- Drag and make it the size you want.
- Type in your content.
- Format the font, size, and color using the “Home” tab.
- To enhance the text, use bullet points, numbered lists, or different styles like bold or italic . These options are in the “Paragraph” section of the “Home” tab.
- Don’t use too many styles as it can make the slides look cluttered.
- For a professional and cohesive look, use a consistent style throughout the presentation.
- According to Microsoft Office Support , PowerPoint 2010 offers many options for adding and formatting text in slides.
Inserting images, graphs, and other media
Select visuals that are relevant to your content. Choose images that look good and support your message. For data, use graphs or charts. To insert an image or media file, go to the “Insert” tab in Microsoft Word 2010. Pick pictures, shapes, charts, and SmartArt graphics. Position images and media files in a way that looks nice and supports your message. Add videos or audio clips for a dynamic presentation. Research shows that multimedia content makes presentations more memorable. Follow these guidelines to create a captivating PowerPoint presentation.
Applying transitions and animations to slides
Select the slide you want to add transitions or animations to. Head to the “Transitions” tab in the PowerPoint ribbon, and choose from the “Transition to This Slide” group. Hover over each transition to preview it, then click to apply.
To animate individual elements, select the element first (e.g. text box, image). Then, go to the “Animations” tab in the PowerPoint ribbon. Explore the “Animation” group for different effects, and click one to apply. Customize using “Effect Options”.
Keep it simple! Excessive effects can distract from your message. Use entrance and exit animation sparingly for better impact. To maintain consistency, use similar transition styles and timings across all slides. This will create a more cohesive and polished look for your presentation.
Adding speaker notes and timings
When crafting a PowerPoint presentation in Microsoft Word 2010, think about speaker notes and timings . These tools help the presenter give their message clearly.
- Speaker Notes : For extra info or reminders, add speaker notes. These only show up for the presenter, not the audience.
- Timing Slides : Also use timing slides to control the duration of each slide. That way, the presentation is smooth and timed well.
- Adding Speaker Notes : Go to “View,” click “Notes Page,” and start typing in the space provided.
- Setting Timings : Go to the “Slide Show” tab. Click “Rehearse Timings,” and follow the instructions.
To take your presentation further, personalize speaker notes with text styles or pics. Practice with timing to make sure you speak at the right pace.
For example, one student used speaker notes and timings to avoid embarrassment at a crucial presentation. With rehearsed slides and prepared notes, they managed to get through their talk without missing important points or rushing.
Previewing and running the PowerPoint presentation
Preview your PowerPoint to make sure everything is running smoothly for your audience. Click the “Slideshow” tab and select either “From Beginning” or “From Current Slide”. To preview individual slides, click on the “Slide Show” button. Utilize the arrows and spacebar to move forward and press “B” to temporarily black out the screen. End the show by pressing “Esc” or right-clicking and selecting “End Show”.
If you want to practice without an audience, go to the “Set Up Slide Show” option under the Slideshow tab and choose one of three options.
Also, check for any hidden slides that may contain extra content. Lastly, have a backup copy saved on external storage in case of technical difficulties.
Saving and sharing the PowerPoint presentation
Saving and sharing a PowerPoint presentation is a must for collaboration and distribution. It allows you to keep your work and easily share it with others. Here’s a simple guide on how to save and share your PowerPoint presentation using Microsoft Word 2010.
- Click on ‘File’.
- Choose ‘Save As’ from the dropdown menu.
- Select the location you want to save your file.
- Type a name for your presentation in the ‘File Name’ field.
- Click ‘Save’.
- Open your saved presentation in Microsoft Word 2010.
- Click ‘File’.
- Select ‘Share’ from the left-hand menu.
- Pick ‘Email’.
- Put in the recipient’s email address, subject and message (if needed).
- Click ‘Send’.
- Choose ‘Save & Send’ from the left-hand menu.
- Pick an option like ‘Save to SkyDrive’.
- Log in with your Microsoft account or create one if you don’t have one. (SkyDrive is now called OneDrive.)
- Follow the instructions to upload and share your file.
Plus, you can also think of saving and sharing your PowerPoint presentations through other file-sharing platforms such as Google Drive or Dropbox. These platforms provide convenient ways to store, access and collaborate on files online.
Fun Fact: Survey says, SlideShare has an average of 60 million unique visitors visiting their platform every month. This makes it one of the biggest professional content sharing communities out there.
- Creating a PowerPoint with Microsoft Word 2010 may seem strange, but it’s possible! Follow these steps to make an attractive and interactive presentation.
- Go to the “ Page Layout ” tab and select “ Slide Orientation “. Customize the slide size and orientation.
- In the “ Insert ” tab you’ll find ways to add images, videos and audio.
- Use the “ Home ” tab to add formatting styles and shapes or SmartArt graphics.
- The “ Design ” tab has pre-designed themes and layouts to quickly customize your slides.
- Incorporate bullet points, headings, and subheadings in your content.
- Finally, use the “ Animations ” tab to add slide transition effects.

No credit card required
Your projects are processes, Take control of them today.
Critical PowerPoint Shortcuts – Claim Your FREE Training Module and Get Your Time Back!
How to Make a PowerPoint Presentation (Step-by-Step)
- PowerPoint Tutorials
- Presentation Design
- January 22, 2024
In this beginner’s guide, you will learn step-by-step how to make a PowerPoint presentation from scratch.
While PowerPoint is designed to be intuitive and accessible, it can be overwhelming if you’ve never gotten any training on it before. As you progress through this guide, you’ll will learn how to move from blank slides to PowerPoint slides that look like these.

Table of Contents
Additionally, as you create your presentation, you’ll also learn tricks for working more efficiently in PowerPoint, including how to:
- Change the slide order
- Reset your layout
- Change the slide dimensions
- Use PowerPoint Designer
- Format text
- Format objects
- Play a presentation (slide show)
With this knowledge under your belt, you’ll be ready to start creating PowerPoint presentations. Moreover, you’ll have taken your skills from beginner to proficient in no time at all. I will also include links to more advanced PowerPoint topics.
Ready to start learning how to make a PowerPoint presentation?
Take your PPT skills to the next level
Start with a blank presentation.
Note: Before you open PowerPoint and start creating your presentation, make sure you’ve collected your thoughts. If you’re going to make your slides compelling, you need to spend some time brainstorming.
For help with this, see our article with tips for nailing your business presentation here .
The first thing you’ll need to do is to open PowerPoint. When you do, you are shown the Start Menu , with the Home tab open.
This is where you can choose either a blank theme (1) or a pre-built theme (2). You can also choose to open an existing presentation (3).
For now, go ahead and click on the Blank Presentation (1) thumbnail.

Doing so launches a brand new and blank presentation for you to work with. Before you start adding content to your presentation, let’s first familiarize ourselves with the PowerPoint interface.
The PowerPoint interface

Here is how the program is laid out:
- The Application Header
- The Ribbon (including the Ribbon tabs)
- The Quick Access Toolbar (either above or below the Ribbon)
- The Slides Pane (slide thumbnails)
The Slide Area
The notes pane.
- The Status Bar (including the View Buttons)
Each one of these areas has options for viewing certain parts of the PowerPoint environment and formatting your presentation.
Below are the important things to know about certain elements of the PowerPoint interface.
The PowerPoint Ribbon

The Ribbon is contextual. That means that it will adapt to what you’re doing in the program.
For example, the Font, Paragraph and Drawing options are greyed out until you select something that has text in it, as in the example below (A).

Furthermore, if you start manipulating certain objects, the Ribbon will display additional tabs, as seen above (B), with more commands and features to help you work with those objects. The following objects have their own additional tabs in the Ribbon which are hidden until you select them:
- Online Pictures
- Screenshots
- Screen Recording
The Slides Pane

This is where you can preview and rearrange all the slides in your presentation.
Right-clicking on a slide in the pane gives you additional options on the slide level that you won’t find on the Ribbon, such as Duplicate Slide , Delete Slide , and Hide Slide .

In addition, you can add sections to your presentation by right-clicking anywhere in this Pane and selecting Add Section . Sections are extremely helpful in large presentations, as they allow you to organize your slides into chunks that you can then rearrange, print or display differently from other slides.

The Slide Area (A) is where you will build out your slides. Anything within the bounds of this area will be visible when you present or print your presentation.
Anything outside of this area (B) will be hidden from view. This means that you can place things here, such as instructions for each slide, without worrying about them being shown to your audience.

The Notes Pane is the space beneath the Slide Area where you can type in the speaker notes for each slide. It’s designed as a fast way to add and edit your slides’ talking points.
To expand your knowledge and learn more about adding, printing, and exporting your PowerPoint speaker notes, read our guide here .
Your speaker notes are visible when you print your slides using the Notes Pages option and when you use the Presenter View . To expand your knowledge and learn the ins and outs of using the Presenter View , read our guide here .

You can resize the Notes Pane by clicking on its edge and dragging it up or down (A). You can also minimize or reopen it by clicking on the Notes button in the Status Bar (B).
Note: Not all text formatting displays in the Notes Pane, even though it will show up when printing your speaker notes. To learn more about printing PowerPoint with notes, read our guide here .
Now that you have a basic grasp of the PowerPoint interface at your disposal, it’s time to make your presentation.
Adding Content to Your PowerPoint Presentation
Notice that in the Slide Area , there are two rectangles with dotted outlines. These are called Placeholders and they’re set on the template in the Slide Master View .
To expand your knowledge and learn how to create a PowerPoint template of your own (which is no small task), read our guide here .

As the prompt text suggests, you can click into each placeholder and start typing text. These types of placeholder prompts are customizable too. That means that if you are using a company template, it might say something different, but the functionality is the same.

Note: For the purposes of this example, I will create a presentation based on the content in the Starbucks 2018 Global Social Impact Report, which is available to the public on their website.
If you type in more text than there is room for, PowerPoint will automatically reduce its font size. You can stop this behavior by clicking on the Autofit Options icon to the left of the placeholder and selecting Stop Fitting Text to this Placeholder .
Next, you can make formatting adjustments to your text by selecting the commands in the Font area and the Paragraph area of the Home tab of the Ribbon.

The Reset Command: If you make any changes to your title and decide you want to go back to how it was originally, you can use the Reset button up in the Home tab .

Insert More Slides into Your Presentation
Now that you have your title slide filled in, it’s time to add more slides. To do that, simply go up to the Home tab and click on New Slide . This inserts a new slide in your presentation right after the one you were on.

You can alternatively hit Ctrl+M on your keyboard to insert a new blank slide in PowerPoint. To learn more about this shortcut, see my guide on using Ctrl+M in PowerPoint .
Instead of clicking the New Slide command, you can also open the New Slide dropdown to see all the slide layouts in your PowerPoint template. Depending on who created your template, your layouts in this dropdown can be radically different.

If you insert a layout and later want to change it to a different layout, you can use the Layout dropdown instead of the New Slide dropdown.
After inserting a few different slide layouts, your presentation might look like the following picture. Don’t worry that it looks blank, next we will start adding content to your presentation.

If you want to follow along exactly with me, your five slides should be as follows:
- Title Slide
- Title and Content
- Section Header
- Two Content
- Picture with Caption
Adding Content to Your Slides
Now let’s go into each slide and start adding our content. You’ll notice some new types of placeholders.

On slide 2 we have a Content Placeholder , which allows you to add any kind of content. That includes:
- A SmartArt graphic,
- A 3D object,
- A picture from the web,
- Or an icon.
To insert text, simply type it in or hit Ctrl+C to Copy and Ctrl+V to Paste from elsewhere. To insert any of the other objects, click on the appropriate icon and follow the steps to insert it.
For my example, I’ll simply type in some text as you can see in the picture below.

Slides 3 and 4 only have text placeholders, so I’ll go ahead and add in my text into each one.

On slide 5 we have a Picture Placeholder . That means that the only elements that can go into it are:
- A picture from the web

To insert a picture into the picture placeholder, simply:
- Click on the Picture icon
- Find a picture on your computer and select it
- Click on Insert
Alternatively, if you already have a picture open somewhere else, you can select the placeholder and paste in (shortcut: Ctrl+V ) the picture. You can also drag the picture in from a file explorer window.

If you do not like the background of the picture you inserted onto your slide, you can remove the background here in PowerPoint. To see how to do this, read my guide here .
Placeholders aren’t the only way to add content to your slides. At any point, you can use the Insert tab to add elements to your slides.
You can use either the Title Only or the Blank slide layout to create slides for content that’s different. For example, a three-layout content slide, or a single picture divider slide, as shown below.

In the first example above, I’ve inserted 6 text boxes, 3 icons, and 3 circles to create this layout. In the second example, I’ve inserted a full-sized picture and then 2 shapes and 2 text boxes.
The Reset Command: Because these slides are built with shapes and text boxes (and not placeholders), hitting the Reset button up in the Home tab won’t do anything.
That is a good thing if you don’t want your layouts to adjust. However, it does mean that it falls on you to make sure everything is aligned and positioned correctly.
For more on how to add and manipulate the different objects in PowerPoint, check out our step-by-step articles here:
- Using graphics in PowerPoint
- Inserting icons onto slides
- Adding pictures to your PowerPoint
- How to embed a video in PowerPoint
- How to add music to your presentation
Using Designer to generate more layouts ideas
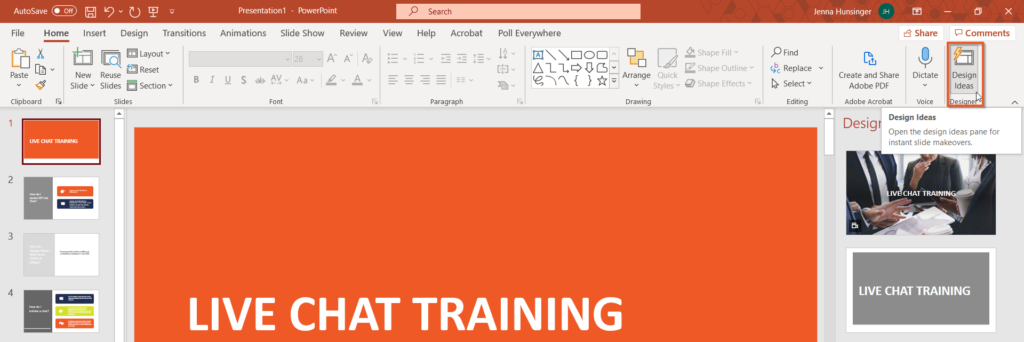
If you have Office 365, your version of PowerPoint comes with a new feature called Designer (or Design Ideas). This is a feature that generates slide layout ideas for you. The coolest thing about this feature is that it uses the content you already have.
To use Designer , simply navigate to the Design tab in your Ribbon, and click on Design Ideas .

NOTE: If the PowerPoint Designer is not working for you (it is grey out), see my troubleshooting guide for Designer .
Change the Overall Design (optional)
When you make a PowerPoint presentation, you’ll want to think about the overall design. Now that you have some content in your presentation, you can use the Design tab to change the look and feel of your slides.
For additional help thinking through the design of your presentation, read my guide here .
A. Picking your PowerPoint slide size
If you have PowerPoint 2013 or later, when you create a blank document in PowerPoint, you automatically start with a widescreen layout with a 16:9 ratio. These dimensions are suitable for most presentations as they match the screens of most computers and projectors.
However, you do have the option to change the dimensions.
For example, your presentation might not be presented, but instead converted into a PDF or printed and distributed. In that case, you can easily switch to the standard dimensions with a 4:3 ratio by selecting from the dropdown (A).
You can also choose a custom slide size or change the slide orientation from landscape to portrait in the Custom Slide Size dialog box (B).

To learn all about the different PowerPoint slide sizes, and some of the issues you will face when changing the slide size of a non-blank presentation, read my guide here .
B. Selecting a PowerPoint theme
The next thing you can do is change the theme of your presentation to a pre-built one. For a detailed explanation of what a PowerPoint theme is, and how to best use it, read my article here .
In the beginning of this tutorial, we started with a blank presentation, which uses the default Office theme as you can see in the picture below.

That gives you the most flexibility because it has a blank background and quite simple layouts that work for most presentations. However, it also means that it’s your responsibility to enhance the design.
If you’re comfortable with this, you can stay with the default theme or create your own custom theme ( read my guide here ). But if you would rather not have to think about design, then you can choose a pre-designed theme.
Microsoft provides 46 other pre-built themes, which include slide layouts, color variants and palettes, and fonts. Each one varies quite significantly, so make sure you look through them carefully.
To select a different theme, go to the Design tab in the Ribbon, and click on the dropdown arrow in the Themes section .

For this tutorial, let’s select the Frame theme and then choose the third Variant in the theme. Doing so changes the layout, colors, and fonts of your presentation.

Note: The theme dropdown area is also where you can import or save custom themes. To see my favorite places to find professional PowerPoint templates and themes (and recommendations for why I like them), read my guide here .
C. How to change a slide background in PowerPoint
The next thing to decide is how you want your background to look for the entire presentation. In the Variants area, you can see four background options.

For this example, we want our presentation to have a dark background, so let’s select Style 3. When you do so, you’ll notice that:
- The background color automatically changes across all slides
- The color of the text on most of the slides automatically changes to white so that it’s visible on the dark background
- The colors of the objects on slides #6 and #7 also adjust, in a way we may not want (we’ll likely have to make some manual adjustments to these slides)

Note: If you want to change the slide background for just that one slide, don’t left-click the style. Instead, right-click it and select Apply to Selected Slides .
After you change the background for your entire presentation, you can easily adjust the background for an individual slide.

Inside the Format Background pane, you can see you have the following options:
- Gradient fill
- Picture or texture fill
- Pattern fill
- Hide background
You can explore these options to find the PowerPoint background that best fits your presentation.
D. How to change your color palette in PowerPoint
Another thing you may want to adjust in your presentation, is the color scheme. In the picture below you can see the Theme Colors we are currently using for this presentation.

Each PowerPoint theme comes with its own color palette. By default, the Office theme includes the Office color palette. This affects the colors you are presented with when you format any element within your presentation (text, shapes, SmartArt, etc.).

The good news is that the colors here are easy to change. To switch color palettes, simply:
- Go to the Design tab in the Ribbon
- In the Variants area, click on the dropdown arrow and select Colors
- Select the color palette (or theme colors) you want
You can choose among the pre-built color palettes from Office, or you can customize them to create your own.
As you build your presentation, make sure you use the colors from your theme to format objects. That way, changing the color palette adjusts all the colors in your presentation automatically.
E. How to change your fonts in PowerPoint
Just as we changed the color palette, you can do the same for the fonts.

Each PowerPoint theme comes with its own font combination. By default, the Office theme includes the Office font pairing. This affects the fonts that are automatically assigned to all text in your presentation.

The good news is that the font pairings are easy to change. To switch your Theme Fonts, simply:
- Go to the Design tab in the Ribbon
- Click on the dropdown arrow in the Variants area
- Select Fonts
- Select the font pairing you want
You can choose among the pre-built fonts from Office, or you can customize them to create your own.
If you are working with PowerPoint presentations on both Mac and PC computers, make sure you choose a safe PowerPoint font. To see a list of the safest PowerPoint fonts, read our guide here .
If you receive a PowerPoint presentation and the wrong fonts were used, you can use the Replace Fonts dialog box to change the fonts across your entire presentation. For details, read our guide here .
Adding Animations & Transitions (optional)
The final step to make a PowerPoint presentation compelling, is to consider using animations and transitions. These are by no means necessary to a good presentation, but they may be helpful in your situation.
A. Adding PowerPoint animations
PowerPoint has an incredibly robust animations engine designed to power your creativity. That being said, it’s also easy to get started with basic animations.
Animations are movements that you can apply to individual objects on your slide.

To add a PowerPoint animation to an element of your slide, simply:
- Select the element
- Go to the Animations tab in the Ribbon
- Click on the dropdown arrow to view your options
- Select the animation you want
You can add animations to multiple objects at one time by selecting them all first and then applying the animation.
B. How to preview a PowerPoint animation

There are three ways to preview a PowerPoint animation:
- Click on the Preview button in the Animations tab
- Click on the little star next to the slide
- Play the slide in Slide Show Mode
To learn other ways to run your slide show, see our guide on presenting a PowerPoint slide show with shortcuts .
To adjust the settings of your animations, explore the options in the Effect Options , Advanced Animation and the Timing areas of the Animation tab .

Note: To see how to make objects appear and disappear in your slides by clicking a button, read our guide here .
C. How to manage your animations in PowerPoint

The best way to manage lots of animations on your slide is with the Animation Pane . To open it, simply:
- Navigate to the Animations tab
- Select the Animation Pane
Inside the Animation Pane, you’ll see all of the different animations that have been applied to objects on your slide, with their numbers marked as pictured above.
Note: To see examples of PowerPoint animations that can use in PowerPoint, see our list of PowerPoint animation tutorials here .
D. How to add transitions to your PowerPoint presentation
PowerPoint has an incredibly robust transition engine so that you can dictate how your slides change from one to the other. It is also extremely easy to add transitions to your slides.
In PowerPoint, transitions are the movements (or effects) you see as you move between two slides.

To add a transition to a PowerPoint slide, simply:
- Select the slide
- Go to the Transitions tab in the Ribbon
- In the Transitions to This Slide area, click on the dropdown arrow to view your options
- Select the transition you want
To adjust the settings of the transition, explore the options in the Timing area of the Transitions tab.
You can also add the same transition to multiple slides. To do that, select them in the Slides Pane and apply the transition.
E. How to preview a transition in PowerPoint

There are three ways to preview your PowerPoint transitions (just like your animations):
- Click on the Preview button in the Transitions tab
- Click on the little star beneath the slide number in the thumbnail view
Note: In 2016, PowerPoint added a cool new transition, called Morph. It operates a bit differently from other transitions. For a detailed tutorial on how to use the cool Morph transition, see our step-by-step article here .
Save Your PowerPoint Presentation
After you’ve built your presentation and made all the adjustments to your slides, you’ll want to save your presentation. YOu can do this several different ways.

To save a PowerPoint presentation using your Ribbon, simply:
- Navigate to the File tab
- Select Save As on the left
- Choose where you want to save your presentation
- Name your presentation and/or adjust your file type settings
- Click Save
You can alternatively use the Ctrl+S keyboard shortcut to save your presentation. I recommend using this shortcut frequently as you build your presentation to make sure you don’t lose any of your work.

This is the standard way to save a presentation. However, there may be a situation where you want to save your presentation as a different file type.
To learn how to save your presentation as a PDF, see our guide on converting PowerPoint to a PDF .
How to save your PowerPoint presentation as a template
Once you’ve created a presentation that you like, you may want to turn it into a template. The easiest – but not technically correct – way, is to simply create a copy of your current presentation and then change the content.
But be careful! A PowerPoint template is a special type of document and it has its own parameters and behaviors.
If you’re interested in learning about how to create your own PowerPoint template from scratch, see our guide on how to create a PowerPoint template .
Printing Your PowerPoint Presentation
After finishing your PowerPoint presentation, you may want to print it out on paper. Printing your slides is relatively easy.

To open the Print dialog box, you can either:
- Hit Ctrl+P on your keyboard
- Or go to the Ribbon and click on File and then Print

Inside the Print dialog box, you can choose from the various printing settings:
- Printer: Select a printer to use (or print to PDF or OneNote)
- Slides: Choose which slides you want to print
- Layout: Determine how many slides you want per page (this is where you can print the notes, outline, and handouts)
- Collated or uncollated (learn what collated printing means here )
- Color: Choose to print in color, grayscale or black & white
There are many more options for printing your PowerPoint presentations. Here are links to more in-depth articles:
- How to print multiple slides per page
- How to print your speaker notes in PowerPoint
- How to save PowerPoint as a picture presentation
So that’s how to create a PowerPoint presentation if you are brand new to it. We’ve also included a ton of links to helpful resources to boost your PowerPoint skills further.
When you are creating your presentation, it is critical to first focus on the content (what you are trying to say) before getting lost inserting and playing with elements. The clearer you are on what you want to present, the easier it will be to build it out in PowerPoint.
If you enjoyed this article, you can learn more about our PowerPoint training courses and other presentation resources by visiting us here .
🔒 Unlock the PowerPoint Shortcuts Trusted by Industry Leaders KKR, American Express, HSBC, and More!
Join over 114,880 professionals from diverse fields including consulting, investment banking, advertising, marketing, sales, and business development who have supercharged their PowerPoint game with our proven methods.
✅ Customize compelling presentations effortlessly.
✅ Master time-saving techniques for faster deck creation.
✅ Boost your career prospects with top-notch PowerPoint skills.
Get FREE access to the Critical PowerPoint Shortcuts module of our premium training course by entering your name and email below.
DISCLAIMER: PC Users Only!
We respect your privacy and will keep your info safe and confidential.
About The Author

Popular Tutorials
- How to Strikethrough Text (l̶i̶k̶e̶ ̶t̶h̶i̶s̶) in Word, Excel & PowerPoint
- How to Make Animated Fireworks in PowerPoint (Step-by-Step)
- Strikethrough Shortcut (l̶i̶k̶e̶ ̶t̶h̶i̶s̶) for Word, Excel & PowerPoint
- How to Create a Flash Card Memory Game in PowerPoint (Like Jeopardy)
- Keyboard Shortcuts Not Working: Solved
PowerPoint Tutorial Categories
- Strategies & Opinions
- Shortcuts & Hacks
- Pictures, Icons, Videos, Etc.
- New Features
- Miscellaneous
- Charts & Data Viz
We help busy professionals save hours and gain peace of mind, with corporate workshops, self-paced courses and tutorials for PowerPoint and Word.
Work With Us
- Corporate Training
- Presentation & Template Design
- Courses & Downloads
- PowerPoint Articles
- Word Articles
- Productivity Resources
Find a Tutorial
- Free Training
- For Businesses
We help busy office workers save hours and gain peace of mind, with tips, training and tutorials for Microsoft PowerPoint and Word.
Master Critical PowerPoint Shortcuts – Secure Your FREE Training Module and Save Valuable Time!
⌛ Master time-saving expert techniques.
🔥 Create powerful presentations.
🚀 Propel your career to new heights.
We value your privacy – we keep your info safe.
Discover PowerPoint Hacks Loved by Industry Giants - KKR, AmEx, HSBC!
Over 114,880 professionals in finance, marketing and sales have revolutionized their PPT skills with our proven methods.
Gain FREE access to a full module of our premium PowerPoint training program – Get started today!
We hate spam too and promise to keep your information safe.
You are currently viewing a placeholder content from Facebook . To access the actual content, click the button below. Please note that doing so will share data with third-party providers.
(2) Save your MS Word file .
(3) Open your PPT file. Go to HOME > NEW SLIDE > SLIDES FROM OUTLINE .
(4) Browse and find your MS Word file. Click INSERT .
PPT will create a new slide for TITLE and HEADING 1 styles, and respective entries for other paragraph styles EXCEPT for NORMAL (body text).
Now you can enter body text for each of the headings and sub-headings.

About Ugur Akinci
- Add an image
- Draft and add content
- Rewrite text
- Chat with Copilot
- Create a summary
- Copilot in Word on mobile devices
- Create a new presentation
- Add a slide or image
- Summarize your presentation
- Organize your presentation
- Use your organization's branding
- Copilot in PowerPoint for mobile devices
- Draft an Outlook email message
- Summarize an email thread
- Suggested drafts in Outlook
- Email coaching
- Get started with Copilot in Excel
- Identify insights
- Highlight, sort, and filter your data
- Generate formula columns
- Summarize your OneNote notes
- Create a to-do list and tasks
- Create project plans in OneNote

Create a new presentation with Copilot in PowerPoint
Note: This feature is available to customers with either a Copilot for Microsoft 365 (work) or Copilot Pro (home) license.
Create a new presentation in PowerPoint.

Select Send and Copilot will draft a presentation for you!
Edit the presentation to suit your needs, ask Copilot to add a slide , or start over with a new presentation and refine your prompt to include more specifics. For example, "Create a presentation about hybrid meeting best practices that includes examples for team building."
Create a presentation with a template
Copilot can use your existing themes and templates to create a presentation. Learn more about making your presentations look great with Copilot in PowerPoint .

Enter your prompt or select Create presentation from file to create a first draft of your presentation using your theme or template.

Edit the presentation to suit your needs, ask Copilot to add a slide , organize your presentation, or add images.
Create a presentation from a file with Copilot
Note: This feature is available to customers with a Copilot for Microsoft 365 license for full options, or a Copilot Pro license for limited options.

With Copilot in PowerPoint, you can create a presentation from an existing Word document—or a PDF if you have a Copilot for Microsoft 365 (work) license. Point Copilot in PowerPoint to your document, and it will generate slides, apply layouts, create speaker notes, and choose a theme for you.

Select the document you want from the picker that appears. If you don't see the document you want, start typing any part of the filename to search for it. You can use a Word document—or, if you have a Copilot for Microsoft 365 (work) license, you can use a PDF, and encrypted documents are available as well.
Note: If the file picker doesn't appear, type a front slash (/) to cause it to pop up.
Best practices when creating a presentation from a Word document
Leverage word styles to help copilot understand the structure of your document.
By using Styles in Word to organize your document, Copilot will better understand your document structure and how to break it up into slides of a presentation. Structure your content under Titles and Headers when appropriate and Copilot will do its best to generate a presentation for you.
Include images that are relevant to your presentation
When creating a presentation, Copilot will try to incorporate the images in your Word document. If you have images that you would like to be brought over to your presentation, be sure to include them in your Word document.
Start with your organization's template
If your organization uses a standard template, start with this file before creating a presentation with Copilot. Starting with a template will let Copilot know that you would like to retain the presentation's theme and design. Copilot will use existing layouts to build a presentation for you. Learn more about making your presentations look great with Copilot in PowerPoint .
Tip: Copilot works best with Word documents that are less than 24 MB.
Welcome to Copilot in PowerPoint
Frequently Asked Questions about Copilot in PowerPoint
Where can I get Microsoft Copilot?
Copilot Lab - Start your Copilot journey

Need more help?
Want more options.
Explore subscription benefits, browse training courses, learn how to secure your device, and more.

Microsoft 365 subscription benefits

Microsoft 365 training

Microsoft security

Accessibility center
Communities help you ask and answer questions, give feedback, and hear from experts with rich knowledge.

Ask the Microsoft Community

Microsoft Tech Community

Windows Insiders
Microsoft 365 Insiders
Find solutions to common problems or get help from a support agent.

Online support
Was this information helpful?
Thank you for your feedback.
60 Effective PowerPoint Presentation Tips & Tricks (Giant List)
Here's a PowerPoint presentation tips and tricks guide that takes you through how to make a good PowerPoint presentation.

The best PowerPoint presentations shouldn’t be remembered. Instead, they should fall into the background to support you and the message you’re trying to get across.
Unlike good PowerPoint presentations , bad PowerPoint presentations are a distraction. You may remember them, but not in a good way.
You’ve seen them before. They might have millions of lines of text. Or a disjointed flow to the slides. Even worse, some slides feature ugly photos and poor design that detract from the message you’re trying to get across. That can even hurt your credibility as a professional or speaker.

This article will take you from finding your initial topic to learning how to make a great PowerPoint presentation. Our guide covers everything in between so that you learn how to present a PowerPoint like a pro.
These Microsoft PowerPoint presentation tips and guidelines are organized into sections. So cut straight to the advice you need and come back when you’re ready for the next steps.
Guide to Making Great Presentations (Free eBook Download)

Also, download our Free eBook: The Complete Guide to Making Great Presentations . It’s the deepest resource for learning effective presentation skills for a PPT.
This eBook covers the complete presentation process. It takes the PowerPoint tips and tricks you learn in this article further. Learn how to write your presentation, design it like a pro, and prepare it to present powerfully. It’s another great source for presentation design tips.
Master PowerPoint (Free Course): 15 Essential Tips
This article is full of helpful tips so you can build a powerful presentation. You can also find more PowerPoint tips in this video lesson:
To learn even more about how to make a PowerPoint look good, review the huge list of tips below.
What Makes a PowerPoint Presentation Effective?
Knowing how to use PowerPoint and work within it quickly is helpful. But more important is making a good presentation that hits all your goals. A great PowerPoint presentation is:
- Prepared to Win . Research, plan, and prepare your presentation professionally. It helps you deliver an effective message to your target audience.
- Designed Correctly . Your visual points should stand out without overwhelming your audience. A good PowerPoint visual shouldn’t complicate your message.
- Practiced to Perfection . Rehearse your timing and delivery so that your points land as practiced with a live audience.
- Delivered With Poise . Present with a relaxed inner calm and confident outward projection. Give your audience warmth, excitement, and energy.
- Free From Mistakes . Avoid typos, cheesy clip art, and mistakes like reading directly from your slides.
Consider this your all-inclusive guide to how to make a good presentation. We’ll look at preparing your presentation and explore how to design it in PowerPoint. Plus, we’ll cover how to practice and nail your delivery successfully come presentation time.
We’ll also address what not to do in these tips for PowerPoint presentations—so you can sidestep any big mistakes. Now let’s dig into these tips for effective PowerPoint presentations.
Killer Presentation Preparation Tips to Get Started Right
Before even opening PowerPoint, start by addressing these things. These Microsoft PowerPoint tips and tricks will ensure that you’re prepared for your presentation:
1. Know Your Stuff
Your presentation isn’t about your slides alone. It’s about the message you want to get across. Before filling in stats, facts and figures, think about the narrative that’ll be discussed, why, and in what order.
2. Write It Out
Start in a Word or Google doc, and storyboard or script the entire presentation. This will give you an idea of how the information presented will flow and how viewers will see it in sequence. Learn the complete writing process .
3. Highlight What’s Most Important
A presentation covers the most crucial pieces only. Whatever you’ve been working on that led to this—a paper, a work project, a new product design—doesn’t need to be shared in its entirety. Pick key points and put the rest in an “Appendix” to refer to during the Q&A session at the end.
4. Know Your Audience
How you talk to a room full of medical professionals should be different from the way you address a room full of young entrepreneurs. Everything, in fact, is different: your topic selection, the language you use, the examples you give to illustrate points. The little bits of humor you include should be tailored specifically with your target audience in mind.
Understand your audience’s needs to create a successful PowerPoint presentation. Customize your content to meet their specific requirements.
5. Rehearse! (Yes, Already)
It’s never too early to get used to the rhythm of your presentation and take note of points you want to emphasize. While saying it out loud, you’ll start to develop a “feel” for the material. You’ll notice that some things work well, while others don’t and might need to be worked around.
6. Rewrite After You Rehearse
As you’re rehearsing your presentation, you’re bound to stumble over sections that don’t quite flow naturally. Instead of reworking your delivery, it might be time to consider the content and rewrite the areas that served as stumbling blocks.
“Editing is hard. ‘It’s good enough,’ is a phrase wannabes use. Leaders take editing seriously.” – Anthony Trendl
The most important part of creating a great presentation is the writing stage. The second most important stage is rewriting.
7. Share With a Friend
If the stakes are high for your presentation, it’s never too early to get feedback from those that you trust. Here’s an article that helps you collaborate as a team on a PowerPoint presentation. Get PowerPoint design tips from those that you trust when you collaborate.
Simple Tips to Design Your PowerPoint Presentation Better
Second only to you (the information you bring and how you present it) is your PowerPoint slides. If not designed well, a PowerPoint can be disengaging or distracting (regardless of the content quality). Here are some presentation design tips to make sure this doesn’t happen to you:
8. Keep Your Slides Simple
This is one of the most important PowerPoint presentation tips to follow when designing your slides. Keep in mind that less is more (effective.) A cluttered slide is distracting. It causes confusion for an audience: Which part of the slide should I focus on? Should I read the slide or pay attention to the presenter?
A simple, visually appealing slide will engage your audience, keeping them on track with your main points. Here’s an example of a simple slide that serves its purpose perfectly:

Minimalist slide templates like Nook can help you resist the urge to clutter your slides.
9. Limit Words on Your Slides
Piggybacking on the last point, less is more effective. If possible, avoid bullets altogether. Otherwise cut them to just a few simple words. The audience should be listening, not reading.
10. Use High-Quality Photos and Graphics
One of the most important tips for quality PowerPoint presentations is to use high-quality photos and graphics.
Earlier in this tutorial, you saw Envato Elements, an all-you-can-download service with PPT tips inside of templates. Those pre-built designs are a beginner’s best friend. They’re even better when paired with Elements’ unlimited library of stock photos .
People are more likely to take you seriously if your presentation is visually appealing. Users view attractive design as more usable. Similarly, they’ll view a more attractive PowerPoint as more effective.
11. Use Accurate and Relevant Charts and Graphs
Charts and graphs can also be distracting if they’re not used right. Make sure your information design is simple and clean so that the audience doesn’t spend the entire time trying to decipher what your X axis says. Learn more about PPT data presentation .
12. Use High-Quality, Fresh Templates
Have you seen the old PowerPoint template that looks like worn paper and uses ink splashes? Yeah, so has your audience. Templates can be distracting if they’re too basic or if the design feels dated. You need one with great design options.
Costs are always a concern. But when you use Envato Elements, you’ve got everything you need to create a great PowerPoint presentation . That’s thanks to the incredible all-you-can-download subscription package.
The best PowerPoint tips and tricks can hardly compare to the value of using a template while building your presentation.
On Envato Elements, there are thousands of PowerPoint design templates that are ready to use. Instead of designing a presentation from scratch, start with a template! Just add your specifics to the placeholders.

Templates like Galaxi are impressively designed and waiting for your slide specifics.
The best PowerPoint design tips save you time. And there’s no tip more powerful than this one: use a pre-built template . It helps you master how to present a PowerPoint without spending all your time in the app.
13. Choose Appropriate Fonts
Fonts are an important part of engaging your audience. Fonts and typography choices have a subconscious effect on viewers. They can characterize your company’s presentation and brand either positively or negatively. Make sure that you’re choosing fonts that are professional and modern.
14. Choose Color Well
Like font choice, colors cause specific subconscious reactions from viewers. Choosing an outdated color combination for your presentation will render it ineffective.
Below is an example of the Popsicle PowerPoint template , which has a modern presentation color choice:

The Popsicle PowerPoint template highlights how harmonized color palettes can create beautiful slides.
15. Clean + Simple Formatting Makes All the Difference!
We’ve got a full tutorial on how to make a good presentation slide . Give it a read through and review the accompanying video. Just remember, less is more. The focus is you and your message , not your slides.
16. Make Sure All Objects Are Aligned
A simple way to create a well-designed presentation is to make sure all items on a slide are intentionally aligned. To do this, hold down Shift and select all the objects you want to include. Then choose Arrange in the options bar and apply Alignment Type .
17. Limit Punctuation
This isn’t the place for exclamation points. Emphasize your points (while speaking). Don’t enlist punctuation to do this for you. (Leave these at home!!!)
18. Avoid Over-Formatting Your Points
This PowerPoint presentation tip is simple. There’s no need to have every word of every bullet point capitalized, or to have all your bullet points in title case. If possible, drop bullets altogether. Again, the simpler, the better!
Limit your text formatting, including reducing the use of bullets, underline, and other effects. Compare the before example on the left to the revised version on the right.

19. Combine Information With Graphics in PowerPoint
One of the most powerful presentation skills for PPT is using infographics. With the right type of visuals, slides come to life and reduce the text in favor of graphics.
Infographics help combine information with graphics. It’s easier to explain complex ideas when you use visual formats that are intuitive.
Practice Presentation Tips: Rehearse, Rehearse, Rehearse!
Delivery is probably more important than the actual content. Here’s how to become more aware of your own unique ticks, and how to present like a polished pro:
20. I’ll Say It Again, Rehearse!
Just do it. Again and again. Experiment with pauses, gestures, and body language. Practice around one hour for every minute of your speech.
21. Practice With a Timer
Consistency is key to an effective PowerPoint presentation. The timing should be similar (ideally the same) each time you rehearse. This one will especially pay off when it’s time to present in front of your audience.
22. Slow It Down
Many of the best speakers today intentionally speak slowly. You’ll have the chance to emphasize, appear more thoughtful, and make your information easier to digest.
23. Pause More Often
Like the prior tip, pausing more often allows your main points to be emphasized and gives time for information to sink in. You need to let key points breathe a little before rushing into the next section.
24. Record Yourself
Use your phone’s voice recorder. Assess and critique yourself. Consider:
- Are your pauses too short or too long?
- Are you speaking slowly enough? Too slow?
- When you’re nervous, does your voice get high like the mice in Cinderella?

It’s always weird to hear your own voice recorded; don’t stress it. Use this as a time to adjust.
25. Choose Three Focal Points in the Room
If you stare at the same spot (or even creepier, the same person) the entire time, your presentation will be ineffective (and awkward.) People will be distracted by you, wondering what you’re staring at.
Try this: pick three points in the room (typically: left, center, right). Take time to direct your delivery toward each physical focal point in the room. Also, focus on the center when making your primary points.
26. Vary Your Sentence Length
This makes you sound more interesting, and it’s easier for your audience to follow. Think short and punchy. Or go long and complex for dramatic effect.
27. Modulate!
Don’t speak in monotone for your whole presentation. Be conscious of raising and lowering your voice tone. Otherwise, people will tune you out, and you’ll come across like the teacher in Charlie Brown.
28. Practice in Front of a Mirror
What you look like is as important as how you sound. Pretend you’re having a normal conversation, and allow your hands to move with your speech to emphasize your points. Just don’t get carried away! (I’m thinking Brene Brown or President Obama , not your Aunt Jamie after a few gin and tonics.)
29. Use “Present Mode” When Rehearsing
When you finally are ready to hit the Present button in PowerPoint, make sure you use the Present Mode option. This allows you (and only you) to view extra notes about each slide—just in case you forget something!
30. Practice With New Audiences
If possible, try doing a few real live test runs as a webinar or even at a local Toastmasters organization to get some feedback from a live audience.
31. Engage the Audience by Asking Questions
There’s no reason that a presentation should be one-sided. Why not invert the format and ask your audience a question?
To learn how to create a slide that kicks off a Q&A, use this article . These PowerPoint design tips help you create an engaging and exciting discussion.
Helpful Tips to Step Up and Deliver Come Presentation Time
When the actual day arrives, there are only a few last PowerPoint presentation tips and guidelines to keep in mind:
32. Take a Deep Breath
Deep breathing is proven to relieve stress. It’s simple, and it’ll help you remain calm and in the moment, even up to the last minute before starting.
33. Lighten Up Your Mood
Tell yourself a joke or watch a funny video clip. Do this before the presentation, of course. Research concludes that happy people are more productive. More productive is more focused and able to perform better.
34. Remind Yourself to Take It Slow
When we’re stressed or nervous (or both), we tend to speak faster. Consciously, take yet another deep breath and remind yourself to take it slow!
35. Read the Room
Every presentation room has a temperature. It’s your job as a speaker to gauge it and tailor your presentation to it.
Here’s a great example. Layoffs are coming at a company, and you’re asked to speak to an audience. Even if the audience isn’t personally affected by the actions, you’ve got to consider the morale of the workforce.

Skilled speakers have a knack for reading the energy of the room and adjusting their presentation on the fly.
The last thing that group will want to hear is how strong the economy is and why the company is the best place to work. That doesn’t mean that you’ve got to align to their uncertainty, but don’t go too far against the grain while presenting.
Robert Kennedy III is a master of bringing energy and aligning a speech to the audience. Here’s his advice for adjusting:
“It can be hard to wake up a “dead” crowd but go for it. Most of all, don’t take their energy personally. Focus on serving them with every bit of your fiber then leave empty.”
36. Fake It ‘Til You Make It!
Go forward with confidence. If you act confident, you’ll start to feel more confident. Move slowly with grace, speak clearly, smile, wear something nice. You’ll appear confident to all attendees (no matter how you feel internally).
PowerPoint Presentation Tips and Tricks to Help Avoid Mistakes (What Not to Do)
Most importantly, focus on what you can do to make your presentation better. There are a few important things not to do that we’ve got to address. Here are a handful of PowerPoint presentation tips and tricks to help you avoid missteps.
37. Stop With the Sound Effects
Sound effects are distracting and outdated. In most cases, avoid them. Add audio or music to your presentation to inject interest or highlight an important point, but it’s something to take extra care with. If you insert audio, then make sure your use really connects with your audience and has a fresh approach. Otherwise, it’s best to leave it out.
38. Don’t Use Flashy Slide Transitions
Again, this is distracting and outdated. Use transitions and subtle animations in your PowerPoint presentation. But you need to take care and do it right .
39. Beware of Clip Art
This PowerPoint presentation tip shouldn’t even have to be said. But please, please don’t use clip art. Use professional graphics instead.
40. Don’t Be Afraid to Be Afraid
The fear of public speaking is a real one. Many beginners think that if they’re feeling nervous that a presentation won’t go well or succeed. That might lead them to cancel the presentation.
Here’s a tip from expert Sandra Zimmer, who leads The Self-Expression Center on conquering your fears before you take the stage:
“Get out of your head and into your body. I do this through a grounding exercise that really works to calm nerves and bring you present in the moment.”
If you think that public speaking fears aren’t normal, you might never give your award-winning presentation. So don’t be afraid to be afraid, and acknowledge it’s part of the process!
41. Don’t Read Directly During Your PowerPoint Presentation
If you spend your entire presentation looking at the screen or your note cards, you’re sure to lose your audience’s attention. They’ll disengage from what you’re saying, and your presentation will fall flat.
Reading from your paper or screen also makes it look like you’re not prepared. Many people do it, but no one should. As a general rule, only present something you know well and have, at least mostly, memorized the main points of.
42. Don’t Miss Out on PowerPoint Customizations
Many new PowerPoint users often make significant mistakes when using Envato Elements designs.
The best way to see how to make a good presentation PPT is to start with designs from others. That means using a template, but that doesn’t mean you can’t customize them!

Don’t forget that PowerPoint templates are infinitely customizable. Think of them as guides with built-in presentation design tips.
To see more presentation tips that show you what not to do, make sure to check out our guide .
Work in PowerPoint More Effectively (Tips & Tricks to Level Up Your PPT Skills)
These PowerPoint tips will help you get the most out of the application to level up your next presentation. Let’s dive in.
43. Use the Visual Guides
When you’re designing your next PowerPoint presentation, it helps to create a sense of visual rhythm. Slides that have objects aligned and centered are more likely to resonate with an audience.
44. Use a Few Animations (Tastefully)
Animations in effective PowerPoint presentations are a slippery slope. We’ve all sat through presentations where there were so many objects in motion that it was easy to lose focus on the key ideas in the presentation.
But that’s why animations get an unfairly bad reputation. Use animations to create motion and hold an audience’s attention. Use them sparingly and on key elements on your slide, and you’ll capture that attention properly.
45. Stage Key Content With Animations
You just learned that animations should avoid being distracting. But there’s an important principle to using animations properly. It’s called staging content.
Staging content means that the content appears step by step. There’s nothing worse than overwhelming an audience with all your content at once. But when you stage content, bring it on step by step.
Take it from presentation pro Suzannah Baum :
“If you’re sharing a slide with lots of different points on it, using the animation to reveal those points one at a time is a way to keep the presenter’s content flowing smoothly.”
For more animation presentation tips and tricks, follow our guide .
46. Add a Video to Your PowerPoint
When you’re sharing a big idea in your presentation, it helps to share your perspective from a few different angles. Adding a video to supplement your content can do just that. Luckily, it’s easy to add and embed a YouTube video in your next PowerPoint presentation.
47. Add Charts & Graphs
Charts and graphs can help you tell stories with data. It’s easy for an audience to zone out when you throw a big data table or set of statistics at them.
instead, convert those to charts and graphs. Try out our tutorial to learn how to edit those graphs.
48. Build Your Own Infographics With SmartArt
Earlier in this tutorial, we gave you one of my favorite PowerPoint design tips: use infographic templates.
Here’s another. One of my favorite PowerPoint features is SmartArt, which allows you to build infographics right inside the app.
You don’t have to use another graphic design app like Photoshop or Illustrator to add visuals. Instead, try out SmartArt to help you build graphics that are easy to update.
49. Use Presenter View
Remember that when you use the PowerPoint, you’ re the presentation. The slides are just there to reinforce what you’ve got to say and support your speaking points.
That’s why I always recommend using Presenter view. More often than not, you’re going to have several displays. Presenter view shows your content on your screen, while your presentation is displayed on another screen.
50. Track Your PowerPoint Changes
One of my favorite PowerPoint design tips is to collaborate. Those who know you best will suggest compelling changes that are sure to help you succeed.
As you start collaborating on your presentation, it helps to keep track of proposed and included PowerPoint changes. Use this article to track changes made by others.
10 More Advanced PowerPoint Tips & Tricks
Really need to wow an audience with a good PowerPoint presentation? Give these tips a try to make an unforgettable impression:
51. Engage With an Interactive Quiz
A good PowerPoint presentation gets your audience involved. One of the best PowerPoint tricks is to do that with a quiz. By engaging audiences, a quiz makes your slides memorable.

By adding trivia, you’ll see how to present a PowerPoint in a way that people will love. Channel your inner game-show host today. MIDTEST is a good PowerPoint presentation with quiz slides.
52. Illustrate With Custom Image Masks
One of the top PowerPoint tips is to illustrate your slides. But you can go beyond simple, rectangular images on each slide.

The Burte template is full of PowerPoint tricks , including custom image masks. Image masks shape photos into unique works of art. And thanks to premium templates, you can style photos just like this. Masks overlay your photos onto geometric shapes, instantly elevating your style.
53. Print Handouts With Extra Notes
Wonder how to give a good presentation PPT that audiences will remember? Give them a piece of it to take home.
PowerPoint makes it easy to print handouts with room for notes on the page. This way, audiences can keep copies of your slides, along with their own notes. This is the perfect way to ensure everyone engages with and retains your content.
54. Make Bulk Edits With Master Slides
When you think about how to present a PowerPoint, consider your branding. That means keeping your logo front and center in the eyes of an audience. But if you’re working with a lengthy slide deck, this could seem daunting.
That’s where master slides come in. They’re common in premium layouts, and they’re a leading example of presentation skills for PPT. Master slides let you make bulk edits fast.
55. Shrink File Sizes for Sharing
Many of the top presentation tips involve making your slides more accessible. Often, that involves sharing them with audiences online.
You’ll often find that email clients and cloud services limit the size of files that you share. This can be a problem with large PPT slide decks. But there are a few quick steps you can take to reduce PPT file size. Cut graphics, scale down photos, and more.
56. Map Processes With Flowcharts
As you consider how to do a good PowerPoint presentation, think of ease of understanding. After all, you’re trying to explain something to your audience.

The Flowcharts in Infographics template seamlessly illustrates ideas and processes. A flowchart maps out a process in a visual way. Instead of resorting to endless narration, try a quick illustration like this. It saves you time and effort, and your audience is sure to thank you.
57. Use Brand-Specific Colors
Using presentation skills for PPT helps form an association between your message and branding. There’s no better way to do that than with your brand colors.
PowerPoint makes it easy to change color themes, adding your brand colors and logo to each slide. This is one of the top PowerPoint tricks for marketing presentations.
58. Build Social Media Posts in PPT
A good PowerPoint presentation doesn’t have to be shared through a projector. Use the app and templates to build amazing illustrations to use anywhere.

A template like Soffee helps you learn how to present a PowerPoint easily with a pre-built design.
Try using PowerPoint to create social media posts. It helps you engage with your audience, with no need to design custom layouts from scratch.
59. Be Industry-Specific
One of the top presentation tips in 2024 is to be industry-specific. That means avoiding generic layouts and choosing something more customized.
This offers two key advantages. First, you save time by having layouts built for you. Second, you gain design inspiration for your specific topic. Themed templates are truly the best of both worlds.

The Medical and Health template is a good PowerPoint presentation with a set theme.
60. Design for Online (Virtual) Sharing
Last but not least in our list of PowerPoint tips comes virtual presenting. More and more often, slides will be shared with online audiences around the globe.
Why not design your slides for that very purpose? And then learn how to share flawlessly with a global team? It’s one of the top presentation tips for 2024. Embrace it today.
More Great PowerPoint Tutorial Resources
We’ve built a resource for Microsoft PowerPoint that you’re sure to want to try. It includes countless PowerPoint tips and tricks. It’s called How to Use PowerPoint (Ultimate Tutorial Guide) and has all the PowerPoint design tips you need.
Discover More Top PowerPoint Template Designs From Envato Elements for 2024
You’ve just seen our favorite powerful PowerPoint presentation tips and guidelines to help you improve your speaking. We’ve also mentioned Envato Elements, an incredible all-you-can-download source for top PowerPoint designs .
Here are five of the best PowerPoint templates that you can use to create your best presentation yet:
1. Galaxi PowerPoint Template
Blast off to success with the help of this PowerPoint template! Think of the pre-built slide designs as pro PowerPoint design tips. They’re built by professional graphic designers. All the popular and modern slide styles that are perfect for your next presentation. Use Galaxi’s five styles and 30 designs to create a great presentation.
2. Masmax PowerPoint Template

We selected templates for this article that match the PowerPoint tips and tricks provided. Masmax fits the bill perfectly across its 234 unique slide designs. These slide designs are sure to align with the latest in design expectations.
3. STYLE Multipurpose PowerPoint Template V50

Style is subjective, but we can all agree that this template is stunning! The light and airy slide designs are built with fashion-focused designs in mind. But that doesn’t mean that it’s not perfect for most presentations. When learning to present a PowerPoint, remember that templates can be customized to suit your purpose.
4. Peachme Creative PowerPoint Template

Peachme has image-focused slides with splashy designs. The slides are colorful and perfect for a modern presentation. Don’t worry about remembering all the PowerPoint design tips because they’re included in the pre-built slides. Use Peachme’s designs for your presentation today.
5. Buizi Office Building Rent PowerPoint Template

Buizi markets itself as a real estate focused template. It’s ideal for that purpose because of the minimal, image-focused slide designs. But that also makes it a perfect choice for presentations in many fields.
We’ve just scratched the surface of PowerPoint design tips with these five options. Here are many more, bundled inside of the best roundups on Envato Tuts+:
How to Build a Good PowerPoint Presentation Quickly (In 2024)
You’ve already seen effective presentation skills PPT techniques. But you may be wondering exactly how to do a good PowerPoint presentation. It only takes a few clicks. Let’s learn how in just five steps.
For this mini-tutorial, we’ll use the Enjoy PowerPoint Template from Envato Elements. You’ll see that it’s a beautiful template that helps you learn how to present a PowerPoint by giving you every object and layout you need.

Let’s get started:
1. Choose Your Slides
As you can see, a template like Enjoy has dozens of unique slides inside. The key to how to give a good presentation PPT is to choose only the slides that you need.

One of the best PowerPoint tricks is to start by selecting slides you wish to use from your template.
In PowerPoint, scroll through the sidebar on the left to view different slide layouts. Right-click and choose Delete to remove unwanted designs. Plus, you can click and drag slide thumbnails to reorder them in the deck.
2. Add Text
Consider how to do a good PowerPoint presentation without investing a ton of time. That’s where premium templates come in.

One of our top presentation tips when working with a PPT is to lean on the pre-built text boxes for your content.
To add custom text, simply click and select the contents of any text box on your slide. Then, type in your own words. Repeat as needed throughout your slide deck.
3. Customize Fonts
With text selected, it’s easy to customize fonts on each slide. Find the Font section on PowerPoint’s Home tab. From there, you’ve got a variety of dropdown options.

Another of our top tips for presentation tricks is to use a custom font setting in your template.
Click to change the font, font size, and more. You can also use the buttons on the left to add bolds, italics, and more.
Need more custom font styles? As an Envato Elements subscriber, you’ve got instant access to thousands of custom fonts . Use them in your presentation with ease.
4. Insert Images
Slides like this one contain an image placeholder. That’s another advantage found only with premium templates. These make adding images a breeze.

Add images to your PPTX template for more visually interesting slides.
To get started, find an image file stored on your computer. Then, drag and drop it over the placeholder. PowerPoint will import it, sized and scaled for a perfect fit.
5. Change Colors
One of the top effective presentation skills is changing shape colors. This helps you control the look and feel of each slide.

With a shape selected, find the Shape Format tab on PowerPoint’s ribbon. Then, click on the Shape Fill dropdown. You’ll see a color chooser menu appear. Click on any thumbnail to apply it to the shape or browse through the Gradient and Texture options.
Start Putting These PowerPoint Presentation Tips & Tricks Into Use Today!
Learning to write, design, and present a PowerPoint presentation is an invaluable skill, no matter where you use it. If you’re a good communicator of important messages, you’ll never go hungry.
Luckily, improving PowerPoint presentations isn’t as hard as it seems. Follow these tips for PowerPoint presentations to design and deliver with greater confidence.
Remember: Less is more (effective) . Use PowerPoint presentation templates for better design and more effective visual impact. And you can customize a PPT template quickly , with the right workflow.
Related Articles

Microsoft 365 Life Hacks > Presentations > How many slides does your presentation need?
How many slides does your presentation need?
When you’re creating a presentation, it’s important to consider the amount of information you’re sharing with your audience. You don’t want to overwhelm them, but you also want to be comprehensive and ensure that you’re covering all your bases. Whether you’re giving a 10, 15, or 30-minute presentation, see how many slides your presentation needs to get your point across.

Rules and guidance for PowerPoint presentations
PowerPoint is a powerful visual aid for introducing data, statistics, and new concepts to any audience. In PowerPoint, you can create as many slides as you want—which might sound tempting at first. But length doesn’t always guarantee a successful presentation . Most presentations last around 10-15 minutes, and anything longer than that (such as a 30-minute presentation) may have additional visual aids or speakers to enhance your message.
A handy rule to keep in mind is to spend about 1-2 minutes on each slide. This will give you ample time to convey your message, let data sink in, and allow you to memorize your presentation . When you limit each slide to this length of time, you also need to be selective about how much information you put on each slide and avoid overloading your audience.
For 10-minute presentations
Ten minutes is usually considered the shortest amount of time you need for a successful presentation. For a shorter 10-minute presentation, you’ll need to be selective with your content. Limit your slide count to approximately 7 to 10 slides.
For 15-minute presentations
When preparing for a 15-minute presentation, concise and focused content is key. Aim for around 10 to 15 slides to maintain a good pace, which will fit with the 1-2 minute per slide rule.
For 30-minute presentations
A longer presentation gives you more room to delve deeper into your topic. But to maintain audience engagement, you’ll need to add interactivity , audience participation, and elements like animations . Aim for around 20 to 30 slides, allowing for a balanced distribution of content without overwhelming your audience.

Tell your story with captivating presentations
Powerpoint empowers you to develop well-designed content across all your devices
Using the 10-20-30 rule
The 10-20-30 rule is an effective way to structure your presentation. It calls for no more than 10 slides and no longer than 20 minutes (as well as a 30-point font).
Tips for crafting an effective presentation
No matter how long a presentation is, there are guidelines for crafting one to enhance understanding and retention. Keep these tips in mind when creating your PowerPoint masterpiece:
- Avoid overload: Ensure that each slide communicates a single idea clearly, avoiding cluttered layouts or excessive text.
- Pay attention to structure: Think of slides as bullet points with introductions, endings, and deep dives within each subject.
- Add visual appeal: Incorporate images, charts, and graphics to convey information without using too many words to make your audience read.
- Engage with your audience: Encourage interaction through questions, polls, or storytelling techniques to keep your audience actively involved.
- Put in the practice: Familiarize yourself with your slides and practice your delivery to refine your timing and confidence.
Ultimately, the ideal number of slides for your presentation depends on the allocated time frame and how detailed your content is. By striking a balance between informative content and engaging delivery, you can create a compelling presentation that can teach your audience something new.
Get started with Microsoft 365
It’s the Office you know, plus the tools to help you work better together, so you can get more done—anytime, anywhere.
Topics in this article
More articles like this one.

How to introduce yourself in a presentation
Gain your audience’s attention at the onset of a presentation. Craft an impressionable introduction to establish tone, presentation topic, and more.

How to add citations to your presentation
Conduct research and appropriately credit work for your presentation. Understand the importance of citing sources and how to add them to your presentation.

How to work on a group presentation
Group presentations can go smoothly with these essential tips on how to deliver a compelling one.

How to create a sales presentation
Engage your audience and get them interested in your product with this guide to creating a sales presentation.
Everything you need to achieve more in less time
Get powerful productivity and security apps with Microsoft 365

Explore Other Categories
Import PDF or Word document
Effortlessly Import PDF or Word documents and convert them into impressive presentations with our innovative tool. Transform your content seamlessly into stunning slides with ease!
Import Word, text, or PDF documents and effortlessly convert them into impressive presentations.
No CC Required
Effortless to use
Instant Results
Amazing Design
How to create presentations using Import
Say goodbye to expensive presentation designers and precious hours wasted creating slides. Presentations.AI works smarter, so you can do great work faster.
Step 1: Navigate to your dashboard and select "Import PDF or Word Document"
Visit your dashboard and select the option to import either a PDF or Word document into the system.

Step 2: Upload your document
Choose the specific document you wish to incorporate into your presentation (e.g., Word, text, PDF).

Step 3: Slides getting generated
Convert your topic or idea into a deck with a single click! Our powerful AI will customize the presentation to showcase your idea and ensure that other instructions such as language and tone are complied with.PRO TIP: Try specifying your company brand in the creation flow and be amazed by how our proprietary "Brand Sync" feature automatically applies your branding to your presentation!

Step 4: Review your work
You can review the presentation as a slideshow - you will notice that your deck is a complete draft with not just content and templates but also with automatic transitions and animations applied.

Step 5: Make any changes you deem fit
You can expand on the AI-generated draft and effortlessly make any changes you wish to the text, images or layouts from right within the editor. You can also add more slides if you wish to do so.

Step 6: Share it with the world!
Once you are satisfied with the output, you can share your stunning deck to the world in a number of ways. You can publish it as a link that anyone can view or you can invite selected team mates to view and edit it with you. You can also export it to PDF or a fully-editable PowerPoint if you wish to do so.

Other AI PPT Tools

Idea to Deck using AI
Prompt with an idea. Generate a storyline. Convert to deck.

Outline to Deck using AI
Pick a use case. Fill in details. Get a stunning deck.

Doc to Deck using AI
Convert a PDF or Word file to a deck.

Become the presentation superstar you were meant to be

Copilot tutorial: Create a presentation with a prompt
Note: This feature is available to customers with a Copilot for Microsoft 365 (work) license.
Duration: 1 minute 14 seconds
Discover how Copilot in PowerPoint effortlessly creates captivating presentations in just a few prompts and access the full power of Microsoft Designer to bring your ideas to life with professional graphics.
Try in PowerPoint
See more videos

Kickstart a presentation

Create a branded presentation from a file

Summarize a presentation
Browse all Copilot videos

Need more help?
Want more options.
Explore subscription benefits, browse training courses, learn how to secure your device, and more.
Microsoft 365 subscription benefits
Microsoft 365 training
Microsoft security
Accessibility center
Communities help you ask and answer questions, give feedback, and hear from experts with rich knowledge.
Ask the Microsoft Community
Microsoft Tech Community
Windows Insiders
Microsoft 365 Insiders
Was this information helpful?
Thank you for your feedback.
COMMENTS
Learn how to use the Export command in Word for the web to transform text-only documents into PowerPoint presentations with AI-backed design elements. Choose a theme, review the results, and save the presentation to OneDrive.
If you want to create a PowerPoint presentation from a Word document, you can use the Send to PowerPoint feature. This feature allows you to send the heading...
Click File > Export > Export to PowerPoint Presentation (preview), and the presentation window will display a few different design themes. Choose the theme most appropriate to the content. If you ...
To turn your Word document into a PowerPoint presentation: Open any document you want to convert into a presentation in Word for the web. Click File > Export > Export to PowerPoint presentation. When prompted, choose a design theme for your presentation. Click Open presentation to re view the results in PowerPoint for the w eb.
Change linked or embedded objects. Right-click the linked object, and then click Linked Slide Object or Linked Presentation Object. Click Open or Open Link, depending on whether the object is embedded or linked, and then make the changes that you want. If the object is embedded, the changes are only in the copy that is in the document.
Head to the Microsoft Office online website, sign in to your account, and open your document in Word. You do not have to open PowerPoint in another tab or window. Click File > Export and choose the "Export to PowerPoint Presentation" option. You'll see a pop-up window with a collection of themes. Select the theme that you want to use and click ...
Tips in this lesson:- Creating Outlines in Microsoft Word- Using Microsoft 365 Styles- Generating New PowerPoint Slides from Microsoft Word Outline- Adding a...
Next, select the paragraph beneath your header. Then, in the "Styles" section at the top, click "More," and then select "Heading 2." Format all of your document paragraphs this way. Finally, click File > Save in Word's menu bar to save the document. (Alternatively, press Ctrl+s on Windows or Command+s on Mac.)
In this tutorial, we will learn the technique of Creating a PowerPoint Presentation from a Word Document in just a couple of clicks. You will learn how to ex...
To convert a PowerPoint file to Word, first open the PowerPoint presentation. On Windows, go to File > Export > Create Handouts and click "OK." On Mac, go to File > Export > File Format > .rtf > Export. Open the RTF in Word, then go to File > Save As > Format > .docx and click "Save." Method 1.
With Microsoft Word and PowerPoint, creating a presentation from a pre-existing Word document is as easy as 1-2-3. 1. Create a Word outline. If you already use headings (levels H1, H2, etc.) in Microsoft Word, then this step is already started for you! Follow these simple steps to create an outline within your documents:
Go to the Insert tab and select Add from Files . Select the PowerPoint file that contains the slides you want to add to the Word document. If the file isn't listed, select Show More Files to browse the filesystem and choose a file. In the Insert From File panel, find the slide you want to insert as an image and select Insert Slide to insert it ...
Step 5: Click "Generate Presentation". After uploading your Word document, click on the "Generate Presentation" button. Let MagicSlides work its magic, seamlessly transforming your textual content into a visually appealing PowerPoint presentation.
To get into Outline View in Word 2010, go to the "View" tab and select "Outline" in the "Document Views" section. Then, organize your text using bullet points and headings. Save your outline as a .rtf file. Open PowerPoint and choose "Open" from the File menu. Select your .rtf file and follow the prompts to import the outline as ...
One person. Sharing and real-time collaboration. PowerPoint for the web and PowerPoint desktop app for offline use. Premium templates, fonts, icons, and stickers with thousands of options to choose from. Dictation, voice commands, and transcription. Advanced spelling and grammar, in-app learning tips, use in 20+ languages, and more.
The easiest way to insert a Word document is to first create your document in Word, then add it to your presentation. Select the slide in which you want to place the Word document. Click Insert > Object. If the Word document already exists, in the Insert Object dialog box, select Create from file. Click Browse to locate the Word document you ...
To do that, simply go up to the Home tab and click on New Slide. This inserts a new slide in your presentation right after the one you were on. You can alternatively hit Ctrl+M on your keyboard to insert a new blank slide in PowerPoint. To learn more about this shortcut, see my guide on using Ctrl+M in PowerPoint.
Go to HOME > NEW SLIDE > SLIDES FROM OUTLINE. (4) Browse and find your MS Word file. Click INSERT. PPT will create a new slide for TITLE and HEADING 1 styles, and respective entries for other paragraph styles EXCEPT for NORMAL (body text). Now you can enter body text for each of the headings and sub-headings.
Create a new presentation in PowerPoint. Select the Copilot button in the Home tab of the ribbon. Click or type Create presentation from file. Select the document you want from the picker that appears. If you don't see the document you want, start typing any part of the filename to search for it. You can use a Word document—or, if you have a ...
Learn how to easily convert a Word document into PowerPoint slides in just a couple of clicks. In this video, you will learn how to export a document into a ...
A simple way to create a well-designed presentation is to make sure all items on a slide are intentionally aligned. To do this, hold down Shift and select all the objects you want to include. Then choose Arrange in the options bar and apply Alignment Type .
@JMaeG Currently Copilot Pro (home license) does not support creating presentations directly from a Word file.This functionality is currently limited to Microsoft 365 Copilot (work license). If you're using Copilot Pro, you won't see the "Create presentation from file" option within Copilot.
In PowerPoint, you can create as many slides as you want—which might sound tempting at first. But length doesn't always guarantee a successful presentation. Most presentations last around 10-15 minutes, and anything longer than that (such as a 30-minute presentation) may have additional visual aids or speakers to enhance your message.
Create a presentation. Open PowerPoint. In the left pane, select New. Select an option: To create a presentation from scratch, select Blank Presentation. To use a prepared design, select one of the templates. To see tips for using PowerPoint, select Take a Tour, and then select Create, . Add a slide.
Step 1: Navigate to your dashboard and select "Import PDF or Word Document" Visit your dashboard and select the option to import either a PDF or Word document into the system. Step 2: Upload your document. Choose the specific document you wish to incorporate into your presentation (e.g., Word, text, PDF). Step 3: Slides getting generated
Make sure that it contains only text. The headings in the document will become the slide headings in the presentation. Go to File > Export > Export to PowerPoint presentation . In the Export to presentation window, choose a design theme for your presentation, and then select Export . Word exports and transforms the document, applying the design ...
Click on "Blank presentation" to create your presentation from scratch, or pick your preferred free PowerPoint template from the options at the top (there's also a host of editable templates you ...
You can print handouts from PowerPoint, but if you want to use the editing and formatting features of Word, you can work on and print your handouts using Word. In the open presentation, do the following: Click File > Export. Under Export, click Create Handouts, and under Create Handouts in Microsoft Word, click Create Handouts. To paste content ...
Create compelling presentations easily with our video guide on Copilot in PowerPoint, powered by Microsoft Designer, to turn ideas into stunning visuals in a few prompts. ... Discover how Copilot in PowerPoint effortlessly creates captivating presentations in just a few prompts and access the full power of Microsoft Designer to bring your ideas ...